
By on 7 Oct 2024 0 Categories / windows
Open a port in Windows VPS can be done for various reasons, including hosting online games, sharing a specific program, accessing some networks or services that must be used from a particular port, and sharing specific protocols. For all these services, opening the Windows VPS port is considered vital.
First, we will teach you how to open the port step by step using several methods along with the image.
How to add a port in a firewall?
If you are using Windows Firewall to open the Windows VPS port, you need to open the Port Number you selected in that firewall. Then the firewall accepts the connection to the port you want.
Note: The firewall can control ingress and egress and only allow inbound ports that you approve.
Different operating systems use different firewalls to manage ports. This is done by the built-in Windows firewall in the case of Windows VPS.
We have 3 ways to do this in the Windows VPS firewall:
1.Windows Firewall GUI (Graphical User Interface)
2.CMD (Command Line)
3.Windows PowerShell
How to open port with firewall GUI?
To access the newly added port in Windows Firewall, follow these steps:
Step 1- Accessing Firewall Settings:
First, execute the Run with “Windows key + R” keys, type “wf.msc” and press OK.
or you can Search for “Firewall” in the Start menu’s search box.
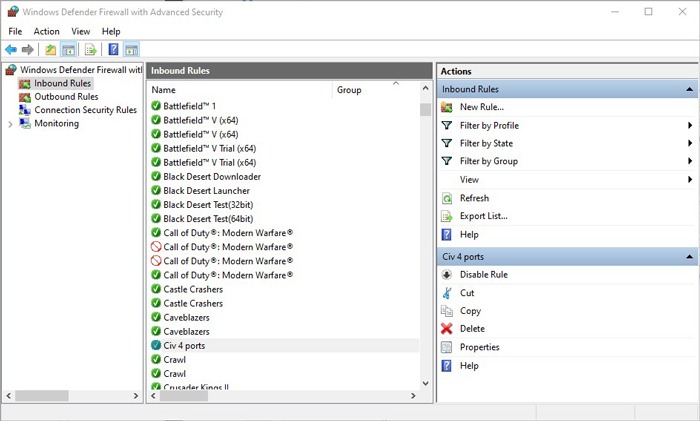
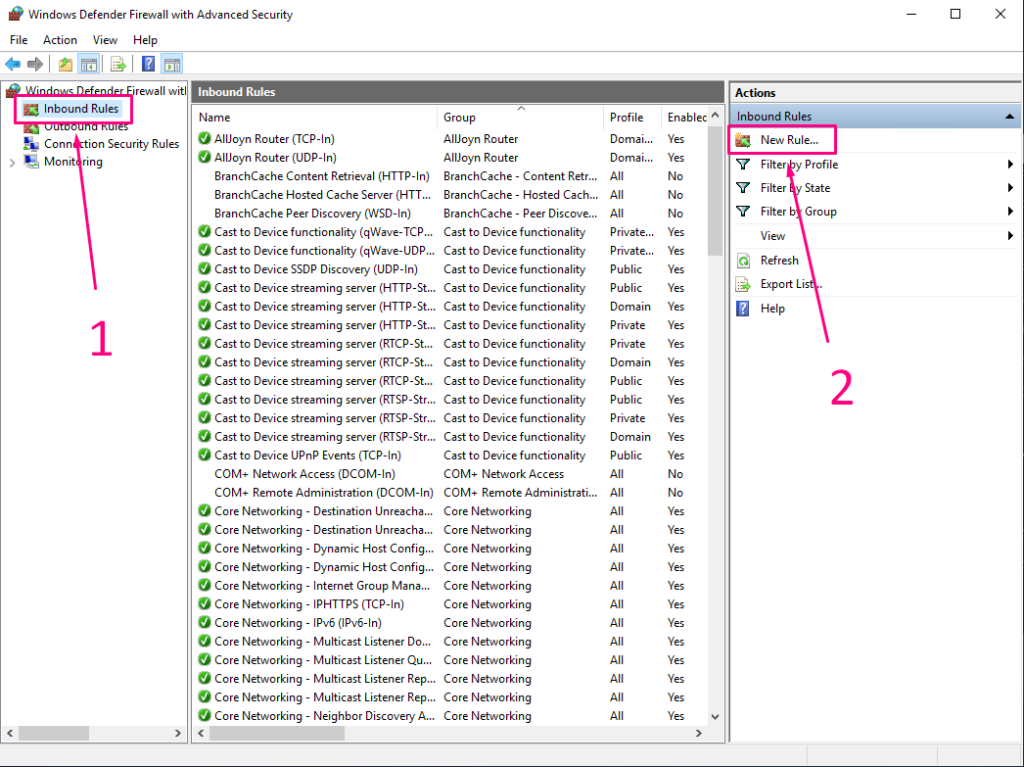
Step 2- Navigating to Inbound Rules:
Find “Inbound Rules” on the left side of the Windows Defender Firewall box and click on it.
Step 3- Creating a New Inbound Rule:
Click “New Rule…” in the right-hand window to access the New Inbound Rule Wizard.
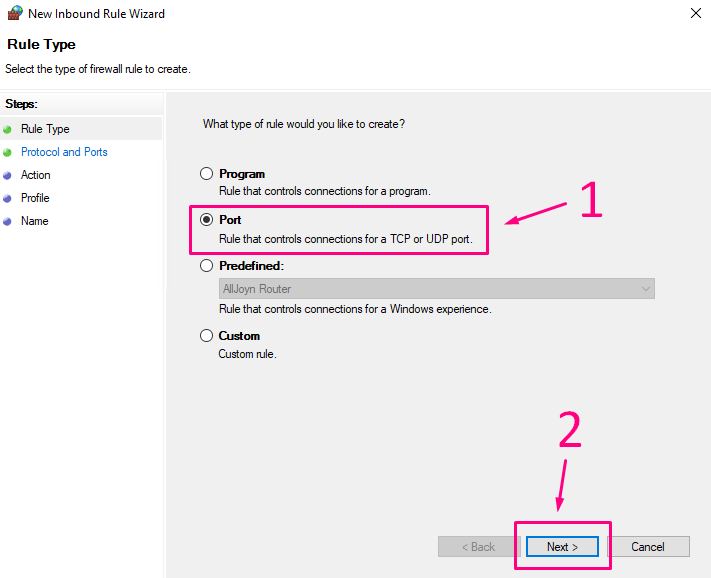
Step 4- Selecting Rule Type:
Choose “Port” under Rule Type and then go to the Next step.
Step 5- Specifying Protocol and Port Number:
Select “TCP” as the protocol type; Remote Desktop Protocol uses TCP.
Select “Specific local ports” and enter the new port number. Go ahead and click Next.
(For example: 33899)
Step 6- Setting Action for the Rule:
Pick “Allow the connection” and then hit the Next button.
Step 7- Selecting Profile:
Choose the relevant option (e.g., Domain, Private, Public) to ensure this rule applies to the right network locations. Click Next.
Step 8- Naming and Completing the Rule:
Name the rule (such as “Allow Port 33899“) and Specify the rule’s purpose, if desired. Make the new incoming rule by clicking Finish.
How to open port with firewall CMD?
Step 1- This time, use the Windows key + R and type CMD and press OK.
Step 2- Type this code.
netsh advfirewall firewall add rule name="Port 33899" dir=in action=allow protocol=TCP localport=33899
Note: The name section is your custom name, and the local port section, is the number of the port you want to open.
Step 3- Reboot the server to apply the settings changes.
How to open port with firewall Powershell?
Step 1: execute the run using the (Windows key + R), type PowerShell, and then press OK.
Step 2- you should type this command on Powershell :
New-NetFirewallRule -DisplayName "Port 33899" -Direction inbound -LocalPort 33899 -Protocol TCP -Action Allow
Step 3- Reboot your server to apply changes.
Note: In the “DisplayName” field, you must write the name of the port you want, and in the “LocalPort” field, you must write the number of the port you want to open.
Conclusion
Finally, according to the above methods, you can open the new port. Configure the firewall to control ingress. Be sure to make the settings and changes in such a way that it has the necessary security when using the VPS remotely. Port security includes (opening necessary ports, updating software, monitoring and management, using encrypted protocols, recording events, and finally using a firewall).
After opening a new port, you need an IP address to host. If you want to find the IP address of your server, use this article: How to find VPS IP Address in Windows Server?
We hope this article is useful for you.
Opening a port on your Virtual Private Server (VPS) is a critical step for enhancing your server’s functionality and accessibility. Whether you’re configuring a web server, setting up a gaming server, or ensuring remote database access, mastering the process of port opening is indispensable. This guide is tailored to demystify the procedure, specifically focusing on vps how open port to ensure clarity and precision.
Choosing a reliable hosting provider like ElderNode is crucial for ensuring that your server has the flexibility and support needed for advanced configurations, including port management. ElderNode offers instant setup VPS servers with 24/7 support, catering to both Windows and Linux platforms. Their diverse hosting solutions empower businesses to optimize server operations effectively. For more details on their services, visit Eldernode.
For Windows VPS Users
Opening a port on a Windows VPS is a straightforward process that involves configuring the Windows Firewall to allow traffic through your desired port. Follow these steps for a hassle-free setup:
- Windows Firewall GUI: Navigate to the Control Panel, enter Advanced Settings in the Windows Firewall, and proceed to establish a new inbound rule for the intended port.
- Command Line (CMD): Leverage the
netshcommand within an elevated Command Prompt to introduce a rule that facilitates traffic on the selected port. - PowerShell Method: Implement the
New-NetFirewallRulecommand in PowerShell to generate the rule essential for opening your port.
These techniques ensure seamless communication through specific ports, thereby augmenting your server’s connectivity and operational capabilities.
For Linux VPS Enthusiasts
Linux VPS users can open a port using either iptables or firewalld, contingent upon their distribution:
- iptables Usage: Execute
iptables -A INPUT -p tcp --dport <port_number> -j ACCEPTto permit traffic on a chosen TCP port, remembering to save the rule for persistence post-reboot. - firewalld Application: Apply
firewall-cmd --permanent --add-port=<port_number>/tcpfollowed byfirewall-cmd --reloadto activate the new port rule effectively.
Adhering to these commands lays the groundwork for your Linux VPS to welcome connections on necessary ports for your applications or services.
Troubleshooting Common Port Opening Challenges
Navigating through port opening on your VPS can sometimes introduce challenges. Here are essential troubleshooting tips:
- Port Verification: Utilize tools such as telnet or nmap to confirm the port’s active status and its readiness to listen.
- Application-Specific Configuration: Certain services may require extra steps beyond just port opening, like configuring the application to listen on the newly opened port.
- Firewall and Security Settings Review: Ensure no existing firewall rules inadvertently block traffic to the newly opened port, considering both your VPS and potentially your local network for remote access scenarios.
Tools for Streamlined Management
Managing your firewall rules and monitoring port activities can be significantly simplified with the right tools:
- UFW (Uncomplicated Firewall) offers Linux users an intuitive interface for iptables management, while FirewallD provides a dynamic solution for firewall management with network zone support.
- Windows Firewall with Advanced Security presents Windows users with a detailed GUI for comprehensive rule management.
Do you have trouble getting your firewall to let go of SSH connections when accessing them? Have you tried to make your Windows VPS more secure but don’t know how to use port forwarding to make it more secure?
We’ve got you covered – we’ll show you how to set up port forwarding on a Windows virtual private server so you won’t have to worry about anything.
To make this tutorial as easy to follow as possible, we have tried to explain everything in plain English so that everyone can use it without the need to go and Google everything.
Understanding what port forwarding is essential and why you should care about it is essential. What are the benefits of port forwarding, and when should you consider it?

What is Port Forwarding?
A port forwarding is a way to configure your router to move data a little more directly across the Internet. We first need to give a simple explanation, and then we’ll dig a little deeper into it.
As part of port forwarding, you tell your router that you want some data to be sent straight to a specific device on your network, bypassing certain security processes so that data can be sent straight to a specific device.
There are several benefits associated with doing this, including the possibility of improving your speed. The downside, however, is that there are risks involved as well.
Using port forwarding is not recommended, and NordVPN is not compatible with port forwarding, so keep that in mind if you are planning on using port forwarding.
Let us take a deeper look at the technical side of port forwarding and learn a little more about how it works.
Why is Port Forwarding Important?
The importance of port forwarding can’t be overstated, especially if you’re planning to host an online game or share a remote desktop from a specific application.
There are many uses of port forwarding, but the most well-known is the SSH connection, which is probably one of the most common. The firewall must open a particular port to establish the Secure Shell connection.
Additionally, to increase security, the default SSH port may have to be changed as part of added security measures, which, in turn, adds an extra challenge for any would-be hackers.
You will not be able to do any of these things if you don’t define which port the data should go through. Additionally, you must consider port forwarding rules for your firewall to function correctly.
In the absence of a properly configured firewall, it can prevent you from connecting to the Internet and prevent you from taking advantage of essential services.
As well as this, other threats can affect the system, such as the fact that I once made the mistake of assigning two different apps to the same port, and of course, neither of them worked anymore. In the end, it took me quite a while to figure out what was going on, and if you’re in business, it can be highly damaging.
It’s time for us to do some port forwarding now that the stage has been set and the stakes have been appropriately introduced.
What is the purpose of port forwarding?
When you need to use a device in your home network directly to a device in the remote network, port forwarding is an excellent way to accomplish this.
As an example, consider the following:
- While you are away from home, make sure you keep an eye on your security cameras or baby monitors;
- Using a remote connection, you can access your home server remotely;
- Access your computer from a remote location with the help of remote desktop software;
- Make your public web server accessible to other users so that they can connect to it;
- Make use of your home network to connect to an IoT device;
- Establish a direct connection with the server of the game you wish to play;
- Ensure that a VoIP call server is accessible to you uninterrupted and direct at all times.
How to Configure Port Forwarding on Windows VPS?
The importance of port forwarding is even greater if you have a Windows VPS, as you will need to set up an SSH connection if you have Windows VPS.
As well as allowing clients to access the web server, it would be best if you allowed them to connect. The port forwarding configuration on a Windows VPS can be configured in several ways, but this article will only discuss the simple GUI approach.
Using the command-line solution is not more difficult, but it takes a lot more time and effort. To configure port forwarding on the Windows VPS, only a few key steps need to be followed one by one, using the Windows Firewall as a vital tool for each step.
The steps are the same whether you are using Windows 10, Windows Server 2019, or other versions of Windows.
- Step 1: Open Settings
- Step 2: Open Defender Settings
- Step 3: Look for Inbound Rules
- Step 4: Define a new rule
- Step 5: Enter Details
- Step 6: Create Rule
- Step 7: Choose Rule Type
- Step 8: Determine Rule Reach
- Step 9: Finalize Rule
- Step 10: Outbound Rules
That’s it, now you are done. So, if you like this article then do not forget to share this article on your social profiles.
A virtual private server (VPS) is a powerful tool that allows you to customize your settings for your specific needs. One crucial aspect of managing a VPS is opening ports on the firewall. This guide will help you open ports on Windows VPS easily.
Opening Ports on the Windows Firewall
To open ports on a Windows VPS, you will need to use the Windows Firewall. Here are the steps:
- Open the Windows Firewall. You can do this by going to Start > Settings > Windows Security > Firewall network protection.
- Click on Advanced settings.
- In the left pane, click on Inbound rules.
- In the right pane, click on New rule.
- In the Rule type dialog box, select Port.
- Click on Next.
- In the Specific local ports dialog box, enter the port number that you want to open.
- Click on Next.
- In the Action dialog box, select Allow the connection.
- Click on Next.
- In the Profile dialog box, select the profiles that you want the rule to apply to. The default profiles are Domain, Private, and Public.
- Click on Next.
- In the Name dialog box, enter a name for the rule.
- Click on Finish.
The port will now be open. You can verify this by running the netstat command in a command prompt.
Additional Considerations
While opening ports on a VPS can be beneficial, there are some things to keep in mind:
Only Open Necessary Ports
Only open the necessary ports for your VPS. Opening unnecessary ports can make your VPS more vulnerable to attack. Before opening any ports, consider what services require access and limit your exposure accordingly.
Use Strong Passwords and Security Measures
Make sure to use strong passwords and security measures to protect your VPS. Ensure that your VPS has up-to-date software and operating systems, and consider using encryption when transmitting sensitive information.
Monitor Your VPS for Unusual Activity
It’s essential to monitor your VPS for any unusual activity. Keep an eye on your logs, and be vigilant about any unfamiliar connections or traffic patterns. Regularly scanning your VPS for vulnerabilities can also help identify potential issues before they become a problem.
Conclusion
Opening ports on a Windows VPS is a straightforward process that can significantly benefit your server’s functionality. By following the steps above, you can easily open the necessary ports while keeping your VPS secure. Remember to keep security in mind at all times, regularly monitor your VPS for unusual activity, and only open the ports that are necessary for your needs.If you encounter any issues while opening ports on your Windows VPS, there are several troubleshooting steps you can take. First, double-check that you have followed the steps correctly and entered the correct port number. If the port is still not open, check that your firewall settings are correctly configured, and consider checking for any third-party firewalls or security software that may be interfering.
После создания VPS (VDS) необходимо в Firewall на входящие соединения открыть порт 4242. Для этого заходим в поиске ищем Windows Defender Firewall with Advanced Security и запускаем.
Теперь необходимо создать новое правило. В открывшимся окне слева нажимаем Inbound Rules, потом New Rule…
Указываем пункт Port и нажимаем Next.
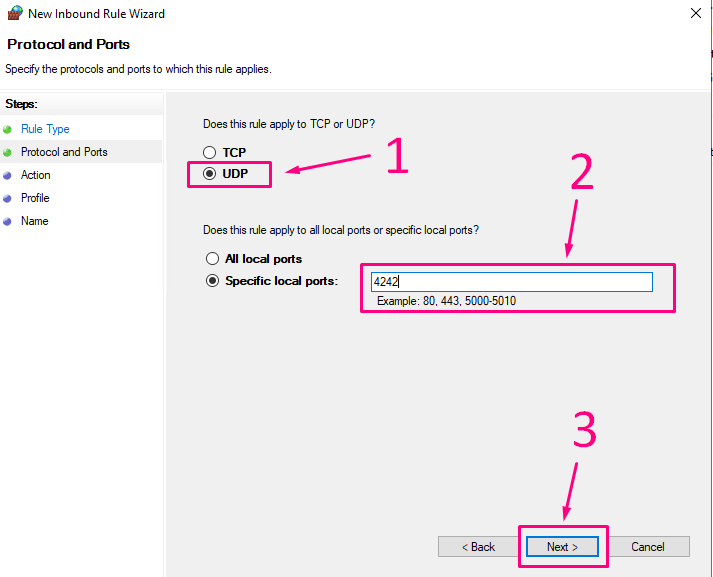
Указываем пункт UDP, вводим в строке Specific local ports — 4242 и нажимаем Next.
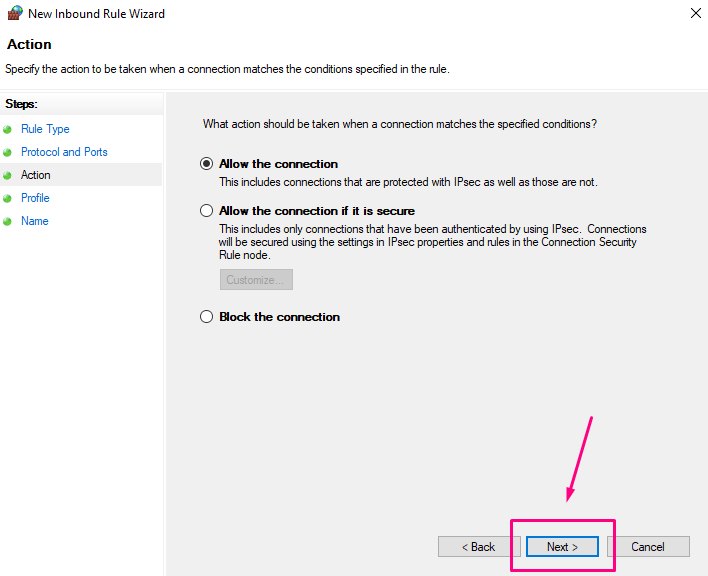
Оставляем всё как есть и нажимаем Next.
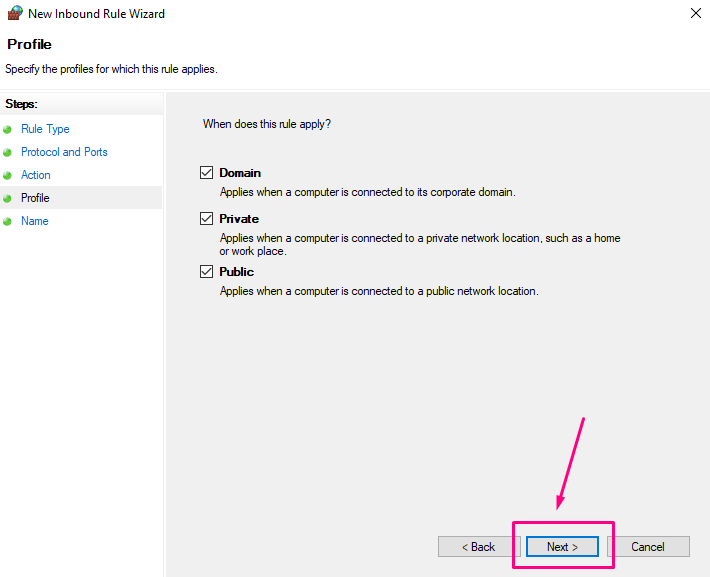
Проверяем чтобы стояли все галочки и нажимаем Next.
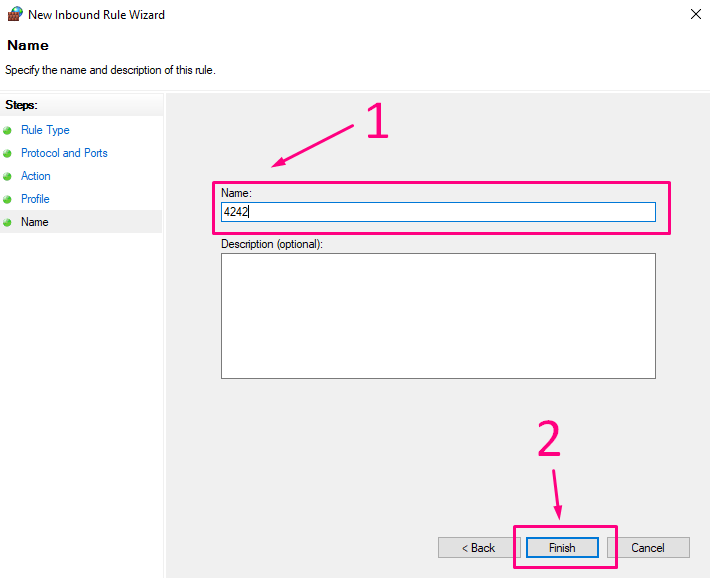
В поле Name указываем Имя правила, к примеру 4242 и нажимаем Finish.
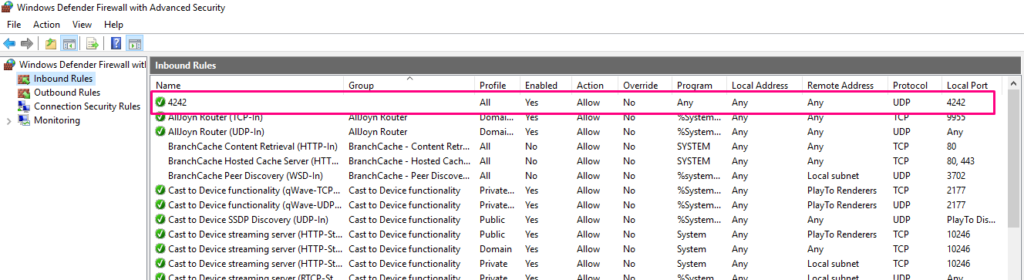
Проверяем что новое правило добавилось. Параметры должны быть схожи как на скриншоте.
! — Для доступа терминала к серверу возможно потребуется создать правила у поставщика услуг VPS (VDS) в личном кабинете. Смотрите пункт “Создание VPS (VDS)”.