
Opening Port 443 on Windows 10 can be a bit tricky if you don’t know where to start, but it’s pretty straightforward once you get the hang of it. Basically, you’ll tweak some settings in the Windows Firewall to allow incoming and outgoing traffic through Port 443, which is typically used for secure web traffic (HTTPS). Follow the steps below, and you’ll have Port 443 open in no time.
First things first, you need to know what this guide will help you accomplish. By the end of this tutorial, you’ll have successfully modified your Windows Firewall settings to open Port 443. This allows secure web traffic to pass through, which is crucial for many web services.
Step 1: Open Control Panel
Navigate to the Control Panel from your Windows 10 start menu.
The Control Panel is your go-to spot for making various system settings changes. You can usually find it by typing «Control Panel» in the start menu search bar.
Step 2: Select «System and Security»
Once you’re in the Control Panel, click on the «System and Security» option.
This section houses the Windows Firewall settings, among other vital system security features. It’s essentially the cockpit for your computer’s defensive measures.
Step 3: Click on «Windows Defender Firewall»
In the System and Security section, choose «Windows Defender Firewall.»
Here, you’ll get an overview of your firewall status. This is where you’ll make all the magic happen to open Port 443.
Step 4: Choose «Advanced Settings»
On the left-hand side, click on «Advanced Settings.»
Advanced Settings give you more control over inbound and outbound rules. It’s like moving from a tricycle to a mountain bike; it gives you more gears and better control.
Step 5: Create a New Inbound Rule
Under the Inbound Rules section, click on «New Rule.»
Inbound rules allow you to specify which traffic can enter your computer. We’re setting up a rule to let traffic through Port 443.
Step 6: Choose «Port» and Click Next
Select the Port option and hit the «Next» button.
This tells the firewall you’re looking to modify settings for a specific port.
Step 7: Specify TCP and Port Number
Select TCP and enter «443» in the specified port number box, then click «Next.»
TCP (Transmission Control Protocol) is used for most web traffic, and Port 443 is the standard port for secure HTTPS connections.
Step 8: Allow the Connection
Choose «Allow the connection» and click «Next.»
This step ensures that all traffic through Port 443 is permitted.
Step 9: Select Network Type
Pick the network types where the rule will apply (Domain, Private, Public), and click «Next.»
Usually, you’d select all three unless you have specific network considerations.
Step 10: Name the Rule
Give your new rule a name, like «Open Port 443,» and click «Finish.»
Naming it helps you identify the rule easily in the future.
After completing these steps, your Windows Firewall will allow traffic through Port 443. This should enable any applications or services that rely on secure web traffic to function correctly.
Tips for Opening Port 443 on Windows 10
- Double-check your firewall settings if something doesn’t seem to work afterward. Sometimes a minor tweak can make all the difference.
- Always ensure your antivirus software is up to date. Opening ports can expose your computer to potential vulnerabilities.
- Consider creating a backup of your firewall settings before making changes. It never hurts to have a safety net.
- Ensure that no other applications are using Port 443. Conflicts can sometimes cause issues.
- If you’re using a corporate network, consult your IT department. They might have additional policies or firewalls in place.
Frequently Asked Questions
What is Port 443 used for?
Port 443 is primarily used for secure web traffic (HTTPS). It ensures that the data transferred between your web browser and server is encrypted.
Why do I need to open Port 443?
Opening Port 443 allows secure web traffic to pass through your firewall. This is crucial for accessing various web services that use HTTPS.
Is it safe to open Port 443?
Generally, yes. However, always ensure you have updated security measures in place, like antivirus software and strong passwords.
Can I close Port 443 after opening it?
Yes, you can always go back into the firewall settings and remove or disable the rule you created to open Port 443.
Do I need administrative rights to open Port 443?
Yes, you will need administrative rights to modify firewall settings on Windows 10.
Summary of Steps
- Open Control Panel
- Select «System and Security»
- Click on «Windows Defender Firewall»
- Choose «Advanced Settings»
- Create a New Inbound Rule
- Choose «Port» and Click Next
- Specify TCP and Port Number
- Allow the Connection
- Select Network Type
- Name the Rule
Conclusion
Opening Port 443 on Windows 10 isn’t just for tech wizards. With a bit of guidance, anyone can do it. Think of your firewall as the gatekeeper to your computer. By opening Port 443, you’re allowing trusted, secure traffic to pass through this gate, much like a VIP pass at a concert. This is especially important for those crucial HTTPS connections, providing a secure pathway for your web data.
So, now that you know how to open Port 443, give it a try! If you run into any snags, revisit the steps and check those tips. Remember, it’s all about keeping your system secure while enabling the services you need. Feel free to explore more about Windows 10 settings to get even more out of your machine.
Kermit Matthews is a freelance writer based in Philadelphia, Pennsylvania with more than a decade of experience writing technology guides. He has a Bachelor’s and Master’s degree in Computer Science and has spent much of his professional career in IT management.
He specializes in writing content about iPhones, Android devices, Microsoft Office, and many other popular applications and devices.
Read his full bio here.
Opening Port 443 on Windows 10 might sound technical, but it’s pretty straightforward. You’ll be using the Windows Firewall to create a new rule that allows traffic through this port. This guide will walk you through each step, keeping it simple and easy to follow. By the end, you’ll have successfully opened port 443 and be ready to handle secure internet connections.
In this tutorial, you’ll learn how to configure your Windows 10 firewall to open port 443, which is essential for secure web traffic. Let’s dive in!
Step 1: Open Control Panel
Go to the Windows Start menu, search for “Control Panel,” and click on it.
Finding the Control Panel is the first step. It’s your go-to for adjusting many system settings, including Windows Firewall configurations.
Step 2: Access Windows Defender Firewall
In the Control Panel, click on “System and Security,” then select “Windows Defender Firewall.”
The Windows Defender Firewall is where you’ll set up a new rule to open port 443. This is a crucial step for managing network security.
Step 3: Advanced Settings
On the left side of the Windows Defender Firewall window, click on “Advanced settings.”
Advanced settings provide more detailed options. This is where you can create and manage inbound and outbound rules for traffic.
Step 4: Create a New Inbound Rule
Right-click “Inbound Rules” in the left pane, and then click on “New Rule.”
Inbound rules handle the traffic that comes into your system. Creating a new rule will allow you to specify the port settings needed.
Step 5: Select Port
In the New Inbound Rule Wizard, select the “Port” option, then click “Next.”
Choosing “Port” allows you to specify which port number you want to open. Here, you’ll input the port 443.
Step 6: Specify Port Number
Select “TCP,” and then enter “443” in the “Specific local ports” box. Click “Next.”
Port 443 uses the TCP protocol, which is essential for secure connections like HTTPS. Make sure you enter the correct port number.
Step 7: Allow the Connection
Select “Allow the connection,” then click “Next.”
Allowing the connection ensures that traffic through port 443 is permitted. This is necessary for accessing secure websites.
Step 8: Apply Rule to Profiles
Check all three boxes: Domain, Private, and Public. Click “Next.”
Applying the rule to all profiles ensures that port 443 is open regardless of the type of network you’re connected to.
Step 9: Name the Rule
Give your new rule a name, like “Open Port 443,” and click “Finish.”
Naming the rule helps you easily identify it in the future. This final step completes the process of opening port 443.
After completing these steps, port 443 will be open on your Windows 10 machine, allowing secure HTTPS traffic through the firewall.
Tips for Opening Port 443 Windows 10
- Double-Check Port Number: Ensure you enter “443” correctly to avoid opening the wrong port.
- Firewall Profiles: Applying the rule to all profiles (Domain, Private, and Public) provides comprehensive coverage.
- Use Descriptive Names: Naming your rules descriptively helps manage them better in the future.
- Security Considerations: Opening ports can expose your system to risks, so only open the ports you need.
- Verify Connectivity: Test the port after opening it to confirm that it’s working as expected.
Frequently Asked Questions
How do I check if port 443 is open?
You can use online tools or command-line utilities like netstat to check if port 443 is open.
What is port 443 used for?
Port 443 is primarily used for HTTPS, which is secure web traffic.
Can opening port 443 cause security issues?
While it allows secure traffic, always ensure your system is protected against potential threats.
Do I need to restart my computer after opening port 443?
No, changes should take effect immediately without needing a restart.
Can I close port 443 if I no longer need it?
Yes, you can delete or disable the rule in Windows Firewall if it’s no longer needed.
Summary
- Open Control Panel.
- Access Windows Defender Firewall.
- Advanced Settings.
- Create a New Inbound Rule.
- Select Port.
- Specify Port Number.
- Allow the Connection.
- Apply Rule to Profiles.
- Name the Rule.
Conclusion
Opening port 443 on Windows 10 is a necessary step for ensuring your system can handle secure web traffic. While it might initially seem daunting, the process is actually quite simple when broken down into manageable steps. By following this guide, you’ve learned how to navigate through the Windows Firewall settings and create an inbound rule that opens port 443.
Always remember to be cautious when adjusting firewall settings. Only open ports that are necessary for your applications to function properly. Keeping your system secure should be a top priority, so consider using additional security measures like antivirus software and regular updates to protect against potential threats.
If you found this tutorial helpful, don’t hesitate to share it with others who might benefit from it. For further reading, check out other guides on managing Windows Firewall settings and optimizing your network security. Now that you’re equipped with this knowledge, you can confidently manage your system’s ports and improve your overall computing experience.
Matt Jacobs has been working as an IT consultant for small businesses since receiving his Master’s degree in 2003. While he still does some consulting work, his primary focus now is on creating technology support content for SupportYourTech.com.
His work can be found on many websites and focuses on topics such as Microsoft Office, Apple devices, Android devices, Photoshop, and more.
Если для какой-то программы или игры требуется подключение через определенный порт, может оказаться что по умолчанию в системе этот порт закрыт и соединение не выполняется. При необходимости порты в Windows 11, Windows 10 и предыдущих версиях системы сравнительно легко открыть.
В этой инструкции подробно о том, как открыть порты в Windows 11 или Windows 10, посмотреть список открытых портов и дополнительная информация, которая может пригодиться, если при подключении всё равно возникают проблемы.
Открытие портов в брандмауэре Windows
Основной способ открытия портов в Windows 11 и 10 — настройка соответствующих правил в брандмауэре.
Прежде всего, откройте настройки Windows в режиме повышенной безопасности. Для этого можно использовать следующие способы:
Следующий шаг — настроить правила для нужных портов:
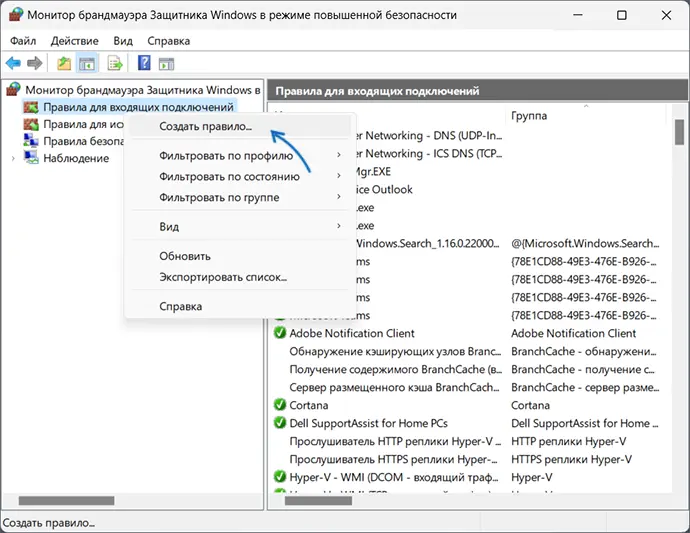
- Нажмите правой кнопкой мыши по «Правила для входящих подключений» и выберите пункт «Создать правило» в контекстном меню.

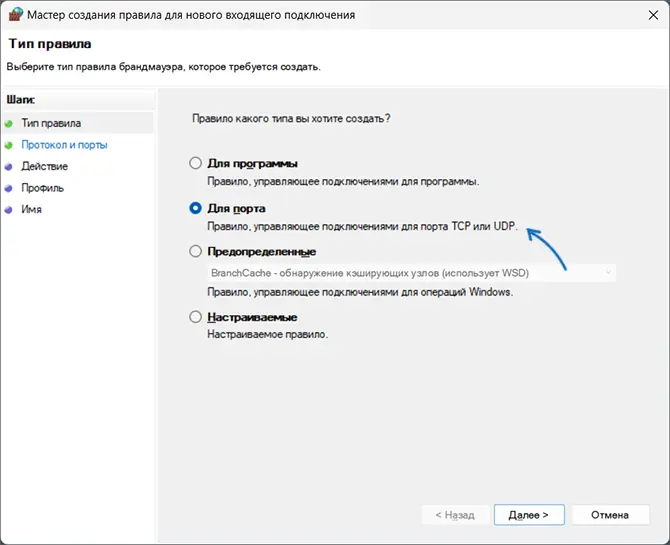
- В мастере создания правил выберите пункт «Для порта» и нажмите «Далее».

- Выберите тип протокола — TCP или UDP (если вам не известен нужный тип, уточните в справке по конкретной программе).
- Укажите порты: конкретный порт или их диапазон, можно использовать запятые для перечисления нескольких портов, или знак дефиса для указания их диапазона. Нажмите «Далее».
- Выберите пункт «Разрешить подключение».
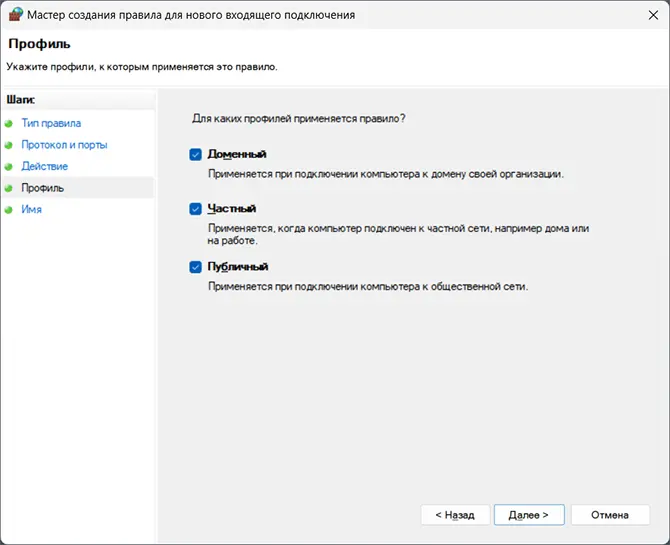
- Укажите, для каких типов сетей (сетевых профилей) следует открыть порты.
- Укажите имя правила и, при желании, его описание. Затем нажмите кнопку «Готово».
- Выполните действия 1-7, но уже для исходящего подключения.


Готово, порт открыт и, если что-то ещё не мешает его работе, соединения должны будут устанавливаться.
Возможные проблемы и дополнительные необходимые действия
Если вы открыли требуемые порты в Windows, но несмотря на это соединение не устанавливается, следует учитывать, проверить или выполнить следующие действия:
- VPN может влиять не возможность обмена данными по определенным портам. Решение: отключить VPN, либо посмотреть, есть ли возможность открыть порты в ПО для VPN.
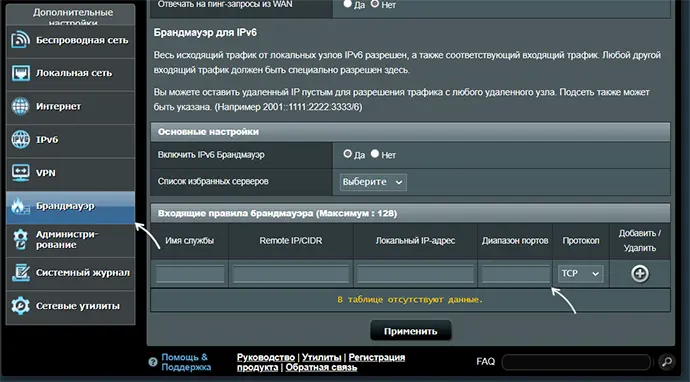
- Роутеры имеют собственные функции файрволла/брандмауэра и порты может потребоваться открыть (пробросить) и в настройках роутера. В зависимости от марки и модели Wi-Fi роутера, это выполняется в разных разделах: перенаправление портов (port forwarding), брандмауэр (firewall), межсетевой экран, виртуальные серверы. Логика настройки везде одна и та же: добавляются обычно совпадающие внешний порт и внутренний порт (нужный вам порт), указывается внутренний IP (локальный IP компьютера, к которому нужно пробросить порт), тип протокола — TCP или UDP, иногда требуется указать интерфейс, для соединений из «внешней сети» — WAN.

- Если само приложение заблокировано в брандмауэре, оно не сможет устанавливать соединения: можно добавить правила, разрешающие подключения для программы тем же способом, которым это выполнялось выше для портов.
- Наличие сторонних файрволлов и антивирусов с функциями защиты сети также может влиять на возможность установки соединений по определенным портам: следует проверить их настройки, при наличии такого ПО, чтобы открыть соответствующие порты или отключить защиту для них.
Как посмотреть открытые порты в Windows и какие программы их используют
В Windows постоянно открыты многие порты, требующиеся как для работы системных служб, программ (в том числе сторонних), браузеров. Вы можете посмотреть список открытых портов одним из следующих способов:
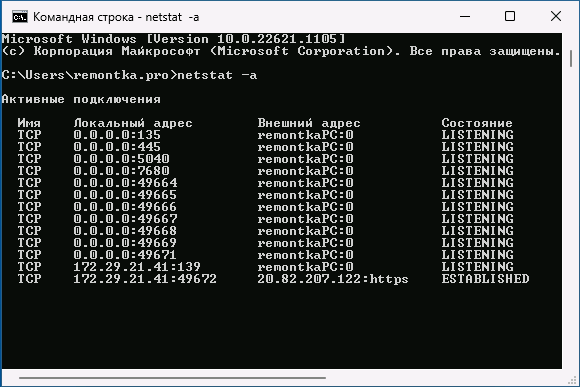
- Запустить командную строку и ввести команду (порты указаны после двоеточия в IP-адресе)
netstat -a

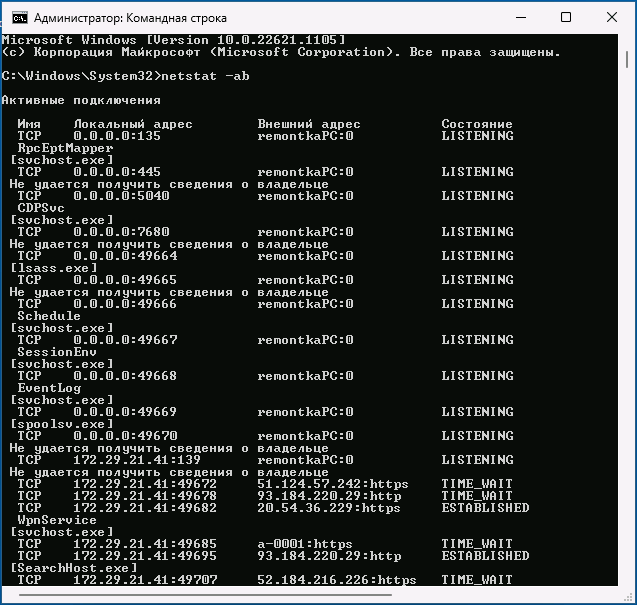
- Если требуется посмотреть, какие процессы используют определенные порты, используйте команду (требует запуска от имени администратора)
netstat -ab

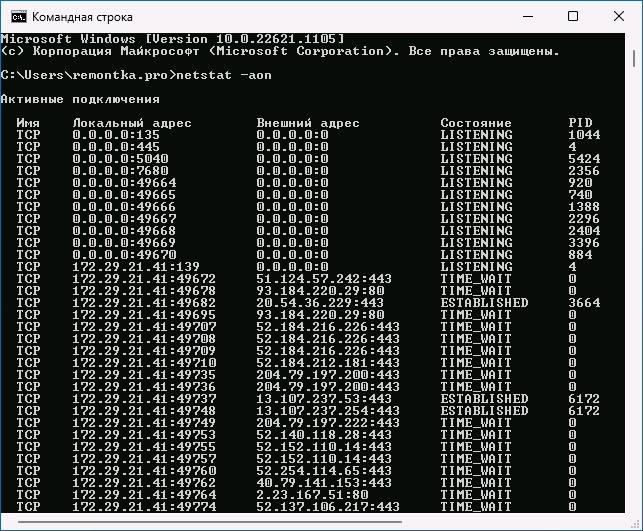
- Для просмотра открытых портов с ИД (PID) процесса (по которому в диспетчере задач можно увидеть конкретный процесс):
netstat -aon

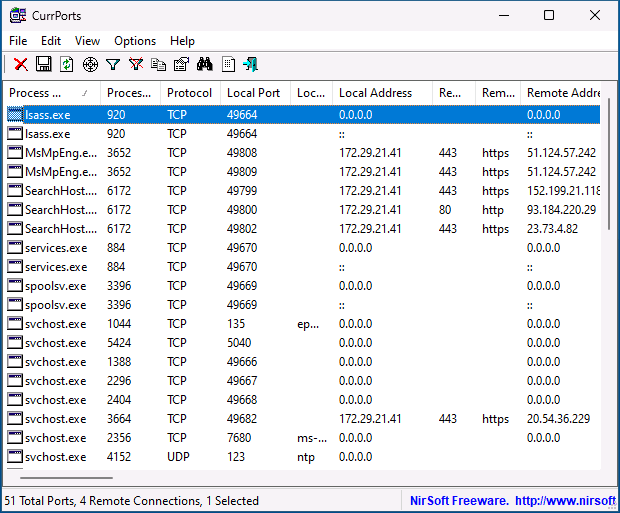
- Есть сторонние программы, позволяющие получить сведения об открытых портах и использующих их процессах, например, бесплатная NirSoft CurrPorts.

Список «стандартных» и наиболее часто используемых портов доступен в Википедии, но многие игры и программы могут использовать свои собственные, не указанные в списке порты для работы.
Реализация DI в PHP
Jason-Webb 13.05.2025
Когда я начинал писать свой первый крупный PHP-проект, моя архитектура напоминала запутаный клубок спагетти. Классы создавали другие классы внутри себя, зависимости жостко прописывались в коде, а о. . .
Обработка изображений в реальном времени на C# с OpenCV
stackOverflow 13.05.2025
Объединение библиотеки компьютерного зрения OpenCV с современным языком программирования C# создаёт симбиоз, который открывает доступ к впечатляющему набору возможностей. Ключевое преимущество этого. . .
POCO, ACE, Loki и другие продвинутые C++ библиотеки
NullReferenced 13.05.2025
В C++ разработки существует такое обилие библиотек, что порой кажется, будто ты заблудился в дремучем лесу. И среди этого многообразия POCO (Portable Components) – как маяк для тех, кто ищет. . .
Паттерны проектирования GoF на C#
UnmanagedCoder 13.05.2025
Вы наверняка сталкивались с ситуациями, когда код разрастается до неприличных размеров, а его поддержка становится настоящим испытанием. Именно в такие моменты на помощь приходят паттерны Gang of. . .
Создаем CLI приложение на Python с Prompt Toolkit
py-thonny 13.05.2025
Современные командные интерфейсы давно перестали быть черно-белыми текстовыми программами, которые многие помнят по старым операционным системам. CLI сегодня – это мощные, интуитивные и даже. . .
Конвейеры ETL с Apache Airflow и Python
AI_Generated 13.05.2025
ETL-конвейеры – это набор процессов, отвечающих за извлечение данных из различных источников (Extract), их преобразование в нужный формат (Transform) и загрузку в целевое хранилище (Load). . . .
Выполнение асинхронных задач в Python с asyncio
py-thonny 12.05.2025
Современный мир программирования похож на оживлённый мегаполис – тысячи процессов одновременно требуют внимания, ресурсов и времени. В этих джунглях операций возникают ситуации, когда программа. . .
Работа с gRPC сервисами на C#
UnmanagedCoder 12.05.2025
gRPC (Google Remote Procedure Call) — открытый высокопроизводительный RPC-фреймворк, изначально разработанный компанией Google. Он отличается от традиционых REST-сервисов как минимум тем, что. . .
CQRS (Command Query Responsibility Segregation) на Java
Javaican 12.05.2025
CQRS — Command Query Responsibility Segregation, или разделение ответственности команд и запросов. Суть этого архитектурного паттерна проста: операции чтения данных (запросы) отделяются от операций. . .
Шаблоны и приёмы реализации DDD на C#
stackOverflow 12.05.2025
Когда я впервые погрузился в мир Domain-Driven Design, мне показалось, что это очередная модная методология, которая скоро канет в лету. Однако годы практики убедили меня в обратном. DDD — не просто. . .
Вы часто играете в онлайн игры, скачиваете файлы с фильмами и музыкой с интернета, знаете, что такое Торрент-трекер, сети DC++, значит понятие «порт» для вас знакомо. С выходом новых Оперативных Систем закономерно возникают справедливые вопросы типа «Как открыть порты на Windows 10, 8, 7» и т.п. Если это для вас актуально, то значит данная информация будет вам интересна. При этом, обыкновенно всем пользователям известно, какие действия нужно делать на роутере, а то что необходимо делать непосредственно с Операционной Системой и то что у новой Windows есть собственные файрволлы и брандмауэры, блокирующие некоторые разновидности трафика, обычно забывают.
При этом, крайне важно использовать лицензионные версии ОС, ключи для которой вы всегда сможете найти на нашем сайте за доступную цену. Только в этом случае вы гарантированно избежите ошибок и сбоев в работе нового софта. А в случае возникновения проблем, всегда сможете обратиться за профессиональной поддержкой к официальному производителю.
Как открыть порты?
Для того чтобы открыть порты windows 10 заходим в «Панель управления» и дальше выбираем необходимый нам раздел «Брандмауэр Windows».
Выбираем графу «Дополнительные параметры», где и находим нужный для нас список с правилами для работы встроенного в Операционную Систему файрволла.
Чтобы далее прописать нужный нам порт, необходимо добавить в выше представленный список новое правило. Для этого кликаем на клавишу «Действие» и из контекстного меню выбираем «Создать правило».
Этим самым мы запускаем программу создания новых инструкций для входящих подключений в Интернете. Дальше выбираем тип правила и ставим галочку (на рисунке точку) в нужной нам графе — «Для порта»
После нажимаем на клавишу «Далее». Затем выбираем порты, вид протокола, или все сразу (в каждом конкретном случае разный, необходимо узнавать в службе поддержке вашего провайдера). После выбора протокола, и портов нажимаем клавишу «Далее».
После выбираем нужное нам действие, в нашем случае «Разрешить подключение», после жмем на клавишу «Далее».
Следующим нашим действием будет выбор профиля, для которого применяется новая инструкция по соединению с Интернетом — ставим галочки во всех трех.
После проделанных выше действий нам остается прописать название новой инструкции. Абсолютно любое, на ваше усмотрение, только латинскими символами. После жмем на клавишу «Готово».
Все новое правило для портов создано и занесено в таблицу уже ранее существующих, открытых на Windows 10.
В случае использования в работе на ПК сторонних файрволов, брандмауэров, новый проброс портов соединения с Интернетом необходимо проводить непосредственно в собственных настройках. Во всех остальных случаях они будут просто недоступны. Вышеописанный способ как открыть порты Windows 10 будет эффективен при использовании исключительно лицензионной Операционной Системы и другого дополнительного софта.
В иных случаях, существует большая вероятность возникновения различных ошибок и неполадок, по причине которых пробросить дополнительные порты не получиться. Именно по этой причине рекомендуется пользоваться программным обеспечением от официальных производителей, ключи для которого вы всегда сможете приобрести по доступной стоимости на нашем сайте.