
To open port 22 on a Windows 10 machine, follow these steps:
1. Open the Windows Firewall with Advanced Security console.
2. In the left pane, click Inbound Rules.
3. Click New Rule in the right pane.
4. Select Port, and then click Next.
5. Select TCP, and then click Specific local ports.
6. Enter 22 in the field, and then click Next.
7. Select Allow the connection, and then click Next.
8. Select when to apply the rule, and then click Next.
9. Enter a name and description for the rule, and then click Finish.
How do I check if port 22 is open Windows 10?
How do I open a port in Windows 10?
To open a port in Windows 10, you will need to follow these steps:
1. Navigate to the Control Panel.
2. Click on «System and Security.«
3. Click on «Windows Firewall.«
4. Click on the «Advanced Settings» link.
5. Click on the «Inbound Rules» link.
6. Click on the «New Rule» link.
7. Select the «Port» option.
8. Enter the port number that you wish to open.
9. Select the «Allow the connection» option.
10. Click on the «Finish» button.
Can we open port 22 on Windows Server?
Yes, you can open port 22 on Windows Server. To do so, you will need to use the Windows Firewall with Advanced Security tool.
How can I tell if port 22 is open?
If you want to check if port 22 is open on a remote host, you can use the nmap tool. For example, the following command will scan port 22 on the host example.com:
nmap -p 22 example.com
If the port is open, you will see a message saying «PORT 22 OPEN«.
How do I enable a 22 port?
In order to enable a 22 port, you will need to access your router’s settings and locate the port forwarding section. Once you have located the port forwarding section, you will need to add a new rule that forwards traffic on port 22 to the internal IP address of the device that you wish to enable the port for. After you have added the rule, be sure to save your changes and restart your router for the changes to take effect.
Is port 22 blocked by default?
Port 22 is not blocked by default, but it is a good idea to have a firewall in place that blocks all incoming traffic except for the specific ports that you want to allow.
How do I manually open a port?
To open a port manually, you will need to access your router or firewall settings and specify which ports to keep open. Each router or firewall will have a different process for doing this, so you will need to consult your router or firewall’s documentation for specific instructions. In general, you will need to identify the port number and protocol (TCP or UDP) that you want to open, and then add a rule to your router or firewall to allow incoming traffic on that port.
How do I manually open a port in Windows?
To open a port in Windows, you will need to follow these steps:
1. Open the Control Panel.
2. Click on System and Security.
3. Click on Windows Firewall.
4. Click on the Advanced Settings tab.
5. Click on Inbound Rules.
6. Click on New Rule.
7. Select Port and click Next.
8. Select TCP and the specific port you want to open. Click Next.
9. Select Allow the connection and click Next.
10. Give the rule a name and click Finish.
How do I connect to port 22?
In order to connect to port 22, you will need to use a program that supports SSH (Secure Shell) connections. Once you have an SSH client installed, you can use it to connect to port 22 on the desired host.
Is port 22 always SSH?
No, port 22 is not always SSH. While SSH does typically use port 22, it is possible to configure SSH to use a different port. For example, if port 22 is already in use on a system, SSH can be configured to use a different port such as port 2222.
How do I fix port 22 connection refused?
If you are receiving a «Connection refused» error when trying to connect to a remote server via SSH, it is likely that the server is not configured to accept connections on the port you are using. To resolve this issue, you will need to modify the server’s configuration to allow connections on the desired port.
Do I need to open port 22 for SSH?
If you want to use SSH, then you will need to open port 22 on your firewall. You can do this by logging into your router and adding port 22 to the list of allowed ports. Alternatively, you can use a software firewall and add port 22 to the list of allowed ports.
How can I tell if my firewall is blocking port 22?
If you are having difficulty connecting to a server via SSH, it is possible that your firewall is blocking port 22. To check if this is the case, you can try connecting to the server on a different port. If you are able to connect on a different port, then you will need to configure your firewall to allow traffic on port 22.
В современных версиях Windows уже есть встроенный SSH сервер на базе пакета OpenSSH. В этой статье мы покажем, как установить и настроить OpenSSH сервер в Windows 10/11 и Windows Server 2022/2019 и подключиться к нему удаленно по защищенному SSH протоколу (как к Linux).
Содержание:
- Установка сервера OpenSSH в Windows
- Настройка SSH сервера в Windows
- Sshd_config: Конфигурационный файл сервера OpenSSH
- Подключение по SSH к Windows компьютеру
- Логи SSH подключений в Windows
Установка сервера OpenSSH в Windows
Пакет OpenSSH Server включен в современные версии Windows 10 (начиная с 1803), Windows 11 и Windows Server 2022/2019 в виде Feature on Demand (FoD). Для установки сервера OpenSSH достаточно выполнить PowerShell команду:
Get-WindowsCapability -Online | Where-Object Name -like ‘OpenSSH.Server*’ | Add-WindowsCapability –Online
Или при помощи команды DISM:
dism /Online /Add-Capability /CapabilityName:OpenSSH.Server~~~~0.0.1.0
Если ваш компьютер подключен к интернету, пакет OpenSSH.Server будет скачан и установлен в Windows.
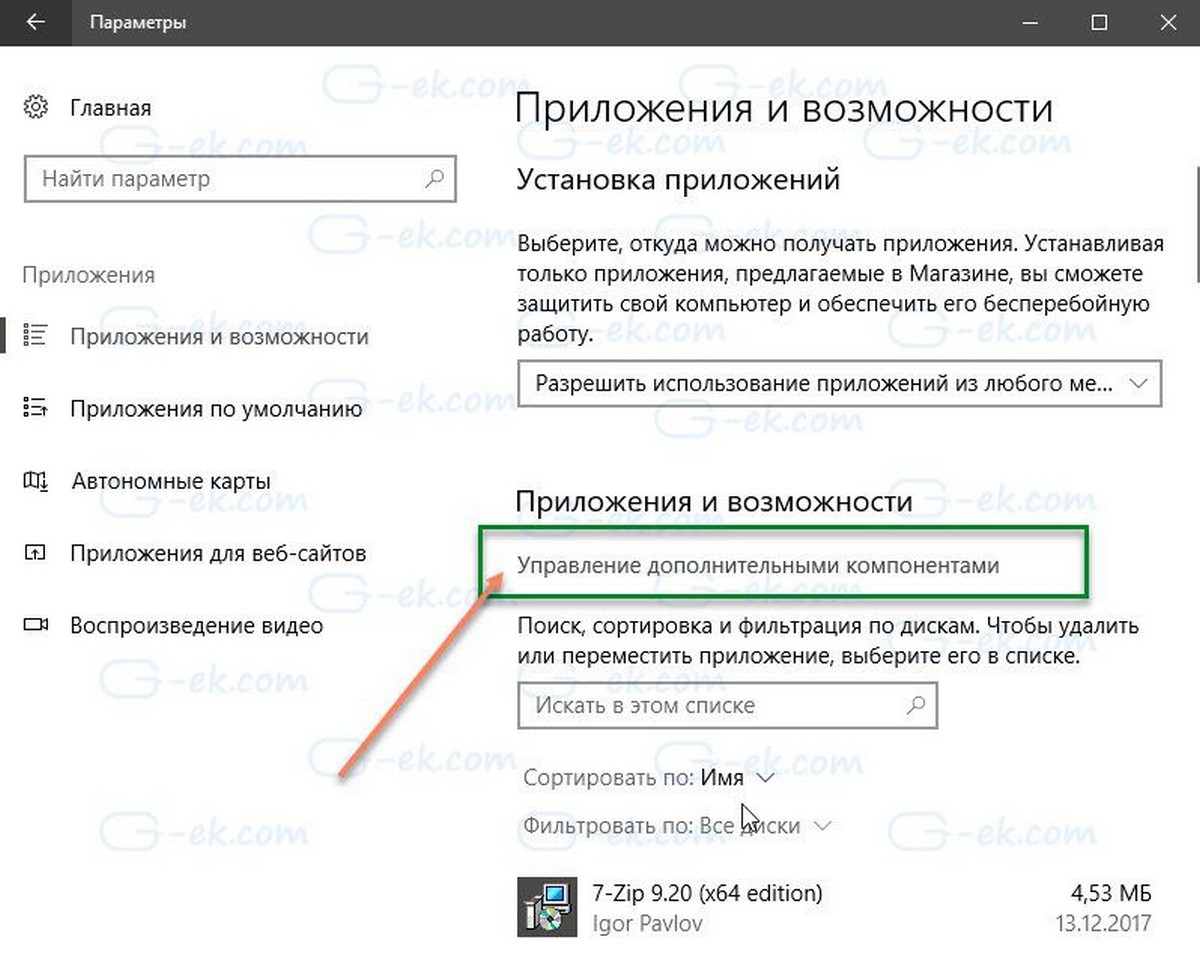
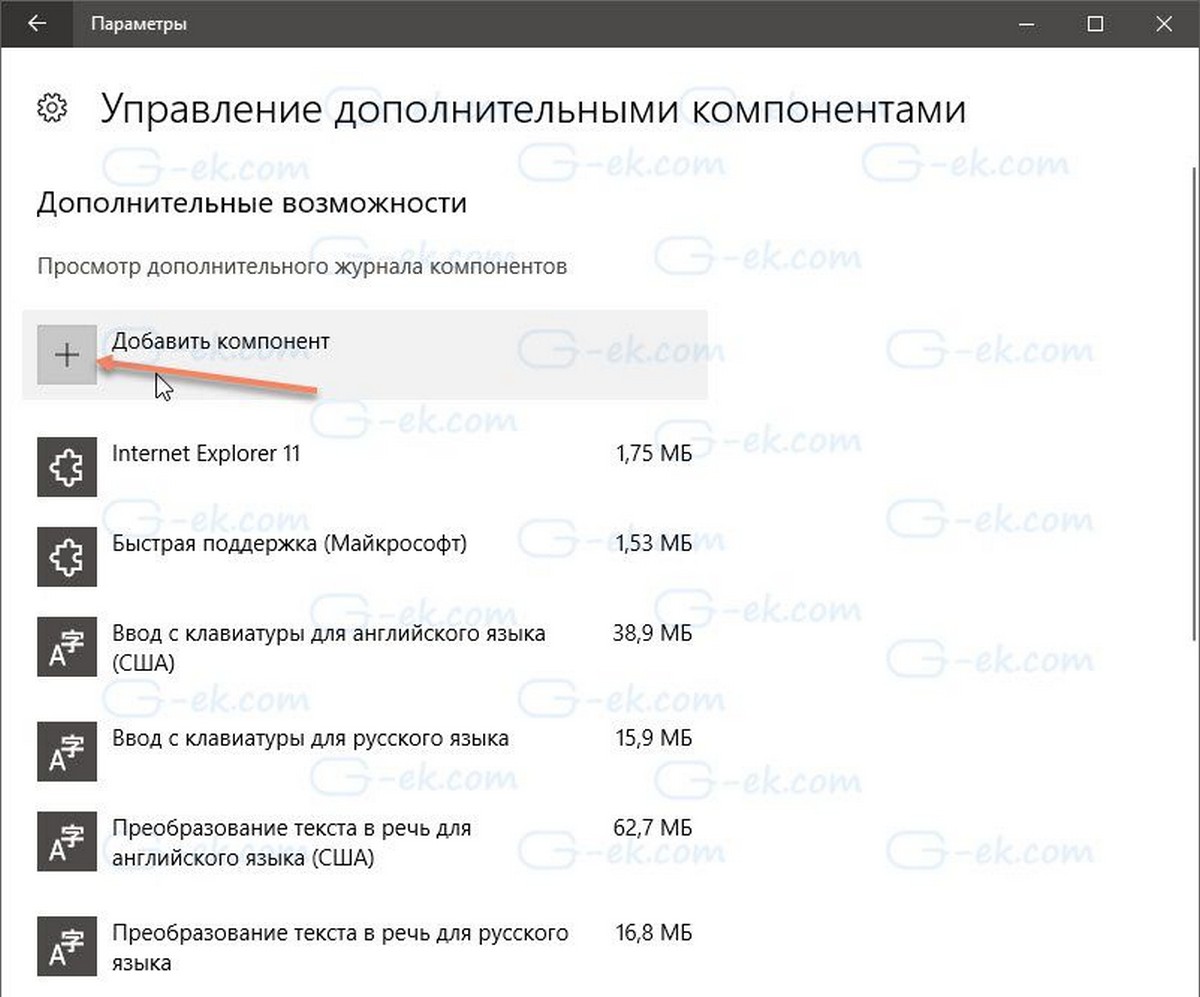
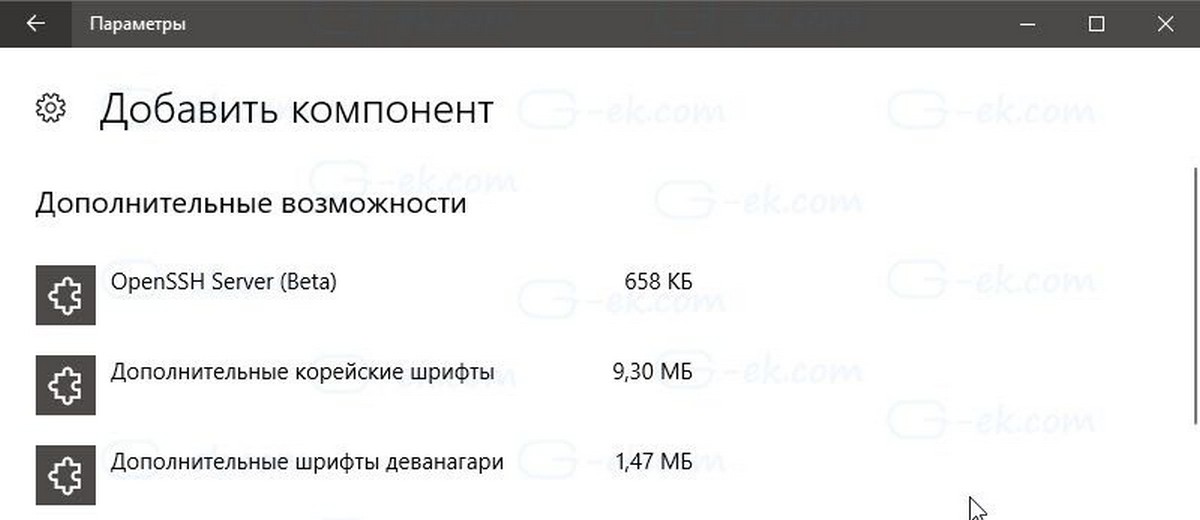
Также вы можете установить сервер OpenSSH в Windows через современную панель Параметры (Settings -> Apps and features -> Optional features -> Add a feature, Приложения -> Управление дополнительными компонентами -> Добавить компонент. Найдите в списке OpenSSH Server и нажмите кнопку Install).
На изолированных от интернета компьютерах вы можете установить компонент с ISO образа Features On Demand (доступен в личном кабинете на сайте Microsoft: MSDN или my.visualstudio.com). Скачайте диск, извлеките его содержимое в папку c:\FOD (достаточно распаковать извлечь файл
OpenSSH-Server-Package~31bf3856ad364e35~amd64~~.cab
), выполните установку из локального репозитория:
Add-WindowsCapability -Name OpenSSH.Server~~~~0.0.1.0 -Online -Source c:\FOD
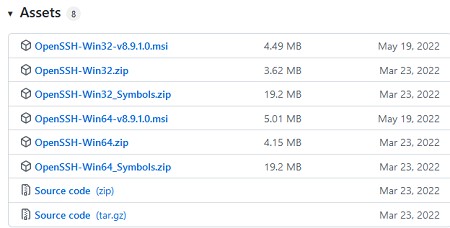
Также доступен MSI установщик OpenSSH для Windows в официальном репозитории Microsoft на GitHub (https://github.com/PowerShell/Win32-OpenSSH/releases/). Например, для Windows 10 x64 нужно скачать и установить пакет OpenSSH-Win64-v8.9.1.0.msi. Следующая PowerShell команда скачает MSI файл и установит клиент и сервер OpenSSH:
Invoke-WebRequest https://github.com/PowerShell/Win32-OpenSSH/releases/download/v8.9.1.0p1-Beta/OpenSSH-Win64-v8.9.1.0.msi -OutFile $HOME\Downloads\OpenSSH-Win64-v8.9.1.0.msi -UseBasicParsing
msiexec /i c:\users\root\downloads\OpenSSH-Win64-v8.9.1.0.msi
Также вы можете вручную установить OpenSSH сервер в предыдущих версиях Windows (Windows 8.1, Windows Server 2016/2012R2). Пример установки Win32-OpenSSH есть в статье “Настройка SFTP сервера (SSH FTP) в Windows”.
Чтобы проверить, что OpenSSH сервер установлен, выполните:
Get-WindowsCapability -Online | ? Name -like 'OpenSSH.Ser*'
State : Installed

Настройка SSH сервера в Windows
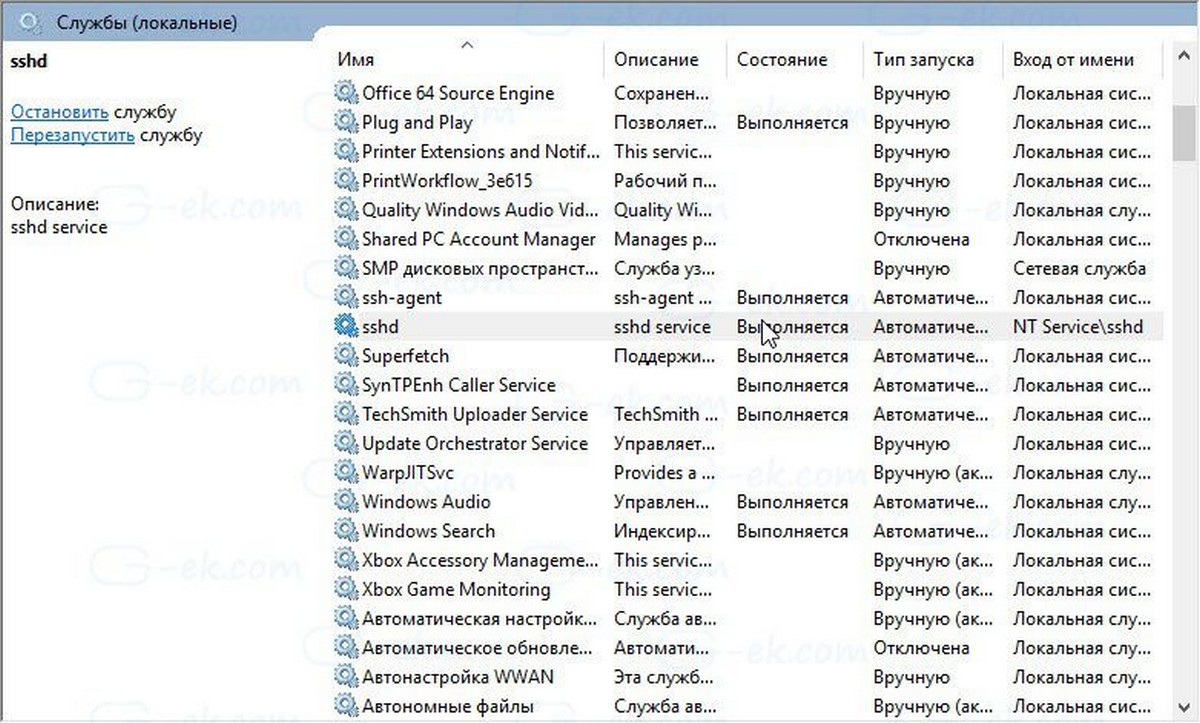
После установки сервера OpenSSH в Windows добавляются две службы:
- ssh-agent (OpenSSH Authentication Agent) – можно использовать для управления закрытыми ключами если вы настроили SSH аутентификацию по ключам;
- sshd (OpenSSH SSH Server) – собственно сам SSH сервер.
Вам нужно изменить тип запуска службы sshd на автоматический и запустить службу с помощью PowerShell:
Set-Service -Name sshd -StartupType 'Automatic'
Start-Service sshd

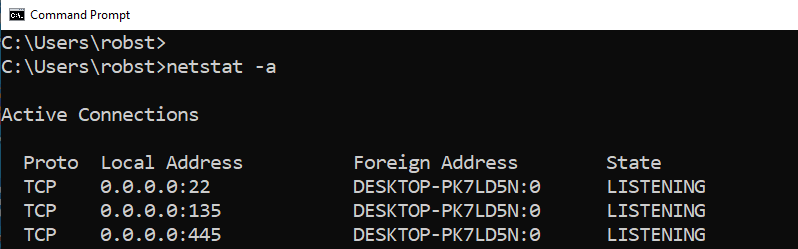
С помощью nestat убедитесь, что теперь в системе запущен SSH сервер и ждет подключений на порту TCP:22 :
netstat -na| find ":22"

Проверьте, что включено правило брандмауэра (Windows Defender Firewall), разрешающее входящие подключения к Windows по порту TCP/22.
Get-NetFirewallRule -Name *OpenSSH-Server* |select Name, DisplayName, Description, Enabled
Name DisplayName Description Enabled
---- ----------- ----------- -------
OpenSSH-Server-In-TCP OpenSSH SSH Server (sshd) Inbound rule for OpenSSH SSH Server (sshd) True

Если правило отключено (состоянии Enabled=False) или отсутствует, вы можете создать новое входящее правило командой New-NetFirewallRule:
New-NetFirewallRule -Name sshd -DisplayName 'OpenSSH Server (sshd)' -Enabled True -Direction Inbound -Protocol TCP -Action Allow -LocalPort 22
Рассмотрим, где храниться основные компоненты OpenSSH:
- Исполняемые файлы OpenSSH Server находятся в каталоге
C:\Windows\System32\OpenSSH\
(sshd.exe, ssh.exe, ssh-keygen.exe, sftp.exe и т.д.) - Конфигурационный файл sshd_config (создается после первого запуска службы):
C:\ProgramData\ssh - Файлы authorized_keys и ssh ключи можно хранить в профиле пользователей:
%USERPROFILE%\.ssh\
Sshd_config: Конфигурационный файл сервера OpenSSH
Настройки сервере OpenSSH хранятся в конфигурационном файле %programdata%\ssh\sshd_config. Это обычный текстовый файл с набором директив. Для редактирования можно использовать любой текстовый редактор (я предпочитаю notepad++). Можно открыть с помощью обычного блокнота:
start-process notepad C:\Programdata\ssh\sshd_config
Например, чтобы запретить SSH подключение для определенного доменного пользователя (и всех пользователей указанного домена), добавьте в конце файле директивы:
DenyUsers winitpro\[email protected]
DenyUsers corp\*
Чтобы разрешить подключение только для определенной доменной группы:
AllowGroups winitpro\sshadmins
Либо можете разрешить доступ для локальной группы:
AllowGroups sshadmins
По умолчанию могут к openssh могут подключаться все пользователи Windows. Директивы обрабатываются в следующем порядке: DenyUsers, AllowUsers, DenyGroups,AllowGroups.
Можно запретить вход под учетными записями с правами администратора, в этом случае для выполнения привилегированных действий в SSH сессии нужно делать runas.
DenyGroups Administrators
Следующие директивы разрешают SSH доступ по ключам (SSH аутентификации в Windows с помощью ключей описана в отдельной статье) и по паролю:
PubkeyAuthentication yes
PasswordAuthentication yes
Вы можете изменить стандартный SSH порт TCP/22, на котором принимает подключения OpenSSH в конфигурационном файле sshd_config в директиве Port.
После любых изменений в конфигурационном файле sshd_config нужно перезапускать службу sshd:
restart-service sshd
Подключение по SSH к Windows компьютеру
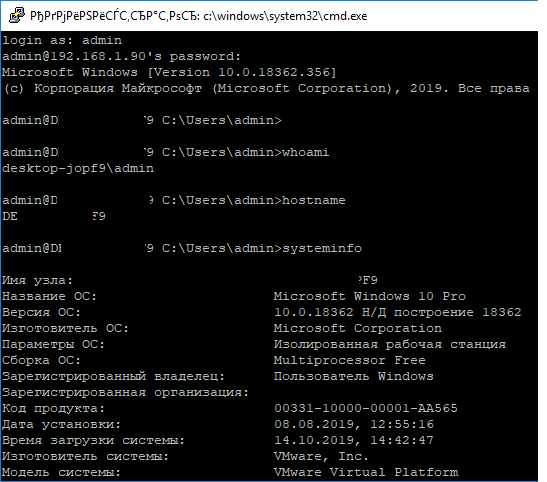
Теперь вы можете попробовать подключиться к своей Windows 10 через SSH клиент (в этом примере я использую putty).
Вы можете использовать встроенный SSH клиентом Windows для подключения к удаленному хосту. Для этого нужно в командной строке выполнить команду:
ssh [email protected]
В этом примере
alexbel
– имя пользователя на удаленном Windows компьютере, и 192.168.31.102 – IP адрес или DNS имя компьютера.
Обратите внимание что можно использовать следующие форматы имен пользователей Windows при подключении через SSH:
-
alex@server1
– локальный пользователь Windows -
[email protected]@server1
–пользователь Active Directory (в виде UPN) или аккаунт Microsoft/ Azure(Microsoft 365) -
winitpro\alex@server1
– NetBIOS формат имени
В домене Active Directory можно использовать Kerberos аутентификацию в SSH. Для этого в sshd_config нужно включить параметр:
GSSAPIAuthentication yes
После этого можно прозрачно подключать к SSH сервер с Windows компьютера в домене из сессии доменного подключается. В этом случае пароль пользователя не указывается и выполняется SSO аутентификация через Kerberos:
ssh -K server1
При первом подключении появится стандартный запрос на добавление узла в список известных SSH хостов.
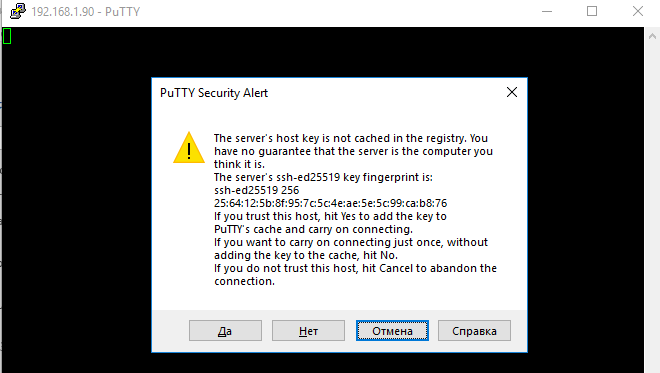
Нажимаем Да, и в открывшееся окне авторизуемся под пользователем Windows.
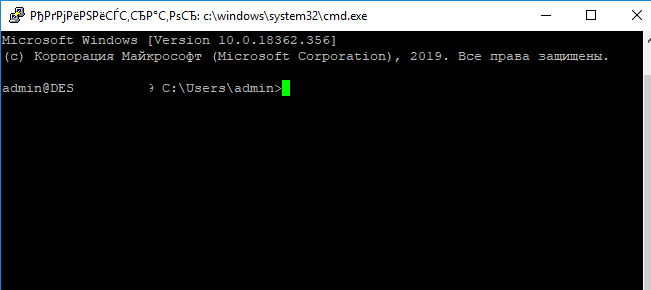
При успешном подключении запускается командная оболочка cmd.exe со строкой-приглашением.
admin@win10tst C:\Users\admin>
В командной строке вы можете выполнять различные команды, запускать скрипты и программы.
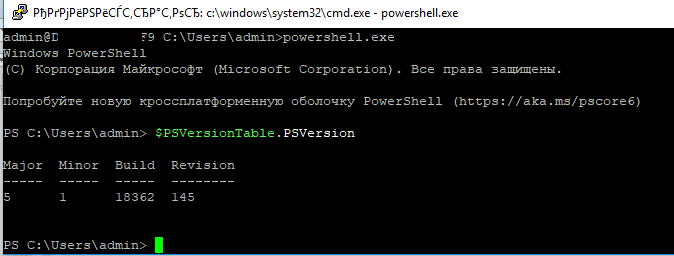
Я предпочитаю работать в командной строке PowerShell. Чтобы запустить интерпретатор PowerShell, выполните:
powershell.exe
Чтобы изменить командную оболочку (Shell) по умолчанию в OpenSSH с cmd.exe на PowerShell, внесите изменение в реестр такой командой:
New-ItemProperty -Path "HKLM:\SOFTWARE\OpenSSH" -Name DefaultShell -Value "C:\Windows\System32\WindowsPowerShell\v1.0\powershell.exe" -PropertyType String –Force
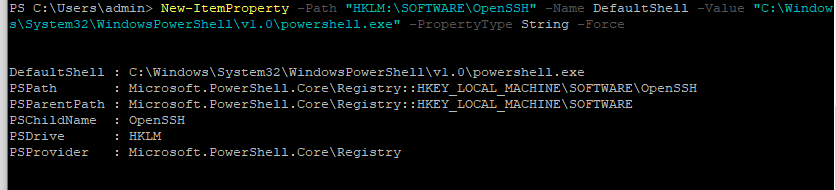
Осталось перезапустить SSH подключение и убедиться, что при подключении используется командный интерпретатор PowerShell (об этом свидетельствует приглашение
PS C:\Users\admin>
).
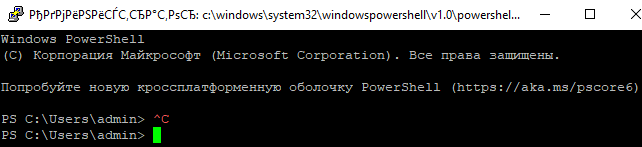
В SSH сессии запустилась командная строка PowerShell, в которой работают привычные функции: авто дополнение, раскраска модулем PSReadLine, история команд и т.д. Если текущий пользователь входит в группу локальных администраторов, то все команды в его сессии выполняются с повышенными правами даже при включенном UAC.
Логи SSH подключений в Windows
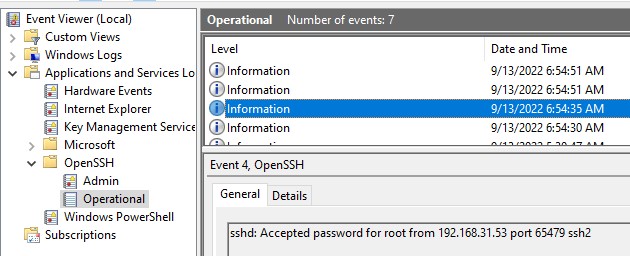
В Windows логи подключений к SSH серверу по-умолчанию пишутся не в текстовые файлы, а в отдельный журнал событий через Event Tracing for Windows (ETW). Откройте консоль Event Viewer (
eventvwr.msc
>) и перейдите в раздел Application and services logs -> OpenSSH -> Operational.
При успешном подключении с помощью к SSH серверу с помощью пароля в журнале появится событие:
EventID: 4
sshd: Accepted password for root from 192.168.31.53 port 65479 ssh2
Если была выполнена аутентификация с помощью SSH ключа, событие будет выглядеть так:
sshd: Accepted publickey for locadm from 192.168.31.53 port 55772 ssh2: ED25519 SHA256:FEHDEC/J72Fb2zC2oJNb45678967kghH43h3bBl31ldPs
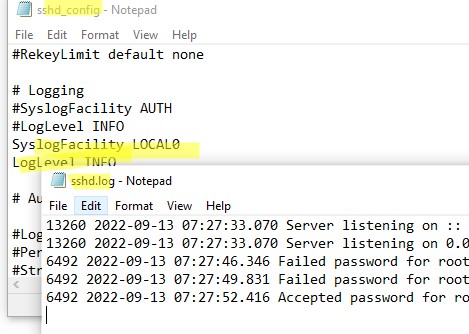
Если вы хотите, чтобы логи писались в локальный текстовый файл, нужно в файле sshd_config включить параметры:
SyslogFacility LOCAL0
LogLevel INFO
Перезапустите службу sshd и провеьте, что теперь логи SSH сервера пишутся в файл C:\ProgramData\ssh\logs\sshd.log
In Windows, remote desktop is the preferred remote access method. But Windows also supports SSH to access command line interface remotely. If you want to use SSH, you must first install OpenSSH Server.
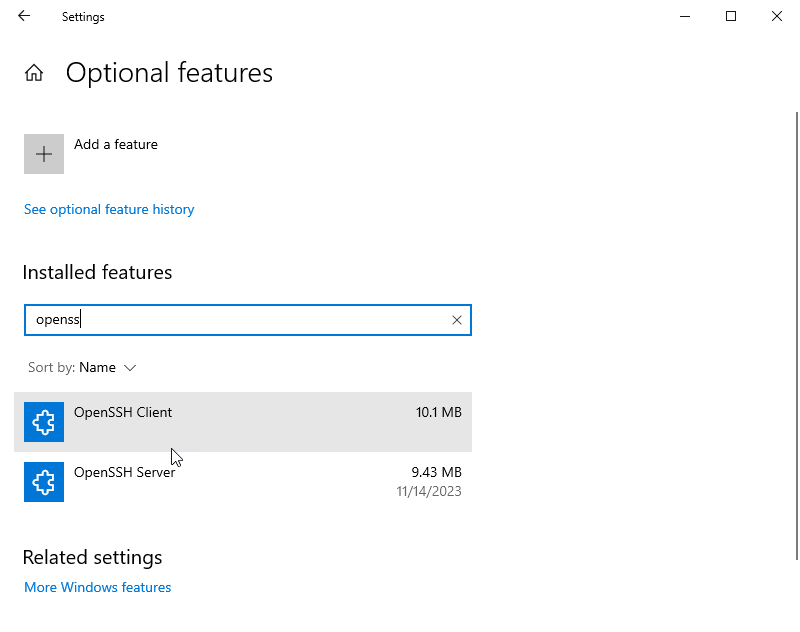
If not already installed, we can install the SSH server on Windows 10 through the app and features by adding the openssh-server package. And it is quite easy.
Setting Up the SSH Server
If your Windows 10 PC doesn’t have the SSH server package installed, do the following steps to install it.
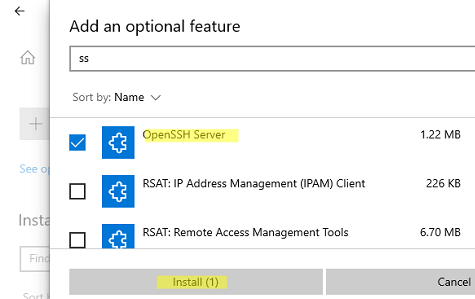
From the Start menu open the Windows Settings. Select Apps and then select Apps & Features from the menu to the left.
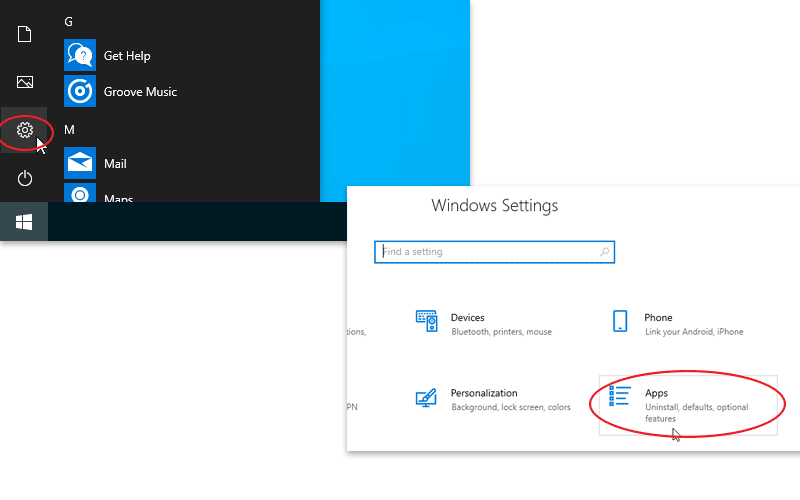
Go to the Optional features section and click on the Add a feature button.
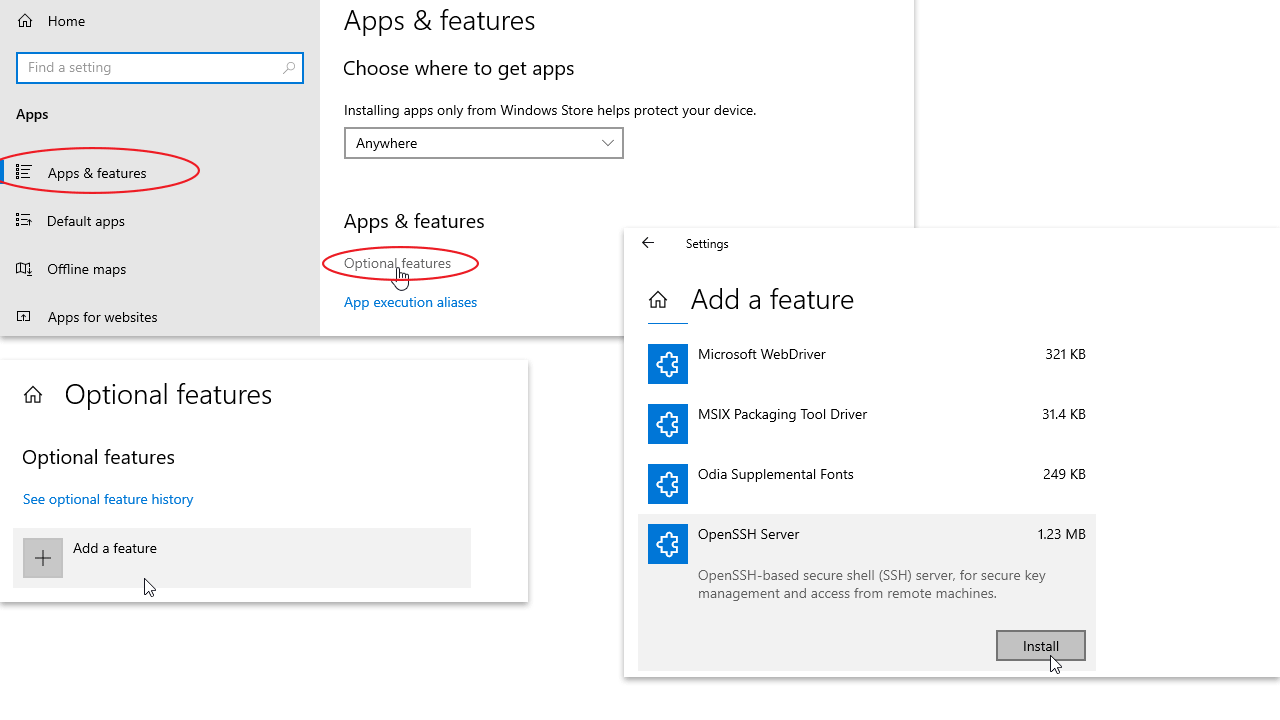
Select the OpenSSH Server package from the list and click the Install button.
Wait till the installation is finished, then go back to Apps & Features main windows and make sure that SSH server has been installed.
After the installation is completed, the sshd service should be ready to run. Open your Windows Services control manager (Start button > Windows Administrative Tools > Services).
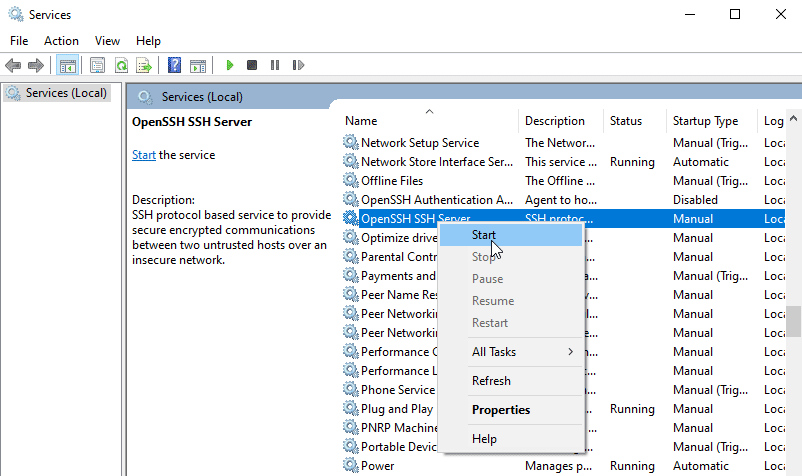
Look for OpenSSH SSH Server, right click on the service and choose Start.
You might also want to set the OpenSSH service startup to Automatic, so it runs whenever you boot your Windows PC. Right click on the SSH service, Select Properties.
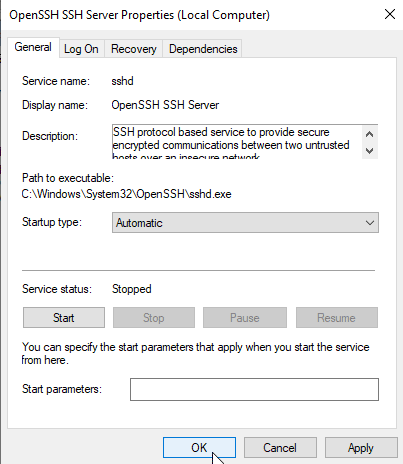
Change the Startup type to Automatic.
With the SSH server started and running, your Windows machine should now be listening for connections on port 22. To verify this, use the netstat command to list listening ports.
You can now connect to Windows command line directly using an SSH client. Use your Microsoft account name (or local username if you are using a local account) to authenticate the SSH connection.
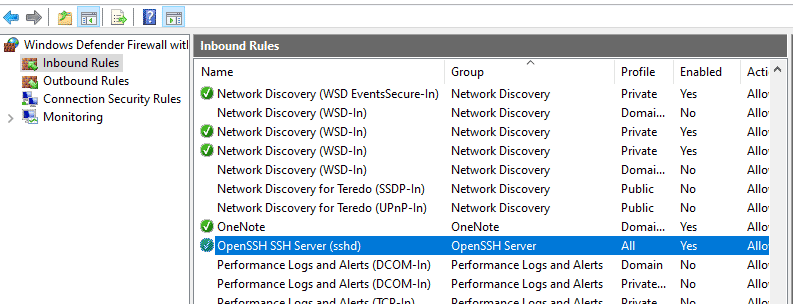
Configuring Windows Firewall
Windows automatically configures Firewall to open port 22 to allow communication to the SSH Server. Just make sure the following inbound rule is active.
You can locate The sshd_config_default file, The main configuration file for the SSH server at C:\Windows\System32\OpenSSH directory. In most cases there is no need to edit this file.
Как вы уже знаете, из предыдущей статьи, Windows 10 включает в себя встроенное программное обеспечение SSH — клиент, и сервер! В этой статье мы рассмотрим, как включить SSH-сервер.
Примечание: Приложение OpenSSH Server позволит вам установить соединение с вашим компьютером с использованием протокола SSH. Это не позволит вам получить доступ к другим компьютерам в вашей сети. Чтобы подключиться к другим компьютерам, вы должны установить клиент OpenSSH.
В Windows 10, Microsoft, наконец, прислушалась к просьбам пользователей и добавила поддержку протокола OpenSSH в версии обновления Fall Creators.
На момент написания данной статьи, программное обеспечение OpenSSH, включенное в Windows 10, находится на стадии BETA. Это означает, что у него могут быть проблемы с стабильностью.
Предоставленный SSH-сервер похож на приложение Linux. На первый взгляд, он поддерживает те же функции, что и его аналог * NIX. Это консольное приложение, но оно работает как служба Windows.
Как включить сервер OpenSSH в Windows 10.
- Откройте приложение «Параметры» и перейдите в «Приложения» → «Приложения и возможности».
- Справа нажмите «Управление дополнительными компонентами».
- На следующей странице нажмите кнопку «Добавить компонент».
- В списке компонентов выберите OpenSSH Server и нажмите кнопку «Установить», это установит программное обеспечение OpenSSH Server в Windows 10
- Перезагрузите Windows 10.
Также вы можете установить клиент SSH с помощью PowerShell.
Откройте PowerShell от имени Администратора и выполните следующую команду и перезагрузите систему:
Get-WindowsCapability -Online | Where-Object{$_.Name -like “OpenSSH.Server*”}
Файлы OpenSSH Server находятся в папке c:\windows\system32\Openssh. Помимо клиентских приложений SSH, папка содержит следующие серверные инструменты:
- SFTP-server.exe
- SSH-agent.exe
- SSH-keygen.exe
- sshd.exe
- конфигурационный файл «sshd_config».
Сервер SSH настроен для работы в качестве службы.
На момент написания этой статьи он не запускается автоматически. Вам нужно включить его вручную.
Как запустить сервер OpenSSH в Windows 10.
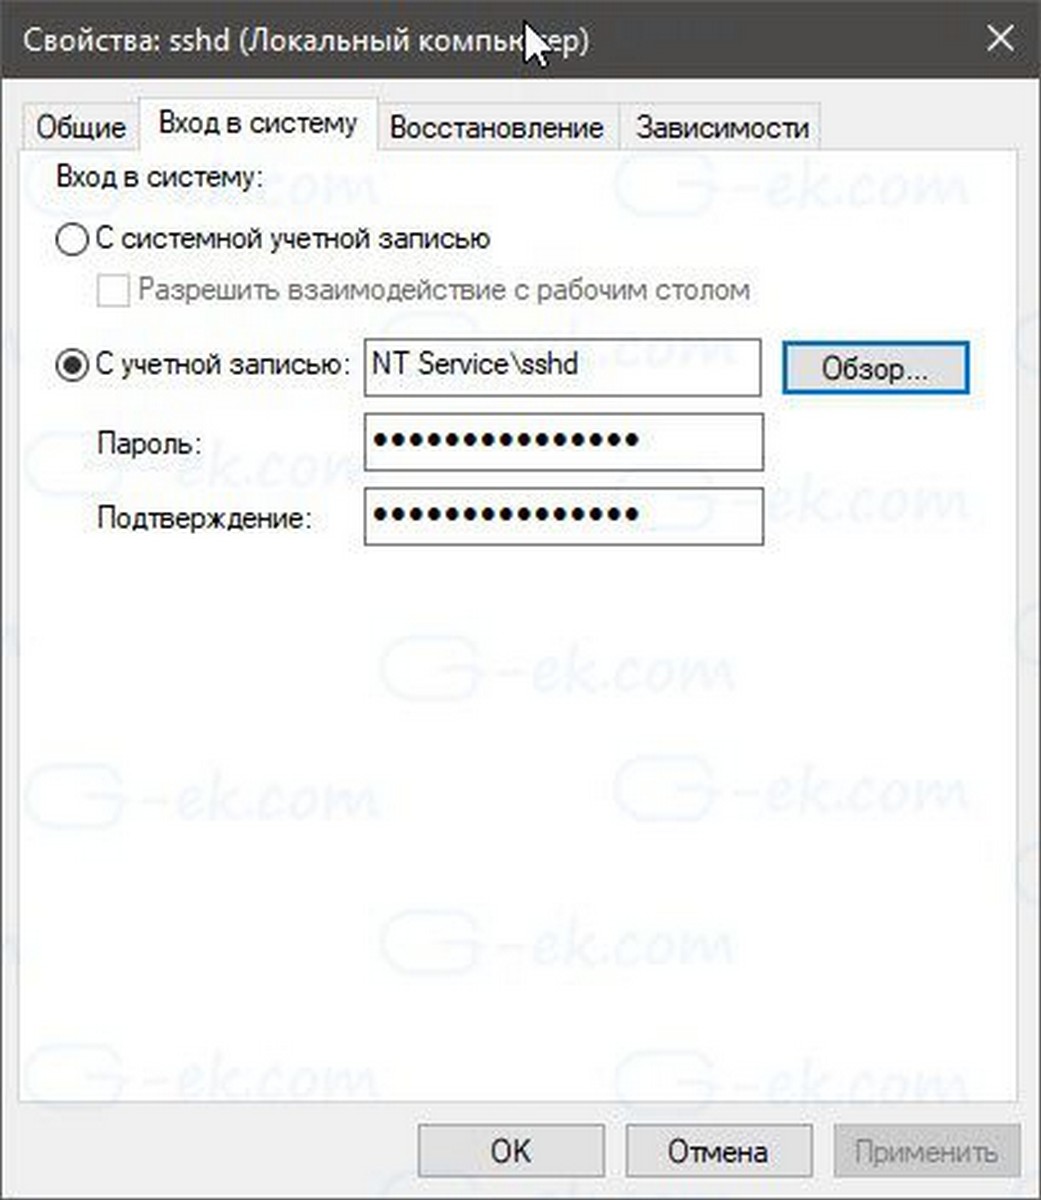
- Откройте Службы, (нажмите клавиши Win + R и введите services.msc в поле «Выполнить») и запустите службу sshd. дважды кликните на запись sshd, чтобы открыть ее свойства.
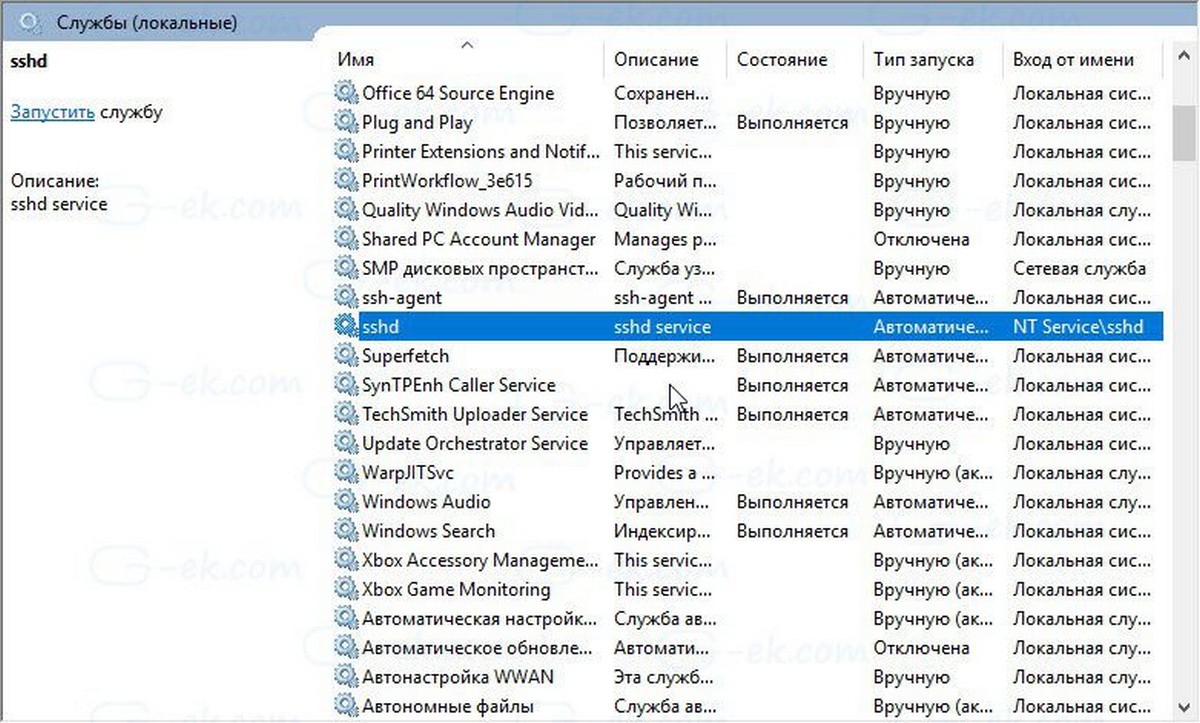
- На вкладке «Вход в систему» см. Учетную запись пользователя, которая используется сервером sshd. В моем случае это NT Service \ sshd
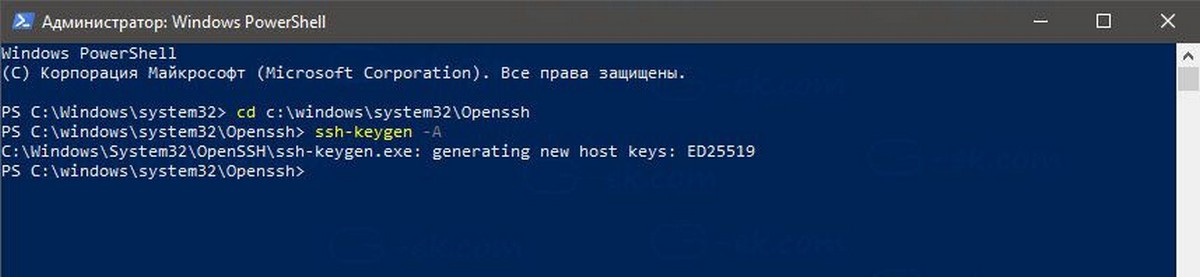
- Теперь откройте командную строку или PowerShell от имени администратора .
С помощью этой команды перейдите в каталог \ Openssh
cd c:\windows\system32\Openssh
- Здесь запустите команду для создания ключей безопасности для сервера sshd:
ssh-keygen -A
Сервер Sshd сгенерирует ключи
- Теперь в командной строке введите: explorer.exe, чтобы запустить Проводник в папке OpenSSH.

- Кликните правой кнопкой мыши файл ssh_host_ed25519_key и измените владельца файла на пользователя службы sshd, например NT Service\sshd.
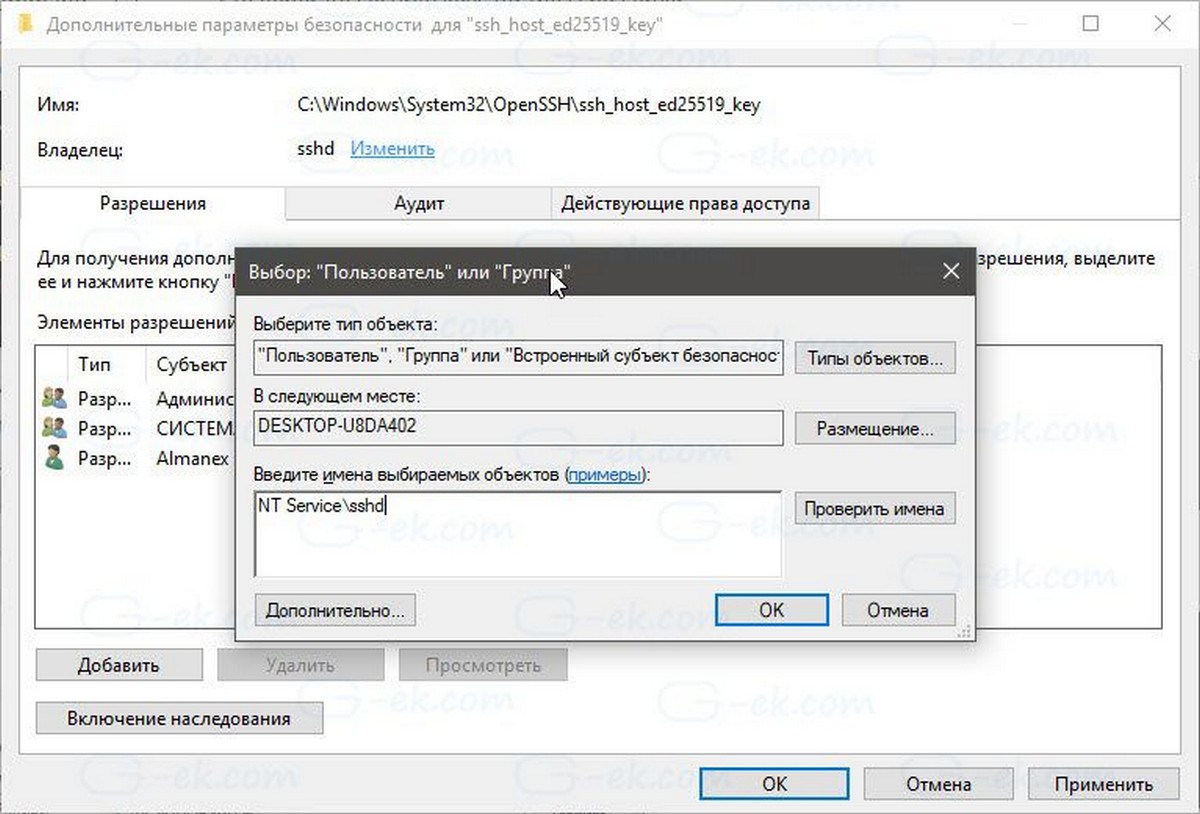
- Нажмите кнопку «Добавить» и добавьте разрешение «Чтение» для пользователя «NT Service\sshd».
- Теперь удалите все другие разрешения, чтобы получить что-то вроде этого:
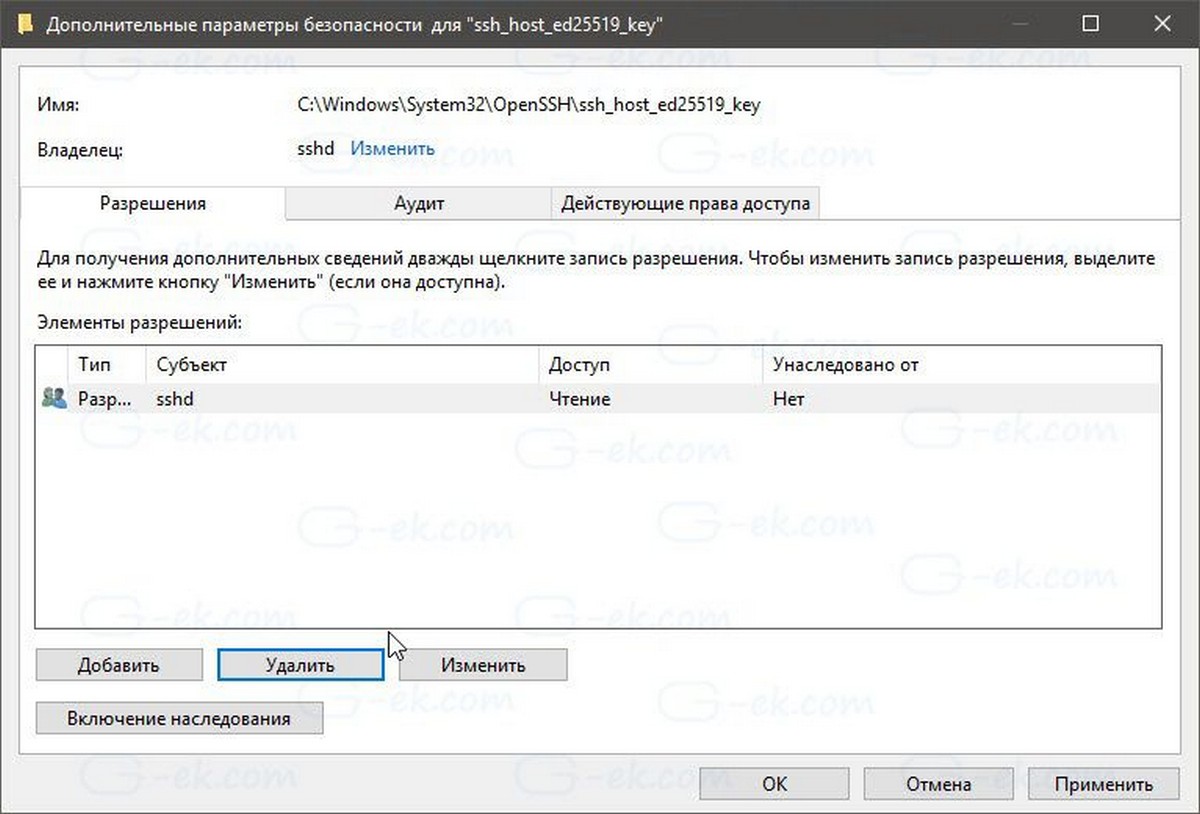
- Нажмите «Применить» и подтвердите операцию.
- Наконец, откройте службы (нажмите клавиши Win + R и введите services.msc в поле «Выполнить») и запустите службу sshd. Она должна запустится:
Служба Sshd работает.
- Теперь необходимо разрешить использование SSH-порта в брандмауэре Windows. По умолчанию сервер использует порт 22. Запустите эту команду в командной строке или PowerShell от имени администратора:
netsh advfirewall firewall add rule name="SSHD Port" dir=in action=allow protocol=TCP localport=22

- Наконец, установите пароль для своей учетной записи пользователя, если у вас его нет.
Теперь вы можете попробовать его в действии.
Подключение к SSH-серверу в Windows 10.
Откройте свой ssh-клиент. Вы можете запустить его на том же компьютере, например, используя встроенный клиент OpenSSH или запустить его с другого компьютера в своей сети.
В общем случае синтаксис для клиента консоли OpenSSH выглядит следующим образом:
Имя пользователя ssh @ host -p
В моем случае команда выглядит следующим образом:
ssh alex_@192.168.1.126
Где alex_ — мое имя пользователя Windows, а 192.168.1.126 — это IP-адрес моего ПК с Windows 10. Я подключусь к нему с другого компьютера, Windows 10.

Вход.

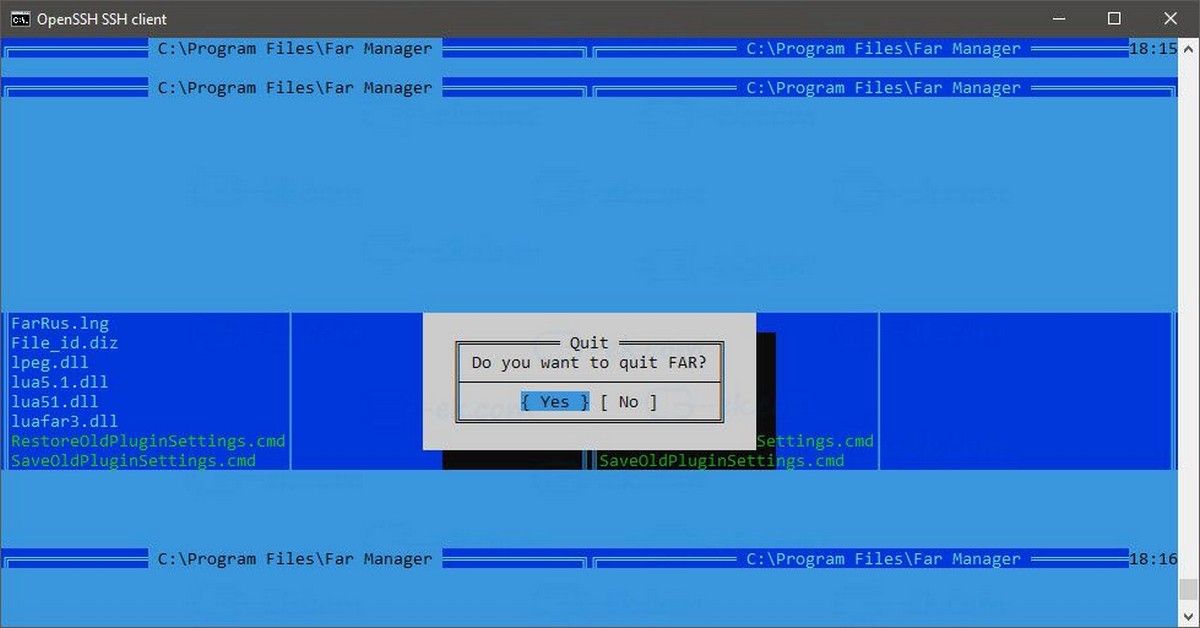
Сервер запускает классические консольные команды Windows, например: more, type, ver, copy.

Но я не могу запустить FAR Manager. Он выглядит совсем сломанным:
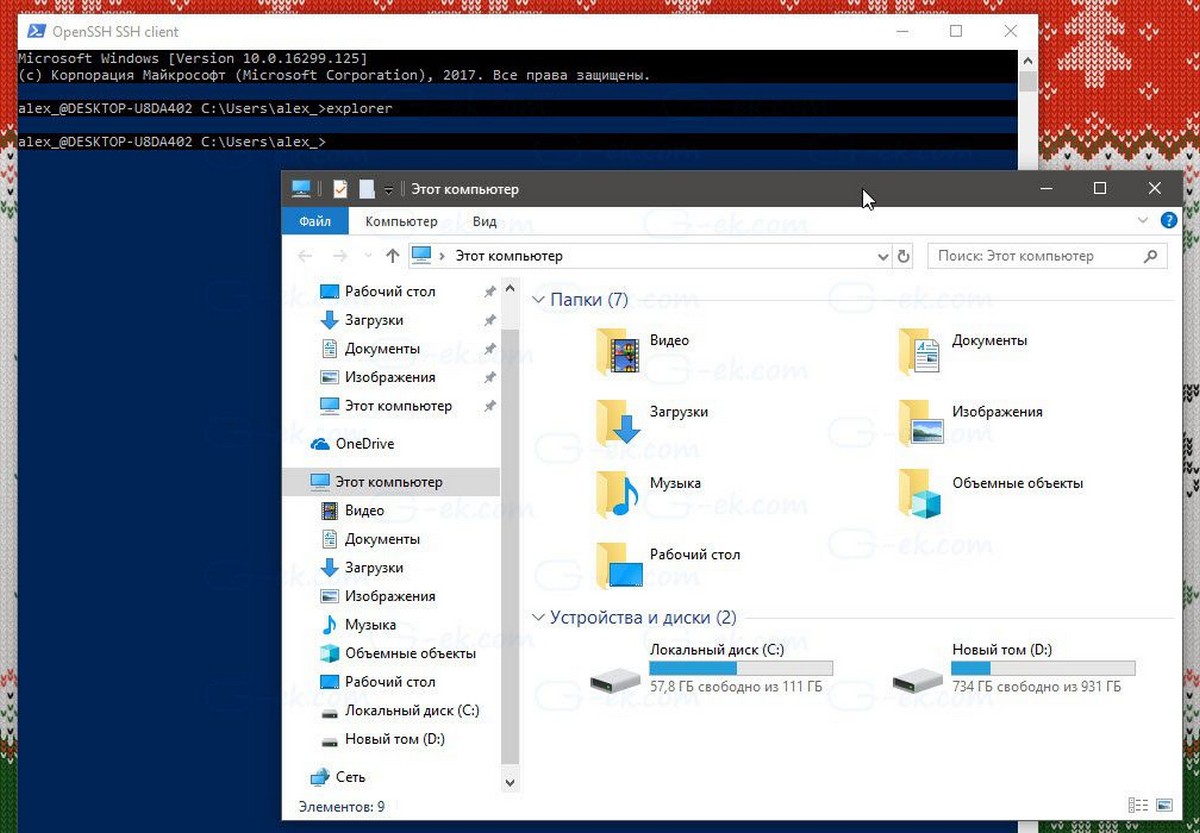
Еще одно интересное примечание: вы можете запускать приложения с графическим интерфейсом, такие как проводник. Если вы вошли в ту же учетную запись пользователя, которую используете для SSH, они будут запускаться на рабочем столе:
Встроенный SSH-сервер определенно интересен. Он позволяет управлять компьютером сWindows 10, без установки сторонних инструментов, как rdesktop и др..
Начиная с этой версии, встроенный SSH-сервер в Windows 10 находится на стадии BETA, поэтому в будущем он должен стать, более интересным и полезным.
Did you know you can run SSH server on a Windows machine and SSH into it?
• 4 min read
One of my pet peeves with Windows was a lack of support for SSH. SSHing into a Linux machine is such a seamless experience. I never had that with Windows. Apparently, Win10 has supported OpenSSH server for a while, and I just never knew about it. Setting it up is not trivial, so I decided to document it here.
Why?
My ultimate goal is to implement this: https://docs.gitlab.com/runner/executors/custom_examples/libvirt.html Right now I have several different VMs running for a variety of projects but they spend most of their time just sitting there waiting for jobs. I want to be able to spin them up on demand. I’ve also had some issues with residuals where one job does something to the system that then affects the next job to run on that VM. Switching to this model will ensure that each job starts with a fresh slate every time. Part of the challenge is that it uses SSH, so you have to be able to SSH into Windows running in the VM.
Initial Setup
So I am going to install OpenSSH Server on a Win 10 Virtual Machine. I created it from a Win10 ISO and created a local user account. First I need to know its IP and make sure you can ping it from the host. If you open a cmd window on the guest, then ipconfig will give you the IP address. You can then try pinging it from your host however it probably won’t work because by default Windows Firewall blocks pings for some reason.
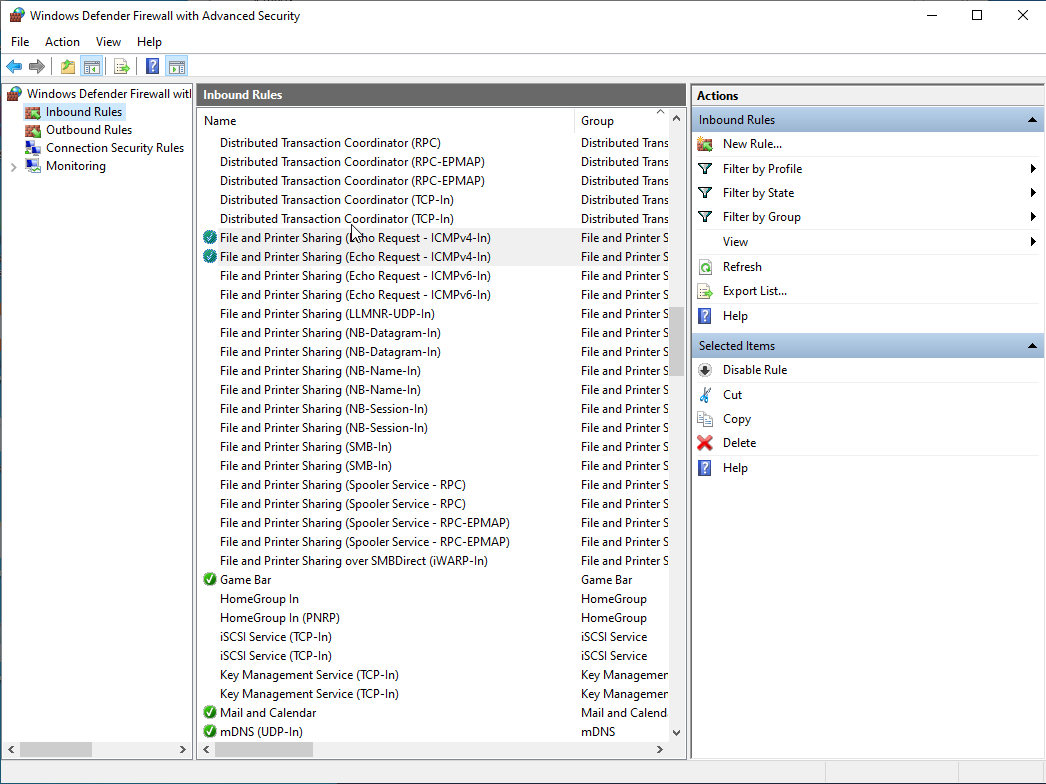
Allowing Ping Responses in Windows
I’m sure there are other ways to do this, but I find just opening Windows Firewall settings in the GUI to be the easiest. Just type Windows Defender Firewall into the search bar. If you look at the inbound rules, You’ll see 2 rules named «File and Printer Sharing (Echo Request — ICMPv4-In). Just right-click on both of them and enable them. At that point, you should be able to ping the VM from the host.
Installing OpenSSH Server
Search for «Manage Optional Features». Click on add a feature.
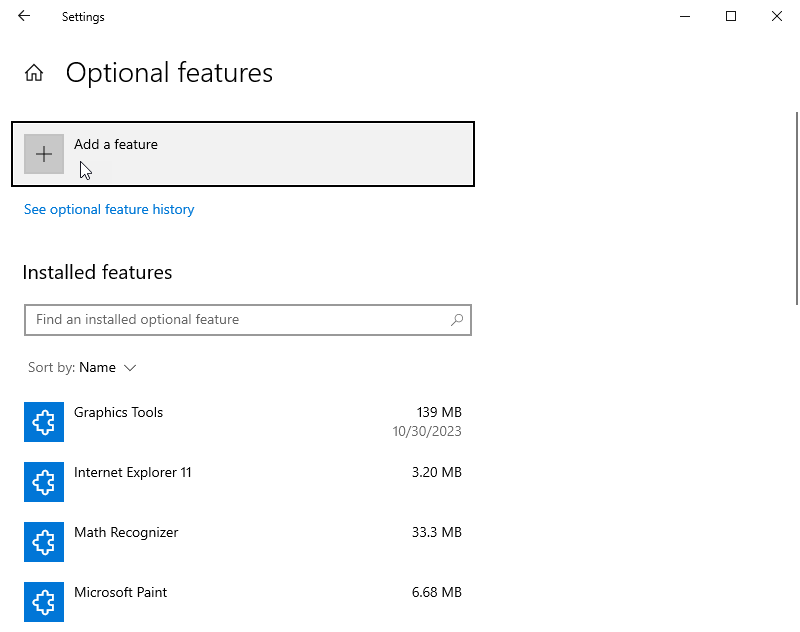
Then search for OpenSSH Server and install it.
Opening a Port in the Firewall
I know I previously used the GUI for the firewall, but here I found a Powershell command to do it for me. Simply open Powershell as an admin and run the following, or use the GUI if you prefer.
New-NetFirewallRule -Name sshd -DisplayName 'OpenSSH SSH Server' -Enabled True -Direction Inbound -Protocol TCP -Action Allow -LocalPort 22 -Program "C:\Windows\System32\OpenSSH\sshd.exe"
Starting the Server
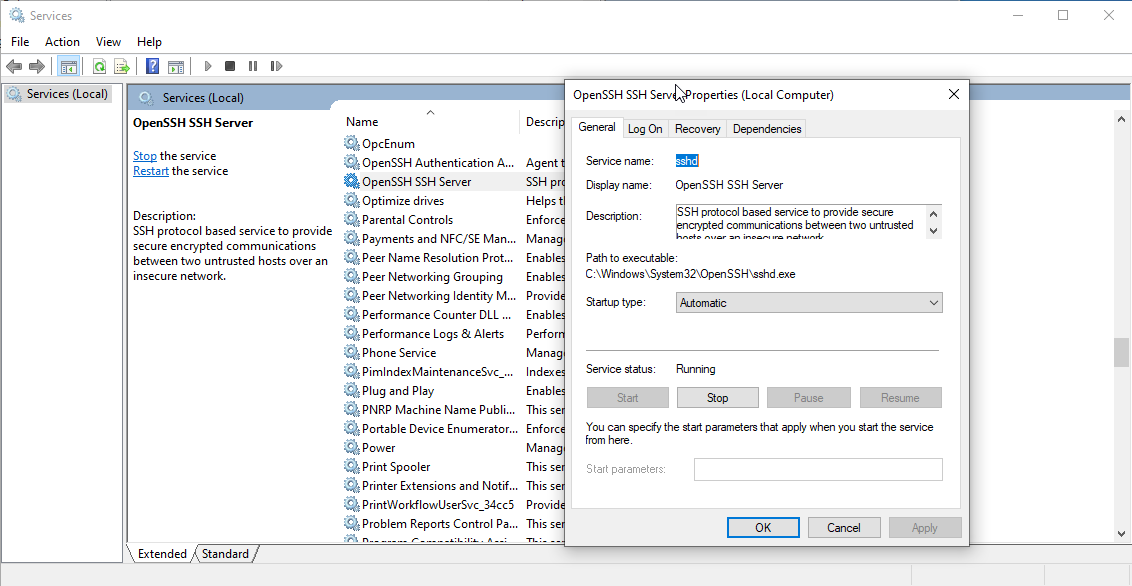
The SSH server is now installed and the port is open, but it isn’t running. To start it, type services into the search to open the services window. Find the Open SSH Server service and right click on it and open the properties window. Then you can press the start button to set it now and set the startup type to automatic, so it will start when Windows boots up.
First Connection
At this point, from the host you should be able to ssh into the Windows box. It will prompt you for your Windows password. That should give you a cmd prompt on the Windows machine.
Refining the Setup
There are a few things we can do to refine this and make it better.
Changing the Default Shell
Initially, the shell defaults to cmd. We can switch it to use GitBash using the PowerShell command below (probably needs to run as administrator).
New-ItemProperty -Path "HKLM:\SOFTWARE\OpenSSH" -Name DefaultShell -Value "C:\Program Files\Git\bin\bash.exe" -PropertyType String -Force
Setting up SSH Keys
If we set up SSH keys then we can ssh into our Windows box without entering our password. The first step is to create an SSH key. There are plenty of instructions out there on how to do that. Once you have a key, typically in Linux you can use the ssh-copy-id command. That doesn’t work with Windows for some reason.
First we need the public key. We copy that to the clipboard on the host. Then in the guest, we need to create an administrators_authorized_keys file and paste the public key into it. Then copy that into C:\Program Data\ssh .
Next we need to set the appropriate permissions on that file. We can do that with the following PowerShell command (executed as admin).
icacls.exe "C:\ProgramData\ssh\administrators_authorized_keys" /inheritance:r /grant "Administrators:F" /grant "SYSTEM:F"Testing
Now you should be able to ssh into the Windows VM without entering your password and should get a Git Bash Prompt.
References
Here are some references:
https://winscp.net/eng/docs/guide_windows_openssh_server
OpenSSH Server configuration for Windows
Learn about the Windows-specific configuration options for OpenSSH Server on Windows Server and Windows.
Microsoft LearnmaertendMSFT
