
This post shows steps for students and new users to add or edit Windows PATH environment variables in Windows 11. Most programs will default add their custom shortcuts to Windows PATH environment variables.
Some programs will not automatically add to the System Path variables but let users edit or add to the path so that the program can function correctly.
The System PATH variable is one of the most used variables in Windows. It allows users to run any executable located inside the paths without giving the full path to the executable or directories to locate.
Users must search for and locate each executable without environment variables or provide full paths and directories of important program files. Environment variables create shortcuts to executables within those paths specified.
Below is how one can add or edit Windows PATH environment variables so they can run executables from their custom directories.
How to set path and environment variables in Windows 11
As mentioned, PATH and environment variables create shortcuts to executables and directories. It allows custom programs to be launched and used efficiently in Windows.
Administrator privileges are required to modify the path and environment variables. Below is how to add or edit Windows PATH and environment variables in Windows 11.
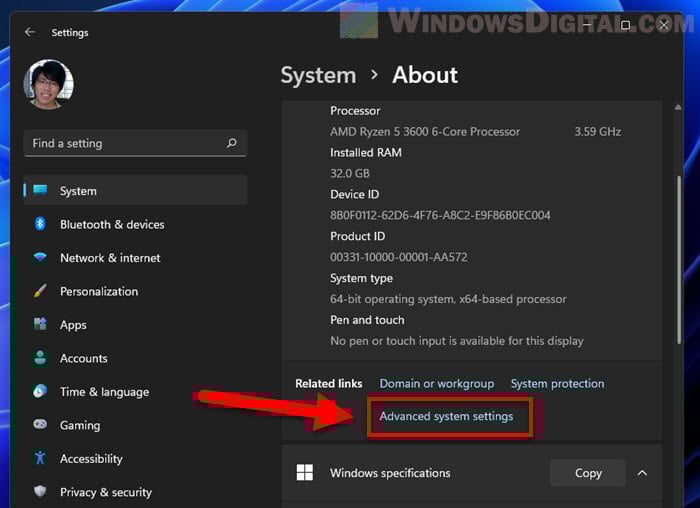
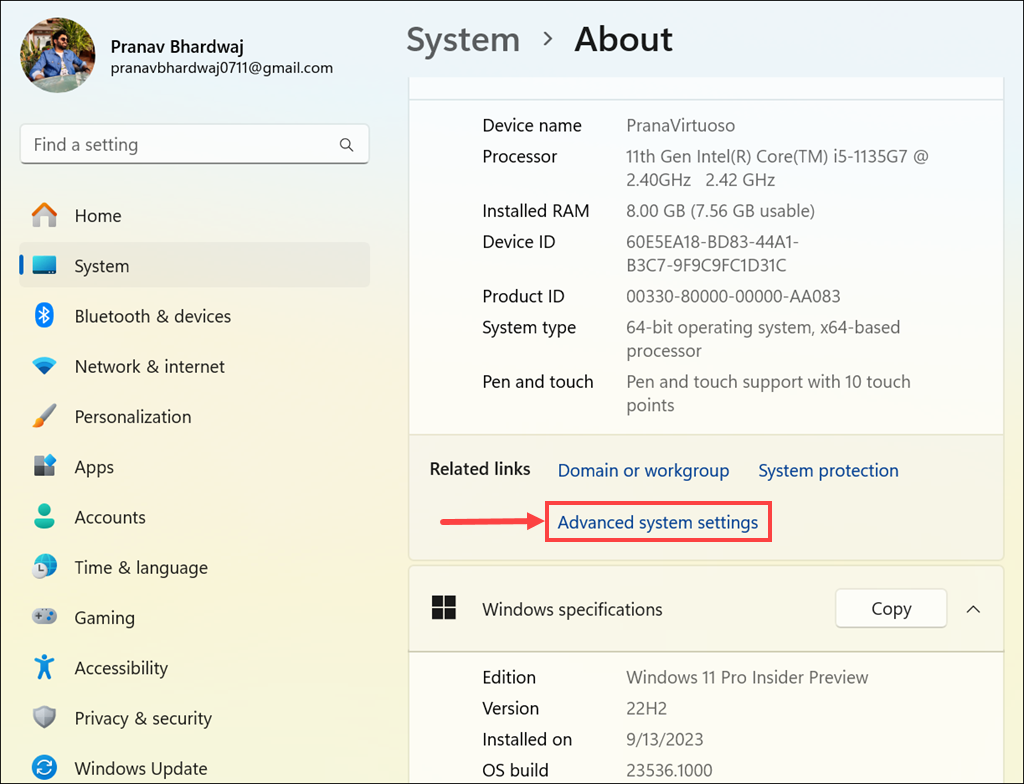
First, go to the Windows Settings app. To get to the Settings app, you can use the Windows key + I shortcut or click on Start ==> Settings, as shown in the image below:

Alternatively, you can use the search box on the taskbar and search for Settings. Then select to open it.
Windows Settings pane should look similar to the image below. In Windows Settings, click System, and select the About tile on the right pane of your screen, as shown in the image below.

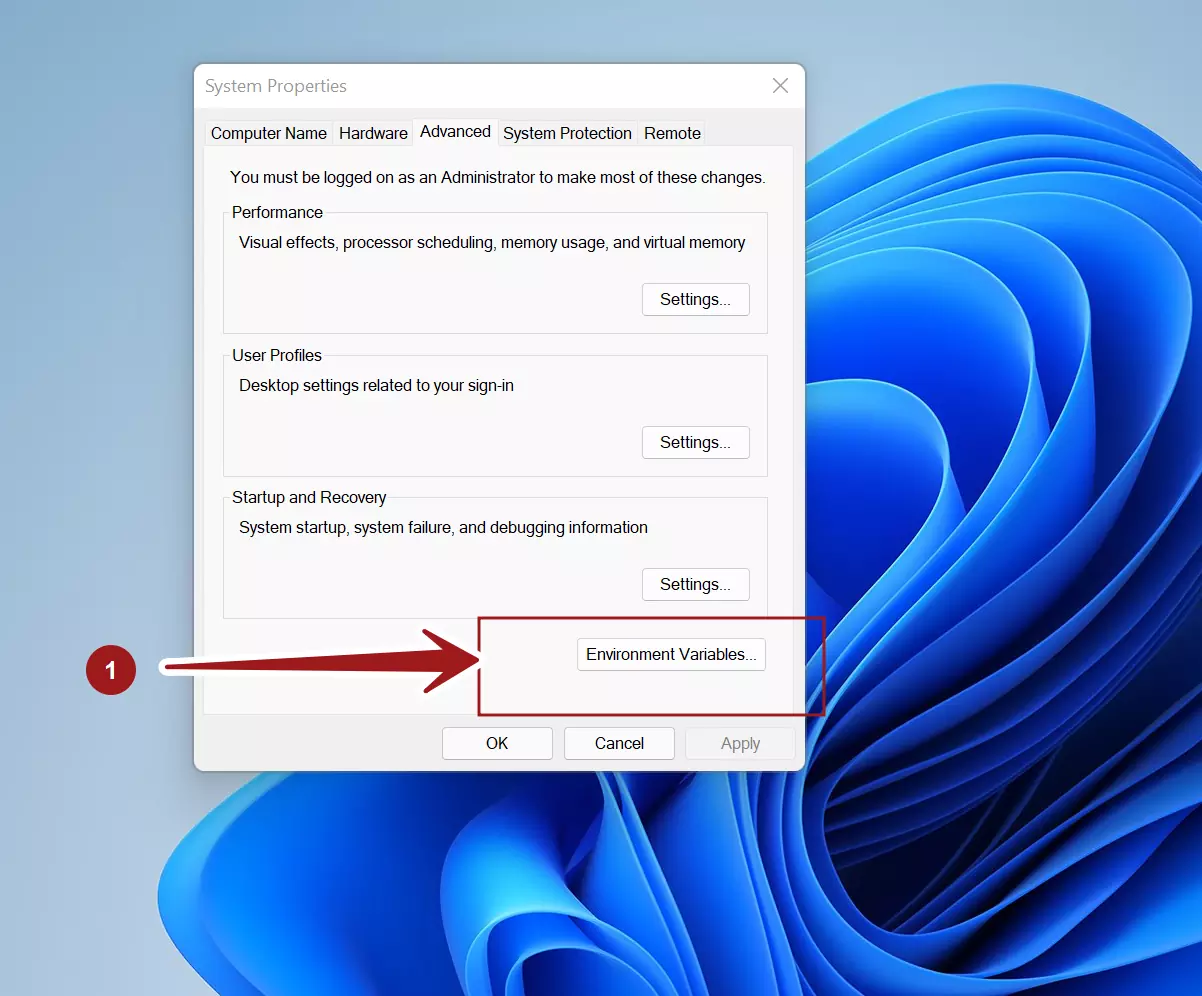
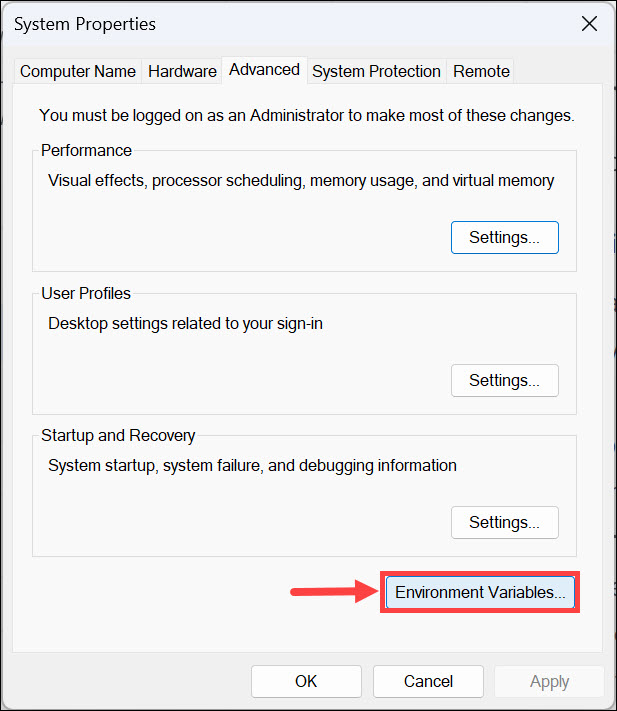
Click the Advanced system settings link on the About screen, as highlighted below.

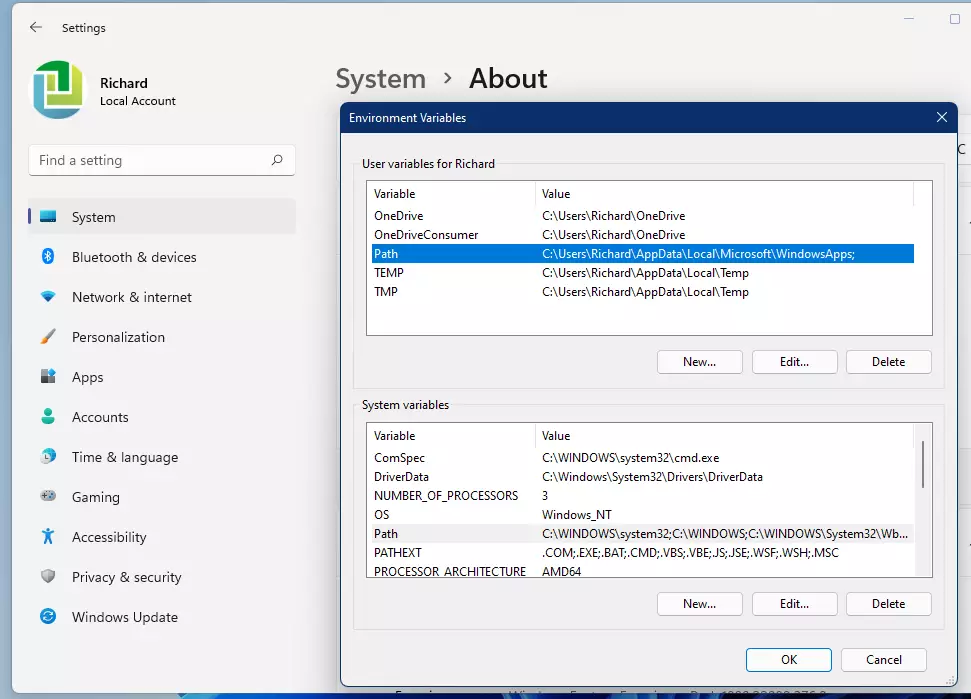
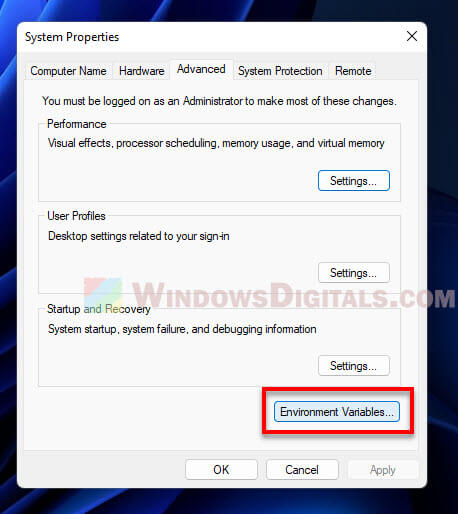
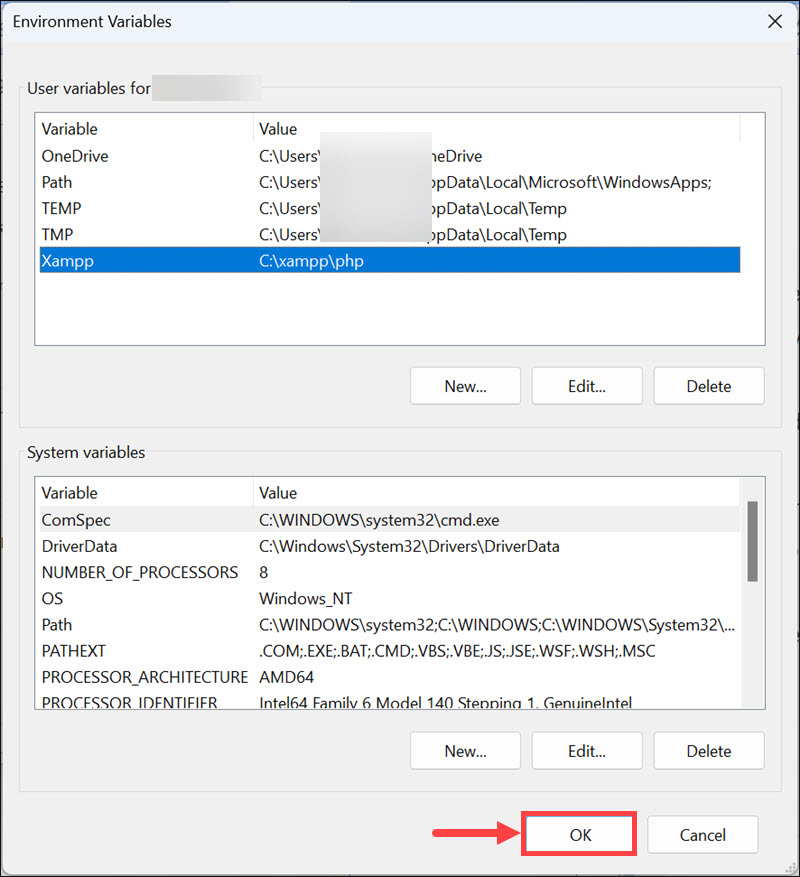
In the System Properties window, click the Advanced tab, then click the Environment Variables button near the bottom of that tab.

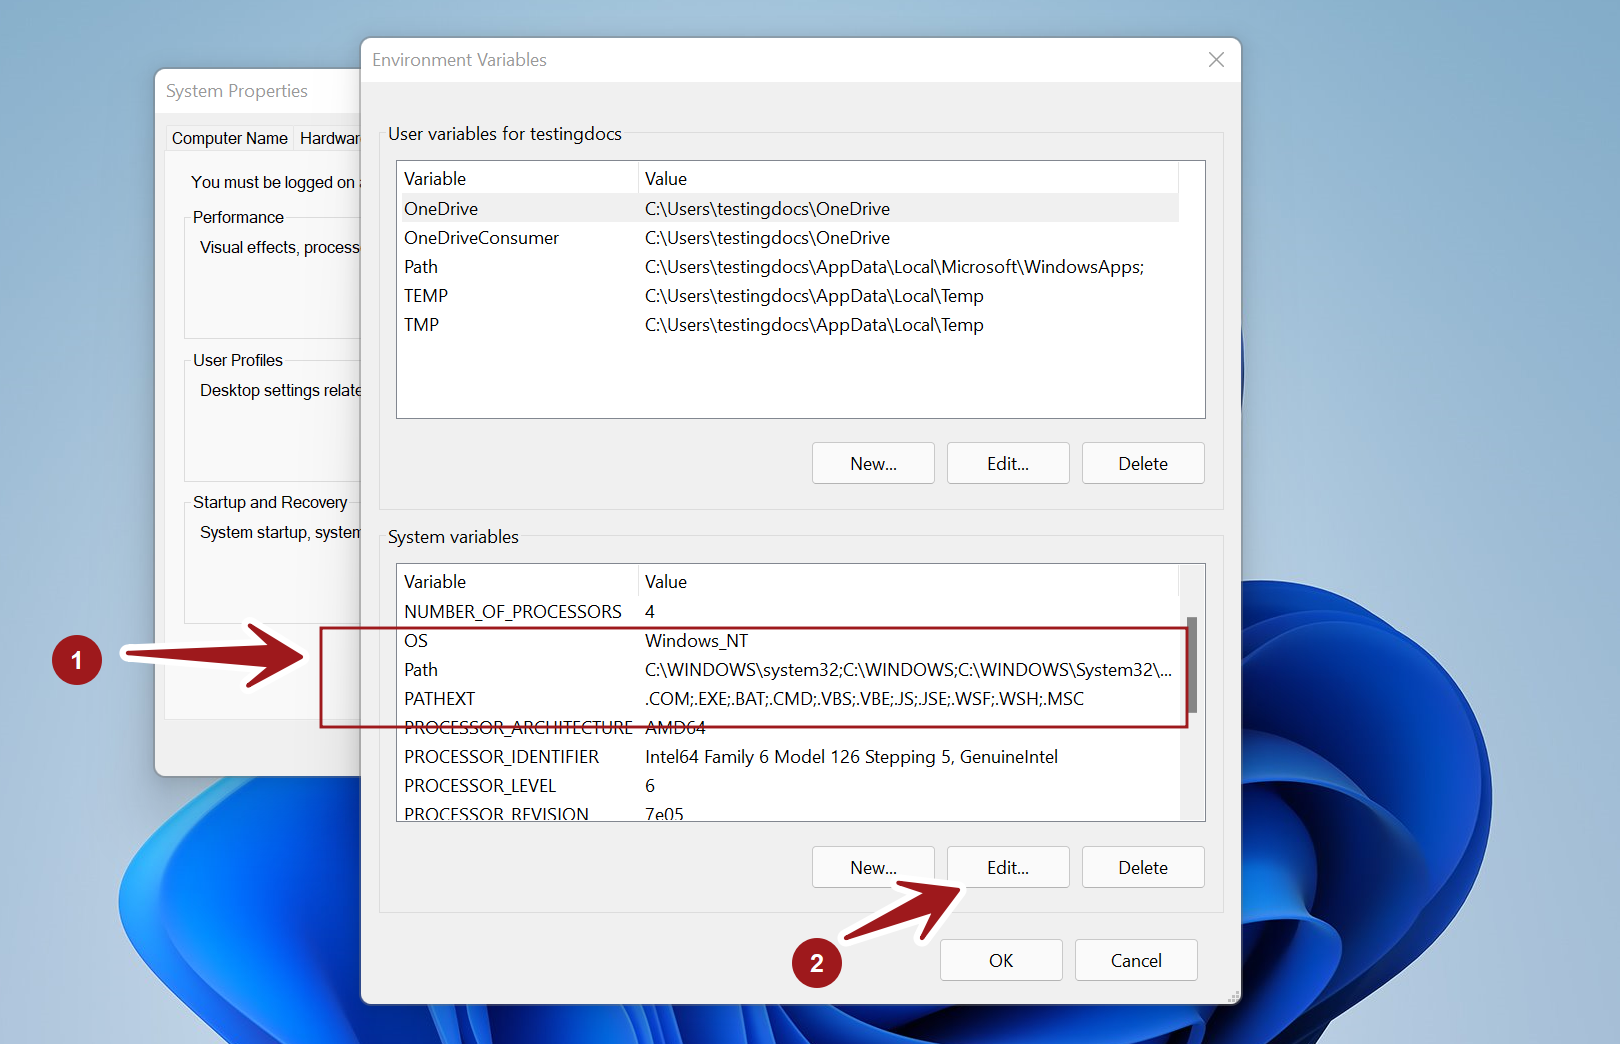
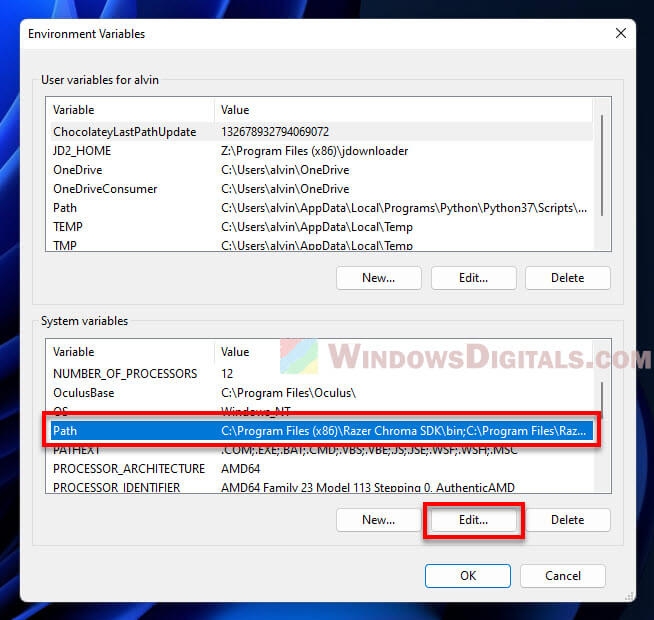
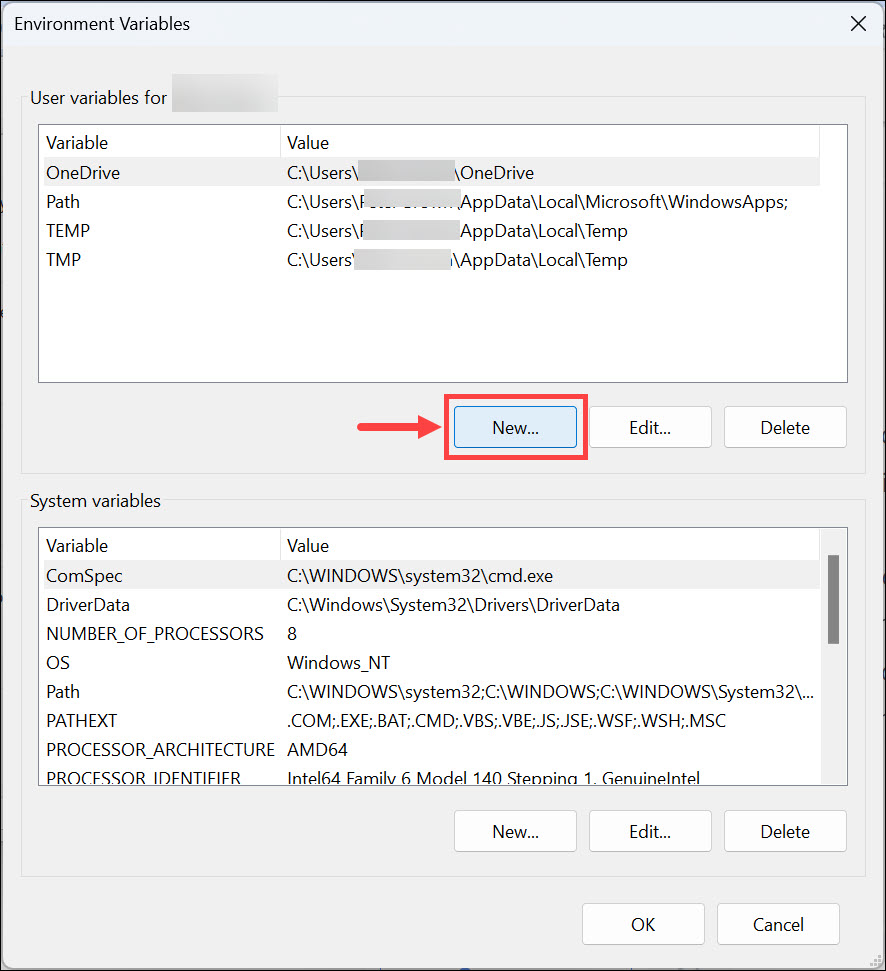
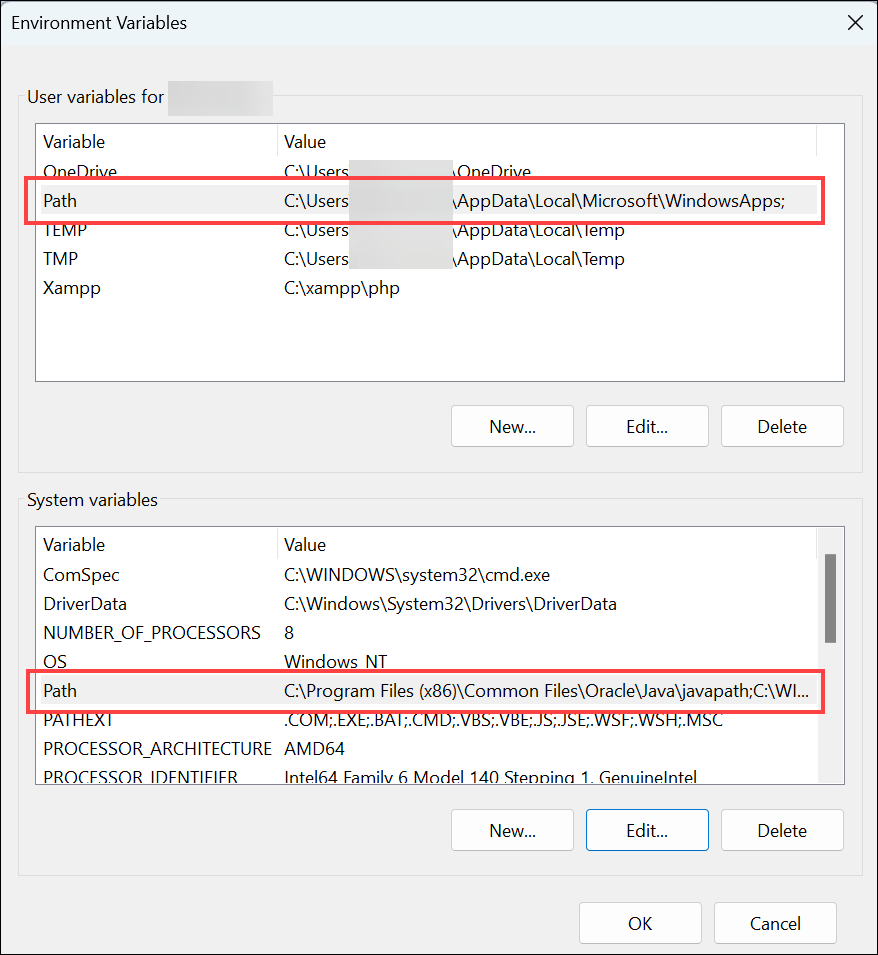
You’ll typically want to add to the System variables so everyone on the System can use it. If you use the User variable, only a user who adds it may use it.
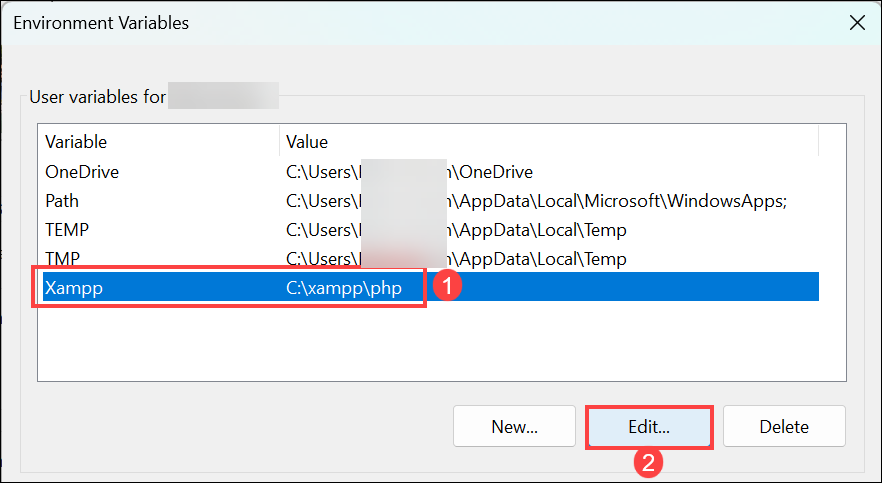
Highlight the Path variable in the System variables section and click the Edit button.
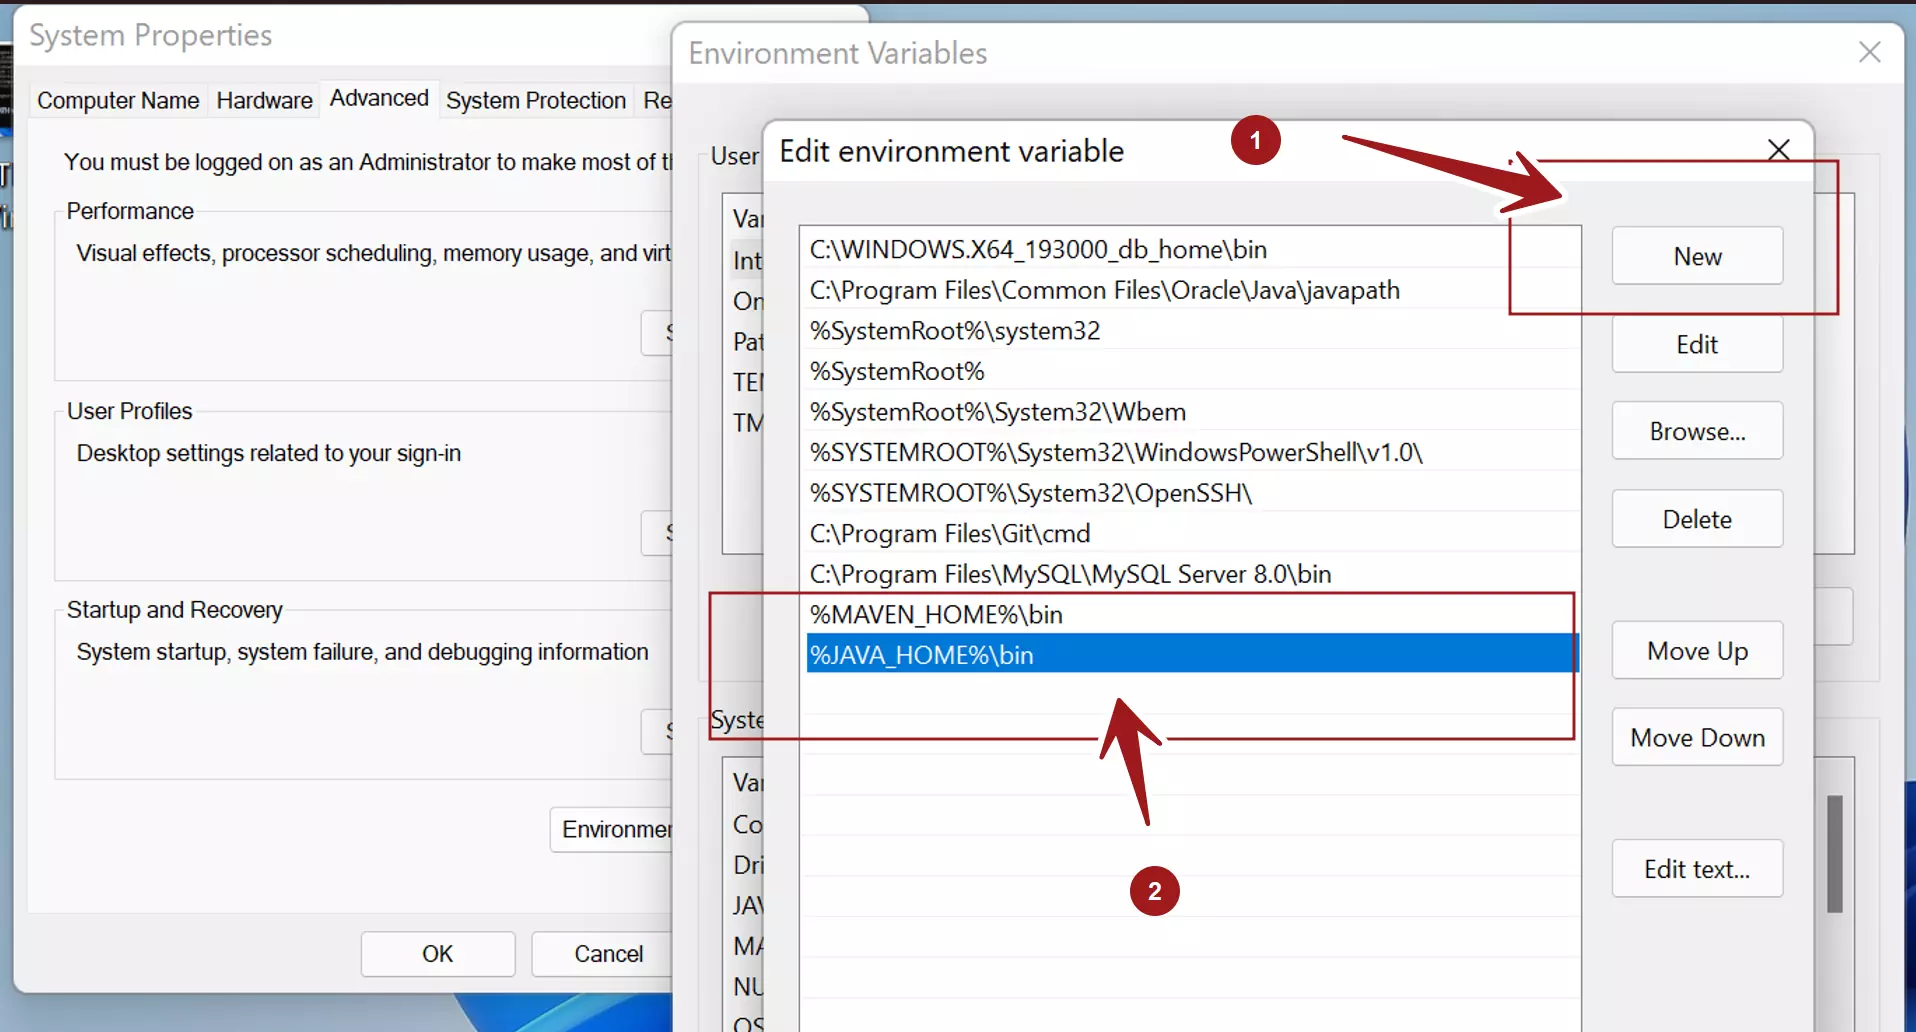
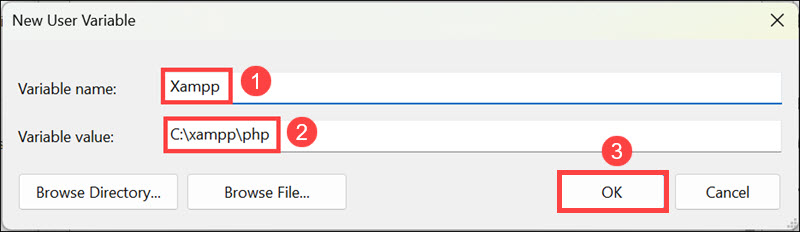
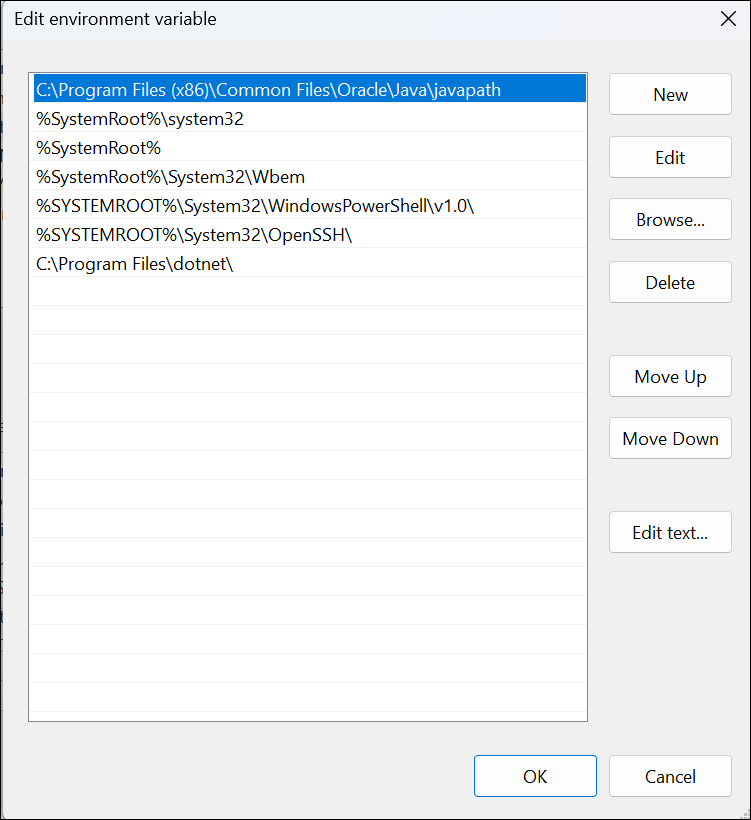
Next, add or modify the path lines with the paths you want the computer to access. Each directory path is separated with a semicolon, as shown below.
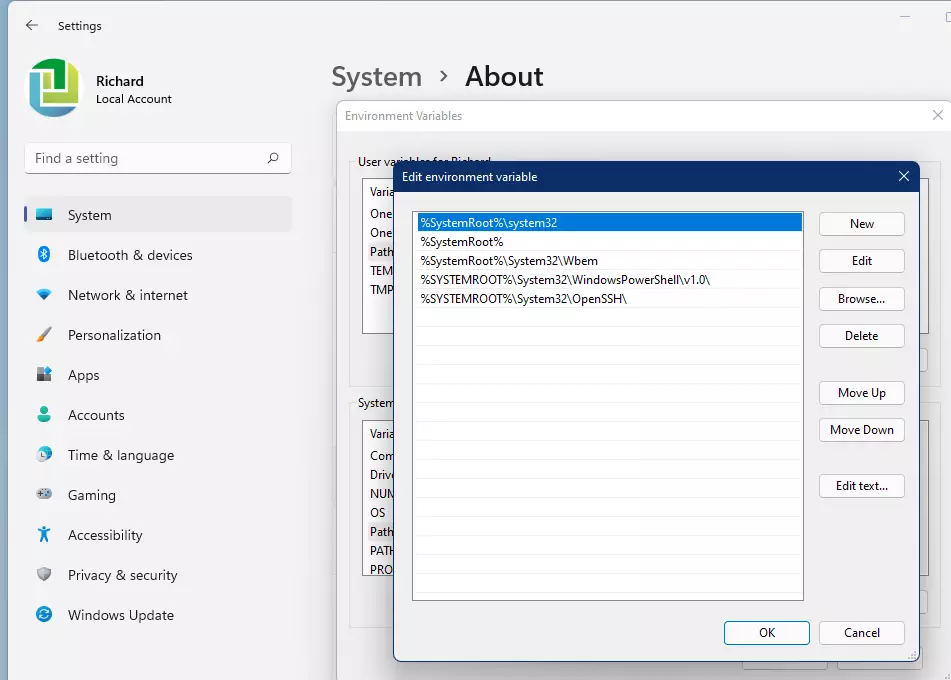
You can click the New button to add new paths or edit to modify the existing path. Delete will delete a path.
If you know the path, simply type it in or copy and paste it. You can also click Browse and navigate to the desired path you want to include in the System path variables.
Each directory path is separated with a semicolon, as shown below.
C:\Program Files;C:\Winnt;C:\Winnt\System32
That should do it.
Conclusion:
- Customizing the Windows PATH environment variables is essential for running programs seamlessly.
- Following the outlined steps, users can efficiently add or edit the PATH variables in Windows 11.
- Ensuring proper PATH configuration can save time and streamline the execution of various applications.
- Remember to use administrator privileges when making changes to system-wide variables.
- Regularly review and update your PATH variables to maintain optimal system performance.
Windows
Edit PATH variable on Windows 11?
In this tutorial, you will learn how to edit the PATH variable on Windows 11 operating system. PATH is a system environment variable that Windows uses to locate programs from the command line. It is a semicolon-separated string of program directories.
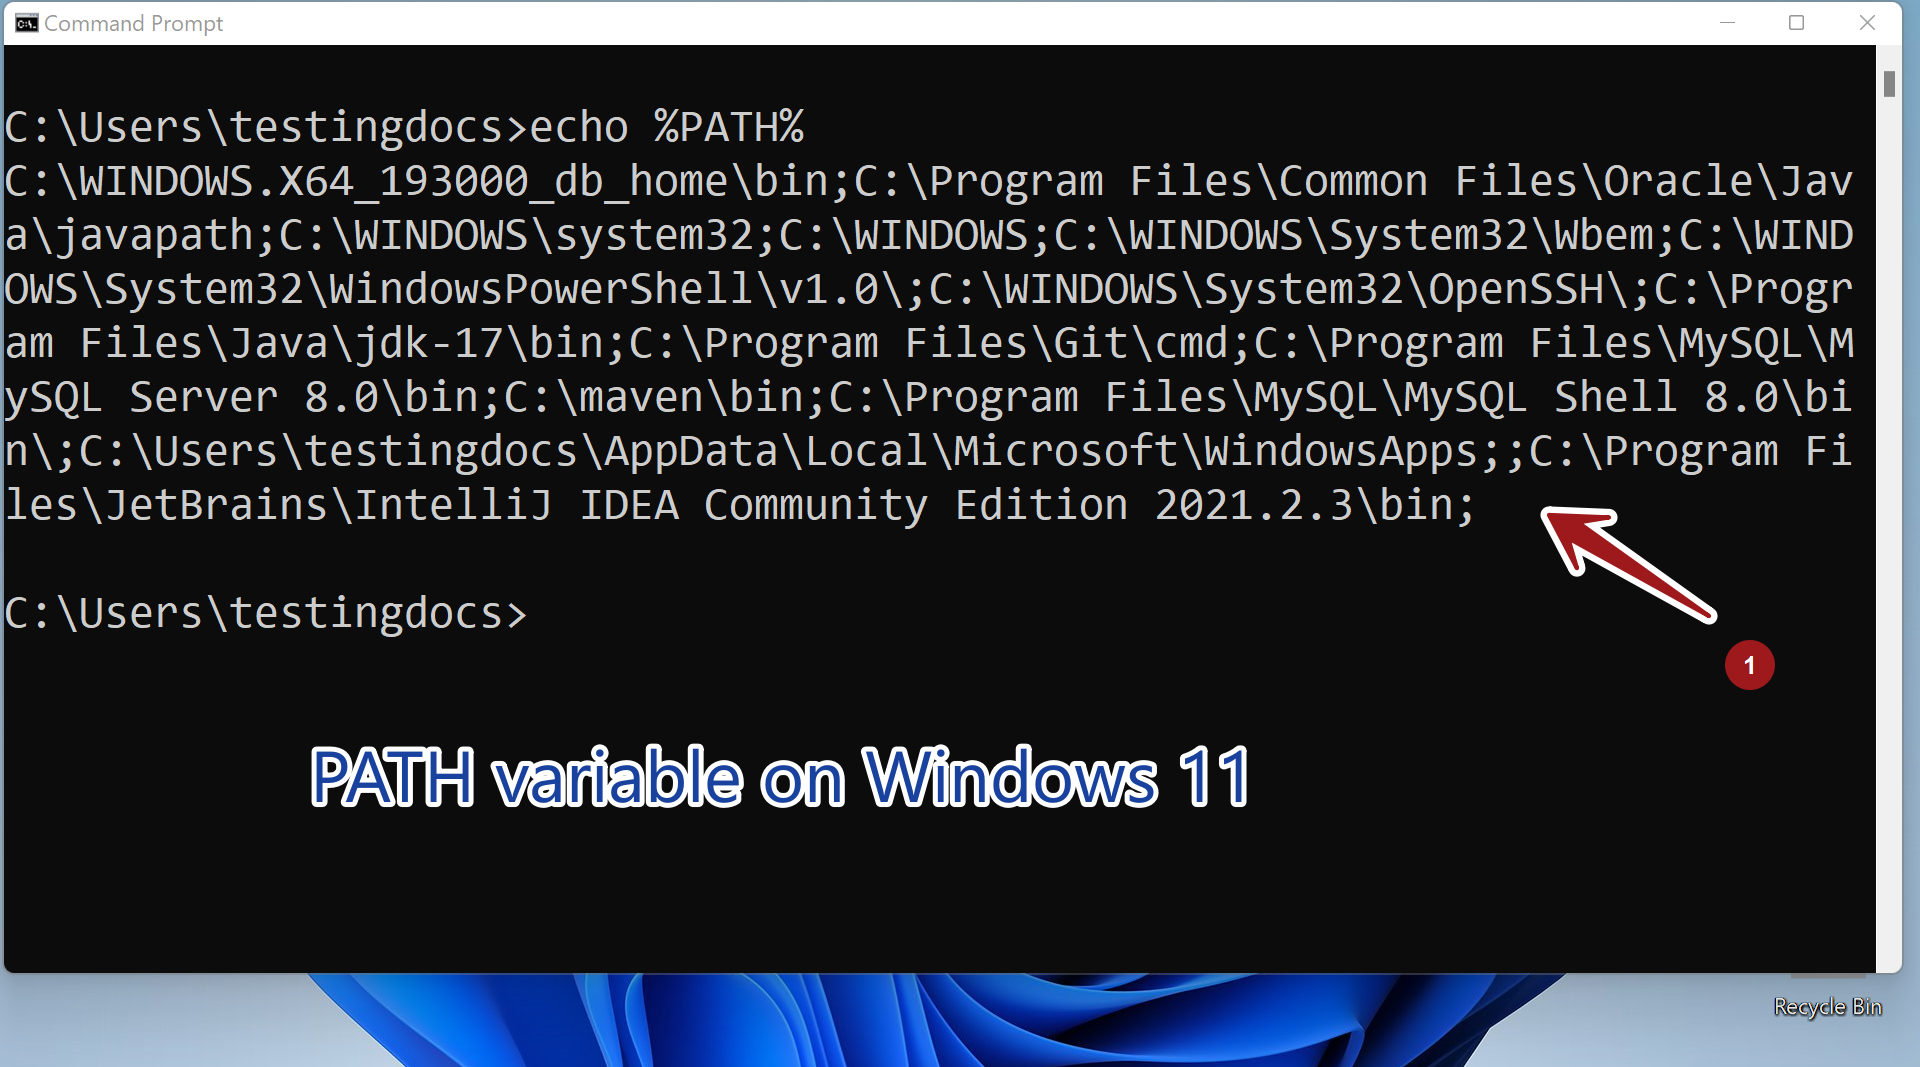
Check PATH variable
To check the PATH environment variable, open the command prompt.
Steps to launch command prompt on Windows 11 PC.
- Launch Command Prompt on Windows
Type the following command.
\> echo %PATH%
Edit PATH variable
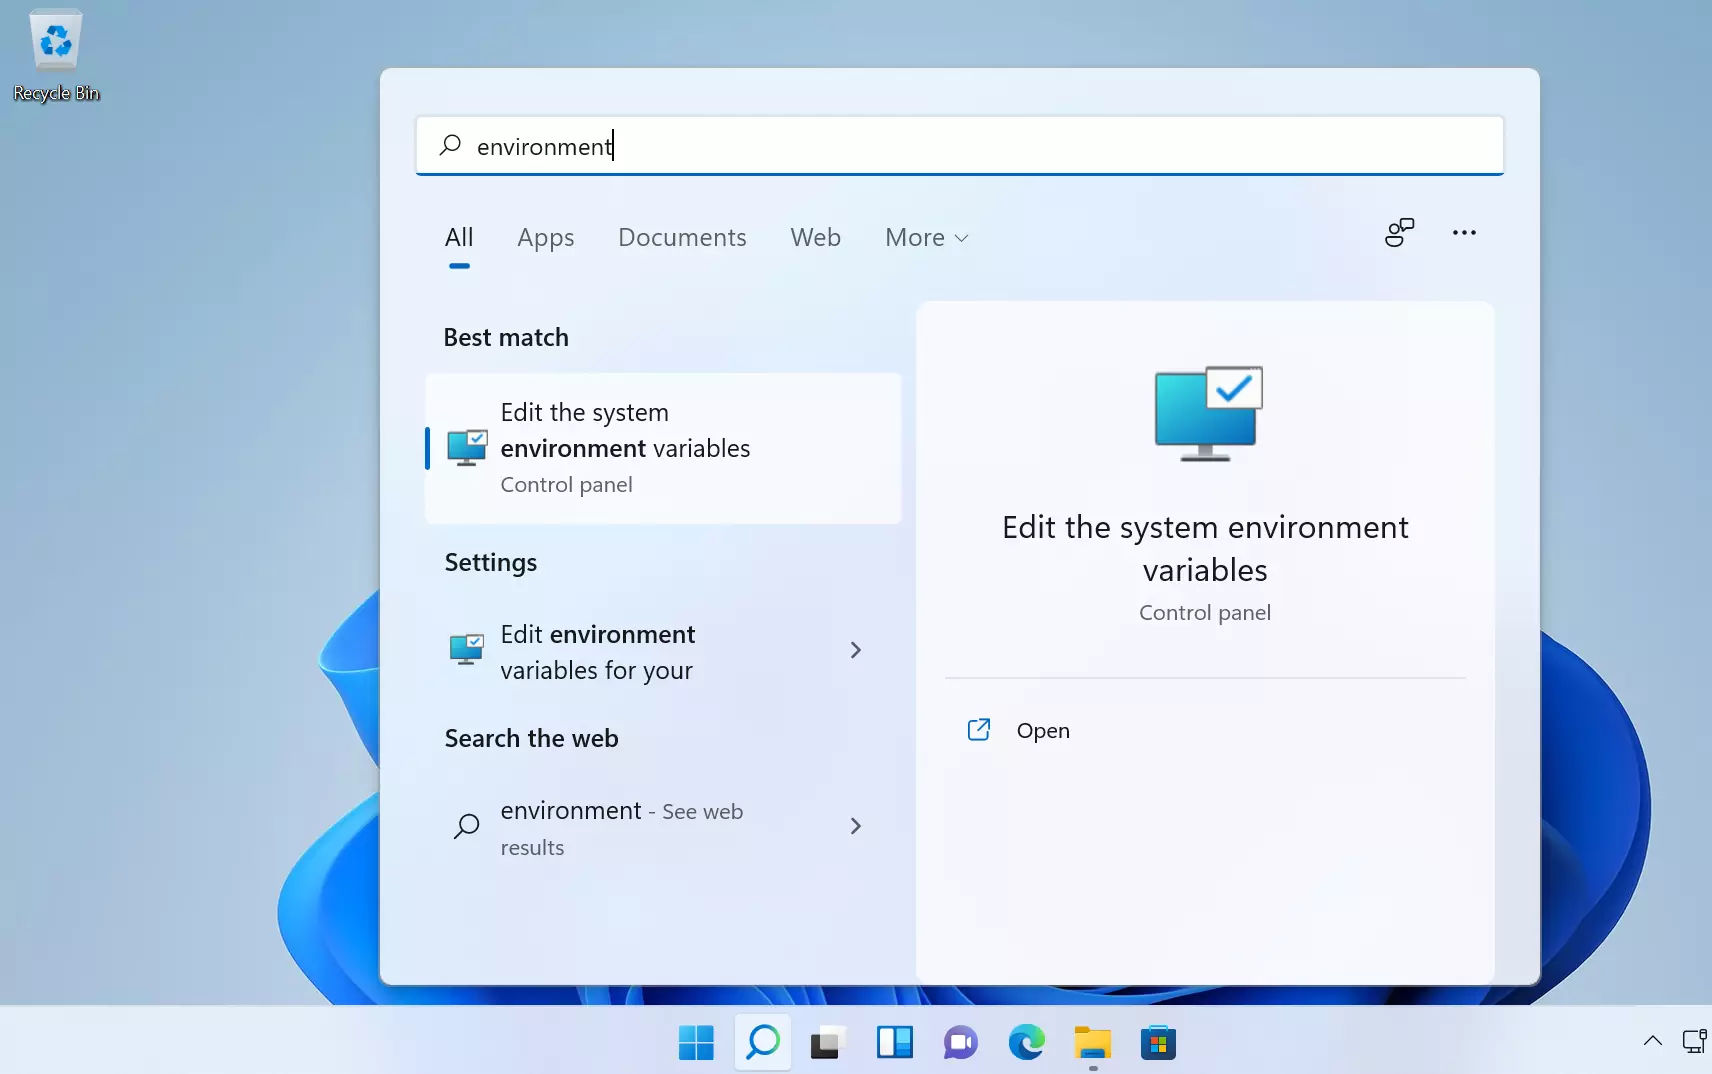
Click on the Search icon in the Taskbar.
Type Environment in the search bar.
Click on the Edit the system environment variables Control panel item.
##Alternatively, open the Run command window ( Windows Key + R ) keyboard shortcut.
Type sysdm.cpl and click on the OK button to open the System Properties window.
In the System Properties window, switch to the Advanced tab and click on the Environment Variables… button.
Select the PATH system variables and click on the Edit… button. If the PATH environment variable does not exist, click the New… button.
To edit we can change the entities listed in the window screen.
Append to PATH
To append the PATH variable, click on the New button and add the program.
For example, to append JDK bin directory by adding the following entry:
%JAVA_HOME%\bin
We can refer to other system variables with enclosing %. For example, to refer to the path of the Java home directory, we can use %JAVA_HOME%. JAVA_HOME is a system environment variable that we need to set prior to accessing it.
That’s it. We have successfully appended the JDK directory to the PATH variable.
The Path environment variable feature in Windows is very important because it lets your computer know where to find the programs when you run them through Command Prompt. For example, if you add a folder path to the “Path” environment variable, you can run any program in that path by entering only its name (e.g. “name.exe”) instead of its whole address every time you want to run it.
This guide will show you how to add a folder to the Path environment variable in Windows 11 or 10. Doing this for a program you often run will save you a lot of hassle and time when executing commands that involve the program.
What is the “Path” environment variable?
The Path environment variable is like a list inside your Windows operating system that helps your computer find and run programs directly from a command prompt or PowerShell without needing the full address of the program. It’s a bunch of folder addresses stuck together with semicolons (;). When you try to start a program, Windows looks through these folders in the order they’re listed to find the program’s executable file.
The big deal about the Path variable is it will truly save you a lot of time. Instead of typing the full path every time you want to run a program, you can just tell your computer to run it by typing only its name, and if the program’s folder is in the Path, Windows will know where to find it.
Related issue: Batch (.BAT) Files Not Running in Windows 11/10
Here’s what a Path environment variable look like:
C:\Windows\system32;C:\Windows;C:\Program Files\Java\jdk1.8.0_281\bin
In this example, there are three directories listed. If you run a command, Windows will check these directories in this order to find the program you’re trying to start. If it’s not in any of these, you’ll see an error message.
“[Program] is not recognized as an internal or external command” error
If you’re trying to run a program called “custom-command,” but its folder isn’t listed in the Path. When you try to start it, you might see an error saying:
'custom-command' is not recognized as an internal or external command, operable program or batch file.
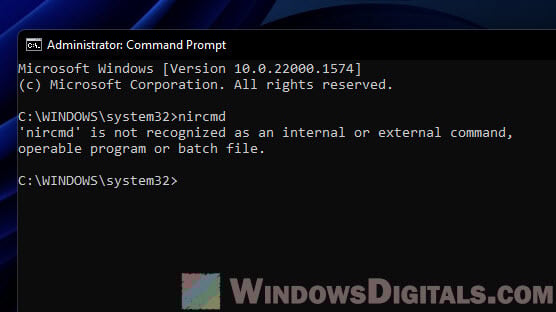
This error means Windows can’t find the program in any of the Path directories. To fix this, you need to add the program’s folder to the Path, which we’ll talk about next, or simply type the full path to the program.
Useful tip: How to List Installed Programs in Windows 11
How to add a folder to the “Path” environment variable in Windows 11 or 10
Adding a folder to the Path can be done through a few methods – the system properties, CMD or PowerShell. Choose a method that you’re comfortable with.
Using System Properties
This method should be the easiest and most friendly for people who are not very into commands because it uses the graphical interface of the System Properties window to add or change the Path.
- Hit Windows + X and choose “System” from the menu that pops up.
- In the System window, click on “Advanced system settings” on the right.

- Go to the “Advanced” tab in the System Properties dialog and hit the “Environment Variables” button.

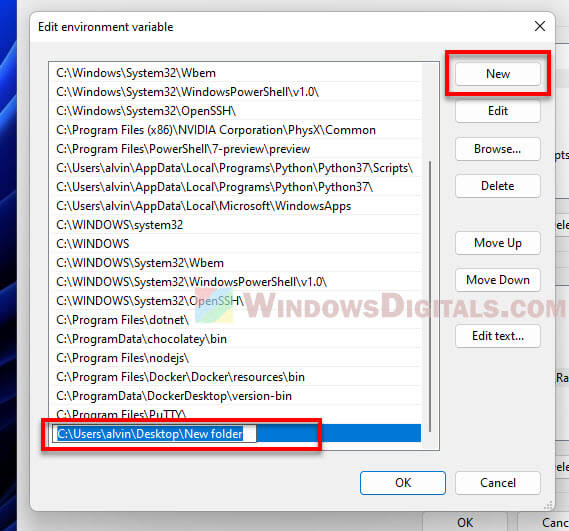
- Find the “Path” variable under “System variables,” select it, and press “Edit.” This opens the “Edit environment variable” window.

- Here, you’ll see all the folders already in the Path. To add a new one, click “New” and type or paste its address. Tip: Use the “Copy as Path” option to get the folder path right, starting from the root (like
C:\Users\YourUsername\custom-folder).
- Hit “OK” when you’re done. Your new folder is now part of the Path, and Windows will check it when looking for programs to run.
See also: Change File(s) Date & Timestamp via CMD or PowerShell
Using Command Prompt
In this method, you will use the Command Prompt to change the Path environment variable.
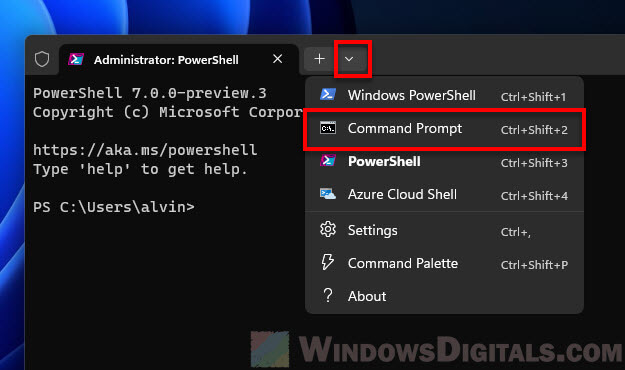
- Start a Command Prompt with admin rights by right-clicking on the Start button, choosing “Windows Terminal (Admin)”, and then picking “Command Prompt” from the list.

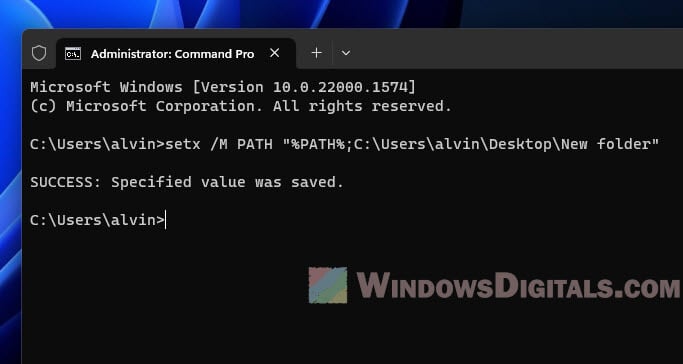
- Type this command, but use your own folder path instead of “YourFolderPath”:
setx PATH "%PATH%;YourFolderPath"
This adds your new folder path to the current Path variable. It’s important to keep the “%PATH%;” part to not lose the paths already there.
To add the folder path in the system environment and prevents the system Path from being duplicated in the user Path, add the/Moption like this:setx /M PATH "%PATH%;YourFolderPath"

- Close the Command Prompt and open it again to see your changes. Your new folder should now be part of the Path environment variable.
Using PowerShell
This method involves PowerShell to update the Path environment variable.
- Open PowerShell with admin rights by right-clicking on the Start button and choosing “Windows Terminal (Admin)”.
- Type this command, swapping “YourFolderPath” with your folder path:
[Environment]::SetEnvironmentVariable("Path",
[Environment]::GetEnvironmentVariable("Path",
[EnvironmentVariableTarget]::Machine) + ";YourFolderPath",
[EnvironmentVariableTarget]::Machine)
This gets the current Path variable, adds your new folder path, and then updates the Path variable. The “;YourFolderPath” adds your new folder after the existing paths.
- Close PowerShell and open it again to check the changes. Your new folder should now be in the Path environment variable.
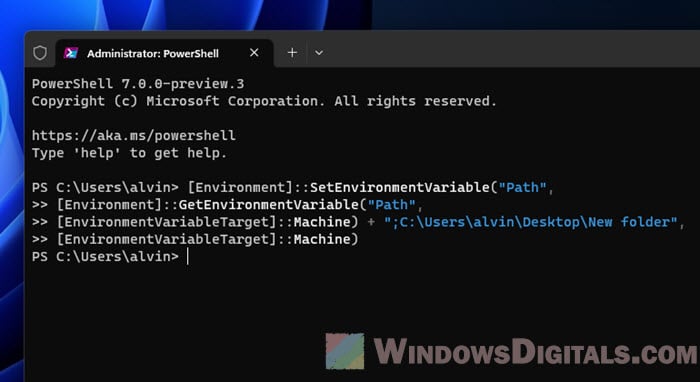
Note: If you need to write a multi-line command in PowerShell, press Shift + Enter to go to a new line without running the command. Press Enter to run it after you’ve typed all of it. This can be helpful for long commands or scripts.
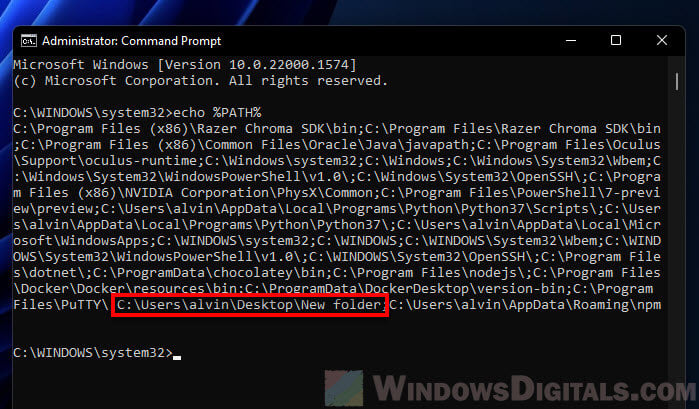
Checking the changes
To make sure the folder is now in the Path environment variable, open a new Command Prompt window and type:
echo %PATH%
Look at the output and check if the folder path you added is there.
Some common issues
The below are some common problems you might encounter when adding a folder to the Path environment variable in Windows.
- If CMD still gives you error after adding the path of a program you want to run, double-check for typos or mistakes in the folder path. It should be a full path without special characters.
- Changes to the Path variable only affect new Command Prompt or PowerShell sessions. Restart them to see the changes.
- If there’s still a problem, there might be a conflict with other software. Look through the Path variable for any outdated or duplicate paths and remove them.
Other common mistakes
It’s easy to make a small mistake that can cause big problems when you’re updating the Path variable.
- Always back up the current state of the Path variable before making changes. This way, if something goes wrong, you can simply restore it to its original state.
- Never delete the existing entries in the Path variable unless you are certain they are no longer needed. Removing important paths can stop other programs from running properly.
One last thing: Knowing Path variable priorities
The order of paths in the Path variable matters a lot because Windows checks them in sequence to find the executable files.
If two folders in the Path contain an executable with the same name, Windows will run the one in the folder that appears first in the Path order. You might want to place frequently accessed program directories higher up in the Path to speed up their launch times.
Environment variables may sound like technical jargon, but they are crucial components of your Windows 11 operating system. These variables store essential information that helps your computer run smoothly and ensures that various software applications can find the resources they need.
Whether you’re a power user, developer, or just someone looking to troubleshoot issues on your PC, understanding how to set environment variables in Windows 11 is a valuable skill.
In this comprehensive guide, we will learn about environment variables, walk through the process of setting them, learn how to edit them, and even delve into the Windows PATH variable. By the end of this article, you’ll be equipped with the knowledge to harness the potential of environment variables on your Windows 11 machine.
What are Environment Variables?
Before we dive into setting environment variables, let’s understand what they are and why they are essential. Environment variables are dynamic values that store information about the system environment.
These variables can be system-wide or user-specific and play a vital role in how applications and the operating system itself function. They serve as placeholders for various system properties, directories, and user preferences.
Here are some key aspects of environment variables:
System Configuration
Environment variables store information about system configuration, such as the location of system files, system paths, and system settings. For example, the “SystemRoot” variable stores the path to the Windows system folder.
User Preferences
They can also hold user-specific settings and preferences, making them adaptable to individual users. For instance, you can create a custom environment variable to store your preferred default download directory.
Access By Applications
Applications and scripts can access these variables to retrieve critical information, like the location of essential files or temporary storage directories. For instance, software installations often use environment variables to determine where to store program files.
Modifiable
In Windows, users have the ability to modify or add environment variables to customize their computing experience. This flexibility allows you to tailor your system to your specific needs.
Now that we have a grasp of what environment variables are let’s delve into how to set them in Windows 11.
How to Set Environment Variables in Windows 11
Setting environment variables in Windows 11 can be done through the System Properties menu. Follow these steps to create a new environment variable:
1. Press Win + X and select “System” from the context menu.
2. Under the System window, click the “Advanced system settings” on the left-hand side.
3. In the System Properties window, click the “Environment Variables…” button in the “Advanced” tab.
4. Under the “User variables” or “System variables” section, depending on whether you want the variable to be user-specific or system-wide, click the New button.
5. Enter a name for your variable in the “Variable name” field. Variable names are case-insensitive.
6. In the “Variable value” field, provide the value you want the variable to hold. This value can be a directory path, a string, or even a numerical value.
7. Next, click OK to create the new environment variable.
8. Finally, remember to click the OK button under the main Environment Variables window; otherwise, the newly created variable won’t work.
Congratulations! You’ve successfully created a new environment variable in Windows 11. Now, let’s explore how to use the newly created environment variable.
Using the Newly Created Environment Variable
Once you’ve created an environment variable, you can utilize it in various ways, such as configuring applications, setting default directories, or even automating tasks. Here’s how to use the newly created environment variable:
Through Command Prompt or PowerShell
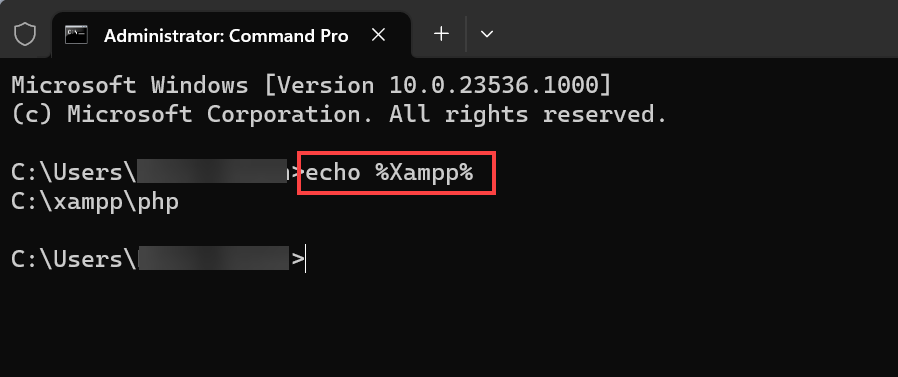
1. Search for Command Prompt or PowerShell, right-click on the app icon, and select Run as Administrator.
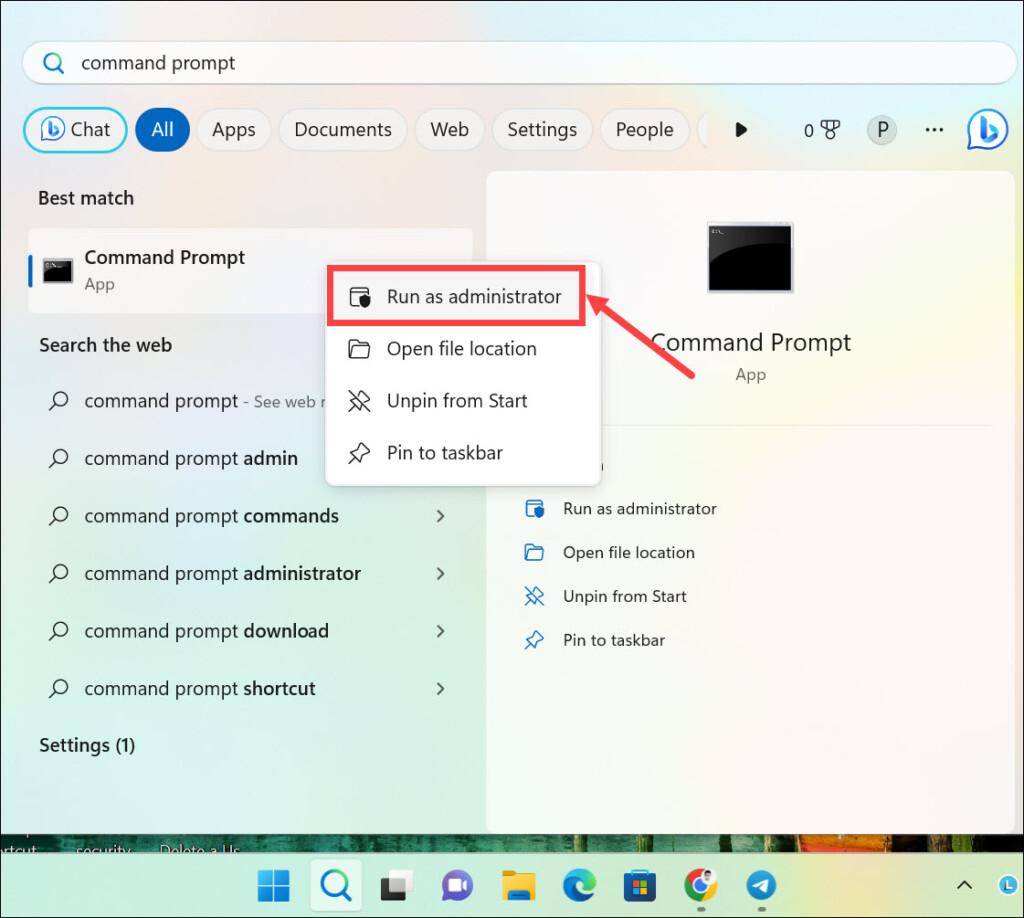
2. Type the echo %variablename% command in the Command Prompt window and press enter. Replace the variablename with the variable name you created.
Through Run Command Window
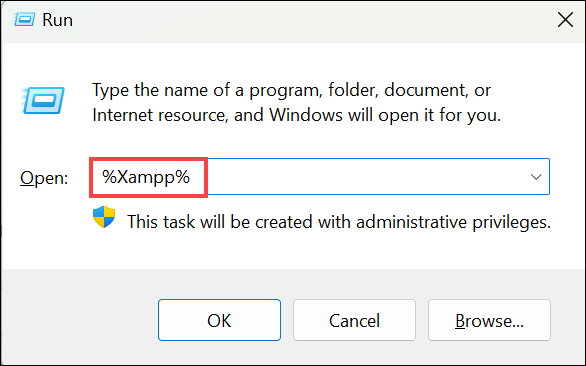
1. Press Windows + R to launch the Run Command Window.
2. Type the %variablename% command and hit enter. Replace the variablename with the variable name you created.
Now that you know how to use environment variables, let’s explore how to edit them if the need arises.
How to Edit Environment Variables in Windows 11
Editing environment variables in Windows 11 is a straightforward process. Here’s how to do it:
1. Follow the same steps as described earlier to access the “Environment Variables” window under System Properties.
2. In the “Environment Variables” window, select the variable you want to edit from the list under “User variables” or “System variables” and click the Edit button.
3. In the “Edit User Variable” window, you’ll see the current variable name and value. Modify the variable name or value as needed.
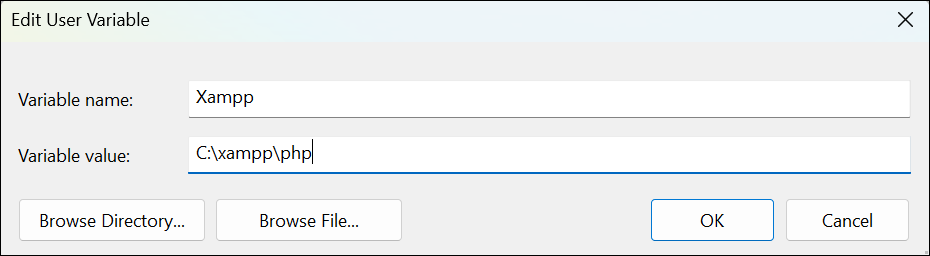
4. Click OK to save your changes.
5. Finally, remember to click the OK button under the main Environment Variables window; otherwise, changes won’t be effective.
You’ve successfully edited an environment variable in Windows 11.
What is Windows PATH Variable
The PATH variable in Windows is a crucial environment variable that specifies a set of directories where executable files are located. When you run a command in the Command Prompt or PowerShell, Windows searches these directories for the corresponding executable.
Understanding and managing the PATH variable can help you streamline your workflow by allowing you to execute commands from any location in the command prompt.
How to Set Windows PATH Variable
To set or modify the Windows PATH variable in Windows 11, follow these steps:
1. Open the “Environment Variables” window as described earlier.
2. In the “Environment Variables” window, under “User variables” or “System variables,” find and select the “Path” variable and click the Edit button.
3. In the “Edit Environment Variable” window, you’ll see a list of paths. Click New to add a new path, and enter the directory path you want to add.
4. To modify an existing path, select it and click Edit.
5. Click OK to save your changes.
The Windows PATH variable has been updated with your new paths or modifications.
FAQs
Can I delete environment variables I no longer need?
Yes, you can delete environment variables. To do this, select the variable in the “Environment Variables” window and click the “Delete” button.
What happens if I create a user-specific environment variable and then delete my user account?
When you delete your user account, the user-specific environment variables associated with that account are also deleted.
Can I use environment variables in batch scripts or PowerShell scripts?
Yes, environment variables are commonly used in scripts to make them more dynamic and adaptable to different system configurations.
Take Control of Environment Variables
Understanding how to set, use, and manage environment variables in Windows 11 is a valuable skill that can enhance your computing experience and productivity. Environment variables are the building blocks that allow you to customize your system, configure applications, and automate tasks.
By following the steps outlined in this guide, you’ve gained the knowledge to set up and use the environment variables and the Windows PATH variable, making your Windows 11 experience more versatile and efficient.
In Windows 11, the environment variables (env) can be easily set via the graphical user interface. The ENV on Windows or other operating-system needed by it to let it know exactly where the most important files are stored. And that can be a little different on every computer. For most Windows users, the system is located in the C:\Windows\ folder and programs in the C:\Program Files\folder. But it is not always the case.
Add or Display system variables Path in Windows 111. Open Edit system environment variables2. System Properties3. Add System Variables or User Variable on Windows 114. Create a New Variable and add the path in Windows 11
And this is the reason why the paths are important locations, they are not permanently programmed, but are stored in so-called environment variables.
There are also environment variables that do not lead to any folders. These are variables like Dirverdata, PATHEXT, and more…
Environment variables are an important element of every operating system, including Windows 11. But how do you actually get them?
Add or Display system variables Path in Windows 11
1. Open Edit system environment variables
For this, you simply use the Windows 11 search and search for “Edit system environment variables“. Then simply select the result and the following window with the system properties will open.

2. System Properties
You will see the “System Properties” there click on the “Environment Variables …” button, which is already focused on in the given screenshot.

3. Add System Variables or User Variable on Windows 11
On the Environment Variable windows you will have two choices:
- User variables for your account; the folder path added under it will only be accessible by that particular user
- System variables for the entire operating system, hence any user account will be able to access the executables or folder declared under it.
Added System variables are visible to all user accounts. If it is the case that only you use the PC, it is sufficient to set user variables. However, here we are going for “System Variables“. You can choose between as per your choice.
Select the Path and hit the Edit button.

4. Create a New Variable and add the path in Windows 11
As you click the Edit button in the above step, the corresponding window will open. After that add the path of the folder or executable that you want to add.


Alternatively, we can also browse the same.
For example, to integrate the Oracle VirtualBox, simply edit the “Path” variable under the system or user variables. So follow the below steps…
• Select the Path variable, click on Edit … and click on Browse
• A file explorer tree will open, go to the folder that you want to add, and hit the OK button.


Then confirm all windows with OK and restart the command line (Windows Terminal/PowerShell/Command Prompt) and start accessing your executable directly in it once. The old variables are still saved in the open instance.
In this way, we can add any path to our system on Windows 11 using the graphical user interface. the user can also remove any of the added paths in a similar way.