
Все способы:
- Способ 1: Системный трей
- Способ 2: Сочетание клавиш (ноутбук)
- Способ 3: «Поиск»
- Что делать, если не получается открыть настройки Intel
- Вопросы и ответы: 0
Способ 1: Системный трей
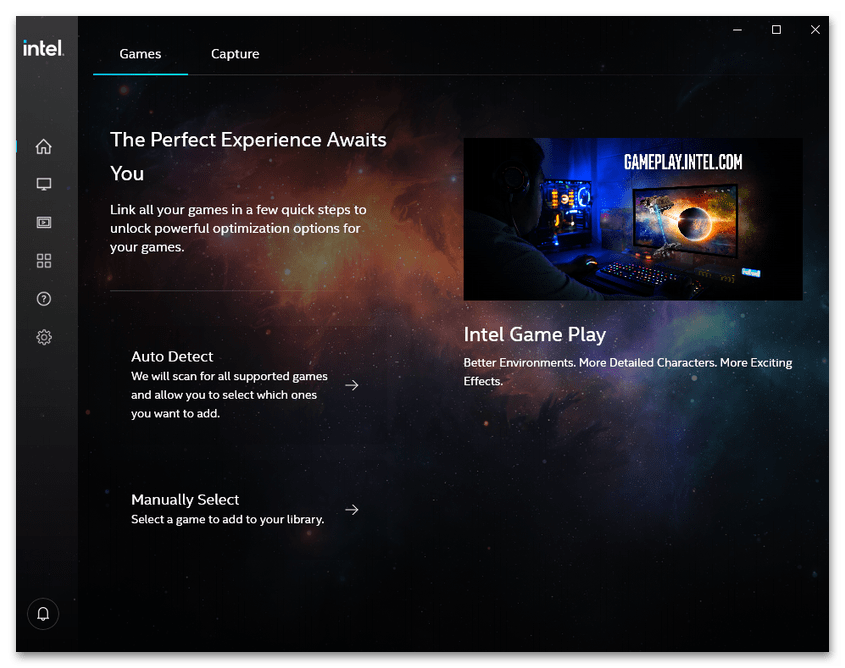
В гибридных системах на ноутбуках или в настольных ПК без дискретной графики средство управления Интел быстрее всего открыть с помощью системного трея: специальной области на панели задач, которая находится в нижнем правом углу экрана.
Кликните левой кнопкой мыши по стрелке для показа скрытых элементов, затем наведите курсор на ярлык требуемой программы (современные версии выглядят как синий квадрат), снова щёлкните мышкой (кнопка не важна) и выберите «Открыть приложение» («Open App»).

Теперь переходите в нужные вам разделы и настраивайте производительность чипа по своему усмотрению.
Способ 2: Сочетание клавиш (ноутбук)
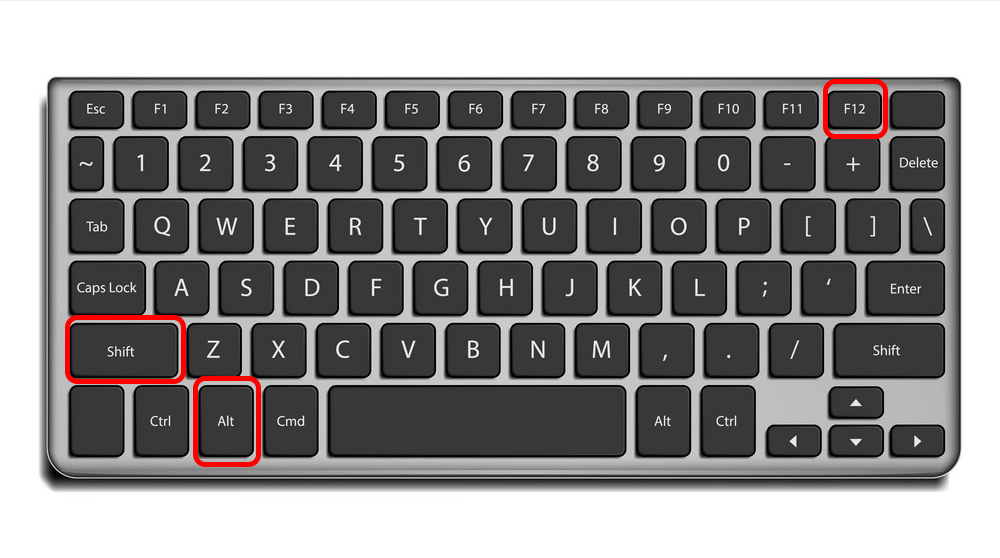
Владельцы лэптопов для быстрого доступа к панели управления драйвером графики Intel могут задействовать комбинацию Ctrl+Shift+F12 – большинство производителей, использующих продукты «синих», привязывают её именно для этой функции.
Впрочем, стоит иметь в виду, что иногда данное сочетание может не работать, особенно если речь идёт об игровых сериях.
Способ 3: «Поиск»
Также можно задействовать встроенные в Виндовс средства поиска – в некоторых случаях это может быть единственным доступным вариантом. Использование этого метода покажем на примере актуальной «десятки».
Нажмите на иконку средства или текстовую строку на панели задач. Введите запрос intel graphics – должен появиться соответствующий результат, по которому нужно кликнуть для открытия.

Если по указанному в предыдущем шаге запросу ничего нет, попробуйте написать просто intel и затем уже выбрать подходящее приложение.
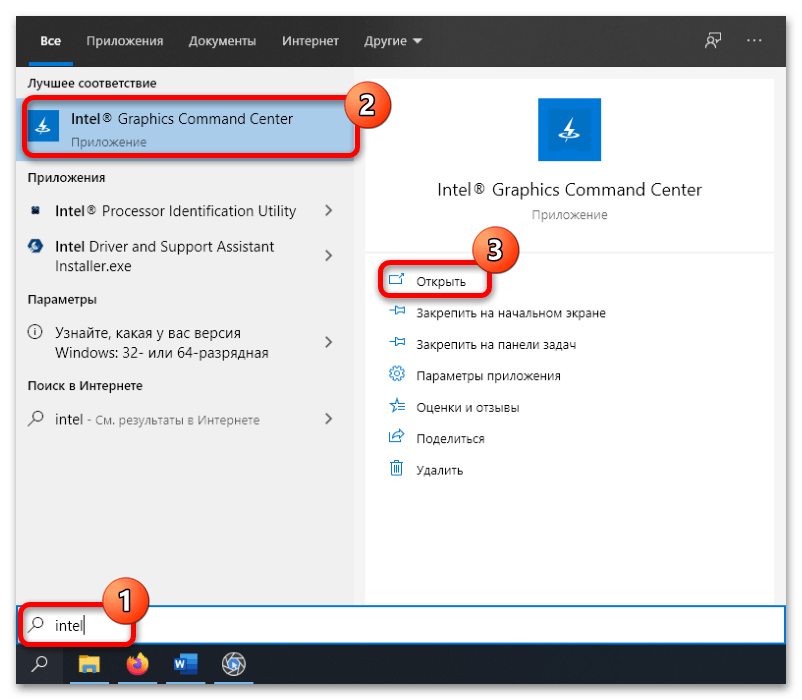
Данный метод универсален и должен работать на всех без исключения системах, в которых установлен драйвер для соответствующего устройства.
Что делать, если не получается открыть настройки Intel
Иногда происходит так, что ни один из представленных выше вариантов не помогает. Далее мы рассмотрим шаги с возможными решениями этой проблемы.
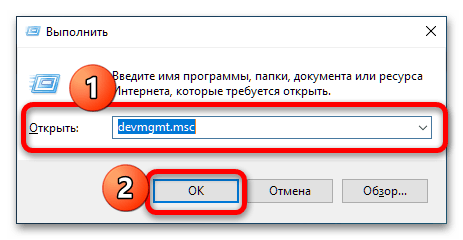
- Первым делом нужно удостовериться, что необходимое ПО вообще установлено. Проверить это можно через «Диспетчер устройств», поскольку при отсутствии драйвера в нём это будет отображено. Самый быстрый способ вызова нужной оснастки – окно «Выполнить»: нажмите комбинацию Win+R, введите запрос
devmgmt.mscи щёлкните «ОК».
Далее раскройте категорию «Видеоадаптеры» и проверьте, нет ли там позиций с ошибками или записи «Базовый драйвер Microsoft». Если есть, скорее всего, это значит, что необходимое для работы программное обеспечение отсутствует. Чтобы решить проблему, инсталлируйте подходящий комплект софта.
Подробнее: Пример установки драйверов для графики Intel
- Если на предыдущем шаге у вас не возникло никаких проблем и по логике вещей панель настроек должна открываться, стоит обратить внимание на саму версию ПО – возможно, она устарела и больше не совместима с инсталлированной операционной системой. Разумным выходом из такой ситуации будет обновление софта – принцип тот же, что и в обычной установке с нуля.
- Нередко возможны случаи, когда уже имеющаяся версия драйверов оказалась повреждена, причём до такой степени, что даже установить новую поверх не получается. Выход из подобной ситуации есть – полное удаление с зачисткой всех следов в системе и инсталляция последнего актуального пакета.
Подробнее: Как переустановить драйвер видеокарты

Повреждение драйверов возможно также вследствие активности вирусов, поэтому перед переустановкой нелишним будет провести проверку системы и избавиться от угроз, если таковые обнаружатся.
Подробнее: Борьба с компьютерными вирусами


Наша группа в TelegramПолезные советы и помощь
Readers help support Windows Report. We may get a commission if you buy through our links.
Read our disclosure page to find out how can you help Windows Report sustain the editorial team. Read more
The Intel Graphics Control Panel enables users to change graphics settings for Intel GPUs. However, some users have reported that Intel Graphics Control Panel is not opening.
This issue can lead to other problems, such as Intel display audio not working therefore it’s crucial that you fix this problem as soon as possible.
Luckily for you, there’s a way to fix this problem, and in this article, we’re going to show you a couple of simple methods that you can use.
How can I fix the Intel Graphics Control Panel not opening?
1. Update your Intel GPU’s driver
First, try updating your Intel GPU’s driver after uninstalling the Intel Graphics Driver package and Graphics Control Panel app via Apps & features.
You can update your Intel driver with driver updater software, which will include options for downloading and automatically installing the latest drivers.
Plus, the whole process works smoothly while updating any driver with almost no input from the user. Hence, manage GPU drivers effortlessly or any other driver on your PC using this software.
2. Manually install the Intel(R) Graphics Control Panel driver on your PC
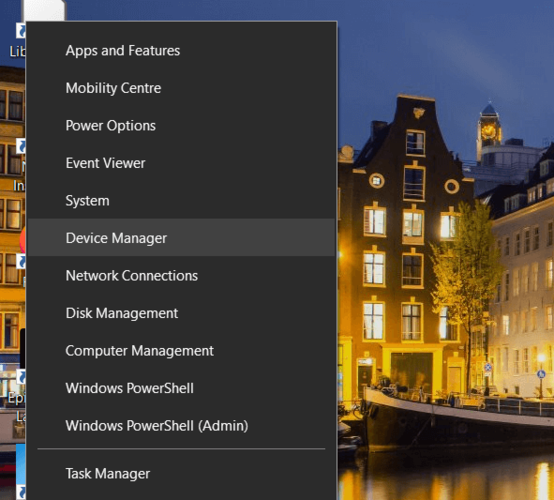
- First, open the Win + X menu in Windows 10 with the Windows key + X hotkey.
- Click Device Manager to open that window.

- Double-click Software components to open that category.
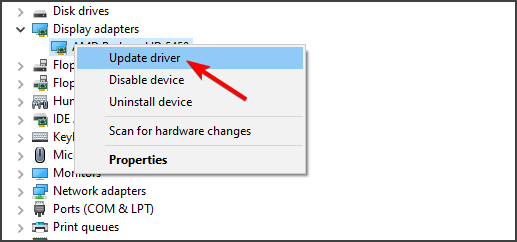
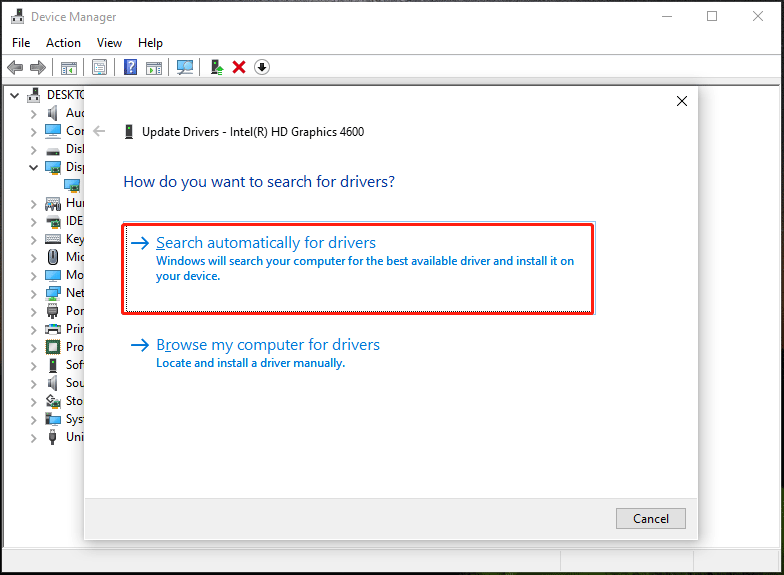
- Next, right-click Intel(R) Graphics Control Panel (or Intel Graphics Command Center) and select Update driver to open the window shown directly below.

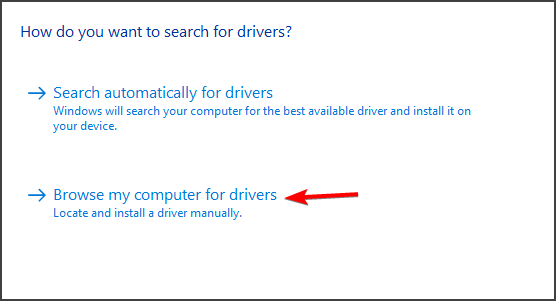
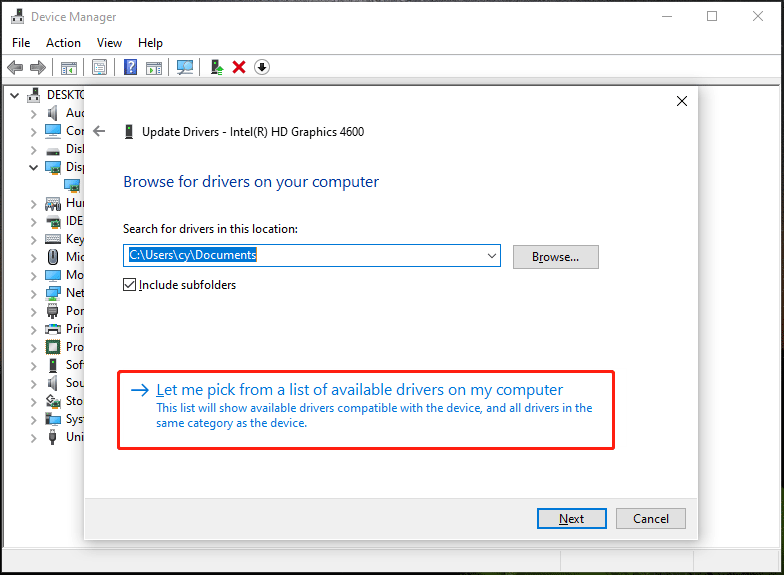
- Then click the Browse my computer for drivers option.

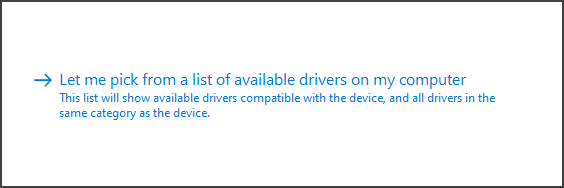
- Click the Let me pick from a list of available drivers on my computer option.

- Select the Intel(R) Graphics Control Panel, and click the Next button.
- Thereafter, restart Windows after reinstalling the driver.
NOTE
The above fix is for users who still can’t open the Intel Graphics app after they’ve installed the required DCH drivers on their PC. First, make sure your PC has a suitable Intel DCH driver installed on it.
Some users might only see Generic software listed in Software Components. If so, try right-clicking Generic software and installing the Intel(R) Graphics Control Panel driver as outlined above.
3. Try opening the Intel Graphics Control Panel with alternative methods
- Click the Type here to search taskbar button, and then enter Intel in the search box.
- Click the Intel Graphics Command Center (Control Panel) search result to launch that app.

If you can’t open the Intel Graphics Control Panel one way, try an alternative method. For example, you can open the Intel Graphics Control Panel with the Ctrl + Alt + F12 hotkey for it.
These are simple workarounds, but they might work if Intel Graphics Control Panel is not opening.
4. Repair and reset the UWP Intel Graphics app
- First, press the Windows and I keys at the same time to launch Settings.
- Click Apps to open that Settings tab.
- Then scroll down to and select your Intel Graphics app.
- Click Advanced options to open the buttons in the shot directly below.

- Then click the Repair option.
- If the Repair option doesn’t do the trick, try pressing the Reset button as well to clear the app’s data.

5. Reinstall your Intel Graphics app
- To reinstall an Intel Graphics app, open Apps & features in Settings as outlined for steps one and two of the previous resolution.
- Then select your Intel Graphics app in Apps & features.
- Click the Uninstall button to remove it.

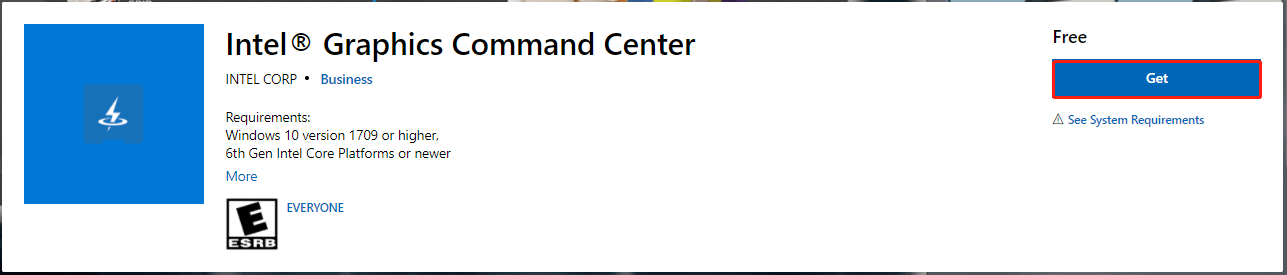
- Open the Intel Graphics Command Center page in a browser.
- Press the Get button on that page.
- If a dialog box window pops up asking to open the MS Store, select the Open option.
- Then click the Get button within the MS Store app to reinstall Intel Graphics Command Center.

NOTE
The Intel® Graphics Control Panel is no longer available for download at MS Store. Users who need to reinstall the GCP app will have to replace it with the Intel Graphics Command Center.
If Intel Graphics Control panel is not opening, you can also remove it completely using specialized software with a built-in uninstaller. We recommend CCleaner because it will also clean junk files and registry entries.
⇒ Get CCleaner
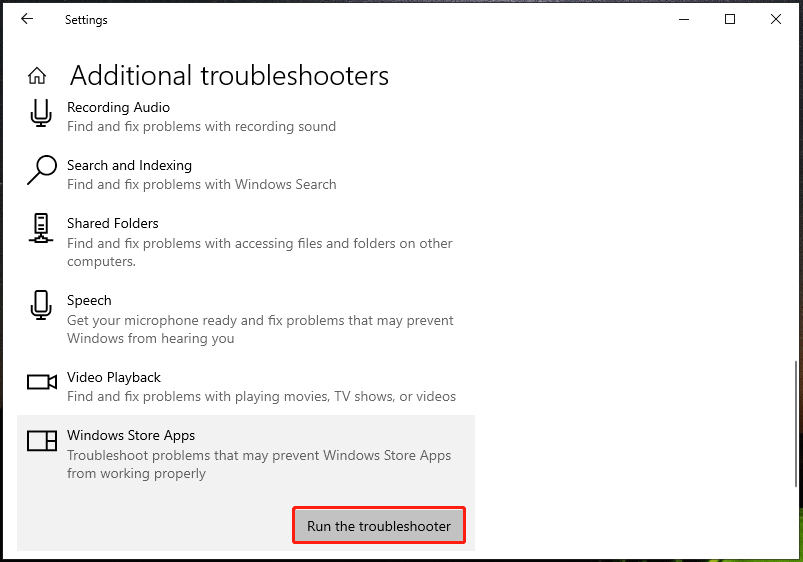
6. Run the Windows Store Apps troubleshooter
- First, open the Settings window.
- Click Update & Security in Settings.

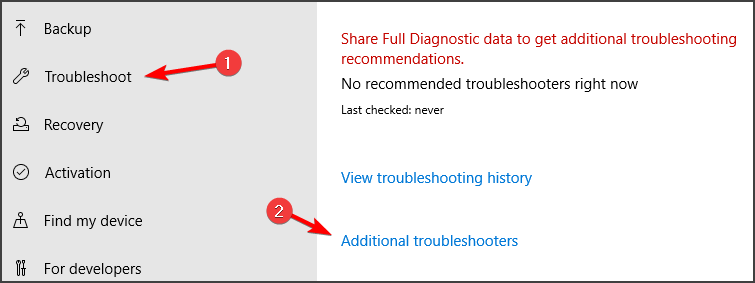
- Select the Troubleshoot on the left of Settings.
- Then click Additional troubleshooters to open the list shown directly below.

- Select Windows Store Apps to click its Run the troubleshooter button.
- Thereafter, go through the instructions provided by the troubleshooter to fix detected issues.


Those are some of the potential resolutions for fixing an Intel Graphics Control Panel (Command Center) app that doesn’t open. If the fixes above aren’t enough, however, you can contact support via Intel’s Customer Support page.
Did you manage to find the solution to this issue on your own? If you did, feel free to share it with us in the comments section.
Matthew Adams
Windows Hardware Expert
Matthew is a freelancer who has produced a variety of articles on various topics related to technology. His main focus is the Windows OS and all the things surrounding it.
He is passionate about the tech world, always staying up-to-date with the latest and greatest. With an analytical view, he likes problem-solving, focusing on errors and their causes.
In his free time, he likes to read and write about history and tries to always develop new skills.
-
Home
-
News
- Intel HD Graphics Control Panel Won’t Open? 6 Ways for You!
By Vera | Follow |
Last Updated
If Intel HD Graphics Control Panel won’t open or is missing on your Windows 10 PC, what should you do to get rid of the trouble? It is easy to fix and you can try solutions in this post from MiniTool Solution to easily help you out.
Intel HD Graphics Control Panel Not Opening
Intel Graphics Control Panel is an application in your Windows 10 that allows you to directly access the graphics driver features and settings. With it, you can customize your graphics settings to enhance your visual experience.

However, sometimes you run into some issues and the common is Intel HD Graphics Control Panel is not opening. Although it has initialized but finally won’t open. It’s a headache. The reasons for the issue of Intel HD Graphics Control Panel initializing but not opening includes issues with the UWP Intel Graphics app and an outdated Intel GPU driver.
How can you fix this issue on your PC? Multiple ways are introduced below.
Fixes – Intel HD Graphics Control Panel Won’t Open
Use Other Methods to Open Intel Graphics Control Panel
If you cannot open this app via right-clicking the desktop and choosing Graphics Settings, you can try other ways to launch HD Intel Graphics Control Panel:
- Type intel to the search bar and choose Intel Graphics Control Panel or Intel Graphics Command Center.
- If option 1 is not working, press Ctrl + Alt + F12 to open Intel Graphics Control Panel.
Update Your Intel GPU Driver
An outdated GPU driver can cause some issues and the issue – Intel HD Graphics Control Panel won’t open is an exception.
Step 1: Press Win + X and choose Device Manager.
Step 2: Tap on Display adapters, right-click on your Intel graphics driver and choose Update driver.
Step 3: Click Search for automatically for drivers.
Tip: In addition, there are some other ways for you to perform a GPU driver update and you can find them in this related article – How to Update Graphics Card Drivers (NVIDIA/AMD/Intel).
Intel Graphics Control Panel Download and Install Manually
If the issue of Intel Graphics Control Panel missing or not opening happens on Windows 10, you can fix it by manually installing the Intel GPU driver.
Step 1: Launch Device Manager via the Win + X menu.
Step 2: Right-click your GPU driver under Display adapters and select Update driver.
Step 3: Click Browser my computer for drivers.
Step 4: Tap on Let me pick from a list of available drivers on my computer.
Step 5: Choose a model like Intel(R) Graphics Control Panel, Intel HD Graphics 4600, or others and click Next to start installing. After that, re-launch the control panel app to see if it can run.
Reinstall Your Intel Graphics App
According to users, this can be a good option to fix your issue of Intel HD Graphics Control Panel initializing but not opening in Windows 10.
Step 1: Open Settings and click Apps.
Step 2: Under the Apps & features tab, scroll down to find the Intel Graphics app like Intel Graphics Command Center or Intel HD Graphics Control Panel, click it and choose Uninstall.
Step 3: After that, go to download Intel HD Graphics Command Center and install it on your PC.
Tip: Intel HD Graphics Control Panel is not available in Microsoft Store now.
Repair the UWP Intel Graphics App
If Intel HD Graphics Control Panel won’t open in Windows 10, you can also try this way to fix it.
Step 1: In Settings, go to Apps > Apps & features.
Step 2: Choose your Intel Graphics app and click Advanced options.
Step 3: Click the Repair button. If this won’t work, click Reset.
Run Windows Store Apps Troubleshooter
This is another way you can have a try and here is what you should follow:
Step 1: Launch Windows 10 Settings.
Step 2: Click Update & Security > Troubleshoot > Additional troubleshooter.
Step 3: Choose Windows Store Apps and click Run the troubleshooter.
These are all the solutions to fix Intel Graphics Control Panel not opening in Windows 10. If you have other ideas on this issue, leave a comment below.
About The Author
Position: Columnist
Vera is an editor of the MiniTool Team since 2016 who has more than 7 years’ writing experiences in the field of technical articles. Her articles mainly focus on disk & partition management, PC data recovery, video conversion, as well as PC backup & restore, helping users to solve some errors and issues when using their computers. In her spare times, she likes shopping, playing games and reading some articles.
Intel Graphics Control Panel missing on Windows 10 is one of the common issues that users are encountering. The desktop context menu and the system tray does not show item for the display card app. Some of them also tell getting BSOD errors while using certain applications like Photoshop.
The possible workaround to get back the Intel Graphics Control Panel is to manually update its driver. Experts around the corner also suggest downloading the UWP app of the same from Microsoft Store. However, for certain users, the app does not work but many are using it flawlessly. So, go through the below section and see the simple solution to get it back.
Intel Graphics Control Panel missing on Windows 10 Solutions
Here is how to fix Intel Graphics Control Panel missing on Windows 10 –
Step-1: Right-click on the Start icon and click Device Manager from the Win+X menu.
Step-2: From the list of devices in the console, find and expand Software components. Now, locate and right-click on the Intel(R) Graphics Control Panel. Select Update driver option.
Step-3: Choose the second option namely “Browse my computer for driver software” from the following window that opens up.
Step-4: Moving ahead, go with the option “Let me pick from a list of available drivers on my computer”.
Step-5: When a list shows up, choose Intel(R) Graphics Control Panel. Click Next.ho
Step-6: Wait and let the system reinstall the driver for your computer. Close the console and now try to open the Intel(R) Graphics Control Panel. This will eventually resolve Intel Graphics Control Panel missing on Windows 10 issue.
In addition, you can also try to download and install Intel(R) Graphics Control Panel app from Microsoft Store. Simply search for it and when you see in the list, select it. On the Store interface, click the Get button.
That’s all!!!
Intel Graphics Control Panel is an Intel utility program you can use to monitor and adjust the settings of your Intel graphics adapter. There are two ways you can get this Control Panel. Just check out the methods listed below.
To download the Intel Graphics Control Panel
- Download the Intel graphics driver
- Get the Intel Graphics Control Panel from Windows Store (Windows 10)
Method 1: Download the Intel graphics driver
Intel Graphics Control Panel comes with Intel’s graphics drivers. You can get the Control Panel by downloading the driver of your Intel graphics adapter.
There are two ways you can download your drivers:
Option 1 – Manually – You’ll need some computer skills and patience to download your drivers this way, because you need to find exactly the right driver online, download it and install it step by step.
OR
Option 2 – Automatically (Recommended) – This is the quickest and easiest option. It’s all done with just a couple of mouse clicks – easy even if you’re a computer newbie.
Option 1 – Download and install the driver manually
Your device manufacturers keep updating drivers. To get them, you need to go to their website, find the drivers corresponding with your specific flavor of Windows version (for example, Windows 64-bit) and download the driver manually.
Once you’ve downloaded the correct drivers for your system, double-click on the downloaded file and follow the on-screen instructions to install the driver.
Option 2 – Automatically update your drivers
If you don’t have the time, patience or computer skills to download your device drivers manually, you can do it automatically with Driver Easy.
Driver Easy will automatically recognize your system and find the correct drivers for it. You don’t need to know exactly what system your computer is running, you don’t need to risk downloading and installing the wrong driver, and you don’t need to worry about making a mistake when installing.
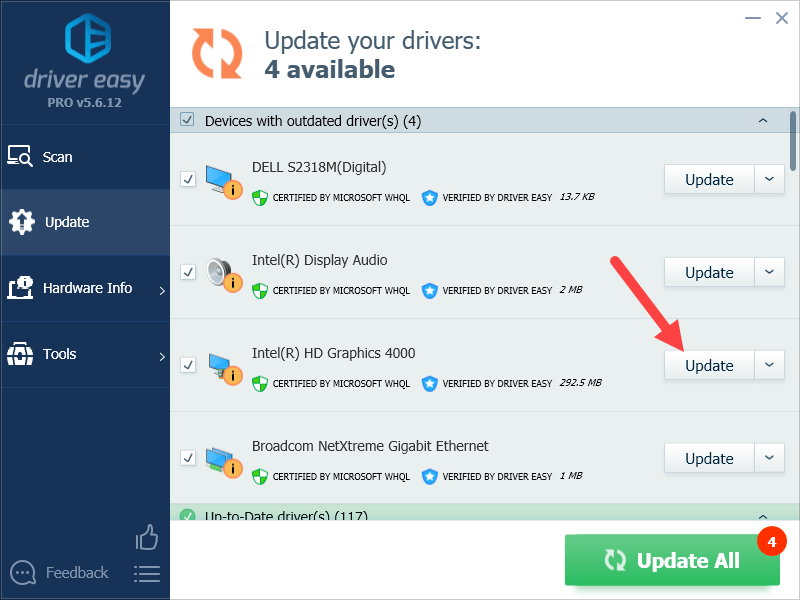
You can update your drivers automatically with either the FREE or the Pro version of Driver Easy. But with the Pro version it takes just 2 clicks:
1) Download and install Driver Easy.
2) Run Driver Easy and click the Scan Now button. Driver Easy will then scan your computer and detect any problem drivers.

3) Click Update All to automatically download and install the correct version of all the drivers that are missing or out of date on your system (this requires the Pro version – you’ll be prompted to upgrade when you click Update All).
If you need assistance, please contact Driver Easy’s support team at support@drivereasy.com.
Method 2: Get the Intel Graphics Control Panel from Microsoft Store
If you’re on Windows 10, you can also download the Intel Graphics Control Panel from Microsoft Store. To do so:
1) Go to the Intel Graphics Control Panel Microsoft Store page.
2) Click the Get button (this redirects you to the Microsoft Store app on your computer).
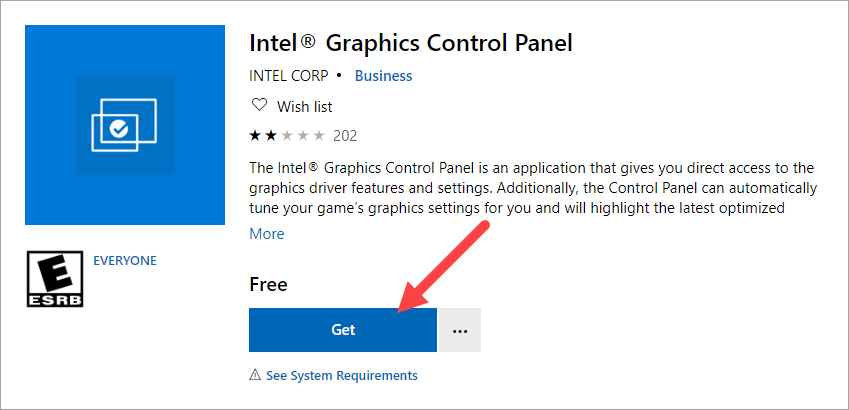
3) On the Microsoft Store, click Get.

This should download and install the Intel Graphics Control Panel on your computer.
Hopefully, this guide has helped you download the Intel Graphics Control Panel. If you have any questions or suggestions, you’re more than welcome to leave us a comment below.
202
202 people found this helpful