Quick Tips
- Turn off the Wi-Fi on your computer and turn it back on to reconnect to the network.
- Restart the computer to try and trigger the login page once again.
- Launch the browser on your computer and enter a random URL in the address bar to bring up the login page.
Fix 1: Forget the Network and Reconnect to It
Try forgetting the network so you can reconnect to it. This way, you’re establishing a fresh connection which may trigger the login page. Here’s how to do it.
On Mac
Step 1: Click on the Wi-Fi icon in the menu bar at the top. This will bring up the Wi-Fi options.

Step 2: Select Network Preferences.

Step 3: Click on the Advanced option. You will now see a new window.
Step 4: Now, select the network you want to forget and click on the ‘–‘ (remove) icon below it.

On Windows
Step 1: Click on the Search icon in the taskbar and look for Settings. Click on the app to open it.

Step 2: Navigate to Network & internet.

Step 3: Select the Wi-Fi option. This will bring up detailed settings related to your network.

Step 4: Now, click on Manage known networks.

Step 5: Hit the Forget button next to the Wi-Fi network.

Fix 2: Disable Auto-Join for the Wi-Fi Network
If your computer automatically connects to a Wi-Fi network you’ve already used in the past, chances are that the captive portal login page may not load. So, disable the Auto-Join toggle to ensure you manually connect to the network and trigger the guest Wi-Fi login page.
First, connect to the network on your Mac or PC. Then, perform the following steps.
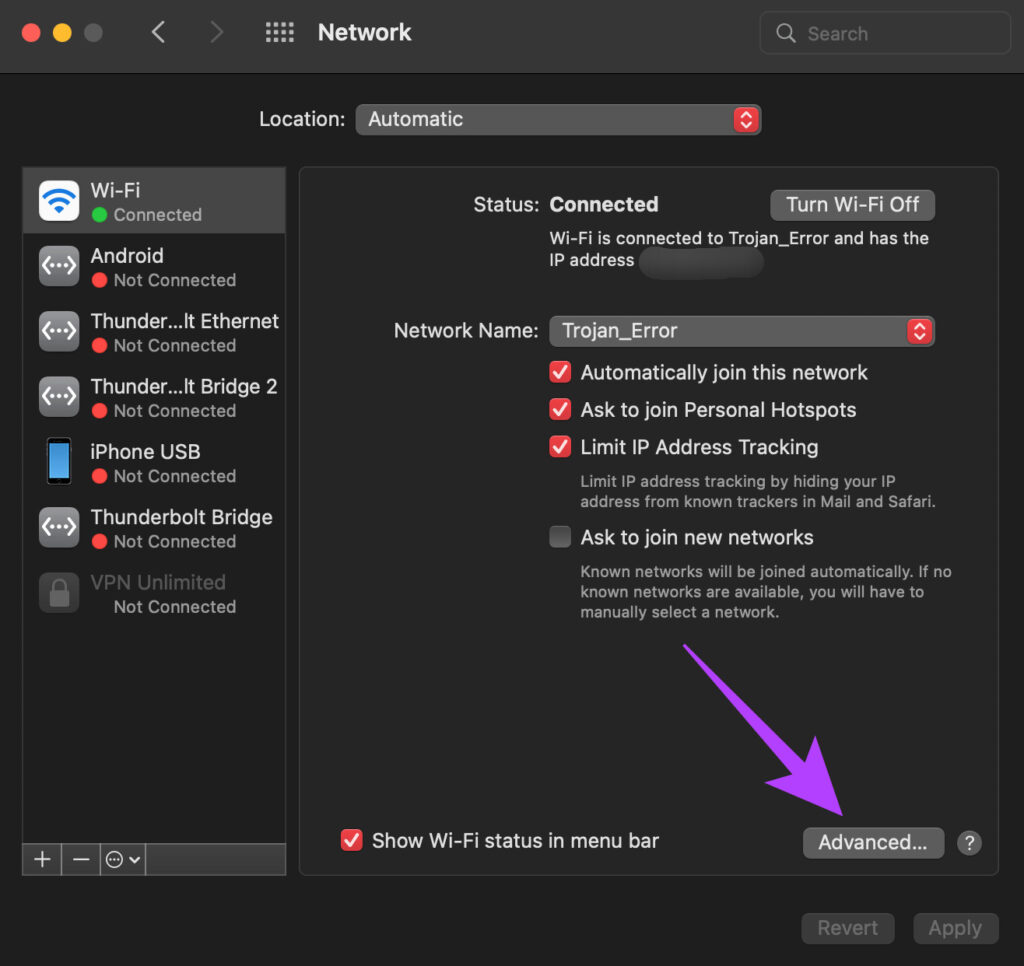
On Mac
Step 1: Click on the Wi-Fi icon in the menu bar at the top. This will bring up the Wi-Fi options.
Step 2: Select Network Preferences.
Step 3: You will see several options listed under the Wi-Fi network. Uncheck the tickbox next to Automatically join this network.

Step 4: Now, forget the Wi-Fi network and reconnect to it by following the steps mentioned above.
On Windows
Step 1: Click on the Search icon in the taskbar and look for Settings. Click on the app to open it.
Step 2: Navigate to Network & internet.
Step 3: Select the Wi-Fi option. This will bring up detailed settings related to your network.
Step 4: Now, click on the Wi-Fi network you’re connected to.

Step 5: Uncheck the tickbox next to Connect automatically when in range.

Fix 3: Clear DNS Cache
Clearing the DNS cache is a solution that has helped several people solve the Wi-Fi login page not showing up issue, especially on a Mac. If you’re wondering how to force the Wi-Fi login page, this is a good way. Here’s how to do it.
On Mac
Step 1: Open Spotlight search by pressing the Command + Space Bar keys. Enter terminal and press the Enter key.

Step 2: In the terminal window, type sudo killall -HUP mDNSResponder and hit the Enter key.

Step 3: You will now be asked to enter your Mac’s password. Input your password and hit the enter key once again.
Your DNS cache will now be flushed.
On Windows
Step 1: Click on the Search icon in the taskbar and look for cmd. Click on the app to open it.

Step 2: Type ipconfig /flushdns and hit the Enter key.

Fix 4: Remove Other DNS
You may be using a public DNS or Cloudflare’s popular 1.1.1.1 DNS to speed up your internet connection. While it is indeed effective, it can prevent the triggering of the Wi-Fi login page when you connect to a new network. If your hotel Wi-Fi login page is not showing up, here’s how you can remove other DNS from your computer.
On Mac
Step 1: Click on the Wi-Fi icon in the menu bar at the top. This will bring up the Wi-Fi options.
Step 2: Select Network Preferences.
Step 3: Click on the Advanced option. A new window will be displayed.
Step 4: Navigate to the DNS section at the top.

Step 5: Select a DNS server that you’ve added. Click on the ‘–‘ (remove) button at the bottom.

Step 6: Now, click on OK to save changes.

On Windows
Step 1: Click on the Search icon in the taskbar and look for Settings. Click on the app to open it.
Step 2: Navigate to Network & internet.
Step 3: Select Properties. Your network properties will be displayed here.

Step 4: Scroll down to the DNS server assignment. Click on the Edit button.

Step 5: Click on the drop-down menu at the top. Select Automatic (DHCP).

Step 6: Save the changes and you’re good to go.
Fix 5: Use the Default Browser
If you’re using a Mac, try launching Safari instead of Chrome or Firefox once you connect to a public network. On Windows, launch Microsoft Edge instead of a different browser. Sometimes, a simple action like this can trigger the login page.
Fix 6: Turn Off VPN
Oftentimes, a VPN may interfere with your computer’s ability to connect to a Wi-Fi network. Since a VPN changes your location, the Wi-Fi network may not show you the login page. If you’re using a VPN on your computer, turn it off before trying to connect to the public Wi-Fi network.
Fix 7: Open the Router’s Default Page
Every router has a default page that can be addressed by entering the IP address of the router in the address bar. Accessing this page will automatically direct you to the captive portal login page where you can enter your details to log in to the Wi-FI network. While this method may not work every time and depends on the make of the router, there’s no harm in giving it a shot.
Open the browser on your computer. In the address bar, type in 192.168.1.1 or 192.168.0.1 and hit the enter key.

This is the default IP address of most routers generally. If the address hasn’t changed, this should lead you to the login page.
Was this helpful?
Thanks for your feedback!
The article above may contain affiliate links which help support Guiding Tech. The content remains unbiased and authentic and will never affect our editorial integrity.
Table of contents
- How to Force a Public Wi-Fi Network Login Page to Open
- Fix 1: Restart Your PC
- Fix 2: Use a Different Browser
- Fix 3: Reset the Network Connection
- Fix 4: Disable Pop-Up Blocking
- Fix 5: Clear Browser Cache and Cookies
- Fix 6: Check Date and Time Settings
- Fix 7: Disable VPN or proxy
- Fix 8: Open the Router’s Default Page
- Fix 9: Turn Off Third-Party DNS Servers
- Fix 10: Enable Incognito Mode
- Fix 11: Flush the DNS Cache
- Fix 12: Renew the DHCP Lease
- Fix 13: Disable Firewall Temporarily
- Fix 14: Update Your Network Adapter Driver
- FAQ
One of the joys of visiting a café or shopping mall is the access to public Wi-Fi that we get to enjoy. But what if, after connecting to the network, the public WiFi login page is not showing up on your Windows 10 PC? As a result, you cannot browse the internet. What can you do when you find yourself in such a situation? Please keep reading to find out how to make a public Wi-Fi login page appear.
How to Force a Public Wi-Fi Network Login Page to Open
Free and paid public Wi-Fi networks have one thing in common, and that is the captive portal. This is a web page you encounter before internet access can be granted to you. It often requires entering a pre-assigned user ID and password or agreeing to some terms of use.
Imagine the inconvenience when you are away from home. You have a conference to prepare for but can’t connect to a hotel Wi-Fi because the captive portal refuses to appear in the browser of your Windows 10 device.
Public WiFi Login Page not Showing Up on Windows 10? We suggest you try these solutions sequentially as presented. However, you are free to go at it in any order you prefer.
Let’s get right to it, shall we?
Fix 1: Restart Your PC
This workaround could be all that is required to resolve the issue. What you need to do is:
- Disconnect from the network and turn off your Wi-Fi.
- Log out of the user account on your computer and shut down the system.
- Turn the PC back on and log back into your user account.
- Turn on your Wi-Fi and connect to the network once again. See if the login page will now appear in your browser.
Fix 2: Use a Different Browser
If WiFi Login Page is still not showing up on your Windows 10 computer, the next best option is to set another browser, such as Microsoft Edge or Firefox, as your default browser. Perhaps the captive portal will now come up.
You can follow these steps:
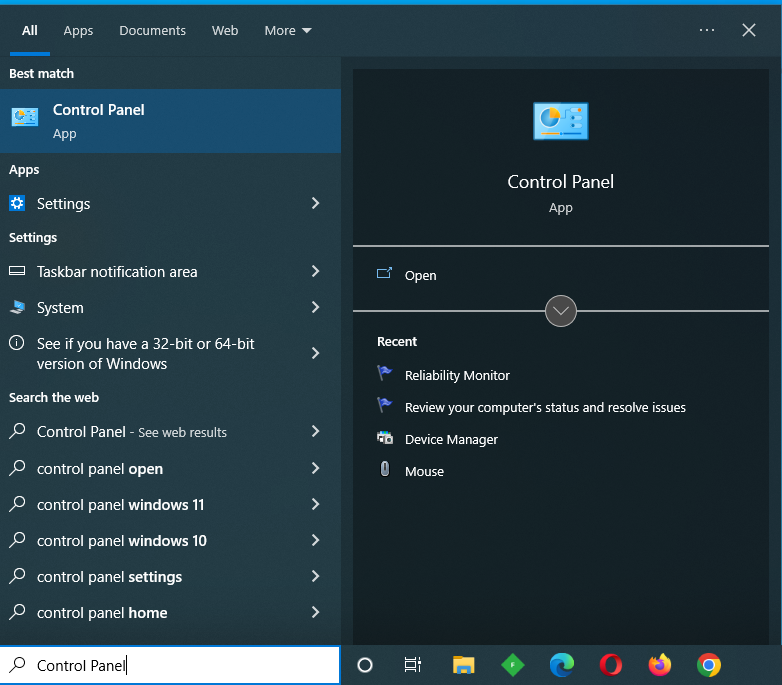
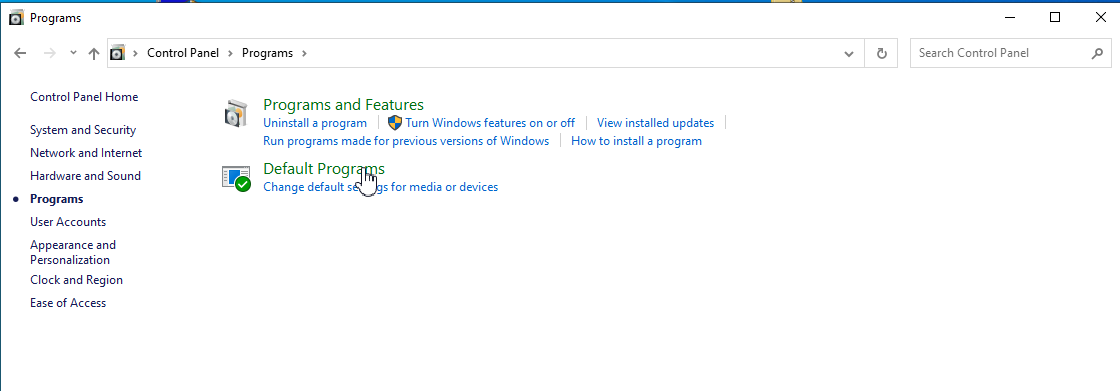
- Go to the Start menu (press the
Windowskey on your keyboard). - Type
Control Panelin the search box. The option will appear as Best Match. Click on it.
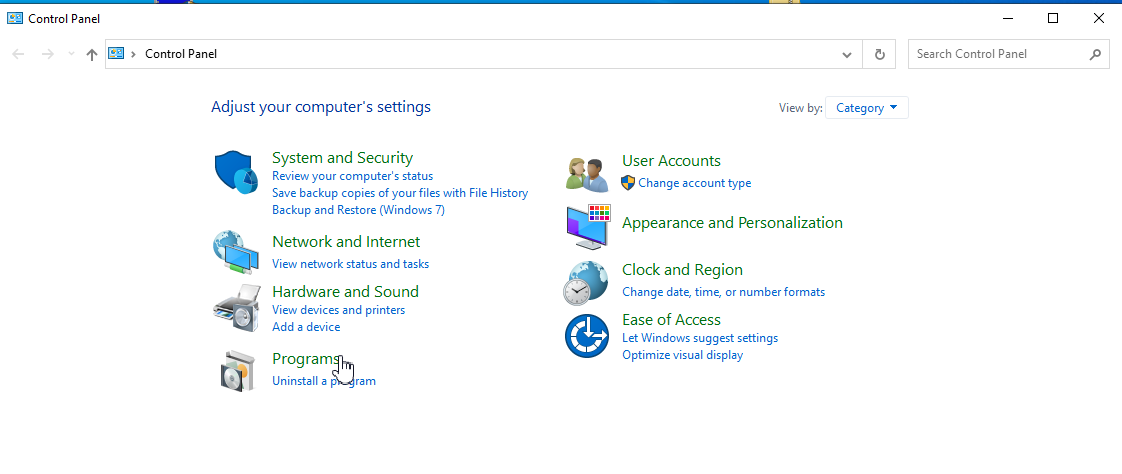
- Select Category under the View-by drop-down.
- Locate Programs and click on it.
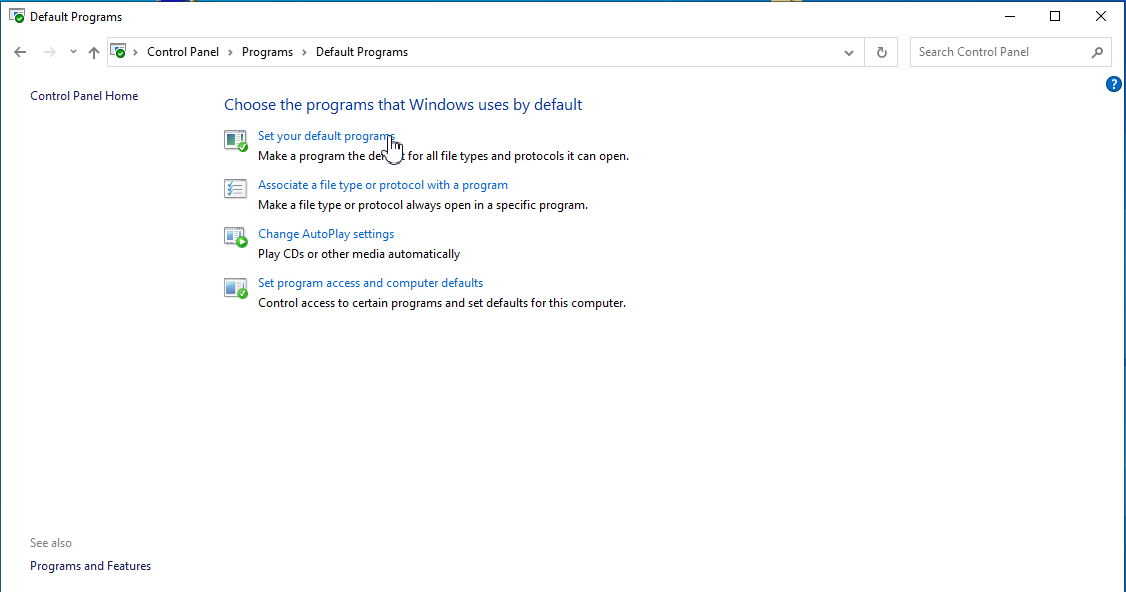
- Now, click on Default Programs.
- Click Set your default programs.
- Wait for the page to load. Then select the browser you wish to use and click the option that says Set this program as default.
- Click OK.
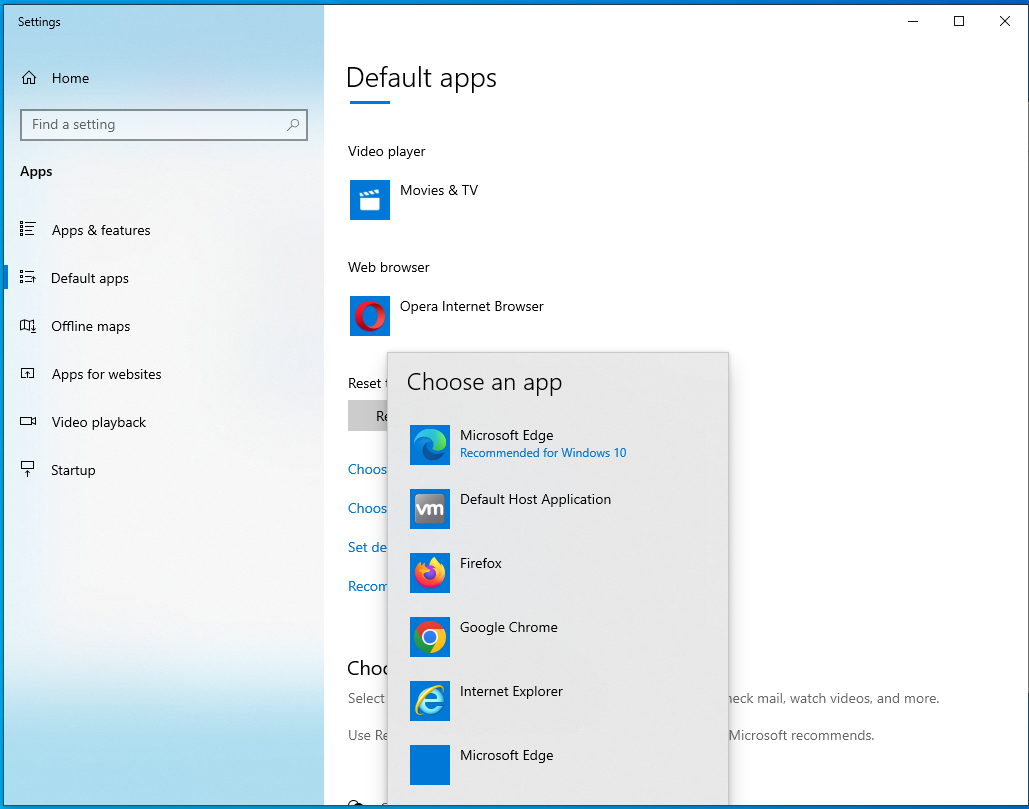
You can go ahead and reconnect to the Wi-Fi network. Launch the new default browser and see if the login page will show up.
Note
You might not necessarily need to set the new browser as default. Simply launch it and try visiting a website. The captive portal could appear.
Further Reading: How to Hard Refresh Your Browser: Chrome, Firefox, Edge and Safari
Fix 3: Reset the Network Connection
Here’s what you have to do:
- Click the Wi-Fi icon in the left corner of your taskbar.
- Click the Wi-Fi tab to disable it.
- Enable the network connection again by clicking on the Wi-Fi icon and the Wi-Fi tab again.
- Launch your browser and try visiting
Google.com. The login page may now appear.
If the issue persists after you’ve tried all the above four fixes, don’t worry. It won’t be long. Move on to the other solutions below.
Download Auslogics BoostSpeed
Your one-stop PC maintenance and optimization tool, this program will clean, speed up, repair and tweak your system to ensure maximum speed and efficiency.
Also Read: Windows Computer Won’t Connect to Wi-Fi: What to Do?
Fix 4: Disable Pop-Up Blocking
Your browser may be set to block pop-ups so as to save data, load pages faster, and also shield you from seeing annoying ads when you visit a website. However, this could also be a factor as to why the public WiFi login page is not showing up on your Windows 10 device.
We’ll now look at how to disable pop-up blocking in Chrome, Microsoft Edge, and Firefox.
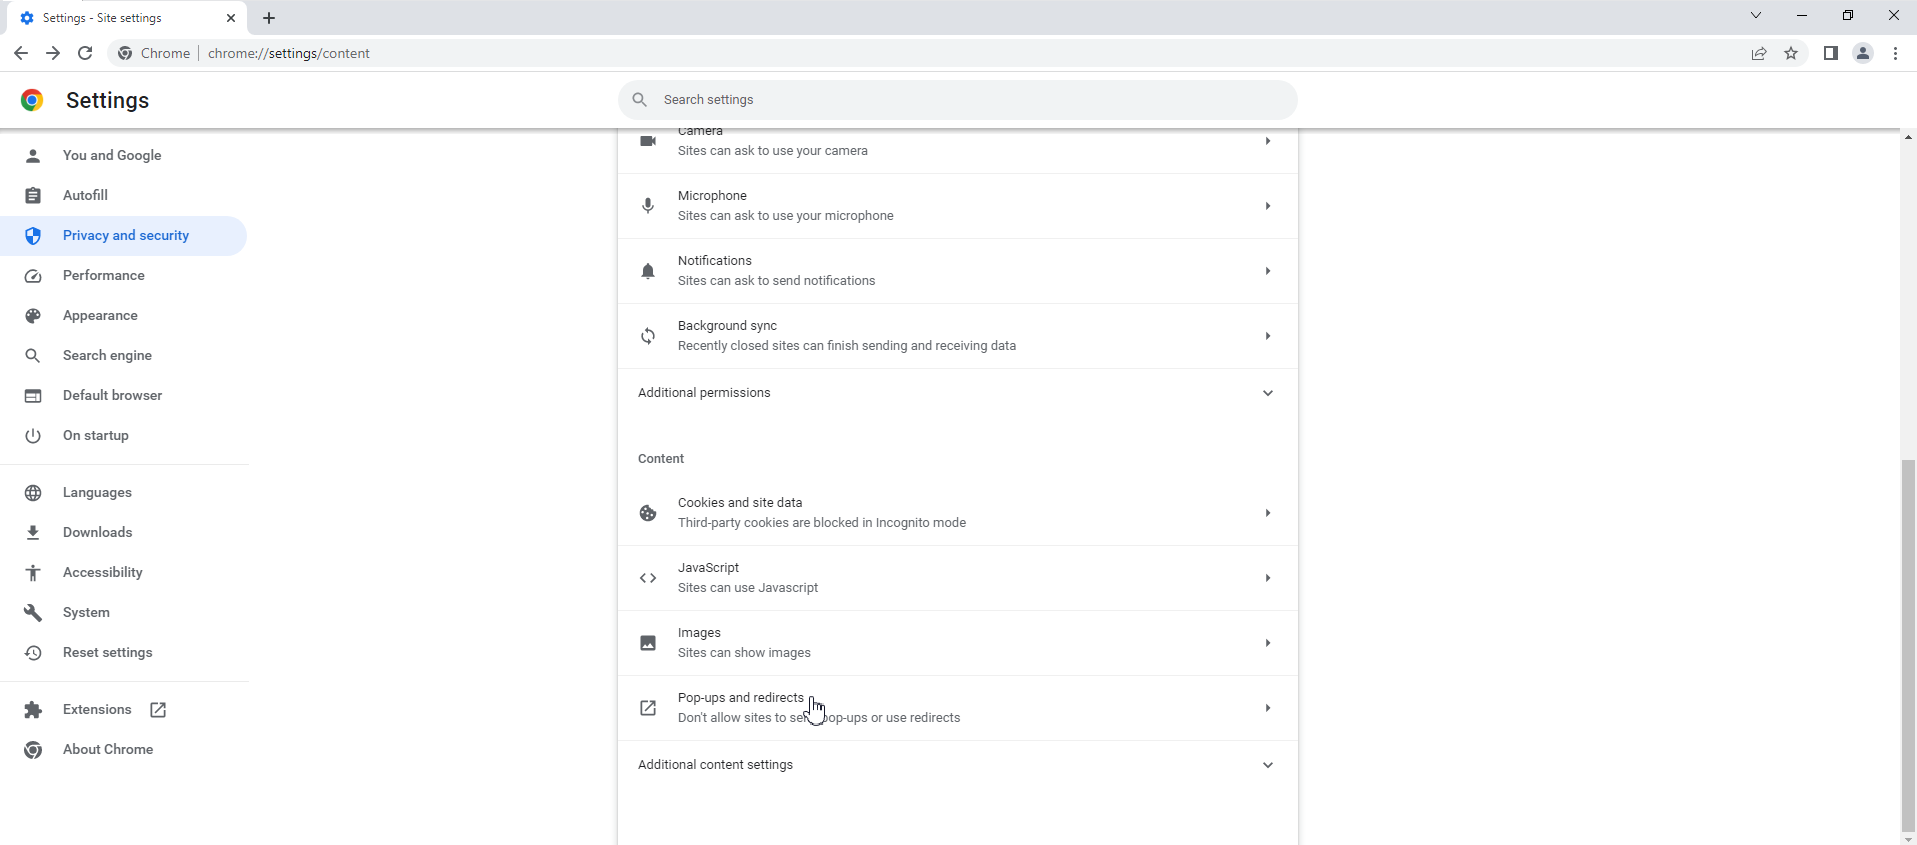
Chrome:
- Launch the browser and click on the three-dot icon in the top-right corner of the window.
- Click on Settings from the context menu.
- Scroll down to the bottom of the page and click on the Privacy and Security drop-down to access more settings.
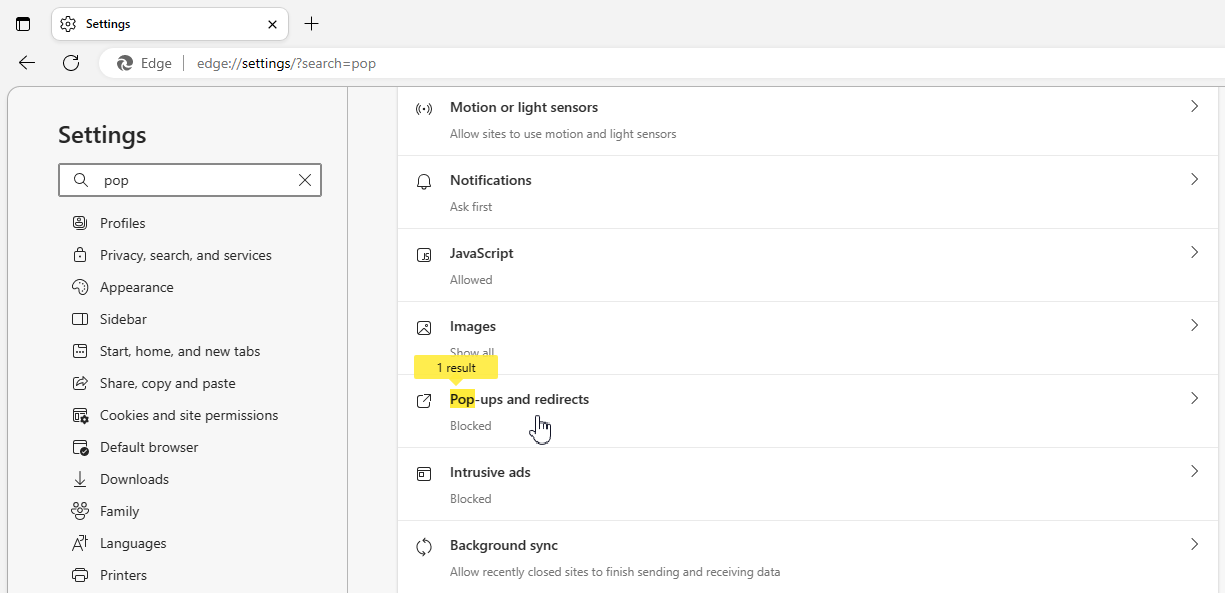
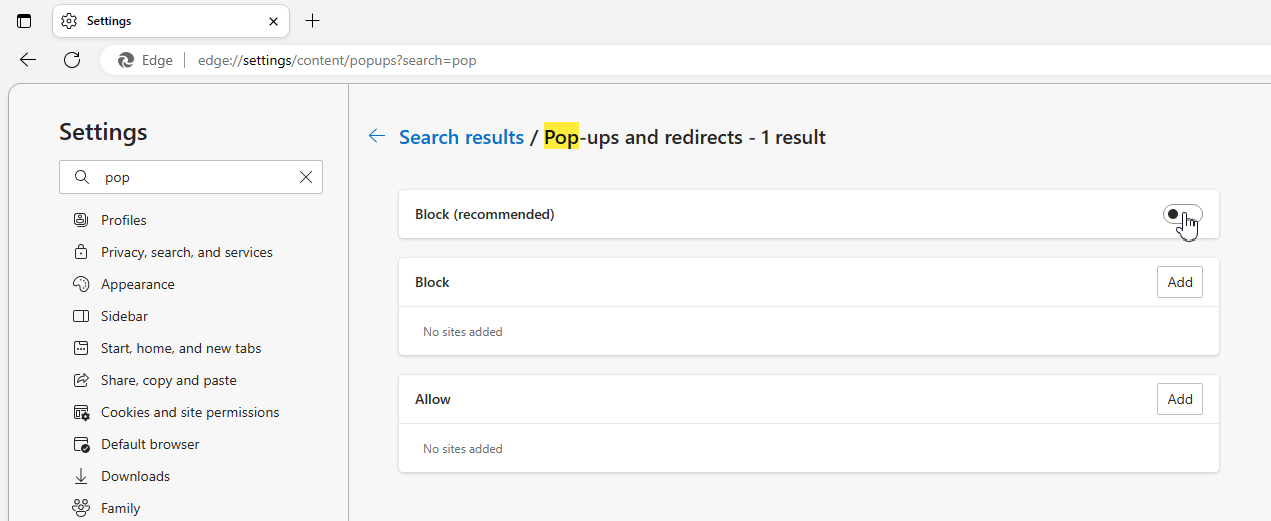
- Click on Site settings and scroll down to Pop-ups and redirects.
- In the page that opens, disable the option Blocked (recommended) by clicking the slider on the right-hand side. It will then change to Allowed.
- Close the Settings tab or re-launch your browser.
Microsoft Edge:
- Launch the browser.
- Click the More button (the horizontal ‘three-dot’ icon in the top-right corner of the window).
- Click Settings and then click Privacy and Security displayed on the left-hand side.
- You’ll find Block pop-ups under Security.
- Click the toggle to turn it off.
- Close the Settings tab or re-launch the browser.
Firefox:
- Launch the browser.
- Click the Menu icon (the horizontal three dots).
- Click on Preferences > Content.
- Unmark the checkbox for Block pop-up windows.
- Close the Preferences tab or re-launch the browser.
Also, after you’ve disabled the option in your browser settings, make sure to turn off any third-party pop-up blocker that’s active on your PC.
Fix 5: Clear Browser Cache and Cookies
If you’re unable to see the login page for a public WiFi network on your Windows 10 device, it could be due to issues with your browser’s cache and cookies. Clearing the cache and cookies can help resolve this problem. For example, let’s take a look at how to clear the browser cache and cookies in the Chrome browser:
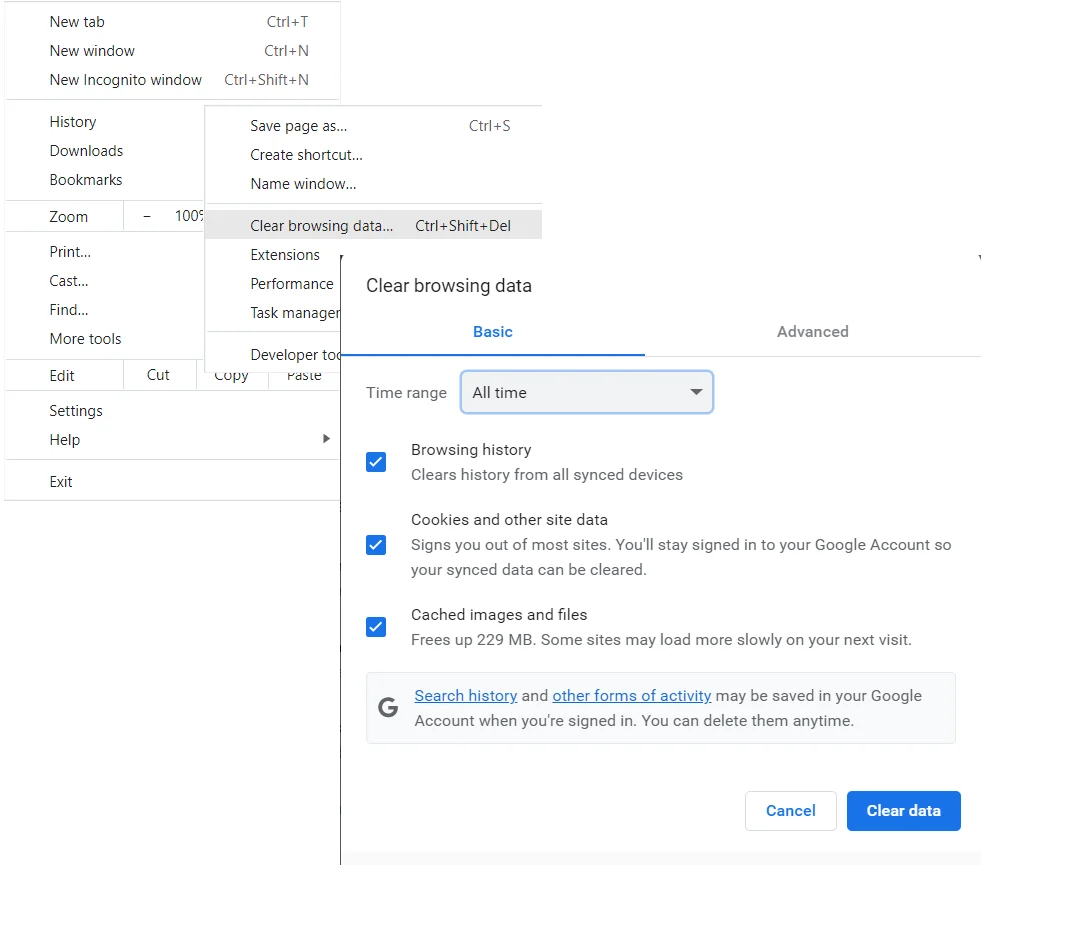
- Launch your Chrome browser.
- Navigate to the top right corner and click on More (the three vertical dots).
- Select More tools from the menu and then click on Clear browsing data.
- Choose a time range. Select the All time option if you would like to clear everything.
- Check the Browsing history, Cookies and other site data, and Cached images and files categories.
- Select Clear data.
By clearing the browser cache and cookies, you are removing temporary files and data stored by your browser. This can help eliminate any conflicting or outdated information that might be preventing the login page from appearing correctly. After clearing the cache and cookies, try connecting to the public WiFi network again and check if the login page shows up as expected.
Also Read: How to Delete Temporary Internet Files?
Fix 6: Check Date and Time Settings
Another possible reason why you may not see the login page for a public WiFi network on your Windows 10 device is incorrect date and time settings. It’s important to ensure that your device’s date and time are accurate, as this information is used by the browser to establish secure connections.
To check and adjust the date and time settings on your Windows 10 device, follow these steps:
- Click on the Start button located at the bottom left corner of your screen and select the Settings gear icon.
- In the Settings window, click on Time & Language.
- On the left-hand side, click on Date & Time.
- Make sure the Set time automatically toggle switch is turned on. This allows Windows 10 to automatically synchronize the time with the internet.
- If the toggle switch is already turned on and the date and time are incorrect, you can manually set them by turning off the toggle switch and clicking on Change under the Set the date and time manually section. Enter the correct date and time information and click Change.

Once you have verified or adjusted the date and time settings, restart your device and try connecting to the public WiFi network again. The correct date and time should ensure that the login page appears as expected.
Fix 7: Disable VPN or proxy
If you’re experiencing difficulties accessing the login page for a public WiFi network on your Windows 10 device, it could be due to the presence of a VPN (Virtual Private Network) or proxy connection. These network configurations can sometimes interfere with the proper functioning of the login page. To resolve this issue, you may need to disable your VPN or proxy temporarily. Here’s how:
- If you’re using a VPN, open the VPN client or application. Look for an option to disconnect or disable the VPN connection. Click on it to disable the VPN.
- If you’re using a proxy, access the proxy settings on your Windows 10 device. You can do this by following these steps:
- Click on the Start button located at the bottom left corner of your screen and select the Settings gear icon.
- In the Settings window, click on Network & Internet.
- On the left-hand side, click on Proxy.
- In the Proxy settings section, disable any active proxy by toggling off the Use a proxy server option.
Once you have disabled your VPN or proxy, try connecting to the public WiFi network again. With these network configurations turned off, you should be able to access the login page without any issues.
Note
Remember to re-enable your VPN or proxy after you have successfully logged into the WiFi network if you require their services for other purposes.
Related: “Do I Need a VPN?” Main Benefits of Using a VPN
Fix 8: Open the Router’s Default Page
Follow these easy steps to access the router’s default page:
- Connect to the public Wi-Fi network.
- Open your browser.
- Type any of the following in the URL bar and then press
Enterto get on the router’s login page:
0.0.1
168.1.1
http://localhost
ca
it
This should be sufficient in forcing the Wi-Fi login page to appear. But in case it doesn’t work, you will have to manually obtain the IP address of the connected router and type it into the URL bar instead. Then press Enter to open the login page.
Further Reading: “Your IP Has Been Temporarily Blocked”- How to Unblock IP?
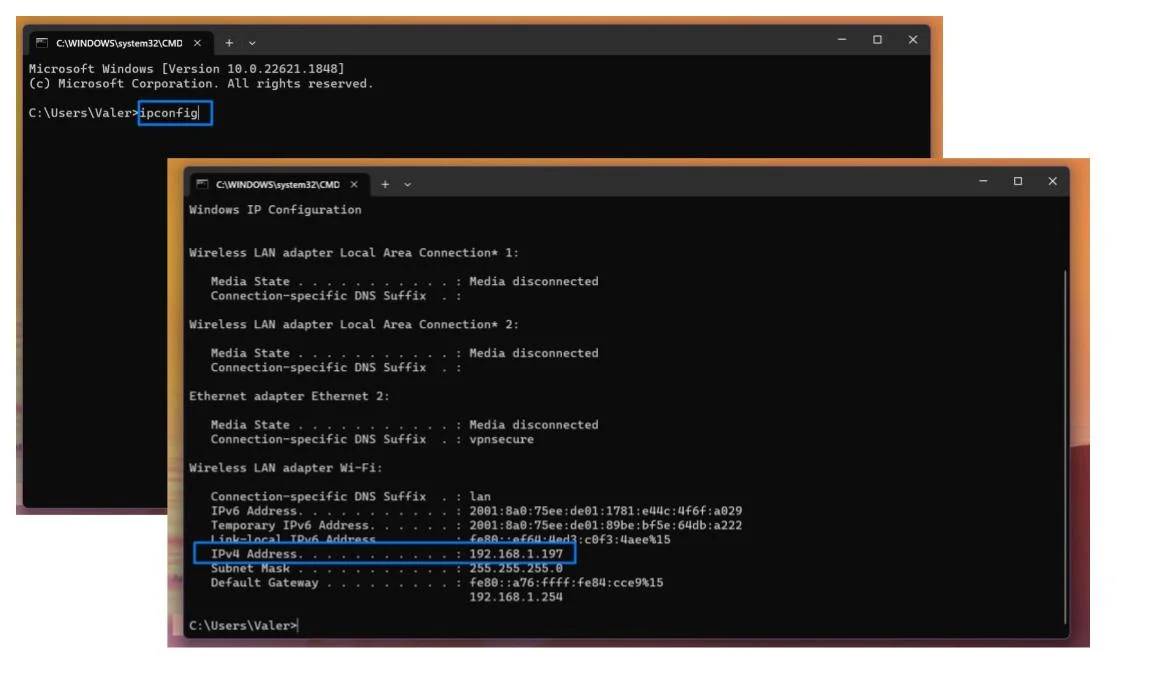
Here’s how to obtain the connected router’s IP address:
- Open the Run dialog. You can do this by pressing the
Windows key + Rcombination on your keyboard. - Type
CMDin the text field and pressEnteror click the OK button to open the Command Prompt window.
- Type
ipconfigand pressEnter.
- Locate the IPv4 address displayed under Wireless LAN adapter Wi-Fi:.
- Now, copy and paste the address in your browser’s URL bar and press
Enter. You will then be able to browse the internet without further issue.
Download Auslogics Driver Updater
Prevent hardware errors and ensure problem-free device operation with this advanced tool that detects outdated drivers and safely gets them updated.
Fix 9: Turn Off Third-Party DNS Servers
A third-party DNS (Domain Name System) server, such as Dyn, the Google Public DNS server, and so on, can sometimes restrict a proper connection to a public Wi-Fi.
If this applies in your case, i.e. if you have a third-party DNS server on your computer, you can resolve the problem by turning it off.
Follow these easy steps below to get it done:
- Press the
Windows key + Ion your keyboard to open the Settings app. - Click on Network and Internet – > Open Network and Sharing Center -> Name of the public Wi-Fi network.
- In the tab that opens, click the Properties button.
- In the new tab that opens, under This connection uses the following items, select Internet Protocol Version 4(TCP/IPv4) and click the Properties button.
- Enable the following options: Obtain an IP address automatically and Obtain DNS server address automatically.
You can now open your browser and check whether the Wi-Fi’s captive portal will show up.
Note
We know websites by their human-readable domain names like Google.com. The purpose of the Domain Name System (DNS) is to translate these domain names into IP (Internet Protocol) addresses like 173.194.39.78 so that your browser can load the site. Thus, DNS is often referred to as the phonebook of the internet because it links URLs with their IP addresses.
Also Interesting: [FIXED] “Your DNS Server Might Be Unavailable” Error On Windows 11
Fix 10: Enable Incognito Mode
It could be that your browser does not load the login page because it’s trying to use the cached DNS info.
Incognito mode or private browsing forgets your browsing data, including cookies, cache, auto-fill forms, and so on. Thus, it could let the login page load successfully.
Incognito mode is available regardless of the browser you are using, be it Edge, Chrome, Firefox, Opera, or Safari.
So here’s what you have to do:
- Launch your browser and open a new incognito window (Click the Menu icon and select New incognito window). To do this quickly in Chrome, simply press
Ctrl + Shift + Non your keyboard. - Go to the URL bar and type the address of a non-HTTPS website and then press
Enter.
After you’ve performed these steps, the login page will be forced to appear.
Related: Chrome Control: How to Turn Off Incognito Mode in Chrome
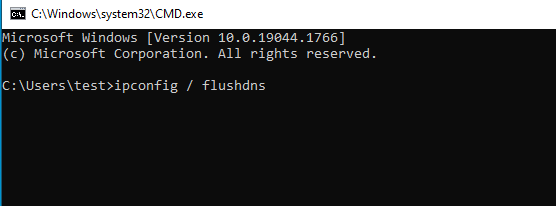
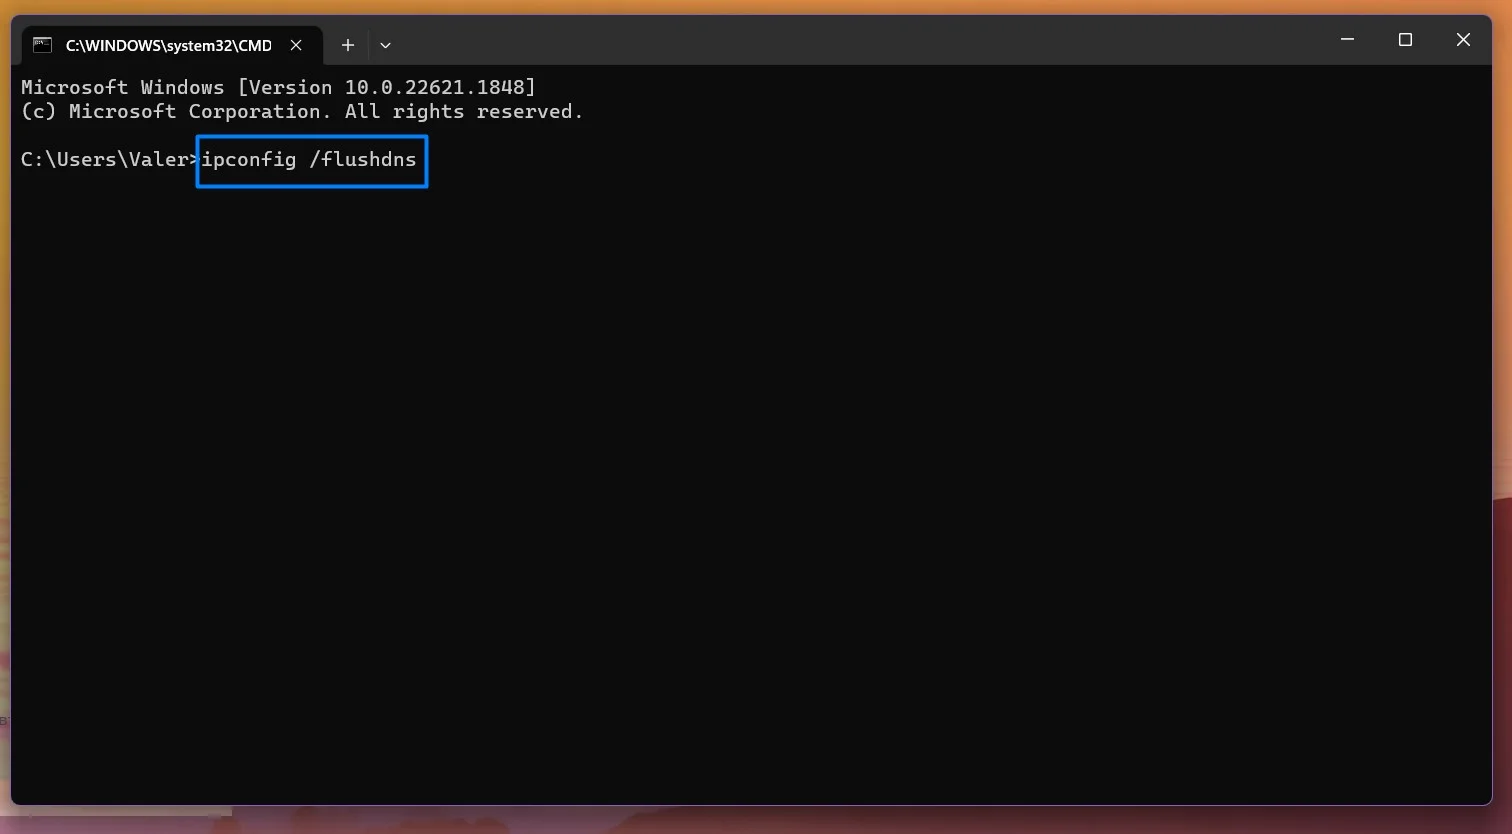
Fix 11: Flush the DNS Cache
The IP address of the public Wi-Fi’s router might have changed recently. And Windows may have stored the old info in its DNS cache. If this is the case, the login page won’t load. So you’ll have to flush the DNS cache via Command Prompt to resolve the issue.
Note
As already explained in Fix 9 above, DNS servers are responsible for converting domain names like www.example.com into numerical IP addresses that can be read by your browser before the website can be loaded.
A DNS cache (sometimes referred to as DNS resolver cache), on the other hand, is a temporary database in which your computer’s operating system records all websites and other internet domains you’ve visited or attempted to visit recently. It is basically a memory of recent DNS lookups that your computer can refer to when trying to determine how to load a website.
Follow these easy steps to flush the DNS cache:
- Press the
Windows key + Rcombination on your keyboard to open the Run dialog. - Type
CMDin the text field and pressEnteror click OK.
- Once done, type
ipconfig /flushdnsand pressEnterto clear the DNS cache. Wait for the process to complete.
- Close the Command Prompt window and then launch your browser. See if the Wi-Fi’s login page will now appear.
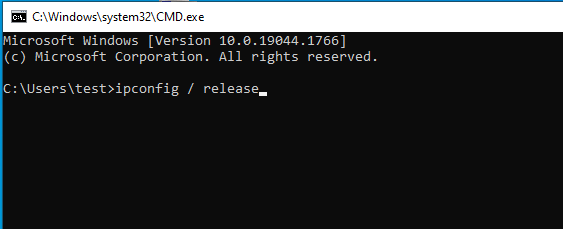
Fix 12: Renew the DHCP Lease
The IP address leased to your computer by the public Wi-Fi’s router might have expired and that is why the captive portal is not coming up.
You’ll have to order your DHCP (Dynamic Host Configuration Protocol) client to renegotiate another lease with the DHCP server on the router so that your computer can connect. This is done via Command Prompt. Here’s how:
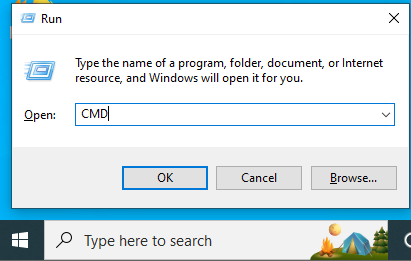
- Open the Run dialog by pressing the
Windows + Rcombination on your keyboard. - Type
CMDin the text box and pressEnteror click the OK button.
- In the Command Prompt window that opens, type
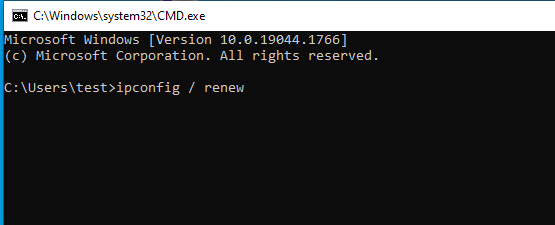
ipconfig /releaseand pressEnterto execute it. This releases the current IP configuration. Wait for the process to complete. It might take some time.
- Now, type
ipconfig /renewand pressEnter. The DHCP (Dynamic Host Configuration Protocol) server will assign your computer a new IP address. Wait for the process to complete.
- Close the Command Prompt window.
- Disconnect from the public Wi-Fi network and then connect to it again.
- Launch your browser and see if the login page will now appear.
Also Interesting: [FIXED] DHCP Is Not Enabled for Wi-Fi on Windows
Fix 13: Disable Firewall Temporarily
Windows Firewall keeps your PC safe from threats by filtering network data transmissions. It blocks malicious communications and programs that initiate them. But it could be the reason why you are unable to access the login page of the public Wi-Fi. Try disabling it to know for sure.
Here’s how:
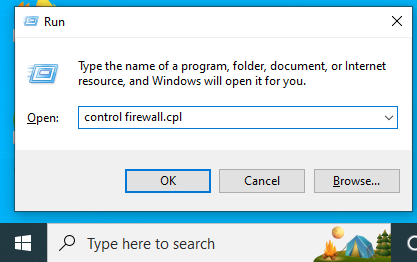
- Press the
Windows key + Rcombination on your keyboard to invoke the Run dialog. - Type
control firewall.cplin the text field and pressEnteror click OK. This leads you to the Firewall page in Control Panel.
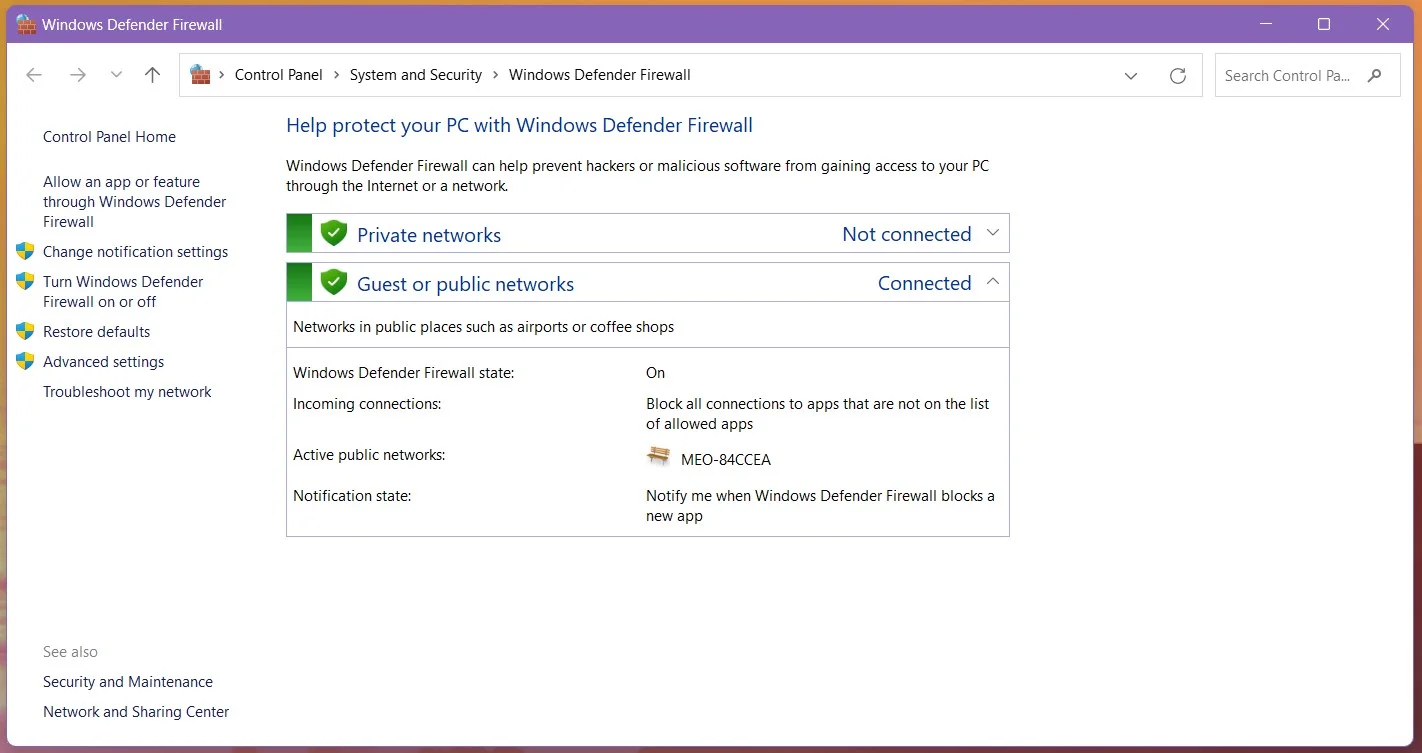
- On the left-hand side of the window, you’ll find the option that says Turn Windows Defender Firewall on or off. Click on it.
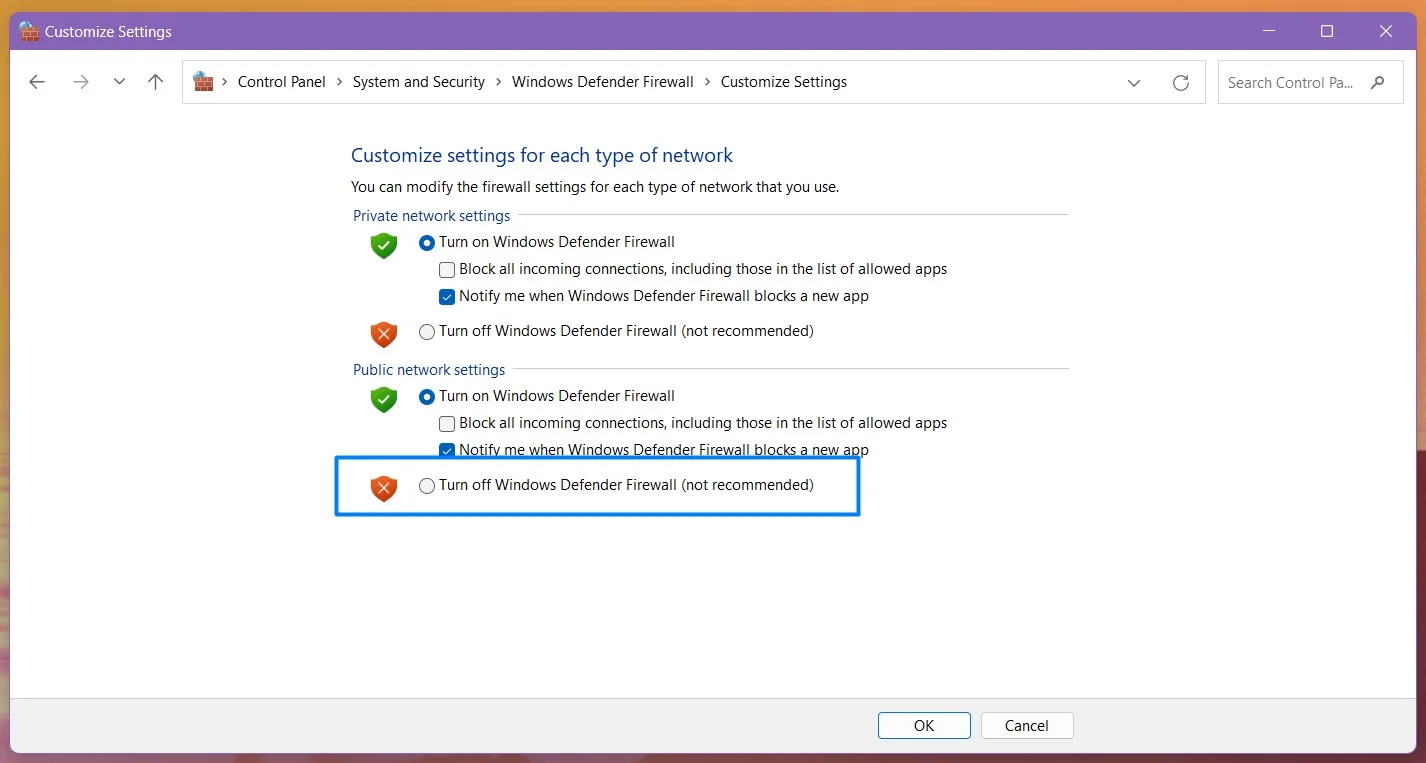
- In the new page that opens, go to the Public Network Settings category and select Turn off Windows Defender Firewall (Not recommended) and then click the OK button.
- Restart your PC, reconnect to the Wi-Fi network and launch your browser. See if the login page will now come up.
Note
To keep your PC safe, ensure that you turn on Windows Firewall again. Follow the same steps above to do so, but instead select ‘Turn on Windows Defender Firewall’ under Public network settings.
Fix 14: Update Your Network Adapter Driver
If you’ve tried all the above fixes but still can’t use the internet, you have to make sure that your network adapter driver is up to date.
PRO TIP
We recommend you use Auslogics Driver Updater to handle it automatically. The tool will read your PC specs and then perform a full scan to detect outdated, missing, incompatible, or corrupt drivers on your PC. Afterwards, once you’ve given it permission, it downloads and installs the latest version of the drivers as recommended by your PC manufacturer.
However, if you are sure that your network adapter driver is already updated and the captive portal still doesn’t appear, uninstalling and reinstalling the driver will help fix any corrupt files.
Follow these easy steps:
- Press the
Windows + Rcombination on your keyboard to bring up the Run dialog. - Type
devmgmt.mscin the text box and click OK or pressEnterto open Device Manager.
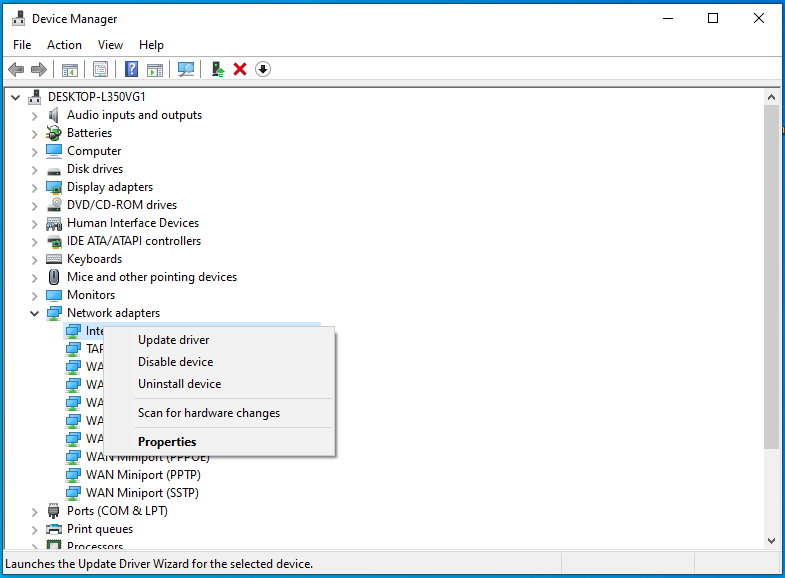
- Now, scroll down to Network Adapters and click the arrow to expand the option.
- Right-click on your network adapter and click Uninstall device from the context menu.
- Reboot your computer. The driver will be reinstalled automatically. But if Windows fails to do this, go back to Device Manager. Click on the Action tab and then click Scan for hardware changes. The driver will then be installed.
- Restart your computer, connect to the public Wi-Fi network, launch your browser and then see if the login page will now appear.

Also Read: How to Update Device Drivers on a Windows 10 PC?
If the captive portal still refuses to show after you’ve tried all the above solutions, then it’s likely that the Wi-Fi is down. Ask anyone around you if they are having the same issue. If so, consider reporting it to the management so that they can troubleshoot it from their end. The router may simply need to be restarted.
We hope you have succeeded in getting past this issue and are now able to surf the internet using the public Wi-Fi. The solutions we’ve presented here will ensure that you can do that.
If you have any questions or comments, please feel free to share them in the section below.
We’ll like to hear from you.
Cheers!
FAQ
What Is a Captive Portal?
A captive portal is a web page that requires users to authenticate or agree to terms before accessing a public Wi-Fi network.
How Do I Trigger a WiFi Login Page?
To trigger a WiFi login page, connect to a WiFi network that requires authentication. If the login page doesn’t appear, try opening a web browser and navigating to a non-HTTPS website. If that doesn’t work, try forgetting the network, restarting your device, and reconnecting. You can also try more advanced options such as turning off third-party DNS servers or updating your network adapter driver.
How to Open Network Connection Page?
To open the network connection page, go to your device’s settings menu, locate the “Network” or “Internet” section, and tap on it. From there, you should find an option to access the network connection settings or manage your network connections.
1.Включите Wi-Fi на ПК/ноутбуке на Windows 11, найдите необходимую сеть и подключитесь к ней, выбрав опцию «Открыть браузер и подключиться».
2. После подключения автоматически откроется браузер со страницей авторизации. Ели этого не произошло — откройте браузер самостоятельно.

3. В зависимости от выбранного типа идентификации — проделать указанные действия. В данном случае авторизация по звонку.
Необходимо ввести номер телефона, после чего позвонить с него по указанному номеру, и нажать Войти.


4. После авторизации появится доступ в Интернет.

Совет, как можно быстро подключиться к незакрытой публичной Wi-Fi-сети.

В зависимости от того, где вы живете, есть множество мест, в которых можно бесплатно подключиться к Wi-Fi, чтобы вы могли работать или учиться удаленно, или избегать ограничения интернет-трафика на вашем смартфоне, установленные сотовым оператором (в случае если ваш мобильный Интернет не безлимитный). К счастью, бесплатный Wi-Fi можно поймать в ресторанах, кафе, вокзалах, аэропортах, магазинах, бизнес-центрах, некоторых торговых комплексах, некоторых парках и т. д. Но есть одна проблема: публичные сети обычно делают процесс подключения довольно раздражающим. Так, например, между вами и беспроводной сетью, как правило, в процессе подключения возникают промежуточные страницы входа, где, прежде чем получить доступ в Интернет, нужно авторизоваться.
Большинство из этих общедоступных сетей Wi-Fi требуют, чтобы пользователи авторизовались с помощью мобильного телефона или электронной почты, соглашаясь с ограничениями использования доступа в Интернет, а также подтверждали свою личность. Часто это утомительный процесс. Но еще хуже, когда эти страницы входа в систему не отображаются автоматически. В итоге, подключившись к какой-нибудь сети, вы не сможете выйти в Интернет, пока не авторизуетесь. Но как быть, если автоматически не появляется форма/страница авторизации публичной Сети?
К счастью, у вас есть несколько хитростей, чтобы принудительно запустить этот процесс, если страницы входа не будут загружаться на вашем устройстве, подключившемся к публичной открытой сети.
Перезагрузите ваше устройство или сбросьте настройки Wi-Fi
Первое и самое простое – это перезагрузить ваше устройство. Если вы не хотите делать полный перезапуск, вам может помочь простое включение и выключение Wi-Fi на вашем устройстве. После того как вы полностью перезапустили смартфон или планшет (или включили и выключили Wi-Fi), попробуйте снова подключиться к беспроводной сети и открыть какой-нибудь веб-сайт, чтобы начать процесс входа в систему.
Перенаправить телефон на страницу входа публичной сети
Если это не сработает, попробуйте следующий шаг: попытайтесь принудительно загрузить страницу входа, установленную по умолчанию в маршрутизаторе (роутере) публичной сети. Есть несколько универсальных веб-адресов, которые могут перенаправить вас на страницу входа в систему маршрутизатора сети. Итак, подключившись к сети Wi-Fi, включите свой веб-браузер (Safari, Google Chrome, Yandex бразуер, Firefox и т. д.) и введите в браузерной сроке имя routerlogin.net, нажав ввод. В большинстве случаев это поможет автоматически сделать перенаправление на страницу авторизации публичной сети, к которой вы подключились. И если это не сработает, попробуйте ввести поочередно эти веб-адреса:
- https://localhost
- Example.com
- 8.8.8.8
- neverssl.com
- Captive.apple.com
Если ни один из вышеперечисленных способов не работает, выполните следующие действия в своем устройстве и повторите попытку:
- Очистите кеш вашего браузера. Обычно это можно сделать из меню истории вашего браузера
- Временно отключите все альтернативные DNS-серверы, которые вы используете, и вернитесь к настройкам по умолчанию (откатите устройство к заводским настройкам)
Задача что бы при подключении к сети wi-fi, открывался браузер со страницей авторизации.
Пользуясь данной статьей — Каким образом Windows определяет наличие выхода в … и этой — Как Windows определяет подключение к Интернету
1. Закрыл любой доступ кроме прокси, 192.168.1.1:8080
2. Разрешил любой DNS запрос 53 (UDP)
Но при подключении к сети, не открывается браузер, система в обще не считает, что у нее нет доступа к интернет, как ни в чем не бывало.
Если зайти в браузер и набрать любой сайт, без проблем проходит редирект на страницу с авторизацией. Это не подходит, так как пользователь должен сразу понимать, что у него нет интернета, так как браузер не всегда нужен, а система ему об этом не сообщает.
Куда посоветуете смотреть? Как Windows еще понимает, что есть или нет интернет? Почему она считает что есть доступ к интернет?
Ниже результаты работы проверок:
SQUI редирект на сервер авторизации:
192.168.1.72 TCP_DENIED/302 350 GET http://www.msftncsi.com/ncsi.txt - HIER_NONE/- text/html
192.168.1.72 TCP_DENIED/302 350 GET http://www.msftconnecttest.com/redirect - HIER_NONE/- text/html
ping к ресурсам майкрософт
Microsoft Windows [Version 10.0.18362.356]
(c) Корпорация Майкрософт (Microsoft Corporation), 2019. Все права защищены.

C:\Users\ynnek>ping www.msftconnecttest.com

Обмен пакетами с 4-c-0003.c-msedge.net [13.107.4.52] с 32 байтами данных:
Превышен интервал ожидания для запроса.
Превышен интервал ожидания для запроса.
Превышен интервал ожидания для запроса.
Превышен интервал ожидания для запроса.

Статистика Ping для 13.107.4.52:
    Пакетов: отправлено = 4, получено = 0, потеряно = 4
    (100% потерь)

C:\Users\ynnek>ping www.msftncsi.com

Обмен пакетами с a1961.g2.akamai.net [88.221.132.25] с 32 байтами данных:
Превышен интервал ожидания для запроса.
Превышен интервал ожидания для запроса.
Превышен интервал ожидания для запроса.
Превышен интервал ожидания для запроса.

Статистика Ping для 88.221.132.25:
    Пакетов: отправлено = 4, получено = 0, потеряно = 4
    (100% потерь)
nslookup
>
> dns.msftncsi.com
Server:  UnKnown
Address:  192.168.1.1

Non-authoritative answer:
Name:    dns.msftncsi.com
Addresses:  fd3e:4f5a:5b81::1
          131.107.255.255
Ну и после всех проверок, Windows «думает» что она в интернет.