
Составили для вас небольшой список лучших приложений для работы с образами MDF и MDS.
О каких файлах идет речь?
Эти два файла взаимосвязаны друг с другом и выполняют общую задачу.
MDF
По сути, это своего рода архив, наподобие ISO. То есть это образ диска. В файле MDF хранится весь список файлов и структура с внешнего носителя. MDF-файл можно представить как виртуальный компакт-диск, который существует только в цифровом виде. В остальном он ведет себя точно так же, как настоящий диск. С него можно скопировать файлы или запустить установщик игры, например.
Обычно как раз в MDF-образах хранятся файлы видеоигр. Раньше «пираты» часто копировали данные с компакт-дисков с игрой в такой файл. Так можно было обмануть компьютер и заставить поверить, что в дисководе стоит лицензионный носитель с игрой.
MDS
Это дополнительный файл, который идет в тандеме с MDF и содержит в себе только структурные данные. То есть информацию о содержимом образа, которая может понадобиться для его монтирования в систему.
Чтобы открыть MDF- или MDS-образ, нужно использовать специальную программу. В этой статье речь пойдет о трех наиболее популярных утилитах, способных с этим справиться.
Daemon Tools
Это одна из самых востребованных программ для эмуляции разных физических приводов в файловой системе компьютера. Проще говоря — это виртуальный дисковод или шина для подключения HDD.

Все ключевые функции доступны в одном окне
Daemon Tools поддерживает форматы MDX, MDF, MDS, ISO и множество других.
Именно эту утилиты используют геймеры, загружающие копии игр с торрент-трекеров. Все из-за бесплатной версии Daemon Tools Lite. Если не использовать образы в коммерческих целях, то платить за нее не нужно, а еще можно неограниченное количество раз устанавливать и запускать пиратские игры. Не то чтобы пиратов мучила совесть, но так просто всем было удобнее. Не нужно было взламывать еще и Daemon Tools.
Плюсы
- Образы можно хранить в приложении и монтировать в любое удобное время.
- Можно делать образы из любых хранилищ и архивов. Можно просто превратить в образ целую папку.
- Есть полноценная бесплатная версия, которая выполняет все необходимые функции.
- Полная интеграция с Windows. Функции программы встраиваются в стандартные приложения операционной системы.
- Есть версия для macOS.
Минусы
- Все Pro-функции доступны по подписке или единоразовой оплате.
- Нет Portable-версии, которая работала бы без установки.
- Во время установки программа тянет за собой много разного мусора (поисковые панели, ненужные браузеры и так далее).
- Многие пользователи жалуются на медлительность утилиты.
Я рекомендую именно Daemon Tools. Самый простой и доступный вариант. Она полностью переведена на русский, работает быстро, поддерживает все нужные функции. Ну и платить не нужно. А если захотите купить Pro-версию, то обойдется она дешевле, чем любой из конкурентов.
Скачать Daemon Tools
Alcohol 120%
Это мощный инструмент для создания образов дисков в промышленных масштабах. С помощью Alcohol 120% крупные компании делают копии программного обеспечения с физических носителей.

Логотип Alcohol 120%
Таким образом они сохраняют все лицензионное ПО. В случае повреждения дисков у корпораций остается возможность заново установить необходимые приложения. А еще оно популярно среди библиотекарей, постепенно избавляющихся от всех CD- и DVD-дисков с аудиокнигами и учебными материалами. Ну и в быту удобно скопировать все диски на жесткий диск и забыть о том, что они вдруг сломаются или перестанут читаться приводом.
Есть менее функциональная версия программы. Называется Alcohol 52%
Плюсы
- Есть Portable-версия, которую можно запускать, не устанавливая программу.
- Утилита получила множество наград и премий, чем подтверждается ее высокое качество и надежность.
- Среди пользователей Alcohol 120% затесались такие крупные компании, как Adobe, Dell, Nasa, Samsung и многие другие.
Минусы
- Стоимость выше, чем у конкурентов.
- Поддерживается только операционная система Windows.
Скачать Alcohol 120%
UltraISO
Довольно популярная утилита, которую часто используют для так называемого «прожигания» дисков. Обычно с помощью нее записывают образы на внешние носители, а не наоборот. UltraISO пользуется спросом среди тех, кто часто экспериментирует с установкой новых операционных систем. Например, если вы захотите попробовать Linux, то вам придется сначала скачать образ системы. А затем записать его на диск или флэшку. Для этих целей как раз и используют UltraISO.

Так выглядит главное окно UltraISO
С открытием MDS- и MDF-файлов утилита справляется без проблем.
Плюсы
- У программы очень удобный интерфейс и много полезных функций для работы с образами всех форматов.
- Относительно небольшая стоимость.
- Низкие системные требования.
- Оптимизация структуры ISO-образов для уменьшения их размера.
Минусы
- Бесплатная версия умеет работать только с файлами размером до 300 мегабайт.
- Дизайн программы выглядит слегка устаревшим.
Скачать UltraISO
Вместо заключения
Конечно, это далеко не все программы, способные открывать MDF и MDS. Есть еще PowerISO и Magic ISO Maker. Но первая считается небезопасной, один из наших читателей отмечал, что в ней хранится какой-то вредоносный код. А вторая уже безнадёжно устарела. Поэтому мы рекомендуем только три вышеназванных продукта.
Post Views: 20 218
Media Descriptor File or MDF is a disk image file format that was designed by Alcohol Soft to burn data onto CDs and DVDs. As an optical disc authoring tool, it serves as a point of convenience for users who want practical access to certain files. Compared to ISO files, MDF is able to contain different layers of data in raw form.
When working with MDS files, it may be accompanied with a MDS file which is a file type that stores metadata. MDS stands for Media Descriptor Sidecar and this means that it is able to include indications for where data belongs in an MDF file. This includes starting and ending layers, values, locations and other relevant information. Although .MDS is helpful, an .MDF file can exist without an MDS file.


On Windows PCs, MDF files are not natively supported. Therefore, unpacking, opening, and mounting them on Windows 11 or 10 computer requires external tools and programs for easy access. We’ve included the best steps to take if you’re looking to unpack, launch, and view an MDF/MDS file content on PC.
How to Mount or Open an MDS and MDF Files on Windows 10/11 Computer
Mounting is the reason you’re on this page, but if you do not want to mount your MDF file, you will need to burn it to a disc using the programs and tools included in this guide.
A simple method to mount an MDF in Windows computers is to convert it to an ISO file. The process is extremely easy and as follows:
- Go to your MDF file
- Right-click on it and select Rename
- Highlight the .mdf portion and type in .iso
This is the easiest way available, but it isn’t the most reliable. However, you may see an error like “The disc image file is corrupted.”
Below are the top 3 third party apps that you can download for free or for a small fee to give you easy access to MDS and MDF file content. Check out these tools and see which one works for you best.
Daemon Tools Lite
Daemon Tools is a pretty popular piece of software for accessing disc image files. There is a paid version, but for the purposes of accessing an MDF file, the free version works pretty well.
- Access the tool from its official website and install it
- Once installed, go to your MDF file of choice and right-click
- Select Open with and choose DAEMON Tools Lite agent
Alcohol 120% Free Edition
This free-to-use tool is authored by the same company responsible for MDF files. It creates a virtual optical drive that allows you to mount an MDF file, giving you full access.
- Install the software by downloading it from the official website
- Click on File and click on Open using the top menu of the app
- Navigate to your chosen MDF file
- Once you’ve opened it, right-click on that file
- Within the right pane of the Alchohol app, select Mount Image
- Go to your Windows File Explorer and access the MDF file through the virtual drive
WinCDEmu
This tool allows you to mount an MDF file directly through the context menu from a right-click. To use it, follow these steps:
- Download and install it using the official website
- After installation, right-click on your chosen MDF file and expand it using Open with
- Click on WinCDEmu mounter
- This will mount your MDF file and allow you to access its contents in your file explorer
Opening an MDF or MDS file on Microsoft desktop devices is very easy. Even when the file extension says “MDS”, any of the methods above should work fine in giving you full access to the file content.
Windows Dispatch is a website supported by its readers & community. Some pages may contain affiliate links which may allow us to earn a little money when you buy through them.
Aileen G. M.
A technology writer with a degree in Business Administration majoring in Marketing. Aileen loves creating helpful but simple guides for troubleshooting and fixing complex issues on today’s gadgets and services.
Transferring files between Linux and Windows might seem tricky at first, especially if you’re new to working across different operating systems. Now, whether you’re sharing documents, moving project files, or backing up data, knowing how to transfer files between these two platforms is very important.
In this blog, we’ll walk you through simple and effective methods to transfer files from Linux to Windows. From using shared networks and USB drives to leveraging powerful tools like Samba, SSH, and cloud services, we’ve got you covered. No matter your level of expertise, this guide will help you choose the best method for your needs and ensure your files are transferred quickly and securely.
Methods to How To Transfer File From Linux To Windows
Explore this section to get three methods that will help you in-order to transfer file form Linux system to Windows system.
Method 1: Using SSH Transfer Protocol with PuTTy
One of the easiest methods to transfer files from Linux (Ubuntu) to Windows OS is to use PuTTy pscp (PuTTy Secure Copy Client). PuTTy is used to create a client-server link to connect both platforms via a Wireless connection. PuTTy is a free open-source SSH client which works across multiple platforms and has become a mode for easy file transfers across platforms.
Step 1: Install SSH
- To start with Install SSH if you don’t have it in your Linux OS. Follow the Command prompt codes to do so.
Ubuntu/Debian OS
sudo apt update
sudo apt install ssh-server
sudo service ssh start
Red Hat and other Linux-based OS
sudo yum install openssh-server
sudo systemctl start sshd
Step 2: Install PuTTy
- Install PuTTy in your system if you don’t have it. Otherwise, ignore this step. If you want to install PuTTy in your Linux OS, follow the command prompt lines below:
For Ubuntu and Linux Mint OS
For Ubuntu, you’ll need to access the universal repository available and install PuTTy there. Hence, there are additional commands to access the universal repository below:
sudo add-apt-repository universe
sudo apt update
sudo apt install putty
For Debian OS
sudo apt-get putty
For Arch Linux OS
sudo pacman -S putty
For RHEL, Fedora, CentOS, AlmaLinux
sudo dnf install putty
For others
sudo yum install putty
Now you have successfully installed PuTTy in your Linux OS. Now, you can use it for file transfer from Linux to Windows and vice-versa. Similarly, you can also download PuTTy in Windows OS.
Step 3: Start Transferring Files
Transfer files across different OS. It becomes easy using PuTTy pscp (PuTTy Secure Copy Client). Simply provide the source path and the destination paths for file transfer and the files would be transfered.
Point to Note
In this case, the IP address of a sample Linux system is 192.168.0.18. Let’s see the skeletal structure of the command prompt line we’ll need to type:
[path_where_pscp_is_downloaded]>pscp user@[host:source destination]
Example 1:
For example, assume that PuTTy pscp is downloaded on the Windows Program Files directory and we’ll need to transfer files from Linux to Windows OS to send a file called “a.txt”. Follow the command prompt code below:
C:\Program Files\PuTTY>pscp user@192.168.0.18:/tmp/a.txt \Users\<username>
Example 2:
For vice-versa, to store the file in a new directory follow the code below:
Important: Check whether the directory exists or else, you’ll get an error. You can use the following command to create a new directory:
mkdir <directory_name>
C:\Program Files\PuTTY>pscp \Users\<username>\a.txt user@192.168.0.18:/<directory_name>
Now, you’ve successfully transferred files from Linux OS to Windows OS and vice-versa.
Method 2: Using FTP with FileZilla or Shared Network Folders
Another simple method used for file transfer is using FTP (File Transfer Protocol). This is the easiest method since this involves no coding/ command lines. Let’s see how to do that. If you don’t have FileZilla, check out How to install FileZilla on Windows. After installing FileZilla, follow the following steps.
Step 1: Download and Install FileZilla on Windows
- To trasnfer file from Linux to Windows you need a FTP server and for this you need to install FileZilla on Windows
Step 2: Open FileZilla
- Once the installation process is over open FileZilla on you Windows system.
Step 3: Open File
- Navigate to “File” section and select “Site Manager” after opening FileZilla.
Step 3: Choose SFTP Protocal
- Change the protocol to SFTP.
Step 4: Add Your Linux Address
- Type your Linux Address in the Host coloumn, which in this case is 192.168.0.18.
Step 5: Modify General Settings
- Under the General section, go to “Logon Type” and select “Normal” as shown in the image below:

Step 6: Enter the User Credentials
- Enter the Username and Password of the Linux OS machine.
Step 7: Share Files
- After all the 6 steps are done, click “Connect”.
- Now you’ve created a client-server connection with SFTP between Linux and Windows OS. After the connection is created, it is simply a matter of dragging and dropping files between the platforms mentioned earlier.
Method 3: Using SMB Protocol
One other way of transferring files from Linux to Windows is by connecting both OS systems using the SMB (Server Message Block) protocol. SMB can be used both in Windows and Linux to initiate a connection to share and transfer files.
Step 1: Use/ Install Samba in Linux
- Samba is an open-source software which provides clients with file and print services in a Windows-based network. This software supports connections between Windows systems and can be used to transfer files.
- To install Samba, type the following commands in your Linux terminal.
sudo apt install samba -y
- After successfully installing samba-client, check its status by typing the command:
systemctl status smbd
Step 2: Create a shared directory
- When transferring files from Linux to Windows, create a shared directory which will be used by both Linux and Windows OS. Follow the command below to see how to do so.
mkdir <directory_of_your_choice>
- Give administrative permission using the chmod command.
chmod 777 <directory_of_your_choice>
Note: There are several numbers in chmod which are used to give specific permissions. They are
- 777— everyone can read, write and edit (full access)
- 755— Owners can read, write and execute, and group users can read and edit the file.
- 644— Only owners can read, write and execute the files. The other people included by the owner can only view the file.
Step 3: Create a New uUer Specifically for File-Sharing
- While sharing files, create a new user whose account will be used for the sharing/ transfer of files. The command for this is
useradd <username>
Step 4: Give an SMB Password for the User
- To facilitate SMB protocol under the user, you must create an SMB password by executing the command below
smbpasswd -a <username>
- Then type out the password in the terminal.
Step 5: Edit the Config File in Samba Using Any Editor (or nano)
- Type out the command below
sudo nano /etc/samba/smb.conf
- After opening the file, scroll to the bottom of the file and add the following lines.
path = <directory_of_your_choice>
valid users = <username>
read only = no
browsable = yes
public = yes
writable = yes
browsable = yes
- Save and exit the file, then check if everything was edited and saved successfully by running the following command.
testparm
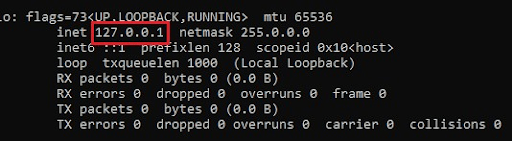
Step 6: Find the IP Address of Your Linux System
- Using ifconfig, find the IP address of your Linux system.
ifconfig wlo1
- Your IP address will be shown below:
Step 7: Connect to the Network from the Windows Side
- Launch the “Run” program by pressing the “Windows button” and “R”. Then type the IP address of the Linux system you got from the previous step. Type the IP address with two slashes before it.
- This will open the Linux-shared folders. Now you can view it and transfer files in between.
Methods 4 Use USB Drive (Easiest Method)
If you do not want to do any scription tasks or do not want to use FTP, then you can simple use USB drive to share files between Linux to Windows systems. Just insert your USB drive and copy all the files into the USB drive that you want to transfer into Windows. Once the copying task is completed, eject the USB drive from your Linux system, insert it into Windows system, and paste in anywhere in your Windows system.
Conclusion
Successfully transferring files from Linux to Windows can streamline your workflow and ensure that your data is accessible across different platforms. Whether you choose to use network sharing, SCP, or a USB drive, the methods covered in this guide provide you with the tools you need for efficient Linux to Windows file transfer. Understanding these techniques will help you handle cross-platform data management with ease.
Also Read
- How to Download a File from a Server with SSH / SCP?
- How to Troubleshoot SSH Connection Issues?
- How To Transfer Files From Android to iPhone?
Если у вас есть образ ISO и вы используете Windows 10 или 11, подключить его будет очень просто. Просто следуйте инструкции ниже, и ваш образ будет готов к использованию за несколько кликов. 😊
Но если у вас установлена Windows 7 или 8 — не переживайте! Для этих версий системы потребуется немного больше действий. Разверните вторую инструкцию ниже, и вы легко справитесь с подключением ISO-образа, используя дополнительное программное обеспечение.
- ⬇️ Windows 10 и 11 (нажмите, чтобы развернуть)
- ⬇️ Windows 7 и 8 (или если образ не .ISO) (нажмите, чтобы развернуть)
Чем открыть MDF и MDS на Windows 7, 8, 10. Какие программы можно использовать для этого.
Вопрос «чем открыть файлы с расширениями MDF и MDS» часто возникает после скачивания программы или игры с торрент-трекеров, можно их открыть стандартными средствами Windows 7, 8 или Windows 10. Файлы такого формата – виртуальные образы CD и DVD дисков, созданные специальной утилитой, открыть их можно с помощью виртуального привода.
Программы для запуска файлов формата MDF и MDS
Для запуска файлов с расширением МДФ можно использовать различные программы. Приведем список самых популярных, их с легкостью можно скачать бесплатно с нашего сайта.
Alcohol 120%
Alcohol 120% – популярный эмулятор, родной для этих форматов. Есть бесплатная вариация программы – Alcohol 52%. С его помощью возможно не только распаковать образы МДФ, но и создать их, а так же выполнить прямое копирование с диска на диск. Есть ограничение по числу виртуальных приводов — максимум 31.
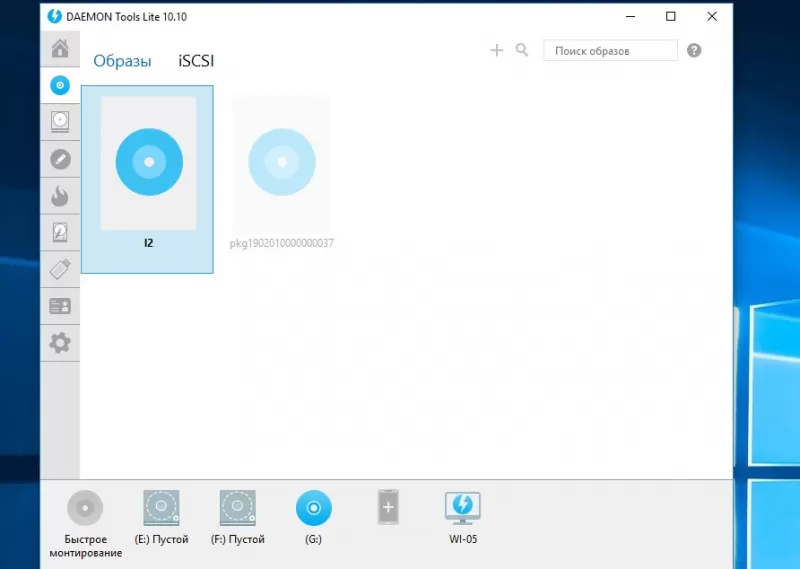
Daemon Tools
Daemon Tools – еще один популярный эмулятор. Бесплатная версия — Deamon Tools Lite. Программа поможет пользователю создать, смонтировать и удобно хранить образы дисков, притом не только CD и DVD, но и HDD.
UltraISO
UltraISO – программа для создания, редактирования и конвертирования CD/DVD образов разных форматов, включая MDF и MDS. Есть функции записи и копирования дисков, создания загрузочных флэшек. Возможно совместное использование с Alcohol 120% и Daemon Tools.
Менее популярные программы для открытия MDF файлов
- Cyberlink AudioDirector;
- PowerDVD;
- IsoBuster;
- MagicISO;
- Virtual CloneDrive.
В рабочем окне программы значок «+», либо «эмулировать» или «монтировать образ». Нажав на эту клавишу появится адресная строка в которой указываем положение файла MDF – нажимаем «открыть». В некоторых случаях для открытия MDF надо дважды щелкнуть мышью по файлу.
Чем открыть MDF и MDS в Windows 7 и Windows 8
В седьмой сборке нет стандартных утилит для работы с образами, поэтому придется скачивать перечисленные выше программы и открывать через них.
Чем открыть MDF и MDS в Windows 10
Для этой серии ОС тоже действуют перечисленные программы. Можно попробовать такой обходной вариант, как открыть MDF файл в Windows 10 через изменение расширения вручную. После нажатия на иконку файла правой кнопкой мыши выберите «Переименовать», уберите после названия «.mdf» и напишите «.iso». После этого нажмите двойным щелчком. Этот способ может подойти также для Mac OS, так как в таких системах установлены стандартные утилиты для чтения ISO.
Общее описание формата MDF и MDS
MDF и MDS – типы файлов, которые практически неотделимы друг от друга. Это – виртуальные образы компакт-дисков форматов CD/DVD. Образ – цифровая копия физического носителя. Тот же диск, который существует, только в цифровом пространстве в виде файла на жестком диске или ином носителе информации.
Образы оптических дисков выполняют функции:
- Резервное копирование – при необходимости создать копию с имеющегося диска создается образ и помещается на компьютере. В случае утери физического носителя информация все равно остается на цифровой копии. При запуске компьютер воспримет такой файл как полноценный компакт диск. Образ создается не только с компакт-дисков, но и с любых носителей, даже с жесткого диска компьютера.
- Передача информации – диск зачастую сложно лично передать другому человеку, тогда как цифровую копию можно переслать по интернету или разместить в открытом доступе.
- Работа с несколькими дисками одновременно – представьте, что в компьютере один дисковод, а работать нужно с несколькими. Создание образов позволит использовать их одновременно. У новых компьютеров и моноблоков чаще дисководов нет. Однако если для работы надо извлечь информацию с диска, цифровой образ поможет это сделать.
- Тиражирование содержимого – образы дисков нужны для размножения содержимого с сохранением функций. Например, скопировав с диска-установщика ОС файлы на другой, второй диск не станет выполнять функции первого – скопируется информация, но не файловая система. Эмуляторы копируют и файловую систему носителя.
Форматы MDF и MDS разработали для программы Alcohol. MDF – непосредственно содержимое, MDS – дополнительная информация о носителе.