
There are several ways to open PowerShell as Administrator in Windows 11. Users can run console applications in user mode or with elevated privileges, also known as «Run as Administrator.» We have already covered in separate articles how to open Windows Terminal in Windows 11 and how to open PowerShell in Windows 11. Now it is time to show how to run PowerShell as Administrator in Windows 11.
PowerShell is an advanced scripting language and engine that comes with a huge set of built-in commands called «cmdlets». Cmdlets allow performing a wide range of tasks, from simple file operation and text processing to programming and system administrative tasks. More than that, the user can create custom modules and utilize .NET functions and assemblies for creating powerful utils and services using just PowerShell.
Note: To open PowerShell as Administrator, you need to log in using a profile with Administrator privileges. Otherwise, Windows will ask you to enter the Administrator password on a UAC prompt.
Tip: Unless you have disabled User Account Control prompts in Windows 11, launching PowerShell as Administrator always ends up in Windows asking for your permission to run a program with elevated privileges. If the operating system launches PowerShell without a UAC prompt, it runs in user mode (or UAC prompts are off).
Perhaps the fastest way to open PowerShell as Administrator in Windows 11 is to use a new console app from Microsoft called Windows Terminal. Windows Terminal supports different profiles and uses PowerShell by default. Note that you can change the default Terminal application. Besides the Windows Terminal, you launch it from the Start menu, Search, or directly start it from the Run dialog, from Task Manager. Also, you can create a special shortcut to start it elevated. Let’s review these methods.
Using Windows Terminal
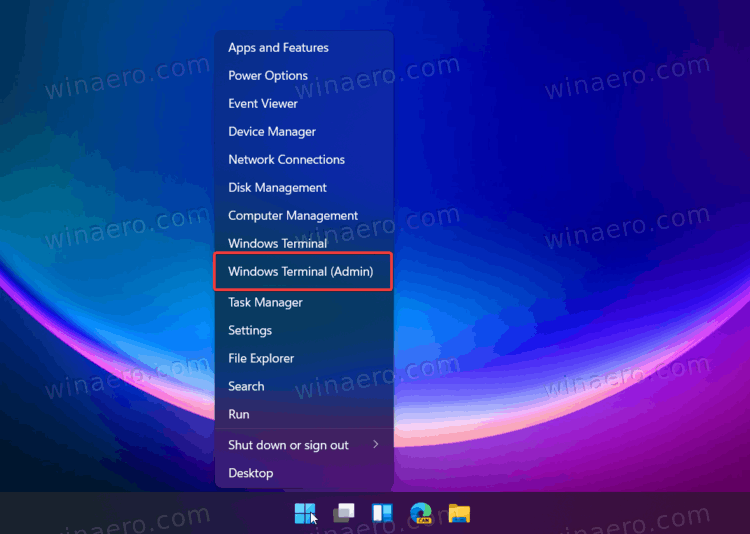
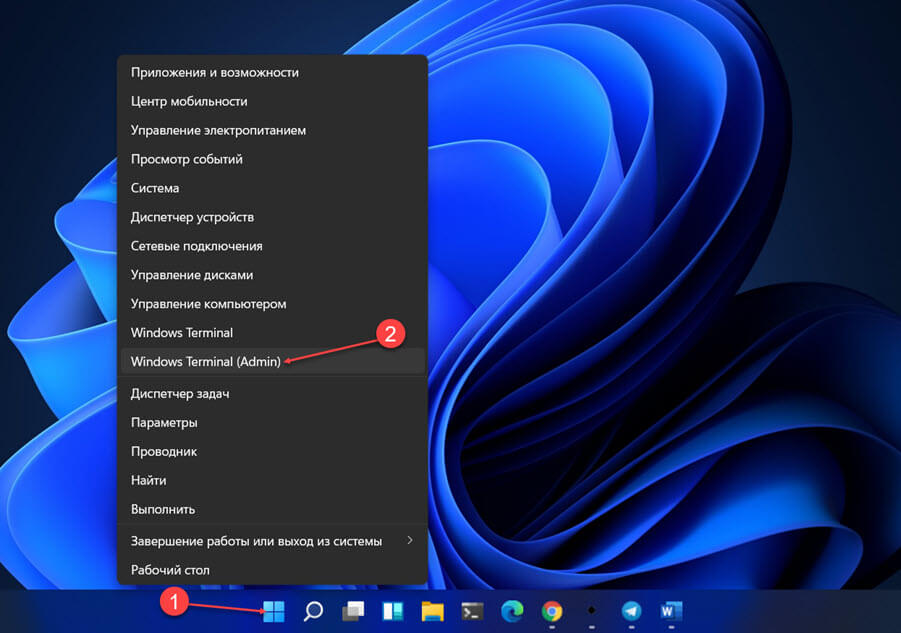
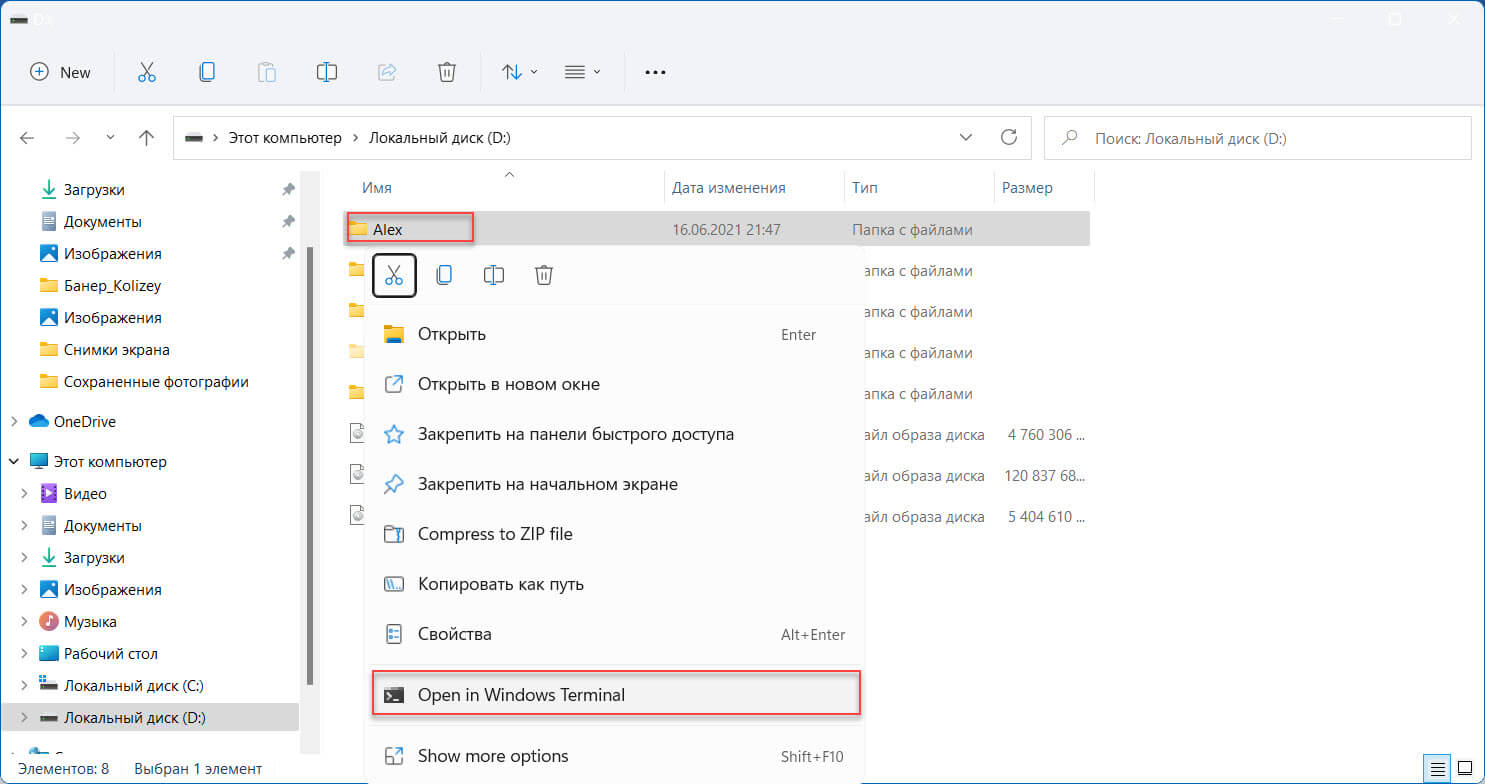
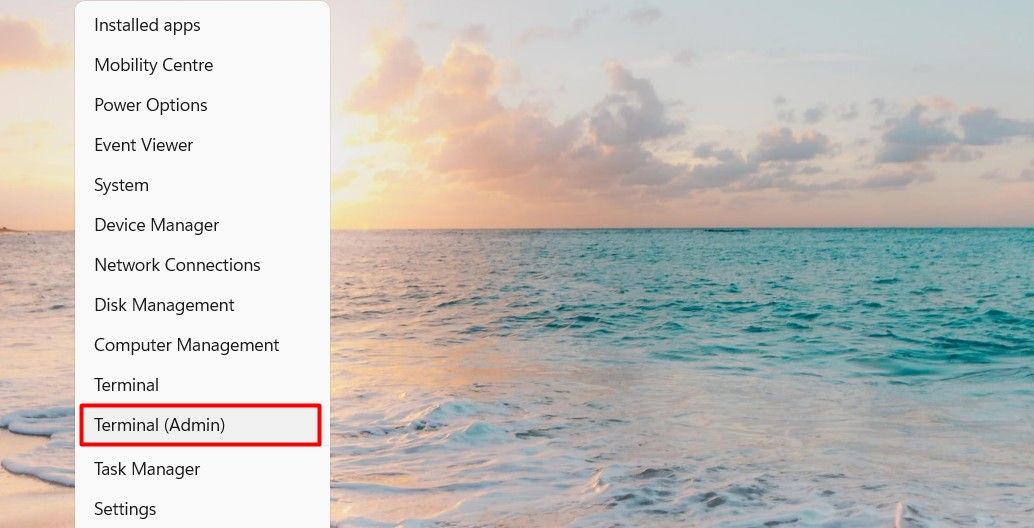
All that you need to do is press Win + X or right-click the Start menu button. Then, click Windows Terminal (Admin). After that, Windows 11 will open a new instance of Windows Terminal in the PowerShell mode with elevated privileges.
We have a dedicated article about how to open Windows Terminal as Administrator in Windows 11.
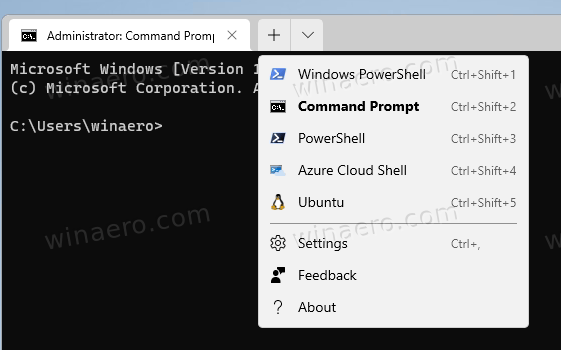
Note that If you changed the default profile in Windows Terminal, then you need to select PowerShell from the ‘profiles’ down arrow button.
Always Run PowerShell as Administrator from Windows Terminal
Starting in version 1.3, Windows Terminal allows you to run any of its profiles as Administrator. You can use this new feature and set the PowerShell start elevated, and then make it your default profile. To check your current Windows Terminal version, launch the app and enter wt -v. If you are running an older release, install the latest Windows Terminal version.
To always run PowerShell as Administrator from Windows Terminal, do the following.
- Open Terminal by right-clicking the Start button and selecting Windows Terminal (Admin).
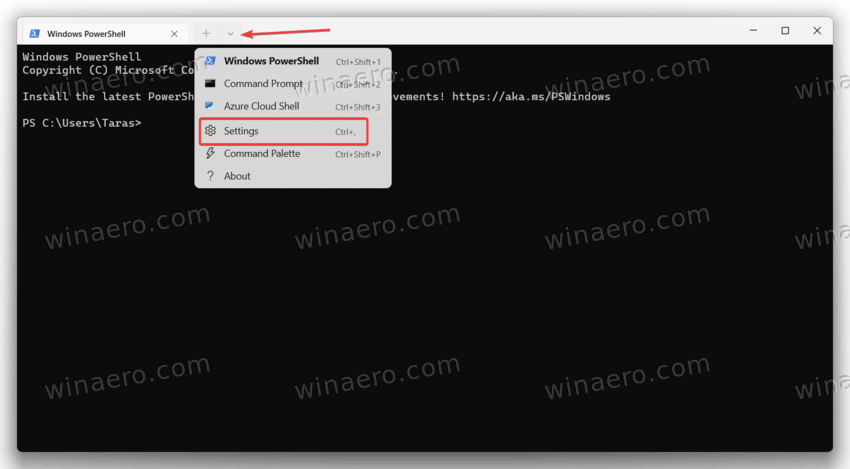
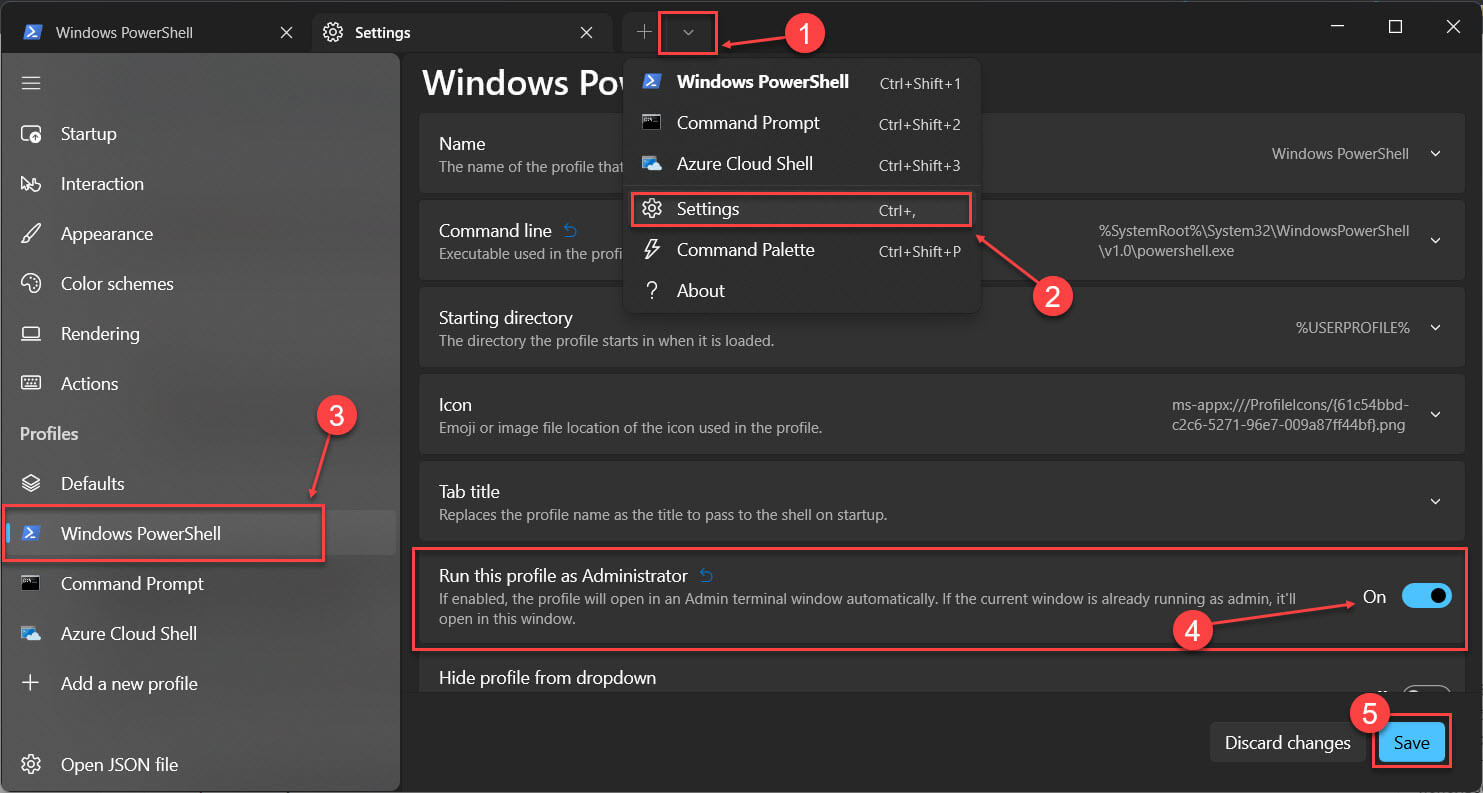
- Click its menu button on the tab strip and select Settings. Or simply press Ctrl + , (comma).

- Select PowerShell in the left panel.
- On the right, find the «Run this profile as Administrator» toggle option and enable it.

- Click Save to apply changes.

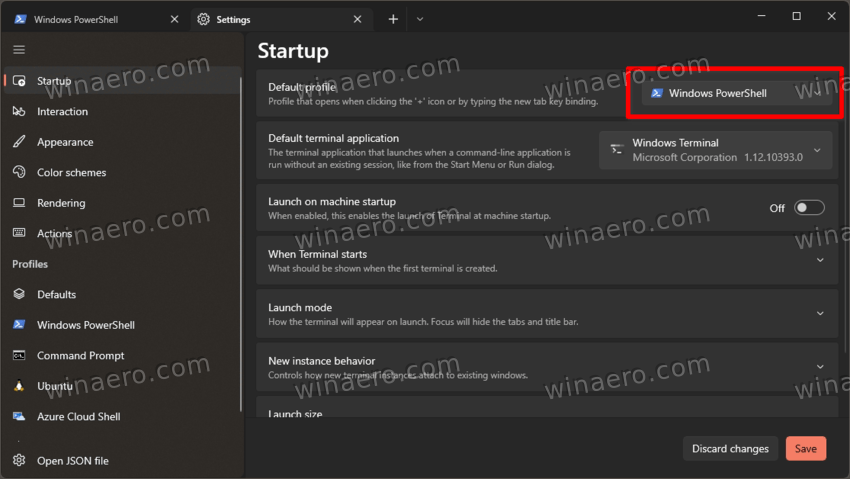
Now you need to set the modified PowerShell profile as your default Windows Terminal profile. This will make it start every time you open the Terminal app.
Set PowerShell as the default Windows Terminal profile
- Press Ctrl + , (comma) to go to Windows Terminal Settings.
- Click Startup.
- Find the Default profile option and change it to PowerShell.
- Click Save to apply the changes.
Done!
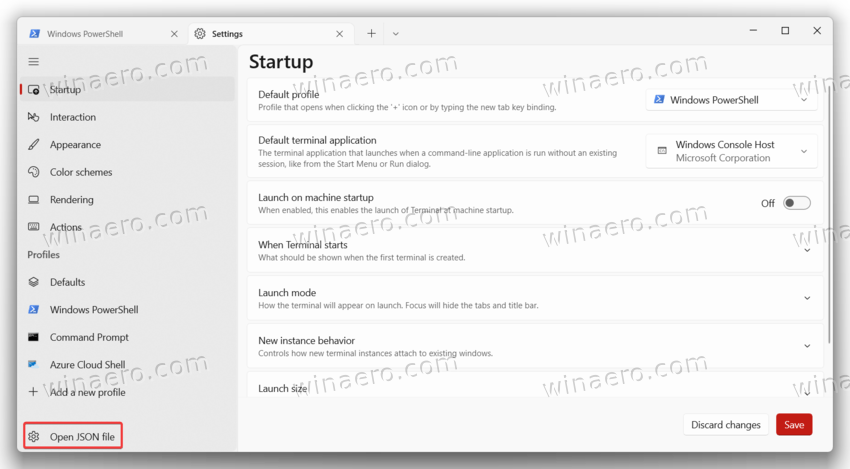
Finally, you can make the PowerShell elevated by editing the JSON config file. If you prefer working with the JSON configuration, here is how to change it.
Edit the JSON file
- Open Windows Terminal and press Ctrl + , (comma) to open Settings.
- Click Open JSON file.
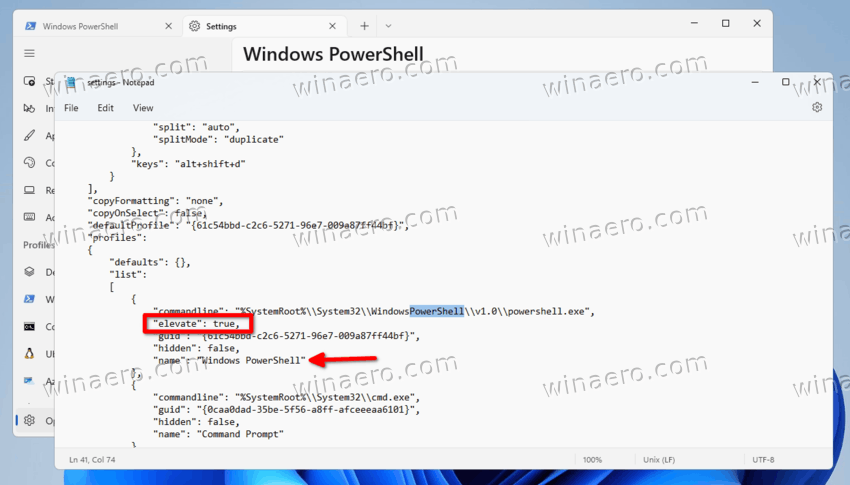
- Find PowerShell in profile JSON array.
- Add
"elevate": true,(don’t forget to add comma). - Save the changes and close Notepad or whatever app you use to edit the file.

And that is how you make Windows Terminal always run PowerShell as Administrator. Now, every time you start the app, it will open to the elevated PowerShell tab. You will have to confirm the UAC prompt.
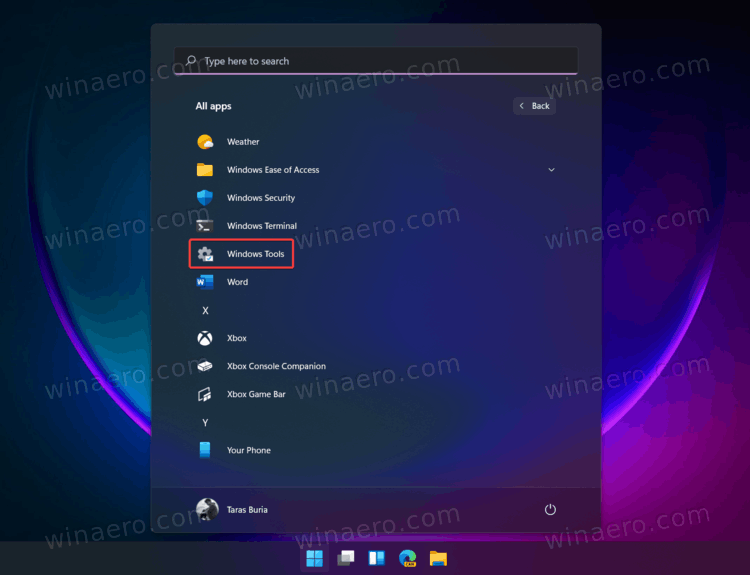
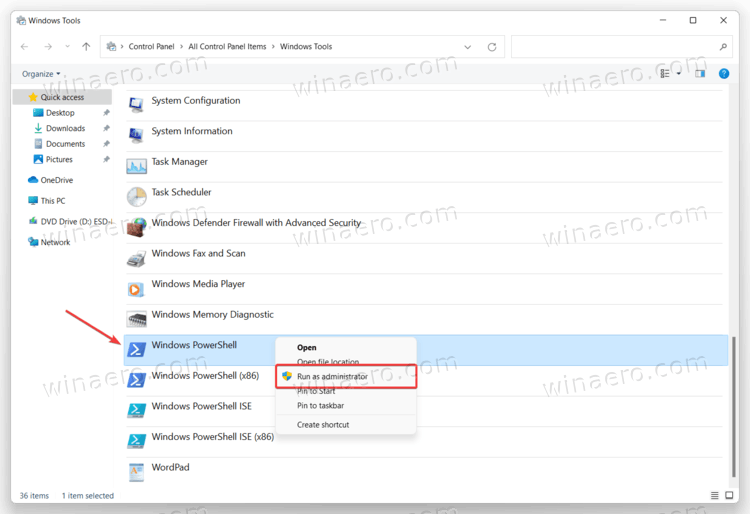
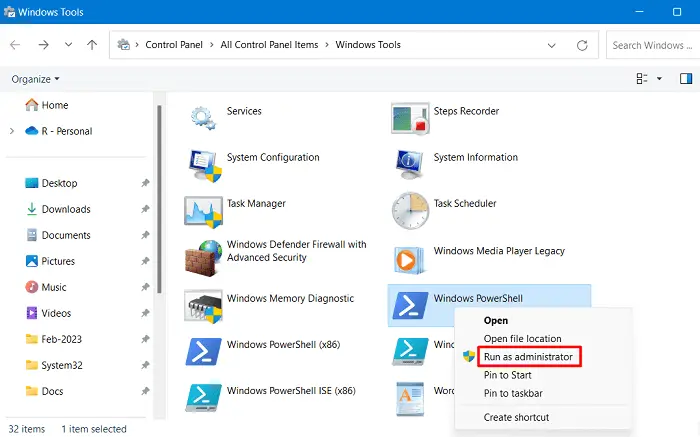
Open PowerShell as Administrator from Windows Tools
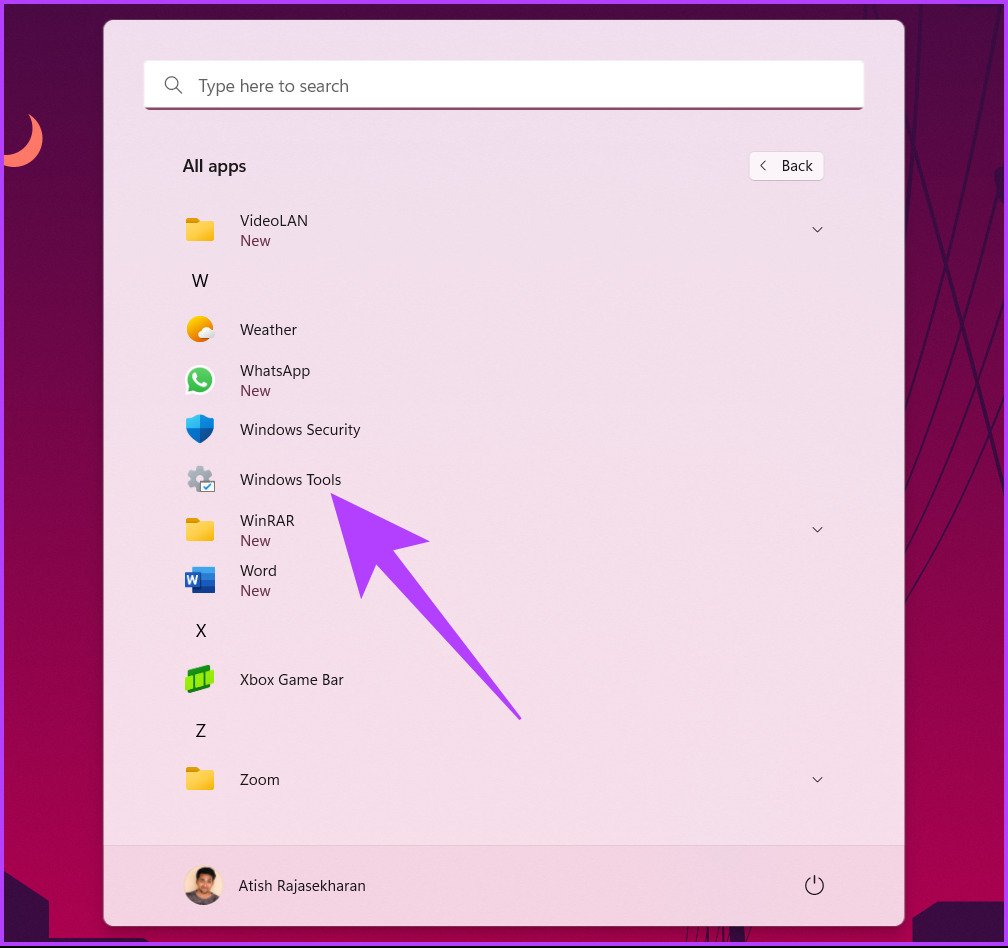
Unlike Windows 10, where PowerShell has a dedicated folder in the list of all apps, Windows 11 «stores» PowerShell alongside all system tools in a single folder called «Windows Tools.» You can launch PowerShell from that folder.
To open PowerShell as Administrator in Windows 11, do the following.
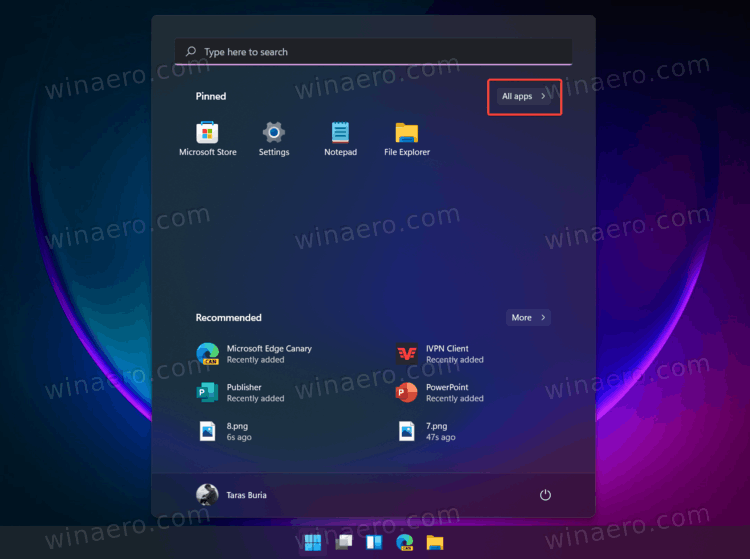
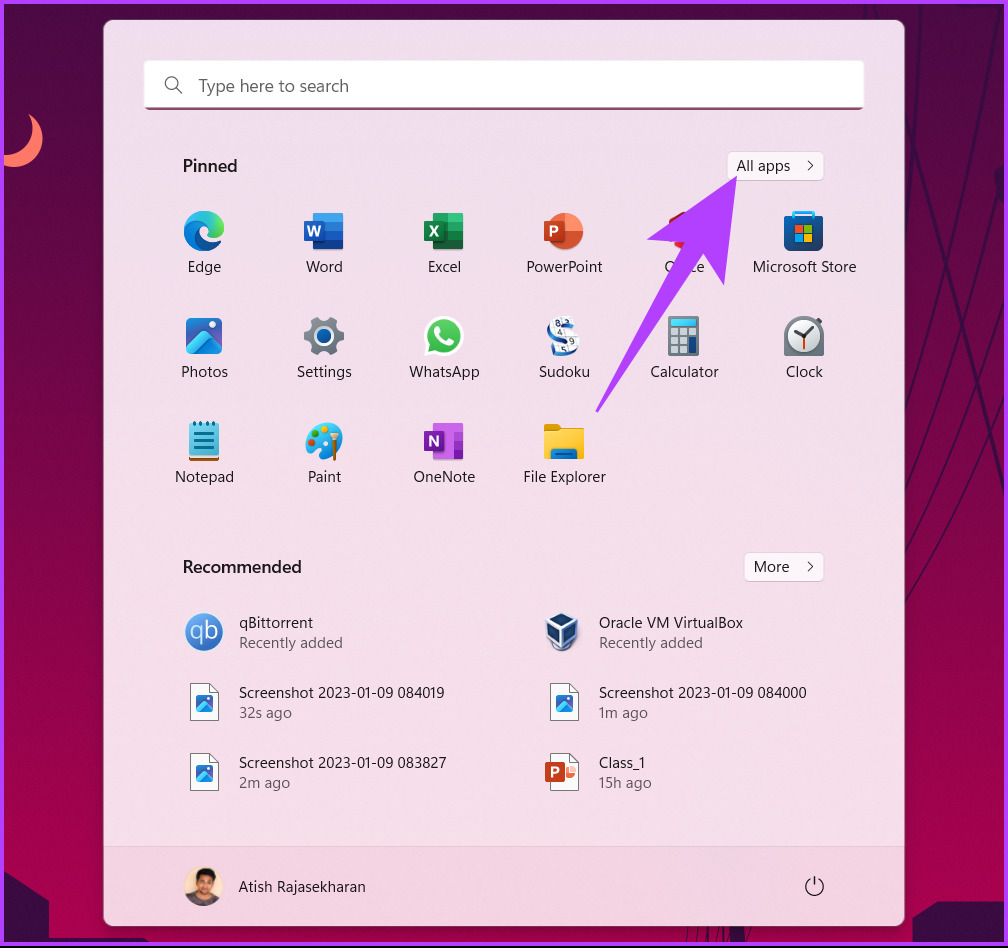
- Open the Start menu and click the «All Apps» button.

- Scroll down and find the «Windows Tools» icon. Open Windows Tools folder and find PowerShell.

- Right-click PowerShell and select Run as Administrator.

- Similarly, you can launch PowerShell ISE, or respective x86 versions of PowerShell.
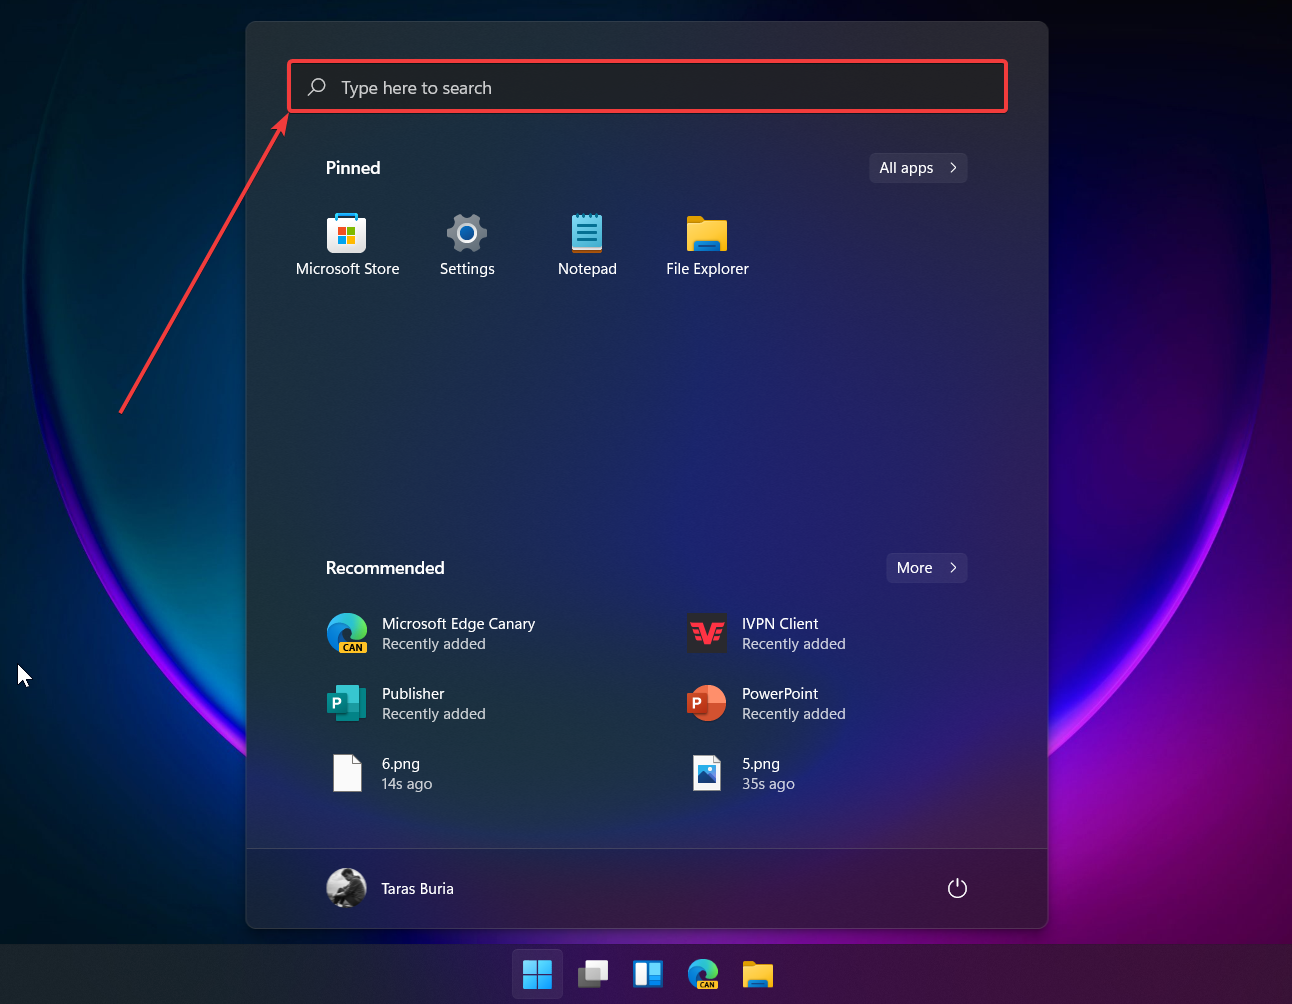
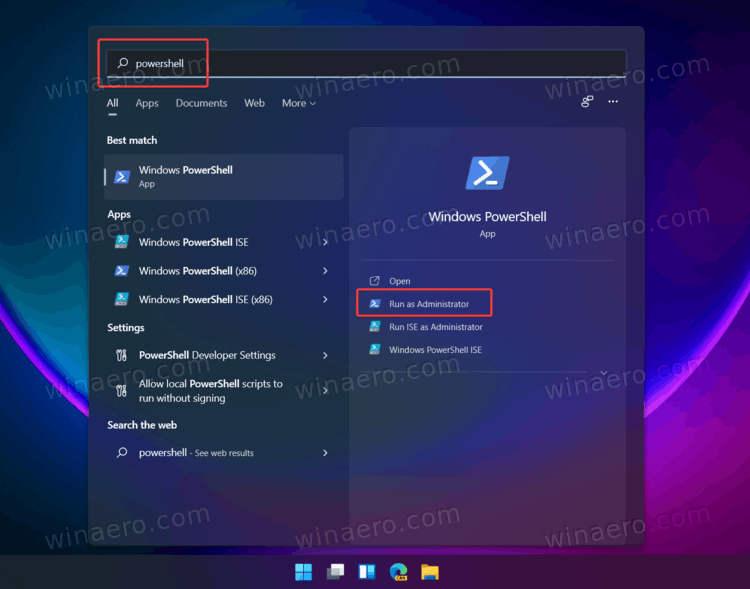
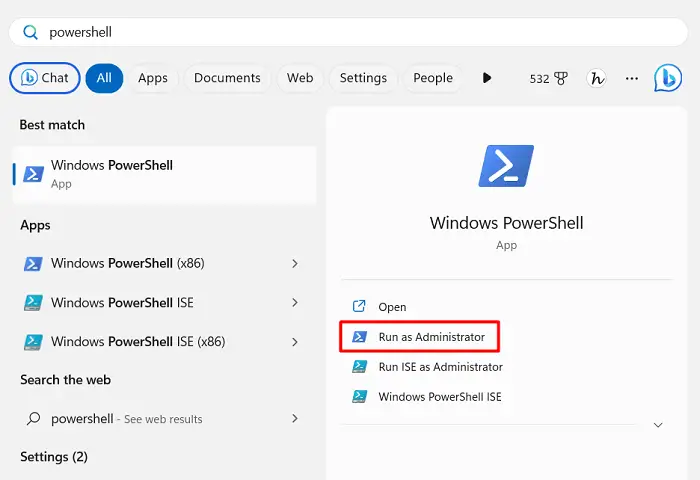
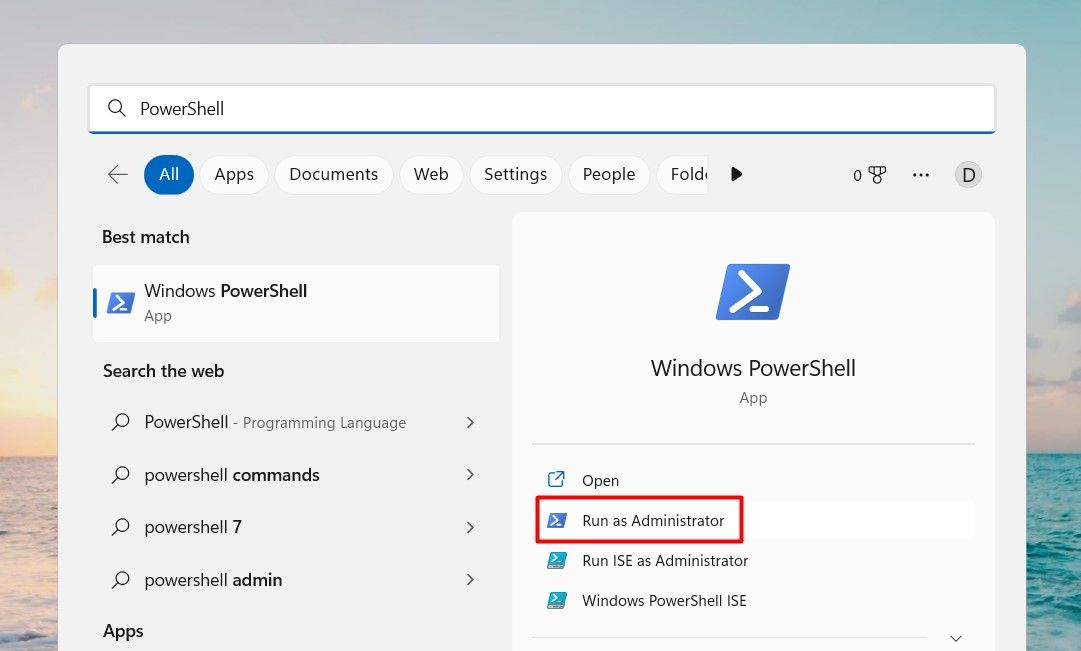
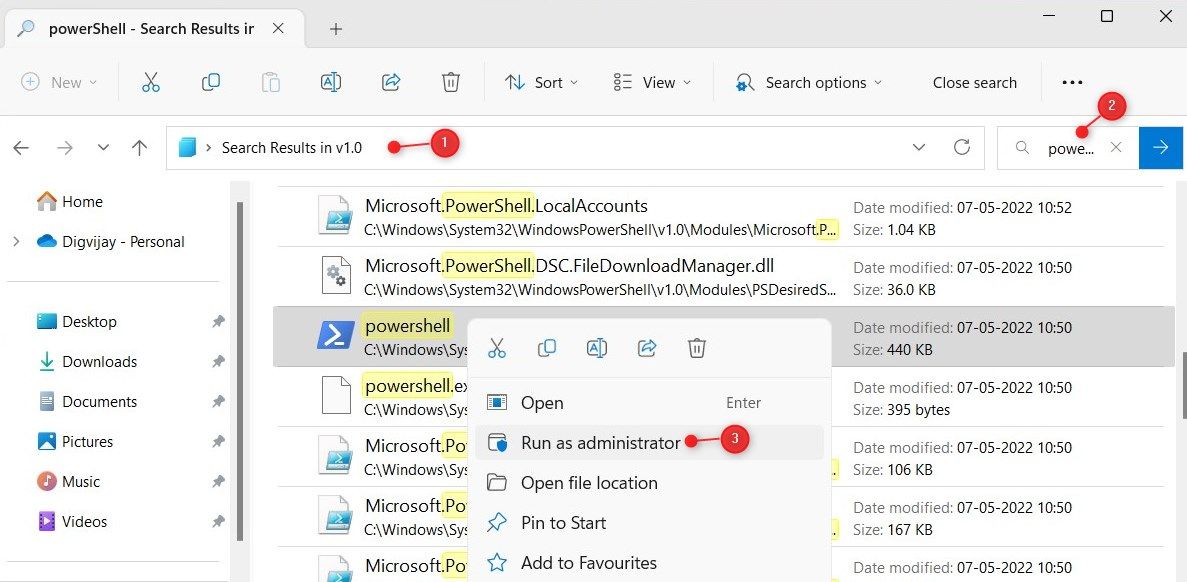
Another quick and easy way to run PowerShell as Administrator is to use Windows Search.
How to open PowerShell in Windows 11 using Search
- Press the Start button and start typing PowerShell. You cal also press the search icon on the taskbar or use Win + S buttons.

- Enter PowerShell. Windows will show the app in the search results.
- Click Run as Administrator to open a new elevated PowerShell. Alternatively, you can press the Ctrl + Shift + Enter keys on the keyboard.

You can also open PowerShell in Windows 11 using the Run dialog box or Task Manager .
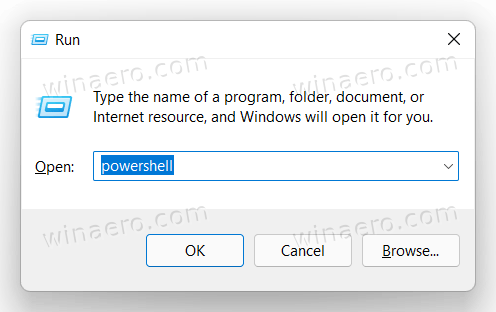
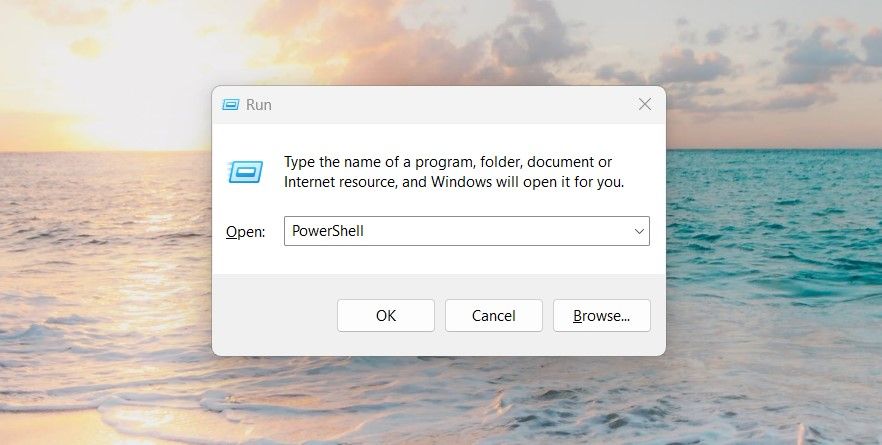
Open an Elevated PowerShell using the Powershell.exe command
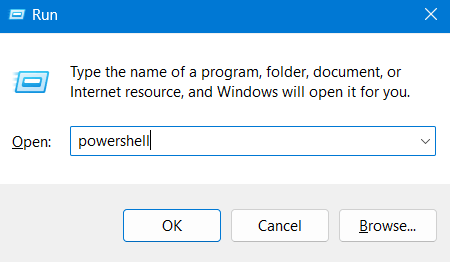
- Press Win + R to open the Run dialog box, then enter
PowerShell.
- Next, press Ctrl + Shift + Enter to execute the command. It is crucial to press exactly those buttons; otherwise, Windows will launch PowerShell in user mode.
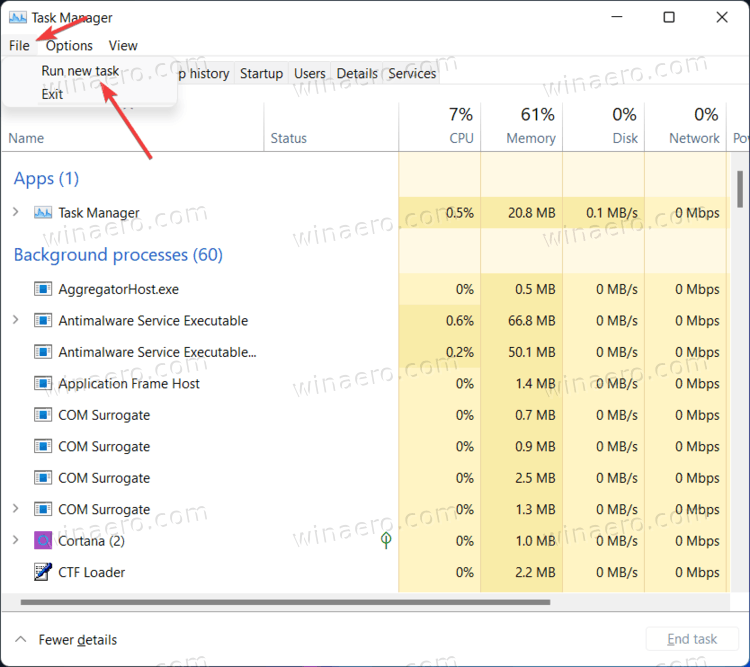
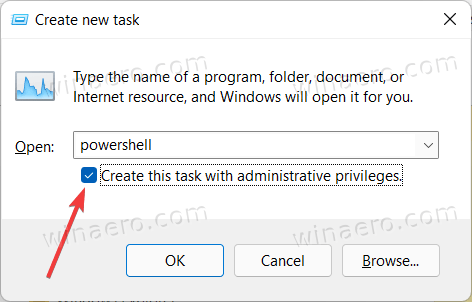
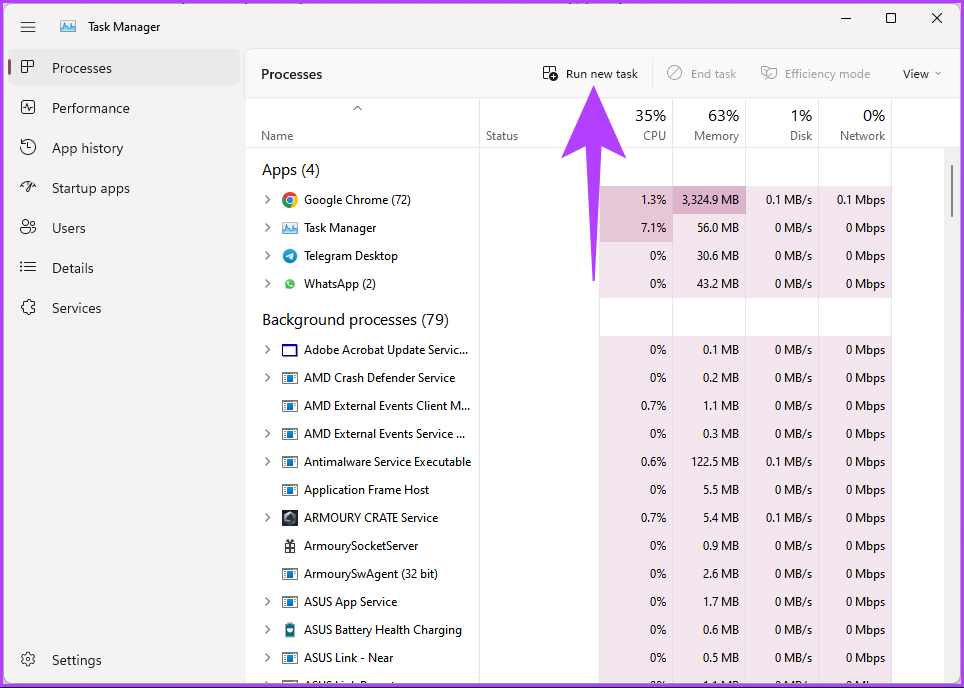
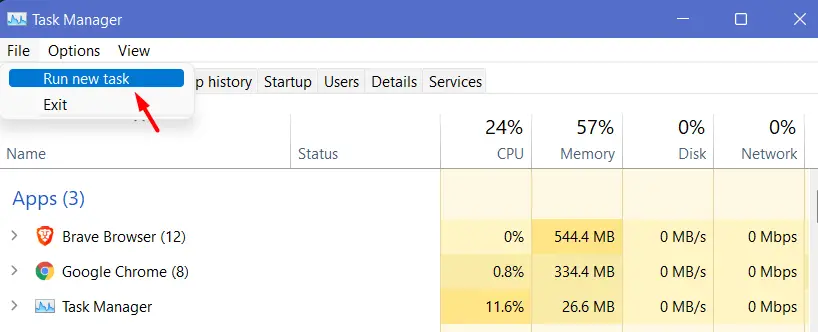
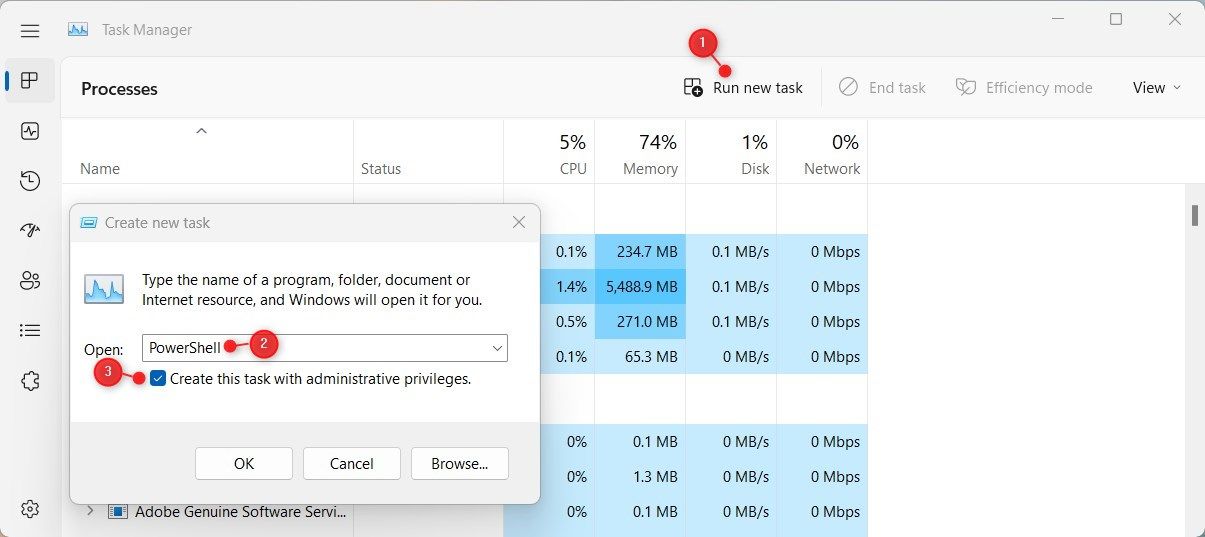
- Similarly to Run, you can open PowerShell in Windows 11 from the Task Manager. Open Task Manager and click File > Run new task.

- Enter
powershellin the Run text box. - Place a checkmark next to «Create this task with administrative privileges«.

That is how to access Windows 11 PowerShell with the command of the same name.
Open PowerShell as Administrator from the Windows 11 taskbar
If you have PowerShell running, you can press and hold the Ctrl and Shift keys on the keyboard, and click on the PowerShell icon in the taskbar. This will instantly open a new PowerShell window running as Administrator.
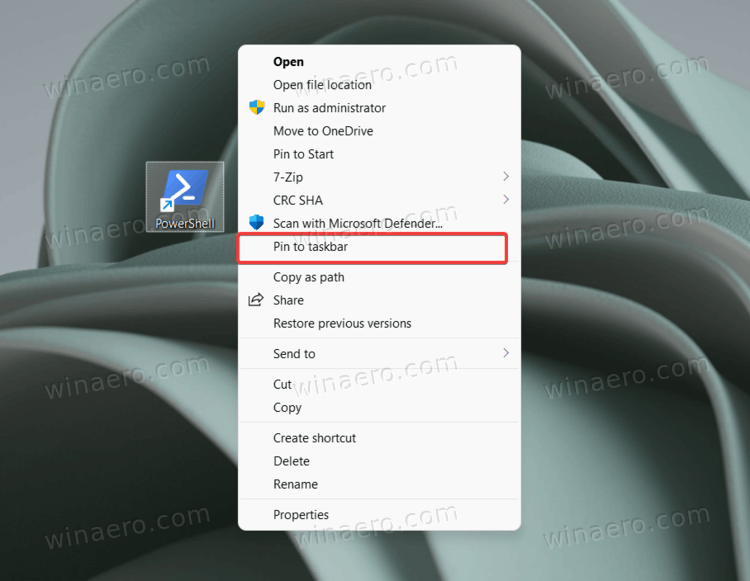
If you frequently use PowerShell in Windows 11, you could have it pinned to the taskbar to access the app with one click. If not, you can quickly get it done by opening PowerShell in Windows 11 using any method in this article, right-click the icon on the taskbar and click «Pin to taskbar.»
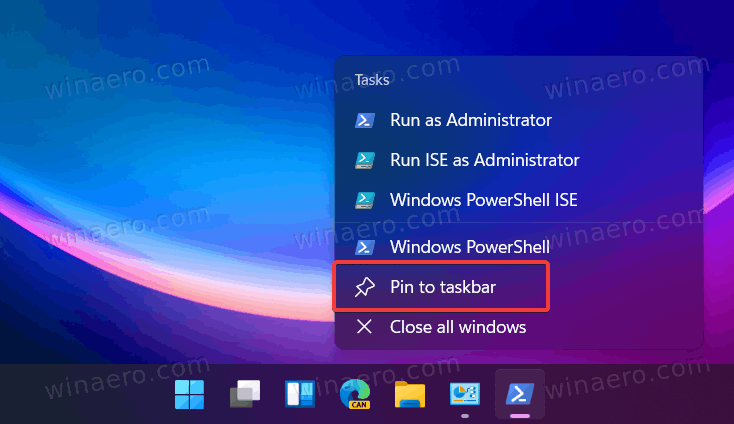
After that, you can use the pinned icon to launch PowerShell as Admin (elevated). Press and hold the Ctrl and Shift keys simultaneously, and click on the PowerShell icon in the taskbar. It will start elevated.
Create a shortcut to open PowerShell as Administrator on the Desktop
A shortcut on the desktop is one more way to open PowerShell as Administrator.
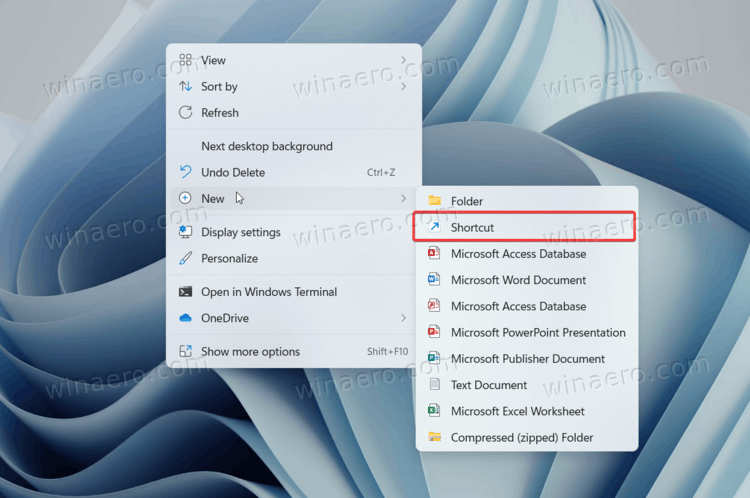
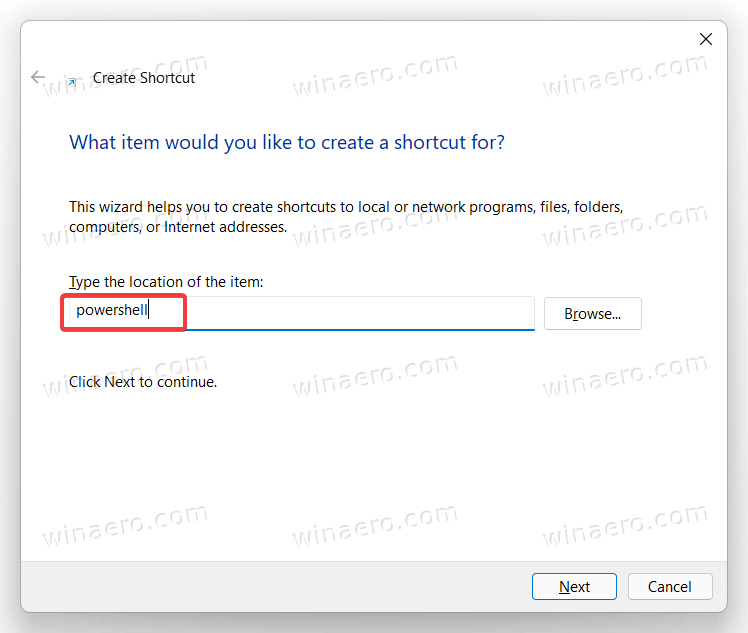
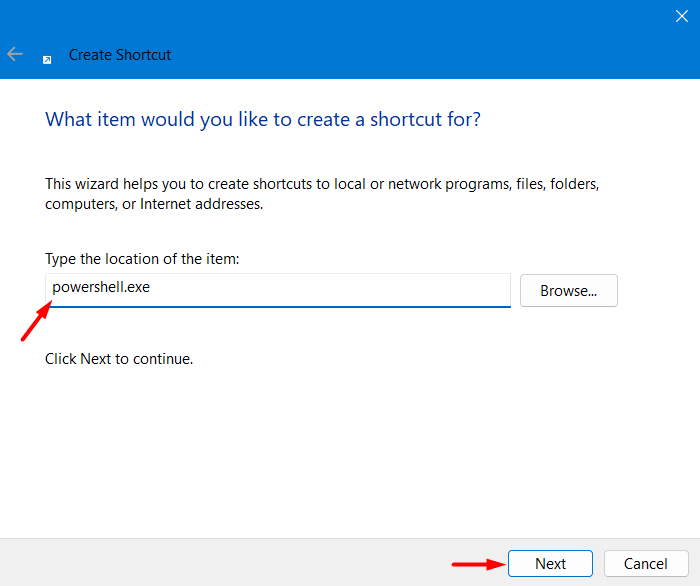
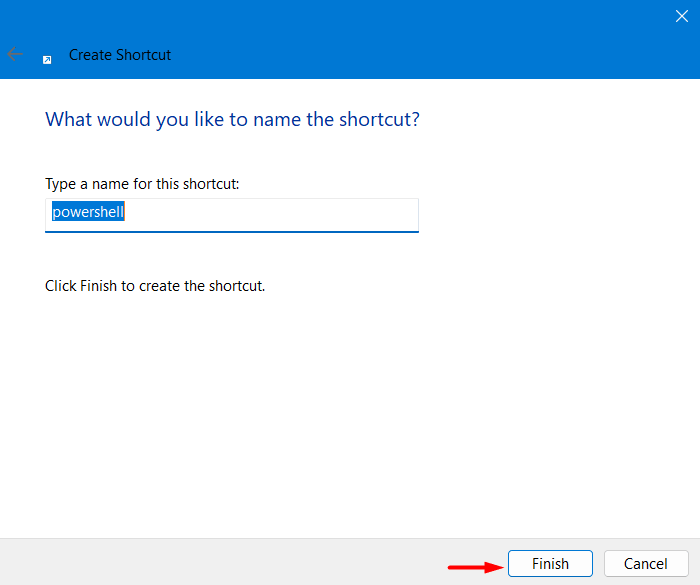
- Right-click anywhere on the desktop or inside a folder and select New > Shortcut.

- In a new window, enter
powershell.exein the «Type the location…» field. Click Next.
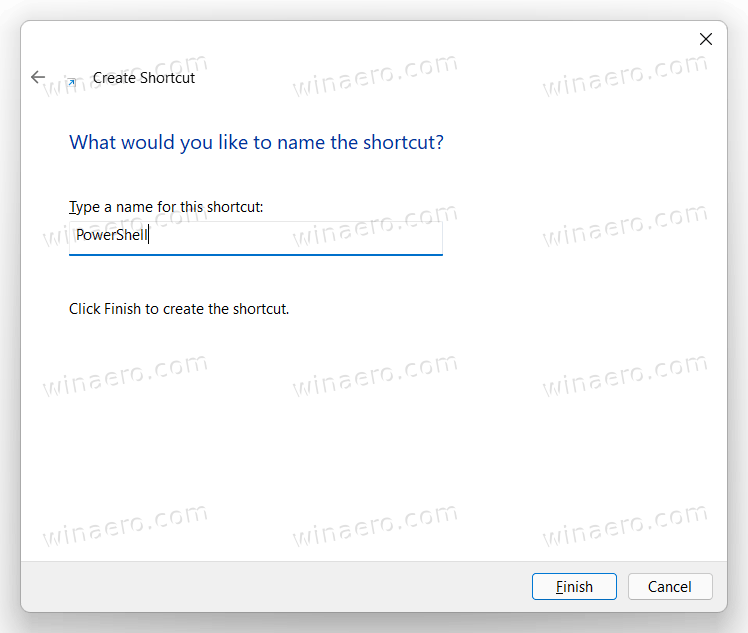
- Name your shortcut as «PowerShell (Administrator) and click Finish.
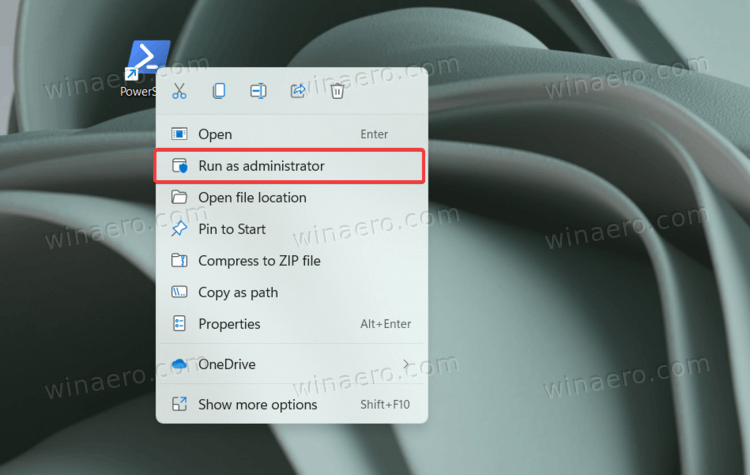
Now you can right-click your newly made shortcut and select Run as Administrator.
But there is one more thing you can do to avoid right-clicking the shortcut every time you need to open PowerShell as Administrator.
Modify the shortcut to always run it as Administrator
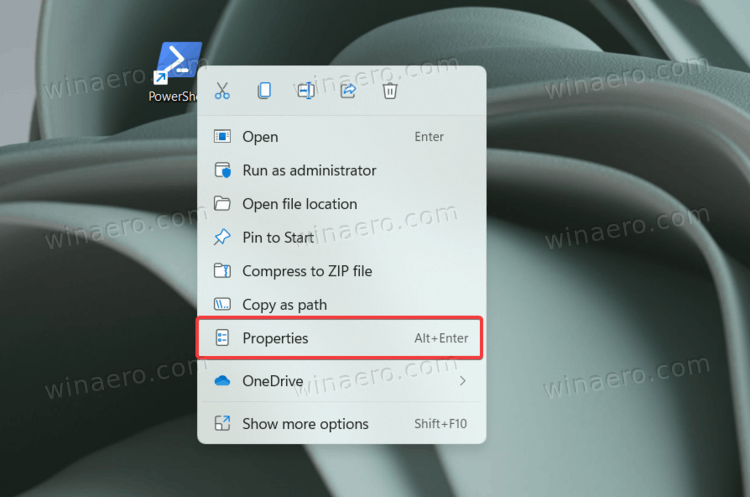
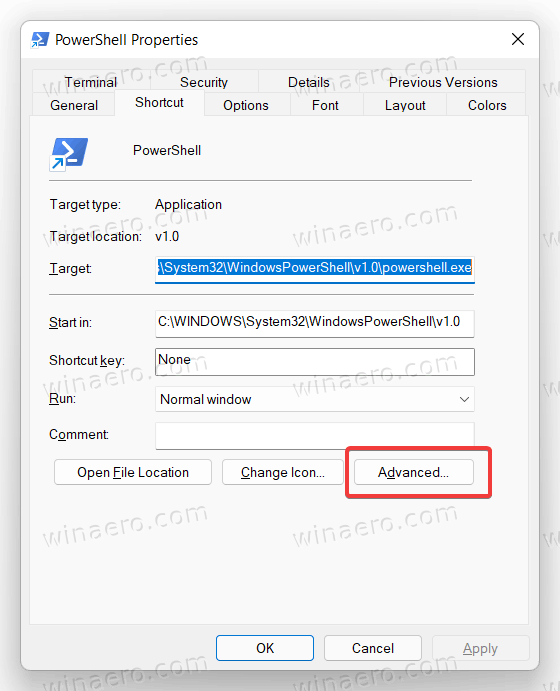
- Right-click the shortcut you have just made and select Properties.

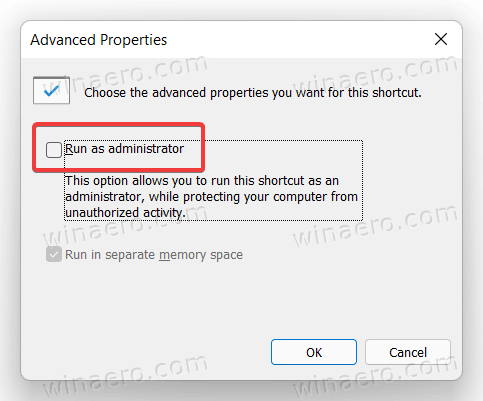
- On the Shortcut tab, click the Advanced button.

- On the next window, place a checkmark next to the «Run as Administrator» option.

- Click OK to save the changes.
That is it. Now you can open PowerShell as Administrator in Windows 11 using the desktop shortcut.
Tip: If you want to pin elevated PowerShell to the taskbar, right-click your shortcut and select Show more options, then click Pin to taskbar.
Pinning a shortcut to the taskbar is not the only quick way to open PowerShell as Administrator. You can add PowerShell to the context menu.
- Download the REG files using this link.
- Double-click the file
Add Open PowerShell here as administrator.reg.
- Confirm the UAC prompt.
- Now, right-click any folder and select Show more options > Open PowerShell here as administrator.

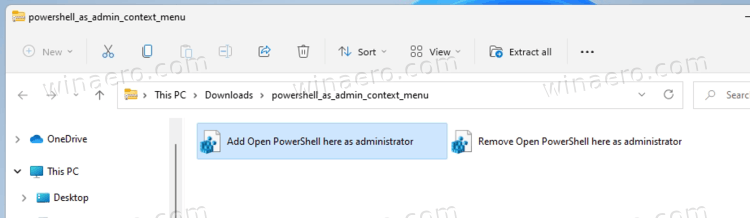
The undo file is included into the archive. Double-click on the Remove Open PowerShell here as administrator.reg to delete the command from the context menu.
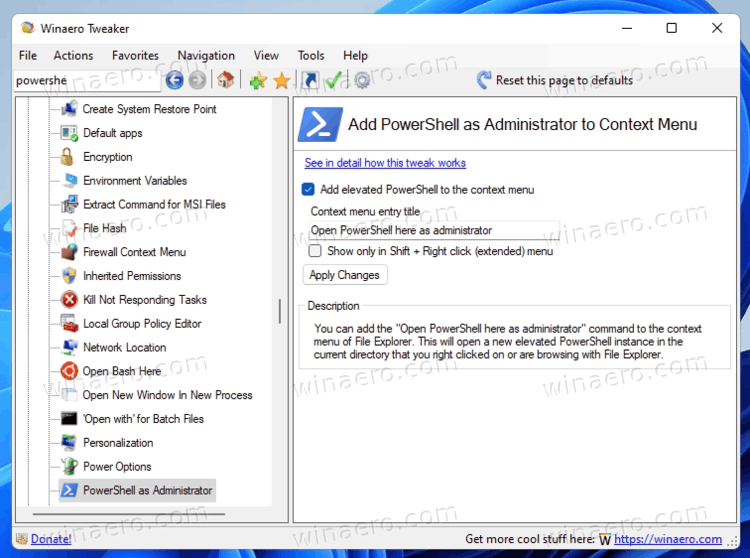
You can save your time using Winaero Tweaker. The app allows you to add the elevated PowerShell item to the context menu with a couple of clicks.
- Download Winaero Tweaker and launch it.
- Open the Context Menu section in the left panel of the window.
- Click PowerShell as Administrator.
- Place a checkmark next to the «Add elevated PowerShell to the context menu» option.

- Click Apply changes.
- Now open any folder and right-click anywhere. Select Show More options.
- Click Open PowerShell here.
Now you know how to open PowerShell as Administrator in Windows 11. Any of those methods work equally, so you can use whichever you prefer.
Support us
Winaero greatly relies on your support. You can help the site keep bringing you interesting and useful content and software by using these options:
If you like this article, please share it using the buttons below. It won’t take a lot from you, but it will help us grow. Thanks for your support!
Quick Tips
- Utilize the search bar. Hit the Windows key + S > type PowerShell > right-click the result > select Run as administrator.
- Press Win + R > type powershell > hold Ctrl + Shift + Enter to launch with admin rights.
- Need another way? Press the Windows key + X and select Terminal (Admin).
Method 1. Using Windows Search
Step 1: Press the Windows key and type PowerShell in the search box.
Step 2: Click on Run as Administrator from the right pane.
Step 3: You will get a UAC prompt asking for your consent; click Yes.
That’s it. The PowerShell will open as administrator. If you don’t want to use the Windows Search feature to find and open PowerShell, you can do the same with the help of the Windows context menu. Keep reading.
Method 2. Using WinX
Step 1: Press the Windows key + X on your keyboard.
Step 2: From the context menu, select Terminal (Admin).
Step 3: In the UAC prompt, click Yes.

There you go. You have launched PowerShell in administrator mode. If you landed on some Command Prompt or in any other terminal, click on the Chevron (arrow) icon at the top and select PowerShell.
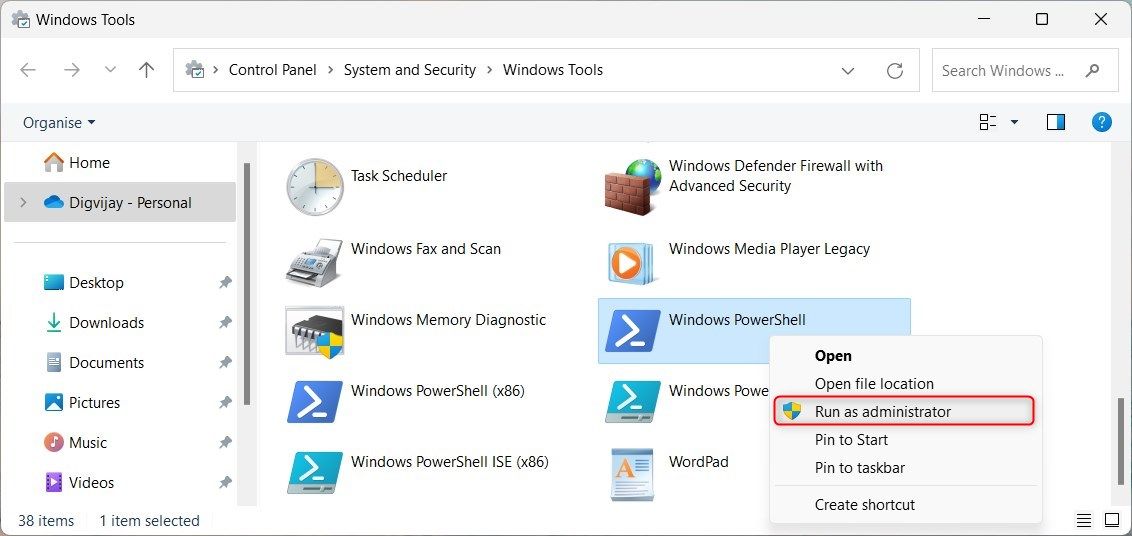
We will be using Windows Tools to execute this method.
Step 1: Press the Windows key on your keyboard > click on All apps.
Step 2: Scroll down and click on Windows Tools.
Step 3: In the Windows Tools window, scroll down and right-click on Windows PowerShell.
Step 4: From the context menu, select Run as administrator.

Step 5: In the prompt, click Yes.
There you go. You can now work on PowerShell with administrator privileges. If you want to know another way, jump to the next method.
Method 4. Using Task Manager
Step 1: Press Ctrl + Shift + Esc on your keyboard to open Task Manager.
Step 2: Click on the Run new task button. It will open a Create new task dialog box.
Step 3: Type PowerShell in the text field > check the box for Create this task with administrative privileges > click OK.

There you have it. It will open PowerShell with administrative privileges without any complications.
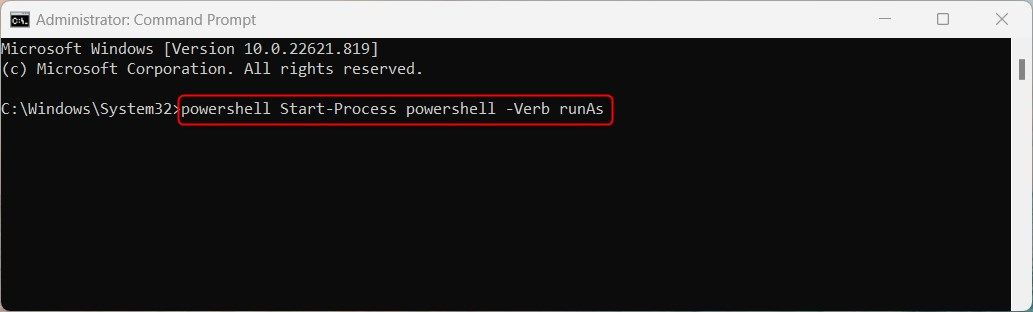
Method 5. Using the Run Command Box
Step 1: Press the Windows key + R on your keyboard to open the Run dialog box.
Step 2: Type PowerShell > click OK. This will open Windows PowerShell with the rights of the current user.

Step 3: To switch from normal (current user) mode to administrator mode, type the below command and press Enter.
Start-Process powershell -Verb runAs
Step 4: In the UAC prompt, click Yes.

Method 6. Using CMD
Step 1: Press the Windows key > type Command Prompt > click Run as administrator. In the prompt, click Yes.
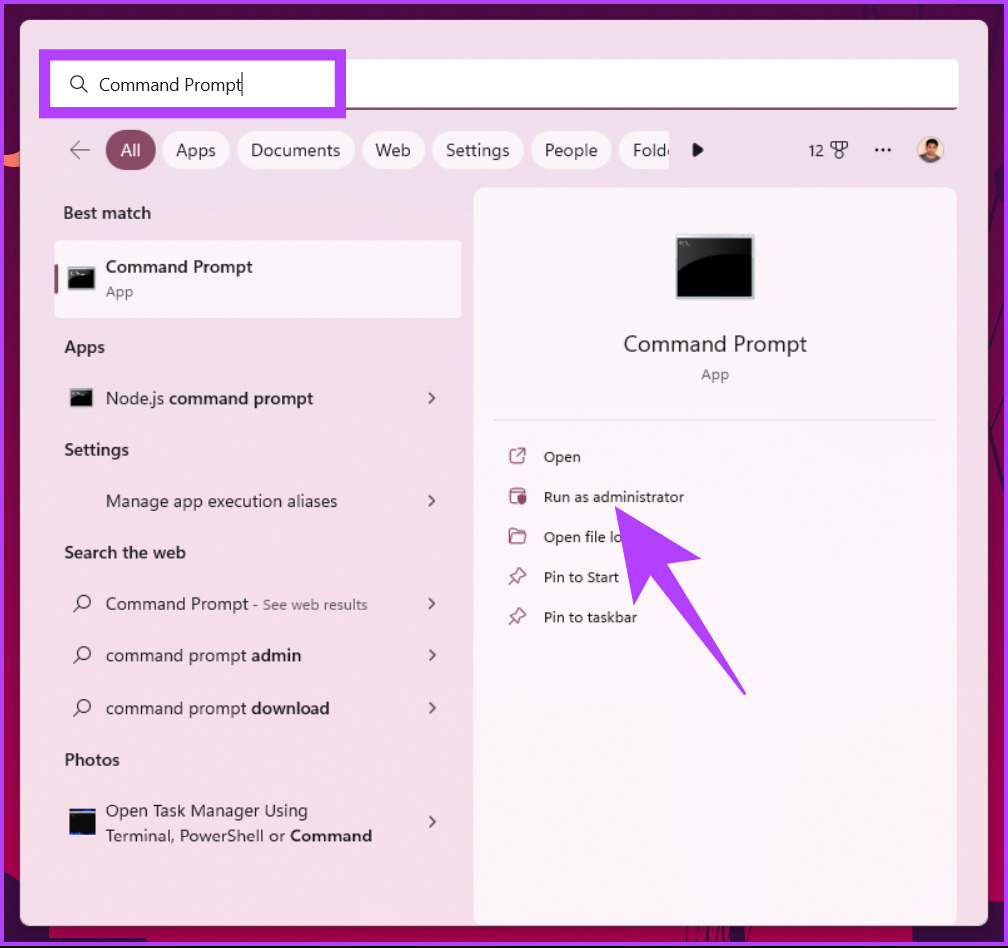
Step 2: In the Command Prompt window, type PowerShell > press Enter.

FAQs
1. Does Windows PowerShell run in administrator mode by default?
Windows PowerShell does not run in administrator mode by default. When you launch PowerShell, it runs with the permissions of the currently logged-in user.
2. How do I know if PowerShell is running as an administrator?
There are several ways to determine if PowerShell is running as an administrator. One is to check the PowerShell window title or the PowerShell execution policy. Another is to check the user account control (UAC) prompt.
Was this helpful?
Thanks for your feedback!
The article above may contain affiliate links which help support Guiding Tech. The content remains unbiased and authentic and will never affect our editorial integrity.
Are you looking for a way to elevate your PowerShell session to an administrator level in Windows 11? With only a few clicks of your mouse, you can effortlessly open the powerful PowerShell script tool and access its advanced features – all as an administrator. In this guide, we’ll show you how to open PowerShell as admin in Windows 11. So let’s start.
Related Post: How to Open Command Prompt as Administrator in Windows 11
To open PowerShell as admin, use the below steps:
1] Using the Windows Search bar
The search bar in Windows 11 makes it easy to quickly open programs as an administrator. To open PowerShell as an administrator using the Windows Search bar, simply follow the steps below:
- Click the Windows icon in the lower-left corner of your screen.
- In the search bar, type in PowerShell.
- Head over to the right pane, and hit Run as administrator.
- Click Yes when User Account Control (UAC) prompts on the screen.
2] Using the Windows Administrative Tools
The Windows Administrative Tools is another easy way to open PowerShell as an administrator. To do this, simply follow the steps below:
- Open the Start menu and search for Control Panel.
- Click on System and Security, then click Windows Tools.
- Then right-click on Windows PowerShell and select Run as administrator.
- When the UAC window appears on the screen, click Yes.
3] Using Command Prompt
You can also use the Command Prompt to open PowerShell as an administrator. To do this, simply follow the steps below:
- Click the Start menu and type Command Prompt in the search box.
- Right-click on Command Prompt and select Run as administrator.
- Type powersSell into the Command Prompt and press Enter.
- Click Yes when User Account Control prompts on the screen.
- You will now be able to use PowerShell as an administrator.
4] Using Windows Run command
This is one of the quickest ways to open PowerShell as an administrator. To do this, simply follow the steps below:
- Press Windows + R on the keyboard to open the Run command.
- Type powershell into the dialog box. Then press Ctrl + Shift + Enter on your keyboard.
- When UAC prompts you, select Yes to grant permission.
- You will now be able to use PowerShell as an administrator.
5] Using Task Manager
Task Manager is an important Windows tool that can help you open PowerShell as an administrator. To do this, simply follow the steps below:
- Press Ctrl + Shift + Esc to open the Task Manager.
- On the top menu bar, click Run new task.
- Type powershell into the dialog box and check the Create this task with administrative privileges.
- Click OK to open PowerShell as an administrator.
6] Using the File Explorer
If you’re familiar with Windows File Explorer, you can also use this to open PowerShell as an administrator. To do this, simply follow the steps below:
- Open File Explorer and navigate to the PowerShell executable file. The default location is provided below –
C:\Windows\System32\WindowsPowerShell\v1.0\powershell.exe
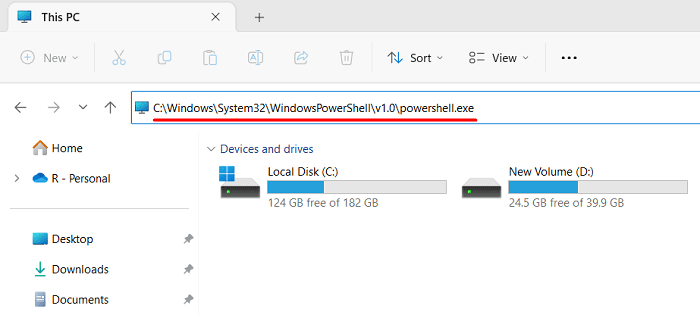
- Right-click on the PowerShell executable file and select Run as administrator.
- Click Yes when prompted by the User Account Control (UAC).
- You will now be able to use PowerShell as an administrator.
7] Using Desktop Shortcut
To make it easier for you, you can also create a desktop shortcut so that you can open PowerShell as an administrator with just one click. To do this, simply right-click on the desktop, select New, and then select Shortcut. Then type in powershell.exe in the location field. Then click Next and give it a name.
Now you have a shortcut that you can use to open PowerShell as an administrator. See the Snapshot below –
After you have created the shortcut, right-click on the same and select Run as administrator. Click Yes to confirm the action. You will now be able to use PowerShell as an administrator.
8] Pin PowerShell to Taskbar
You can also pin PowerShell to your taskbar for easier access. To do this, simply open the Start menu and type PowerShell in the search box. Right-click on the PowerShell icon and select Pin to taskbar from the drop-down menu. Now right-click on the PowerShell icon on your taskbar and select Run as administrator. When UAC prompts you, select Yes to grant permission.
Frequently Asked Questions – Windows PowerShell
How do I open PowerShell as an administrator?
To open PowerShell as an administrator, you can use the Command Prompt, Windows Run command, Task Manager, File Explorer, desktop shortcut, or pin PowerShell to the taskbar.
What is UAC?
UAC stands for User Account Control. It is a security feature of Windows that prompts users for permission when making changes to their devices. You must select Yes when UAC prompts you to grant permission for the program to make changes to your device.
How do I create a PowerShell shortcut?
To create a PowerShell shortcut, right-click on the desktop, and select New > Shortcut. Then type “C:\Windows\System32\WindowsPowerShell\v1.0\powershell.exe” into the location box and click Next to create the shortcut. You can also drag and drop a PowerShell icon onto the desktop to create a shortcut.
What is Windows PowerShell?
Windows PowerShell is an automation platform and scripting language for Windows. It helps users automate and manage various tasks, including system administration and application deployment. PowerShell can also be used to write scripts that configure the system and customize it with various commands.
Во многих руководствах на нашем сайте, вы часто видите инструкции, в которых необходимо открыть PowerShell от имени администратора. В Windows 11 вам иногда придется его использовать, поэтому я хотел бы поделиться с вами несколькими способами открытия PowerShell от имени Администратора.
Как открыть PowerShell из меню «Win + X»
- Этот способ очень удобен в Windows 11. Чтобы получить доступ к этому меню Win X в Windows 11, нажмите на клавиатуре сочетание клавиш Win X или кликните правой кнопкой мыши на меню «Пуск».
- В открывшимся меню выберите пункт Терминал Windows (Admin).
Это откроет окно терминала с запущенным PowerShell от имени администратора.
Открыть PowerShell с помощью поиска
В Windows 11 вы можете использовать значок поиска на панели задач. Кликните мышкой на нем и введите «PowerShell», в разделе «лучшее соответствие» кликните на результат правой кнопкой мыши и выберите «Запуск от имени администратора» или в результатах поискам справа нажмите «Запуск от имени администратора».
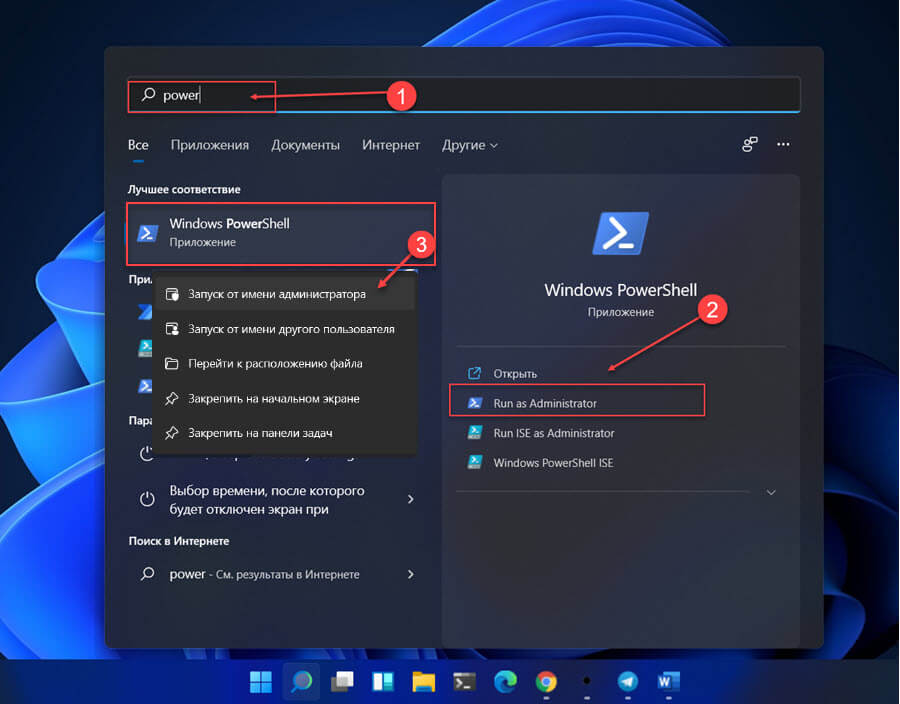
Это также работает в меню «Пуск», просто начните печатать PowerShell, затем кликните правой кнопкой мыши на появившемся представлении Windows PowerShell и выберите «Запуск от имени Администратора».
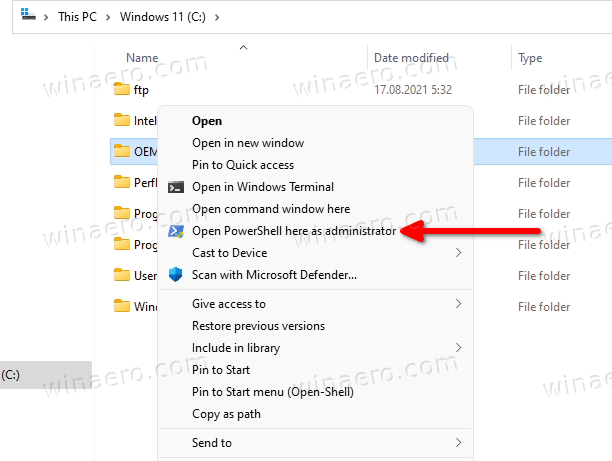
Как запустить PowerShell из Проводника Windows 11
Вы можете запустить PowerShell из Проводника. Вы можете подумать, зачем? Вот примерный сценарий.
Всякий раз, кликаете правой кнопкой мыши по любой папке в проводнике, вы получите пункт в контекстном меню «Открыть в терминале Windows». Это очень удобно, вы просто открыли окно PowerShell по желаемому пути.
Как Всегда открывать PowerShell от имени администратора
Примечание: Параметр автоматического повышения уровня доступен в Windows Terminal версии 1.13 и выше. Чтобы проверить версию терминала, используйте команду «wt -v». Если вам нужно обновить приложение, используйте команду: winget upgrade —id Microsoft.WindowsTerminal.Preview. Если у вас нет приложения, используйте команду для его установки: winget install —id Microsoft.WindowsTerminal.Preview
Чтобы всегда запускать PowerShell от имени администратора в Windows 11 или Windows 10, выполните следующие действия:
-
Откройте Терминал Windows.
-
Нажмите кнопку меню рядом с параметром новой вкладки и выберите «Параметры».
-
В разделе «Профили» нажмите PowerShell.
-
Включите переключатель в положение «Вкл.» для «Запускать этот профиль от имени администратора», чтобы автоматически запускать PowerShell с правами администратора.
-
Нажмите кнопку «Сохранить».
После выполнения этих шагов закройте терминал, и когда вы снова откроете PowerShell, консоль откроется от имени администратора. Однако вам все равно нужно будет подтвердить повышение, как и в любом другом приложении.
Все!
PowerShell is a task-based command-line shell and scripting language built on .NET technology. It’s designed especially for system administrators and power users, so it has more features than the standard Command Prompt. If you want to use PowerShell to do anything more than basic tasks, you must run it as an administrator.
In this guide, we’ll show you ten simple ways to open an elevated PowerShell prompt on Windows 11.
The Power User Menu is a great way to quickly access important system tools and settings in Windows 11. To open Windows PowerShell using the Power User Menu, do the following:
- Right-click on Start to open the quick access menu. You can also access it by pressing Win + X on your keyboard.
-
From the menu list, select Terminal (Admin).

- If UAC appears on the screen, click Yes to grant permission.
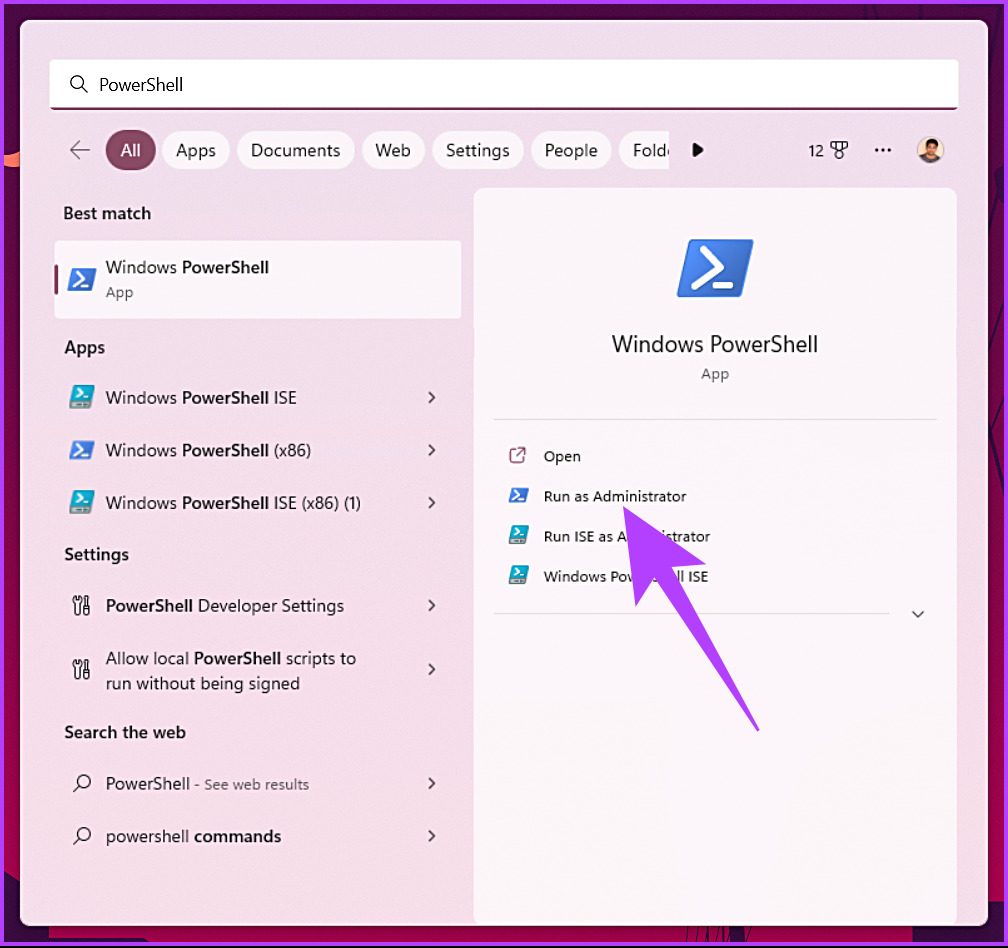
Alternatively, you can open Windows PowerShell as an administrator using the Windows Search tool. This process is relatively simple and only takes a few steps. Here is how to do it:
- Press the Win + S keyboard shortcut to open Windows Search.
- Type «PowerShell» into the search bar.
-
From the right pane, select Run as administrator.

- If User Account Control prompts you, click Yes to grant admin privileges.
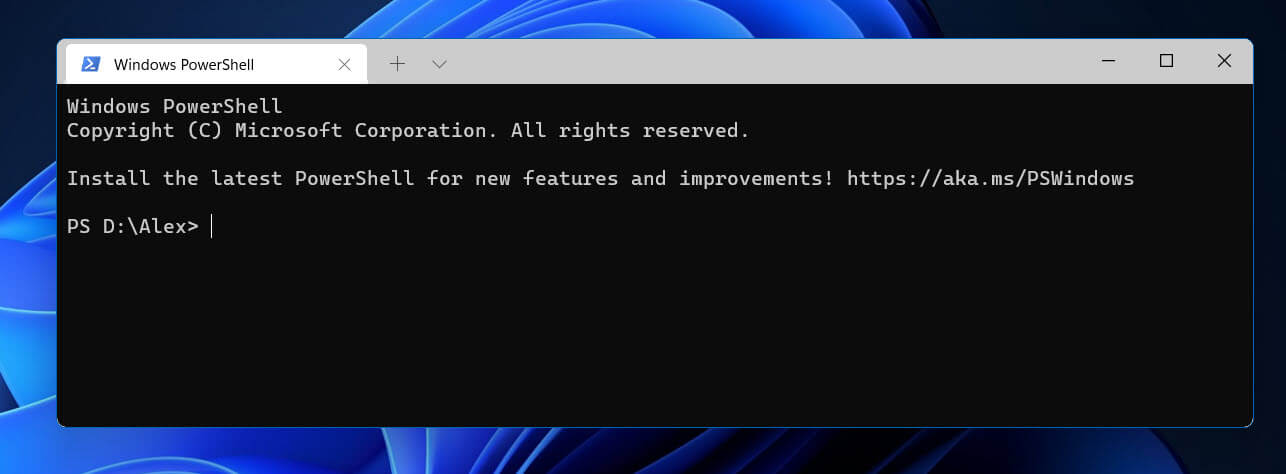
PowerShell will now open with administrative privileges. Here you can type any PowerShell command you want to execute. To exit PowerShell, type «Exit» and press Enter.
3. How to Open Windows PowerShell as an Administrator Through the Run Command
There is a powerful tool in Windows 11 called Run Command that lets you access files, launch programs, and adjust many system settings. You can also use it to launch Windows PowerShell as an administrator. Here’s how:
- Press Win + R on your keyboard. This will open the Run dialog box.
-
From here, type in «PowerShell» and press Ctrl + Shift + Enter key combination.

- If a confirmation prompt pops up, click Yes to continue. This will launch PowerShell as an administrator.
4. How to Open Windows PowerShell as an Administrator From Windows File Explorer
Another method for opening Windows PowerShell as an administrator is through File Explorer’s address bar. To do this, follow these steps:
- Press Win + E on your keyboard to open Windows File Explorer.
-
In the File Explorer address bar, type the following command and press Enter.
C:\Windows\System32\WindowsPowerShell\v1.0\
- Next to the address bar, search for «PowerShell».
-
Right-click on the PowerShell executable file and select Run as administrator.

- When UAC appears, click Yes to grant admin rights.
5. How to Open Windows PowerShell as an Administrator Using Command Prompt
A command prompt lets you run almost any program or application on your Windows device. To run Windows PowerShell using this tool, follow these steps:
-
Run Command Prompt as an Administrator (see how to open the Command Prompt as an administrator for instructions).

-
In the elevated command prompt, copy and paste the given command line:
powershell Start-Process powershell -Verb runAs
As soon as you type the above command line in the elevated command prompt window, Windows PowerShell will start running as an administrator.
The Start Menu contains a wide range of software programs and files that provide a central place for launching applications and other tasks. Start Windows PowerShell with these steps:
- Click the Start button at the bottom left of your screen.
- Select All apps from the upper right corner.
- Scroll down and click the Windows Tools option
-
Now right-click on Windows PowerShell and select Run as administrator.

- The UAC will appear on the screen. If it does, click Yes to grant administrative privileges.
7. How to Open Windows PowerShell as an Administrator Through Task Manager
Task Manager is a powerful tool that can help you troubleshoot and fix problems with your PC. Besides this, you can also use this tool to launch programs on your Windows device.
Here’s how to start Windows PowerShell as an administrator with this tool.
- Press Ctrl + Shift + Esc on your keyboard to open Task Manager (see how to open the Task Manager for more tips).
- Select Run new task from the top of the page.
-
In the pop-up menu, type «PowerShell» and check the «Create this task with administrative privileges» box.

- Click OK and Windows PowerShell will start as an administrator.
8. How to Open Windows PowerShell as an Administrator Using the Control Panel
Windows Control Panel is a software program that contains many tools for managing settings on Windows. With this tool, you can launch almost any application installed on your computer. Follow these steps to open Windows PowerShell as an administrator:
- Use one of the many ways to open the Control Panel.
- Click on System and Security.
- Scroll down to the bottom and select Windows Tools.
-
Right-click on Windows PowerShell and select Run as administrator.
- A User Account Control pop-up window will appear asking if you want to allow this app to make changes to your PC; click Yes to continue.
PowerShell will now launch as an administrator, and you can run commands with full privileges. If you need to exit PowerShell, type Exit and press Enter.
9. How to Open Windows PowerShell as an Administrator With a Desktop Shortcut
If you often run commands that require administrative privileges, consider creating a desktop shortcut. Here’s how to do it with Windows PowerShell.
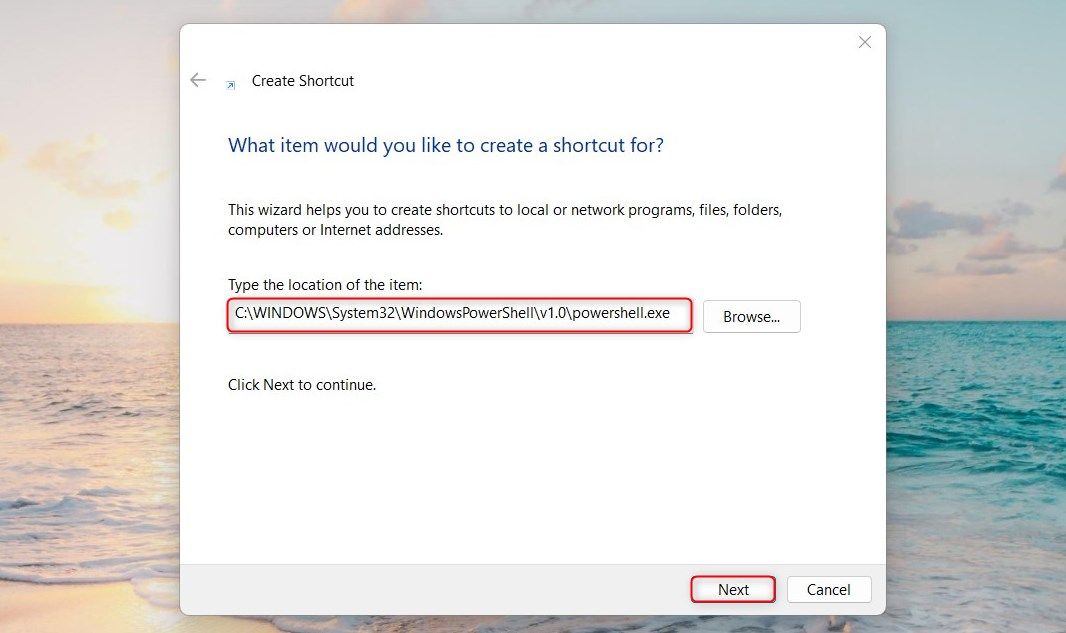
- Right-click on your Desktop and select New > Shortcut.
-
Next, type the following command in the «Create Shortcut» window.
C:\WINDOWS\System32\WindowsPowerShell\v1.0\powershell.exe
-
Then click Next to continue.

- Type in a name for the shortcut and click Finish.
Now, whenever you want to open PowerShell as an administrator, simply double-click on the shortcut.
10. How to Open Windows PowerShell as an Administrator Using a Batch File
This method involves creating a batch file to open Windows PowerShell as an administrator. Here’s how to do it:
- Press Win + R, type «Notepad», and hit Enter to open it (see how to open Notepad for more ways).
-
In Notepad, copy and paste the following command line:
Powershell.exe -Command "& {Start-Process Powershell.exe -Verb RunAs}" - Now click on File and select Save as from the menu list.
- Put «PowerShell.bat» in the file name. You can name your file anything you like with the .bat extension.
-
Choose the location where you’d like to save it, and then click Save.

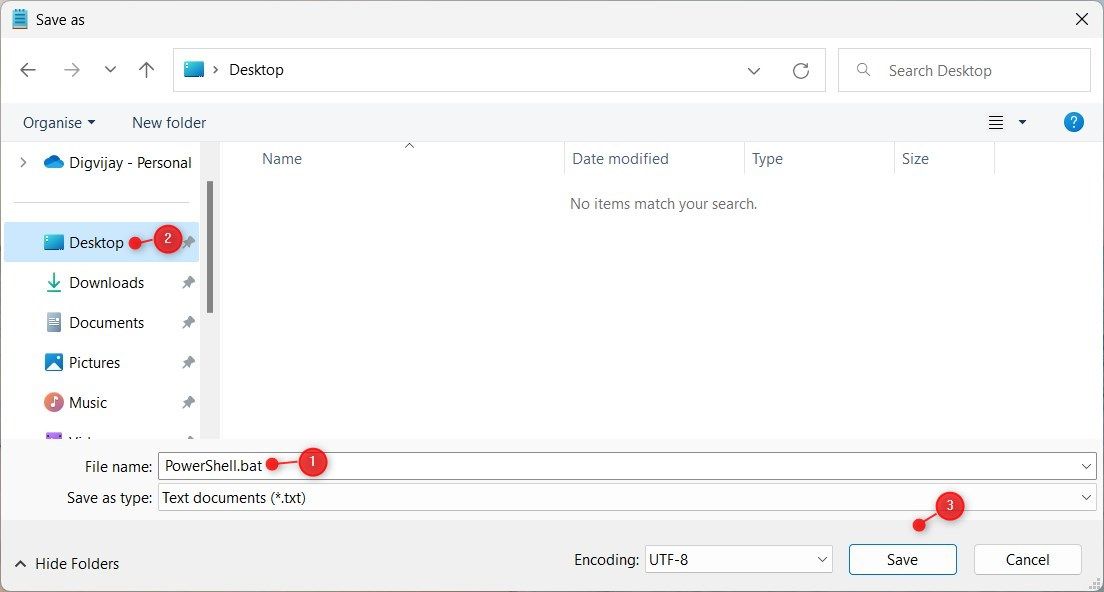
This will create the Windows PowerShell batch file. To open Windows PowerShell with administrator access, double-click the batch file. When the UAC prompt appears, click Yes to continue.
Get an Elevated Windows PowerShell Running
When you are working with files or folders that need elevated permissions, you may need to open PowerShell as an administrator. This is because some tasks require elevation in order to complete them successfully. As shown above, there are several ways to open Windows PowerShell as an administrator.