
As a computer user, you might have encountered different situations that demanded you to re-access CMD or Command Prompt on Windows 10 logon screen. If you are new to this, then you must be thinking that it is very difficult, and maybe impossible. But the truth is, it’s possible, and there are several ways and methods available to open CMD on Windows 10 logon screen. In this article, we will take you through the step-by-step guide on how to achieve this.
Video Tutorial:
The Challenge of Opening CMD on Windows 10 Logon Screen
Opening CMD or Command Prompt on Windows 10 logon screen is not an easy task. The reason is that Windows 10 default settings don’t allow any clicks or keyboard shortcuts to open CMD on the logon screen. You can only log in using your credentials or switch to another user or administrator account. Therefore, you need to prepare before accessing CMD on the logon screen.
Things You Should Prepare for
Before you start accessing CMD on the Windows 10 logon screen, here are the things you need to prepare in advance:
- A Windows 10 DVD or bootable USB drive
- Basic knowledge of Windows 10 Command Prompt
- Basic knowledge of BIOS settings and boot order
- A Password Reset Disk, if you have forgotten the login password
Method 1: Via Ease of Access
This method involves using the Ease of Access feature on the Windows 10 login screen. Here is how to do it:
1. On the Windows 10 login screen, click on the Ease of Access icon located at the bottom right corner.
2. A menu with several quick options will appear. Choose the «On-Screen Keyboard» or «OSK.«
3. When the on-screen keyboard appears, press and hold the «Shift» key for five to six seconds.
4. A Command Prompt window will open.
Pros:
– This method is easy to use.
– No additional software is required.
Cons:
– This method is only available for Windows 10 versions before v1803.
– This method doesn’t work if you have enabled Secure Boot on your PC.
Method 2: Via Windows 10 Bootable Disc or USB Drive
This method involves booting your computer from a Windows 10 bootable disc or USB drive to access the Command Prompt. Here is how to do it:
1. Insert your Windows 10 bootable USB drive or disc into your computer and reboot it.
2. Press the appropriate key to enter the BIOS setting. It’s usually F1, F2, F10, F12 or Esc. Check your computer manufacturer’s website for more specific instructions.
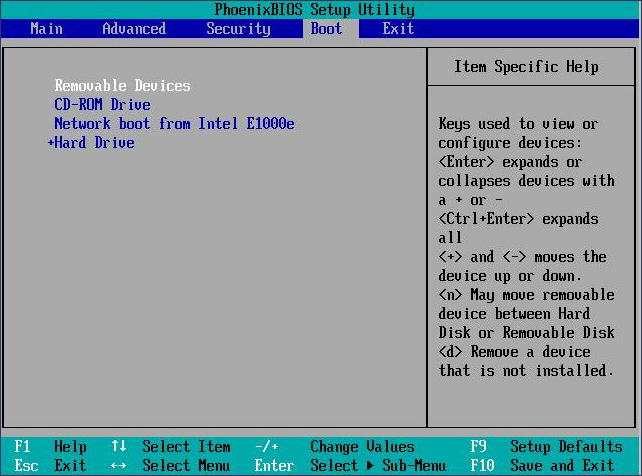
3. Once the BIOS settings menu opens, change the boot order to boot from your Windows 10 bootable USB drive or disc.
4. Save the changes and exit the BIOS menu.
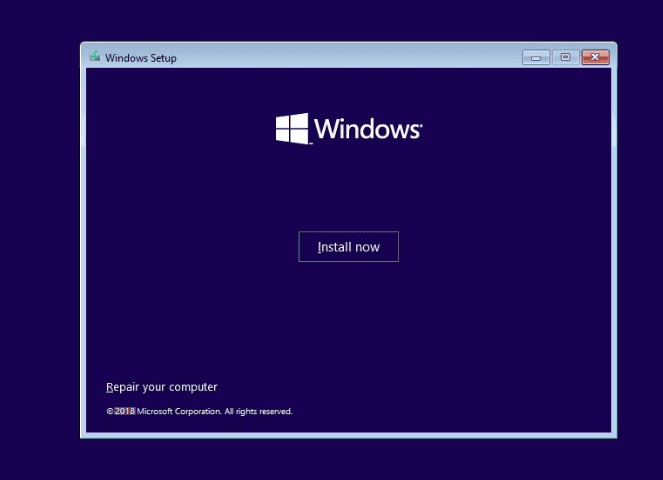
5. Wait for the Windows 10 setup files to load.
6. When the setup screen appears, choose your language and other preferences.
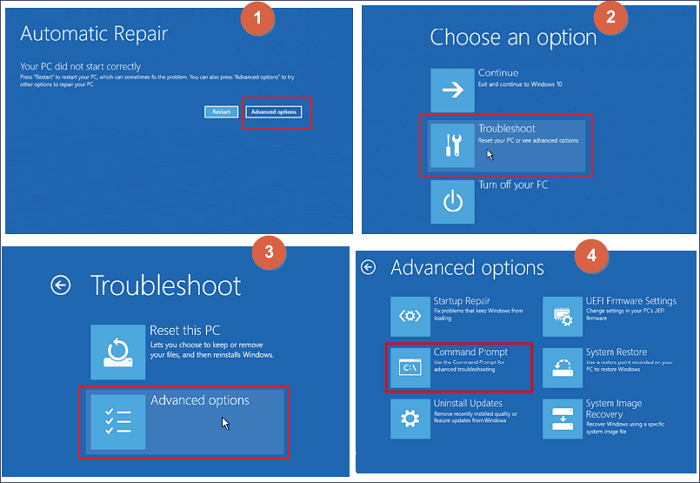
7. Click on “Repair your computer.”
8. Select “Troubleshoot.”
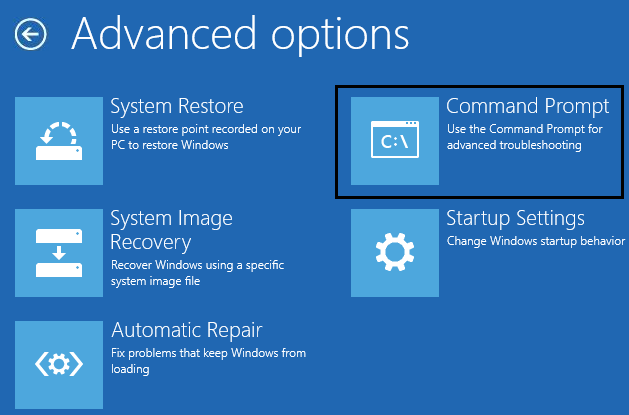
9. Click on “Advanced Options.”
10. Choose «Command Prompt.«
Pros:
– This method works on all versions of Windows 10.
– It allows you to use Command Prompt with elevated privileges.
Cons:
– Some users might not have the technical know-how to create a bootable disc or USB drive.
Method 3: Via Windows Password Reset Disk
This method involves using a Password Reset Disk or USB drive to access Command Prompt. If you have forgotten your login password, this is the way to go. Here is how to do it:
1. Insert the Password Reset Disk or USB drive into your computer and reboot it.
2. On the login screen, click on the «Reset Password» icon.
3. Follow the prompts to create a new password.
4. Once you have changed your password, click on the «Continue» button to get back to the login screen.
5. Click on the Ease of Access icon.
6. Choose «Command Prompt» from the menu.
Pros:
– This method allows you to reset your password if you have forgotten it.
– It’s a safe and secure way to access Command Prompt.
Cons:
– You need to create a password reset disk or USB drive in advance.
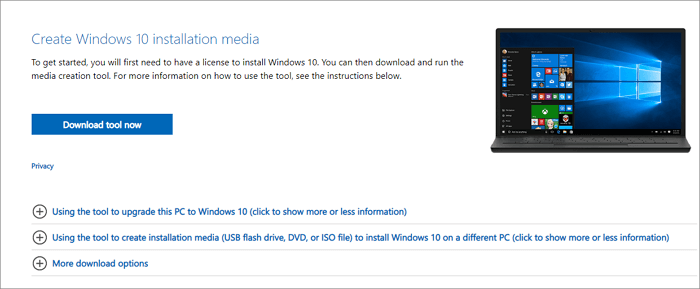
Method 4: Via Windows 10 Installation Media
This method involves using the Windows 10 installation media to access Command Prompt. Here is how to do it:
1. Insert your Windows 10 installation media into your computer and reboot it.
2. Follow steps 2-6 of «Method 2: Via Windows 10 Bootable Disc or USB Drive.«
3. Choose «Command Prompt» from the Advanced Options menu.
Pros:
– This method works on all versions of Windows 10.
– It’s similar to using a bootable USB drive or disc.
Cons:
– You need to have the Windows 10 installation media in advance.
Why Can’t I Access CMD on Windows 10 Logon Screen
Here are some reasons why you can’t access CMD on Windows 10 logon screen:
1. Windows 10 default settings don’t allow any clicks or keyboard shortcuts to open CMD on the logon screen.
2. If you have enabled Secure Boot on your PC, it blocks any attempts to access CMD on the logon screen.
3. If you have forgotten your login password, you can’t access CMD on the logon screen.
Fixes:
1. Use any of the methods listed above to access CMD on Windows 10 logon screen.
2. Disable Secure Boot on your PC.
3. Create a Password Reset Disk or USB drive in advance.
Additional Tips
Here are some additional tips you can use to make it easier to access CMD on Windows 10 logon screen:
1. Create a Password Reset Disk or USB drive in advance.
2. Always keep a Windows 10 installation media on hand.
3. Familiarize yourself with BIOS settings and boot order.
5 FAQ’s about Opening CMD on Windows 10 Logon Screen
Q1: How do I create a Windows 10 Password Reset Disk?
A: Follow these simple steps:
1. Insert a USB drive into your computer.
2. Search for «Password Reset Disk» in the Windows 10 search bar.
3. Click on «Create a password reset disk.«
4. Follow the prompts to create a password reset disk.
Q2: How do I disable Secure Boot on my PC?
A: Here is how to do it:
1. Reboot your computer.
2. Press the appropriate key to enter the BIOS settings.
3. Look for the «Secure Boot» option.
4. Change the settings to «Disabled.«
5. Save the changes and exit the BIOS menu.
Q3: Can I use a different bootable disk other than Windows 10?
A: Yes, you can use any bootable disc or USB drive that contains a CMD line.
Q4: Can I access CMD on Windows 10 logon screen without any additional tools?
A: No, you need additional tools to access CMD on Windows 10 logon screen.
Q5: Is it safe to access CMD on Windows 10 logon screen?
A: Yes, it’s safe to access CMD on Windows 10 logon screen if you know what you are doing.
In Conclusion
Opening CMD on Windows 10 logon screen may seem difficult, but if you follow the methods and tips provided in this article, it’s easy to achieve. Knowing how to access CMD on Windows 10 logon screen can come in handy in many situations, including when you have forgotten your login password or need to fix some system errors. Remember to always prepare in advance before accessing CMD on Windows 10 logon screen.
Overview — How to Boot to Command Prompt in Windows 10
A Command Prompt is an entry point for typing computer commands. By typing commands at the window, you can perform tasks on your computer without using the Windows graphical interface. In fact, there are two ways to open Command Prompt in Windows 10. Check the table below to get quick navigation.
| Workable Solutions | Step-by-step Troubleshooting |
|---|---|
| 1-Windows 10 Can’t Boot |
Fix 1. Boot to Windows 10 Command Prompt with Installation Media…Full steps Fix 2. Boot to Command Prompt Windows 10 from Advanced Startup Options…Full steps |
| 2-Windows 10 Can Boot |
Fix 1. Start Command Prompt Using Search…Full steps Fix 2. Open/Boot Windows 10 Command Prompt from the Settings…Full steps |
Part 1. How to Open Command Prompt If Windows 10 Can’t Boot
If you can’t boot into Windows 10 and repair the errors, you’ll need to create an installation media or turn off the PC three times. Read on to get the detailed information.
Way 1. Boot to Windows 10 Command Prompt with Installation Media
If your computer fails to boot, you can open Command Prompt with Windows 10 Installation Media. With the help of a Windows 10 Media Creation Tool, you can enter BIOS even if your Windows 10 can’t start.
Step 1. Create Windows 10 Installation Media
Requirements:
- A PC with a stable internet connection for the download.
- A USB flash drive with at least 8 GB of space or a blank DVD.
- When burning a DVD from an ISO file, if you’re told the disc image file is too large, you’ll need to use dual-layer (DL) DVD media.
Steps: Follow this guide to make a Windows 11/10 media creation tool.
Step 2. Boot into the BIOS in Windows 10
- Insert the installation media into your Windows 10 PC and boot the PC from it.
- Press F2, Del, Esc, or other required keys to enter BIOS.
- Access the «Boot» pane and move your USB drive to the top of the boot list.
Step 4. Boot to Windows 10 Setup Interface
- Press F10 to save your settings and exit the BIOS.
- Set the language, time, and keyboard, then click «Next».
- Click «Repair your computer» at the bottom left.
Step 5. Boot to Command Prompt in Windows 10
- Click «Troubleshoot > Advanced Options > Command Prompt»
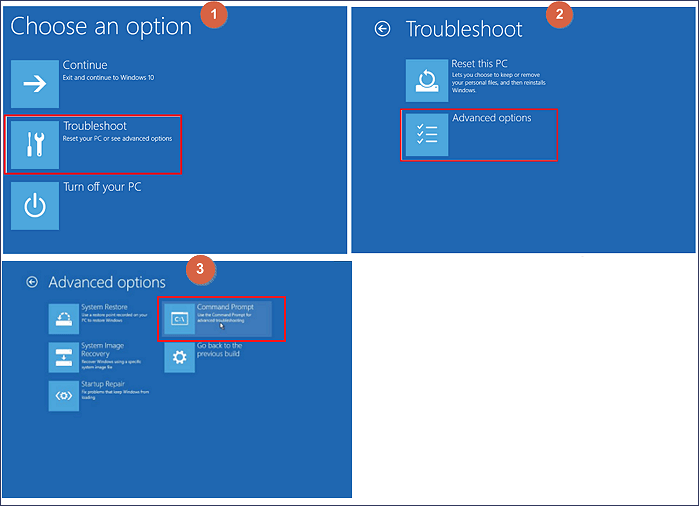
Then, you will enter the Command Prompt to repair Windows 10 with command lines.
To repair Windows 10 with SFC:
- On the command window, type D: and press Enter to go to the C: drive of your computer.
- Tip
- Because your computer is started with bootable media, the System Reserved partition of your hard drive is temporarily marked as C: and therefore the C: drive that you see from within Windows 10 is marked as D: drive. This is a temporary modification.
- Type sfc /scannow and press Enter.
If you want to fix Windows 10 boot problems like repair MBR, type the commands below:
- bootrec /fixmbr
- bootrec /fixboot
- bootrec /rebuildbcd
Way 2. Boot to Command Prompt in Windows 10 from Advanced Startup Options
What if you start your PC, but you get a blue screen or the desktop is blank? You can fix your problem and open Command Prompt in Advanced Startup Options. Here are the steps:
Step 1. Enter the Windows 10 recovery environment.
Turn your computer on and off three times. While booting, make sure you turn off the computer when you see the Windows logo. After the third time, Windows 10 will boot into the diagnostics mode.
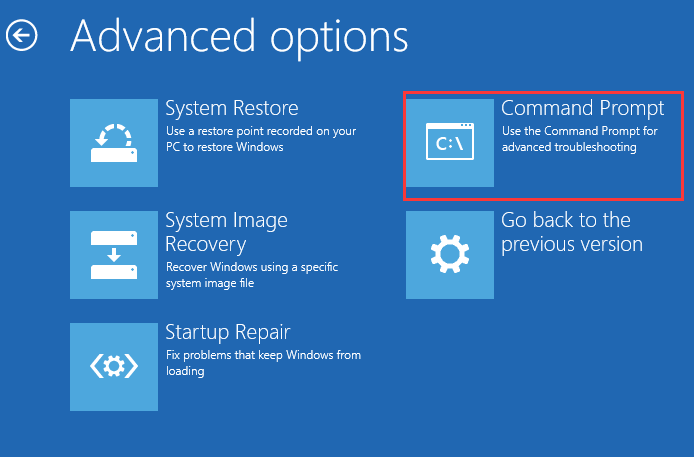
Step 2. Click «Advanced options > Troubleshoot > Advanced options > Command Prompt» when the recovery screen appears.
Then, the Command Prompt is immediately loaded, and you can start using it for whatever you need.
Part 2. How to Start Command Prompt If Windows 10 Can Boot
Things could be easier if your Windows computers or laptops are running well. You can search for Command Prompt or enter Command Prompt from Settings. Here are the steps in detail.
Fix 1. Start Command Prompt Using Search
This solution is the most recommended one for its easiness.
Step 1. Go to Start and type cmd into the search box.
Step 2. From the list, right-click Command Prompt and choose «Run as administrator».
You should enter into the Command Prompt window now.
Fix 2. Start Windows 10 Command Prompt from Settings
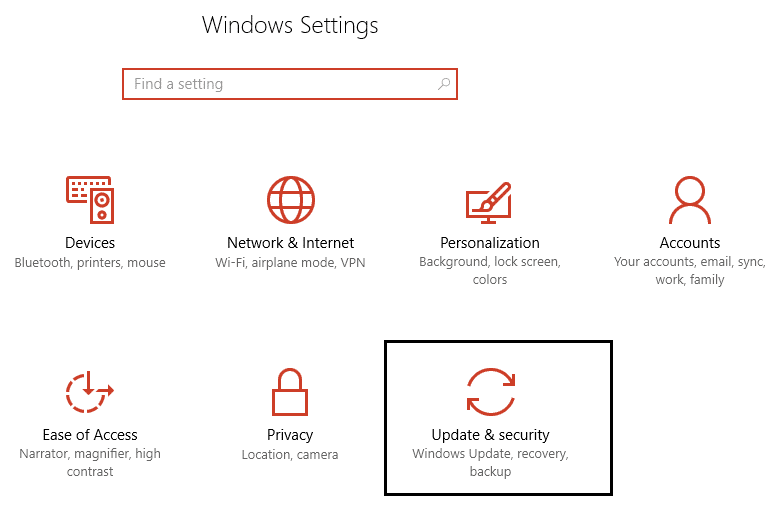
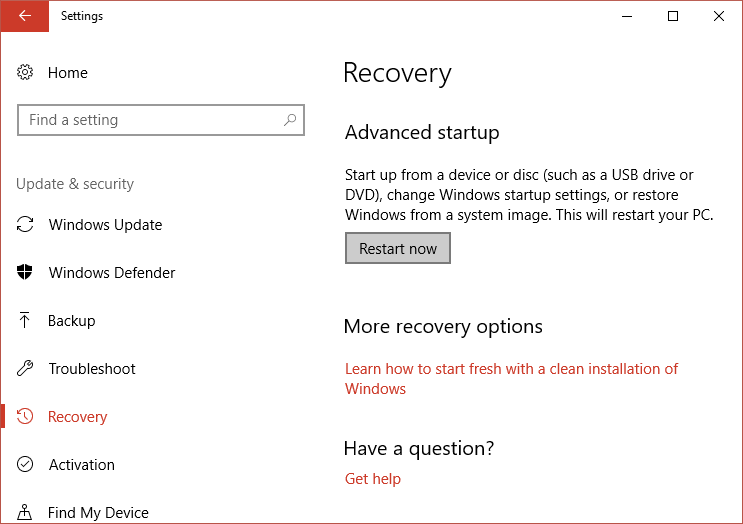
Step 1. Click «Start > Settings» to open the «Settings» Window. Next click «Update & Security», and choose «Recovery».
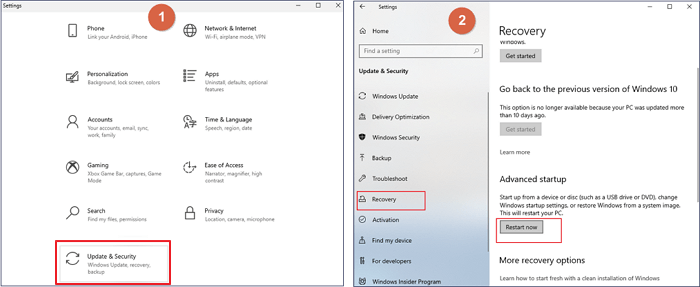
Step 2. Click «Restart now» under Advanced startup, and your Windows 10 computer will restart now.
Step 3. When you see the «Choose an option» screen, click «Troubleshoot > Advanced options».
Step 4. Click «Command Prompt». You should enter into the Command Prompt window now.
Extra Tip: How to Recover Command Prompt Deleted Files
When you use some cleanup commands like a clean command or format command, you lost data on your drive. These command lines delete files permanently without backup. What can you do to get back Command Prompt deleted files? The answer is using the best data recovery software — EaseUS Data Recovery Wizard. This EaseUS Data Recovery Wizard can recover formatted hard drive, using Command Prompt, or pressing Shift-Delete.
Download this all-in-one data recovery software and restore lost data from your PC or laptop.
Step 1. Run EaseUS Data Recovery Wizard. Choose the drive where you lost files and start scanning by clicking «Search for Lost Data». This software allows you to recover lost data from all devices, including HDD, SSD, USB drive, SD card, pen drive, camera, etc.

Step 2. Browse the full scan results. You can choose the file type you need by clicking on the file type filter. EaseUS data recovery software supports 1000+ file types like photos, videos, documents, emails, audio files, and many more.

Step 3. Select the files you want to preview. Click «Recover» and set a storage location or Cloud drive to save the recovered data.

Conclusion
This post has provided you with 4 ways to boot Windows 10 from Command Prompt. If your PC cannot boot, refer to Part 1. If your computer can start normally, refer to Part 2. Besides, If you have data loss problems, turn to EaseUS EaseUS Data Recovery Wizard for help.
How to Open Command Prompt at Boot in Windows 10: Command Prompt is one of the essential features of Windows, which is used for typing computer commands and is a command-line interpreter on Windows. Command Prompt is also known as cmd.exe or cmd which interacts with the user through a command-line interface. Well, it’s a powerful tool which users can use to do almost anything they can do with the GUI but instead with commands.
Now Command Prompt is also important because when Windows fails to start, the cmd is used for maintenance & recovery. But again if Windows fails to start then how you are going to access Command Prompt? Well, in this guide you will exactly see how to start Command Prompt at boot in Windows 10. There are mainly two methods where the first one involves the Windows installation disk to access Command Prompt whereas the other one uses Advanced Startup Options. Anyway without wasting any time let’s see How to Open Command Prompt at Boot in Windows 10 with the help of the below-listed tutorial.
Table of Contents
Method 1: Open Command Prompt at Boot Using Windows Installation Media
1.Insert the Windows 10 installation disc or recovery media into CD/DVD Drive.
Note: If you don’t have an installation disc then make a bootable USB disk.
2.Enter BIOS then make sure to set the first boot priority as CD/DVD ROM or USB.
3.Exit saving changes from the BIOS which will restart your PC.
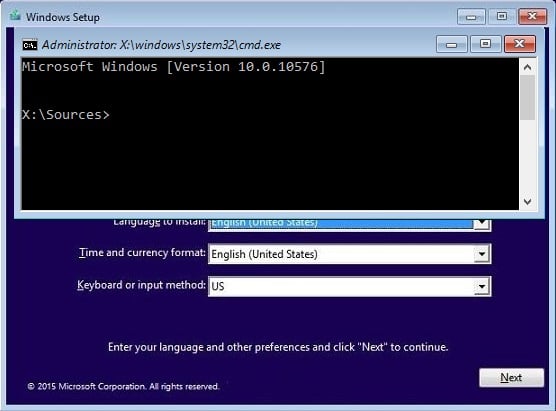
4.When prompted to Press any key to boot from CD or DVD, press any key to continue.

5.Now on Windows Setup Screen (where it asks you to select Language, time and currency format, etc) press the Shift + F10 keys on your keyboard to open Command Prompt.

Method 2: Open Command Prompt at Boot in Windows 10
1.Insert the Windows 10 bootable installation DVD or Recovery Disc and restart your PC.
2.When prompted to Press any key to boot from CD or DVD, press any key to continue.
3.Select your language preferences, and click Next. Click Repair your computer in the bottom-left.

4.On choose an option screen, click Troubleshoot.

5.On Troubleshoot screen, click Advanced option.

6.Finally, on the Advanced options screen, click Command Prompt.
Method 3: Open Command Prompt at Boot Using Advanced Startup Options
1.Make sure to hold the power button for few seconds while Windows is booting in order to interrupt it. Just make sure it doesn’t get past the boot screen or else you need to again start the process.
2.Follow this 3 consecutive times as when Windows 10 fails to boot consecutively three times, the fourth time it enters Automatic Repair mode by default.
3.When the PC starts 4th time it will prepare Automatic Repair and will give you the option to either Restart or Advanced options.
4.Click on Advanced options and you would again be taken to Choose an option screen.
5.Again follow this hierarchy Troubleshoot -> Advanced options
6.From Advanced options screen click on Command Prompt.
Method 4: Open Command Prompt at Boot in Windows 10 Using Settings
If you’re able to access Windows then you could start your PC into Advanced Startup Options.
1.Press Windows Key + I then click on Update & Security.
2.From the left-hand menu click on Recovery.
3.Now under Advanced Startup click on Restart now.
4.Once the PC restart, it will automatically boot to Advanced Startup Options.
5.Now click Troubleshoot > Advanced Options and from Advanced Options screen click on Command Prompt.
Recommended:
- Change Default Action when you close your Laptop Lid
- 4 Ways to Change Date and Time in Windows 10
- Prevent Changing Color and Appearance in Windows 10
- Synchronize Windows 10 Clock with an Internet Time Server
That’s it you have successfully learned How to Open Command Prompt at Boot in Windows 10 but if you still have queries regarding this post then feel free to ask them in the comment’s section.
Уверенный пользователь компьютера обязательно должен знать, как открыть командную строку в Windows. Особая программа позволит управлять операционной системой на продвинутом уровне.
Редактор новостей Hi-Tech Mail
Что это
От имени администратора
Windows 8, 10, 11
Windows 7
Для чего нужна
Вопросы и ответы
Что это
От имени администратора
Windows 8, 10, 11
Windows 7
Для чего нужна
Вопросы и ответы
Быстро выполнять полезные функции, менять настройки можно с помощью одного окна. Командная строка позволяет быстро выполнять полезные функции. Можно с помощью всего нескольких слов исправить работу диска, проверить систему на ошибки и устранить неполадки. Наша статья поможет узнать, как открыть командную строку в Windows 7, 8, 10 и 11 различными способами.
Что такое командная строка
Командная строка — это вид операционной системы (ОС) в текстовом формате. Ее также называют консолью или терминалом. Она выглядит как черное окошко с белым текстом. С помощью такой программы можно управлять компьютером, программами или внешними устройствами. Это может быть полезно, если вы хотите сделать то, что не позволяют осуществить графические интерфейсы. Для этого пользователь должен вводить текстовые команды.

Как открыть командную строку в Windows от имени администратора
Командная строка при открытии без специальных настроек работает в режиме обычного пользователя. Это значит, что у нее нет особых прав, которые позволяют вносить изменения в систему. Есть немало способов, как открыть командную строку клавишами или, например, через поиск.
1. Через «Пуск»
«Пуск» — это главное меню в Windows. Оно позволяет получить доступ к различным программам, документам и настройкам системы. «Пуск» находится в левом нижнем углу экрана и напоминает прямоугольник, разделенный на четыре части — это логотип операционной системы. Соответствующий значок можно увидеть и на клавиатуре.
Как открыть командную строку в Windows через «Пуск»? Сначала нажмите на иконку с логотипом ОС на панели задач или на клавиатуре. В Windows 8 и 10 в перечне программ выберите «Служебные — Windows», а в Windows 11 — «Все приложения» → «Инструменты Windows». Затем найдите «Командную строку» и нажмите правой кнопкой мыши. В «Дополнительно» используйте «Запуск от имени администратора». После появится окошко «Разрешить этому приложению вносить изменения на вашем устройстве?». Нажмите кнопку «Да».

2. «Поиск»
Откройте «Пуск», нажмите на иконку с лупой на панели задач или используйте окно поиска. Наберите на клавиатуре «Командная строка». Дальше есть два варианта. Либо воспользуйтесь «Запуском от имени администратора» в появившемся справа перечне, либо щелкните правой кнопкой на иконке приложения под надписью «Лучшее соответствие» слева.


3. «Диспетчер задач»
Щелкните правой кнопкой мыши на панель задач и выберите «Диспетчер задач». Либо используйте комбинацию клавиш Ctrl+Shift+Esc. Нажмите «Файл» → «Запустить новую задачу». Командная строка — это программа, и в ОС семейства Windows она называется cmd. Поэтому ее, как и любой другой файл, можно открыть через «Диспетчер задач». В новом окошке напечатайте cmd и оставьте галку возле «Создать задачу с правами администратора». Нажмите «OK».
Более быстрый вариант: выберите «Файл», зажмите клавишу Ctrl и нажмите «Запустить новую задачу».

4. Папка System32
Командной строкой можно воспользоваться через папку, где хранится программа. Откройте «Проводник» → «Мой компьютер» → «Локальный диск (C:)» → Windows → System32. Найдите в папке приложение cmd.exe. Нажмите на него правой кнопкой мыши → «Запуск от имени администратора». Другой способ — выделите приложение cmd.exe и нажмите вверху окна «Проводника» на «Средства работы с приложениями». Затем выберите «Запуск от имени администратора».

5. Создать Ярлык
Также для cmd.exe можно сделать ярлык с админскими правами. Нажмите правой кнопкой мыши на приложение, выберите «Отправить» → «Рабочий стол (создать ярлык)». На рабочем столе снова щелкните правой клавишей на ярлыке cmd.exe. Выберите «Свойства» → «Ярлык» → «Дополнительно». Поставьте галочку возле «Запуск от имени администратора». Подтвердите и запустите приложение.
Ярлыки на рабочем столе создают для быстрого доступа к файлам, папкам, программам и другим объектам. Они позволяют экономить время на поиске и запуске нужных объектов, а также упрощают организацию рабочего пространства на экране. С ярлыком cmd на рабочем столе вы облегчите себе доступ к командной строке.


6. «Проводник»
«Проводник» — это файловый менеджер, позволяющий управлять содержимым на компьютере. С его помощью можно создавать новые папки, удалять старые, копировать и перемещать между ними файлы. Также «Проводник» позволяет просматривать свойства элементов, изменять их характеристики и выполнять другие операции.
Откройте «Проводник» → «Мой компьютер». Наберите в поиске cmd.exe. Когда компьютер найдет файл, щелкните на него правой кнопкой и выберите «Запуск от имени администратора».

7. «Выполнить»
«Выполнить» — это приложение, которое позволяет быстро открыть программу, документ или сайт. Чтобы открыть окошко с командой одновременно нажмите клавишу Windows и кнопку R. Наберите в строке cmd, а затем зажмите комбинацию Ctrl+Shift+Enter. Командная строка будет работать с админскими правами.

8. PowerShell
В современных версиях Windows используется похожая на командную строку «прокачанная» программа PowerShell. У нее синий фон и она работает по другому принципу. При этом с ее помощью можно как открыть командную строку cmd, так и выполнять другие задачи. Нажмите Win+X и выберите «Windows PowerShell (администратор)». Либо используйте Win+R, введите powershell и нажмите Ctrl+Shift+Enter. Затем напечатайте cmd и щелкните на Enter.

Как открыть командную строку в Windows 8, 10, 11
Способы доступа к командной строке с админских прав почти не отличаются от обычных. Главное отличие — пользователю нужно меньше совершать действий.
1. Через поиск cmd
В Windows 10 и 11 щелкните на иконку с лупой на панели задач, в Windows 8 — на кнопку «Пуск». В новом окне наберите cmd и нажмите Enter.

2. Горячими клавишами
Комбинации кнопок, которая позволит открыть командную строку через одно нажатие, изначально в системе нет. Но если один раз сделать дополнительное действие, такую функцию вы получите. Так как открыть командную строку клавишами просто так нельзя, подготовьте ярлык. Воспользуйтесь поиском их предыдущего метода. Нажмите правой клавишей на командную строку и выберите «Закрепить на панели задач». Например, иконка стала пятой по счету среди приложений на панели. Нажмите Win+5 и откройте командную строку.

3. «Выполнить»
Используйте комбинацию Win+R. Напечатайте cmd и нажмите Enter.

4. «Пуск»
Откройте «Пуск» удобным способом. В Windows 8 и 10 найдите «Служебные — Windows», в Windows 11 — «Инструменты Windows». Затем выберите командную строку.

5. «Диспетчер задач»
Нажмите Ctrl+Shift+Esc. В левом верхнем углу щелкните на «Файл» — «Запустить новую задачу». Напишите cmd и нажмите Enter.

6. Папка System32
Зайдите в «Проводник» → «Мой компьютер» → «Локальный диск (C:)» → Windows → System32. Откройте из списка cmd.exe.

7. «Проводник».
В любой папке напечатайте cmd в адресной строке. Нажмите Enter. Так папка откроется в командной строке без прав администратора.

8. PowerShell
Нажмите Win+X, выберите PowerShell. Введите команду cmd и подтвердите через Enter.

Как открыть командную строку в Windows 7
В более старой версии ОС методы немного отличаются. Вот как открыть командную строку в Windows 7.
1. Через «Пуск»
Откройте «Пуск» через иконку на панели управления или соответствующую клавишу на клавиатуре. Во «Все программы» выберите раздел «Стандартные». Осталось лишь найти командную строку и запустить ее.

2. «Поиск»
Снова откройте «Пуск». Введите в поле для поиска cmd или «командная строка». Щелкните на Enter. Готово.
3. «Диспетчер задач»
Нажмите Ctrl+Alt+Del. Появится «Диспетчер задач». Теперь выберите «Файл» → «Запустить новую задачу». Введите cmd и нажмите Enter.
4. Папка System32
Откройте «Мой компьютер» → Windows → System32. Дважды нажмите на cmd.exe.
5. Создать ярлык
На рабочем столе щелкните правой клавишей мыши. Выберите «Создать» → «Ярлык». В строке «Укажите расположение объекта» напечатайте cmd.exe, затем нажмите «Далее» и «Готово». Теперь откройте ярлык.
6. Любая папка
В любой папке в Windows 7 нажмите на адресную строку вверху окна. Напечатайте cmd и нажмите Enter. Текущая папка откроется в командной строке.
7. «Выполнить»
Откройте окно запуска через комбинацию клавиш Win+R. В появившейся строке введите cmd. Нажмите «OK».
Для чего нужна командная строка
Командную строку можно сравнить с горячими клавишами. Только их используют не для одной программы, а для всей операционной системы. Благодаря этому с помощью командной строки можно изменить сотни параметров компьютера. А также воспользоваться полезными программами, не выходя из одного окна. Вот одни из самых популярных задач.
1. Диагностика компьютера
Командная строка позволяет исправить ошибки в Windows. Специальная проверка помогает восстановить поврежденные или удаленные системные файлы. Чтобы провести диагностику, введите в командной строке sfc /scannow. Окно нельзя закрывать, пока операция не закончится.

2. Восстановление системы
Жесткий диск компьютера можно проверить на ошибки. Для этого используют команду chkdsk C. Вместо C можно указать букву другого диска. Для дополнительных действий нужно прописать параметры. Например, команда chkdsk C: /F /R означает, что компьютер проверит диск C. Буква F говорит, что ошибки автоматически исправятся, а R — что компьютер проверит поврежденные секторы и попытается восстановить информацию (R).
3. Работа с дисками
Также можно управлять дисками компьютера. Для этого используйте команду diskpart. С ее помощью получится менять разделы, размер, названия, форматировать накопители и проводить другие операции. Полный список функций можно посмотреть через команду diskpart help.
4. Проверка интернета
Командная строка позволяет увидеть IP-адрес вашего компьютера. Для этого напишите ipconfig. Если нужно определить MAC-адрес, введите getmac /v. Можно проверить и стабильность соединения. Например, напишите команду ping hi-tech.mail.ru. Компьютер отправит на наш сайт данные и определит, как быстро они вернутся. Так вы узнаете, работает ли у вас интернет. Время отклика покажет качество соединения. Хороший показатель — до 40 мс.

5. Работа с папками
Командной строкой можно заменить «Проводник». С ее помощью можно получить доступ к папкам. Основная команда называется cd. Она означает change directory (изменить каталог). Например, чтобы открыть диск C, введите cd c:\. Для доступа к папке внутри введите cd «название папки». В случае, если в имени пути есть пробелы, добавьте кавычки.
6. Работа с файлами
Также можно открывать файлы или программы. Для запуска приложений нужно использовать ту же команду cd, что и в случае с папками. Однако в конце адреса укажите полное название файла и его расширение.
7. Проверка активных процессов
Чтобы узнать, какие программы открыты на вашем компьютере, не обязательно использовать «Диспетчер задач». Введите tasklist в командной строке, и вы увидите аналогичный перечень. В списке отобразятся все действующие процессы и память, которую они потребляют.

Вопросы и ответы
Как открыть текущую папку в командной строке?
Текущая папка — это та, которую вы открыли для просмотра. Зайдите в «Проводник» и поставьте курсор на адресную строку. Введите cmd и нажмите Enter. Папка появится в командной строке, однако без прав администратора.
Если вам нужны дополнительные разрешения, то откройте нужную папку в «Проводнике». Просто сделать это через командную строку не получится. В левом верхнем углу нажмите «Файл», а затем «Запустить Windows PowerShell от имени администратора». В появившемся окне терминала напишите cmd, после нажмите Enter.

Можно ли запустить командную строку от имени администратора без прав?
Нет, это невозможно. Имя администратора подразумевает наличие соответствующих прав пользователя. Такие ограничения ввели в Windows, чтобы защитить компьютер от нежелательных действий. По сути, командная строка дает возможность полностью управлять компьютером, а значит, потенциальные злоумышленники не должны иметь к ней доступ. Без контроля администратора пользователь может нанести вред устройству.
Как открыть командную строку при установке Windows?
Командную строку в Windows во время установки можно открыть двумя способами. Первый доступен через специальное меню. В самом начале установки нажмите на «Восстановление системы». В появившемся меню выберите «Поиск и устранение неисправностей». Нажмите на «Дополнительные параметры», а затем на «Командная строка».
Второй способ работает в любом меню установки. Для этого одновременно нажмите Shift и F10 или Shift+Fn+F10.

Как открыть командную строку в Linux?
Поскольку Linux — это семейство операционных систем, единого способа доступа к командной строке нет. Методы зависят от дистрибутива. Это набор программного обеспечения, который включает в себя операционную систему, драйверы устройств, системные утилиты и другие программы, необходимые для работы компьютера. Дистрибутивы Linux могут быть различными. Одними из самых популярных считаются Ubuntu и другие версии, основанные на ОС Debian. В них открыть командную строку (терминал) можно через комбинацию клавиш Ctrl+Alt+T или через список всех приложений.

Как можно открыть командную строку в игре Симс?
В игре The Sims 4 командная строка нужна, чтобы ввести коды. Здесь не будем подробно останавливаться на том, что такое коды и зачем они нужны в игре. Как правило, они дают различные преимущества геймеру. Доступ к специальной консоли можно получить через комбинацию клавиш Ctrl+Shift+C. Так можно открыть командную строку в Windows и macOS. Вводите коды в главном меню или во время игры.

Как открыть командную строку в КС?
Геймеры пользуются командной строкой (консолью) во всех версиях популярного шутера Counter-Strike. Она нужна, чтобы править различные параметры игры.
Чтобы получить доступ к командной строке в Counter-Strike 2, зайдите в «Настройки» в главном меню, затем «Игра» → «Включить консоль разработчика», выберите «Да». Второй способ — через Steam. Откройте в приложении «Библиотеку», выберите CS2 и нажмите правой кнопкой мыши. В «Свойствах» найдите вкладку «Общие». В строке «Параметры запуска» напишите -console или -dev.
Открыть консоль можно клавишей Ё (со знаком ~ в английской раскладке).
