
Download Article
Learn every way to find settings you’re looking for in Windows 10
Download Article
- Start Menu
- Keyboard Shortcut
- Windows Search
- Power User Menu
- Action Center
- MS Copilot
- File Explorer
- Command Prompt
- PowerShell
- Run Menu
- Control Panel
- Desktop Menu
- Task Manager
- Specific Settings
- Taskbar
- Video
- Q&A
- Tips
|
|
|
|
|
|
|
|
|
|
|
|
|
|
|
|
|
As Microsoft is trying to move away from the Control Panel, the Windows 10 settings are slowly being moved into the modern Settings app. If you’re wondering all the ways the Settings app can be opened, we can help! This wikiHow article will teach you every way to open the Settings app on a Windows 10 PC.
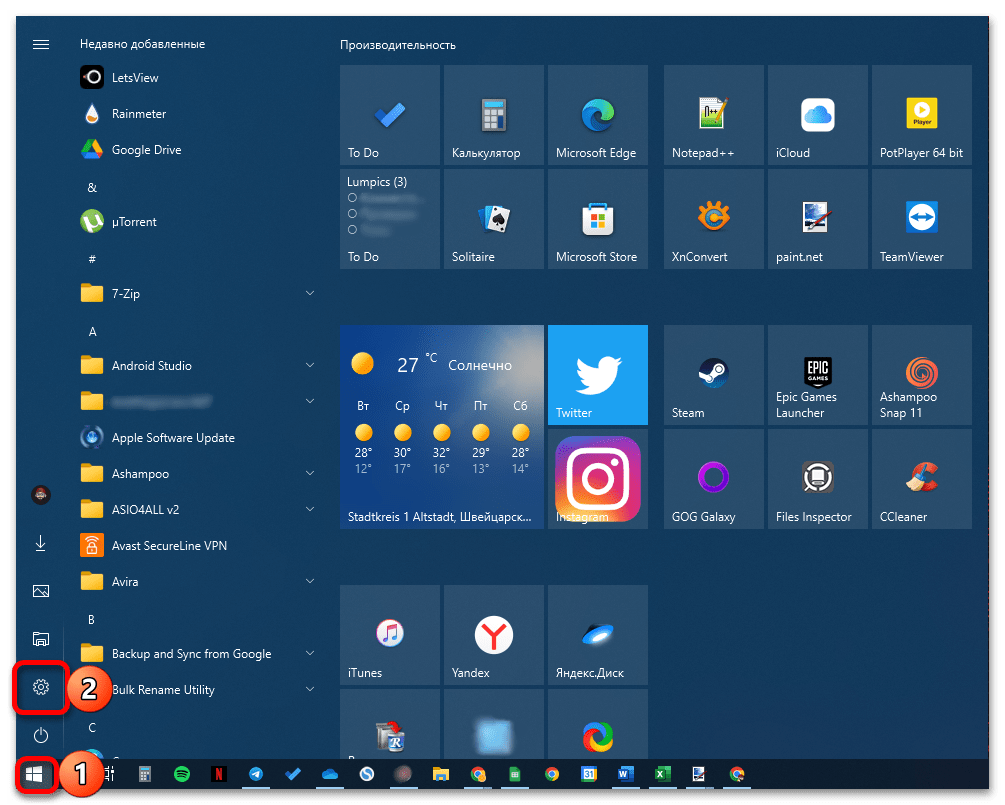
- Click the Start menu and select the Settings gear icon.
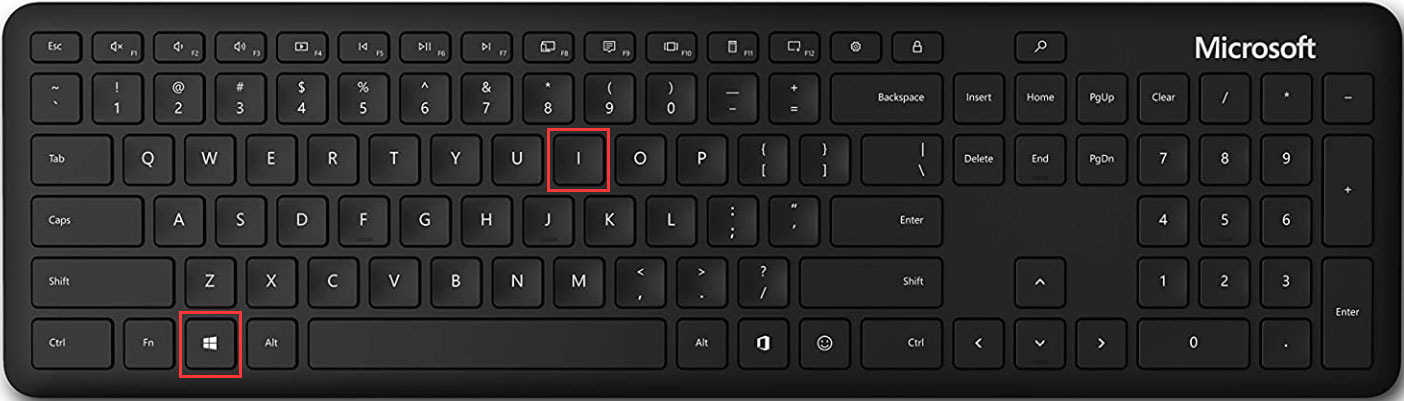
- Press Windows key + i at the same time.
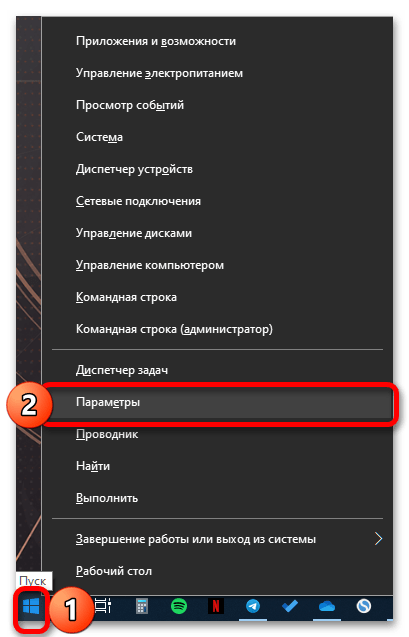
- Right-click the Start menu and select Settings.
- Type «start ms-settings:» into Command Prompt, PowerShell, or the run dialog.
-

The gear icon near the lower left corner of the Start menu is a quick and easy way to open your Windows 10 settings.

Advertisement
-
This is a very quick and convenient way to open Settings.

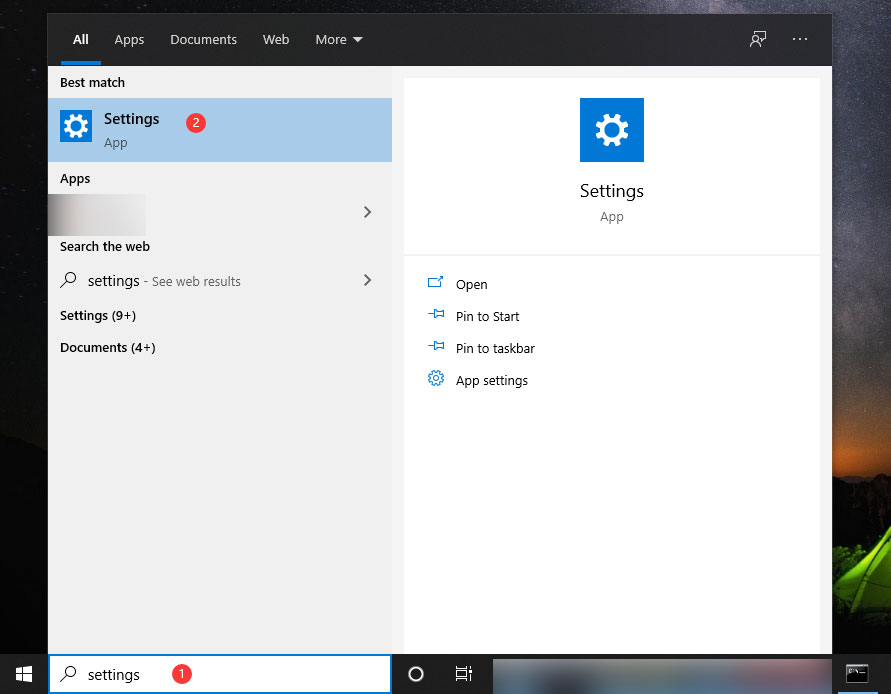
-
If you don’t see the Search bar in the taskbar at the bottom of the screen, click the circle or magnifying glass icon to open it first.
- You can also press the Windows key on your keyboard to activate search.

Advertisement
-
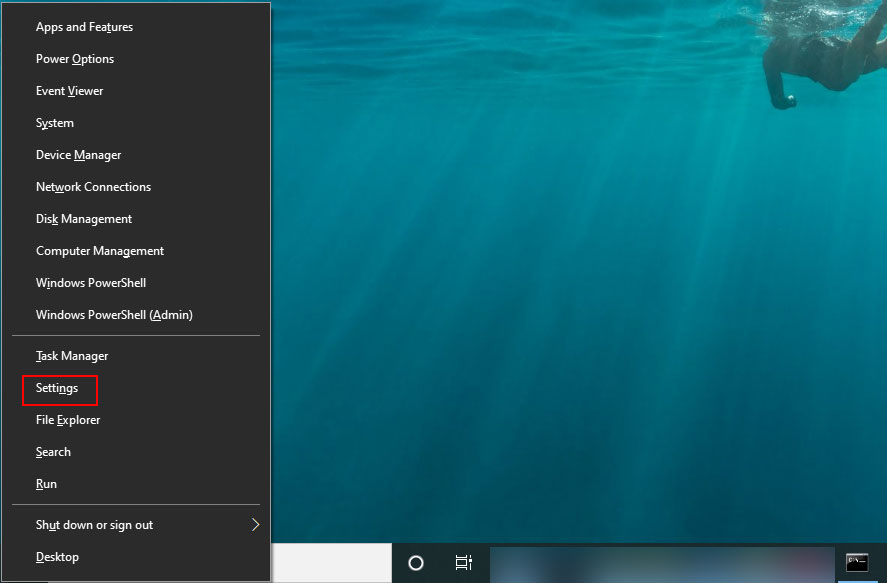
The Ctrl + X shortcut opens a secret Windows menu that gives you quick access to Settings, task manager, device manager, and more.
- You can also access the Power User menu by right-clicking the Start menu.

-
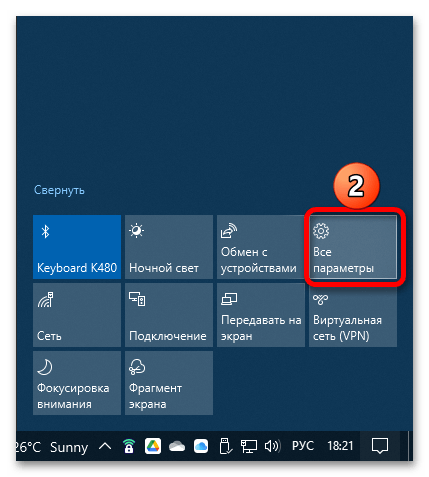
The Action Center (near the clock) is where you can view any notifications on your device. You can perform actions using the tiles at the bottom (called quick actions), including this tile that opens the Settings app.
- If you only see four tiles, click the «Expand» link to show the rest of them.

Advertisement
-
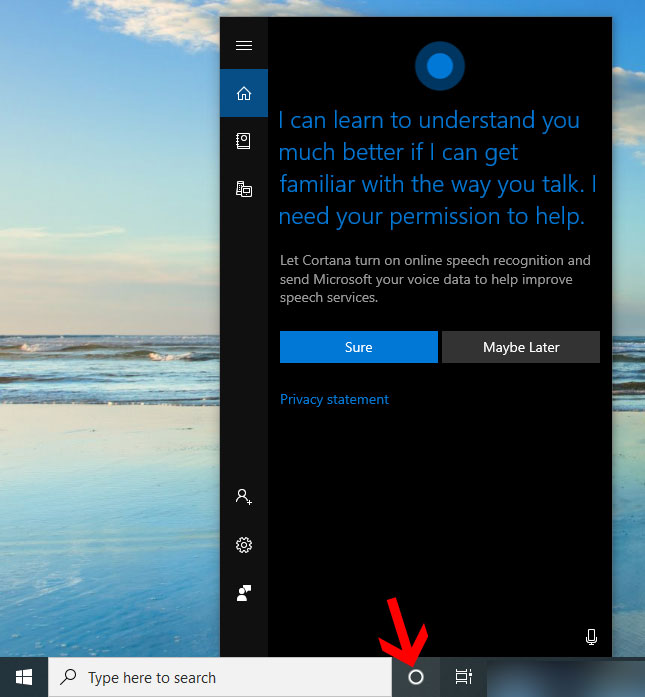
If you have Microsoft Copilot, the latest AI feature from Microsoft, for Windows 10, you can use it to open the Settings app. Look for a blue and pink icon to the right of the clock.
- If you don’t see this icon, Copilot may not be available for your device.[1]
- If you don’t see this icon, Copilot may not be available for your device.[1]
-

Copilot will reply, asking if you want to open Settings.
-
The Settings app will launch.


Advertisement
-
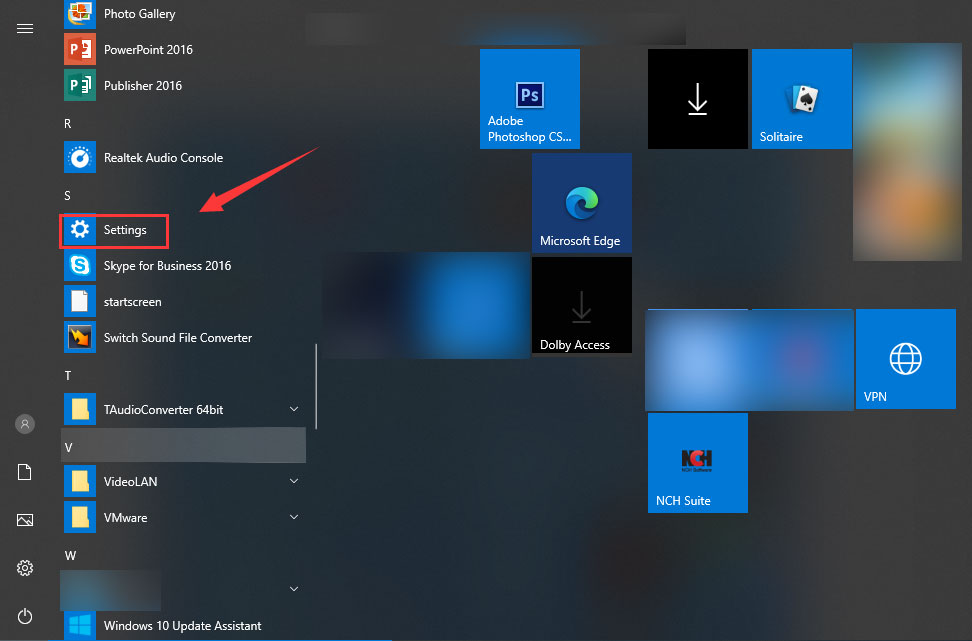
A fast way to do this is to right-click the Start menu and select File Explorer.
-

-
It’s the blue and white gear icon in the toolbar at the top of File Explorer.
- Alternatively, select the local drive Windows is installed on, navigate to «Windows\ImmersiveControlPanel», and then open «SystemSettings» or «SystemSettings.exe».


Advertisement
-
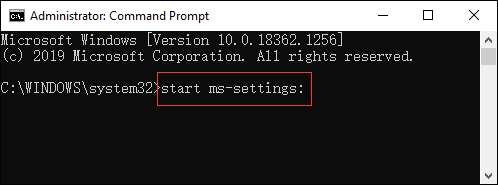
To do this, type cmd into the Windows Search bar, then click Command Prompt.
- If you don’t see the search bar in the taskbar at the bottom of the screen, click the circle or magnifying glass icon first.
-
. Type it exactly as written at the prompt.
-
This opens the Settings app.


Advertisement
-
Type powershell into the Windows search bar and press ↵ Enter to run PowerShell.
- If you don’t see the search bar in the taskbar at the bottom of the screen, click the circle or magnifying glass icon first.
-
.
-
You will now see the Windows Settings app.


Advertisement
-
This opens the Run dialog window.
-
.
-
The Settings window will now open.


Advertisement
-
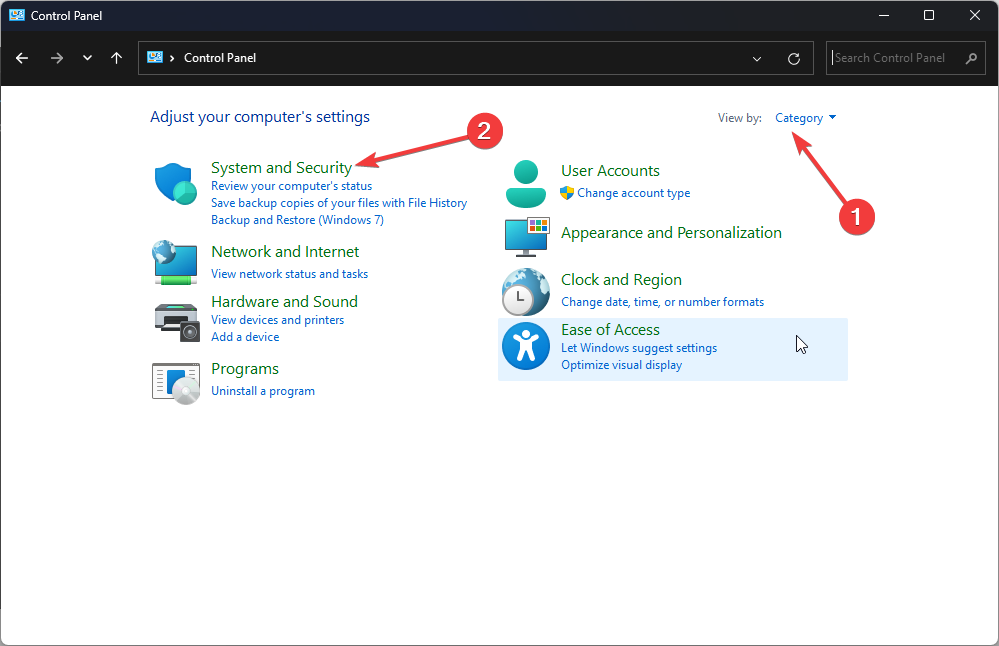
You can launch Control Panel by clicking or tapping the search bar (or magnifying glass icon), typing control panel, and then pressing ↵ Enter or selecting the matching result. You can use the Control Panel to jump to different areas of the Settings app:
- System and Security > Security and Maintenance > Recovery. If you’re having problems with your PC, this will help you reset it.
- User Accounts > User Accounts. Make changes to my account in PC settings.
- Appearance and Personalization > Taskbar and Navigation (or Navigation properties). This takes you to your Taskbar settings.
- Appearance and Personalization > Turn High contrast on or off. Quick access to high-contrast theme settings.
- Time and Language. Make changes regarding the display language of the system or the timezone.

-
This takes you to the Personalization area of the Settings app. You can also navigate the rest of the Settings app by clicking Home at the upper-left corner.

Advertisement
-
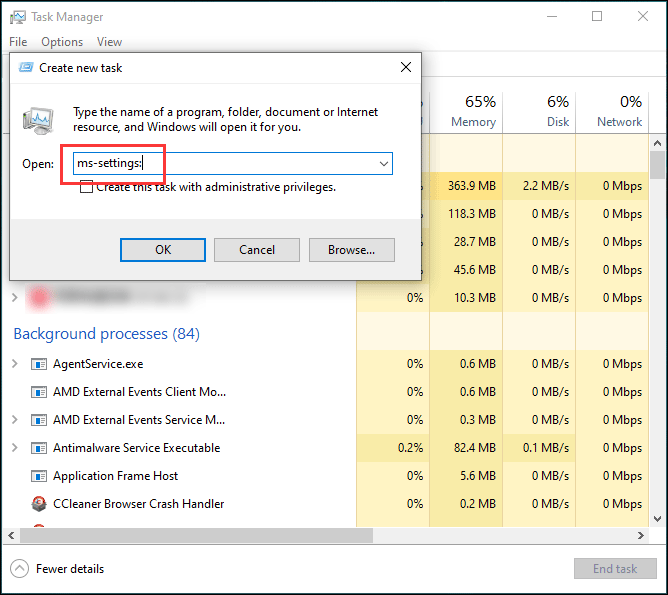
This quick keyboard shortcut launches Task Manager, another place from which you can launch the Settings app in Windows 10.
-
The «Create new task» window will appear.
-
and click OK. The Windows Settings app will now open.


Advertisement
-
If you want to bypass the Settings app and head right to the setting you want to view or modify, just type the name of the setting into the search bar on the taskbar. For example, type color, and then selectColor settings to open the Colors area of your Personalization settings.

-
If you want to make the Settings app super easy to find in the future, you can pin it to your taskbar.
-
A list of options will appear.
-
You can now click the Settings icon in the taskbar to open Windows Settings.


Advertisement
Add New Question
-
Question
Is the Settings app a universal app or desktop app/program?
The Windows 10 Settings app is a universal app. It is available on multiple different Windows 10 platforms.
Ask a Question
200 characters left
Include your email address to get a message when this question is answered.
Submit
Advertisement
-
If Windows Settings won’t open, restart your computer. If that doesn’t help, there may be file system corruption. Open Command Prompt as an administrator, type sfc /scannow, and press Enter to scan for and repair errors.
-
If the Settings app still won’t open, you can reinstall it using PowerShell. Type powershell into the search bar, right-click Windows PowerShell, and select Run as administrator. Then, type the following command and press Enter:
- Get-AppXPackage | foreach {Add-AppxPackage -DisableDevelopmentMode -Register "$($_.InstallLocation)\AppXManifest.xml"}
Thanks for submitting a tip for review!
Advertisement
Video
References
About This Article
Thanks to all authors for creating a page that has been read 162,060 times.
Is this article up to date?
-
Home
-
News
- Windows 10 Settings | How to Open Windows 10 Settings? (15 Ways)
By Stella | Follow |
Last Updated
Windows 10 Settings is an important app on your Windows 10 computer. You can use multiple methods to open Windows 10 Settings and use the options in it to modify the settings in the operating system. In this post, MiniTool Software will show you all the methods it knows.
About Windows 10 Settings
What Is Windows 10 Settings?
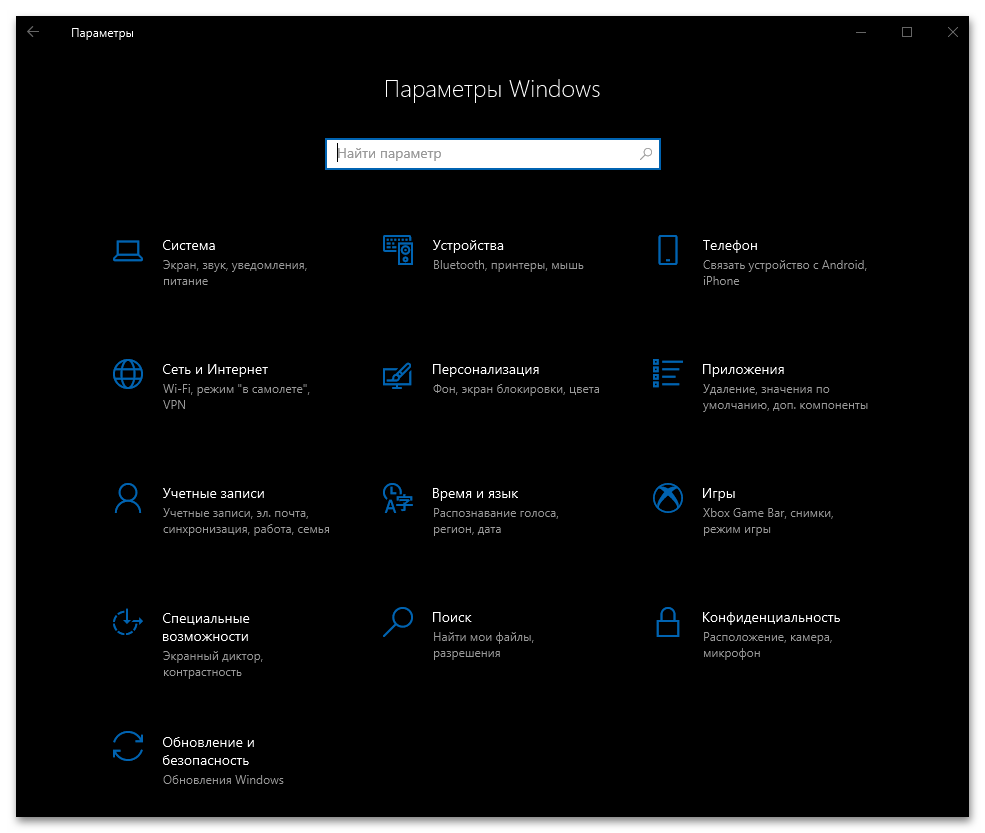
Windows Settings or Settings was introduced in Windows 8. In Windows 8/8.1, it is called PC Settings. It is a component of Windows, which allows you to customize and configure your operating system according to your requirements. It is very similar to Control Panel. You can use it to enter the main configuration options and settings for your computer. Windows 8/10 Settings shows you the categories of possible user interaction and activities, but not only the list of all devices and options.
Windows 10 Settings and Windows 8 Settings have some differences. Here are the categories in Settings:
The Categories in Windows 10:
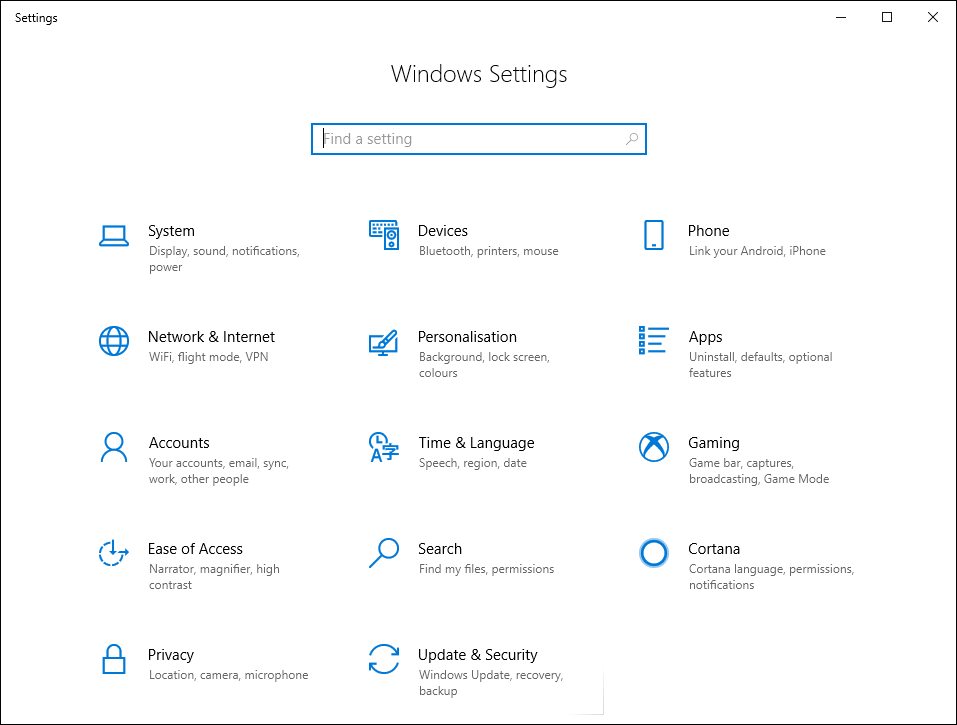
- System
- Devices
- Phone (introduced in Windows 10 Fall Creators Update)
- Network & Internet
- Personalization
- Apps (introduced in Windows 10 Creators Update)
- Accounts
- Time & Language
- Gaming (introduced in Windows 10 Anniversary Update)
- Ease of Access
- Search
- *Cortana (introduced in Windows 10 Fall Creators Update; removed in Windows 10 May 2020 Update)
- Privacy
- Update & Security
- *Mixed Reality (introduced in Windows 10 Creators Update; appears only if a device meeting minimum HoloLens requirements is connected to the PC.)
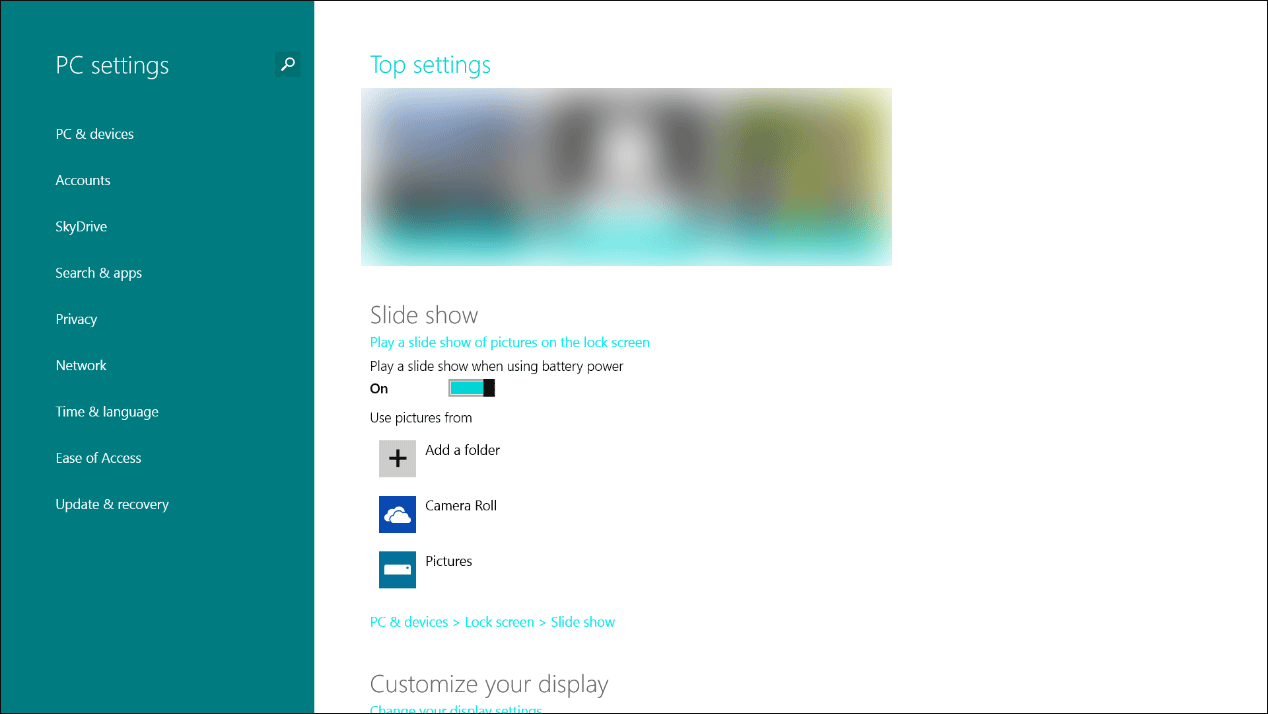
The Categories in Windows 8:
- PC & devices
- Accounts
- OneDrive/SkyDrive
- Search & apps
- Privacy
- Network
- Time and language
- Ease of Access
- Update & recovery
- *Activate Windows/Activate Windows8.1 (if your Windows is not activated)
How to Open Windows 10 Settings?
- Use Windows 10 Settings Keyboard Shortcut
- Via Start
- Use Command Prompt (CMD) or PowerShell
- Via the WinX Menu
- Use Windows Search
- Use Cortana
- Via Run
- Create a Windows 10 Settings Shortcut on Desktop
- Use File Explorer
- Via the Action Center
- Pin the Settings to the Taskbar or Start Menu
- Via Task Manager
- From the Desktop
- From the Taskbar
- From Control Panel
Method 1: Open Windows 10 Settings Using Windows 10 Settings Keyboard Shortcut
You can press Win+I on your keyboard to directly open Windows 10 Settings. This is the easiest method.
Method 2: Open Windows 10 Settings via Start
There is access to Windows 10 Settings in Start. You can click the Start menu (on the bottom-left side of the screen/the left side on the taskbar) and then select the Gear icon to open Windows 10 Settings.

On the other hand, you can also scroll down the Start menu to find Settings in S categories and then click it to open it.
Method 3: Open Windows 10 Settings Use Command Prompt (CMD) or PowerShell
If you are a professional user, you can also use Command Prompt or Windows PowerShell to open Windows 10 Settings. How to open Windows 10 Settings using this method? Here is a simple guide:
- Run Command Prompt as administrator.
- Type start ms-settings:.
- Press Enter.
You can also type the above command line in Windows PowerShell to open Windows 10 Settings.
Press Win+X on your keyboard and you can find Settings in the WinX menu. Then, you can click it to open it.
Method 5: Open Windows 10 Settings Use Windows Search
You can use Windows search to search for files and programs on your computer. So, you can also use it to search for Settings and then open it.
Method 6: Open Windows 10 Settings Use Cortana
You can also click Cortana and then tell Cortana to open Windows 10 Settings.
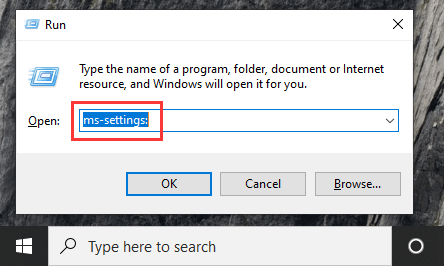
Method 7: Open Windows 10 Settings via Run
Run is another utility that can help you open an application on your Windows computer. You can follow these steps to open Windows 10 Settings:
- Press Win+R to open Run.
- Type ms-settings:.
- Press Enter.
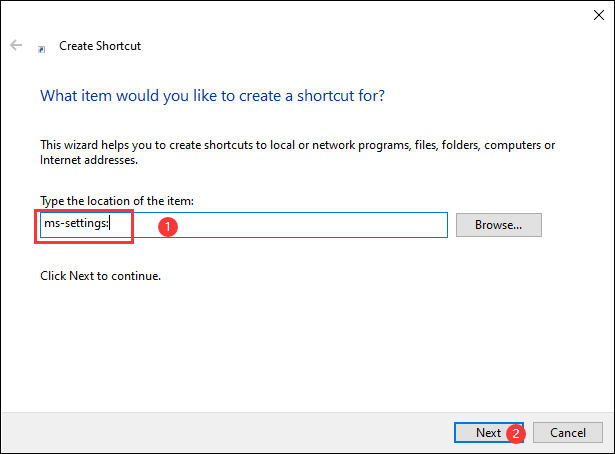
Method 8: Create a Windows 10 Settings Desktop Shortcut
You can also create a Windows 10 Settings desktop shortcut. Whenever you want to use it, you can just click that Windows 10 Settings shortcut to directly open it.
1. Right-click the desktop and then go to New > Shortcut.
2. Type ms-settings: when you see the following interface.
3. Click Next.
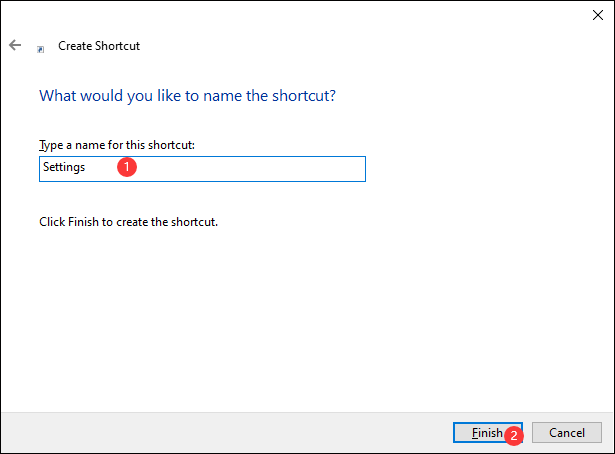
4. Type a name for the shortcut.
5. Click Finish.
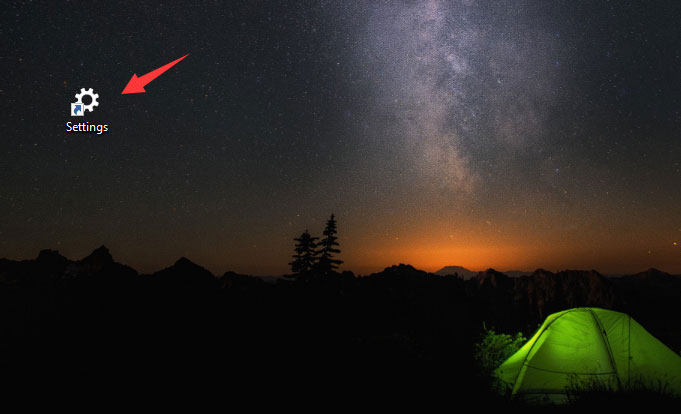
6. Then, you can see the Settings shortcut on the desktop. You can click it to open Windows 10 Settings.
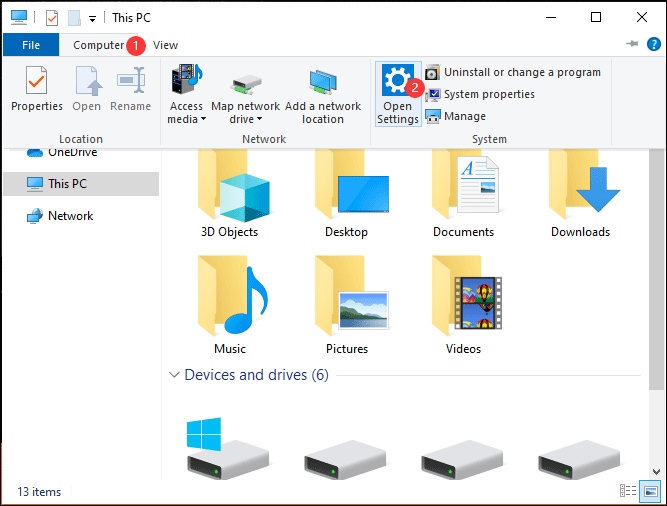
Method 9: Open Windows 10 Settings Using File Explorer
It is very easy to use File Explorer to open Settings in Windows 10:
- Click This PC.
- Select the Computer tab from the top menu.
- Click Open Settings to open it.
Method 10: Open Windows 10 Settings via the Action Center
How to open Settings in Windows 10 using the Action Center? You can follow this guide:
- Click the Notification icon on the right side of the taskbar.
- Select All Settings to open Settings in Windows 10.
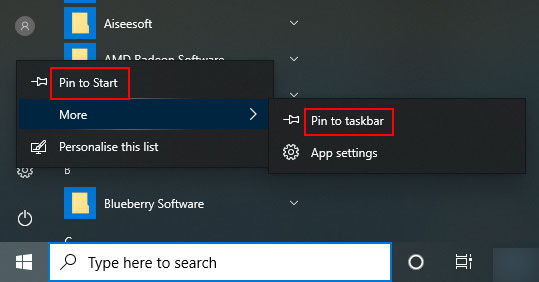
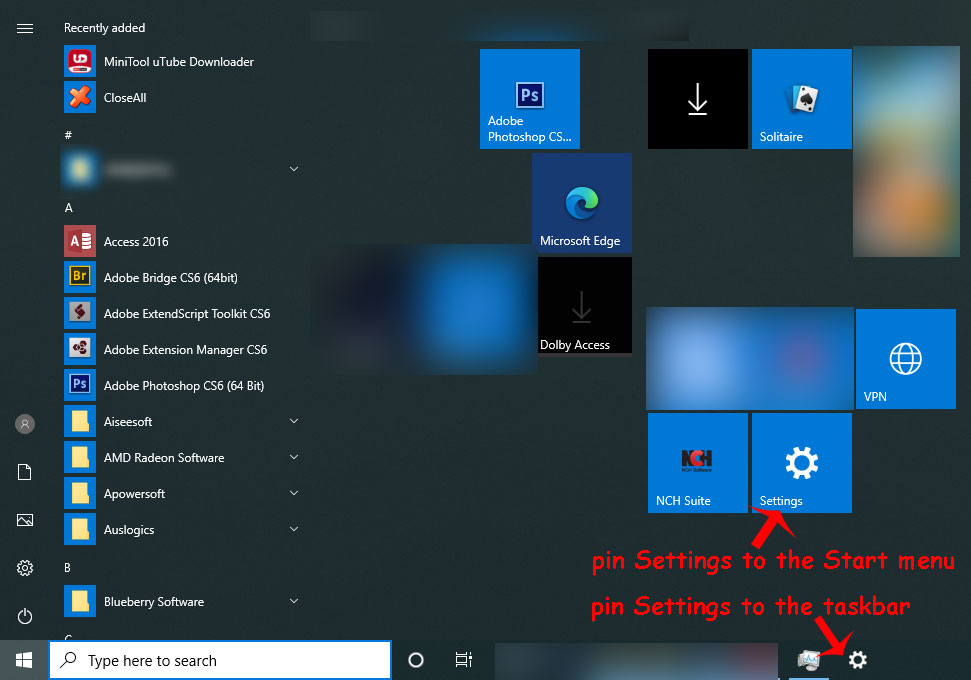
- Click Start.
- Right-click the Gear icon and then select Pin to Start. You can also go to More > Pin to taskbar to pin Settings to the taskbar.
The following image is the result:
Method 12: Open Windows 10 Settings via Task Manager
1. Right-click the taskbar and then select Task Manager.
2. Go to File > Run new task.
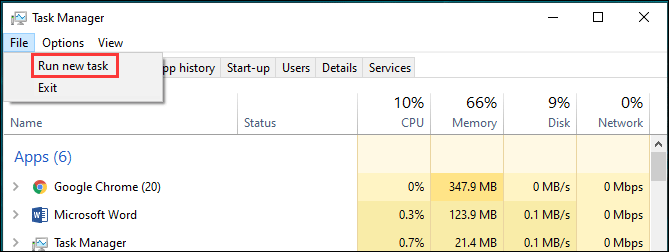
3. Type ms-settings:.
4. Click OK.
Method 13: Open Windows 10 Settings from the Desktop
You can also open Settings from the desktop. Here is how to do this:
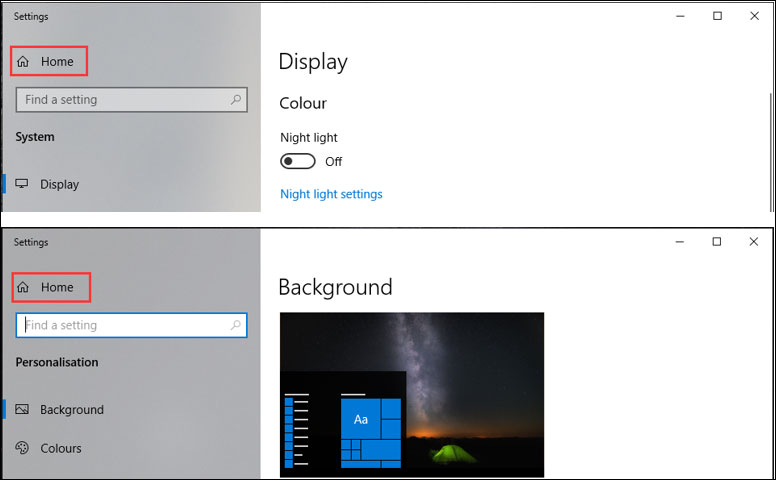
1. Right-click your desktop and then select Display settings or Personalise.
2. Click the Home button when you see the Display or Background interface to open Windows 10 Settings.
Method 14: Open Windows 10 Settings from the Taskbar
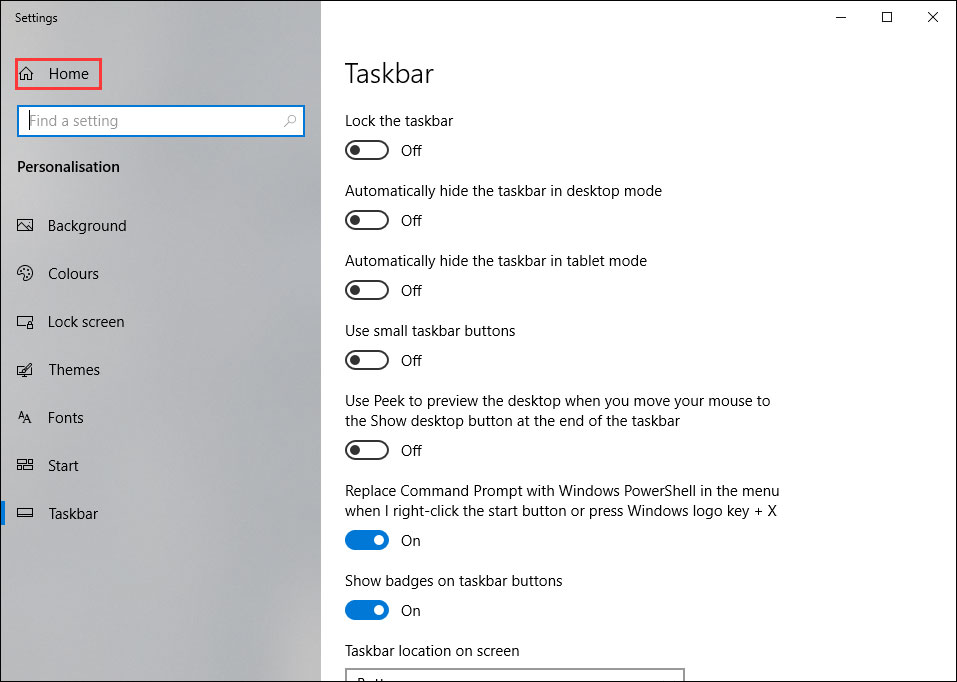
- Right-click the taskbar and then select Taskbar settings.
- Click the Home button on the pop-out interface to open Windows 10 Settings.
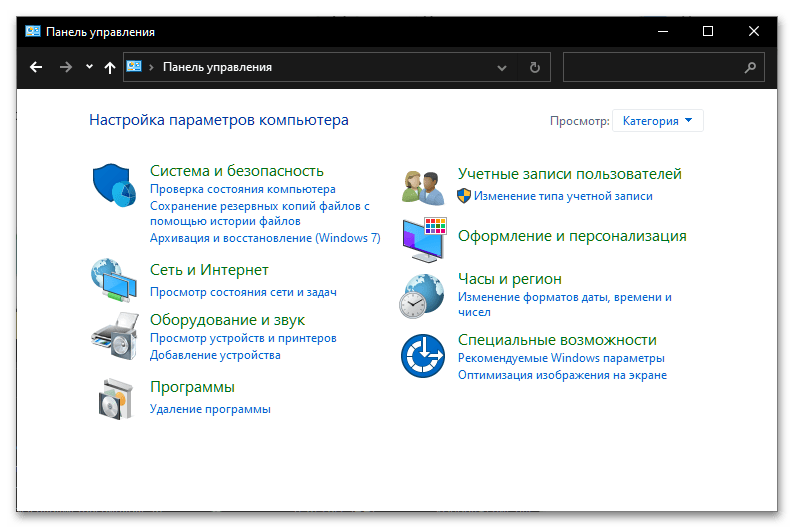
Method 15: Open Windows 10 Settings from Control Panel
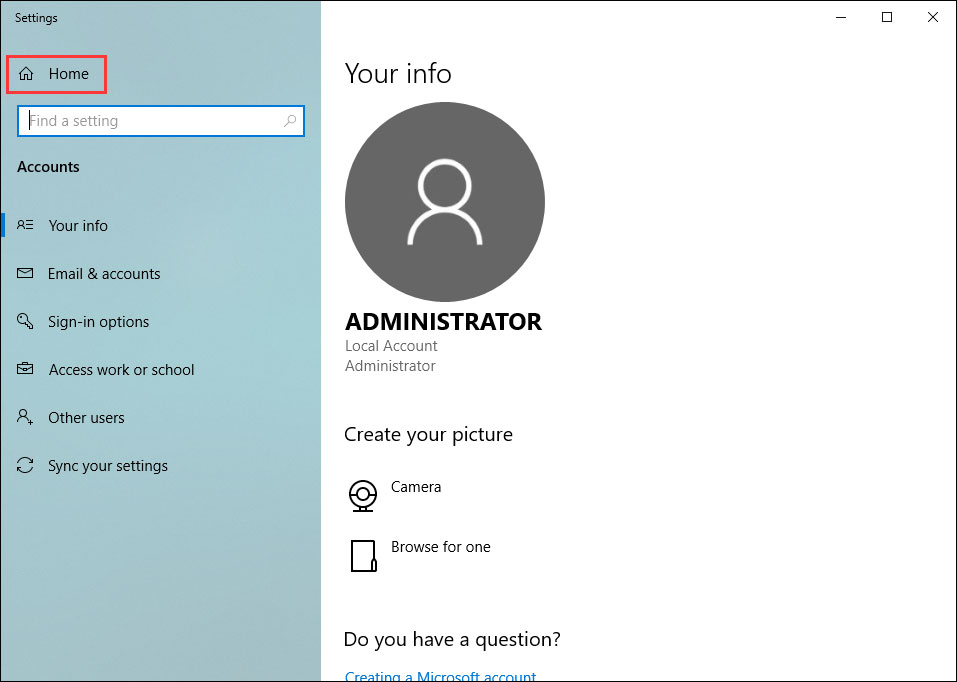
- Open Control Panel.
- Go to User Accounts > Make changes to my account in PC Settings.
- On the pop-out interface, click Home to go to Windows Settings.
Those are the methods to open Windows 10 Settings on your computer. You can just select your preferred method to use.
About The Author
Position: Columnist
Stella has been working in MiniTool Software as an English Editor for more than 8 years. Her articles mainly cover the fields of data recovery including storage media data recovery, phone data recovery, and photo recovery, videos download, partition management, and video & audio format conversions.
Readers help support Windows Report. We may get a commission if you buy through our links.
Read our disclosure page to find out how can you help Windows Report sustain the editorial team. Read more
If you’re trying to find Advanced System Settings in Windows 10, you’re in the right place.
They’re hidden in menus within menus, which can make them hard to access. But don’t worry, we’ll show you a few ways to get there.
How can I get to Advanced system settings on Windows 10?
1. Use the Control Panel
- Press the Windows key, type Control Panel, and click Open.

- Click View by and select Category from the drop-down.
- Now click System and Security.

- Click System.
- On the next page, select System.

- Click Advanced system settings from the left pane.
- On the System Properties window, go to the Advanced tab.


2. Use the Search bar
- Click the search bar and type View advanced system properties. Choose the best match and click Open.

- Go to the Advanced tab.

3. Use the Run console
- Press Windows + R to open the Run window.
- Type sysdm.cpl and hit Enter to open System Properties.
- Once you have the System Properties open, click on Advanced.
4. Use the File Explorer
- Press Windows + E to open File Explorer.
- Right-click on This PC and select Properties.

- Now click Advanced system settings.


- Microsoft wants Windows 10 users to upgrade to Windows 11 or Copilot + PCs
- Deleting ‘inetpub’ folder lets hackers permanently stop Windows updates, Microsoft warns
5. Use the Start button
- Right-click on the Start button and choose System from the context menu.
- Click the Advanced system settings option from the left pane.
6. Use the Settings app
- Press Windows + I to open the Settings app.
- Click System, then click About.

- Now click Advanced system settings.


7. Use the Windows PowerShell
- Go to the search bar, type PowerShell, and click Run as administrator.

- Copy and paste the following command and press Enter:
SystemPropertiesAdvanced


8. Use the Command Prompt
- Go to the search bar, type Command Prompt, and click Run as administrator.

- Type the following command to open Advanced system settings and press Enter:
control sysdm.cpl


What are the best advanced system settings for optimization?
- Open Advanced system settings using one of the methods mentioned above.
- With the Performance option, you can modify the visual effects, change VRAM size, and configure processor scheduling.

- Next, the User Profiles option can create, manage, and delete user profiles.

- With the Start and Recovery option, you can configure settings to decide what happens if your computer encounters a problem. Also, you can configure System Restore, manage disk space usage and perform system restore operations.

- The Environment Variables button can let you view and edit environment variables used by apps and operating systems to keep configuration information.


Advanced System Settings in Windows 10 let you optimize performance, manage virtual memory, configure user profiles, and even adjust startup options.
No wonder it’s a go-to tool for users who care about system maintenance.
So, this is how you can get to advanced system settings on Windows 10 using sysdm.cpl to improve the performance of your computer and modify environment variables. If you’re using a legacy version of Windows, we also have a guide on how to access advanced system settings on Windows 7.
Knowing how to make your Windows run faster and improve your computer performance can help enhance user experience and keep your Windows up and running.
Srishti Sisodia
Windows Software Expert
Srishti Sisodia is an electronics engineer and writer with a passion for technology. She has extensive experience exploring the latest technological advancements and sharing her insights through informative blogs.
Her diverse interests bring a unique perspective to her work, and she approaches everything with commitment, enthusiasm, and a willingness to learn. That’s why she’s part of Windows Report’s Reviewers team, always willing to share the real-life experience with any software or hardware product. She’s also specialized in Azure, cloud computing, and AI.
Все способы:
- Способ 1: Сочетание клавиш
- Способ 2: Поиск по системе
- Способ 3: Меню «Пуск»
- Способ 4: Контекстное меню кнопки «Пуск»
- Способ 5: Центр уведомлений
- Способ 6: Панель задач
- Способ 7: Рабочий стол
- Вопросы и ответы: 1
Обратите внимание! В настоящей статье будет рассмотрено то, как открыть стандартные для Windows 10 «Параметры», а не «Панель управления», которая считалась основным разделом настроек в предыдущих версиях операционной системы. Если же вас интересует именно эта оснастка, ознакомьтесь с представленной по ссылке ниже статьей.
Подробнее: Как открыть «Панель управления» в Виндовс 10
Дополнительно отметим, что если у вас не получается открыть «Параметры», то есть требуется устранить проблемы, связанные с запуском данной системной оснастки, перейдите по указанной ниже ссылке и выполните предложенные в инструкции рекомендации.
Подробнее: Что делать, если не открываются «Параметры» в Windows 10
Способ 1: Сочетание клавиш
Одним из наиболее простых способов запуска системных параметров, особенно для пользователей, которые привыкли активно использовать горячие клавиши, является сочетание «Win+I».
Способ 2: Поиск по системе
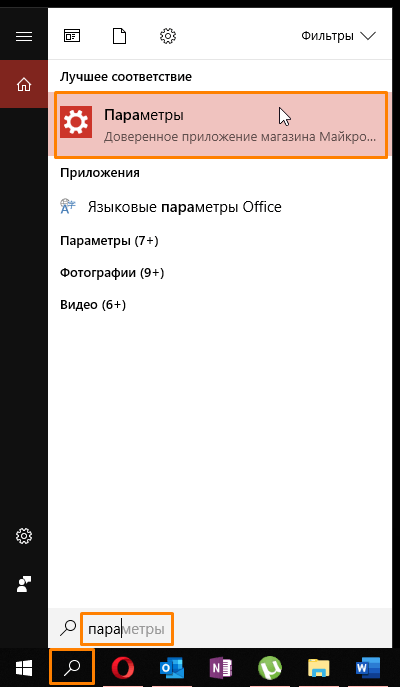
Не менее простым, а во многом даже более удобным методом открытия не только настроек, но и большинства других системных оснасток и установленных на компьютере приложений является поиск. Вызовите данную функцию, кликнув по значку лупы (или поисковой строке) на панели задач либо воспользуйтесь сочетанием клавиш «Win+S» и начните вводить запрос «параметры». Как только вы увидите искомый компонент в выдаче, кликните по его наименованию для запуска.
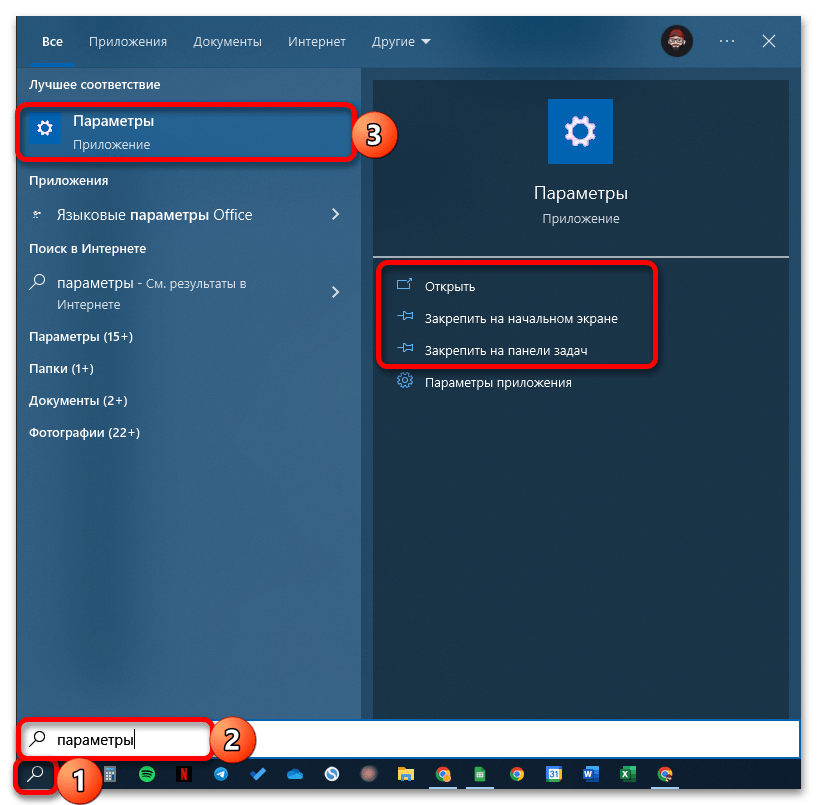
Примечание: Используя доступные справа пункты меню, можно не только открыть настройки, но и закрепить значок данного системного приложения в меню «Пуск» или на панели задач для более быстрого запуска в дальнейшем.
Читайте также: Как открыть поиск в Windows 10
Способ 3: Меню «Пуск»
Как и в предыдущих версиях Виндовс, в «десятке» получить доступ к системным параметрам можно через «Пуск». Откройте соответствующее меню, нажав по его иконке в левом нижнем углу экрана (расположение по умолчанию) или клавишу «Win» на клавиатуре, после чего кликните по находящемуся сбоку значку шестеренки.
Способ 4: Контекстное меню кнопки «Пуск»
У «Пуска» есть дополнительное меню, в котором представлены доступные для быстрого запуска системные компоненты, имеется среди них и интересующий нас. Для вызова «Параметров» кликните правой кнопкой мышки (ПКМ) по значку стартового меню и выберите искомый пункт.
Способ 5: Центр уведомлений
Такой важный компонент Windows 10, как «Центр уведомлений» (ЦУ), позволяет не только узнавать о важных событиях в системе, но и управлять активацией и деактивацией ряда ее функций с помощью отдельных плиток – быстрых действий. Одна из них предоставляет возможность быстрого перехода к системным параметрам.
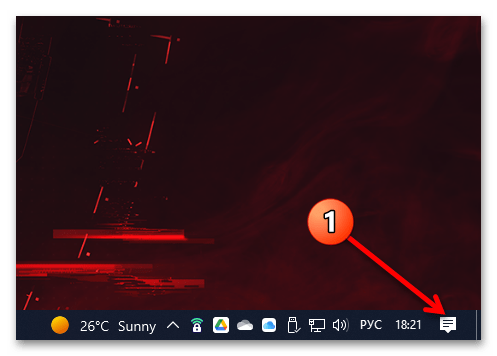
Для того чтобы решить озвученную задачу, кликните по значку «Центра уведомлений» на панели задач (за часами), а затем в появившемся меню по элементу «Все параметры».
Обратите внимание! Из ЦУ также можно перейти в конкретный раздел системных настроек, связанный с той или иной закрепленной плиткой («Bluetooth», «Сеть» и так далее). Достаточно просто нажать по элементу ПКМ и выбрать первый из доступных пунктов в контекстном меню.
Читайте также: Настройка «Центра уведомлений» в Виндовс 10
Способ 6: Панель задач
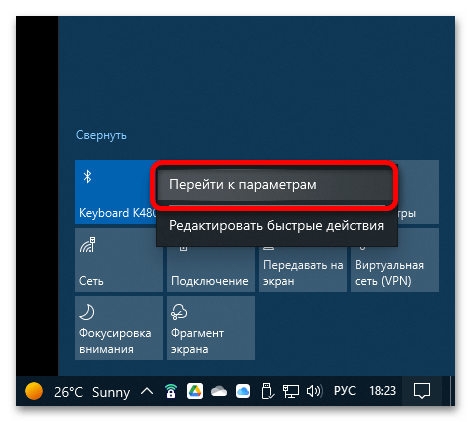
В случае если вам требуется перейти в конкретный раздел «Параметров» с целью настройки элементов панели задач (ПЗ), кликните в пустом месте данной области правой кнопкой мышки и выберите отмеченный на изображении ниже пункт меню.
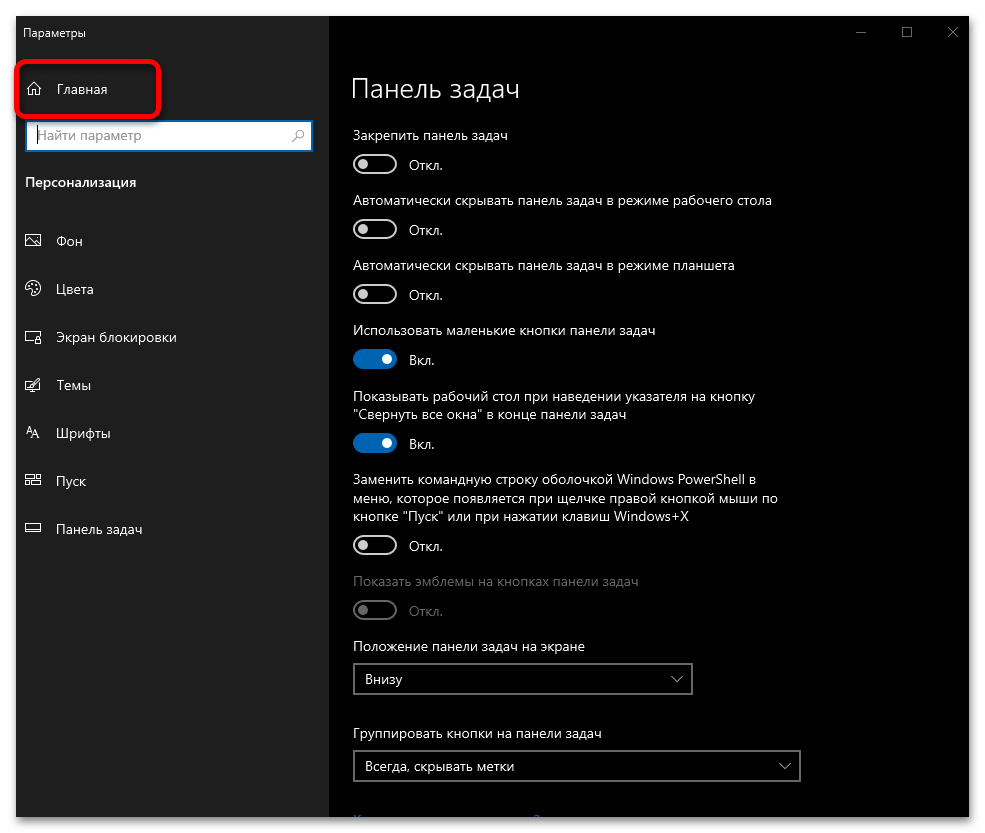
Когда указанный раздел настроек будет запущен, по необходимости, вы можете перейти на домашнюю страницу – для этого достаточно нажать по расположенной в левом верхнем углу кнопке «Главная».
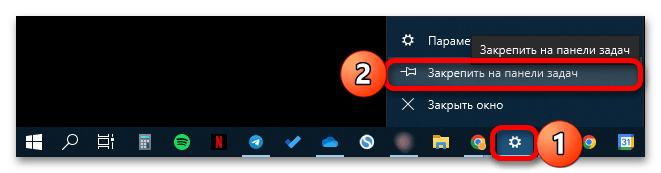
Примечание: Если в дальнейшем вы хотите открывать «Параметры» максимально быстро, рекомендуем закрепить их на панели задач. Для этого щелкните по ярлыку запущенного приложения ПКМ и выберите обозначенный на изображении ниже пункт меню. По необходимости переместите значок в удобное место ПЗ.
Схожим образом можно перейти не только к параметрам панели задач, но и к настройкам звука, сети, языковой раскладки и времени, а также (не всегда) некоторых других разделов, если в трее отображаются соответствующие значки. Кликните по любому из них и выберите пункт, в описании которого есть «Открыть параметры…» или «Настройки…».
Обратите внимание! Для того чтобы перейти к параметрам языка, необходимо нажать по индикатору раскладки не правой, а левой кнопкой мышки (ЛКМ).
Читайте также: Настройка панели задач в Windows 10
Способ 7: Рабочий стол
По аналогии с предложенным выше решением вы можете перейти к некоторым разделам системных параметров Виндовс 10 прямо через рабочий стол.
Кликните по его пустому месту ПКМ и выберите пункт «Параметры экрана» или «Персонализация» в зависимости от того, что вас интересует.
Читайте также: Параметры персонализации в Windows 10
Наша группа в TelegramПолезные советы и помощь
Сегодня мы поговорим о том, какими способами можно открыть приложение «Параметры» в операционной системе Windows 10 и что делать, если войти в него не получается.
Если вы столкнулись с тем, что «Параметры» не открываются, для начала советуем убедиться, что ваша Windows обновлена до последней версии, так как подобная ошибка, часто встречающаяся на старых версиях OC, была исправлена в последних обновлениях. Чтобы исправить проблему и решить проблему с запуском параметров, просканируйте компьютер антивирусной программой, поскольку вредоносное ПО нередко заражает именно системные компоненты и, прежде чем приступать к применению методов исправления данного сбоя, следует убедиться, что ваш компьютер чист.
Открыть окно «Параметры Windows» можно пятью разными способами:
- Нажатием горячих клавиш «Windows» + «I».
- Щелчком правой кнопки мыши на значке «Пуск» и выбором команды «Параметры» в открывшемся контекстном меню.
Открываем «Параметры» из контекстного меню кнопки «Пуск»
- С помощью поиска: кликнув значок лупы в панели задач и набрав в поле ввода «Параметры».

Находим приложение «Параметры» через системный поиск
- Нажав на иконку шестеренки в меню «Пуск».
Кликаем кнопку с шестеренкой в меню «Пуск»
- Выбрав пункт «Все параметры» в «Центре уведомлений», открыть который можно кнопкой на панели задач в правом нижнем углу экрана.
Запускаем «Параметры» из «Центра уведомлений»
Если вышеуказанные методы не дают результата и вы все еще испытываете проблемы с запуском параметров, то читайте далее.
Что делать, если не открываются параметры Windows 10
Дальнейшие инструкции помогут вернуть в строй приложение «Параметры», и оно снова сможет запускаться любым из перечисленных выше способов.
Перерегистрация приложения Windows 10
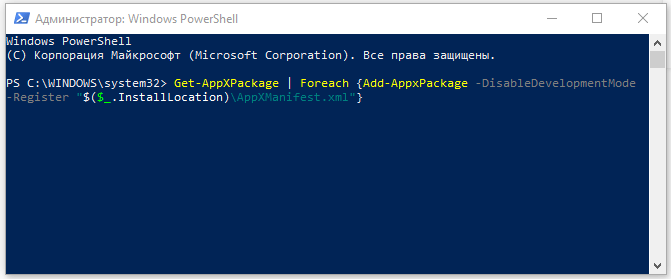
Наиболее действенный способ исправления ошибок в работе приложений Windows 10 — их перерегистрация с помощью специальной команды.
- Запустим утилиту «PowerShell» от имени администратора. Для этого в контекстном меню кнопки «Пуск» найдем пункт «Windows PowerShell (администратор)».
Открываем «Windows PowerShell (администратор)» из контекстного меню кнопки «Пуск»
- Выделите и скопируйте из этой статьи («Ctrl» + «C») и вставьте («Ctrl» + «V») в командную строку следующий текст: Get-AppXPackage | Foreach {Add-AppxPackage -DisableDevelopmentMode -Register «$($_.InstallLocation)\AppXManifest.xml»} и нажмите «Enter». После применения команды перезагрузите компьютер.

Вставляем текст команды из буфера обмена
Проверка целостности системных файлов Windows 10
Если предыдущий способ не решил проблему с невозможностью открыть «Параметры» Windows, может помочь сканирование и автоматическое восстановление системных файлов. Включить этот процесс мы можем также из оболочки «Windows PowerShell», запущенной от имени администратора. См. также: больше о целостности системных файлов в Windows 10.
Выполните шаг 1, описанный в предыдущем разделе статьи и введите команду sfc /scannow, подтвердив ее нажатием клавиши «Enter», после чего дождитесь окончания процесса.
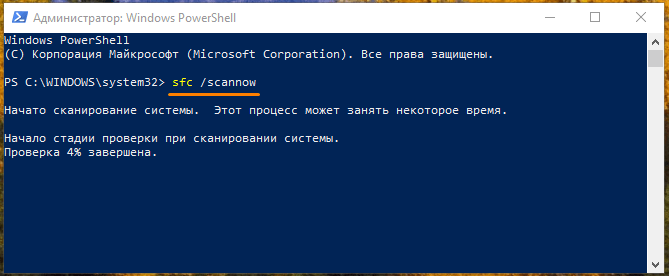
Запускаем сканирование системных файлов командой «sfc /scannow»
Создание нового пользователя
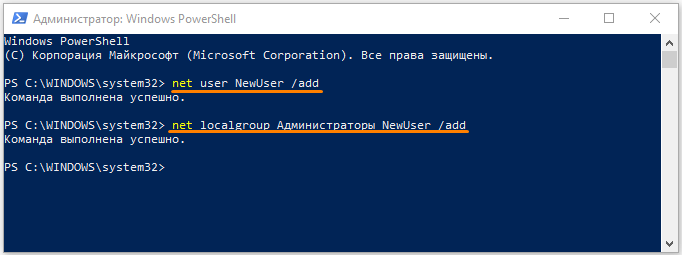
Если причиной неполадок в работе приложения «Параметры» в Windows 10 стал сбой в файле конфигурации пользователя, придется создать нового пользователя Microsoft и перенести данные из старой учетной записи в новый аккаунт. Для этого снова обратимся к утилите «Windows PowerShell».
- В командную строку вводим команду для создания нового пользователя: net user имя пользователя пароль /add. Вместо «имя пользователя» пишем название нового аккаунта, а вместо слова «пароль» — пароль для новой учетной записи, но можно обойтись и без пароля. Нажимаем «Enter» для подтверждения.
- Следующий шаг — добавляем новой учетной записи права администратора. Для этого вводим в командную строку: net localgroup Администраторы имя пользователя /add, где «имя пользователя» заменяем на название нашего нового аккаунта. Подтверждаем введенную команду клавишей «Enter».

Создаем нового пользователя и присваиваем ему права администратора
- Выйдите из старой учетной записи, войдите в новый аккаунт и проверьте, открываются ли в нем «Параметры» Windows. Если да, переходим к четвертому шагу.
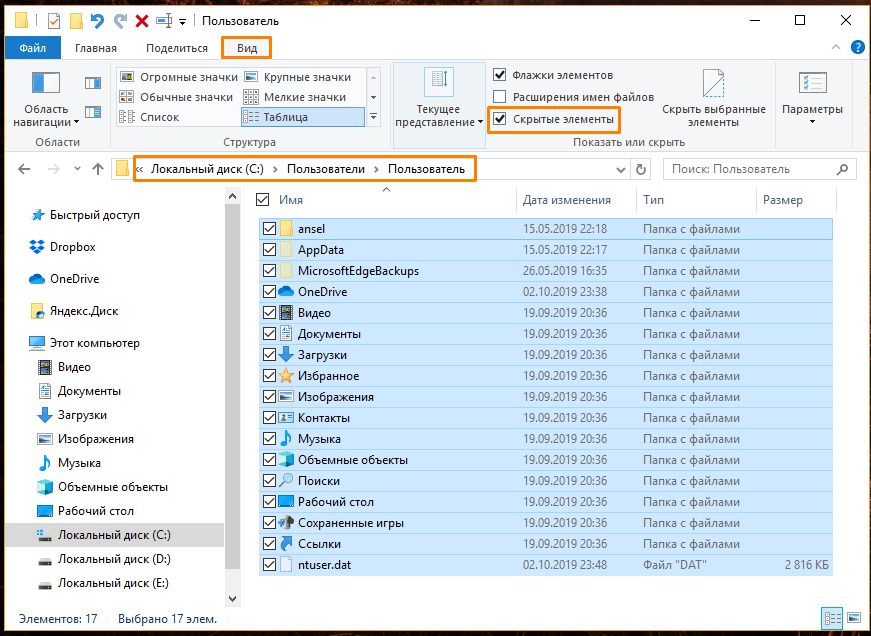
- Далее нам нужно скопировать содержимое папки с данными старой учетной записи. Для этого переходим в системный раздел диска в «Проводнике» Windows. С помощью флажка «Скрытые элементы» на вкладке «Вид» в верхней части окна отображаем скрытые папки и файлы, открываем папку «Пользователи» («Users»), а затем папку старой учетной записи. При появлении сообщения «У вас нет разрешений на доступ к этой папке», нажимаем кнопку «Продолжить». С помощью комбинации клавиш «Ctrl» + «A» выделяем все файлы и папки в данном расположении и, нажав «Ctrl» + «C», копируем их в буфер обмена Windows.

Переносим данные из старой учетной записи в новую
- Переходим в папку вновь созданной учетной записи и с помощью клавиш «Ctrl» + «V» вставляем в нее скопированные данные. Проблема должна исчезнуть.
Восстановление системы
И напоследок — самый радикальный способ. Если не удается запустить приложение «Параметры» после всех описанных в нашей статье манипуляций, остается произвести восстановление системы Windows 10.
- Щелкните кнопку «Пуск», а затем кнопку «Выключение». Нажмите клавишу «Shift» и, удерживая ее, кликните пункт «Перезагрузка».
Выбираем команду «Перезагрузка», удерживая клавишу «Shift»
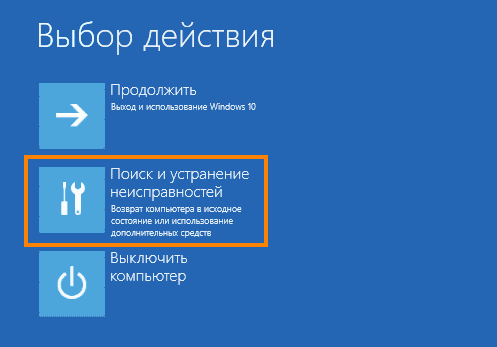
- В появившемся загрузочном меню жмем на «Поиск и устранение неисправностей».

Выбираем пункт «Поиск и устранение неисправностей»
- На следующем экране выбираем «Вернуть компьютер в исходное состояние», а затем указываем, хотим ли сохранить личные файлы.
Указываем, нужно ли сохранять личные файлы
- Компьютер перезагрузится, после чего выберем пользователя, от имени которого вы хотите произвести восстановление системы. Если для учетной записи задан пароль, его нужно ввести и нажать кнопку «Продолжить».
- Для начала восстановления системы нажмем кнопку «Вернуть в исходное состояние».
На этом все! Надеемся, что вам удалось решить проблему с запуском параметров Windows.
Post Views: 9 296