
Last Updated :
18 Apr, 2025
Windows 11 offers new features that are designed to improve user experience and productivity to implement any ideas and system configurations. The Widgets panel is one of these elements that jump out as being very useful to the users for delivering personalized content—like news, weather, calendar events, and more supports. Small cards known as widgets are used to provide dynamic content directly on the taskbar by an automatic memory management system. To use the widgets board in the Windows operating system effectively, you need to be signed in with your official Microsoft account.
In this article, we’ll explore the new features of Widges and How to Use Widgets in Windows 11.
Table of Content
- How to Access the Widgets Panel?
- How to Use Widgets in Windows 11?
- Method 1: Use Shortcut keys to open Widgets
- Method 2: Download the required Widgets
- Method 3: Customize the Widgets
Small, interactive displays to monitor the overall process called widgets show current information. In Windows 11, take the following actions to open the Widgets panel by implementing system software —
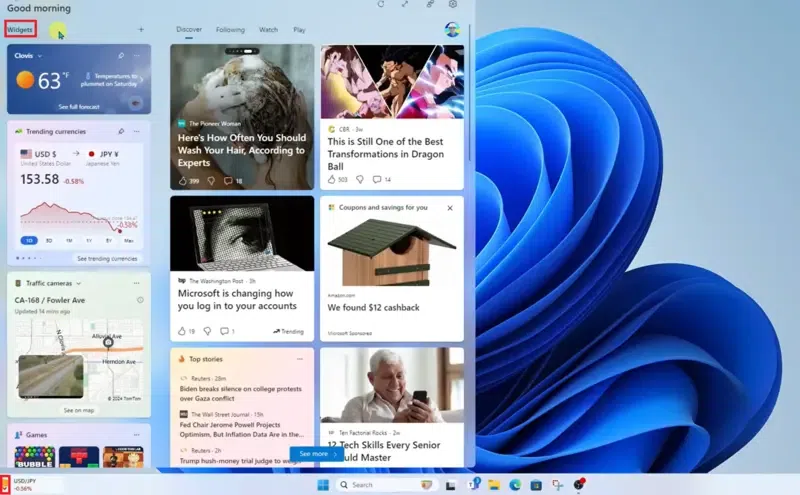
- Press the unique Icon for Widgets: The Widgets icon is a small square with four pieces that are located on the taskbar where the terminal is present. This icon can be clicked to open the Widgets panel manually.
- Make an operating gesture: To access the operational Widgets panel on a touchscreen device processor, swipe from the left edge of the screen toward the optimal center.
- Implement keyboard shortcuts: To quickly open the Widgets panel, press the Windows key + W from the keyboard.
Your official Microsoft account is linked with Windows 11 Widgets, enabling a smooth experience across all of your internal devices. You may synchronize your widgets automatically and preferences by logging in with a Microsoft account, making your customized information accessible on any Windows 11 device processor. To view all the essential widgets for the weather application, calendar, Microsoft To-Do list, news app, stocks prediction model, photographs, and other items, open the widgets board manually.
Now, follow the below steps and implement them to Use Widgets in Windows 11 effectively.
Method 1: Use Shortcut keys to open Widgets
Even if you’ve configured the Windows 11 taskbar to conceal the widgets button functionally, the keyboard shortcut remains functional for the overall system operation.
- Press Win + W from the keyboard > Click on the widget icon (on the left of the taskbar)
- Click on Open > Hold and swipe from the left to open the system widgets panel
Method 2: Download the required Widgets
Depending on the information a widget has, you can do different operations with it by following the steps. For example, you can check completed activities within the system without accessing the main program by using the Microsoft To-Do widget setup.
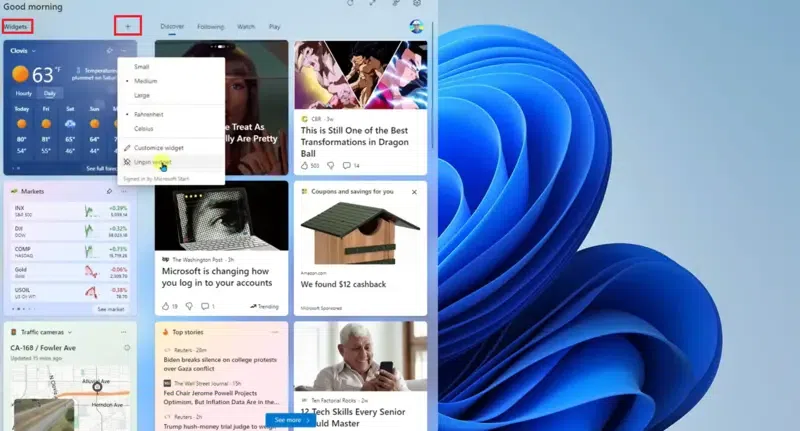
- Tap on the plus (+) sign to add more required Widgets > Select the Pin option
- Click on Find more Widgets > Download the Widgets (as per requirement)
Method 3: Customize the Widgets
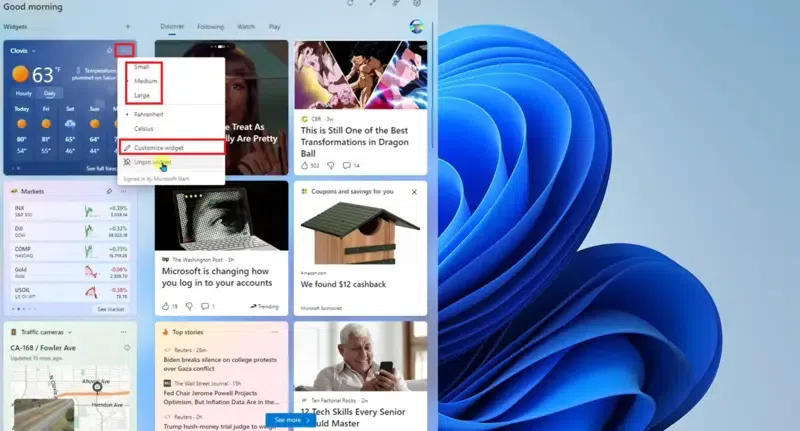
To view the service powering the information on the widget panel system, open the widget’s menu by selecting More Options (three dots) in the upper-right corner of your screen.
- Find and Select the three-dotted button at the upper right corner > Tap on Customize
Conclusion
Windows 11’s widgets are an effective tool for maintaining the overall management of the organization and knowledge distribution system. You may design a unique area that provides the essential information by spending some time customizing your Widgets panel on the device location. Follow the methods to use Widgets in Windows 11 by maintaining a Microsoft account. With Windows 11 and an official Microsoft account, Widgets make it simpler than ever to stay connected and productive by following the system, whether you’re checking the weather, reading the news, or organizing your daily activities.
Also Read
- How to Get the Weather Widget on Windows 11 Taskbar
- How to Customize Taskbar in Windows 11 (7 Methods)
В этой статье, друзья, рассмотрим гаджеты в Windows 11. Гаджеты — мини-приложения, размещаемые на рабочем столе или на отдельной боковой его панели, как системный функционал появились в Windows 7. С их помощью можно было отслеживать различную информацию — погоду, новости, курсы валют, потребление ресурсов компьютера и т.п. — прямо на рабочем столе. Несмотря на популярность гаджетов, ни в одной из следующих версий Windows они не появились, так Microsoft решила из соображений безопасности. Но появилась масса сторонних решений по внедрению гаджетов, и их можно реализовать в любой актуальной версии Windows – 8.1, 10, 11. Что за сторонние решения?
Gadgets Revived — бесплатная программа, реализующая в любой Windows начиная с 8 классические гаджеты, точь-в-точь такие, какими они были в Windows 7.
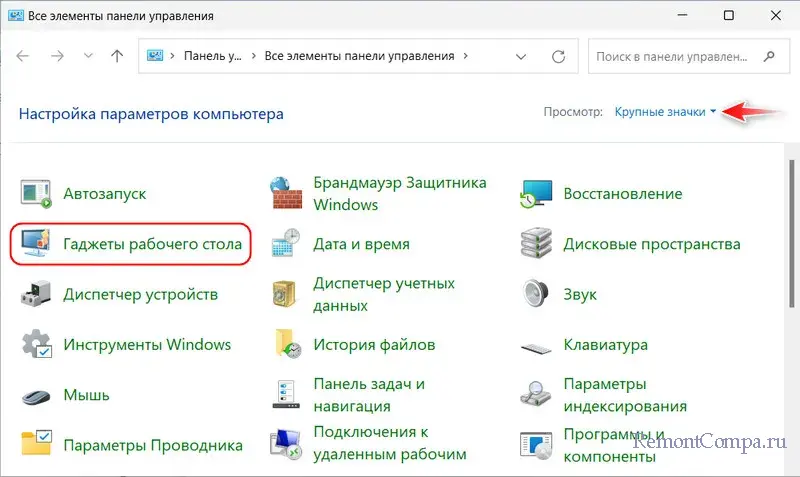
После установки программы запускаем её из классической панели управления.
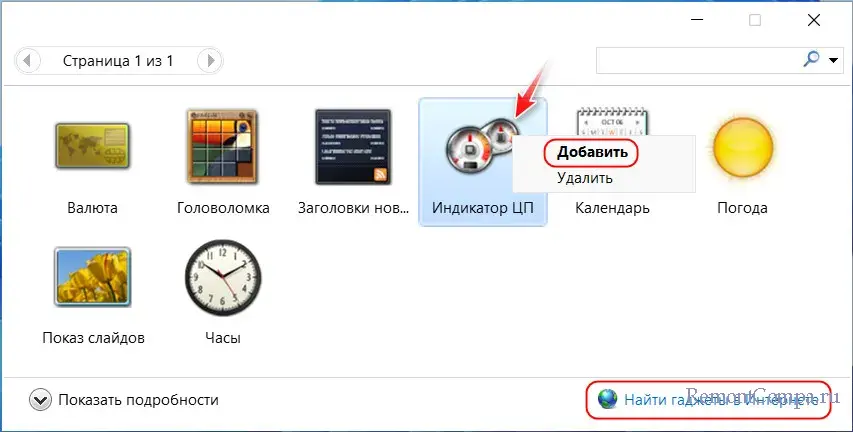
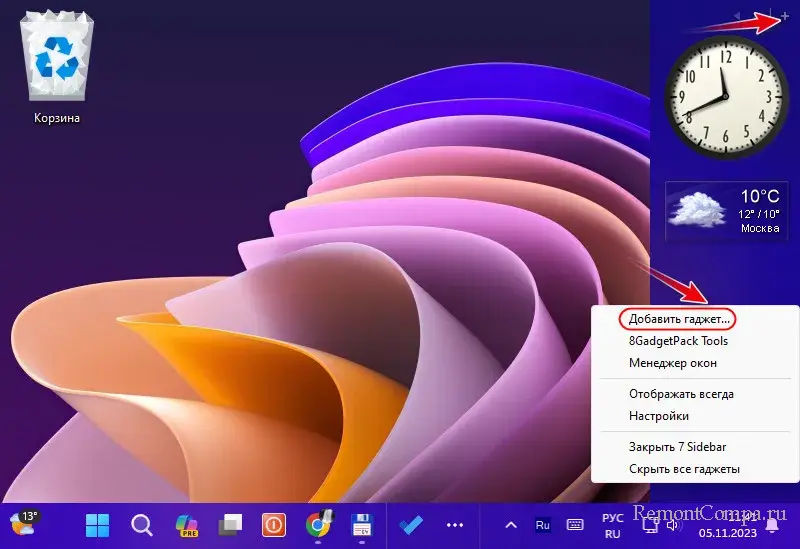
И добавляем гаджеты опцией в их контекстном меню или перетаскиванием на рабочий стол. Изначально нам предлагается небольшой ассортимент гаджетов. Но этот ассортимент можно пополнить на сайте программы по отсылке внизу окна.
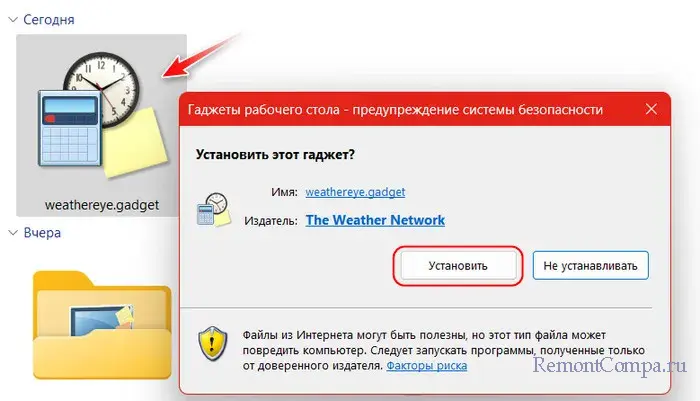
Скачиваем на сайте заинтересовавшие гаджеты и устанавливаем их как обычные программы.
Аналогичный предыдущему бесплатный проект — 8GadgetPack. Реализует в любой Windows начиная с 8 такие же гаджеты, какими те были в Windows 7. Предусматривает боковую панель.
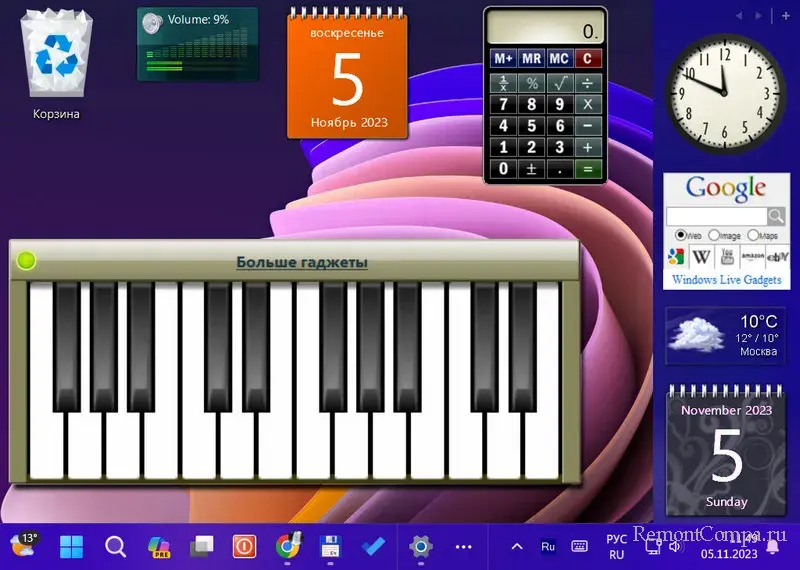
Добавлять гаджеты можно на этой панели – в её контекстном меню или кнопкой-плюсиком.
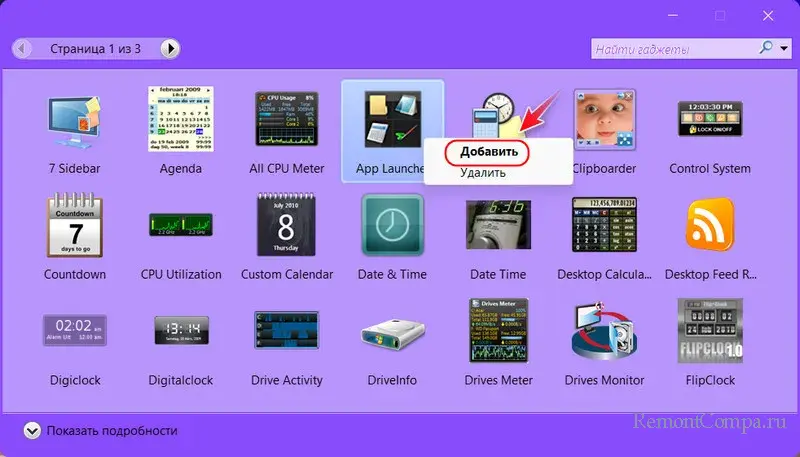
Запускается программное окно с выбором гаджетов, где каждый из них мы можем добавить на рабочий стол опцией в контекстном меню или перетаскиванием.
8GadgetPack изначально предусматривает полный ассортимент гаджетов. Детально о 8GadgetPack.
Что Gadgets Revived, что 8GadgetPack, помимо своего ассортимента, могут быть совместимы с гаджетами, предлагаемыми на различных сайтах по кастомизации Windows. Однако ни одна из программ не гарантирует корректность работы всех гаджетов, даже своих.
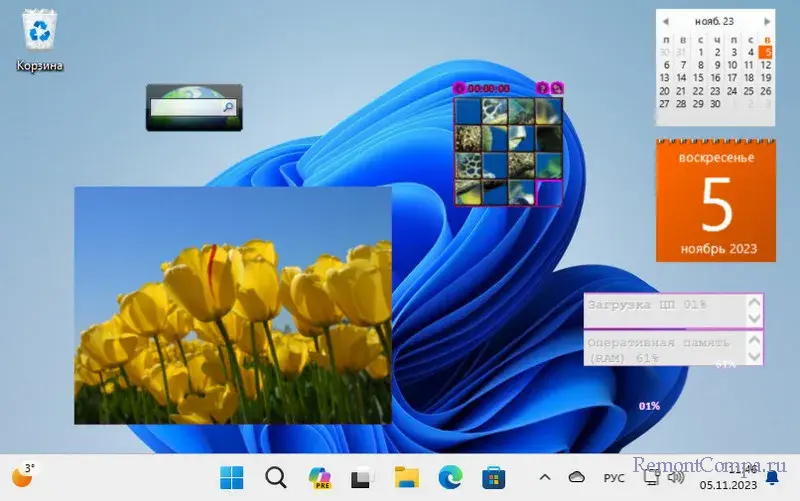
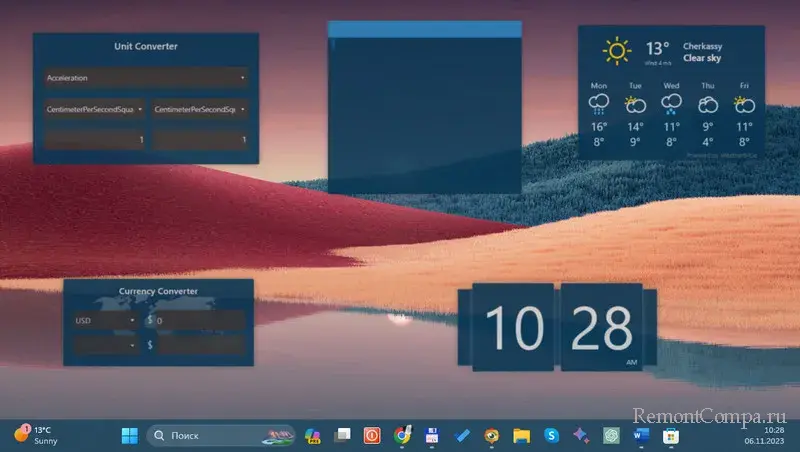
В Windows 10 и 11 гаджеты можно реализовать в современном формате, с помощью приложений из Microsoft Store. Одно из таких – условно-бесплатное Desktop Gadgets. Предлагает гаджеты как то: время, дата, погода, активность системных ресурсов, фотогалерея, заметки, калькулятор, конвертер величин.
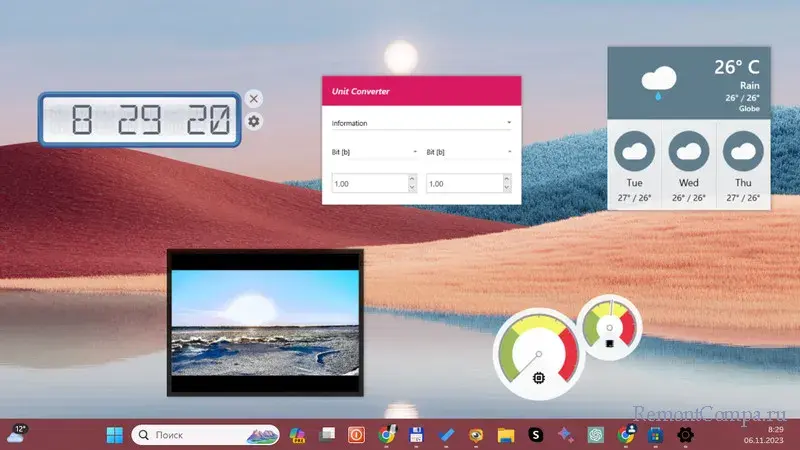
В окне приложения выбираем гаджет и двойным кликом добавляем его на рабочий стол.
Всё это доступно бесплатно, за плату можно получить дополнительные гаджеты и сменить их скины.
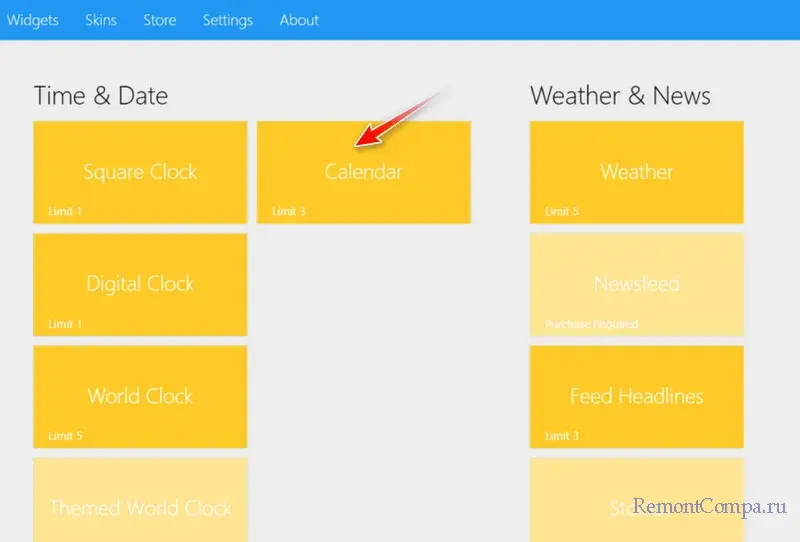
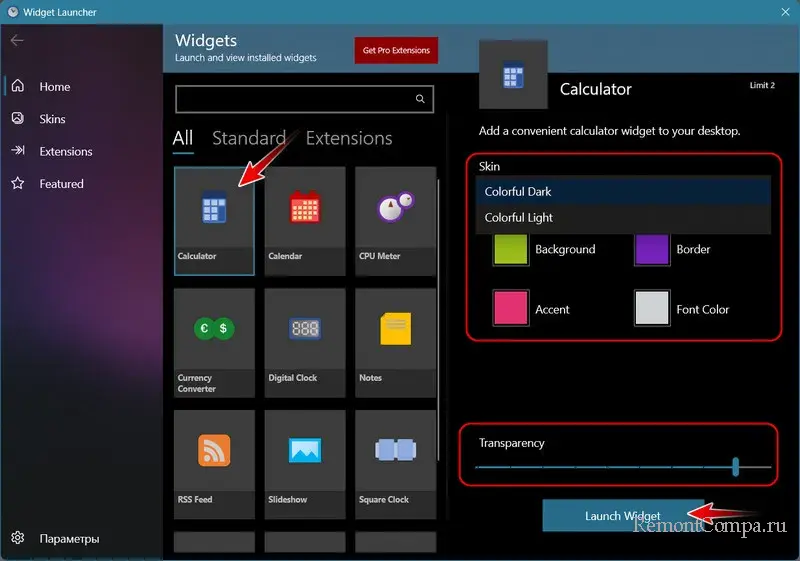
Бесплатное приложение Widget Launcher – это стильные современные гаджеты, именуемые виджетами. Есть виджеты: часы, погода, калькулятор, календарь, активность системных ресурсов, конвертеры, RSS, заметки, слайд-шоу фото и пр.
Для добавления виджета на рабочий стол кликаем его в окне приложения. Можем выбрать для него тёмную или светлую тему, настроить цвета и прозрачность. В итоге жмём «Launch Widget».
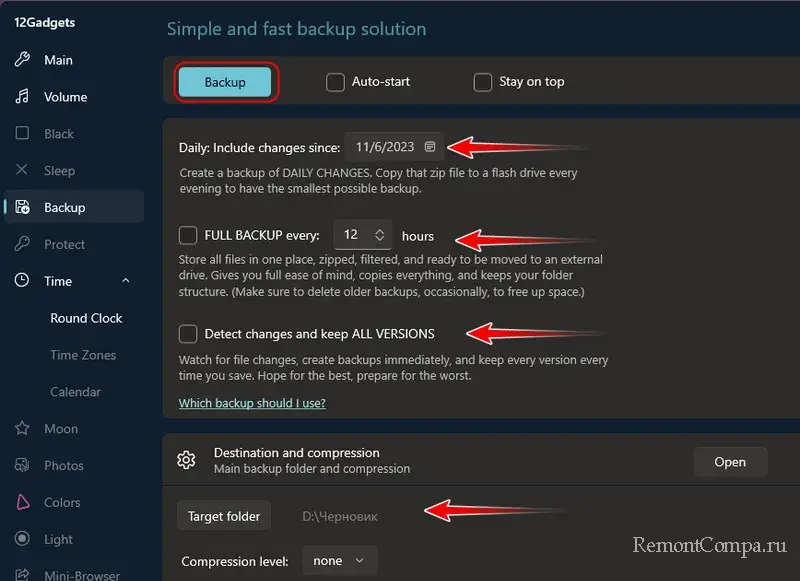
Бесплатное приложение 12Gadgets предлагает подборку 12-ти современных гаджетов. В их числе типичные как то: ползунок громкости, кнопка сна, часы календарь, слайд-шоу фото. И есть уникальные гаджеты — экранная заставка, бэкап и шифрование файлов, информация о луне, цветовая палитра с кодами оттенков, цветовая температура.
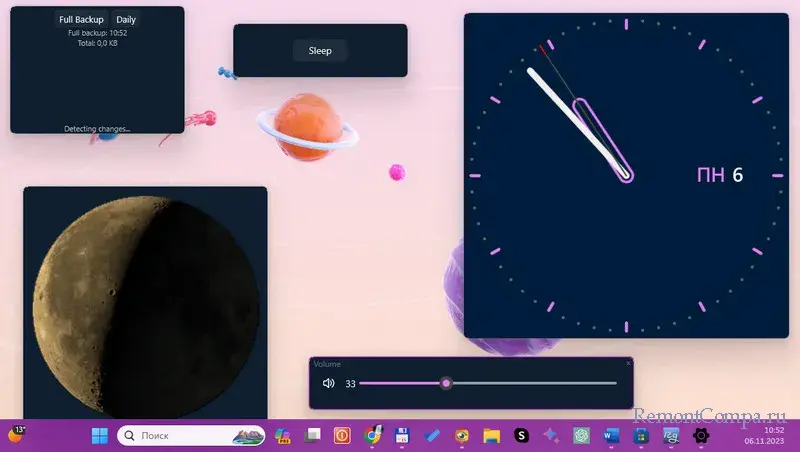
Для добавления гаджета открываем его вкладку в приложении. Если есть настройки, вносим их. Можем назначить автозапуск и поверх других окон. И запускаем гаджет кнопкой вверху с его названием.
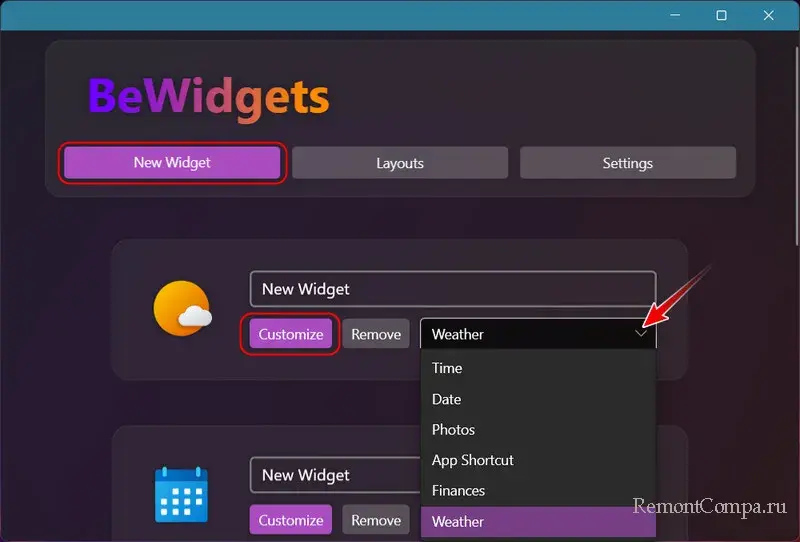
Бесплатное приложение BeWidgets – это небольшая подборка современных гаджетов, именуемых виджетами, как то: часы, дата, погода, фото, финансы, ярлыки программ. Позволяет виджеты настраивать и создавать с ними разные слои с разными подборками.
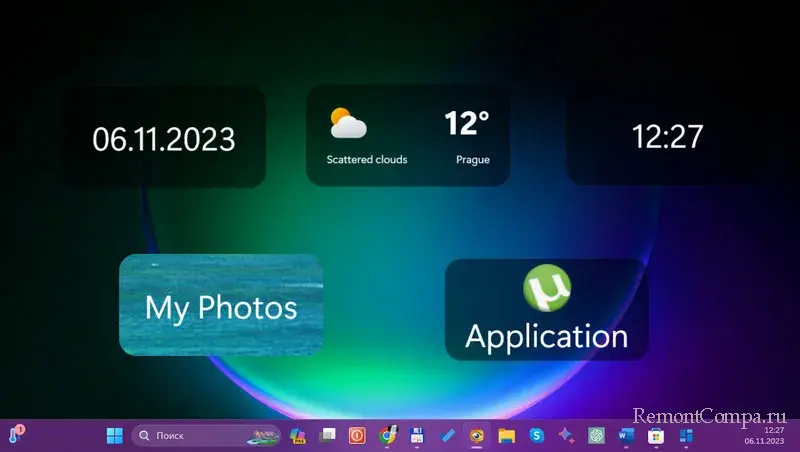
Для добавления виджета в окне приложения жмём «New Widget». Выбираем виджет, и он появится на рабочем столе. Нажав для виджета «Customize», можем настроить его.
Детально о BeWidgets.
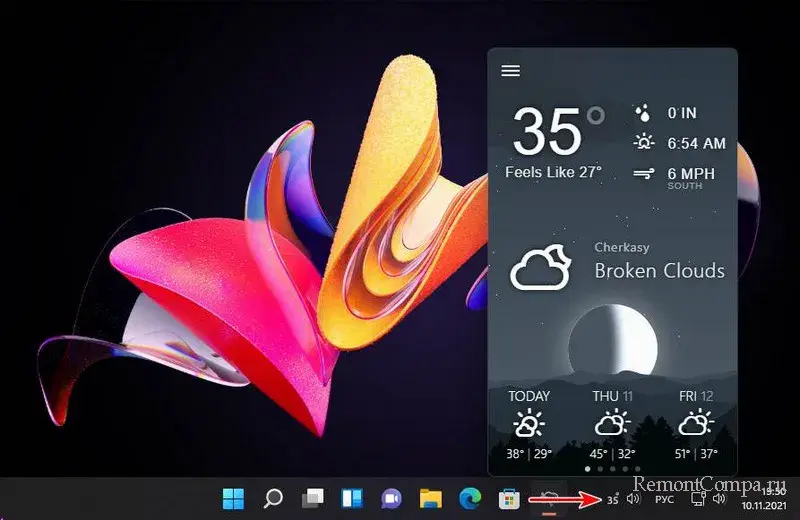
Weather Bar – это бесплатный виджет погоды, интегрирующийся в системный трей. Детально о Weather Bar.
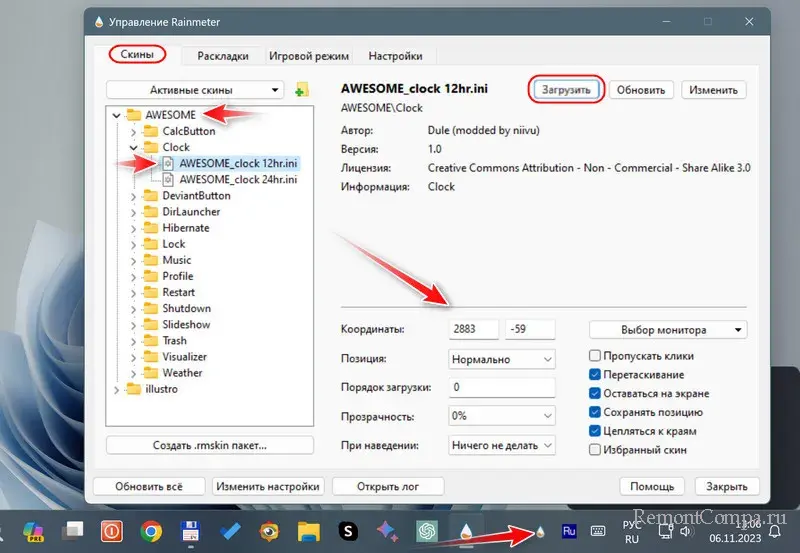
Максимум возможностей в плане гаджетов в любой Windows начиная с 7 получим с бесплатной программой Rainmeter. Потребляет минимум системных ресурсов, с открытым исходным кодом, имеет своё сообщество, создающее скины.
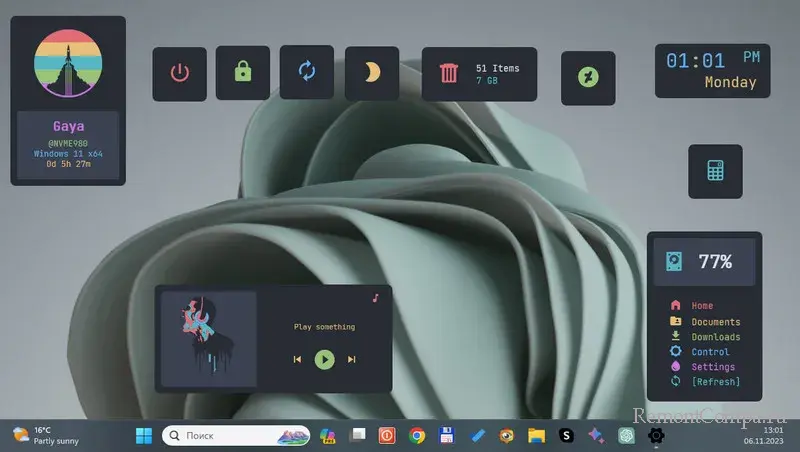
Сама программа – это платформа для гаджетов, сами же они реализуются скинами. Это оболочки, предусматривающие подборки с теми или иными гаджетами, с тем или иным интерфейсом и дизайном. Вместе с программой устанавливается дефолтный скин. Но мы можем найти в Интернете множество скинов на любой вкус. Просто вводим в поисковик «скины Rainmeter». Детали установки уточняем на сайтах, где предлагаются скины. Обычно они внедряются путём установки файла типа «.rmskin», для этого программа Rainmeter должна быть установлена в систему, а не работать как портативная. Также скины могут поставляться в папках, которые необходимо поместить в папку «Skins» внутри папки программы Rainmeter.
После установки файлов «.rmskin» новые скины обычно сами открываются со всей подборкой гаджетов. Если скин мы добавили в папке, жмём иконку Rainmeter в трее Windows. Запустится окошко управления программой. Во вкладке «Скины» открываем папку нового скина. Кликаем каждый гаджет и жмём кнопку «Загрузить». Здесь же ниже можно настроить любой гаджет в составе любого скина.
Widgets in Windows are interactive elements that display dynamic content and provide quick access to various apps and features. You can view your location’s current weather conditions directly on the taskbar and hover over the icon to see concise, scannable information on topics like sports, stocks, local news, and breaking headlines. Widgets are designed to help you staying informed and organized by presenting personalized information at a glance.
Widgets are displayed on the Widgets board, which contains a collection of cards, each representing a widget with relevant information and actions related to an app. On the Widgets board you can discover, pin, unpin, arrange, resize, and customize widgets to reflect your interests.
Widgets can show a variety of information, including:
-
Weather: Current conditions and forecasts for your selected location
-
News: Latest headlines from sources you trust
-
Traffic: Real-time traffic updates for your route
-
Stocks: Updates on your favorite stocks and market trends
-
Photos: A slideshow of your recent photos
Note: Widgets are not intended to replace full applications but provide a convenient way to access important information and perform quick actions without launching the associated app or website. They are refreshed dynamically throughout the day to keep the content current and relevant.
You can access the Widgets board either by:
-
Hovering over or selecting the Widgets area on the taskbar
-
Using the Windows key + W shortcut
-
Swiping from the side of the screen
Configure Widgets settings
The following sections describe common operations to customize your Widgets experience. Expand each section to learn more:
By default, the Widgets board is personalized using the preferences of the Microsoft account used to sign in to Windows. You can sign out from the Widgets board or choose to sign in with a different Microsoft account.
To sign out from the Widgets board:
-
Open the Widgets board
-
Select your user account button
-
Select Sign Out
If you want to sign in with another account, select the Sign in option displayed on the banner when opening Widgets.
By default, the language and the content displayed on the Widgets board is determined by your Windows display language and Country or region settings. To change the language and content used by Widgets:
-
Open the Widgets board
-
Select your user account button
-
From the Language and content dropdown, select your preferred language
The feed is the stream of news content displayed on the Widgets board. If you prefer to hide the feed:
-
Open the Widgets board
-
Select the settings button
-
Select the option Show or hide feeds and select the option Feed to Off
If you want your board to take up more space so you can access more widgets at a glance, use the expand button on the Widgets board. The expand button changes to a collapse button after you use it so you can collapse the size of your Widgets board as needed.
If you don’t want the Widgets board to open on hover:
-
Open the Widgets board
-
Select the settings button
-
Toggle the option Open Widgets board on hover to Off
In addition to receiving live updates on the taskbar from the weather widget, you can also receive updates from other widgets such as sports, finance, and breaking news.
Rotating announcements
Widgets display weather information on the taskbar most of the time. When something important happens related to one of your other widgets of feeds, you might receive an announcement from that widget.

These announcements are meant to be quick and glanceable. If you don’t interact with them, the taskbar will return to displaying weather information.
Badges
A badge notification might appear on your taskbar for notifications that need to persist for longer than a few seconds, such as severe weather alerts or breaking news.

When you open the Widgets board, a banner will appear at the top of the board providing more information on what triggered the notification badge.
Note: When you’re in a focus session, widgets’ announcements and badges are not displayed on the taskbar.
To configure notifications on the taskbar for your widgets:
-
Open the Widgets board
-
Select the settings button > Notifications
-
Toggle the option Show notification badges on the taskbar to On to Off
-
Toggle the option Show announcements on the taskbar to On to Off
To personalize your notifications experience:
-
Open the Widgets board
-
Select your user account button
-
Select the Notifications tab and customize the type of notifications you want to receive
To show or hide Widgets from the taskbar:
-
Right-click on the taskbar and select taskbar settings , or use the following shortcut:
Taskbar
-
Under Taskbar items, toggle the Widgets switch to On or Off
To learn more about taskbar customization options, see Customize the Taskbar in Windows.
Note: Even if you remove Widgets from the taskbar, you can still access the Widgets board by using the Windows key + W shortcut or by swiping from the side of the screen.
Personalize your feed
Your feed, which is the stream of news content displayed on the Widgets board, will become more personalized over time. The following sections describe common operations to personalize your feed. Expand each section to learn more:
-
Open the Widgets board
-
Select your user account button
-
In the Discover tab, find the topics of interests and publishers, and select them
-
View and unfollow your followed topics or publishers in the Following tab
-
View and unblock any blocked topics or publishers from the Blocked tab
You can fine-tune your feed from within an individual news story too.
-
To remove an article from your feed, select the Hide this story button in the upper corner of the article. You can then provide feedback that you are not interested in the story, you don’t like the source, or that you want to report an issue
-
Select the More like this (thumb up) or Fewer like this (thumb down) buttons in the lower corner of a news story to receive more news of what you care about or less of what you don’t. You can also choose to hide stories from the story’s publisher
Updated content will appear in your feed when there is new content that meets your personalization settings. Your feed learns about you over time, so you might not always see changes right away.
Signing in to Windows and Widgets with the same Microsoft account helps ensure that your news feed personalization is available across Widgets, apps, and devices.
Customize the Widgets board
The following sections describe common operations to configure the Widgets board. Expand each section to learn more:
You can discover and install new widgets for supported apps by visiting the Widgets page in the Microsoft Store.
Pinning a widget keeps the widget in a predictable and easily accessible location. Pinned widgets have a Pin icon in the upper corner.
To pin widgets to your Widgets board, select the more options button in the upper corner of the widget, and then select Pin widget.
To unpin a widget from the Widgets board, select the more options button in the upper corner of the widget, and then select Unpin widget.
Note: A widget that you unpin might still appear on your board when it is relevant to your interests. To completely remove a widget from appearing in your Widgets board, select the more options button in the upper corner of the widget, and then select Hide this widget.
To move a pinned widget to another spot on your Widgets section of the board, select the widget header and drag the widget to a new location within the pinned section.
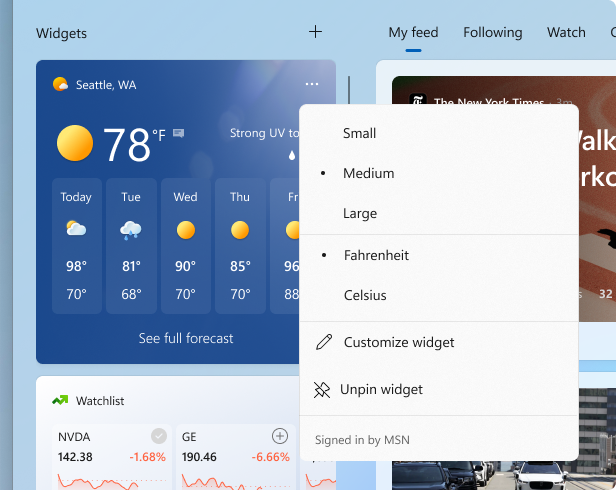
To make a widget larger or smaller in the pinned section, select the more options button in the upper corner of the widget, and then select Small, Medium, or Large.
Note: Some widgets might only offer one or two sizes.
To edit a widget, select the more options button in the upper corner of the widget, and then select Customize widget.
Editing a widget gives you access to customization options like changing the city for your weather widget or updating the watchlist for your stocks’ widget.
To hide a widget from appearing in your Widgets board, select the more options button in the upper corner of the widget, and then select Hide this widget.
Note: Hiding a widget signs you out of its associated app or service. You will no longer have the widget on the Widgets board unless you pin it again through the Widgets gallery.
Frequently asked questions
The Widgets board is a personalized experience, powered by MSN, that shows you the most relevant widgets and content based on your usage. To access and manage the data associated with your Microsoft account and used to personalize the Widgets board, go to the Microsoft privacy dashboard. Or, to stop the collection of this data, you can sign out of the Widgets board.
Windows diagnostic data is collected from the Widgets board and is determined by the diagnostic data settings you choose in the Windows Settings app. Learn more about diagnostic data in Windows.
Since each widget is powered by a different app or service, individual widgets might also collect data. To review what’s powering a widget, select More on the widget, and check the Signed in by message. Each widget is an extension of its corresponding app or service, and it’s controlled by the settings for that app or service. This means the way to change your privacy settings for a widget is to change them for the app or service that powers that widget.
Note: Some apps or services that power your widgets might tailor content based on your location estimation to provide you with the most contextually relevant experience. Location estimation can come from the Windows Location service if enabled, otherwise it may fall back on using the IP address of your internet connection.
(Image credit: Future)
On Windows 11, «Widgets» is a feature that provides various types of informational content (weather, news, sports, stocks, traffic, entertainment, tasks, and family activities) in the form of small widgets from a flyout without having to open your phone to consume the same content.
If the feature looks familiar, it should because it’s the same idea as the «news & interests» feature found on Windows 10.
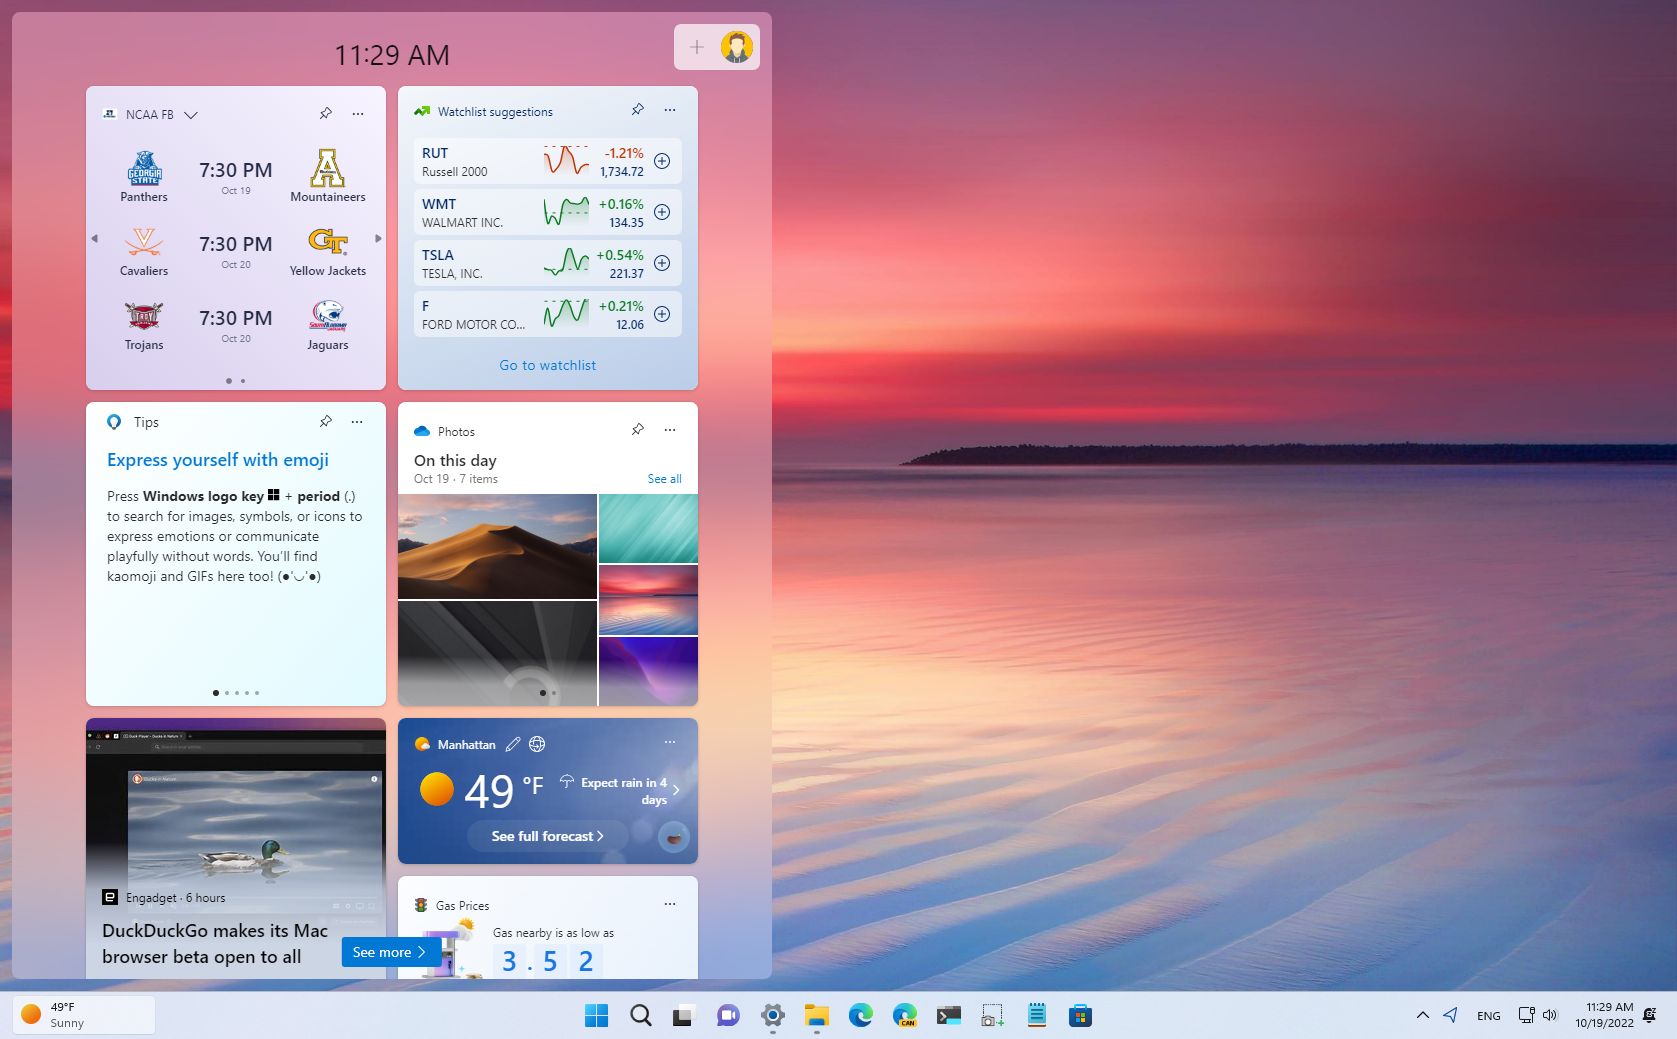
The Widgets board flies out from the left side of the screen as you click the icon in the Taskbar or use the «Windows key + W» keyboard shortcut. You can swipe from the left edge to open the board on a tablet or laptop with a touch screen.
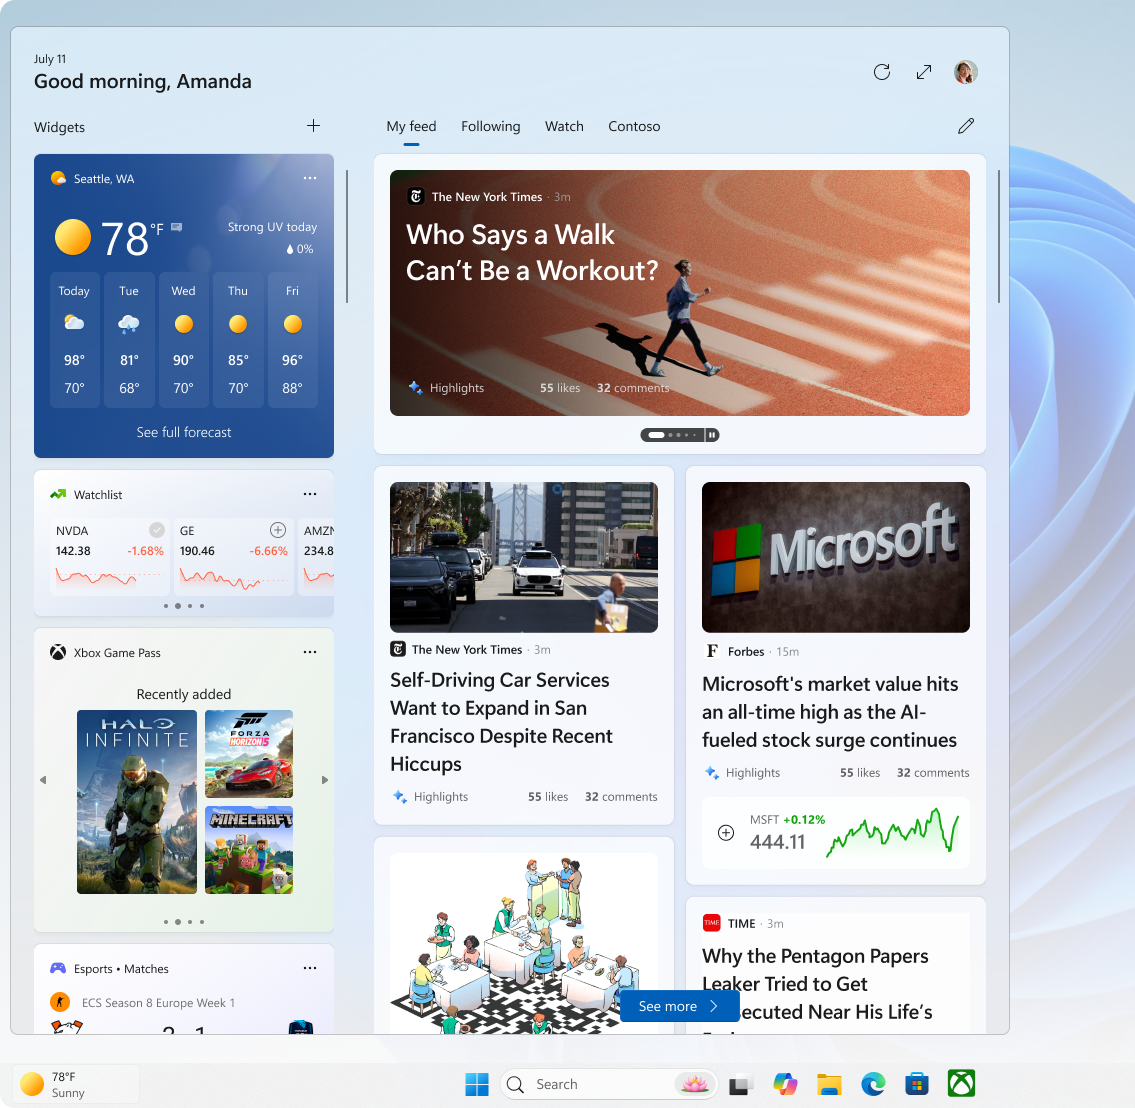
The board is divided into three sections. At the top, you’ll find the header with the current time and controls to access the settings, then there’s the section to place your widgets, and at the bottom, it includes your feed (which won’t be fully personalized until you change the preferences.)
Alongside the board, there’s the Widgets icon in the Taskbar that shows weather information with badge notification support and alerts for dynamic content like sports, finance, and breaking news information.
Although the default settings may be optimal for some users, Windows 11 allows you to control the experience and disable it (not completely) to avoid distractions.
This guide will walk you through the steps to get started with the Widgets experience on Windows 11.
All the latest news, reviews, and guides for Windows and Xbox diehards.
How to add and remove widgets on Windows 11
On Windows 11, you can add, resize, re-arrange, and remove any of the available widgets to make the experience more personal.
Add widgets
To add more widgets to the board, use these steps:
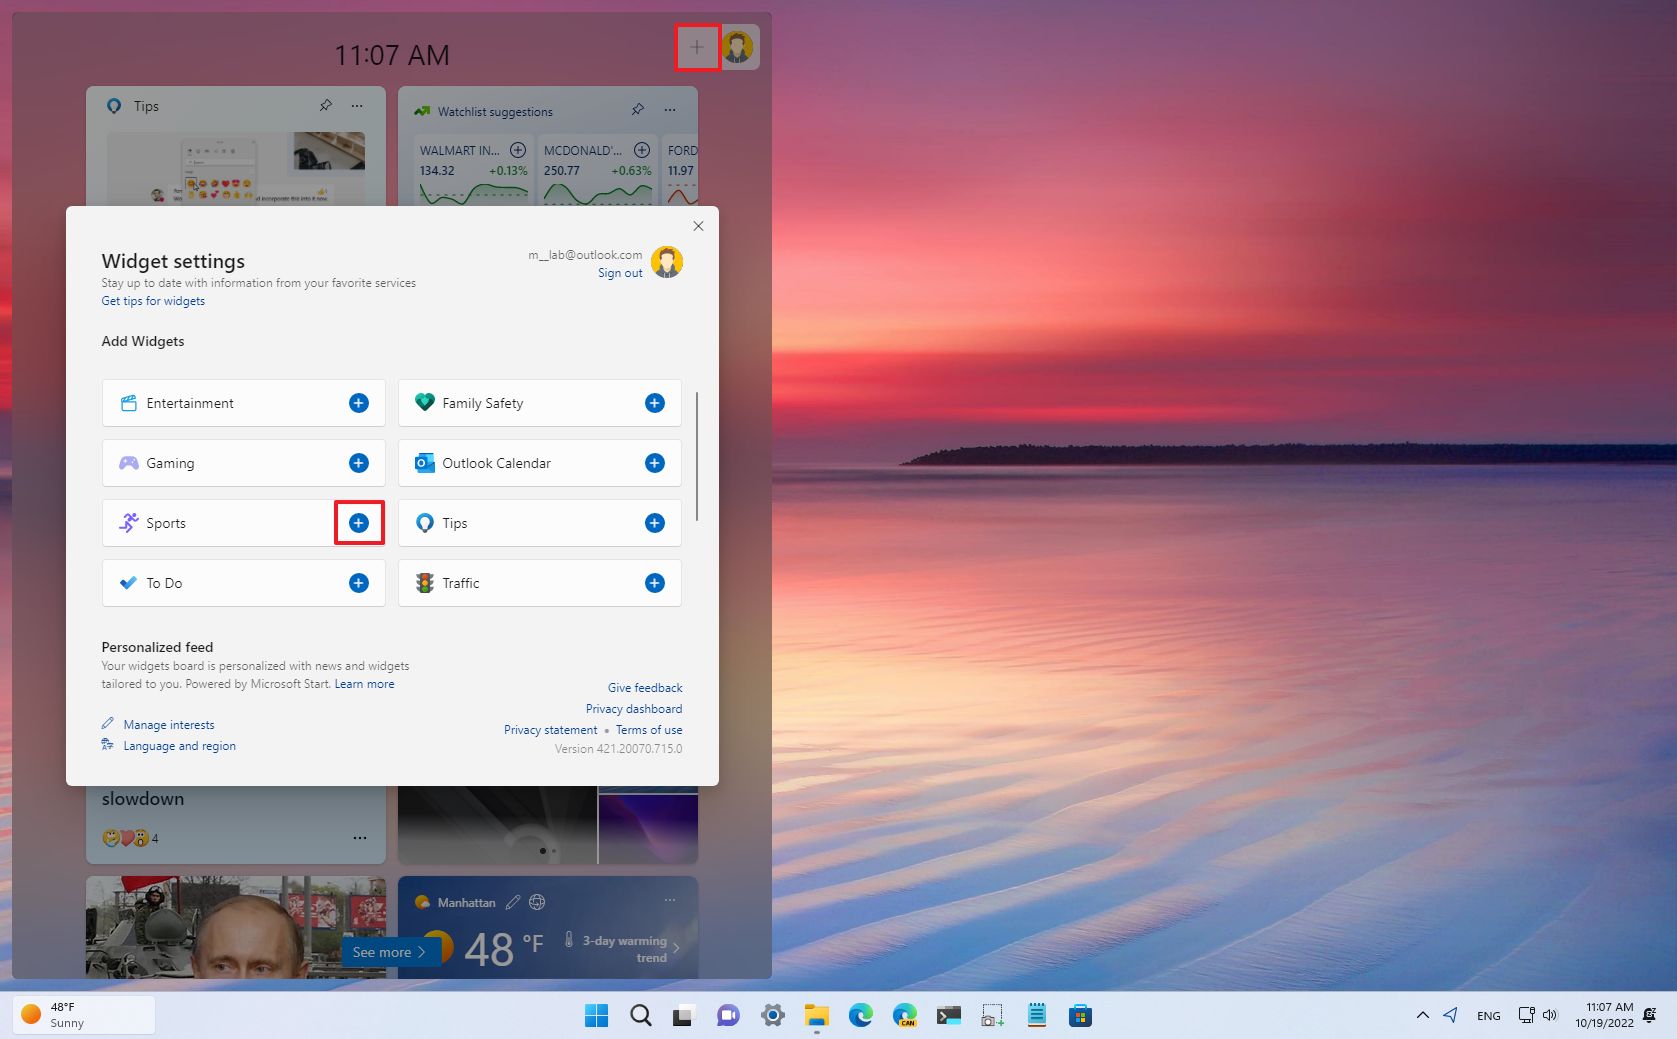
- Open Widgets.
- Click the Plus (+) button next to the profile menu.
- Click the Plus (+) button for each widget you want to add.
Microsoft has already published the documentation that developers can use to bring third-party widgets to Windows 11, but at the time of this writing, you can use these:
- Watchlist – Shows stock information.
- Traffic – Displays the current traffic information based on your location.
- Gaming – Presents information about gaming.
- Weather – Brings the current weather information based on your location, and you click the widget, the forecast will open in the browser.
- To Do – Displays tasks from your Microsoft To Do lists.
- Tips – Surfaces tips to use Windows 11.
- Sports – Shows game results and schedules.
- Entertainment – Displays trending movies, and clicking each item will open the Microsoft Store with different ways to acquire the movie.
- Family Safety – Brings up recent activities from members in the family group of your Microsoft account.
- Outlook Calendar – This shows upcoming events in the calendar.
- Photos – Shows a slideshow of pictures stored on your OneDrive account.
Resize widget
To change the side of a widget, use these steps:
- Open Widget.
- Click the menu (three-dotted) and select one of the available sizes, including small, medium, or large.
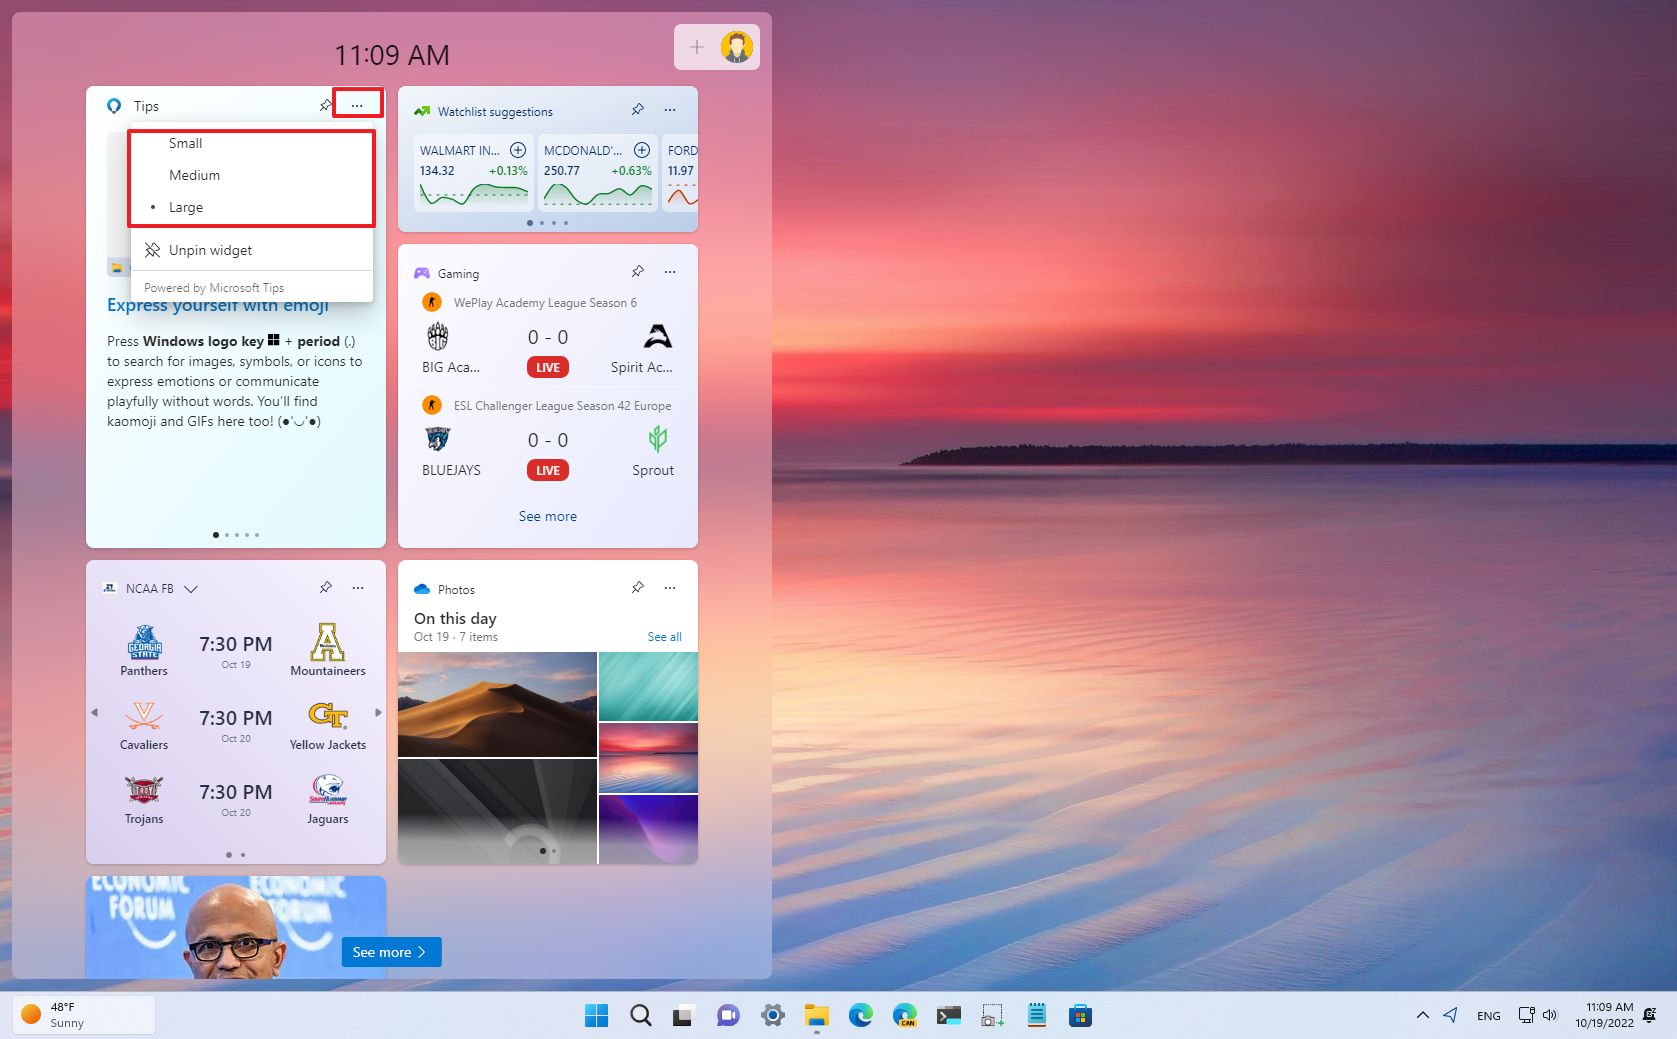
Once you complete the steps, the widget will change to your selected size.
Re-arrange winget
To change the location of a widget, use these steps:
- Open Widget.
- Drag the widget by grabbing the title bar and dropping it in your desired location.
- Repeat step 2 to change the location of other widgets.
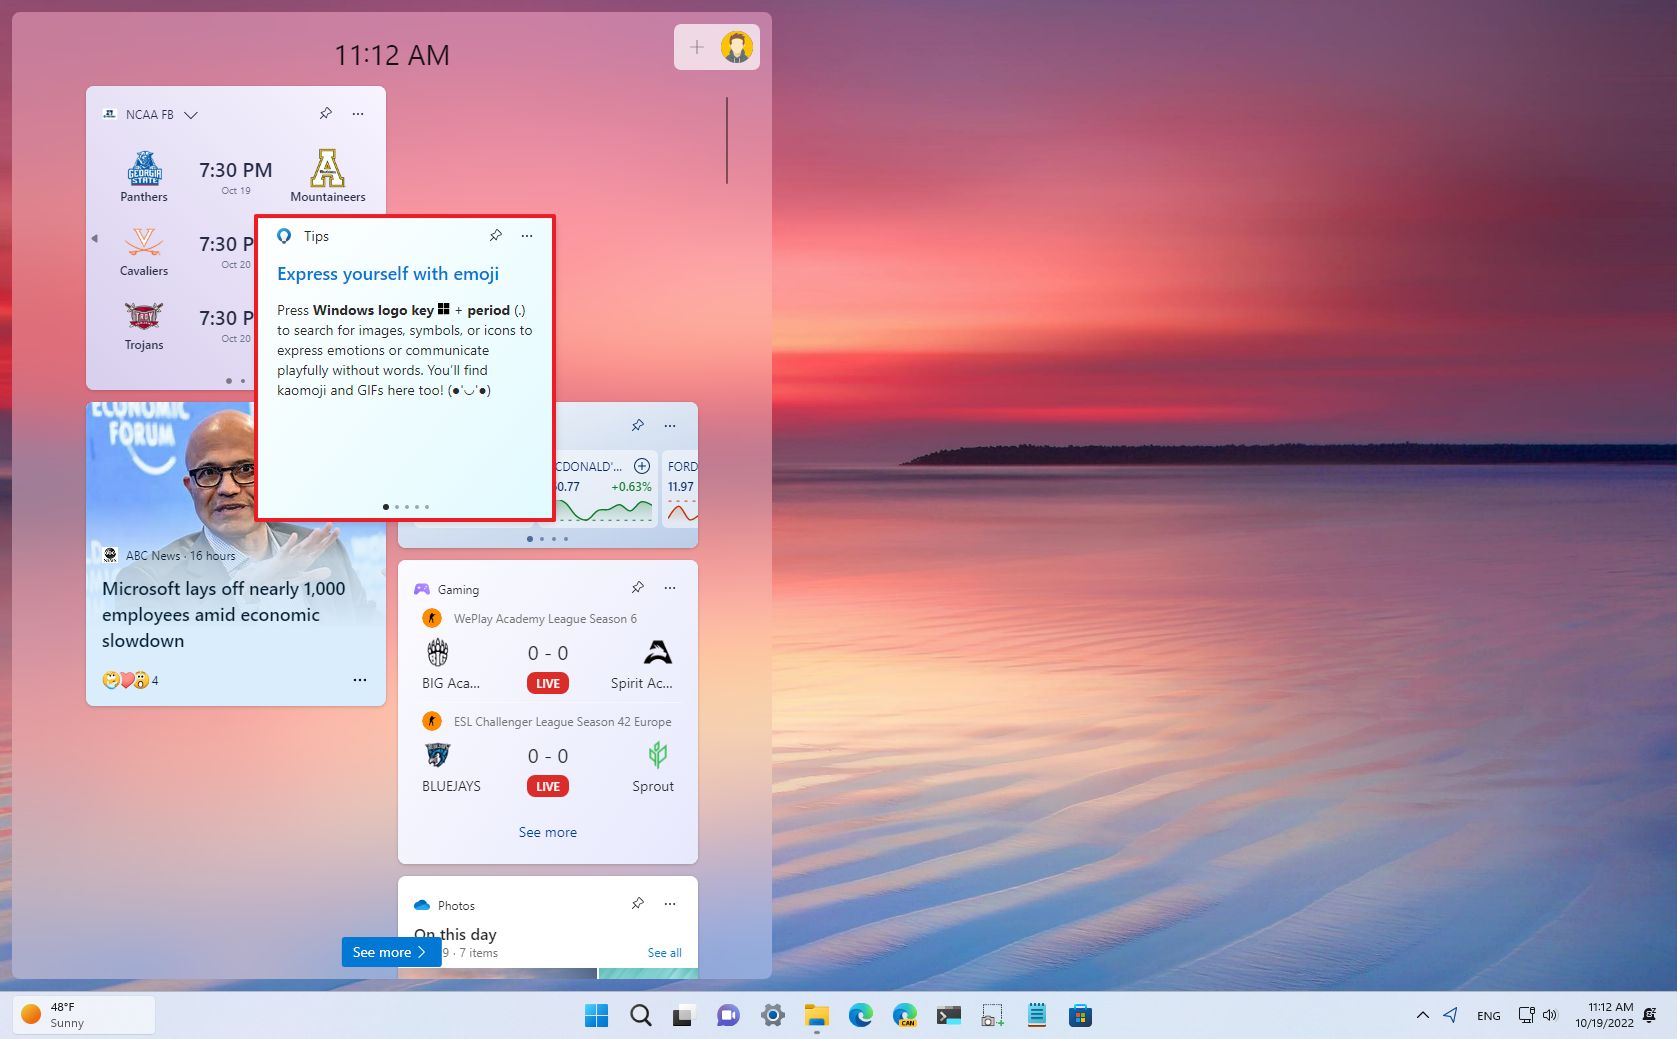
You can only re-arrange your widgets, not the news feed widgets.
Remove widgets
To remove widgets from the board, use these steps:
- Open Widgets.
- Click the menu (three-dotted) and select the Unpin widget option.
- Repeat step 2 to remove other widgets.
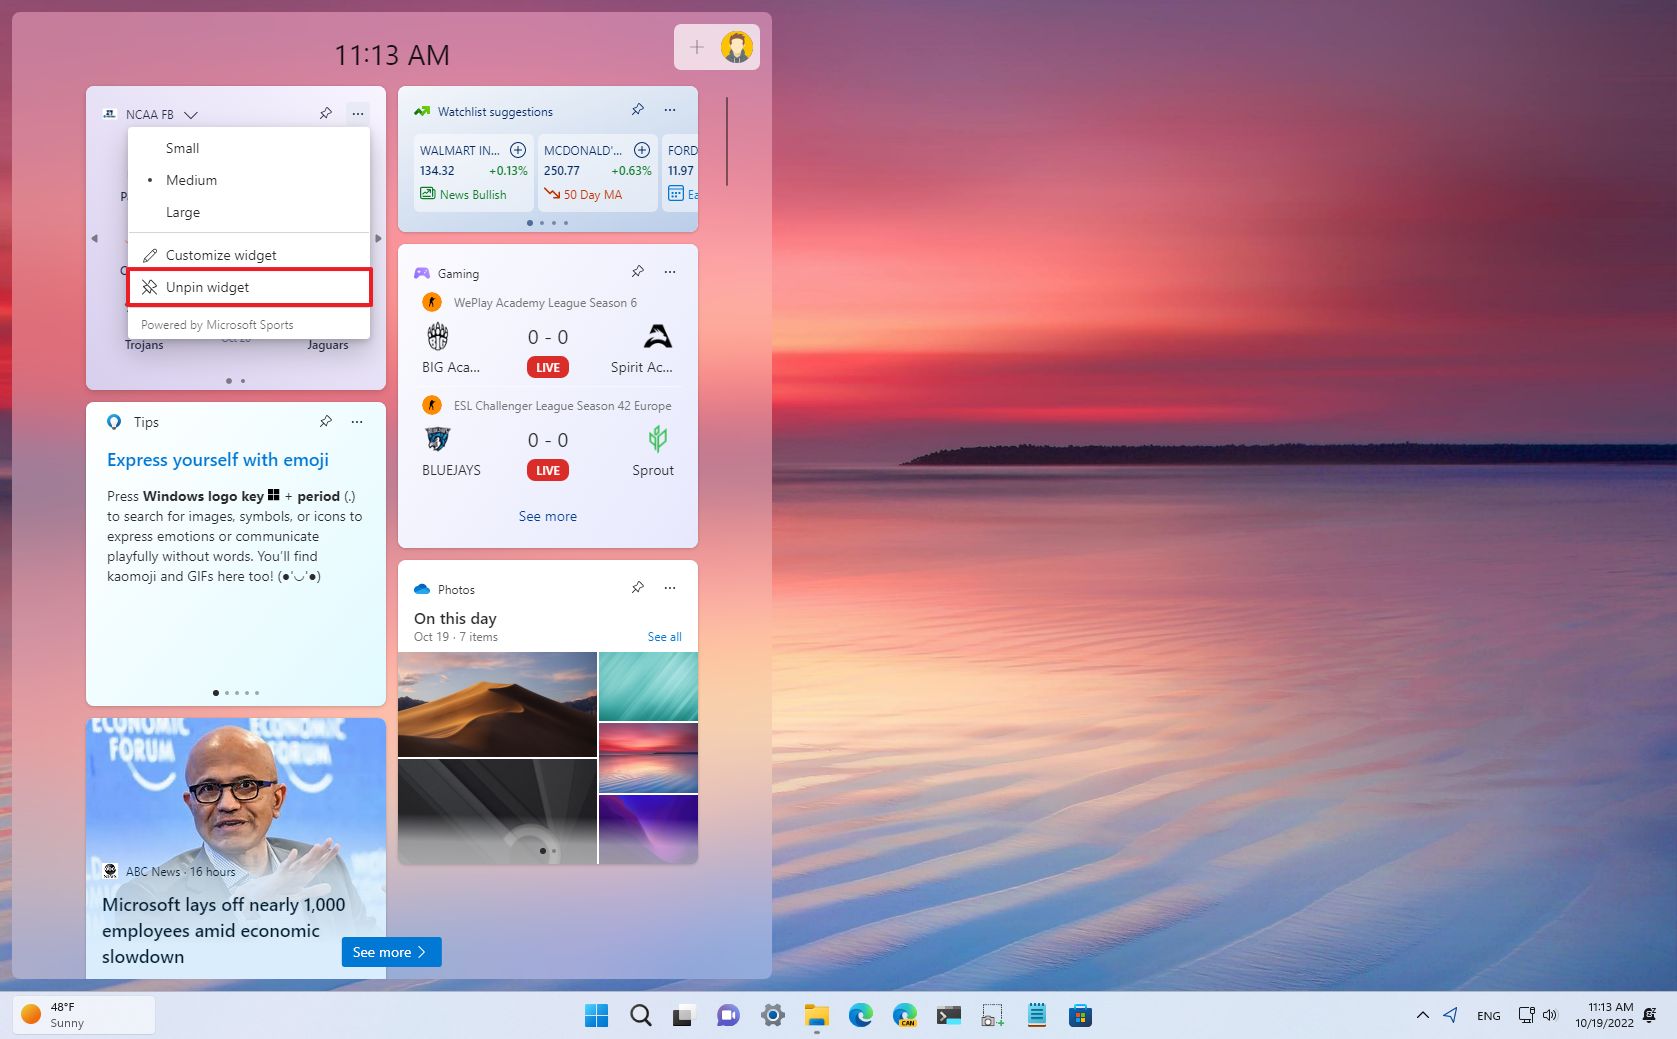
After you complete the steps, the widget will no longer be available on the board. You can only remove your widgets, not the ones in the news feed.
How to manage interests settings for widgets on Windows 11
The news stream shows content based on your interests. However, if you don’t use Microsoft Edge, are logged in with a Microsoft account, and using Microsoft Bing, you will probably need to set your preferences to see the content based on your likings.
Change widgets interests
To change the content that appears in the stream, use these steps:
- Open Widgets.
- Click the Plus (+) button next to the profile menu.
- Under the «Personalized feed» section, click the Manage interests option.
- Click the Follow button for each category you want to see in your feed.
- Click the Block button for the categories you don’t want to see in your feed.
- Quick tip: The topics you don’t choose any option may or may not appear in the feed.
- (Optional) Click the Tune your feed option to specify specific sources you want to see in your feed.
Once you complete the steps, the news stream will update and reflect your interest changes.
Control widgets stream
To tweak the type of content you like to see in your stream of news, use these steps:
- Open Widgets.
- Hover over the story widget, click the Close (X) button, and select the best option to control your feed. For example, «Not interested in this story» or «Hide stories from.»

- In the «Top stories» widget, click the menu button for each story and choose the best option to manage your feed. For example, «More stories like this,» «Fewer stories like this,» «Hide stories from,» or «Save for later.»
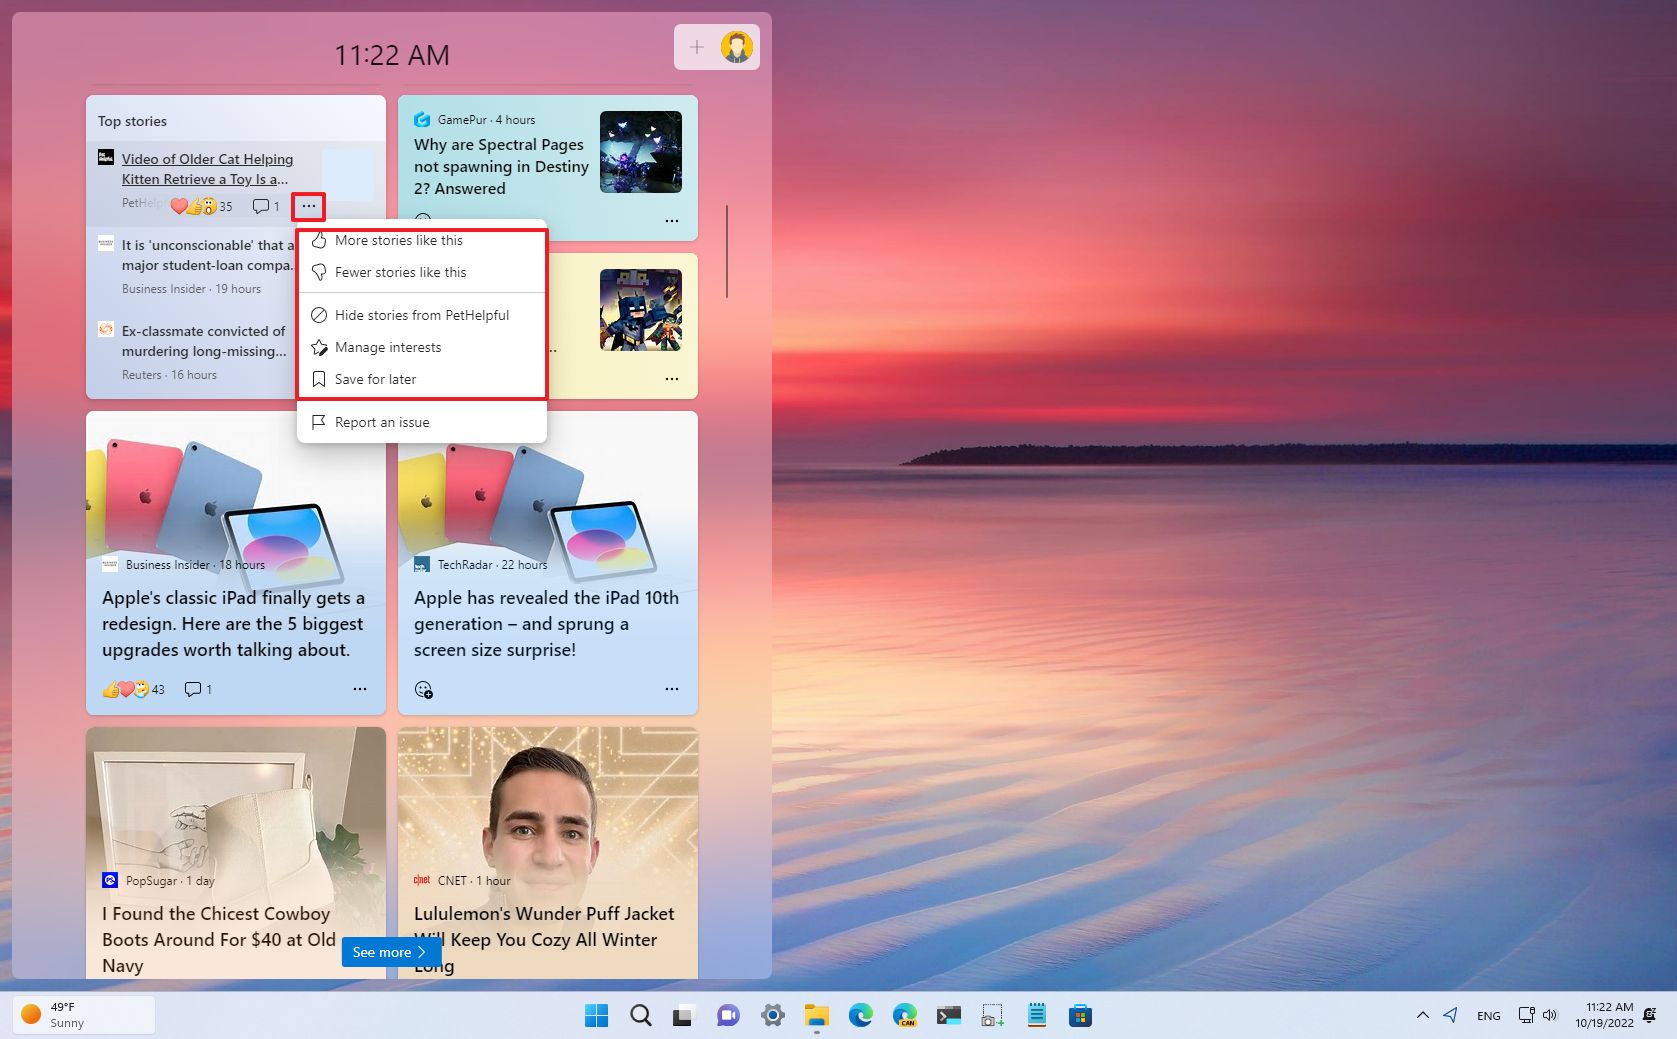
- Quick tip: You can also react to the story with emojis or comments.
As you interact with your feed, you will train it to show more stories you’re likelier to like. If you save a story for later, it’ll be available through your Microsoft account.
How to enable or disable widgets icon in Taskbar on Windows 11
The widgets icon in the Taskbar can show various alerts with animations for sports, finance, and breaking news information, in addition to weather, which can be distracting for many. If you don’t find a use for this feature and keep opening the board by accident every time you hover over the icon, you can remove the icon from the Taskbar to minimize distractions.
To enable or disable the Taskbar widgets icon, use these steps:
- Open Settings.
- Click on Personalization.
- Click the Taskbar page on the right side.
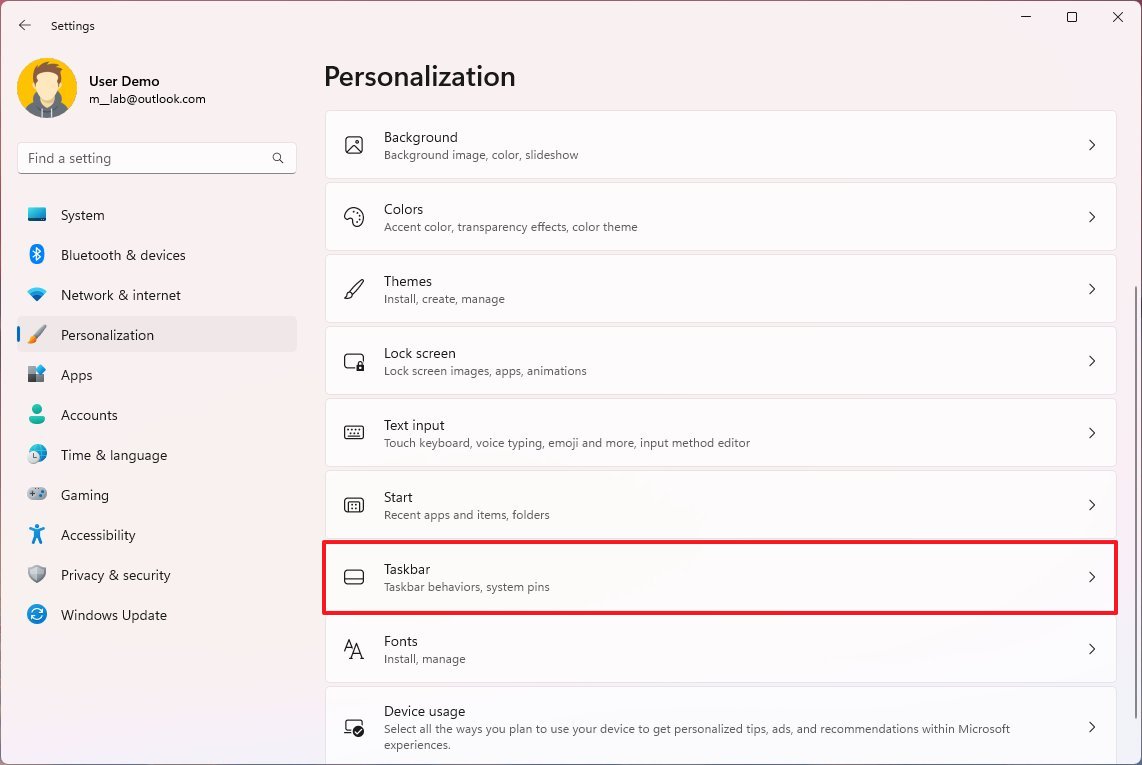
- Under the «Taskbar items» section, turn off the Widgets toggle switch to remove the icon from the Taskbar.
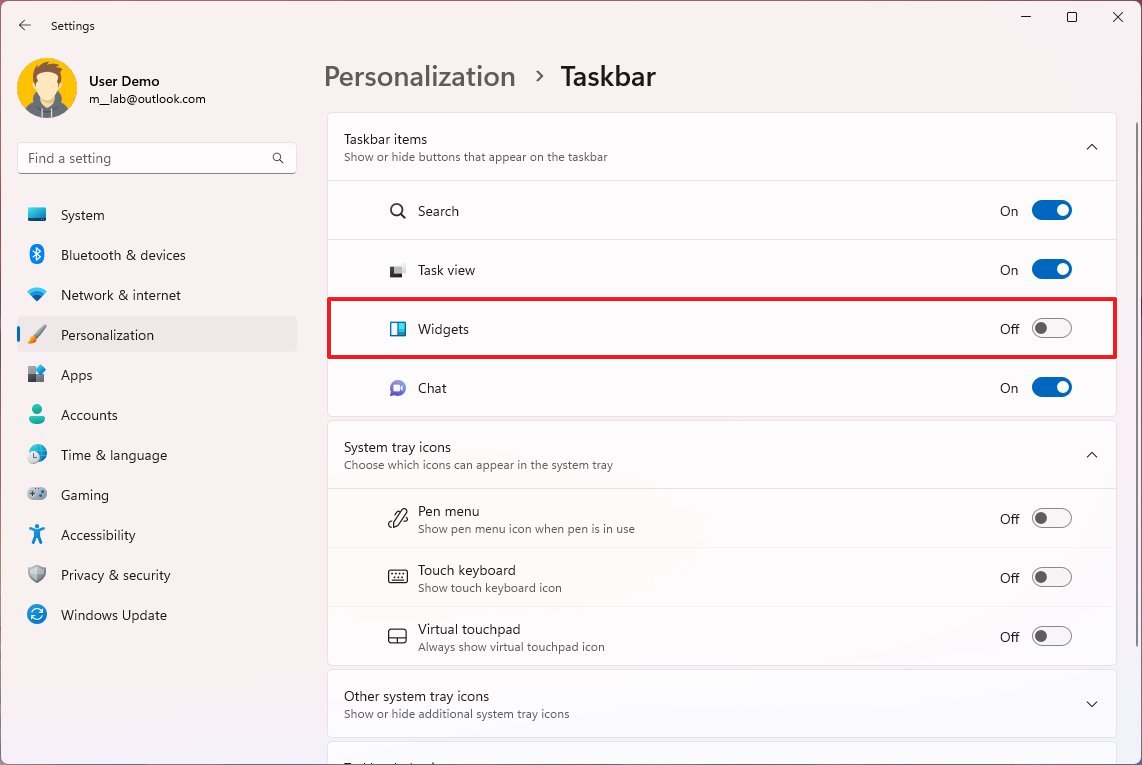
- Turn on the Widgets toggle switch to add the icon in the Taskbar.
After you complete the steps, the Taskbar icon with dynamic content and weather information will be removed. However, using the «Windows key + W» keyboard shortcut, you will continue accessing the flyout.
More resources
For more helpful articles, coverage, and answers to common questions about Windows 10 and Windows 11, visit the following resources:
- Windows 11 on Windows Central — All you need to know
- Windows 10 on Windows Central — All you need to know
Mauro Huculak has been a Windows How-To Expert contributor for WindowsCentral.com for nearly a decade and has over 15 years of experience writing comprehensive guides. He also has an IT background and has achieved different professional certifications from Microsoft, Cisco, VMware, and CompTIA. He has been recognized as a Microsoft MVP for many years.
Previously known as Gadgets, Widgets have returned to Windows 11 after a pause on previous Windows OS like Windows 8. So, what’s new and improved? Microsoft has addressed the security concerns that caused their temporary disappearance, ensuring a safer experience for users. Plus, all your Windows 11 widgets are now conveniently located in a dedicated menu on your Taskbar.
Windows 11 introduces a fresh take on widgets with its built-in widget board accessible by pressing the Win + W keys. However, these widgets are limited to the widget board and cannot be placed directly on your desktop. But don’t worry, if you’re a fan of having widgets on your desktop, there are other third-party widget apps available for you to use on Windows 11. So today in this article we are going to look at how to enable and add desktop widgets to Windows 11.
How to Enable Widgets on Windows 11
Windows 11 Widgets are ready and waiting for you, enabled by default on your system. Want to see your widgets in action? Simply click on the Widget button on your taskbar, or if you’re feeling speedy, use the keyboard shortcut Windows Key + W. If, for some reason, you don’t see the Widgets button on your taskbar, don’t worry! Just head over to Windows Settings then tap on Personalization and finally click on Taskbar and there under Taskbar items toggle the button next to Widgets to enable it.


Just a heads up, toggling the button won’t disable Widgets altogether, it just hides the Widgets button from the taskbar.
Read Also: How To Change the Size & Orientation of Taskbar in Windows 11
Important: To enable and use desktop Widgets on Windows 11 make sure that your OS is on the latest version or build. (Windows 22H2)
How to Add Widgets to Windows 11 PC/Desktop?
On the built-in widget board, you have the freedom to add, remove, and arrange your widgets to your heart’s content. But what if you want to take things a step further and place widgets directly on your desktop? Don’t fret! Windows has got you covered with a third-party app called Widget Launcher. With Widget Launcher, you can easily pin your favorite widgets to your desktop and enjoy a fully customized widget setup.
To download and install the custom widget launcher just go to the Microsoft Store and type widget launcher in the search area and hit the Enter key. Then just click on the Get button and install the custom widgets launcher on your Windows 11 desktop.

After the successful installation of the app tap on the Search icon and type the app’s name and open the app by clicking on open.
Add Desktop Widgets to Windows 11 PC

Once you’ve opened the app, you’ll be greeted with a list of all the fantastic widgets at your disposal, like Weather, Calendar, Clock, CPU Meter, and Notes. Simply pick the widget you want to add to your desktop and click on it. After selecting the widget, you want to add to your desktop in the right panel, simply click on “Launch Widget.” Voila! Your widget will now be proudly displayed on your desktop.

When you first launch some widgets, RSS Feed, Weather, and Slideshow, you may notice they’re blank. Don’t worry, that’s just because they need a little bit of information from you to show their magic. Let’s take the Weather widget for example. To get weather updates for your area, you’ll need to add your location. With a few quick clicks, you’ll have a fully functional Weather widget right on your desktop.

To Wrap This Up
So, this was a brief guide on how to enable and how to add widgets to the Windows 11 desktop. Be creative and put the best widgets for Windows 11 on your desktop. By doing so, you’ll have immediate access to your preferred data straight from your desktop screen. And for such troubleshooting guides and tips & tricks related to Windows, Android, iOS, and macOS follow us on Facebook, Instagram, Twitter, and YouTube
Next Read: FIX: Widgets Not Working/Loading Blank on Windows 11