
Все способы:
- Способ 1: «Параметры»
- Способ 2: Быстрые команды
- Способ 3: «Панель управления»
- Способ 4:«Командная строка»
- Вопросы и ответы: 4
Способ 1: «Параметры»
В Windows 10 пользователям доступно два типа компонентов: основные и опциональные. Получить доступ к первым и вторым в этой операционной системе можно из приложения «Параметры».
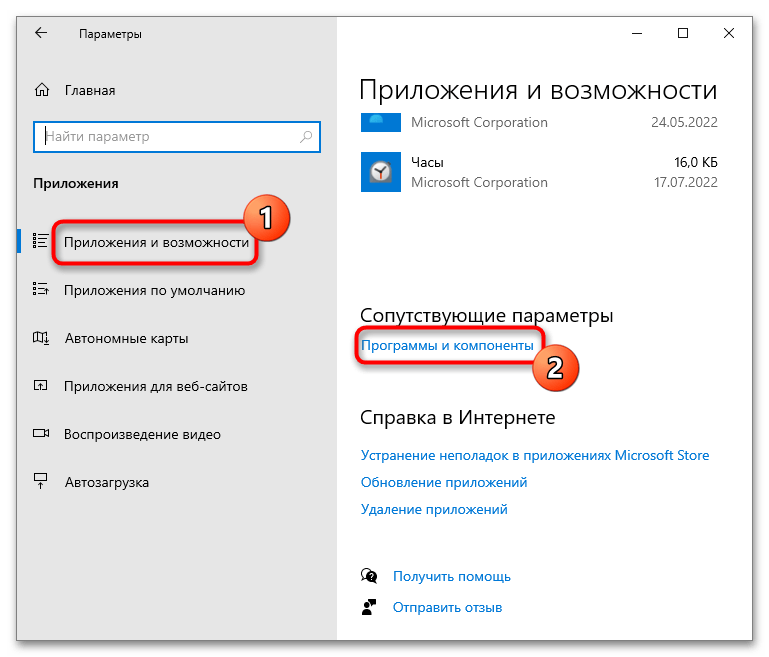
- Откройте приложение «Параметры» и перейдите в раздел «Приложения и возможности», прокрутите содержимое окна вниз и кликните по ссылке «Программы и компоненты».
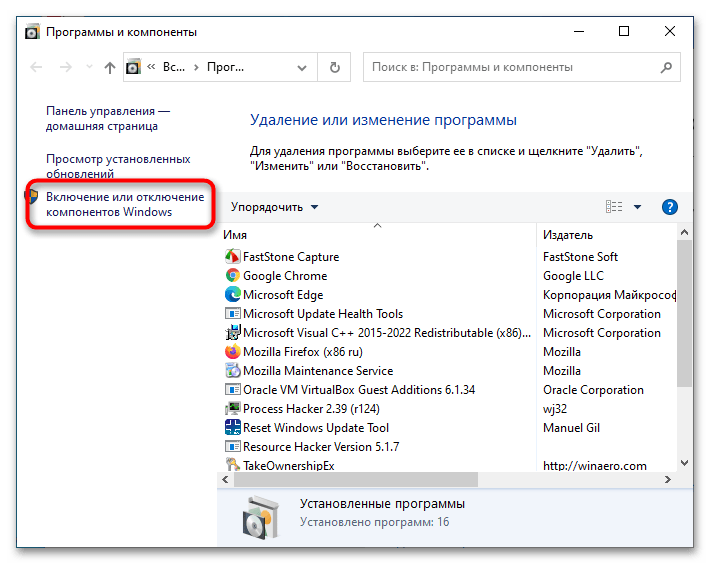
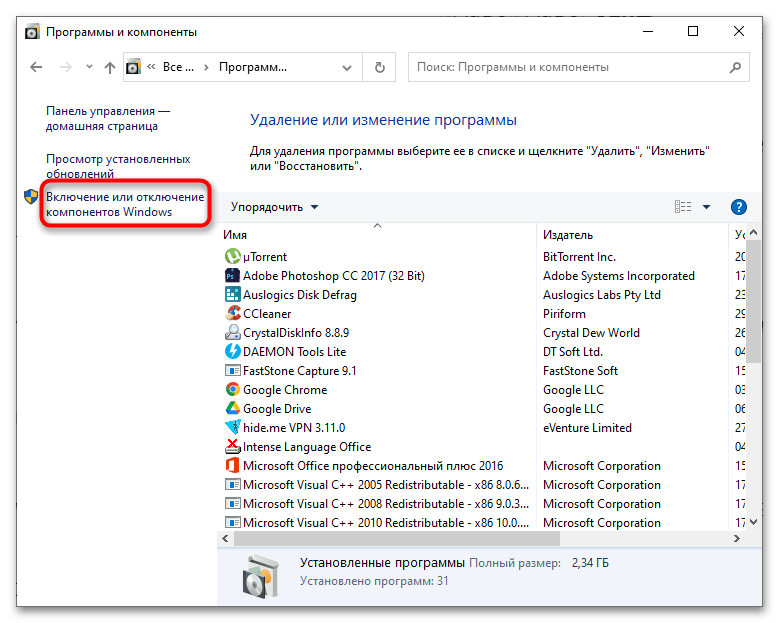
- В одноименном окне нажмите слева ссылку «Включение или отключение компонентов Windows».
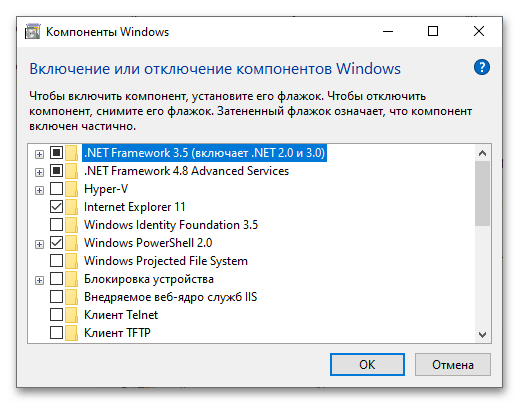
- В результате откроется оснастка управления компонентами.
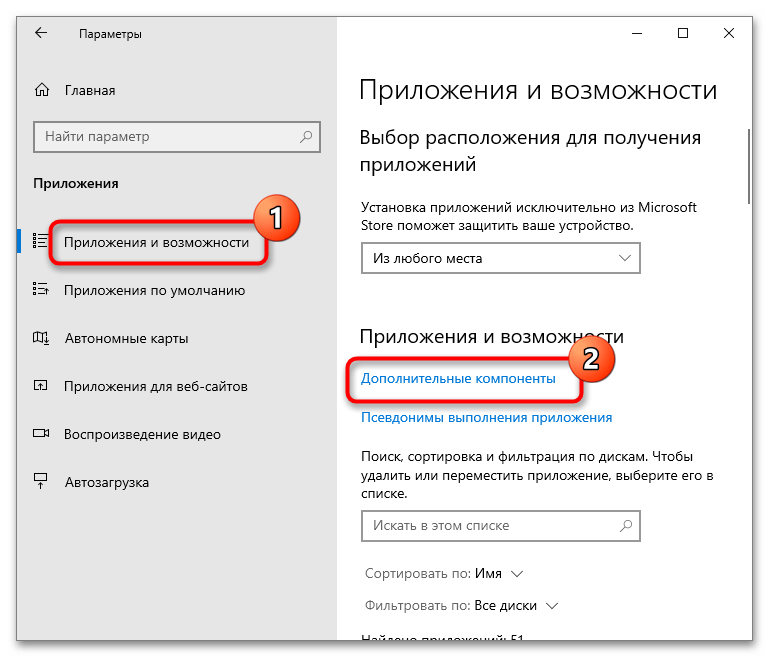
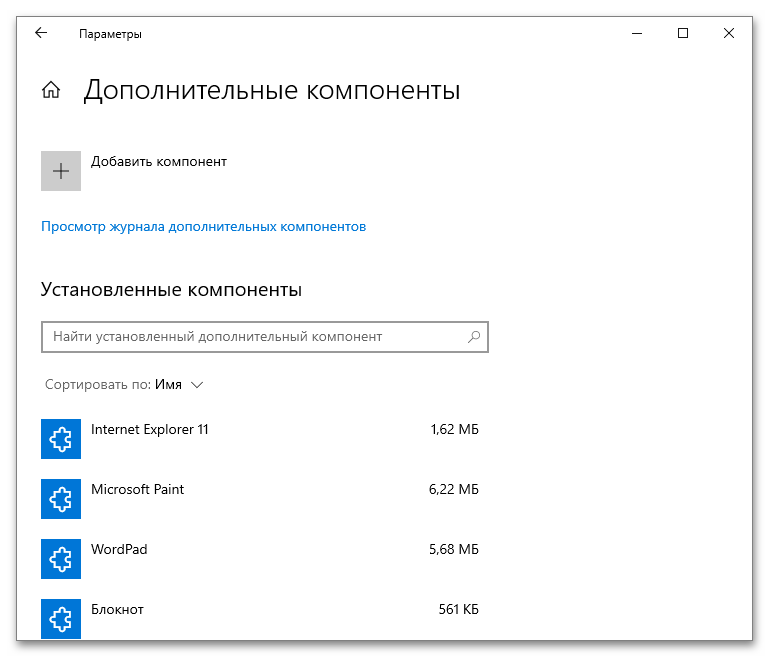
- Чтобы получить доступ к управлению дополнительными компонентами, в окне «Приложения и возможности» найдите и нажмите ссылку «Дополнительные компоненты».
- В следующем окне откроется список установленных в Windows 10 компонентов, доступных для удаления.
- Если вы хотите добавить новый компонент, нажмите в этом же окне кнопку «Добавить компонент» и выберите его в дочернем окне.
Способ 2: Быстрые команды
Если вам часто приходится обращаться к оснастке управления компонентами, удобнее использовать быстрые команды.
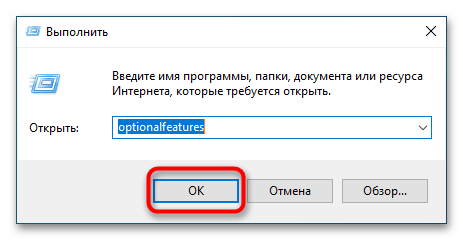
- Чтобы открыть основные компоненты, вызовите нажатием комбинации клавиш Win + R диалоговое окошко «Выполнить», введите в него команду
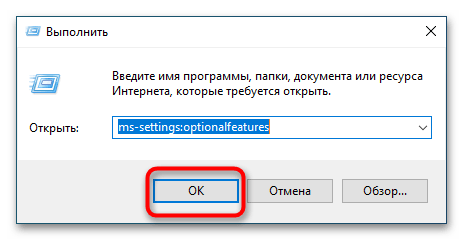
optionalfeaturesи нажмите клавишу ввода. - Чтобы открыть дополнительные компоненты, в этом же диалоговом окошке выполните команду
ms-settings:optionalfeatures.
Также выполнять эти команды можно в адресной строке «Проводника» — результат будет тот же.
Способ 3: «Панель управления»
Открыть оснастку управления компонентами в Windows 10 можно также и по старинке — через классическую «Панель управления».
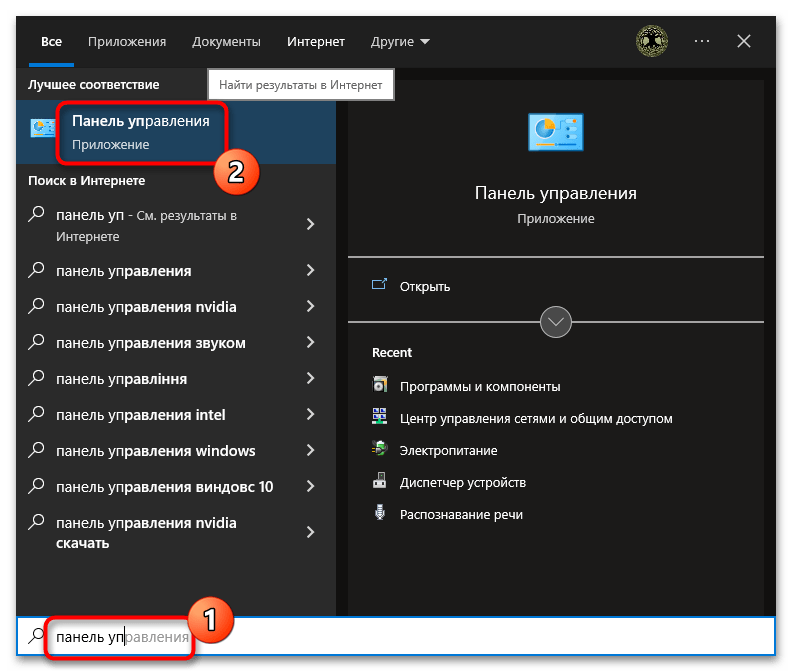
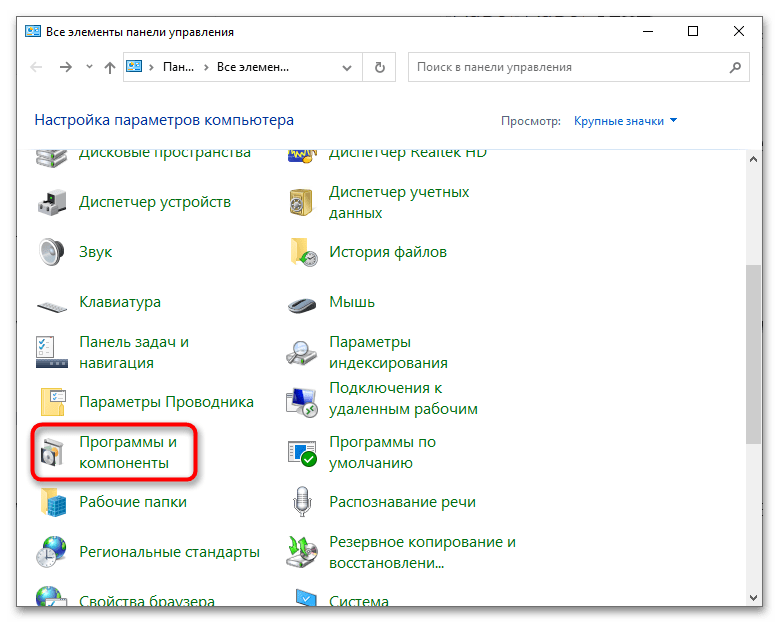
- Откройте классическую «Панель управления», воспользовавшись встроенным поиском Windows 10.
- Найдите апплет «Программы и компоненты» и запустите его.
- В меню слева нажмите ссылку «Включение и отключение компонентов Windows».
Способ 4:«Командная строка»
Этот способ вряд ли можно назвать удобным, но у него есть свои фишки, например возможность вывода список компонентов в файл.
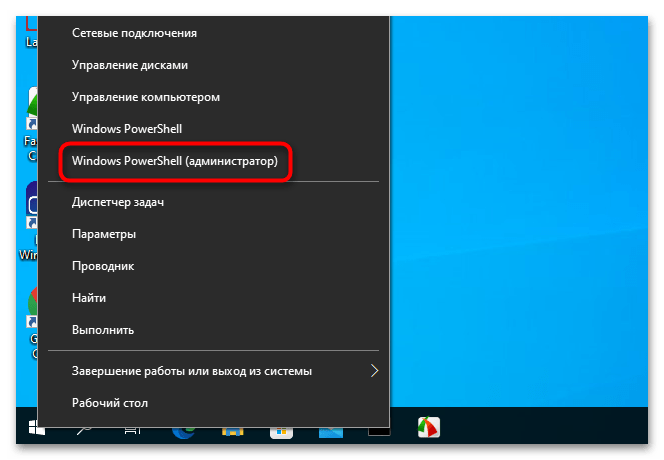
- Откройте от имени администратора «Командную строку» или «Windows PowerShell».
- Выполните в консоли команду
Dism /online /Get-Features, чтобы вывести список доступных компонентов.

Названия модулей (имя функции) отображаются на английском языке, также указывается их статус – включен или отключен.
Наша группа в TelegramПолезные советы и помощь
The Windows Programs and Features tool is a built-in feature in Windows 10 that can be used to uninstall programs, change the settings of programs, and update or upgrade installed programs. It is also known as “appwiz cpl”, “appwiz cpl.exe”, or just “CPL”.
This tool has been around since Windows Vista and it was originally called Add or Remove Programs but was renamed to Programs and Features in Windows 7. It is a very simple interface that allows you to uninstall, change settings for, update or upgrade installed programs.
There are a number of ways to open the Windows Programs and Features tool, which we are going to look at in this article.
1). Using the Run Command Dialog Box
The Windows Programs and Features tool is a built-in utility that allows you to uninstall, change, or repair a program. It’s an appwiz.cpl file that can be accessed by using the Run command dialog box.
There are two ways to open the Run command dialog box:
1) Press the Windows key and type «appwiz cpl» in the search bar.
2) Press the Start button on your desktop and type «appwiz cpl» in the search bar. Then click Ok to open the Programs and Features Tool.
2). Using the Quick Access Menu
The Windows Programs and Features tool is available from the Quick Access Menu. It can help you find and remove programs that you no longer need.
Steps to Using the Quick Access Menu to open The Windows Programs and Features tool:
1) Open the Start menu.
2) Open the Settings app.
3) Click on «Apps» in the left-hand pane of Settings app.
4) Select «Appwiz.»
5) Click on «Cpl.»
3). Using the Windows Search Bar
The Windows Programs and Features tool is a useful tool that allows you to manage your installed programs. In order to access the tool, we will need to use the Search Bar.

To open the Windows Programs and Features tool in Windows 10, follow these steps:
- Click on the search bar at the bottom of your screen.
- Type «programs» and press enter.
- Press on «Windows Settings» under Programs and Features.
4). Using the Control Panel
The Control Panel is a tool in Windows that provides an easy way to manage all the different programs and features that are installed on your computer.

Steps to Use the Control Panel to open The Windows Programs and Features tool:
1. Press the Win+X keys on your keyboard simultaneously.
2. Click on «Control Panel».
3. Select «Programs and Features».
4. Click on «Windows» in the left-hand side of the window, then select «Windows 10».
5. You will now see a list of installed programs in Windows 10, including all programs you have installed as well as all programs installed by default when you first set up Windows 10.
5). Using the Command Prompt or PowerShell
When you want to use the Command Prompt or PowerShell to open The Windows Programs and Features tool, there are a few steps that you need to take.
1) Open Command Prompt or PowerShell (Command Prompt is recommended as it has a more user-friendly interface)
2) Type «appwiz cpl» without quotes and press Enter
3) Click on «Windows features» and then click on «Turn Windows features on or off»
4) Check all of the boxes to turn them on, then click ok.
6). Using the File Explorer
The Windows Programs and Features tool allows users to change settings for their apps and hardware. It is also a good way to find out what software is already installed on your computer.

There are three steps to using the File Explorer to open the Windows Programs and Features tool:
1. Launch File Explorer from the Start menu or taskbar.
2. Click on this icon in the toolbar of File Explorer:
3. Navigate through this folder until you see a file called «Programs and Features».
7). Through System Settings
In order to go through the steps to open The Windows Programs and Features tool, you need to follow a few steps.
Step 1: Press Windows Key + X.
Step 2: Type appwiz cpl in the search bar and hit enter.
Step 3: Click on the Programs and Features tab.
Step 4: Click on Turn Windows features on or off.
Step 5: Check out the checkbox next to Open The Windows Programs and Features tool in order to turn it on or off.
8). Creating a Shortcut For Programs and Features
A Programs and Features shortcut is an appwiz shortcut that automatically opens up the Programs and Features app when you tap on it. This appwiz shortcut is a quick way to find new apps or features in Windows. It lets you quickly get to the right place without having to search through the Start menu.
Creating a Programs and Features shortcut is easy! Here’s how:
- Create a new shortcut on your home screen and give it a name (e.g., «Programs»)
- Click on «Edit» and then click on «Add Shortcut» at the bottom left corner of your screen. This will open up another menu where you can find all your apps, features, and shortcuts.
- Click on your desired app or feature and drag it into this menu.
- When you’re done creating shortcuts, click on «Done.»
FAQs
1). How can I open the Windows Programs and Features Tool?
The Windows Programs and Features tool is a built-in tool in Windows 10 that allows you to manage your installed programs.
The Windows Programs and Features Tool is a built-in tool in Windows 10 that allows you to manage your installed programs. The tools can be accessed from the Control Panel, but it is easier to use this tool as it lets you manage the programs with just one click.
2). What is the Windows Programs and Features Tool?
The Windows Programs and Features tool is a Microsoft utility that allows users to easily manage installed software and features on their computer.
The Windows Programs and Features tool is a Microsoft utility that allows users to easily manage installed software and features on their computer. It can be accessed through the Control Panel of the PC. It can help you find out what programs should be removed, which ones are outdated, or which ones may cause problems with your computer.
The Windows Programs and Features tool is accessible through Control Panel in the PC’s operating system, but it also has an app for mobile devices called «Programs & Features.»
3). Why should I use the Windows Programs and Features Tool?
The Windows Programs and Features Tool is a utility that helps you to uninstall, disable, or change the settings of programs that are currently installed on your computer.
There are many reasons why you should use this tool. It allows you to uninstall unwanted programs and give more space for other programs that are important for your work. It also helps you to disable and change the settings of any program so that it doesn’t interfere with other software or hardware.
The Windows Programs and Features Tool is a must-have utility for all users who have Windows 10 operating system.
4). What does the Windows Programs and Features Tool do?
The Windows Programs and Features Tool is a tool that helps you uninstall, disable, or remove programs.
The Windows Programs and Features Tool is a tool that helps you uninstall, disable, or remove programs from your Windows 10 PC. It can also help you find the most appropriate driver for your device.
The Windows Programs and Features Tool has been available since the release of Windows 10 in 2015.
5). How can I use the Windows Programs and Features Tool?
The Windows Programs and Features Tool can be used to find and remove programs that you don’t need. If a program has been installed by accident, then you can use the tool to uninstall it.
The Windows Programs and Features Tool is a powerful tool for users who want to remove programs on their computer. The program is located in the Control Panel, and it has two main functions:
- Find programs that aren’t necessary
- Remove unnecessary programs
The Windows Programs and Features Tool can be used as a quick way to uninstall software if you have accidentally installed it or if you want to uninstall an application that was installed by mistake.
In this tutorial I will show you, how to reach the Windows Features options in Windows 10 and how to use it to enable and disable Windows Features in Windows 10.
You can use the Windows Features to turn on or off the following features:
- .NET Framework 3.5
- .NET Framework 4.6
- Active Directory Lightweight Directory Services
- Embedded Shell Launcher
- Hyper-V
- Internet Information Services
- Internet Information Services Hostable Web Core
- Legacy Components
- Media Features
- Microsoft Message Queue
- MultiPoint Connector
- Print and Document Services
- Print as a PDF
- RAS Connection Manager Administration Kit
- Remote Differential Compression API Support
- RIP Listener
- Simple Network Management Protocol (SNMP)
- Simple TCPIP Services
- SMB 1.0 / CIFS File Sharing Support
- Telnet Client
- TFTP Client
- Unified Write Filter
- Windows Indentity Foundation
- Windows PowerShell 2.0
- Windows Process Activation Service
- Windows TIFF Ifilter
- Work Folders Client
- XPS Services
- XPS Viewer
Depending on your installation and device, some features might not be available or you might have more features. The above list was given as a way of showing you some features, features can change in upcoming updates.
How-to Enable or Disable Windows Features in Windows 10
1. Begin by opening the Control Panel, you can do this by typing “Control Panel” in the Cortana search bar or by right-clicking the Start logo and then choose Control Panel
2. In Control Panel click on Programs
3. Within programs click on Programs and Features
4. In the left pane you will now see the button Turn Windows Features on or off, click on that.
5. A UAC (User Account Control) message might appear, click on Yes or fill in an Administrator password.
You can now turn on and off certain features. I suggest you be careful with disabling features as Windows or your software might need them to function properly. In some cases Windows will warn you before you can disable features.
I hope this tutorial helped you to turn on or off Windows Features in Windows 10.
Both Windows 11 and Windows 10 come with predefined sets of features and components. You can customize Windows by removing the features you’re not using and by adding the ones you need but aren’t installed by default. Moreover, if you remove unwanted components, you can theoretically save a bit of space on your hard drive. This tutorial teaches you how to add and remove Windows features in Windows 11 and Windows 10. The process is pretty straightforward, so let’s get started:
How to open Windows Features
Although opening Windows Features is quite similar in Windows 11 and Windows 10, the visuals are slightly different. For that reason, we’re going to show you how to get to them first in Windows 11 and then in Windows 10:
How to open Windows Features in Windows 11
If you’re using Windows 11, click or tap the Search button on the taskbar that looks like a magnifying glass, and type “windows features” in the search field. Once the results are in, click or tap on “Turn Windows features on or off.”
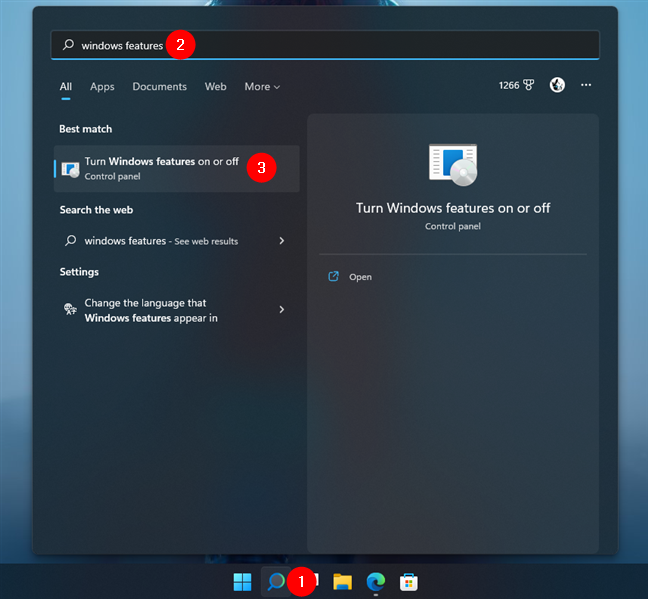
Search for windows features in Windows 11
Alternatively, you can also access Windows Features using the Settings app. Open it (Windows + I), select Apps on the left sidebar, and click or tap on Optional features on the right.
TIP: The Optional features settings from Windows 11 and Windows 10 allow you to add other extra functionality for your device. If you want to learn how to install new features or remove the ones you don’t need, check this other guide that we just published: How to add or remove optional features in Windows 11 and Windows 10.
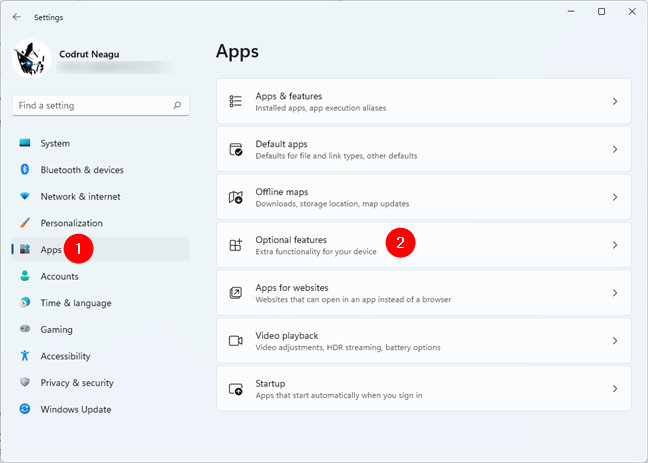
Access Optional features in Windows 11
On the Optional features page, scroll down to the Related settings section at the bottom, and click or tap on More Windows features.
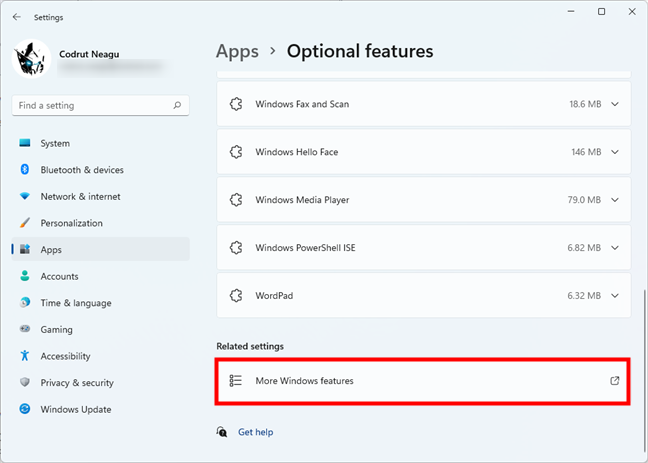
The More Windows features link in Optional features
And last but not least, a third method of getting to the Windows Features in Windows 11 is using the Control Panel. In it, go to Programs > Programs and Features and click or tap the “Turn Windows features on or off” option on the left.
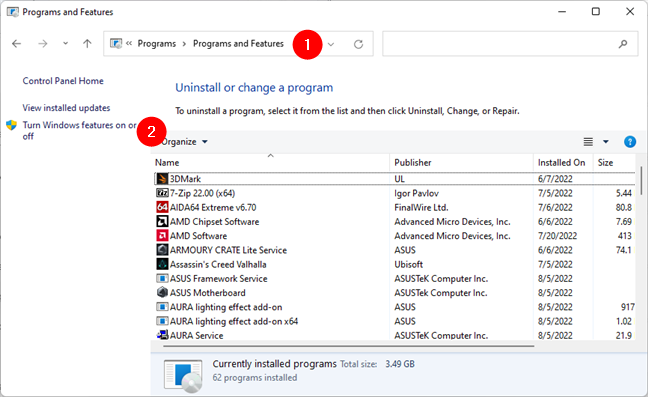
Click or tap on Turn Windows features on or off
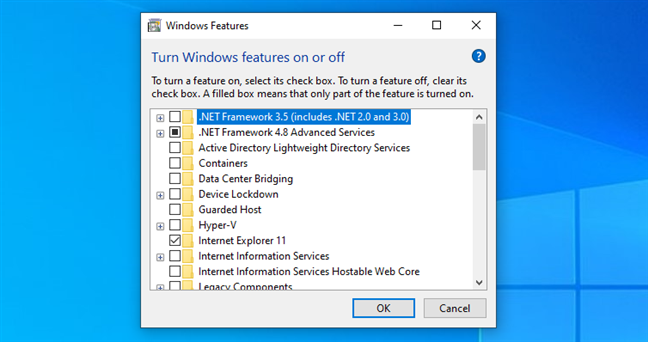
The Windows Features window opens, displaying a list of features you can add or remove according to your preferences.
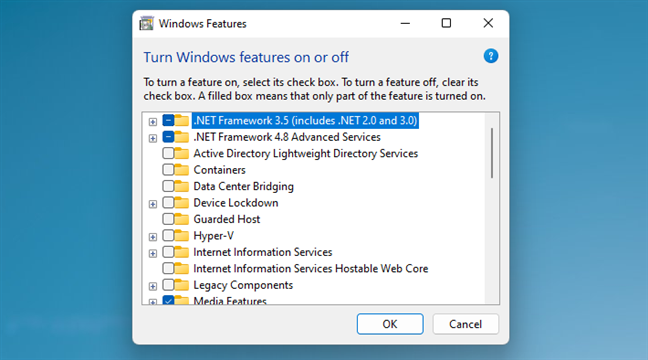
The Windows Features from Windows 11
The checked entries are already installed on your computer or device, while those unchecked are not.
How to open Windows Features in Windows 10
In Windows 10, click or tap the search field in your taskbar, and enter “windows features.” Click or tap the “Turn Windows features on or off” option from the list.
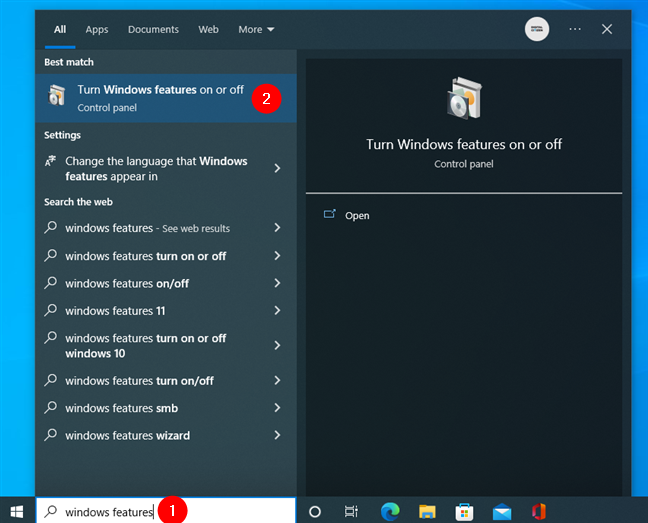
Type windows features in the taskbar’s search field
If you prefer, you can also choose the long way. Open the Settings app (Windows + I) and head to Apps > Apps & features > Optional features.
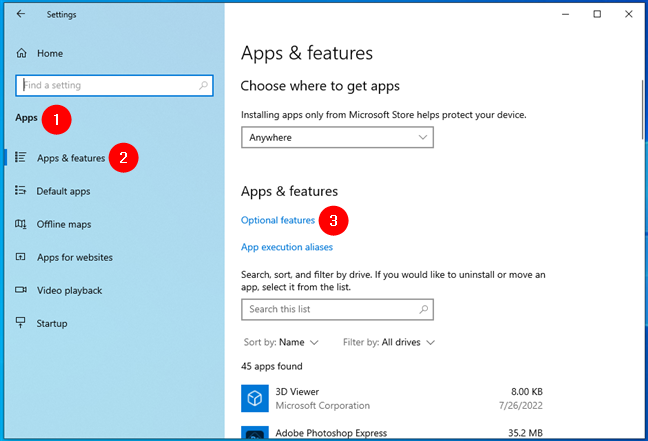
Access Optional features in Windows 10
Then scroll to the Related settings section and click or tap on the “More Windows features” link.
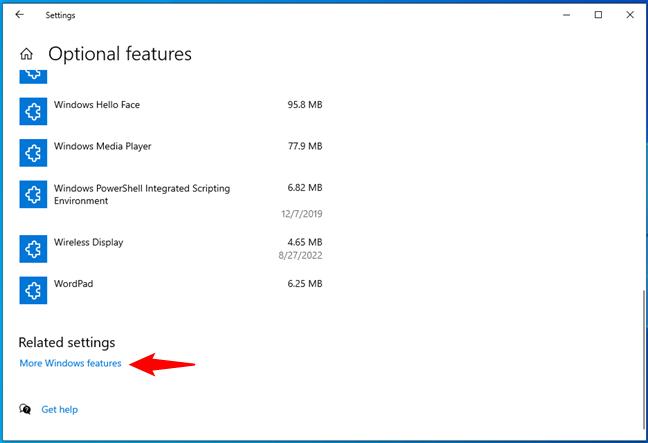
Open More Windows features in Windows 10
A third alternative method to access Windows Features in Windows 10 is provided by the Control Panel. Open it, navigate to Programs > Programs and Features, and click or tap “Turn Windows features on or off” on the left of the window.
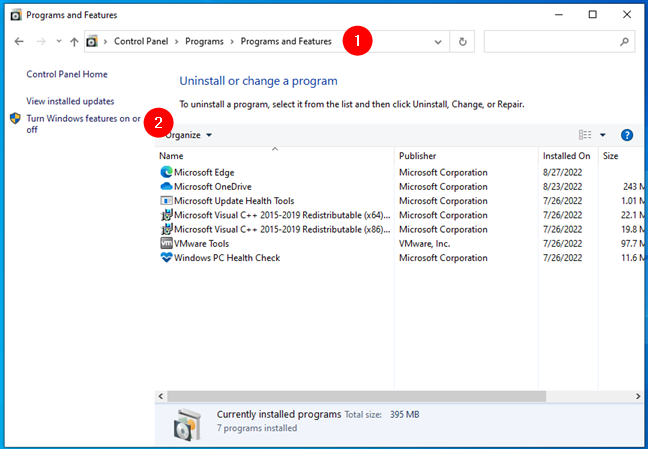
Turn Windows features on or off in Windows 10
Windows 10 then launches the Windows Features window. It shows you a list of features available to install or remove.
Windows Features and components available in Windows 10
The features with checkmarks are already installed, while those unselected are not.
NOTE: From here on, both the steps and the interface used to install or remove features and components are identical in Windows 11 and Windows 10. In consequence, we decided to use screenshots from Windows 11.
How to add Windows features or components
The Windows Features window lists all the features or components available for Windows. To view more information about a feature, hover on top of it with your mouse or tap on it, and a brief description appears. However, if you want even more details about each component, read: What are those Windows features that you can add or remove?.

A brief description is available for every Windows feature
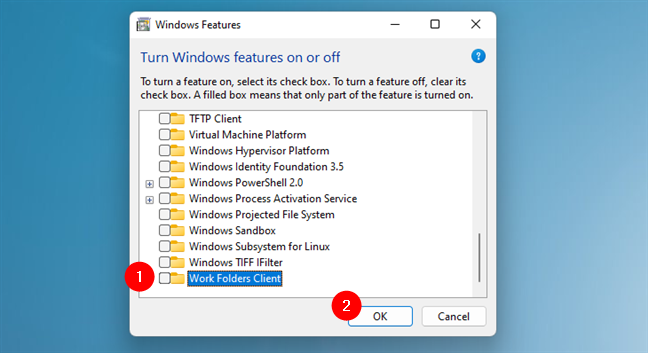
To add features to Windows 10 or Windows 11, check their boxes in the Windows Features window, and then click or tap OK.
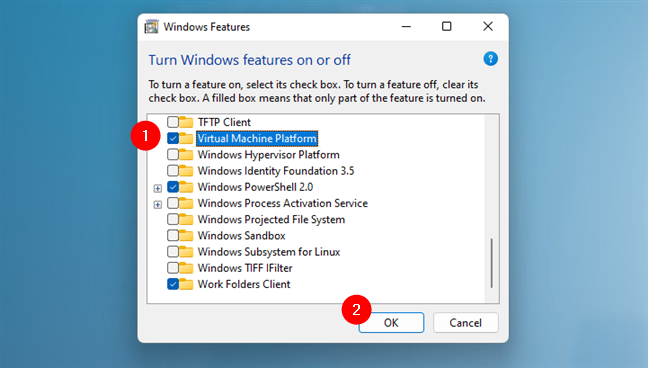
Adding the Virtual Machine Platform component
You must wait while Windows searches for the files required to install the selected feature.

A loading screen informs you of the progress
NOTE: For certain features, Windows might need to download some files from Windows Update to successfully add the requested components.
Once Windows finds the required files, it starts installing the optional feature, letting you know it’s “Applying changes.”
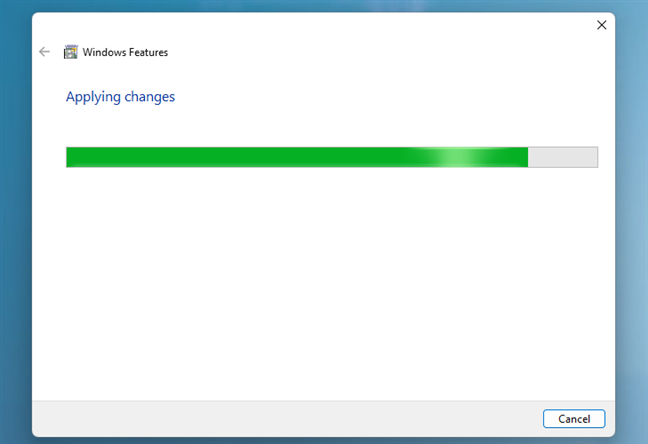
Wait while your changes are being applied
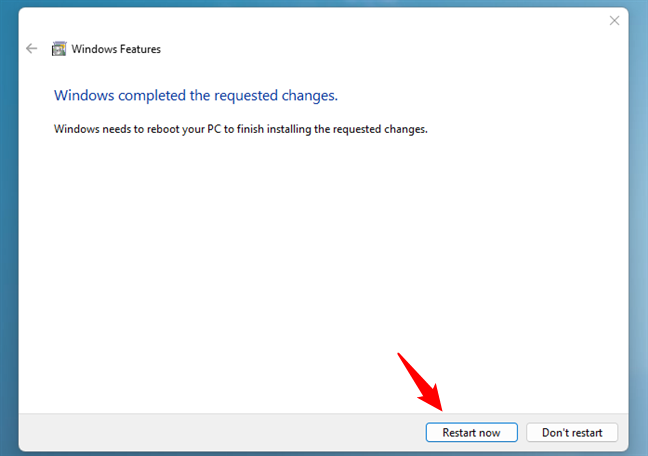
For certain components, like “Virtual Machine Platform,” rebooting your Windows computer or device is required to finish installing your changes. Click or tap “Restart now,” and remember that the reboot may take extra time to configure the added components.

Reboot to finish installing your changes
Other features, like “Windows Projected File System,” do not require a restart. Once your changes are completed, press Close to finish the process.
Press Close to finish completing the installation of new components
Windows now includes the feature(s) you selected for installation.
How to remove Windows features or components
Once you decide which components you want to be removed, uncheck the box next to them to uninstall unnecessary Windows features. When you uncheck certain features, like Internet Explorer 11, from Windows, you might get a warning that turning them off might affect other Windows features, programs, or default settings. If that happens, you’ll need to confirm again that you want to uninstall that certain feature.

Windows warns you about the consequences of disabling certain features
You might think that the “Go online to learn more” link might provide more specific info about the component you are disabling, but clicking or tapping on it takes you to a generic Windows help page offering more information about Windows.

The Windows help page provides generic tips and info
Either way, once you unchecked the features or components you want to remove, click or tap the OK button from the Windows Features window.
Press OK to apply your changes
A loading screen keeps you updated on the progress, letting you know your system is “Searching for required files” first.
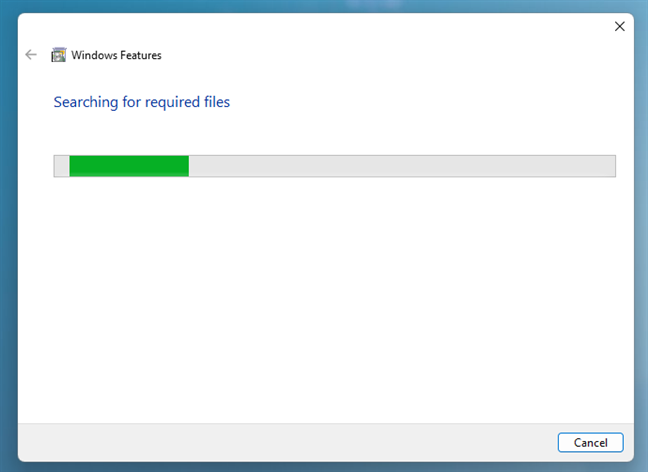
Windows is searching for the required files
You then have to wait while the changes you requested are being applied.

Wait for Windows to apply the changes
After removing certain features, Windows may inform you that it needs to restart your computer or device to apply the requested changes. Press Restart now and wait for the reboot to be performed. Keep in mind that this restart takes longer than usual because Windows needs to spend additional time configuring itself according to your instructions.
Restart your Windows PC to apply the changes
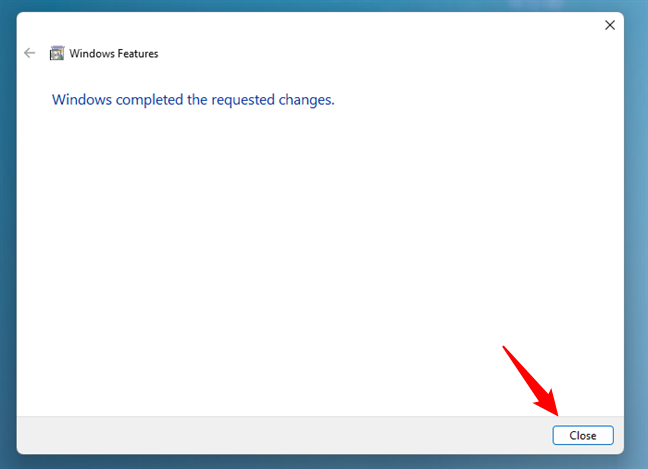
Other components may be removed without a system restart. If that is the case for the features you chose to get rid of, you are informed that “Windows completed the requested changes.” Click or tap Close, and you are done.

Press Close to exit Windows Features
TIP: If you are interested in purging your Windows computer or device of more unnecessary software, you can also read: Windows 11 and Windows 10 bloatware list (2022 update).
What Windows features or components did you add or remove?
We at Digital Citizen use certain optional features that are not installed by default in either Windows 11 or Windows 10. For example, Windows Sandbox and the Windows Subsystem for Linux. That’s why we add them to almost all our computers. On the other hand, there are features that we don’t usually need, like Internet Explorer, which we uninstall. What about you? What Windows components did you add or remove from your system? Let us know in the comments section below.
Sign in to your MUO account
The Programs and Features tool lists all the apps on your PC. It’s a quick and easy way to manage installed programs, updates, and Windows features with just a few clicks. There are several ways to access it; I’ll show you three of the quickest.
1
Use the Run Command
The easiest way to open Programs and Features in Windows 11 or 10 is through the Run command dialog box. Just hit Win + R on your keyboard, and a small window will pop up. Type appwiz.cpl in the text field, then press Enter or click OK.
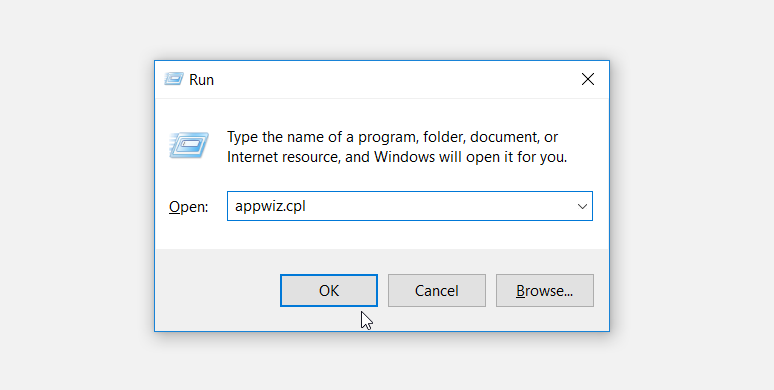
This action is a quick and easy way to get to Programs and Features without clicking through several menu options.
2
Use the Command Prompt
Another method to open Programs and Features is through the Command Prompt, PowerShell, or Windows Terminal. This is handy if you like working on the command line instead of the Windows graphical interface.
To open the Command Prompt, type cmd in the Windows search bar and press Enter. You can also press Win + X to open the Power User Menu and choose Terminal, Command Prompt, or PowerShell (depending on what you’ve selected as the default). For this purpose, they all work the same.
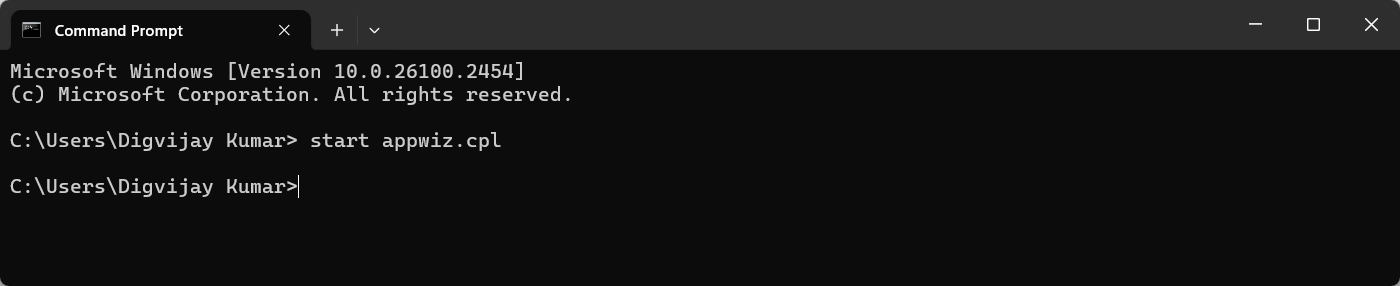
Next, type start appwiz.cpl in the command line and hit Enter. The panel will launch momentarily.
3
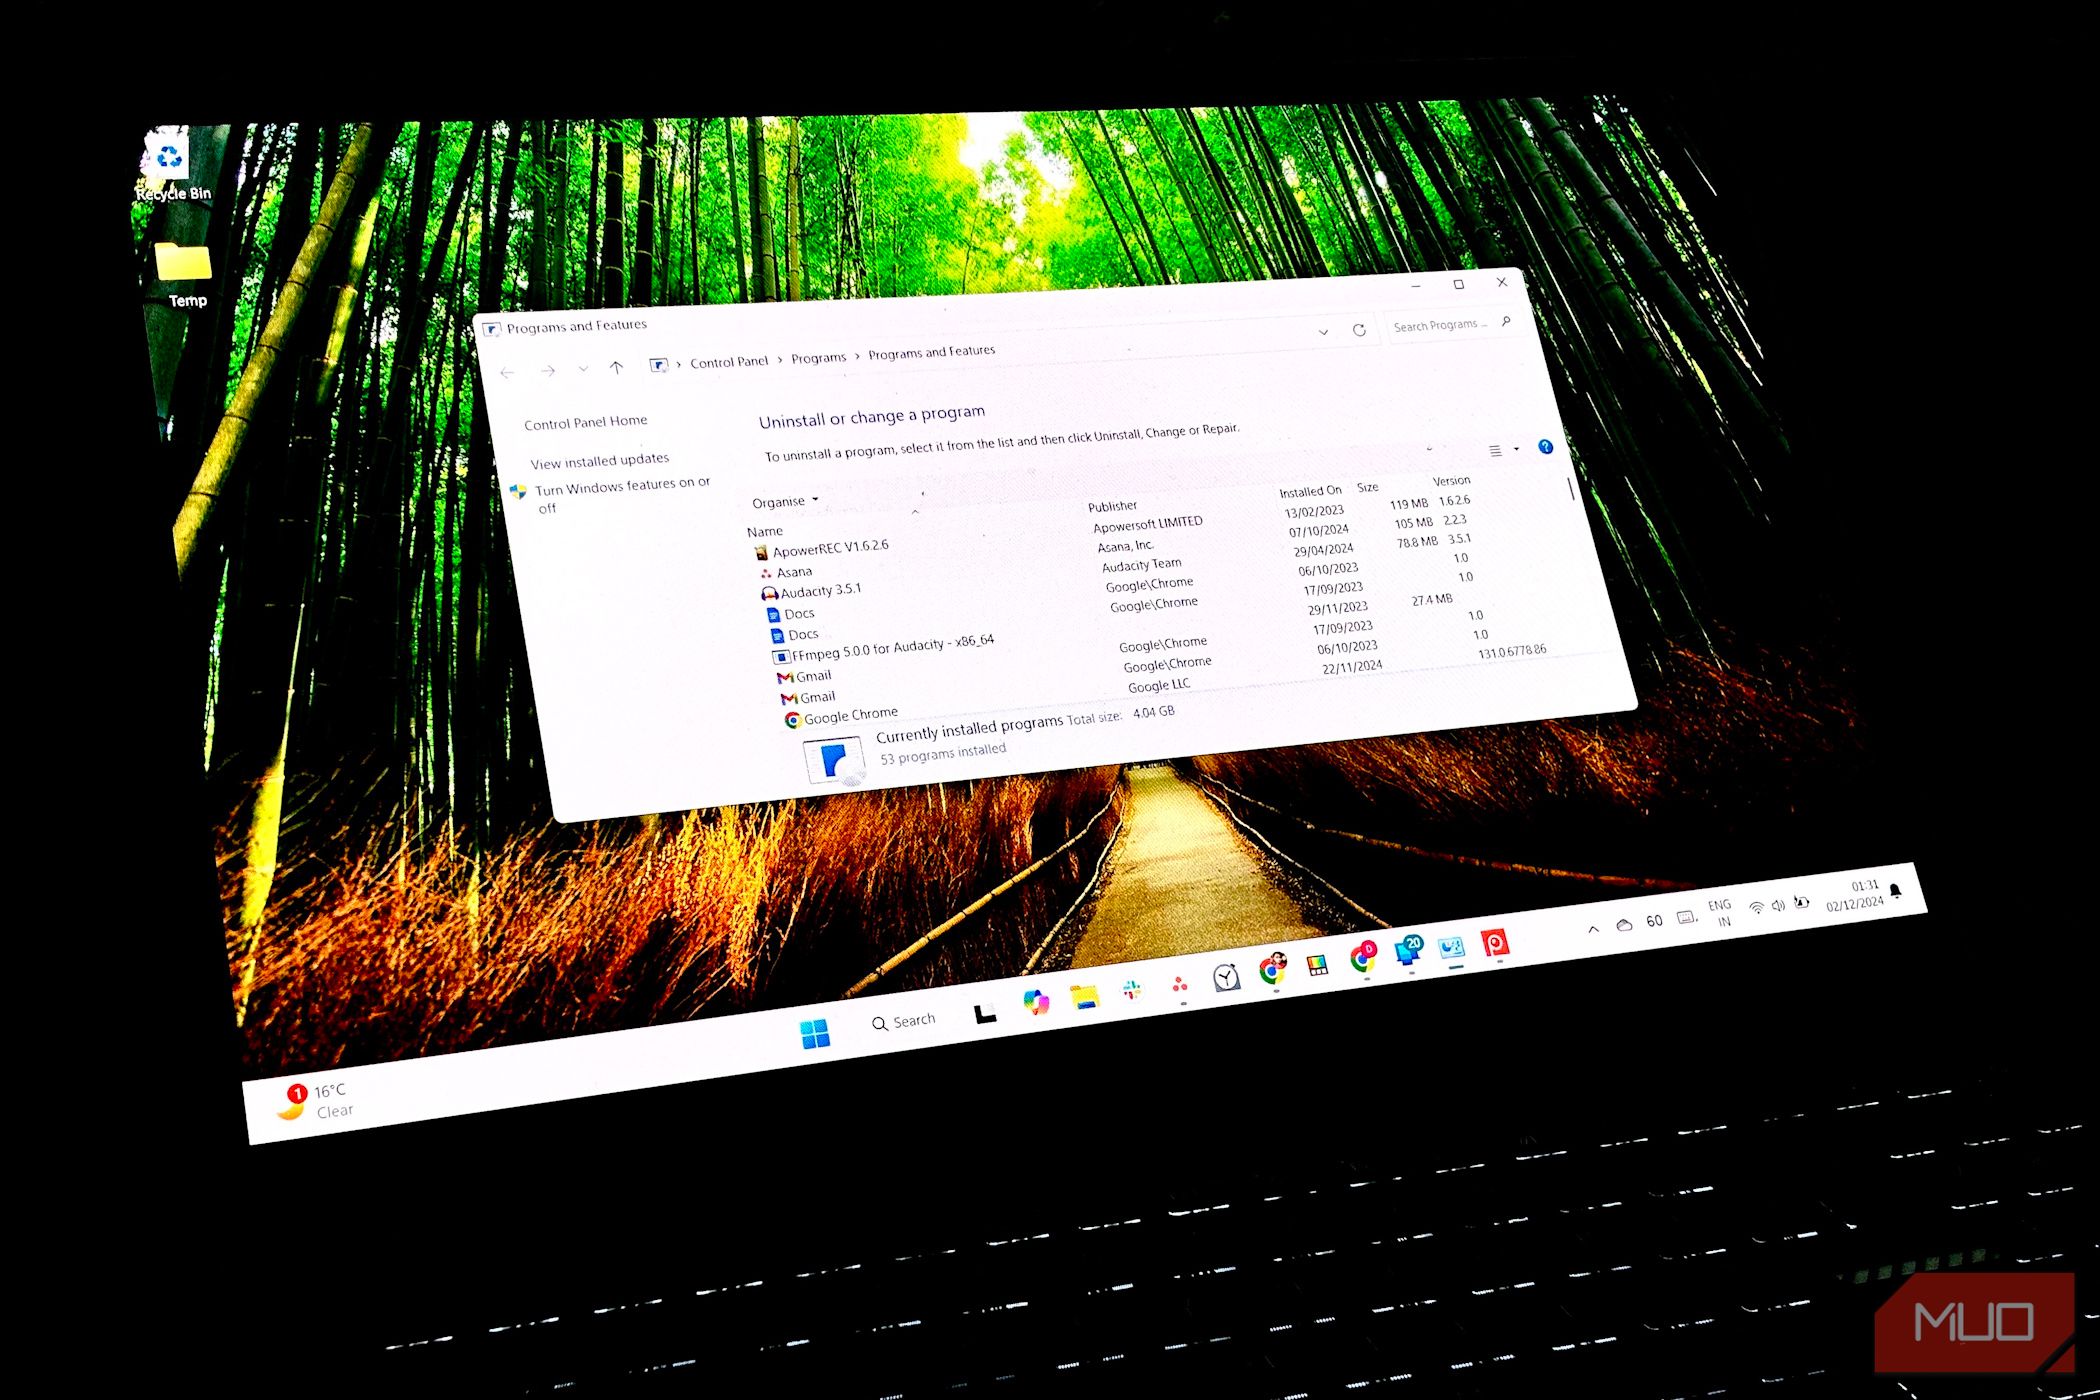
Use the Control Panel
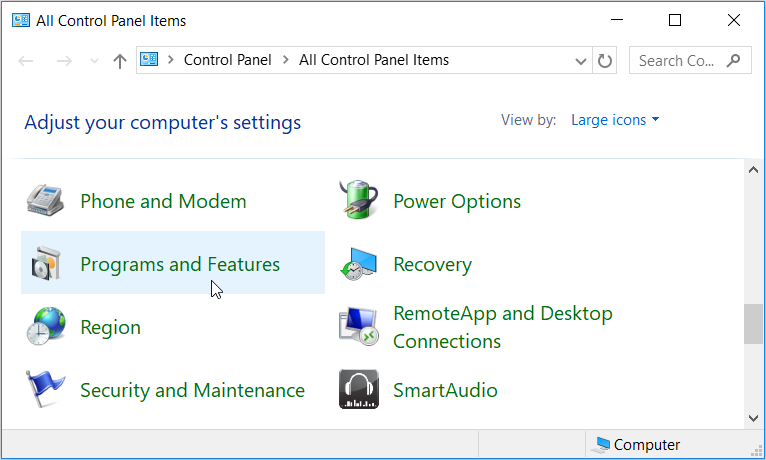
The classic Control Panel is still available in Windows 11, and you can use it to access Programs and Features if you prefer clicking to typing. To open the Control Panel, press the Windows key and type «Control Panel» in the search bar. Then pick the option that pops up. Once you’re in, you can view by Category or Icons at the top-right.
For Category, click on Programs > Programs and Features. If you’re viewing by icons, select Programs and Features. Either way, you’ll end up in the Programs and Features window.
These are the easiest methods to access the Programs and Features window in Windows—through the Run menu, command line, or Control Panel. But don’t forget that this menu is old-school, and many of the same options are available in the modern Settings app under the Apps heading.