
Загрузить PDF
Загрузить PDF
Из этой статьи вы узнаете, как анализировать файлы дампа после сбоя Windows. В таких файлах, которые автоматически создаются после сбоя системы, содержится список программ, которые работали до сбоя; так можно выяснить, какие программы привели к сбою. Если вы ждете очередного сбоя или хотите протестировать программу, используйте бесплатную программу BlueScreenView, чтобы анализировать файлы дампа. Также можно воспользоваться бесплатным инструментом Windows 10 Drivers Kit (WDK), чтобы открыть файлы дампа.
-

Нажмите на логотип Windows в нижнем левом углу экрана.
-
Начнется поиск раздела «Просмотр расширенных параметров системы» Панели управления.
-
Этот значок в виде монитора с галочкой расположен в верхней части меню «Пуск». Откроется окно «Расширенные параметры системы».
-
Это вкладка в верхней части окна.
- Возможно, сначала нужно щелкнуть по значку в виде монитора, который находится в нижней части экрана, чтобы открыть окно «Расширенные параметры системы».
-
Эта кнопка находится в разделе «Загрузка и восстановление» в нижней части страницы. Откроется новое окно.
-
Вы найдете его посередине окна.
-
Эта опция находится в меню. В этом случае файлы дампа можно прочесть с помощью таких программ, как BlueScreenView.
-
Эта кнопка находится в нижней части окна. Вы вернетесь в окно «Расширенные параметры системы».
-
Изменения будут сохранены, а окно «Расширенные настройки системы» закрыто.
-
Перейдите на страницу https://www.nirsoft.net/utils/blue_screen_view.html в браузере. BlueScreenView — это программа, которая находит и анализирует файлы дампа, чтобы выяснить, какие программы работали до сбоя.
-
Прокрутите страницу вниз и нажмите «Download BlueScreenView with full install/uninstall support» (Скачать BlueScreenView с полной поддержкой); эта ссылка находится посередине страницы.
-
Дважды щелкните по файлу «bluescreenview_setup» в папке для загрузок.
-
Для этого:
- нажмите «Да», когда будет предложено;
- нажмите «Next» (Далее);
- нажмите «Next» (Далее);
- нажмите «Install» (Установить);
- дождитесь, когда BlueScreenView будет установлена.
-
Установите флажок у «Run NirSoft BlueScreenView» (Запустить NirSoft BlueScreenView), а затем нажмите «Finish» (Завершить) в нижней части окна. BlueScreenView откроется.
-
В BlueScreenView есть верхняя и нижняя панели; файл дампа отобразится на верхней панели, а на нижней появится список программ, которые работали до сбоя.
- Чтобы выбрать файл дампа, щелкните по нему на верхней панели.
- Скорее всего, как минимум одна программа, которая есть в файле дампа, ответственна за сбой.
Реклама


-
-
Прокрутите страницу вниз и нажмите «Download WDK for Windows 10, version 1803» (Скачать WDK для Windows 10, версия 1803); эта ссылка находится в разделе «Install WDK for Windows 10» (Установить WDK для Windows 10) в верхней части страницы.
-
Дважды щелкните по файлу «wdksetup» в папке для загрузок.
-
Для этого:
- нажмите «Next» (Далее) на первых 4 страницах;
- нажмите «Accept» (Принять);
- нажмите «Yes» (Да), когда будет предложено;
- дождитесь, когда WDK будет установлен.
-
Нажмите на логотип Windows в нижнем левом углу экрана.
-
Начнется поиск командной строки.
-
Это значок в виде черного квадрата в верхней части меню «Пуск». Раскроется меню.
-
Эта опция находится в меню.
- Вы не сможете выполнить этот шаг, если у вас нет учетной записи администратора.
-
Запустится командная строка (с правами администратора).
-
Введите следующий адрес, а затем нажмите ↵ Enter:
cd C:\Program Files (x86)\Windows Kits\10\Debuggers\x86
-
Введите
windbg.exe -IA, а затем нажмите ↵ Enter. -
Теперь WDK будет автоматически открывать файлы дампа.
-
Откройте меню «Пуск»

, введите windbg и нажмите «WinDbg (X86)» в результатах поиска. Откроется Отладчик Windows.
-
Путь к символу указывает отладчику Windows, какую информацию следует отобразить:[1]
- нажмите «File» (Файл) в верхнем левом углу;
- нажмите «Symbol File Path» (Путь к символу);
- введите
SRV*C:\SymCache*http://msdl.microsoft.com/download/symbols - нажмите «OK».
-
Для этого перейдите в корневой каталог системы:
- откройте меню «Пуск»;
- введите выполнить и нажмите ↵ Enter;
- введите %SystemRoot%;
- нажмите «OK»;
- перейдите на вкладку «Вид»;
- установите флажок у «Скрытые элементы»;
- прокрутите вниз и дважды щелкните по файлу «MEMORY.DMP».
-
Отобразится список программ, которые работали до сбоя — этот список поможет выяснить, какая программа(ы) привела к сбою.
Реклама


Советы
- BlueScreenView идеально подходит для тестирования различных программ (например, запустите программу и проверьте, произойдет ли сбой), так как она быстро устанавливается и запускается.
Реклама
Предупреждения
- Компьютерные сбои, особенно «синие экраны смерти» (BSOD), могут случиться по разным причинам — от неисправного приложения до сломанного процессора. Таким образом, даже если вы просмотрите содержимое файла дампа, не факт, что вы найдете причину сбоя.
Реклама
Об этой статье
Эту страницу просматривали 23 052 раза.
Была ли эта статья полезной?
If your PC has recently crashed, you must have faced the Blue Screen of Death (BSOD), which lists the crash’s cause and then the PC shutdown abruptly. Now the BSOD screen is only shown for a few seconds, and it’s not possible to analyze the reason for the crash at that moment. Thankfully, when Windows crashes, a crash dump file (.dmp) or memory dump is created to save information about the crash just before the Windows shutdown.

As soon as the BSOD screen is displayed, Windows dumps the information about the crash from the memory to a small file called “MiniDump” which is generally saved in the Windows folder. And this .dmp files can help you troubleshoot the cause of the error, but you need to analyze the dump file. This is where it gets tricky, and Windows doesn’t use any pre-installed tool to analyze this memory dump file.
Now there is a various tool which can help you debug the .dmp file, but we are going to talk about two tools which are BlueScreenView and Windows Debugger tools. The BlueScreenView can analyze what went wrong with the PC quickly, and the Windows Debugger tool can be used to get more advanced information. So without wasting any time let’s see How to Read Memory Dump Files in Windows 10 with the help of the below-listed guide.
Make sure to create a restore point just in case something goes wrong.
Method 1: Analyze Memory Dump Files using BlueScreenView
1. From NirSoft Website downloads the latest version of BlueScreenView according to your version of Windows.
2. Extract the zip file you download and then double-click on BlueScreenView.exe to run the application.

3. The program will automatically search for the MiniDump files at the default location, which is C:\Windows\Minidump.
4. Now if you want to analyze a particular .dmp file, drag and drop that file to BlueScreenView application and the program will easily read the minidump file.

5. You will see the following information at the top of the BlueScreenView:
- The name of the Minidump file: 082516-12750-01.dmp. Here 08 is the month, 25 is the date, and 16 is the year of the dump file.
- Crash Time is when the crash happens: 26-08-2016 02:40:03
- Bug Check String is the error code: DRIVER_VERIFIER_IOMANAGER_VIOLATION
- Bug Check Code is the STOP error: 0x000000c9
- Then there will be Bug Check Code Parameters
- The most important section is Caused By Driver: VerifierExt.sys
6. In the lower part of the screen, the driver who caused the error will be highlighted.

7. Now you have all the information about the error you could easily search the web for the following:
Bug Check String + Caused by Driver, e.g., DRIVER_VERIFIER_IOMANAGER_VIOLATION VerifierExt.sys
Bug Check String + Bug Check Code eg: DRIVER_VERIFIER_IOMANAGER_VIOLATION 0x000000c9

8. Or you can right-click on the minidump file inside the BlueScreenView and click “Google Search – Bug Check + Driver“.

9. Use this information to troubleshoot the cause and fix the error. And this is the end of the guide How to Read Memory Dump Files in Windows 10 using BlueScreenView.
Method 2: Analyze Memory Dump Files Using Windows Debugger
1. Download Windows 10 SDK from here.
Note: This program contains WinDBG program that we will be using to analyze the .dmp files.
2. Run the sdksetup.exe file and specify the installation location or use default.

3. Accept License agreement then at “Select the features you want to install” screen select only the Debugging Tools for Windows option and then click Install.

4. The application will begin downloading the WinDBG program, so wait for it to be installed on your system.
5. Open Command Prompt. The user can perform this step by searching for ‘cmd’ and then press Enter.

6. Type the following command into cmd and hit Enter:
cd\Program Files (x86)\Windows Kits\10\Debuggers\x64\
Note: Specify the correct installation of the WinDBG program.
7. Now once you’re inside the correct directory type the following command to associate WinDBG with .dmp files:
windbg.exe -IA

8. As soon as you enter the above command, a new blank instance of WinDBG will open with a confirmation notice which you can close.

9. Type windbg in Windows Search then click on WinDbg (X64).
10. In the WinDBG panel, click on File, then select Symbol File Path.
11. Copy and paste the following address into the Symbol Search Path box:
SRV*C:\SymCache*http://msdl.microsoft.com/download/symbols

12. Click OK and then save the symbol path by clicking File > Save Workspace.
13. Now find the dump file you want to analyze, you could either use the MiniDump file found in C:\Windows\Minidump or use the Memory dump file found in C:\Windows\MEMORY.DMP.

14. Double click the .dmp file and the WinDBG should launch and begin processing the file.

Note: Since this is the first .dmp file being read on your system, WinDBG appears to be slow but do not interrupt the process as these processes are being carried out in the background:
A folder called Symcache is being created in C:
Symbols are being downloaded and saved to C:\Symcache
Once the symbols have been downloaded, and the dump is ready to analyze, you will see the message Followup: MachineOwner at the dump text’s bottom.

15. Also, the next .dmp file is processed, it will be quicker as it will have already downloaded the required symbols. Over time the C:\Symcache folder will grow in size as more symbols are added.
16. Press Ctrl + F to open Find then type “Probably caused by” (without quotes) and hit Enter. This is the quickest way to find what caused the crash.

17. Above the Probably caused by line, you will see a BugCheck code, e.g., 0x9F. Use this code and visit Microsoft Bug Check Code Reference for verifying the bug check refer.
Recommended:
- Fix Windows can’t set up a HomeGroup on this computer
- Fix Computer Screen Turns Off Randomly
- How To Fix Right Click Not Working in Windows 10
- Fix The Registry editor has stopped working
That’s it you have successfully learned How to Read Memory Dump Files in Windows 10 but if you still have any queries regarding this post then feel free to ask them in the comment’s section.
On Windows 10, when there is a crash, the system creates a «dump» file containing the memory information at the time of the error, which can help determine the reason for the problem.
The «.dmp» file includes the stop error message, a list of the drivers loaded at the time of the problem, kernel, processor, and process details, as well as other information depending on the type of dump file you have.
Although Windows 10 automatically creates dump files, the only problem is that you won’t find any built-in tools to open this type of file, and this is when the Microsoft Windows Debugging (WinDbg) tool can help. WinDbg is an advanced tool designed for debugging kernel-mode and user-mode code, reviewing processor registries, and analyzing crash dumps.
This guide will walk you through the steps to open a dump file to determine what caused the crash to resolve the problem on your computer.
How to open dump file with WinDbg on Windows 10
On Windows 10, you may find multiple ways to open and review a dump error file, but the easiest way is to use the WinDbg tool available through the Microsoft Store.
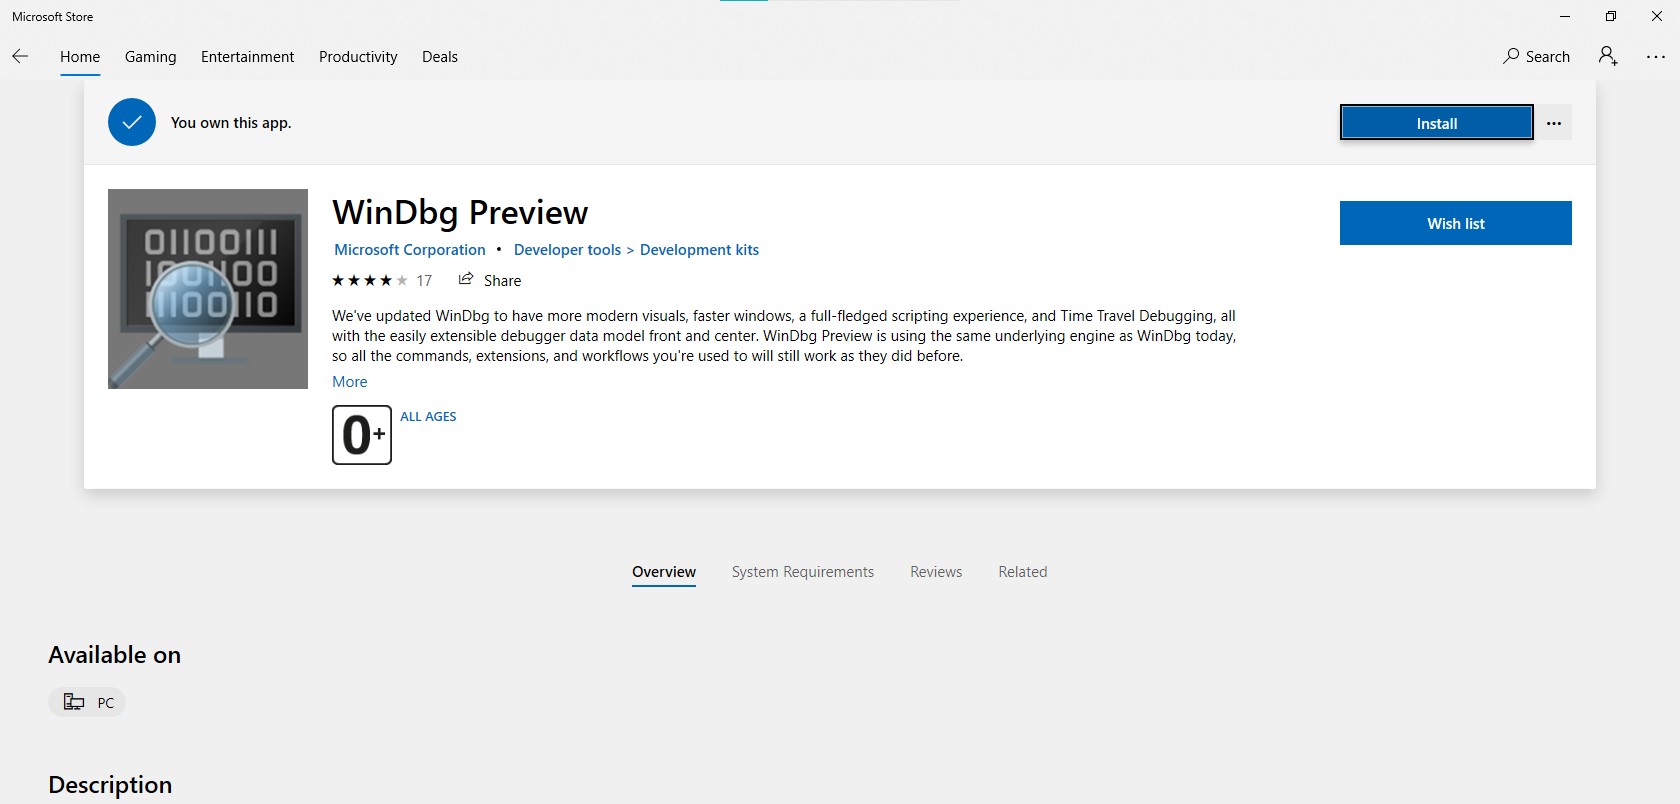
Install WinDbg
To install the WinDbg tool on Windows 10, use these steps:
All the latest news, reviews, and guides for Windows and Xbox diehards.
- Open the WinDbg download page.
- Click the Install button.
- Click the Open button.
- Click the Install button.
Once you complete the steps, the application will install, and it will be available through the Start menu.
Analyze dump file
To open and analyze a dump file created by a crash on Windows 10, use these steps:
- Open Start.
- Search for WinDbg, right-click the top result, and select the Run as administrator option.
- Click the File menu.
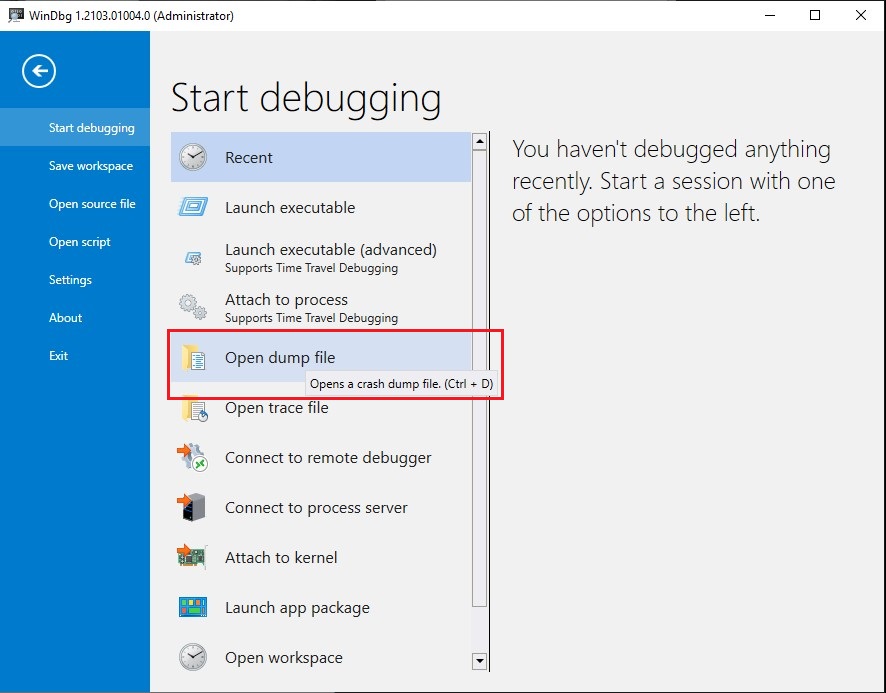
- Click on Start debugging.
- Select the Open sump file option.
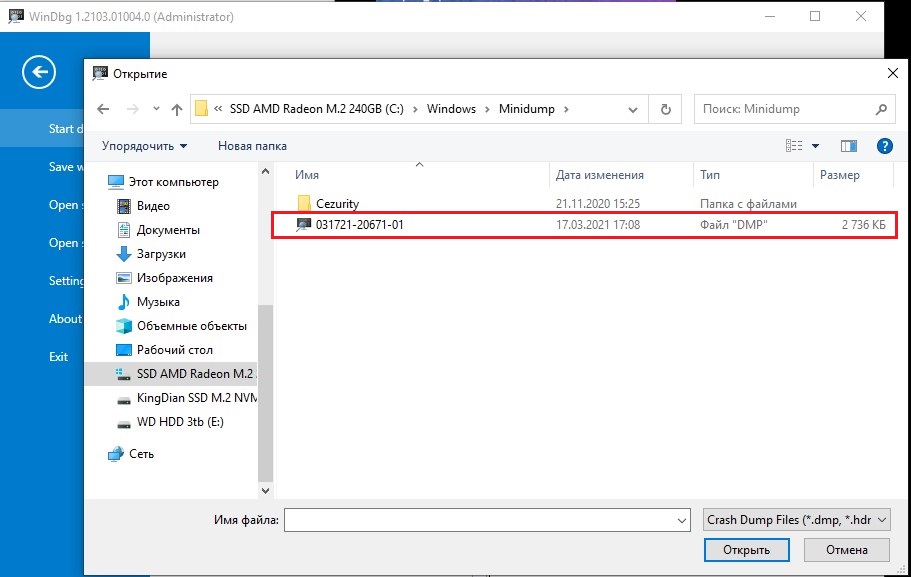
- Select the dump file from the folder location — for example, %SystemRoot%\Minidump.
- Click the Open button.
- Click the Open button again.
- Check the progress bar until it loads the dump file (this may take a while).
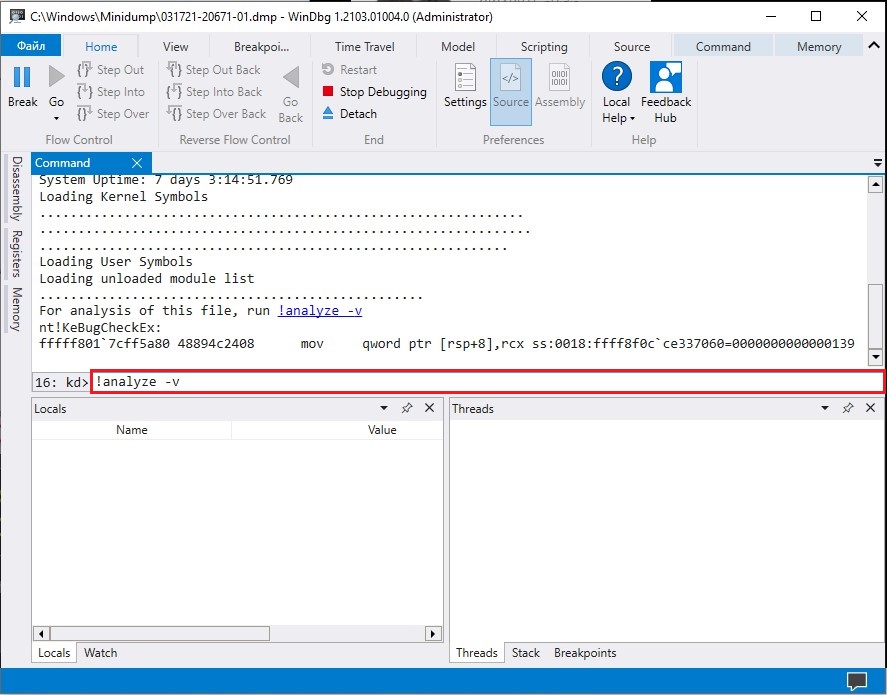
- Type the following command in the run command and press Enter: !analyze -v
- Quick tip: You can also click the !analyze -v link if available from the main area if available after loading the dump file.
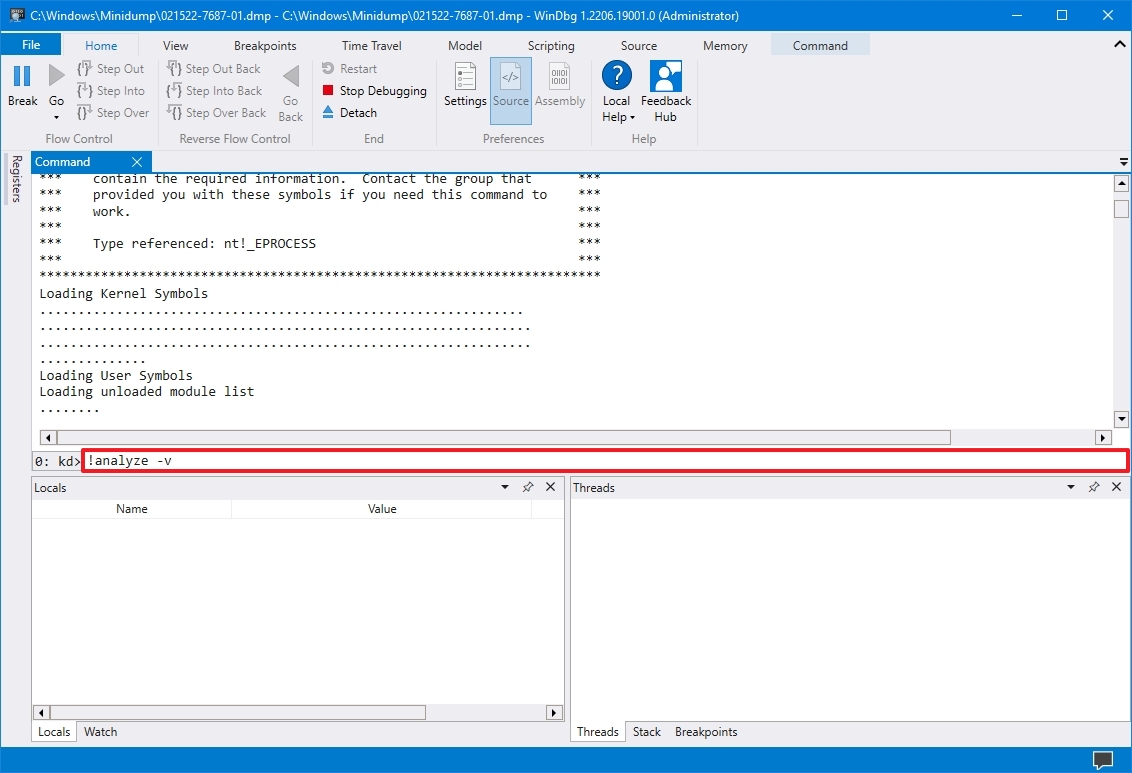
- Check the progress bar until the analysis is complete (this may take a long time depending on the data size).
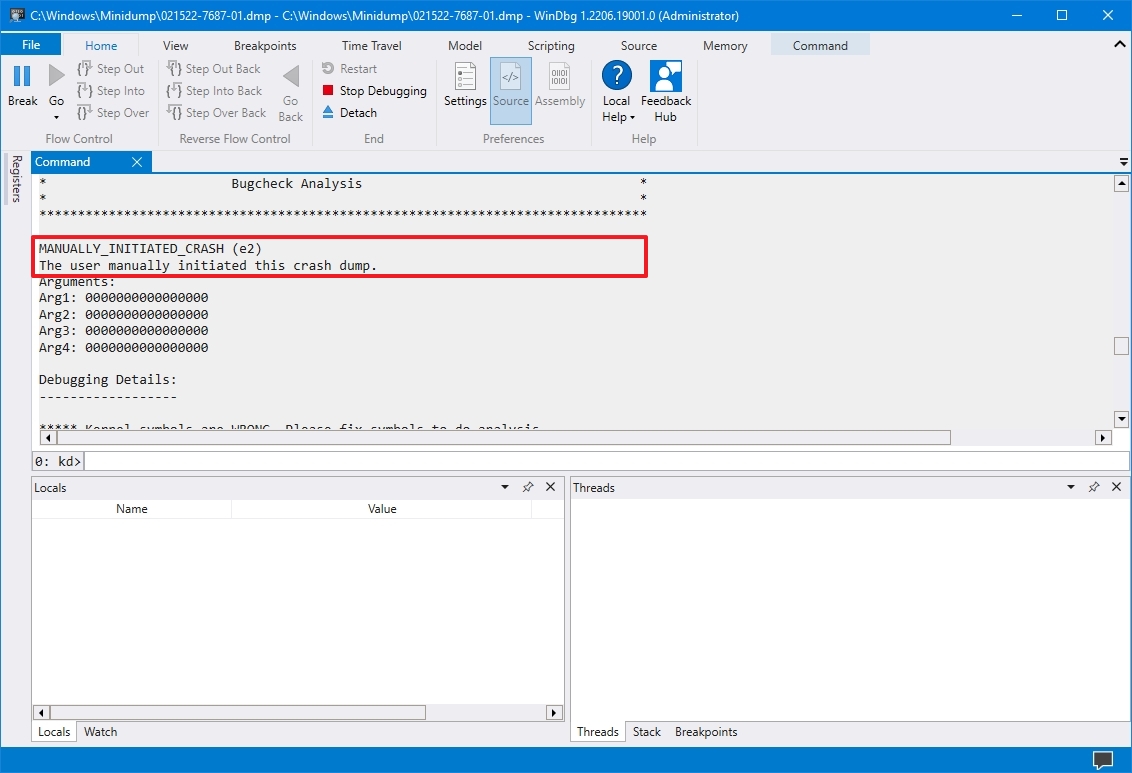
After you complete the steps, the application will return the dump file analyses, which you can then review to determine the reason for the problem to help you resolve the issue.
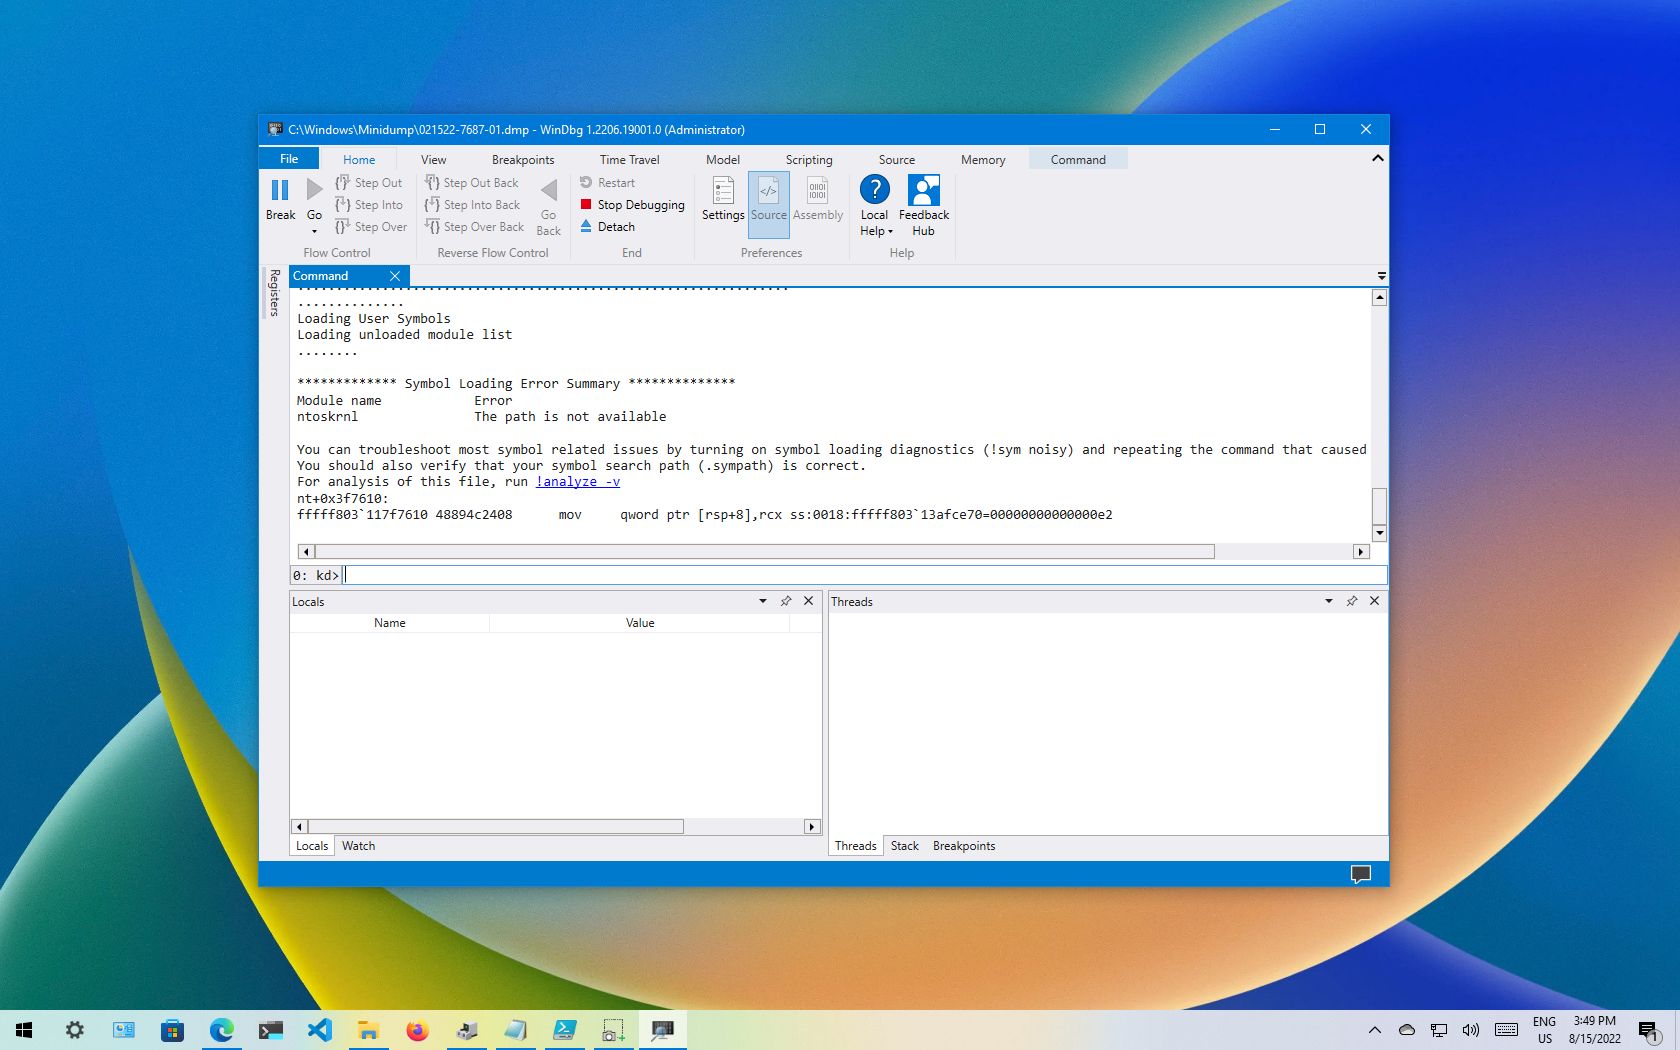
The information will be different depending on the problem. For example, this result points out that this was a manually initiated crash with an «e2» error code, which is correct since, for this guide, we use these instructions to force a dump file. The WinDbg even makes an excellent job describing the crash in a language anyone can understand («The user manually initiated this crash dump»).
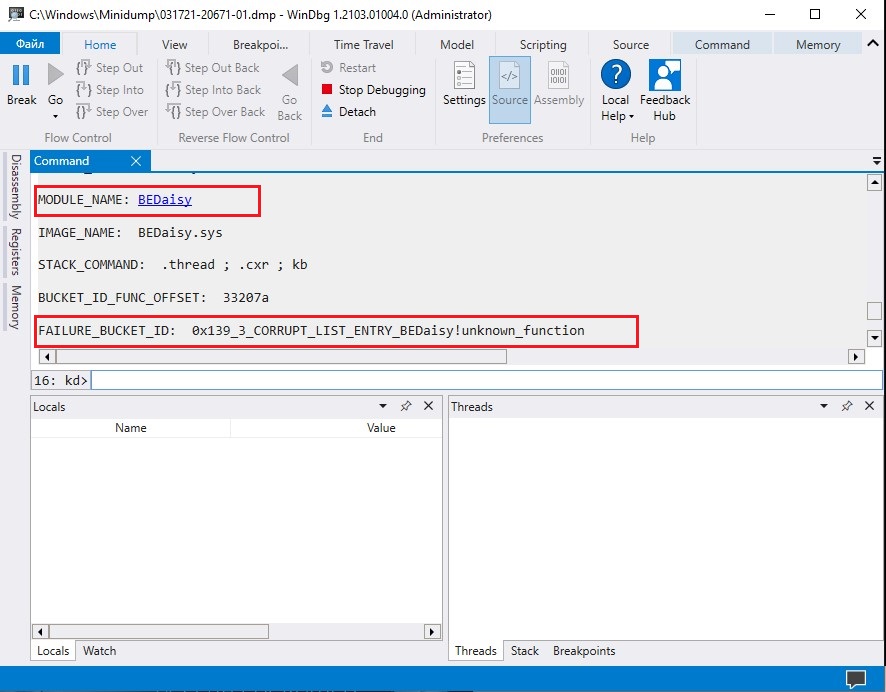
As you continue reviewing the dump file, you will also find more information, such as «FAILURE_BUCKET_ID» and «MODULE_NAME,» which could indicate what is causing the problem.
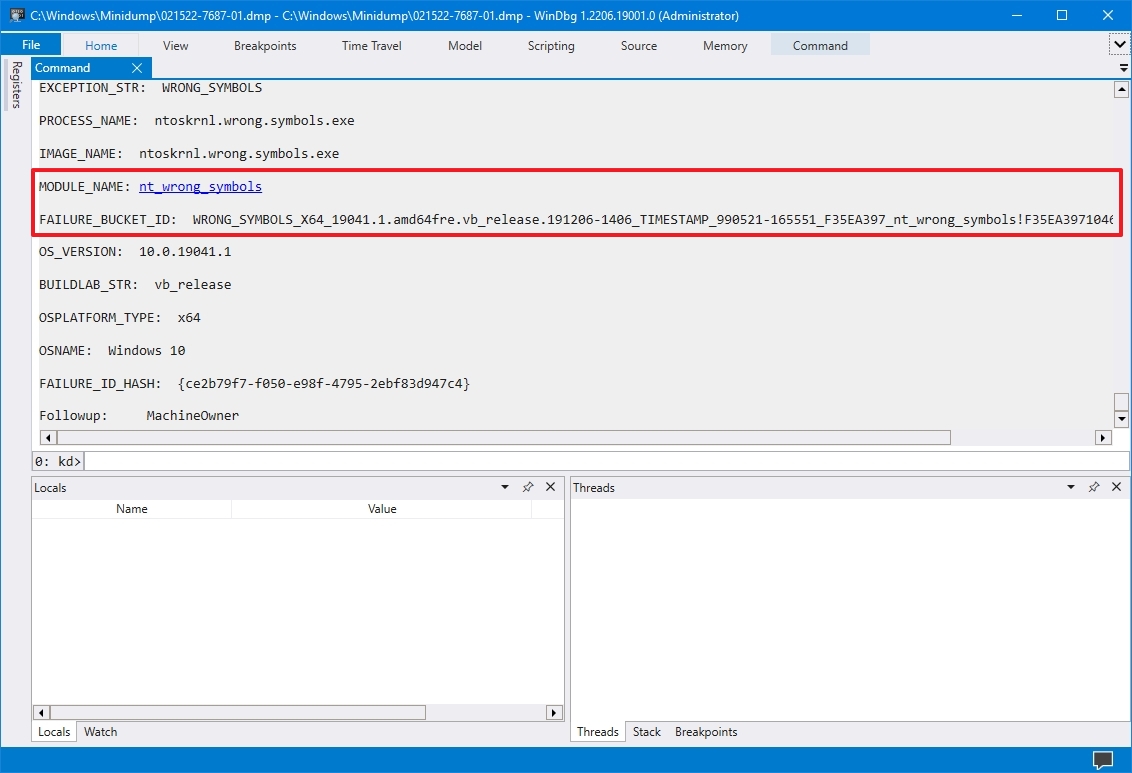
The information can be overwhelming since it is not meant for regular users. If your computer keeps crashing, you can use this tool to get an idea of the problem. If you cannot figure it out, you can use the hints in the report to search online for more information.
More resources
For more helpful articles, coverage, and answers to common questions about Windows 10 and Windows 11, visit the following resources:
- Windows 11 on Windows Central — All you need to know
- Windows 10 on Windows Central — All you need to know
Mauro Huculak has been a Windows How-To Expert contributor for WindowsCentral.com for nearly a decade and has over 15 years of experience writing comprehensive guides. He also has an IT background and has achieved different professional certifications from Microsoft, Cisco, VMware, and CompTIA. He has been recognized as a Microsoft MVP for many years.
If your system has crashed and experienced a Blue Screen of Death (BSoD), or a program or Windows feature suddenly crashes, Windows automatically generates a record of the conditions and circumstances under which the error occurred. This information is stored in dump files with the extension “.dmp.”
These dump files can help troubleshoot the root cause of the error so that it does not occur again.
This article contains everything you need to know about these dump files and how they can be opened in Windows, since there is no native method, so they can be analyzed to determine the cause of the error.
Table of Contents
Windows Crash Dump Files
Crash dump files, also known as “mini-dump files,” are system-generated binary files that contain various information about a crash that may have occurred on your computer. Like Event Viewer, these files can be used to determine the cause of the error, and then use that data to fix it. Dump files can contain the following data in them, which can be helpful for the matter:
The list below highlights the content which can be found inside a mini-dump file.
- The Stop message (error code), its parameters, and other data.
- List of loaded drivers.
- The processor context (PRCB) for the processor that stopped.
- Process information and kernel context (EPROCESS) for the process stopped.
- Process information and kernel context (ETHREAD) for the thread stopped.
- Kernel-mode call stack for the thread that stopped.
Dump files are created by copying the data off the system memory and onto the computer’s storage. It uses the Windows Page File and requires at least 2MB of free space. With this information, you can understand how different dump files are created.
Windows can write debugging information in three types of dump files.
Types of Dump Files
Complete Memory Dump
Complete Memory Dump files are the largest of the dump files. In this case, the complete contents of the memory are written onto the dump file.
When generated by the system, all old Complete Memory Dump files are replaced and overwritten.
Complete Memory Dump files are saved to C:\Windows\MEMORY.DMP file.
Kernel Memory Dump
Kernel Memory Dump files only contain data from kernel memory, which is why they are relatively smaller in size. Such files do not contain data from any unused, unallocated memory or the memory used by user-mode programs.
When generated by the system, all old Kernel Memory Dump files are replaced and overwritten.
Kernel Memory Dump files are also saved to C:\Windows\MEMORY.DMP file, the same as Complete Memory Dump files. However, only one of these is saved at a time and is overwritten when another crash occurs.
Small Memory Dump/Mini Memory Dump
The minidump file, which we will discuss in this post, is the smallest kind of dump file. This file contains the information described above that can assist in determining the cause of the crash.
Minidump files generated by the system are not overwritten. Instead, a new one is generated.
Minidump files can be found at C:\Windows\Minidump. If you do not find a directory named “Minidump,” it is likely because a dump file has not been created yet.
When a minidump file is created, Windows automatically includes the date it was created on. For example, in Windows 11, if a file is named “020322-18890-01.dmp,” “02” indicates the month, “03” indicates the date, and “22” indicates the year the file was created. “-01” at the end indicates it was the first dump file created that day.
The same is true for a minidump file created in Windows 10, which is automatically named something like “mini020322-01.dmp.”
Now let’s move on to opening and analyzing a dump file.
How to Read and Analyze DMP Files
As we mentioned, Windows does not allow you to open dump files directly. However, you can use other tools available online to open and analyze them. One of the most common tools to do so is through the Windows Debugging (WinDbg) tool, which can be downloaded through Microsoft Store. Continue reading the given guide below to use this tool to open and analyze memory dump files in Windows.
Using WinDbg
We have divided this section into 2 parts: Downloading and installing the WinDbg tool and then using it to analyze a dump file.
Download and Install WinDbg
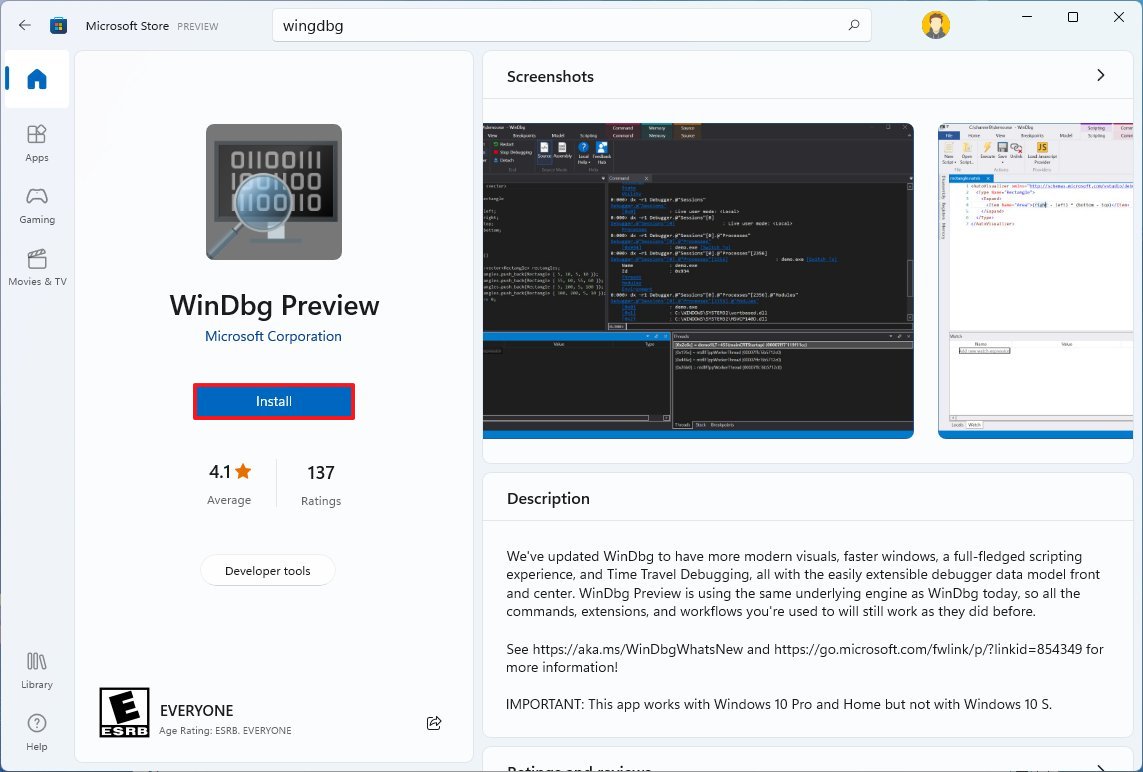
- Open the WinDbg Preview page in the Microsoft Store and click Get.

- The browser will prompted you to open the Microsoft Store app, click Open Microsoft Store.
- From the Store app, click Get again.


The WinDbg tool will now begin to download and then install. We are now done with the installation phase. Let us now use the tool to open and analyze dump files.
Open and Analyze dmp files using WinDbg
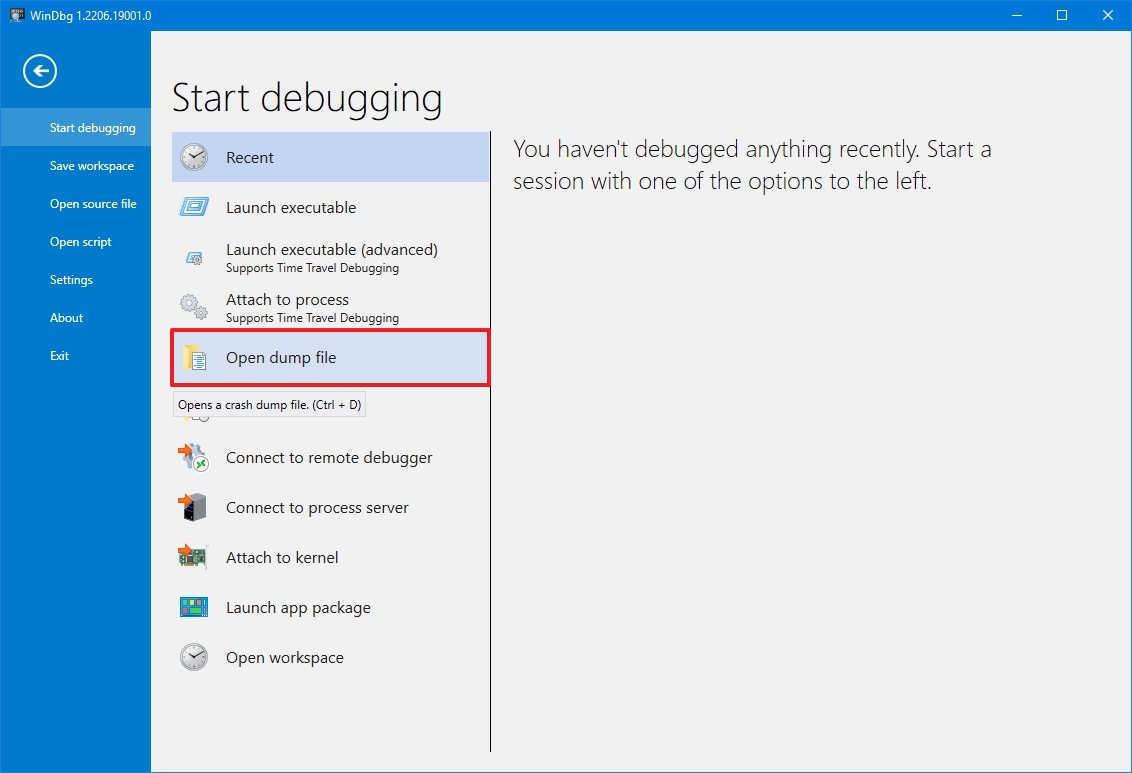
- Open the WinDbg tool with administrative rights by searching for it through the search box, right-clicking it, and then clicking Run as administrator from the context menu.

- From the WinDbg tool, click File from the top menu.
- In the Start Debugging tab, click Open dump file.

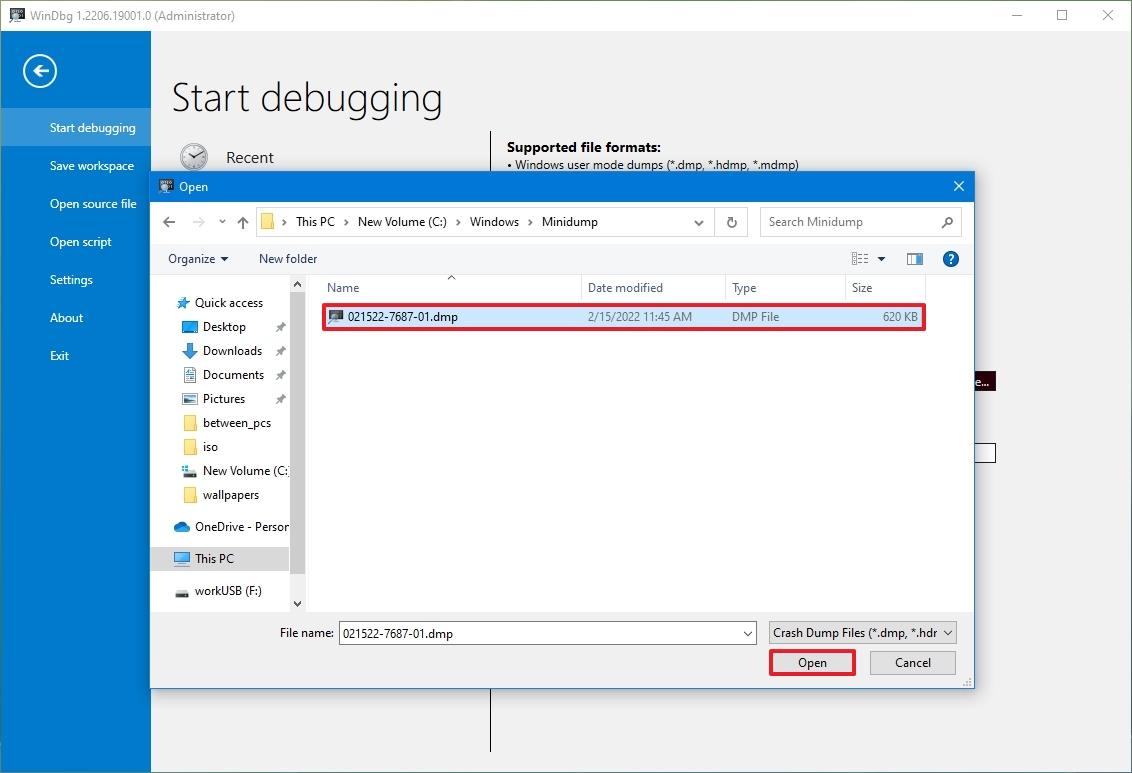
- Now click Browse from the right pane within the tool and select the dump file that you want to analyze by navigating to
C:\Windows\Minidump. When selected, click Open.
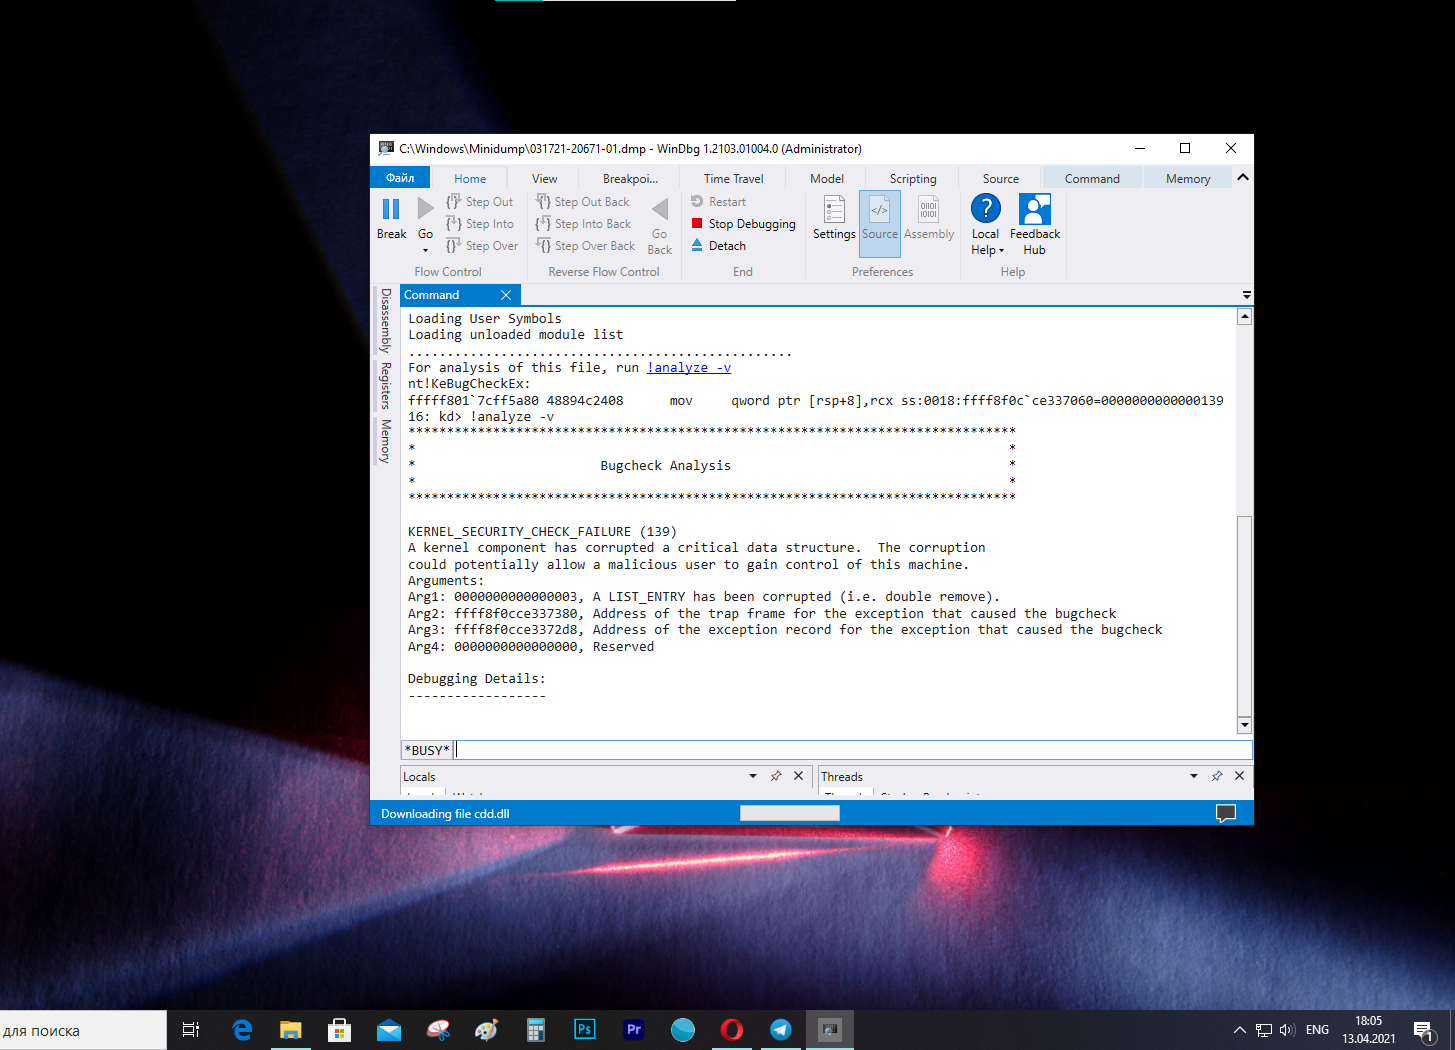
- The tool will now open the dump file, which can take a few minutes. When the dump file successfully opens, type in the following command in the text field in front of “0: kd>“:
!analyze -v
- WinDbg will now begin analyzing the dump file. This can take a few minutes to complete. Once completed, you should see the results in the top window.


In the example above, since we initiated a BSoD intentionally, it states “The user manually initiated this crash dump.” Otherwise, if it were an actual error, you would see different statements and information after performing the analysis of the dump file.
You can then use this information to troubleshoot the error that caused the crash.
Using WhoCrashed
Download WhoCrashed

WhoCrashed is available in both free and paid editions. However, the free edition is sufficient to open and analyze dump files. With this tool, you can obtain reports on the dump files with a single click. The tool will automatically scan your system files for any .dmp files and fetch the data within.
To do so, download WhoCrashed from the link given above, and run the .exe file to install in a few easy steps. Once installed, click Analyze from the ribbon menu at the top. The tool will then take a few seconds to scan any dump files and present the analysis. You can also view the .dmp files discovered from the Dump files tab.
Using BlueScreenView
Download BlueScreenView

BlueScreenView is a portable and small tool that can provide you with relevant information on minidump files. When you run this tool, it automatically picks up any .dmp files in the Minidump directory and displays the relevant information gathered from them. If there are multiple .dmp files, you can click on the one you want to analyze from the top field within the tool, and the information is presented in the bottom one.
Simply download the app from the link given above, extract the content and run the BlueScreenView application.
Final Thoughts
Dump files, regardless of their type, can be pretty useful when it comes to troubleshooting your operating system. However, the methods we have used above to analyze them may not be everyone’s cup of tea, as some of you may find them complex.
That said, there are more methods to analyze dump files using tools, but they involve using the Command prompt, not a Graphical User Interface (GUI). If you’d still like to learn more about it, you can read this detailed post by Microsoft on memory dump files.
В Windows 10 каждый раз, когда происходит сбой, система создает файл «дампа», содержащий информацию о памяти на момент ошибки. Это может помочь определить причину проблемы.
Файл .dmp включает в себя сообщение об ошибке, список драйверов, загруженных в момент возникновения проблемы, а также информацию о ядре, процессоре и процессах, а также другую информацию в зависимости от типа используемого файла дампа.
Хотя Windows 10 создает файлы дампа автоматически, в системе нет никаких встроенных утилит для их открытия. Тут пригодится инструмент Microsoft WinDbg (Windows Debugging). Он предназначен для отладки кода в режиме ядра и пользовательском режиме, изучения реестров процессоров и анализа аварийных дампов.
В этой инструкции мы расскажем, как открыть файла дампа и попытаться выяснить, что вызвало сбой.
Как открыть файл дампа с помощью WinDbg
Всего есть несколько способов открыть и просмотреть файл ошибки дампа, но самый простой — использовать инструмент WinDbg, доступный в Microsoft Store.
Установка WinDbg
Чтобы установить инструмент WinDbg на Windows 10, проделайте следующее:
- Откройте браузер.
- Откройте страницу загрузки WinDbg.
- Нажмите Получить.
- Нажмите Открыть.
- Нажмите Установить.

После выполнения этих шагов приложение будет установлено и доступно через меню Пуск.
Анализ файла дампа
Чтобы открыть и проанализировать файл дампа, созданный в результате сбоя в Windows 10, выполните следующие действия:
- Откройте Пуск.
- Найдите WinDbg, щелкните правой кнопкой мыши верхний результат и выберите Запуск от имени администратора.
- Выберите пункт меню Файл.
- Нажмите кнопку Start debugging.
- Выберите Open dump file.

- Выберите файл дампа из расположения папки – например, %SystemRoot%\Minidump.
- Нажмите Открыть.

- Подождите, пока файл дампа загрузится. Это может занять некоторое время.
- Введите следующую команду в поле Command и нажмите Enter:
!analyze -v
На заметку: также можно нажать ссылку !analyze-v, если она доступна в основной области после загрузки файла дампа.
- Подождите завершения анализа — это может занять много времени в зависимости от размера данных.
После выполнения этих шагов приложение выдаст анализ файла дампа, который затем можно просмотреть, чтобы определить причину проблемы и решить ее.
Информация будет отличаться в зависимости от проблемы. Например, этот тестовый файл дампа показывает информацию о синем экране смерти.
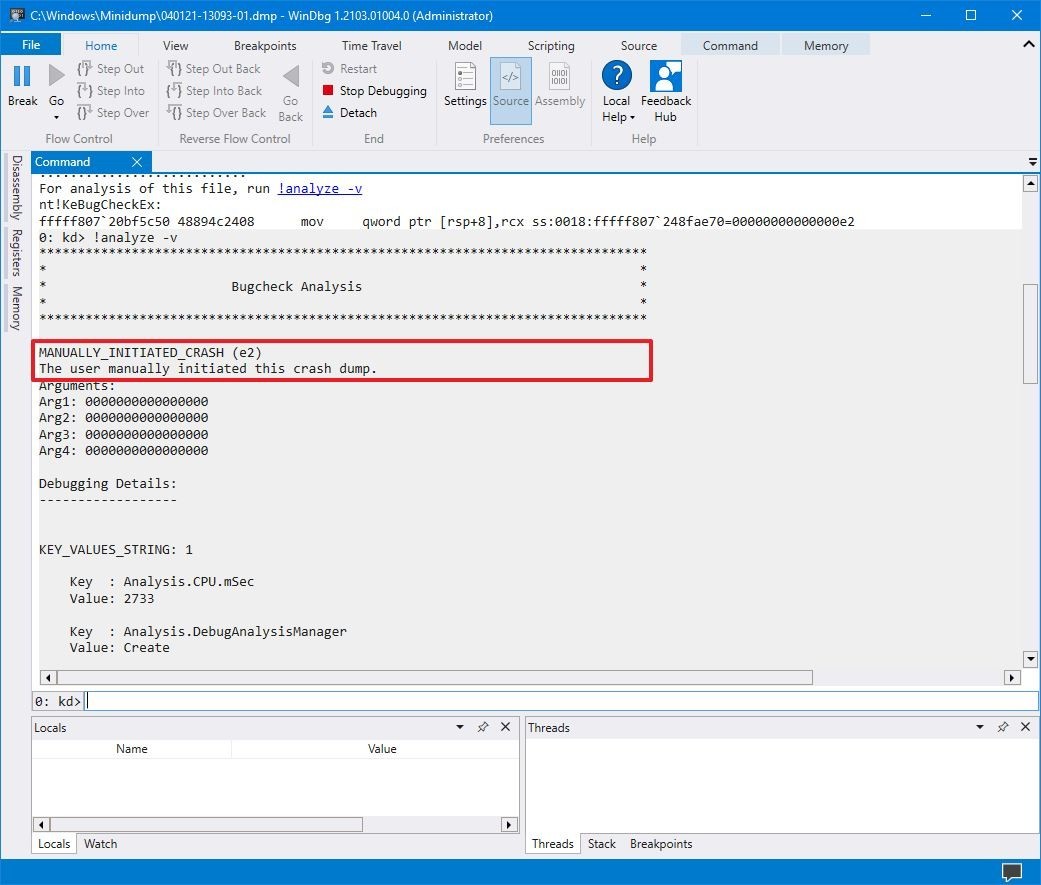
Результат указывает на то, что сбой был инициирован вручную и имеет код ошибки e2 (сбой мы действительно вызвали вручную). WinDbg также довольно понятным языком описывает проблему — из этого отчета понятно, что пользователь вызвал сбой вручную.
В файле дампа вы найдете и дополнительные сведения, например FAILURE_BUCKET_ID и MODULE_NAME, которые также могут указывать на причину проблемы.
Большая часть информации может привести в замешательство, так как она не предназначена для обычных пользователей. Тем не менее, этот инструмент пригодится, чтобы получить общее представление о проблеме. Если вы не понимаете, в чем дело, данными из отчета можно воспользоваться, чтобы поискать решение в сети.