
Важно! Встроенный системный эквалайзер может отсутствовать в Windows 10 по причине некорректно работающего драйвера, устаревшей версии операционной системы или из-за влияния антивирусного программного обеспечения, разработанного сторонней студией. В случае возникновения подобных проблем рекомендуем ознакомиться с тематическими статьями на нашем сайте, в которых подробно описаны действия по их устранению.
Подробнее:
Как обновить драйверы в Windows 10
Как обновить Windows 10 до последней версии
Как удалить антивирус с компьютера
Чтобы открыть встроенный эквалайзер в операционной системе Windows 10, потребуется перейти в соответствующее меню и активировать дополнительную функцию графического отображения этого компонента.
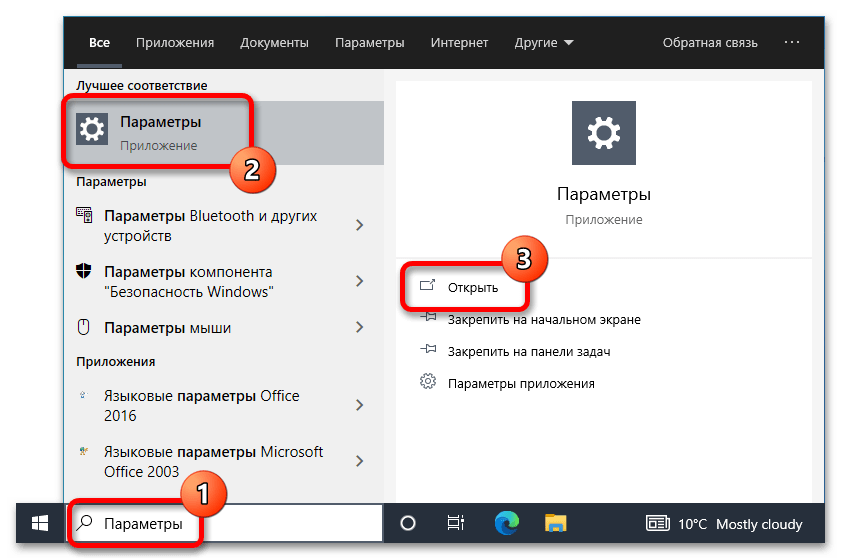
- Откройте окно системных параметров любым доступным способом. Это можно сделать посредством горячих клавиш Win + I или воспользовавшись поиском по системе, введя запрос «Параметры».
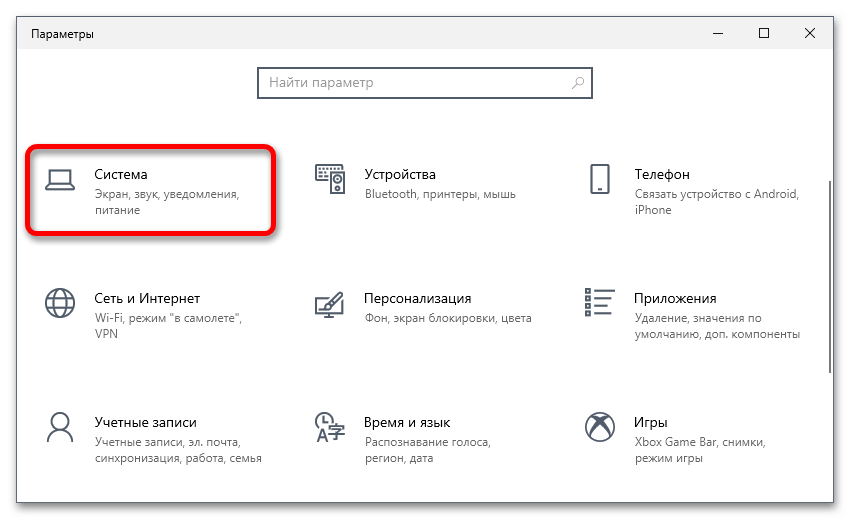
- В открывшемся окне перейдите в раздел «Система», кликнув по соответствующему пункту пользовательского интерфейса.
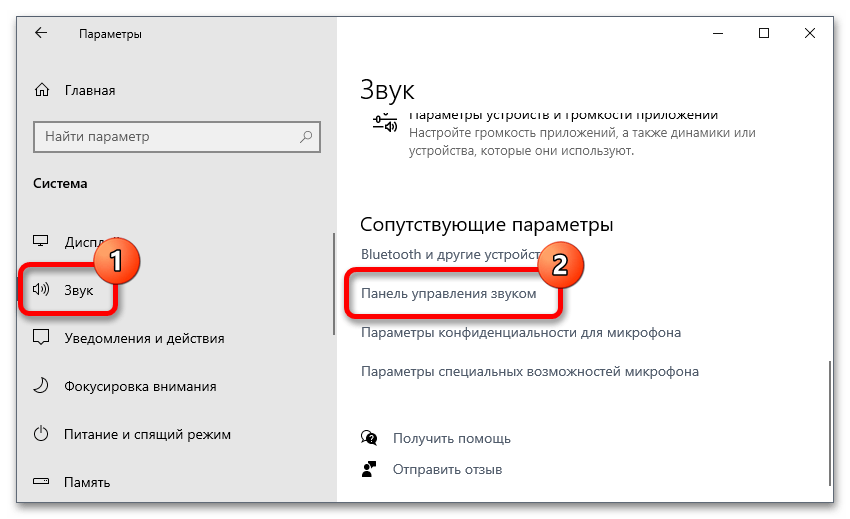
- На боковой панели выберите вкладку «Звук», после чего в основном меню перейдите в самый низ страницы и кликните по строке «Панель управления звуком».
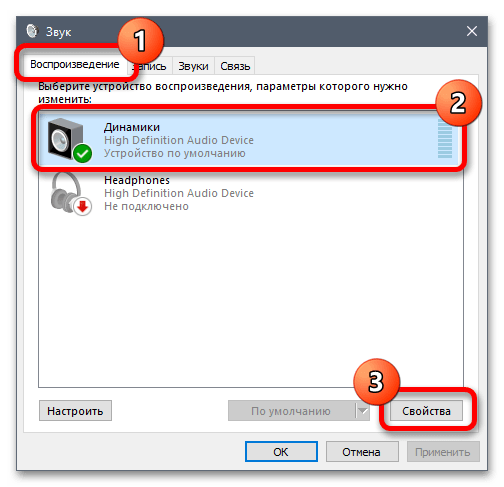
- В новом окне во вкладке «Воспроизведение» выделите одним щелчком мыши устройство, эквалайзер которого необходимо открыть, а затем нажмите по кнопке «Свойства».
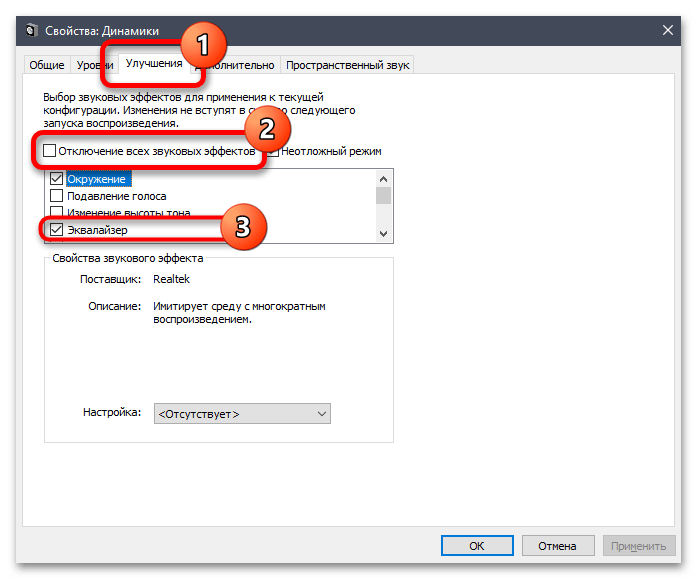
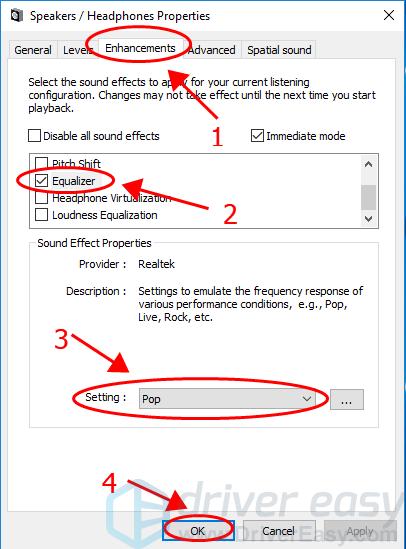
- Проследуйте во вкладку «Улучшения», где в списке дополнительных функций поставьте отметку напротив строки «Эквалайзер». Проследите за тем, чтобы опция «Отключение всех звуковых эффектов» была деактивирована.
- Если ранее создавались пользовательские шаблоны эквалайзера, выберите нужный из выпадающего списка «Настройка». При необходимости откройте графический интерфейс этого инструмента, кликнув по кнопке с тремя точками, расположенной правее.
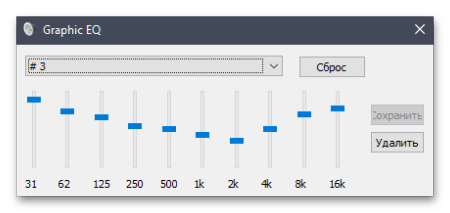
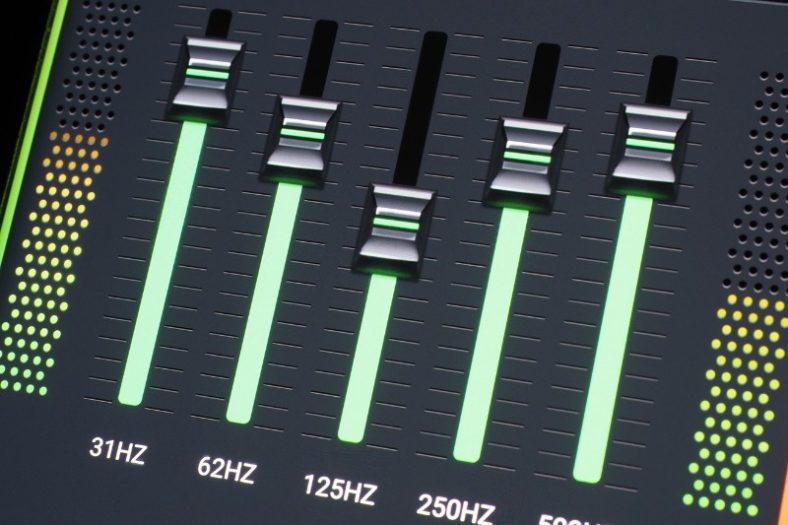
- В появившемся окне «Graphic EQ» задайте нужную конфигурацию для воспроизведения аудио на компьютере. Левые ползунки отвечают за изменение нижнего диапазона частот, а расположенные справа — за высокие.

Обратите внимание! Помимо системного эквалайзера на компьютер можно установить соответствующее программное обеспечение от стороннего разработчика. В отдельной статье на нашем сайте было рассмотрено пять представителей этой категории приложений, там же есть ссылки на их скачивание.
Подробнее: Популярные эквалайзеры для компьютера на Windows 10
Наша группа в TelegramПолезные советы и помощь
Windows 10 provides a sound equalizer, which enables you to adjust the sound effects and emulate the frequency when playing music and videos. This post shows you something about equalizer in Windows 10 and how the equalizer works on your Windows computer.
This article includes three parts:
- What is Windows 10 equalizer
- Where is sound equalizer settings in Windows 10
- Bonus Tip
1. What is Windows 10 equalizer
The process of adjusting the balance between frequency components and electronic signal is called equalization, and people who do this work is equalizers. Now in Windows 10, equalizations become much easier and more convenient with the equalizer feature.
You can now adjust the balance between frequency components by using the equalizer settings, and you can emulate the frequency response of various performance conditions, such as Rock, Live, and Jazz.
However, the equalizer settings depend on the audio driver installed on your Windows computer. Most audio devices are built in the equalizer in Windows 10, but if your audio driver doesn’t support the equalizer, you can’t find the settings related to it. But you can still head to Part 2 to add an equalizer in your Windows computer.
But it never hurts to have a check and see if your computer supports the Windows equalizer.
2. Where is sound equalizer settings in Windows 10
This part shows you how to find and manage the Windows 10 sound equalization on your computer.
Way 1: Via your Sound Settings
Generally, you can check and enable equalizer in your Windows 10 computer via the sound settings. Here’s how to do it:
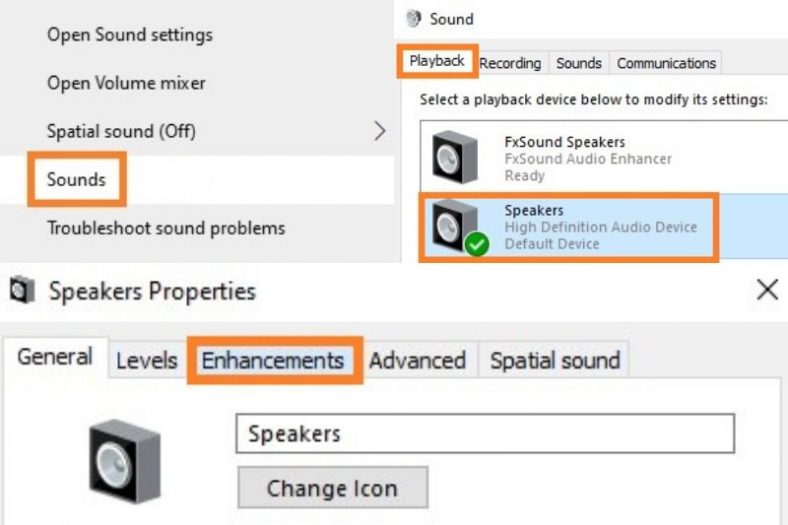
- Right-click on the volume icon at the bottom right corner on your desktop, and select Sounds.
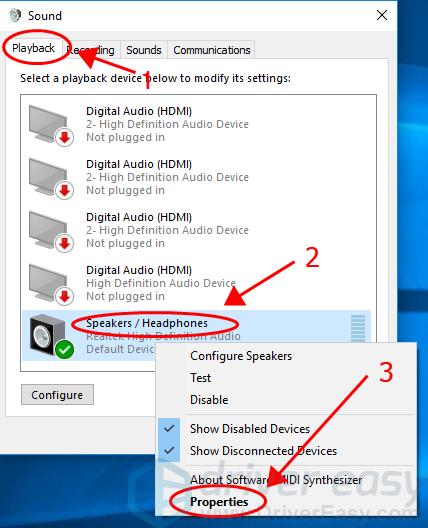
- In the popup pane, click the Playback tab, right click on your default audio device, and select Properties.

- In the new pane, click the Enhancement tab, check the box next to Equalizer, and select the sound setting that you want from the Setting drop-down list. Then click OK to save your settings.

Now you can enjoy the equalizer sound effect on your Windows computer.
Way 2: Via the third-party audio software
There are various equalizer applications on the market, and you can choose the one with good reviews and a friendly user experience, and install it on your computer.
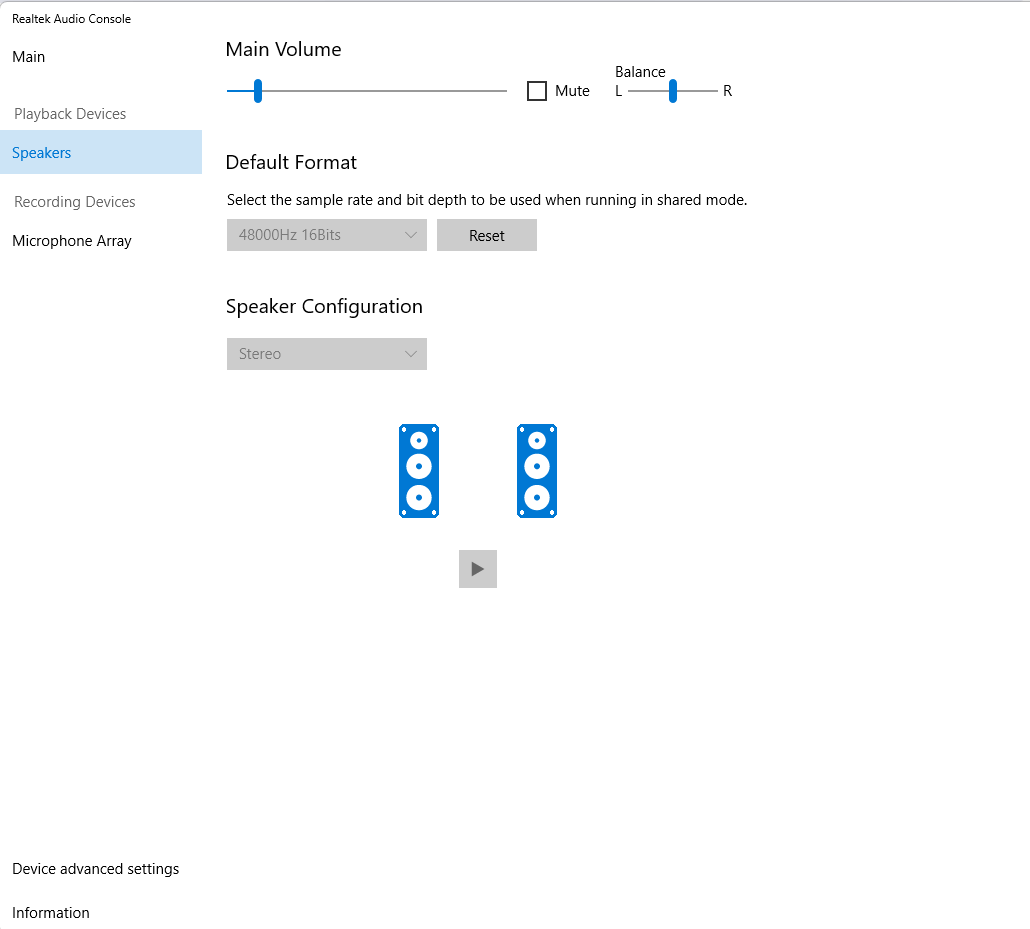
Some audio device manager installed in your computer also supports the equalizer for Windows 10. Here we take Realtek Audion Control as an example.
- Download Realtek Audio Control on your computer from Microsoft Store.
- Open Realtek Audio Control when it’s fully installed, and tweak the settings there.

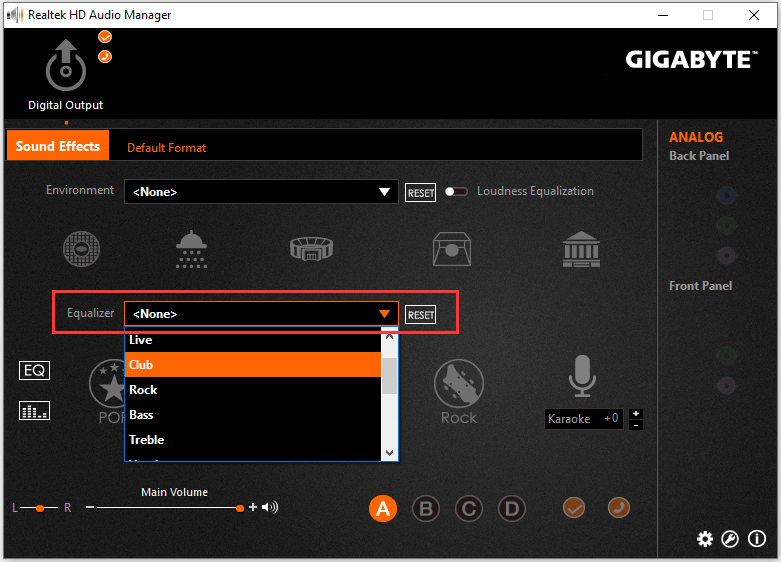
For some builds of motherboard and sound cards, you may get the Realtek HD Audio Manager when a certain audio driver is installed. In that case, open Realtek HD Audio Manager and select your audio device from the top menu, and you’ll see Equalizer on the page under the Sound Effects tab.
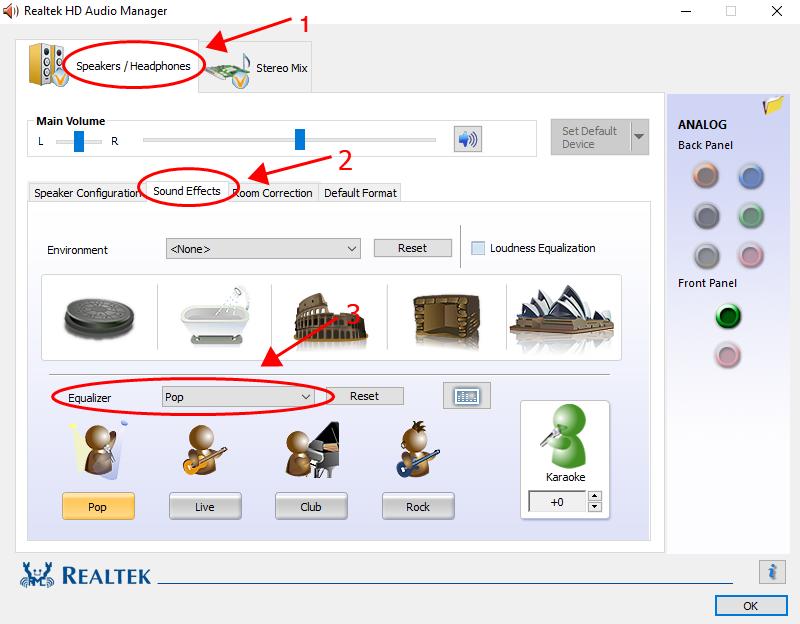
Select the equalization sound that you want from the drop-down menu. You’re provided with various sound effects: Pop, Club, Bass, etc.
Tada, now you should have added Equalizer in Windows 10.
3. Bonus Tip
If you want to enhance your audio sound effect, or if your sound isn’t working properly, you should consider updating the sound driver in your computer, which can bring you a much better audio experience.
There are two ways to update your sound driver: manually and automatically.
Manually: you can manually update your audio driver by searching for your audio driver from your manufacturer, and downloading and installing the latest correct driver that is compatible with your Windows operating system. This requires time and computer skills.
Automatically: if you don’t have time or patience, you can do it automatically with Driver Easy.
Driver Easy will automatically recognize your system and find the correct drivers for it. You don’t need to know exactly what system your computer is running, you don’t need to be troubled by the wrong driver you would be downloading, and you don’t need to worry about making a mistake when installing. Driver Easy handles it all.
You can update your drivers automatically with either the 7 days free trial or the Pro version of Driver Easy. It takes just 2 clicks, and you get full support and a 30-day money-back guarantee with the Pro version:
- Download and install Driver Easy.
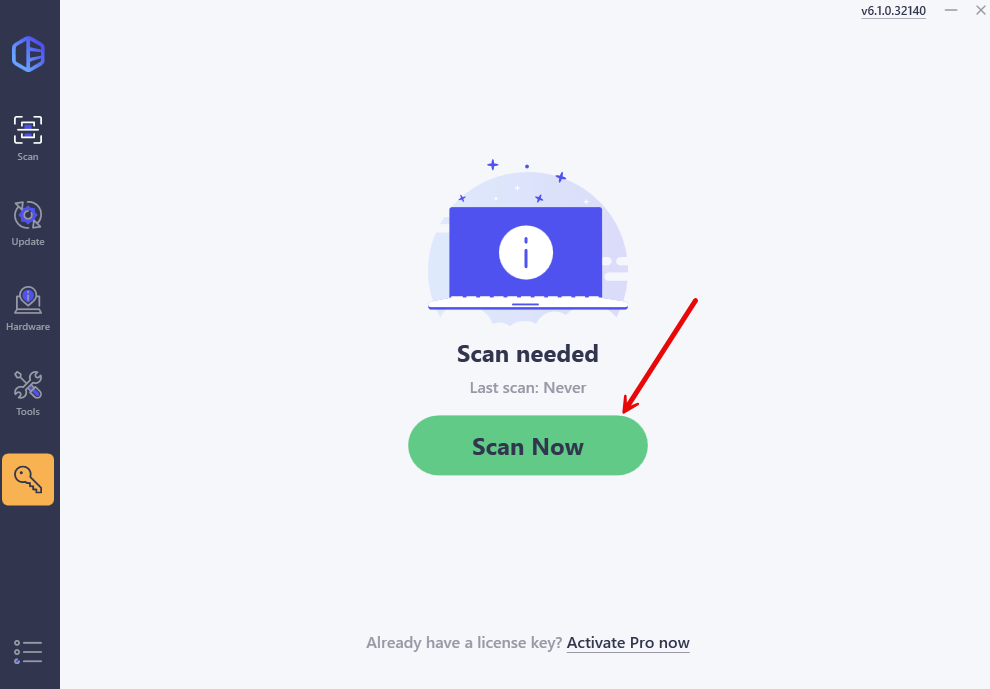
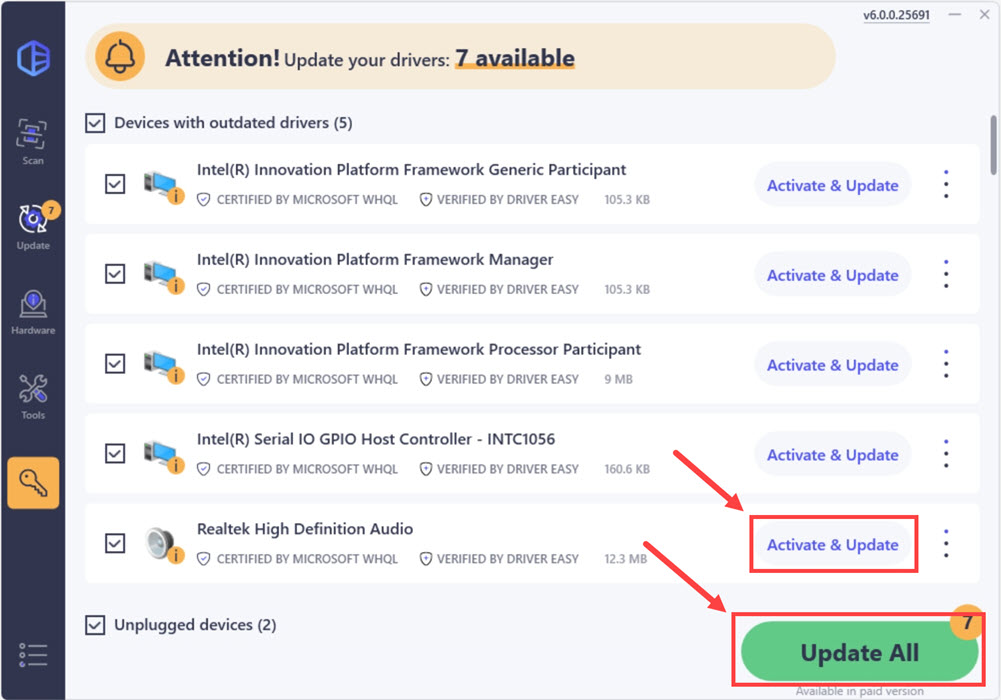
- Run Driver Easy and click the Scan Now button. Driver Easy will then scan your computer and detect any problem drivers.

- Click the Activate & Update button next to the flagged device to automatically download and install the correct version of this driver.
Or click Update All to automatically download and install the correct version of all the drivers that are missing or out of date on your system (You’ll need the Pro version for this – when you select Update All, you’ll get a prompt to upgrade. If you’re not prepared to purchase the Pro version yet, Driver Easy provides a 7-day trial at no cost, granting access to all Pro features like fast downloads and easy installation. No charges will occur until after your 7-day trial period ends.)

- Restart your computer for the change to take effect.
That’s it. Hope this post comes in handy and provides you with something useful about equalizers in Windows 10. If you have any questions, feel free to add a comment below.
50
50 people found this helpful
Many people who are new to Windows 10 operating system are confused about what is the location of equalizer settings. In the previous OS like Windows 7, to get to the same settings, we just had to go to Quick Settings and then click on the Speaker icon > Enhancements and select Equalizer. But now in Windows 10, the same settings are missing. So, where exactly are these settings in this new OS? In this guide, we will tell you how to get to the Equalizer Settings in Windows 10 in detail below.
Where is Sound Equalizer Setting in Windows 10 (2023)
You can easily get to the Equalizer Settings in Windows 10 by using a third-party audio program or by going into your Sound Settings. Below you can find both methods to customize the equalizer sounds as per your choice and situation.
Using Third-Party Audio Software
You can find ample of equalizer software online on the web, like for example, Realtek High Definition Audio Manager, which will do the job for you. With the help of this application, you can easily set the equalizer settings on your Windows 10 computer, here are the steps on how to get it:
- First of all, download the Realtek High Definition Audio Driver for Windows via this link and install it on your Windows 10 system.
- Next, click on the Start menu, type Control Panel and open it.
- Search for Realtek HD Audio Manager and click on it to open it.
- From the top menu, choose the option of Audio device.
- Here you will see Equalizer settings under the Sound Effects tab.
- Finally, you just have to select the equalizer sound settings from the drop-down menu which consists of Jazz, Rock, Pop, etc.
Using In-Built Sound Settings
You can easily get to the location of Equalizer settings and enable it on your Windows 10 PC by going into the Sound Settings, just follow the steps given below to access it:
- In the Quick settings (bottom right corner of taskbar), right-click on the Volume icon.
- Then click on Sounds.
- A new window will pop up, here you need to click on the Playback tab.
- Now you have to right-click on the default audio device and select Properties.
- A new window will again pop up, here you have to click on the Enhancement tab.
- Tick mark the checkbox next to Equalizer.
- After that choose the sound setting you would like from the drop-down list Setting.
- Finally, click on OK to save the settings to get access to the Equalizer settings easily on your Windows 10 computer.
That is all you need to know about how to get to the Equalizer Settings in Windows 10. In the meantime, do not forget to check out our other guides only on TechNClub.com: How to Test Microphone on Windows 10, and How to Boost Bass on Windows 11 and Windows 10.
-
Home
-
News
- Realtek Equalizer Windows 10 for Realtek HD Sound
By Alisa |
Last Updated
The Realtek equalizer Windows 10 controls the Realtek HD sound. This post from MiniTool Software teaches you how to how to open Realtek equalizer in Windows 10 and adjust Realtek audio equalizer settings, how to fix Realtek equalizer missing or not working issues, etc.
What is Realtek equalizer in Windows 10 and how to open and adjust its settings or troubleshoot its issues? Check the answers in this post.
Realtek Equalizer Windows 10
What is Realtek equalizer?
Realtek sound card features a graphic equalizer to let users freely adjust the computer sound. You can go to Realtek equalizer settings window to make proper adjustments for Windows 10 audio.
Realtek equalizer comes along with Realtek sound card in your Windows 10 computer and should work only if the Realtek High Definition Audio driver has been installed.
How to Open Windows 10 Realtek Equalizer
You can open Realtek equalizer in Windows 10 and adjust its settings if you like. Generally, you can access the default Realtek equalizer from Sound settings.
- Right-click Sound icon at the bottom-right corner of Windows taskbar and select Sounds.
- Under Playback tab, right-click Speakers and select Properties.
- Click Enhancements tab and click Equalizer. Click the drop-down icon next to Setting to choose an audio equalizer option.
- You can also click the three-dot icon next to Setting to open Graphic EQ to adjust its settings.
Fix Realtek Equalizer Windows 10 Missing or Not Working
Fix 1. Open Realtek Audio Manager to access Realtek equalizer. You can press Windows + R, type C:\Program Files\Realtek\Audio\HDA\ in Run box, and press Enter. Then double-click RtkNGUI64 file to open Realtek HD Audio Manager. Then you can click Equalizer to choose a preferred equalizer setting for Realtek audio. Here you can also click Change to Graphic EQ icon under EQ to activate Realtek sound card equalizer in Windows 10.
Tip: If your computer doesn’t have Realtek HD Audio Manager, you can check how to get Realtek HD Audio Manager download for Windows 10.
Fix 2. If the Realtek equalizer is disappeared from your Windows 10 computer, you can go to Realtek official website to download and install the latest Realtek High Definition Audio driver to make Realtek equalizer work.
Fix 3. Update Realtek High Definition Audio driver. Press Windows + X and select Device Manager to open Device Manager in Windows 10. Expand Sound, video and game controllers. Right-click Realtek High Definition Audio and click Update driver.
Fix Realtek No Enhancements Tab
Some users may find that there is no Enhancements tab in the Speakers Properties window. You can follow the steps to fix Enhancements tab missing issue.
- Press Windows + X and select Device Manager.
- Expand “Sound, video and game controllers” category.
- Right-click Realtek High Definition Audio and select Disable device
- Right-click Realtek High Definition Audio again and select Update driver.
- Click Browse my computer for driver software and select High definition audio device to install the High Definition Audio Device driver.
This should replace the Realtek Audio driver and install the default High Definition Audio Device driver in Windows 10, and get back the Enhancements tab in the Speakers Properties window.
8 Best Free Equalizer for Windows 10 for Better Sound
If you are looking for a top third-party sound equalizer for Windows 10, here we list the top 8 free Windows 10 audio equalizers for you. They are Equalizer APO, Realtime Equalizer, Viper4Windows, FXSound, Boom3D, Graphic Equalizer Studio, Breakaway Audio Enhancer, and EqualizerPro.
About The Author
Position: Columnist
Alisa is a professional English editor with 4-year experience. She loves writing and focuses on sharing detailed solutions and thoughts for computer problems, data recovery & backup, digital gadgets, tech news, etc. Through her articles, users can always easily get related problems solved and find what they want. In spare time, she likes basketball, badminton, tennis, cycling, running, and singing. She is very funny and energetic in life, and always brings friends lots of laughs.
Last Updated:
January 16, 2023
You can easily access the built-in Windows 10 equalizer by going to your sound settings. Simply go to Sounds > Playback > Speakers > Properties, then go to the Enhancements tab and select Equalizer. However, if you want a better EQ or if the Windows 10 one isn’t available for your device, then consider installing EQ APO and Peace GUI.
The sound equalizer is a great tool to adjust the audio parameters of your sound system. It can help you to enhance the bass, treble, and other frequencies of your audio output to get the best outcome. However, the option might not be available on every PC depending on your audio device, drivers, etc. If that’s the case, third-party EQ software should be a good substitute.
Note: Using EQ might not always be the ideal solution. If you’re simply trying to enrich your sound experience, some slight tweaking might help. However, if you go overboard, the sound quality can get quite poor. Learn more in our article about the best equalizer settings.
Keep reading to find out how to use the Windows 10 equalizer and get the most out of it. We’ll also explain how to install EQ APO and Peace GUI and how to use it if the standard Windows 10 EQ isn’t available.
Contents
- How to Use the Windows 10 Equalizer
- EQ APO and Peace GUI
- Best Ways to Use the Windows 10 Equalizer
- Conclusion
How to Use the Windows 10 Equalizer
Follow these steps to use the Windows 10 equalizer:
- Right-click the speaker icon in the taskbar and select “Sounds.”
- Select the “Playback” tab, and choose your audio device.
- Right-click your audio device and select “Properties.”
- In the Properties window, go to the “Enhancements” tab and check the “Equalizer” box.
- Adjust the individual frequency bands to boost or cut the levels of certain frequencies in the audio.
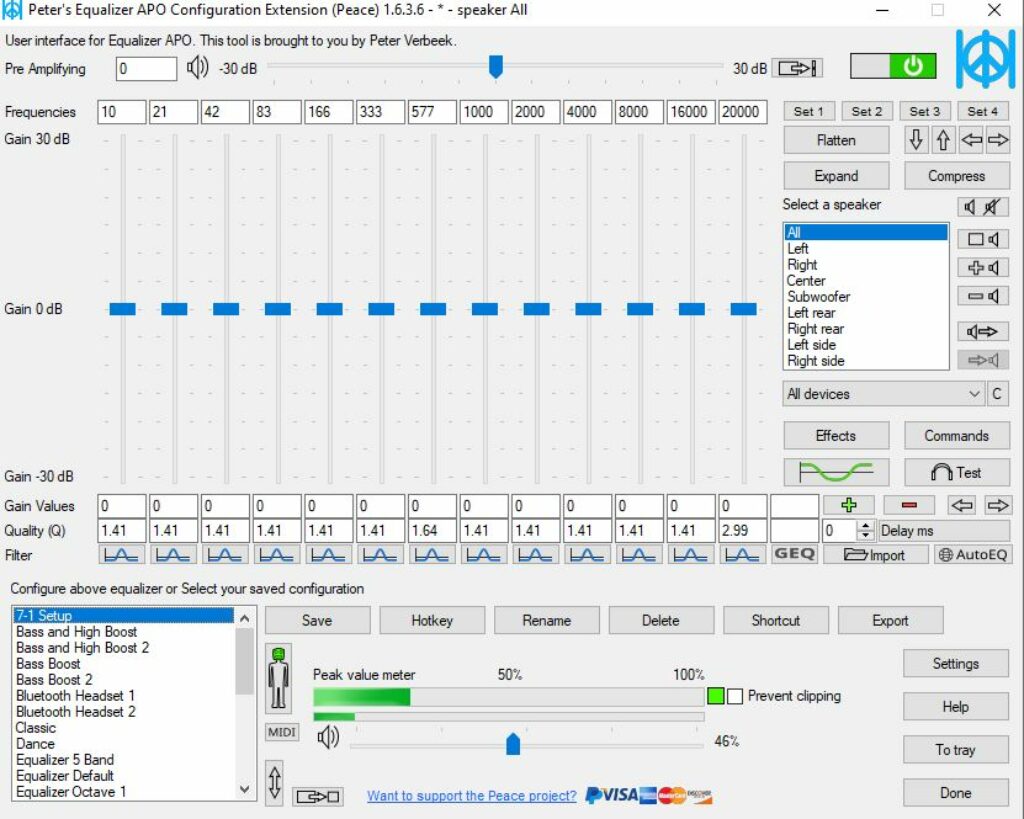
EQ APO and Peace GUI
If you want to get a better EQ experience on Windows, You can also try installing EQ APO and then install Peace GUI as an easy interface to use the EQ. Make sure to install the EQ APO first, otherwise the Peace GUI installation won’t work.
After installing EQ APO, you might have to restart your computer.
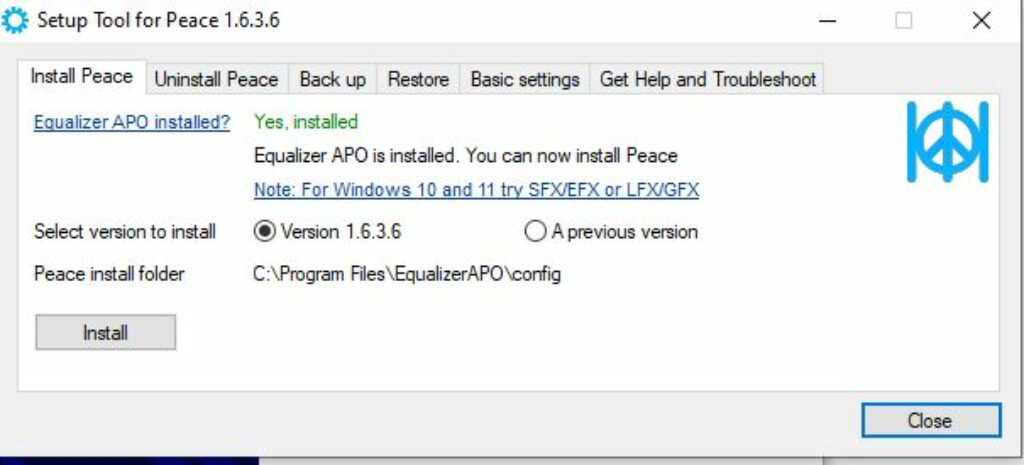
The Peace GUI was very quick for me and I was set up in no time.
Some other potential ones to try are as follows, but please note, we did not test the below options. We only tested EQ APO and Peace GUI and that worked very nicely for our use.
- FxSound
- Boom 3D
- Audio Equalizer – EQ
- DeskFX Audio Enhancer
Best Ways to Use the Windows 10 Equalizer
Check out our article on the best equalizer settings to learn more about how to use an EQ. Oftentimes, it’s better to not touch the EQ at all as it will distort what was intended from the original recording, but of course, sometimes it makes sense to change the EQ depending on your speaker setup or if you want to change the sound a little.
Some common use cases of EQ for listening to music is if you want to boost the bass for more thump. I have been recently using the EQ on my windows machine to reduce the bass on my home studio monitors as too much bass was travelling around the house even at reasonably low volumes!
Conclusion
The Windows 10 equalizer is a great tool to adjust the frequencies of your audio output and alter the sound to your taste. If you don’t have an audio device that supports the built-in Windows 10 equalizer, you can try any third-party sound EQ tool. I got a good result from EQ APO and Peace GUI, which are both free tools.