

Understanding the EFI Partition in Windows 11
If you’re a Windows 11 user, you may have come across the term «EFI partition». The EFI (Extensible Firmware Interface) partition is a crucial part of the system that contains essential files for the boot process. It serves as the bridge between the firmware and the operating system during the boot-up sequence. Mounting the EFI partition can be necessary in various situations, such as modifying the bootloader, repairing boot-related issues, or accessing EFI boot files. In this guide, we will explore how to mount the EFI partition in Windows 11 step by step.
Why Mount the EFI Partition in Windows 11?
Before diving into the process of mounting the EFI partition, it’s important to understand why you would need to do this in the first place. Here are some common reasons:
- Repairing boot-related issues: Mounting the EFI partition allows you to access the EFI boot files and repair any issues that may be preventing your system from booting correctly.
- Modifying the bootloader: If you want to add or remove operating systems from the boot menu, customize the boot order, or make any changes to the bootloader, you’ll need to mount the EFI partition.
- Accessing EFI boot files: Sometimes, you may need to access specific EFI boot files for troubleshooting or other purposes. Mounting the EFI partition gives you direct access to these files.
- Performing advanced system configurations: Mounting the EFI partition can be useful when performing advanced system configurations that require modifying or updating EFI-related files.
Step-by-Step Guide to Mount the EFI Partition
Now that you understand the importance of mounting the EFI partition, let’s walk through the step-by-step process:
Step 1: Open Disk Management
To begin, you’ll need to open the Disk Management utility in Windows 11. You can do this by right-clicking on the Start button and selecting «Disk Management» from the menu. Alternatively, you can press the Windows key + X key and choose «Disk Management» from the Power User menu.
Step 2: Identify the EFI Partition
In the Disk Management window, look for a partition labeled as «EFI System Partition» or «ESP». The EFI partition is typically a small partition with a few hundred megabytes in size. Take note of the disk number and the partition number of the EFI partition for the next steps.
Step 3: Open Command Prompt as Administrator
Next, you’ll need to open the Command Prompt with administrative privileges. Right-click on the Start button and select «Windows PowerShell (Admin)» from the menu. If you see «Command Prompt (Admin)» instead, you can choose that option as well.
Step 4: Mount the EFI Partition
In the Command Prompt window, type the following command:
The command is:
mountvol X: /s
Replace «X» with any unused drive letter that you want to assign to the mounted EFI partition. This drive letter will be used to access the EFI partition from Windows Explorer or any other file manager.
Using the Mounted EFI Partition
Now that you have successfully mounted the EFI partition, you can access it like any other drive from Windows Explorer. Here are a few things you can do with the mounted EFI partition:
- Browse the contents: You can explore the files and folders within the EFI partition to view the boot files and other EFI-related components.
- Make changes to the bootloader: If you want to modify the bootloader, add or remove operating systems from the boot menu, or customize the boot order, you can make the necessary changes directly from the mounted EFI partition.
- Back up EFI boot files: It’s always a good idea to create a backup of your EFI boot files. With the EFI partition mounted, you can easily copy and store these files in a safe location.
- Perform repairs or updates: If you encounter boot-related issues in the future, having the EFI partition mounted makes it easier to perform repairs or updates to the bootloader or EFI files.
Alternative Methods for Mounting the EFI Partition
In addition to the method outlined above, there are a few alternative methods you can use to mount the EFI partition in Windows 11:
Using DiskPart
DiskPart is a command-line utility in Windows that allows you to manage disks, partitions, and volumes. Here’s how you can use DiskPart to mount the EFI partition:
Step 1: Open Command Prompt as Administrator
Open the Command Prompt as an administrator using the method mentioned earlier.
Step 2: Launch DiskPart
Type «diskpart» in the Command Prompt and press Enter to launch the DiskPart utility.
Step 3: List the Disks and Partitions
Once inside DiskPart, type «list disk» to view the available disks and identify the disk number containing the EFI partition. Then, type «select disk X» (replace «X» with the appropriate disk number) to select the disk.
After selecting the disk, type «list partition» to view the partitions on the selected disk. Identify the partition number of the EFI partition.
Step 4: Assign a Drive Letter
With the EFI partition selected, type «assign letter=X» (replace «X» with the desired drive letter) to assign a drive letter to the EFI partition. The EFI partition will now be mounted and accessible from Windows Explorer.
Using Third-Party Tools
There are also third-party tools available that provide a graphical interface for managing partitions and volumes. These tools often include features for easily mounting and accessing the EFI partition. Some popular tools include EaseUS Partition Master, AOMEI Partition Assistant, and MiniTool Partition Wizard.
It’s important to note that when using third-party tools, caution should be exercised, and it’s recommended to create a backup of your system before making any changes to disk partitions or volumes.
In Conclusion
Mounting the EFI partition in Windows 11 is a useful skill to have, especially if you need to repair boot-related issues, modify the bootloader, or access EFI boot files. By following the step-by-step guide outlined in this article, you can easily mount the EFI partition and gain access to its contents. Remember to exercise caution when making changes to the EFI partition and create backups to ensure the safety of your system.

Mounting the EFI Partition in Windows 11
Mounting the EFI partition in Windows 11 allows you to access and modify the files stored in this crucial partition. Here’s a step-by-step guide to help you:
Method 1: Using Disk Management
- Press the Windows key + R to open the Run dialog box.
- Type «diskmgmt.msc» and press Enter to open Disk Management.
- Find the EFI partition, usually labeled as «EFI System Partition,» and note its drive letter.
- Right-click on the EFI partition and select «Change Drive Letter and Paths.»
- Click on «Add» and choose a drive letter for the EFI partition.
- Click «OK» to mount the EFI partition with the assigned drive letter.
Method 2: Using Command Prompt
- Press the Windows key + X and select «Command Prompt (Admin)» or «Windows PowerShell (Admin).»
- Type «diskpart» and press Enter to open the DiskPart command-line utility.
- Use the following commands:
| list disk | Show a list of drives. |
select disk X
Key Takeaways — How to Mount Efi Partition in Windows 11
Frequently Asked QuestionsHere are some commonly asked questions about mounting the EFI partition in Windows 11. 1. How can I mount the EFI partition in Windows 11?To mount the EFI partition in Windows 11, follow these steps: To start, open the Command Prompt as an administrator. You can do this by right-clicking the Start button and selecting «Command Prompt (Admin)» from the menu. Once the Command Prompt window opens, type «diskpart» and press Enter. Next, type «list disk» and press Enter to display a list of all available disks on your computer. Identify the disk number that corresponds to your EFI partition. Once you have identified the disk number, type «select disk [disk number]» (replace [disk number] with the actual disk number) and press Enter. In the next step, type «list partition» and press Enter to display a list of partitions on the selected disk. Locate the EFI partition in the list. After you have identified the EFI partition, type «select partition [partition number]» (replace [partition number] with the actual partition number) and press Enter. Finally, type «assign letter=Z» and press Enter to assign a drive letter to the EFI partition. The EFI partition will now be mounted and accessible in Windows Explorer. 2. Why would I want to mount the EFI partition in Windows 11?Mounting the EFI partition in Windows 11 can be useful for various reasons: 1. Accessing or modifying boot-related files: The EFI partition contains important files related to the boot process, such as bootloaders and configuration files. By mounting the EFI partition, you can access and modify these files if needed. 2. Troubleshooting boot issues: If you are experiencing boot issues, mounting the EFI partition can help you analyze and troubleshoot the problem. You can check for any corrupted or missing files in the EFI partition and make necessary repairs. 3. Customizing the boot menu: Mounting the EFI partition allows you to customize the boot menu options in Windows 11. You can add or remove entries, change the default boot option, or modify the boot order. 3. Can I mount the EFI partition in Windows 11 without using Command Prompt?While using Command Prompt is the most common method for mounting the EFI partition in Windows 11, there are alternative methods available: 1. Using Disk Management: You can also mount the EFI partition using Disk Management. Open Disk Management by right-clicking the Start button and selecting «Disk Management» from the menu. Locate the EFI partition, right-click it, and select «Change Drive Letter and Paths.» Then, click «Add» and assign a drive letter to the EFI partition. 2. Using third-party software: There are third-party software applications available that provide a graphical interface for mounting the EFI partition. These tools can make the process more user-friendly and intuitive. 4. Is it safe to mount the EFI partition in Windows 11?Mounting the EFI partition in Windows 11 is generally safe, as long as you are cautious and know what you are doing. However, it is important to be mindful of the following: 1. Modify files with caution: When accessing and modifying files in the EFI partition, make sure you know what you are changing. Modifying or deleting critical files can cause boot issues and render your system unbootable. 2. Create backups: Before making any changes to the EFI partition, it is highly recommended to create backups of the important files and the entire partition. This ensures that you can restore the system in case anything goes wrong. 3. Follow instructions carefully: When using Command Prompt or any other method to mount the EFI partition, follow the instructions precisely. Mistakes or incorrect commands could have unintended consequences. 5. Can I unmount the EFI partition in Windows 11?Yes, you can In conclusion, mounting the EFI partition in Windows 11 is an essential step for managing system boot and firmware settings. By accessing the EFI partition, users can modify bootloader configurations, update firmware, and troubleshoot boot-related issues. Mounting the EFI partition in Windows 11 can be done through the Disk Management tool or using Command Prompt. Both methods involve locating the EFI partition, assigning it a drive letter, and accessing its contents. However, it is crucial to exercise caution when making changes to the EFI partition to avoid damaging the system’s boot files. Always create a backup and consult reliable resources or seek expert advice if needed.
|
How to Mount EFI in Windows 11
The EFI (Extensible Firmware Interface) system is a standard interface between a computer’s firmware and its operating system. It is used to boot the operating system and manage hardware devices. In Windows 11, the EFI system is located on a partition called the EFI System Partition (ESP). This partition is typically hidden by default, but you can mount it to view its contents.
There are a few reasons why you might want to mount the EFI system partition. For example, you may need to access the EFI Boot Manager to change the boot order of your system. Or, you may need to troubleshoot a problem with your computer’s firmware.
In this article, I will show you how to mount the EFI system partition in Windows 11. I will also provide a brief overview of the EFI system and its role in the boot process.
What is the EFI System Partition?
The EFI System Partition (ESP) is a small partition (typically 100 MB) that is created when you install Windows 11. The ESP contains the EFI firmware, which is responsible for booting the operating system. It also contains the boot loader, which is a small program that loads the operating system into memory.
The ESP is typically hidden by default, but you can mount it to view its contents. To do this, you can use the Disk Management tool or the Command Prompt.
How to Mount the EFI System Partition
There are two ways to mount the EFI System Partition in Windows 11:
- Using the Disk Management tool:
1. Open the Disk Management tool by pressing Windows+X and selecting Disk Management.
2. Right-click the EFI System Partition and select Mount.
3. In the Mounted Location box, type a drive letter for the EFI System Partition.
4. Click OK.
- Using the Command Prompt:
1. Open the Command Prompt by pressing Windows+R and typing cmd.
2. Type the following command:
mountvol X: /s
where X is the drive letter you want to use for the EFI System Partition.
What is the EFI Boot Manager?
The EFI Boot Manager is a small program that is stored on the EFI System Partition. The EFI Boot Manager is responsible for loading the operating system into memory.
When you start your computer, the EFI Boot Manager is the first program that is executed. The EFI Boot Manager scans the EFI System Partition for bootable operating systems. When it finds a bootable operating system, it loads the operating system into memory.
How to Access the EFI Boot Manager
To access the EFI Boot Manager, you can use the following steps:
1. Restart your computer.
2. Press the F2 key or the Delete key repeatedly during the boot process.
3. The EFI Boot Manager will be displayed.
4. Use the arrow keys to select the operating system you want to boot.
5. Press Enter to boot the operating system.
In this article, I showed you how to mount the EFI system partition in Windows 11. I also provided a brief overview of the EFI system and its role in the boot process.
If you have any questions about mounting the EFI system partition, please leave a comment below.
| Column 1 | Column 2 | Column 3 |
|---|---|---|
| Title | Description | Link |
| How to Mount EFI in Windows 11 | This guide will show you how to mount the EFI partition in Windows 11. | Link |
| Troubleshooting EFI Mount Problems in Windows 11 | This guide will help you troubleshoot problems mounting the EFI partition in Windows 11. | Link |
The EFI system partition (ESP) is a small partition on a hard drive that contains the files necessary for the computer to boot from the hard drive. The ESP is typically located at the beginning of the hard drive, and it is formatted with the FAT32 file system. The ESP contains the following files:
- Boot loader: The boot loader is a small program that loads the operating system into memory.
- EFI drivers: EFI drivers are required for the operating system to communicate with the hardware.
- EFI configuration file: The EFI configuration file contains information about the hardware on the computer.
If you need to access the files on the EFI system partition, you can mount it using the Disk Management tool in Windows 11.
How to mount the EFI system partition in Windows 11
To mount the EFI system partition in Windows 11, follow these steps:
1. Open the Disk Management tool by pressing Windows+R and typing diskmgmt.msc.
2. In the Disk Management window, right-click the EFI system partition and select Mount.
3. In the Mount Partition dialog box, select the Mount in the following empty NTFS folder option and click Browse.
4. Navigate to the location where you want to mount the EFI system partition and click OK.
5. The EFI system partition will be mounted as a drive letter. You can now access the files on the EFI system partition by opening the drive letter in File Explorer.
In this article, we showed you how to mount the EFI system partition in Windows 11. If you need to access the files on the EFI system partition, you can use the steps in this article to mount the partition.
Additional resources
- [How to Mount an EFI System Partition in Windows 10](https://www.windowscentral.com/how-mount-efi-system-partition-windows-10)
- [How to Access the EFI System Partition in Windows](https://www.howtogeek.com/197645/how-to-access-the-efi-system-partition-in-windows/)
- [What is the EFI System Partition?](https://www.dell.com/support/kbdoc/en-us/000124339/what-is-the-efi-system-partition)
The EFI (Extensible Firmware Interface) system is a standard interface between a computer’s operating system and its firmware. It is used to boot the operating system and manage hardware devices. In Windows 11, the EFI system is located in the \EFI\ folder on the system drive.
If you need to access the EFI system for troubleshooting or other purposes, you can mount it as a drive in Windows 11. This guide will show you how to mount the EFI system in Windows 11.
Prerequisites
To mount the EFI system in Windows 11, you will need:
- A Windows 11 computer
- Administrator privileges
Steps
To mount the EFI system in Windows 11, follow these steps:
1. Open the Run dialog box by pressing Windows+R.
2. Type diskmgmt.msc and press Enter.
3. Right-click on the EFI System Partition and select Mount.
4. In the Mount Drive Letter or Path dialog box, select a drive letter for the EFI system and click OK.
The EFI system will now be mounted as a drive in Windows 11. You can access it by opening the File Explorer and navigating to the drive letter you selected.
This guide has shown you how to mount the EFI system in Windows 11. By following these steps, you can access the EFI system for troubleshooting or other purposes.
Here are some additional resources that you may find helpful:
- [How to Access the EFI System in Windows 10](https://www.windowscentral.com/how-access-efi-system-windows-10)
- [What is the EFI System Partition?](https://www.howtogeek.com/197989/what-is-the-efi-system-partition-and-how-do-i-use-it/)
- [How to Repair the EFI System Partition in Windows](https://www.tenforums.com/tutorials/163056-repair-efi-system-partition-windows-10-a.html)
Q: What is the EFI partition?
A: The EFI partition is a small partition on a hard drive that contains the files necessary for the computer to boot from that drive. It is typically 100 MB in size and is located at the beginning of the hard drive.
Q: Why do I need to mount the EFI partition?
A: You may need to mount the EFI partition if you need to access the files on it, or if you need to make changes to the partition’s settings. For example, you may need to mount the EFI partition if you are trying to install a new operating system or if you are trying to change the boot order of your computer.
Q: How do I mount the EFI partition?
A: To mount the EFI partition, you can use the following steps:
1. Open the Disk Management tool.
2. Right-click on the EFI partition and select Mount.
3. Select the drive letter that you want to assign to the EFI partition.
4. Click OK.
The EFI partition will now be mounted and you will be able to access it from File Explorer.
Q: What are the common problems when mounting the EFI partition?
A: There are a few common problems that you may encounter when mounting the EFI partition. These include:
- The EFI partition may not be visible in Disk Management.
- You may not be able to assign a drive letter to the EFI partition.
- You may receive an error message when trying to mount the EFI partition.
If you encounter any of these problems, you can try the following solutions:
- Make sure that the EFI partition is formatted as FAT32.
- Make sure that the EFI partition is not in use by another operating system.
- Try mounting the EFI partition in a different way. For example, you can try using the Diskpart command-line tool or a third-party partitioning tool.
Q: How can I prevent problems when mounting the EFI partition?
You can prevent problems when mounting the EFI partition by following these tips:
- Make sure that the EFI partition is formatted correctly.
- Make sure that the EFI partition is not in use by another operating system.
- Back up the EFI partition before making any changes to it.
By following these tips, you can help to ensure that the EFI partition is mounted correctly and that you do not encounter any problems.
In this blog post, we discussed how to mount the EFI partition in Windows 11. We covered the steps on how to do this using the Disk Management tool and the Command Prompt. We also provided some tips on troubleshooting common problems.
We hope this blog post was helpful. If you have any questions, please feel free to leave a comment below.
Author Profile
-
Hatch, established in 2011 by Marcus Greenwood, has evolved significantly over the years. Marcus, a seasoned developer, brought a rich background in developing both B2B and consumer software for a diverse range of organizations, including hedge funds and web agencies.
Originally, Hatch was designed to seamlessly merge content management with social networking. We observed that social functionalities were often an afterthought in CMS-driven websites and set out to change that. Hatch was built to be inherently social, ensuring a fully integrated experience for users.
Now, Hatch embarks on a new chapter. While our past was rooted in bridging technical gaps and fostering open-source collaboration, our present and future are focused on unraveling mysteries and answering a myriad of questions. We have expanded our horizons to cover an extensive array of topics and inquiries, delving into the unknown and the unexplored.
Latest entries
The easiest way to mount an EFI partition in Windows 10 is to use the Disk Management tool. To do this, follow these steps:
1. Press the Windows key + R to open the Run dialog box.
2. Type diskmgmt.msc and press Enter.
3. Right-click on the EFI partition and select Mount.
4. Follow the prompts to complete the operation.
How do I mount an EFI folder in Windows 10?
Where is EFI partition mounted?
The EFI partition is mounted at /boot/efi.
How do I access my EFI System Partition?
The EFI System Partition (ESP) is a small (usually FAT32-formatted) partition on a data storage device that is used by computers adhering to the Unified Extensible Firmware Interface (UEFI). The ESP is intended to contain files that are used by the computer to initialize and boot the operating system.
To access the ESP, you will need to open the Disk Management tool in Windows. To do this, press the Windows key + R, type diskmgmt.msc into the Run dialog, and press Enter.
In the Disk Management tool, you should see the ESP listed as a separate partition. You can then right-click on the ESP and select the option to mount it. Once the ESP is mounted, you can access it like any other drive in Windows.
There are a few different ways to mount a Windows EFI partition, depending on what operating system you’re using.
If you’re using a Windows operating system, you can use the Disk Management tool to mount the EFI partition. To do this, open the Disk Management tool (press the Windows key + R, type diskmgmt.msc, and press Enter), right-click on the EFI partition, and select the «Mount» option.
If you’re using a Linux operating system, you can use the mount command to mount the EFI partition. For example, if your EFI partition is /dev/sda1, you would use the following command:
sudo mount /dev/sda1 /mnt/efi
If you’re using a MacOS operating system, you can use the diskutil command to mount the EFI partition. For example, if your EFI partition is /dev/disk0s1, you would use the following command:
sudo diskutil mount /dev/disk0s1
How do I fix mount the EFI system partition failed?
There are a few things that could cause this issue.
First, check to make sure that the EFI system partition is indeed present and intact on the drive. If it is not, you will need to recreate it.
Next, check the boot order in the BIOS and make sure that the EFI system partition is listed first.
If those two things check out, try running the bootrec utility from a Windows Recovery Environment. This will scan the drive for any missing or corrupt boot files and attempt to repair them.
If none of these things work, you may need to reinstall Windows.
How do I add an EFI partition?
There are a few different ways to add an EFI partition, but the most common is to use a tool like gdisk to create a new partition and then format it as FAT32. Once the partition is created, you can then mount it to a directory and add it to your /etc/fstab file so that it will be automatically mounted at boot.
Does EFI partition need to be first?
There is no requirement for the EFI partition to be first on a drive, but it is often recommended to keep it at the beginning of the drive for organizational purposes. If you do choose to keep the EFI partition at the beginning of the drive, you will need to ensure that your computer’s BIOS is configured to boot from that location.
Where is the EFI directory located?
The EFI directory is located on the EFI System Partition (ESP). The ESP is a partition on your hard drive that is used to store boot data.
Does Windows 10 need Reserved Partition?
There is no reserved partition on Windows 10.
Can not find room for the EFI System Partition?
If you cannot find room for the EFI System Partition on your hard drive, you may need to delete or resize an existing partition to make room. To do this, you will need to use a partition manager. Once you have made room for the EFI System Partition, you can create it using the Windows Disk Management tool.
How do I fix system reserved partition Windows 10?
If you are using Windows 10, you can fix the system reserved partition by following these steps:
1. Press the Windows key + R to open the Run dialog box.
2. Type «diskpart» and press Enter.
3. Type «list volume» and press Enter.
4. Type «select volume X» where X is the number of your system reserved partition.
5. Type «assign letter=Y» where Y is the drive letter you want to assign to the system reserved partition.
6. Type «exit» and press Enter.
Your system reserved partition should now be accessible from Windows Explorer.
Does Windows 10 need EFI partition?
No, Windows 10 does not require an EFI partition. However, if you are using an EFI-based computer, you will need to create an EFI partition in order to install Windows 10.
Is EFI partition necessary?
The answer to this question depends on the specific computer system and operating system in question. In general, however, an EFI partition is not necessary and can be safely removed without affecting the normal operation of the computer.
On Windows 11, the EFI System Partition, as on Linux distros, contains the boot manager files. On a Linux distro, the partition is mounted on the /boot/efi folder, so accessing its contents is as easy and simple as typing cd /boot/efi or ls /boot/efi. On Windows 11, however, the EFI System Partition is not even assigned a drive letter, so its contents are off limits.
In this tutorial, you learn learn how to assign a drive letter to the EFI System Partition on Windows 11, so that you can then access its contents from the PowerShell or command prompt terminal.
step 1: Assign a drive letter to the EFI System Partition
You’ll be completing this step from a PowerShell terminal. To launch the terminal application, type in terminal in the search field of the Windows 11 taskbar. Right-click on it and select Run as administrator. All the PowerShell commands you need to complete this step are red-arrowed in Figure 1. PowerShell has command completion, so you do not have to type in every letter of each command.
Get-Disk, the first command you’ll type, outputs all the drives available on the system. In my case, only a single drive was found – Number 0. Then type Get-Partition -DiskNumber 0 to output all the partitions configured on that drive. Studying the command’s output, you can tell that the EFI System Partition is PartitionNumber 1.
Now you can assign that partition a drive letter using the following command: Set-Partition -NewDriveLetter E. You can change the “E” to a drive letter that’s not already in use on your system.
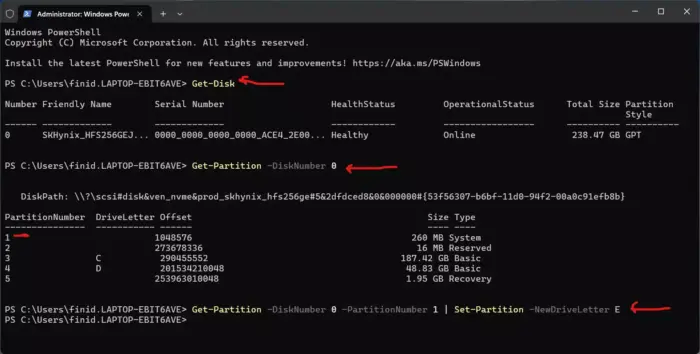
Figure 1: PowerShell commands to use when trying to assign a drive letter to the EFI System Partition on Windows 11.
Now that the EFI System Partition has a drive letter, you’ll see how easy it is to access its contents in the next step.
step 2: Access the EFI System Partition using PowerShell
With a drive letter assigned to it, its now easy and simple to access the EFI System Partition from within a PowerShell terminal launched as administrator. You can type ls E: or first cd E: and then an ls command to access and view the contents of the EFI System Partition. Critical boot files are in the EFI folder , so you can view the contents of that folder using the ls EFI command. If you study the output of that command in Figure 2, you can tell that I’m dual-booting Windows 11 and a Linux distro. That distro, by the way, is Linux Mint 22, with the distro installed on an external drive.
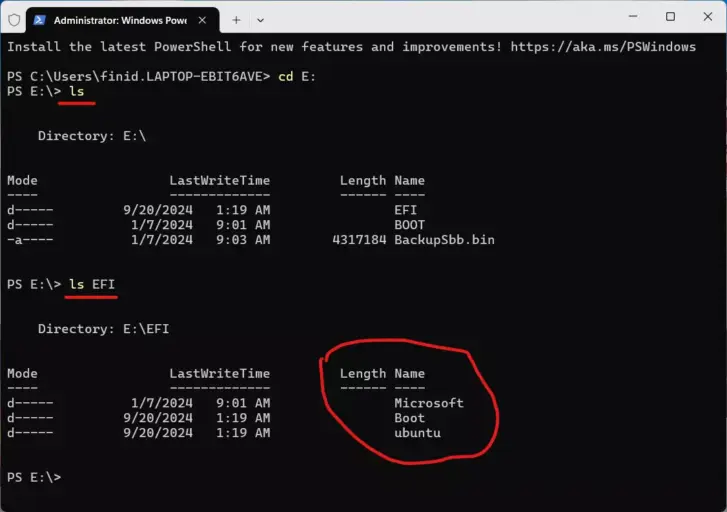
Figure 2: Accessing the EFI System Partition on Windows 11 from PowerShell.
In the next step, you’ll learn how to access the the same EFI System Partition using the traditional Windows command prompt.
step 3: Access the EFI System Partition using command prompt
While PowerShell presents a more user-friendly interface for working in the Windows 11 terminal application, you can still perform the same tasks in the traditional Windows command prompt. If you have the terminal application still open as administrator, you can open the command prompt in a shell by pressing the Ctrl-Shift-2 key combination or by clicking on the chevron (the downward-pointing arrow) and selecting Command Prompt.
Otherwise, type in terminal in the search field of the Windows 11 taskbar. Right-click on it and select Run as administrator. Then open the command prompt using the above key combination or clicking on the chevron and selecting the appropriate option.
The commands to type in order to access the EFI System Partition are red-underlined in Figure 3.
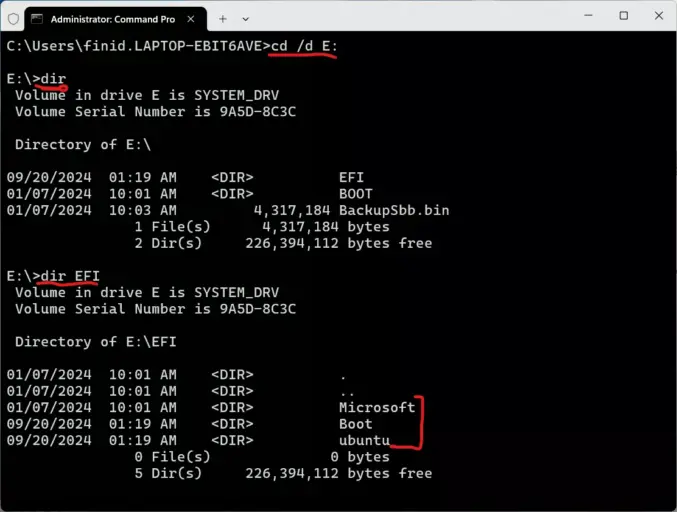
Fig. 3: Commands used to access the EFI System Partition from the command prompt on Windows 11.
Can you access the EFI system partition from File Explorer?
After assigning a drive letter to the EFI System Partition, you should see it listed under This PC in the side panel of File Explorer.
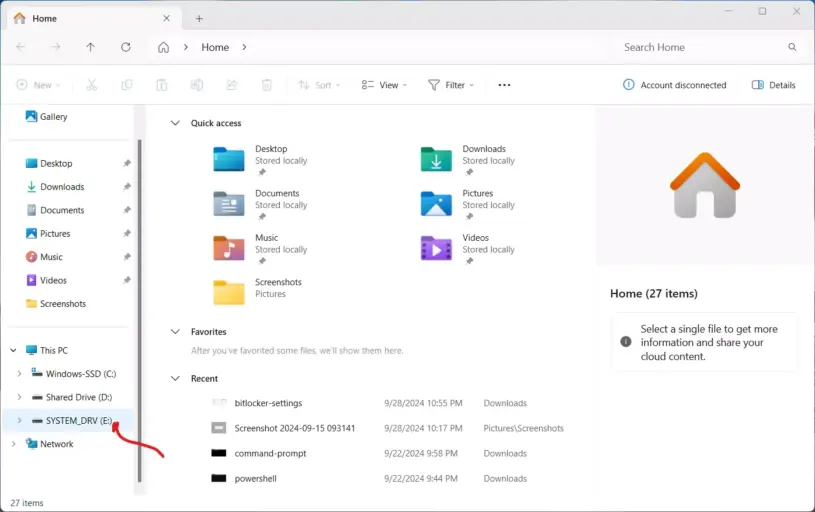
Fig. 4: Windows 11 File Explorer showing an entry for the EFI System Partition in the side panel.
However, clicking on that entry will open the message window shown in Figure 5. What do you think will happen if you click the Continue button?
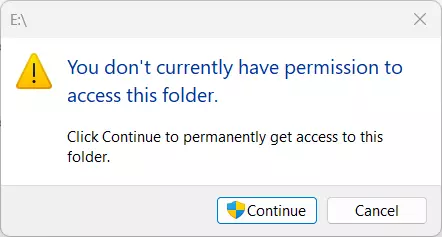
Fig. 5: File Explorer message after clicking on the EFI System Partition.
You’ll be denied permission to access the EFI System Partition from File Explorer.
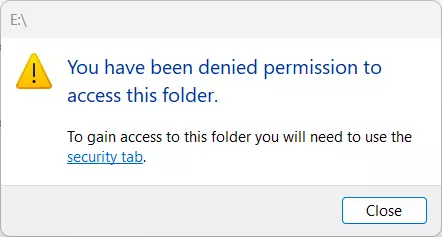
Fig. 6: Permission denied message from File Explorer.
I’m guessing the reason it’s not possible to access the EFI System Partition from File Explorer is it was not launched as administrator. But this is not a big deal, since you can already access it using PowerShell or command prompt.