
-
Home
-
News
- How to Open and Run dxdiag.exe on Windows 10/11
By Alisa |
Last Updated
This post includes answers for what is dxdiag, how to run dxdiag in Windows 10/11, DirectX Diagnostic Tool’s main functions, and how to update dxdiag.exe driver. MiniTool Software also provides many other computer tips and solutions for users. You can visit its News library.
What Is Dxdiag?
Dxdiag refers to DirectX Diagnostic Tool. This tool is built into Windows OS. It is used to reports detailed information about the DirectX components and drivers installed on your system. It can also help troubleshoot video or sound-related hardware problems on your Windows 10/11 computer. If your computer has problems, you may extract the information from Dxdiag application to send it to the support person.
How to Run Dxdiag.exe on Windows 10/11 – 4 Ways
You can easily open and run dxdiag.exe (DirectX Diagnostic Tool) on Windows 10/11 using the 4 ways below.
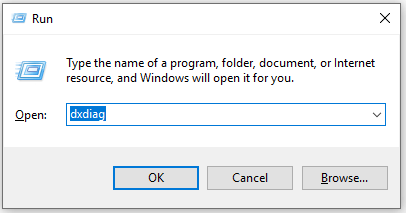
Way 1. Press Windows + R, type dxdiag in Run dialog, and press Enter to quickly launch dxdiag.exe on Windows 10/11.
Way 2. You can click Start or the search box at the taskbar, type dxdiag, and select dxdiag Run command to open it.
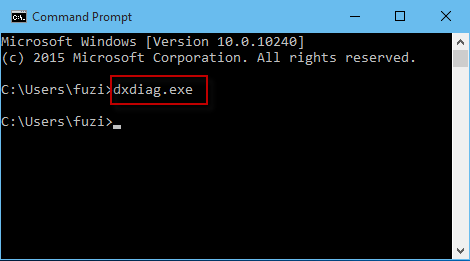
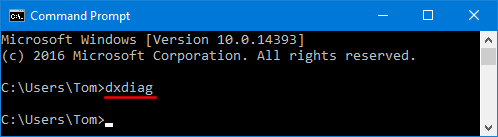
Way 3. Press Windows + R, type cmd, and press Enter to open Command Prompt. Type dxdiag.exe in CMD and press Enter to run dxdiag application on Windows 10/11.
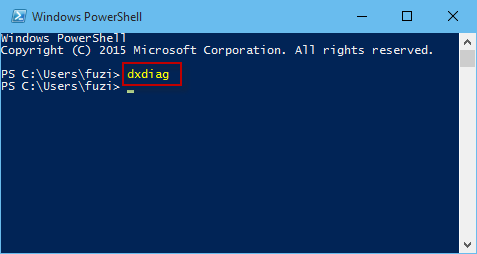
Way 4. Press Windows + X and select Windows PowerShell (Admin). Type dxdiag and press Enter to open this tool.
Dxdiag Functions
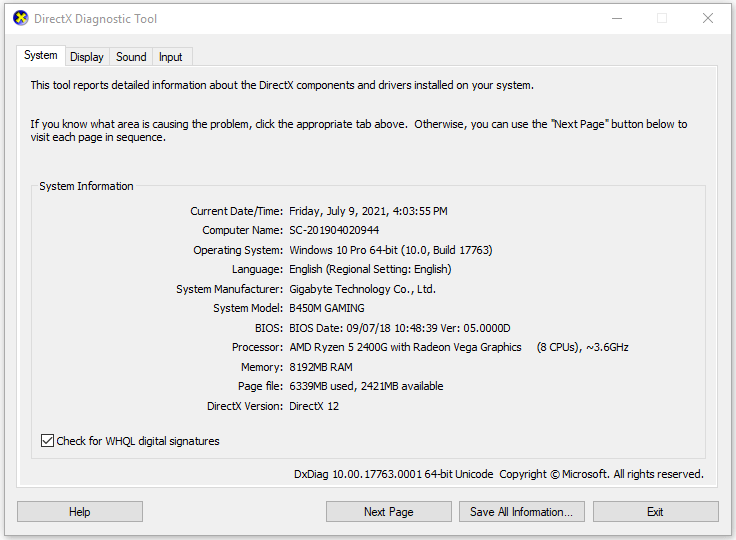
You can see the dxdiag tool has four tabs: System, Display, Sound, and Input. Dxdiag also displays detected problems with these devices.
System: The System tab displays your current DirectX version, computer name, OS version, system model, BIOS information, process, Memory, etc.
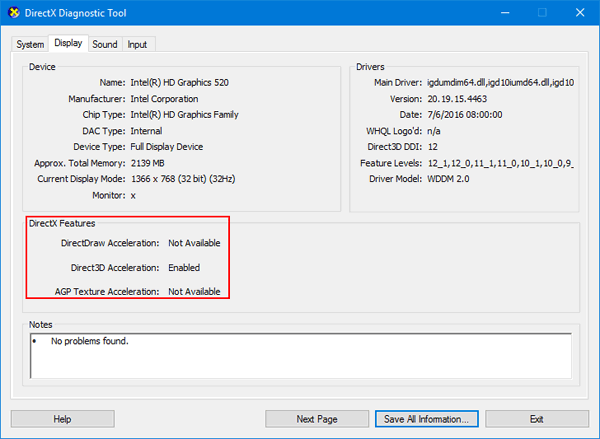
Display: The Display tab display information about your graphics card, monitor, and display driver.
Sound: The Sound tab shows your audio device and drivers.
Input: This tab shows the information about your computer input devices like keyboard, mouse.
If you want, you can click Save All Information button to export all information in DirectX Diagnostic Tool to a .txt file for later sharing.
How to Download and Update Dxdiag.exe Driver
You can do this through Windows Update.
Go to Settings on your Windows 10 or 11 computer. For Windows 10, continue to click Update & Security -> Windows Update -> Check for updates. For Windows 11, click Windows Update -> Check for updates.
This will update DirectX on Windows 10/11 and update its driver.
MiniTool Software is a top software company. It has designed MiniTool Power Data Recovery, MiniTool Partition Wizard, MiniTool ShadowMaker, MiniTool Video Converter, MiniTool MovieMaker, MiniTool uTube Downloader, and some other useful software products. Users can download and try preferred software from its official website.
Among these products, MiniTool Power Data Recovery helps you recover any deleted or lost files from Windows PC or laptop, SD/memory card, USB flash drive, external hard drive, etc.
MiniTool Partition Wizard is also a flag product. It lets you easily create/delete/resize/format/wipe partition, convert disk/partition format, migrate OS, check and fix disk errors, and more.
MiniTool ShadowMaker is a free PC backup tool that lets you choose files, folders, partitions, or the whole disk content to back up to an external hard drive, USB, or network drive. Also support backup and restore Windows OS. Automatic file backup is supported.
About The Author
Position: Columnist
Alisa is a professional English editor with 4-year experience. She loves writing and focuses on sharing detailed solutions and thoughts for computer problems, data recovery & backup, digital gadgets, tech news, etc. Through her articles, users can always easily get related problems solved and find what they want. In spare time, she likes basketball, badminton, tennis, cycling, running, and singing. She is very funny and energetic in life, and always brings friends lots of laughs.
The instructions here guide for How to Open DirectX Diagnostic Tool in Windows 11 or 10. The built-in utility of Windows helps to troubleshoot problems related to multimedia applications. Detection of the issues associated with audio, display, and video running an advanced game is the main function of this app. Additionally, dxdiag.exe also lets you find problems that take place while using media players.
By applying the DirectX Diagnostic Tool, you can collect all necessary information about the occurred error. As a result, troubleshooting the issue doesn’t need great effort. Microsoft generally takes help of DirectX to develop Xbox games. So, whenever your video games conflict with stability and performance issues, you need to access this tool to get support. This will help you to know where the problem is coming from.
Open DirectX Diagnostic Tool
Here is How to Open DirectX Diagnostic Tool in Windows 11 or 10 –
1] Use Run Dialog box
Step-1: Invoke Power user menu by pressing Win+X hotkey.
Step-2: When it becomes visible, select Run.
Step-3: Type dxdiag in the text area located next to Open and hit the Enter key.
2] Open DirectX Diagnostic Tool through Windows search
- Press Windows and S keys together to bring forward search box.
- Once appears, type dxdiag in the specific field.
- When the result becomes visible, either click dxdiag from the top or hit Enter.
3] Access Dxdiag with Task Manager
- Right-click on any empty space of Taskbar and select Task Manager.
- Click More details if the wizard is not elongated.
- Next, click File option located in the Menu bar and then select Run new task.
- On the next wizard, write dxdiag and click the OK button to launch it.
4] Open DirectX Diagnostic Tool using Command Prompt
- Press Win+R at once to open Run dialog.
- When it appears, type cmd in the given text field and then hit Enter.
- On the black panel of Command Prompt, type dxdiag followed by pressing Enter.
5] By means of Windows PowerShell
- Click the search icon located at the Taskbar and type powerShell.
- When you see the result, hit Enter.
- Wait for a few seconds so that Windows PowerShell becomes ready to execute the command. Thereafter, type dxdiag right after the blinking cursor and press the Enter key.
6] Go through File Explorer to open DirectX Diagnostic Tool
- Press Windows key and E simultaneously to open File Explorer.
- Once appears, move your pointer to its address bar and make a click on it.
- Write down dxdiag there and hit the Enter key to start DirectX Diagnostic Tool.
7] Explore System32 directory
Again launch File Explorer and navigate the following directory first –
C:\Windows\System32
After reaching there, press Ctrl+F and type dxdiag.
When the result shows up, select dxdiag.exe from there to access DirectX Diagnostic Tool.
8] Establish a desktop shortcut to quickly Open DirectX Diagnostic Tool
- Press Win+Q and type dxdiag in the search bar.
- Upon appearing the result, right-click on dxdiag and select Open file location.
- From the subsequent page, right-click on dxdiag.exe and then select Send to>>Desktop (create shortcut).
9] Assign hotkey to run dxdiag tool
To generate a keyboard shortcut, you need to create desktop shortcut first. To do so, follow the previous method.
- Now, head over to desktop screen by using Win+D hotkey.
- Right-click on the shortcut you created and select Properties.
- On the next wizard, take the cursor to the bar assigned for the Shortcut key.
- Type a key you prefer. For example, we pressed D and the system automatically added Ctrl+Alt before that.
In the end, click the Apply button followed by OK.
Methods:
1] Using Run Dialog box
2] Through Windows search
3] By accessing Dxdiag with Task Manager
4] Via Command Prompt
5] By means of Windows PowerShell
6] Through File Explorer
7] From System32 directory
8] Establish a desktop shortcut
9] Assign hotkey
That’s all!!
- Blog>
- Windows 10>
- 4 Ways to Run DirectX Diagnostic Tool in Windows 10

The DirectX is a diagnostic tool on the Windows platform. It can help check, diagnose and test the files, devices, and drivers running on the Windows, and help improve the computer’s capabilities to process sound and 3D graphics. Then how do you open or run DirectX Diagnostic Tool in Windows 10? This post will introduce four ways, as shown below.
Either way, you need to use the dxdiag or dxdiag.exe command.
Way 1: from Start menu
Bring up the Start menu and start typing dxdiag (or dxdiag.exe) in the search box. After the dxdiag (or dxdiag.exe) icon appears under the ”Best match”, click it to run the DirectX Diagnostic Tool.
Tips: If it is the first time for you to run the DirectX Diagnostic Tool, a dialog will pop up asking whether you want to check if your drives are digitally signed. Just click Yes to confirm it.
Way 2: by Run box
Open the Run dialog box using Win +R keyboard shortcut, then type dxdiag (or dxdiag.exe) in the Open box, and click OK.
Way 3: with Command Prompt
Open a Command Prompt (or CMD) window, then type dxdiag (or dxdiag.exe), and press the Enter key on your keyboard.
Way 4: with Windows PowerShell
Open a Windows PowerShell window, then type dxdiag (or dxdiag.exe), and hit Enter key.
As we have seen a lot of advancements in technology in the last few decades, people have also updated themselves according to technology. People have begun using devices like laptops, tablets, phones, etc for paying bills, shopping, entertainment, news, or any other activity. The Internet is the major reason behind such developments. The use of devices that run with the help of the internet has increased, as a result of which the service providers are bound to improve user experience with new updates.

This user experience improvement leads us to the development of DirectX which is an Application Programming Interface that has improved the user experience in the field of games, videos, etc.
Table of Contents
What is the DirectX diagnostic tool?
DirectX is used for creating and working on the graphic images and other effects of multimedia in games or web pages or other similar applications that run on the Microsoft Windows operating system.
No external capability is required, to work on DirectX or run it, the capability comes integrated with different web browsers. In comparison to the earlier version of DirectX, the upgraded version has become an integral part of the Microsoft Windows operating system.
The DirectX Diagnostic Tool helps Windows users in identifying problems related to the audio, video, display and other related problems. It also works on the performance of various multimedia applications. This tool also helps in diagnosing and troubleshooting problems faced on the audio, video players connected to the device. If you are facing any issue related to the audio, video or sound quality of your system you can use the DirectX Diagnostic Tool. You can use the DirectX Diagnostic Tool by using the methods listed below:
Make sure to create a restore point just in case something goes wrong.
There are different ways of accessing any specific tool in Windows 10, similarly, DirectX can also be accessed in 2 ways. Both these ways are as given below:
Method 1: Launch DirectX Diagnostic tool using the Search feature
You can use the search feature in Microsoft’s operating system for launching the DirectX Diagnostic Tool.
1.Press the Windows key + S button on the keyboard & type dxdiag in the search box.

2.Click to open the dxdiag option as shown below.

4.Once you click on dxdiag, the DirectX Diagnostic Tool will start running on your screen.
5.If you are using the tool for the first time, you will be prompted to check the digitally signed drivers. Click on Yes to continue.

6.Once the drivers check is completed, and the drivers are approved by Windows Hardware Quality Labs by Microsoft, the main window will open up.

7.The tool is now ready and you can check all the information or troubleshoot any particular issue.
Also Read: Fix Unable to Install DirectX on Windows 10
Method 2: Launch DirectX Diagnostic tool using Run Dialog Box
You need to follow the steps mentioned below to run the DirectX Diagnostic Tool using the Rundialog box:
1.Open the Run dialog box using the Windows key + R keys shortcut on the keyboard.

2.Enter dxdiag.exe in the dialog box.

3.Click on the OK button, and the DirectX Diagnostic tool will launch.
4.If you are using the tool for the first time, you will be prompted to check the digitally signed drivers. Click on yes.
5.Once the drivers check is completed, and the drivers are approved by Windows Hardware Quality Labs by Microsoft, the main window will open up.
6.The tool is now ready to troubleshoot as per your requirements.
The DirectX Diagnostic tool show on the screen has four tabs. But many times more than one tab for elements such as Display or Sounds might be shown on the window. This is because you might have more than one device connected to your system.
Each of the four tabs has a significant function. The functions of these tabs are as listed under:
#Tab 1: System Tab
The first tab on the dialog box is the System tab, no matter what device you connect to your device the System tab will always be there. The reason behind this is that the System tab shows information about your device. When you click on the Systems tab, you’ll see information about your device. Information about the operating system, language, manufacturer’s information, and much more. The System tab also shows the version of DirectX installed on your device.

#Tab 2: Display Tab
The tab next to the Systems tab is the Display tab. The number of display devices varies according to the number of such devices connected to your machine. The Display tab shows information about the connected devices. Information such as the name of the card, the name of the manufacturer, the device type, and other similar information.
At the bottom of the window, you’ll see a Notes box. This box shows the problems detected in your connected display device. If there aren’t any issues with your device, it will show a No issue found text in the box.

#Tab 3: Sound tab
Next to the Display tab, you’ll find the Sound tab. Clicking on the tab will show you information about the audio device connected to your system. Just like the Display tab, the number of Sound tab can increase based on the number of devices connected to your system. This tab shows information such as the manufacturer’s name, hardware information, etc. If you want to know, the problems your audio device is facing, you need to look in the Notes box, all the issues will be listed there. If there aren’t any issues you’ll see a No issue found message.

#Tab 4: Input Tab
The last tab of the DirectX Diagnostic Tool is the Input tab, which shows information about the input devices connected to your systems, such as a mouse, keyboard, or other similar devices. The information includes the status of the device, controller ID, vendor ID, etc. The notes box of the DirectX Diagnostic Tool will show the problems in the input devices connected to your system.

Once you are done checking for the errors in your connected device, you can use the buttons shown on the bottom of the window to navigate as per your choice. The functions of the buttons are as listed under:
1.Help
If you face any issue while operating the DirectX Diagnostic Tool, you can use the Help button in the tool to look for solutions to your problems. Once you click on the tab, it will take you to another window where you can get help regarding the devices connected to your system or the tabs of the Diagnostic Tool.

2.Next Page
This button on the bottom of the DirectX Diagnostic Tool, it helps you to navigate to the next tab on the window. This button only works for the System tab, Display tab, or the Sound tab, as the Input tab is the last in the window.

3.Save All Information
You can choose to save the information listed on any page of the DirectX Diagnostic Tool by clicking on the Save All Information button on the window. Once you click on the button, a window will appear on the screen, you can select the location where you want to save the text file.

4.Exit
Once you are done diagnosing issues of the connected devices and you have checked for all the errors. You can click on the Exit button and can exit from the DirectX Diagnostic Tool.

The DirectX Diagnostic Tool proves to be of great advantage when looking for the cause of errors. This tool can help you in fixing errors related to DirectX such as League of Legends DirectX error and devices connected to your machine.
Recommended:
- Fix Unable to Install DirectX on Windows 10
- Shut Down or Lock Windows Using Keyboard Shortcuts
I hope the above steps were helpful and now you will be able to use the DirectX Diagnostic Tool in Windows 10 without any issues. If you still have any queries regarding this tutorial then feel free to ask them in the comment section & we will definitely help you out.
How to check what version of DirectX your PC is using? If you are concerned with video game performance, or you are trying to fix some problems with any 3D application, you can run DirectX Diagnostic Tool to perform basic diagnostic tests. In this article we’ll show you 3 simple ways to run DirectX Diagnostic Tool in Windows 10.
Method 1: Run DirectX Diagnostic Tool in Windows 10 from Run
Press the Windows key + R to open the Run command box. Type dxdiag and press Enter.
This will open DirectX Diagnostic Tool immediately. The System tab lists the general information about your system and most importantly what version of DirectX you currently have installed. The Display tab shows information specific to your graphics adapter and monitor, and you can see which DirectX features are enabled.
Method 2: Run DirectX Diagnostic Tool in Windows 10 Using Cortana Search
You can also start DirectX Diagnostic Tool by typing dxdiag in Cortana’s search box on the taskbar, and then clicking the dxdiag search result.
Method 3: Run DirectX Diagnostic Tool in Windows 10 from Command Prompt
Open the Command Prompt in Windows 10, type dxdiag and press Enter. This will also launch DirectX Diagnostic Tool.
- Previous Post: Turn on / off Press and Hold for Right-clicking in Windows 10
- Next Post: 2 Ways to Disable Cortana Web Search in Windows 10