

In this tutorial, we are going to see how to open a second file explorer window in Windows 10. In Windows, if you have ever tried to open multiple File Explorer windows, you will quickly know that there is no visible option or way to do so. For example, if you double-click the file explorer icon in the taskbar, it will simply open the file explorer and minimize it. The good thing is that there are several ways to open multiple instances of File Explorer in Windows 10. Just follow one of the methods below to open a second File Explorer window.
Method 1: Open a Second File Explorer Window Using Shortcut Key
When you want to open multiple Windows file explorers, simply press the shortcut Windows key + E. As soon as you press the keyboard shortcut, Windows opens a new instance of the file explorer. So, if you want three file explorer windows, press the keyboard shortcut three times.
Remember that when you press the keyboard shortcut, a new file explorer window opens on the default page. that is, Quick Access or This PC.
Method 2: Open a Second File Explorer Window Using Shift + left click
Another method is to use the Shift-Click method. This method is especially useful if you are a heavy mouse user or if you don’t like the awkward shortcut position of File Explorer on the keyboard.
To open multiple File Explorer windows using the mouse, simply hold Shift on your keyboard and click the File Explorer icon that appears in the taskbar. This action will open a new File Explorer window with its default page. i.e., Quick Access or This PC.

Method 3: Open a Second File Explorer Window Using right-click
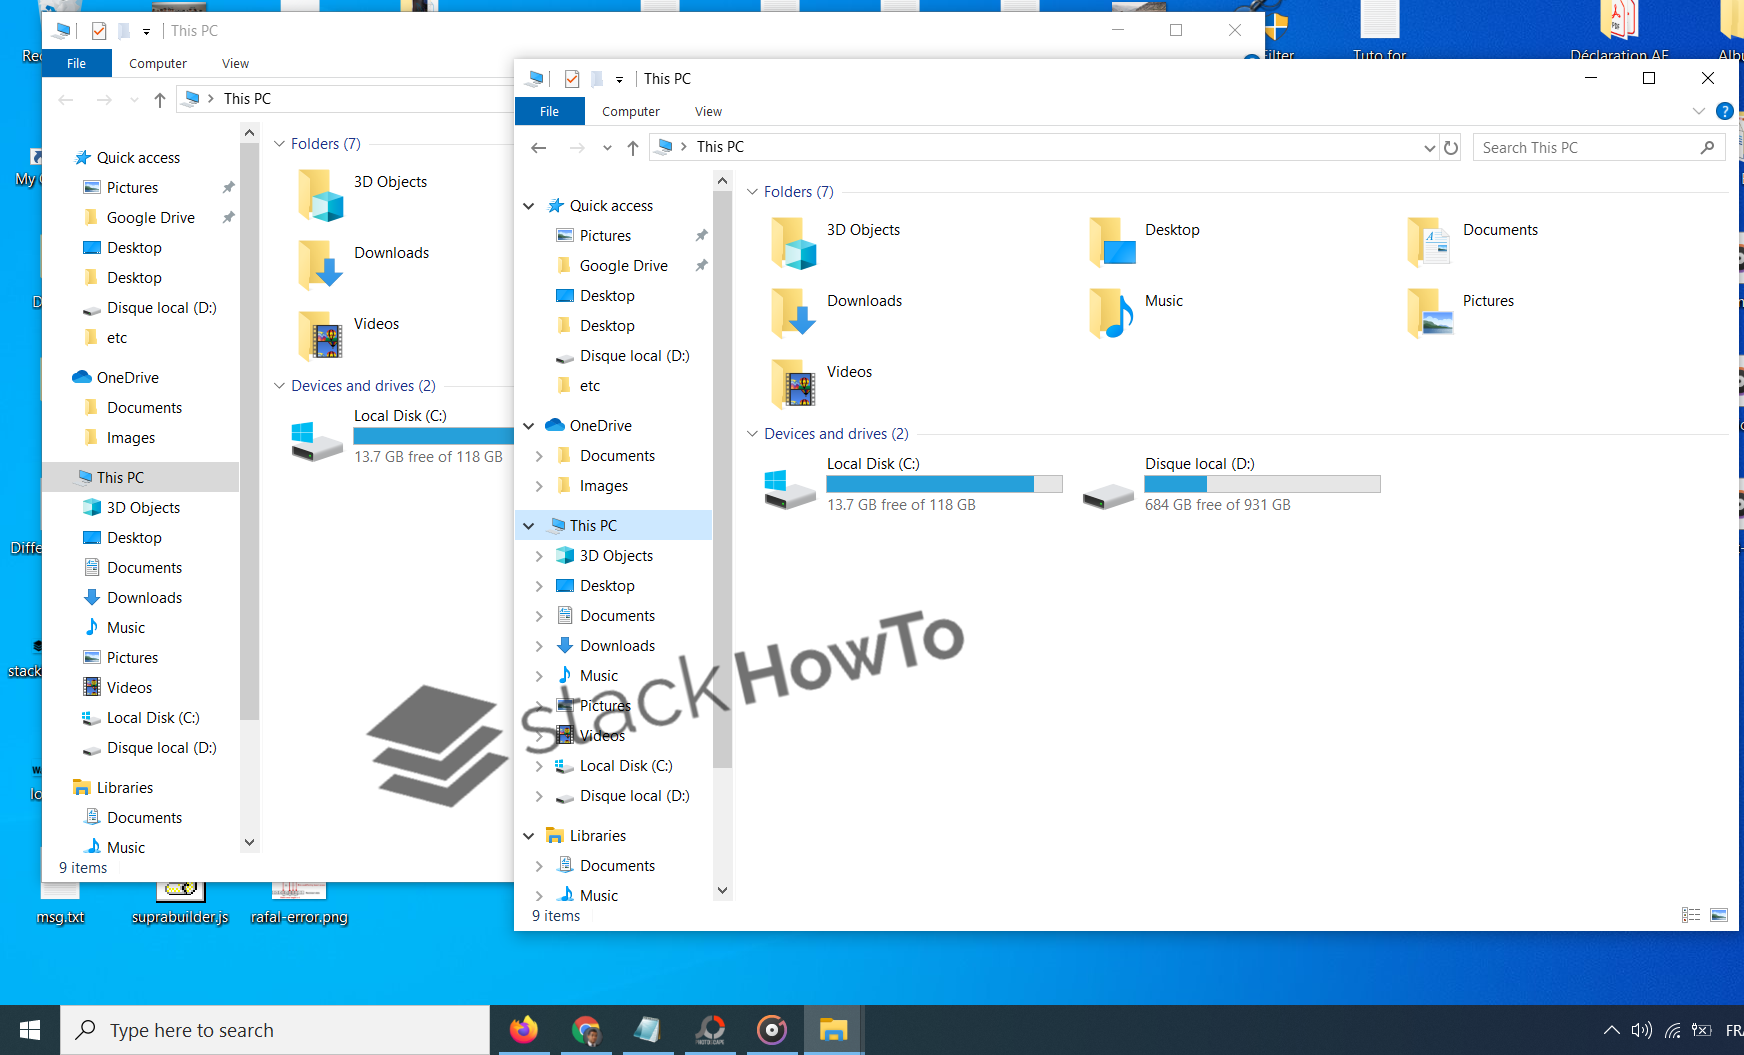
Now, sometimes you need to open a specific folder in a new window instead of a new file explorer window with its default page. This method is especially useful when you don’t want to manually navigate to the target folder. Fortunately, it is quite easy to open a folder in a new window.
To open a folder in a new window, right-click on the target folder and select Open in a new window. As soon as you select the option, the folder will open in the new window.
- Types of Ethernet Cable
- How to Install CAB File in Windows 10 using Command Line
- How to Change Multiple File Extensions at Once in Windows 10 Using PowerShell
- How to Make Taskbar Buttons Smaller in Windows 10
- How to Run AutoHotKey Script on Startup Windows 10
- How to Remap Keyboard Keys in Windows 10
- How to Search Files by Size in File Explorer on Windows 10
- How to Check Internet Data Usage in Windows 10
- How to Change Folder Background Color in Windows 10
- How to Turn off Location on Laptop Windows 10
- How to Disable Sleep Option from Windows 10 Start Menu
- How to Wake Up Computer From Sleep Mode in Windows 10 with Mouse
- How to Wake Up Computer From Sleep Mode in Windows 10 with Keyboard
- Batch File To Display Popup Message in Windows 10
- How to Display Popup Reminder in Windows 10
- How to See PC Startup and Shutdown History in Windows 10
- How to Record Your Screen with VLC on Windows 7/8/10
- How to Change Paging File Size in Windows 10
- How to Display Full Path in Title Bar of File Explorer on Windows 10
- How to Cancel Shutdown on Windows 10
- How to Schedule Auto Shutdown in Windows 10
- How to Schedule a Scan in Windows Defender
- How to Calculate Total Duration of Multiple Video Clips in Windows 10
- How to Fix Drag and Drop Problems in Windows 10
- How to Disable Power Throttling in Windows 10
- How to Run Program as Administrator Without Password Prompt in windows 10
- How to Limit Windows Defender CPU Usage
- How to Check if Windows 10 is Activated
- How to Fix Right Click on Desktop Not Working in Windows 10
- Image Resizer on Right-click for Windows 10
- How to Change Computer Name in Windows 10
- How to Change Account Picture in Windows 10
- How to Zoom in and out in CMD and PowerShell
- How to Lock Screen After Inactivity on Windows 10
- How to Sync Computer Time With Internet in Windows 10
- Command To Check Open Ports in Windows
- How to Keep a Window Always On Top on Windows 10
- How to Increase Font Size in Windows 10
- How to Change Cursor Color in Windows 10
- How to Change Cursor Size in Windows 10
- How to Change Default PDF viewer on Windows 10
- How to Disable Security Questions in Windows 10
- How to Pin Specific Settings to the Start Menu in Windows 10
- How to Format USB Device When FAT32 Option is Not Available
- How to Automatically Open a Web Page at a Specific Time
- How to Restart explorer.exe in Windows 10 Using CMD
- How to Restart Explorer.exe in Windows 10 [2 Methods]
- How to Add Program Shortcut to Start Menu in Windows 10
- Hibernate Option Not Showing In Windows 10
- How To Delete Previous Version of Windows in Windows 10
- How to Add Print Option in Right-Click Menu
- How to Delay Startup Programs in Windows 10/8/7
- How to Disable Task Manager on Windows 10
- How to Turn on Network Discovery in Windows 10
- How to Check if Virtualization is Enabled in Windows 10
- How to Password Protect a Zip File on Windows 10
- How To Change User Folder Name in Windows 10
- How to Restore Drivers in Windows 10
- How to Backup Drivers using PowerShell Command in Windows 10
- How to Add Store Apps to Startup in Windows 10
- How to Enable Fingerprint in Windows 10
- How to Enable Autocorrect and Predictive Text in Windows 10
- How To Open a Second File Explorer Window in Windows 10
- How to Block Websites On Your Computer
- Check Disk Command in Windows 10
- How to Activate a Window by Hovering Over it with the Mouse in Windows 10
- How to Control Volume for Individual Programs in Windows 10
- How to Schedule Restart in Windows 10
- How to Change Microsoft Store Region in Windows 10
- How to Hide the Clock From Windows 10 Taskbar
- How to Enable Number Pad on Keyboard Windows 10
- How to Turn Off Taskbar Thumbnail Previews in Windows 10
- How Can I See All Drives in CMD
- How to Show All Drives in Windows 10 File Explorer
- Windows 10 Privacy Settings to Turn Off
- How to Change Desktop Icons in Windows 10
- How to Force a Program to Open in Full Screen in Windows 10
- How to Delete Temporary Files in Windows 10
- How to Enable Startup Sound in Windows 10
- How to Reset All Default Apps in Windows 10
- How to Change Default Action on Connecting a USB Device Windows 10
- How to Remove Old Drivers From Windows 10
- Where is the Drivers Folder in Windows 10
- How to Reset Windows Update in Windows 10
- How to Format USB Using CMD on Windows 10
- How To Check WiFi Signal Strength on Windows 10 Using CMD
- How to Remove “Show Desktop” Button on Windows 10
- How to Enable Remote Desktop on Windows 10
- How To Open File Explorer To “This PC”
- How to Stop the Screen From Turning Off on Windows 10
- How to Change Default Folder Name in Windows 10
- How to Display Day of Week in Windows 10 Taskbar
- How To Display Windows 10 Start Menu in Full Screen
- How to Create a New Library in Windows 10
- How to Reset the Settings App in Windows 10
- How To Disable Startup Programs in Windows 10
- How to Enable Registry Backup in Windows 10
- How to Remove Password at Windows 10 Startup
- How to Reset Windows 10 To Factory Settings
- How To Enable or Disable Night Light in Windows 10
- How to Add Clocks to Start Menu on Windows 10
- How to Disable Bing Web Search Results in Windows 10 Start Menu
- How to check Bluetooth battery level on Windows 10
- How To Set Static IP Address in Windows 10 using CMD
- How To Find Out If a Program is 32 or 64-bit Windows 10
- How To Check Bios Firmware Version in Windows 10
- How To Activate Windows 10
- How to enter UEFI (BIOS) on Windows 10
- How to Boot From a USB Drive on Windows 10
- How to Reinstall Microsoft Store in Windows 10
- How to Enable Ultimate Performance Mode in Windows 10
- How to Stop Apps From Running in the Background on Windows 10
- How to Change Another User’s Password in Windows 10
- How to Delete Local User Account using PowerShell in Windows 10
- How to Create Local User Account using PowerShell in Windows 10
- How to Disable User Account Control (UAC) in Windows 10
- How to Block Inappropriate Websites on Windows 10
- How to Set Up a Child Account in Windows 10?
- How to Download Windows 10 ISO file (32 bits and 64 bits)
- How to Change the Default Save Location in Windows 10
- How to Add Open Command Prompt Here to right-click Menu in Windows 10
- Add Open PowerShell Window Here as Administrator in Windows 10
- How to Mount ISO Images on Windows 10
- How to Clear DNS Cache on Windows 10
- How to Change DNS Server in Windows 10
- How to Change Temp Folder Location in Windows 10
- How to Reduce the Size of the Search Bar in Windows 10
- How to Force Close a Program on Windows Without Task Manager
- How to Force Close a Program with Task Manager
- How to Speed Up Windows 10 Startup
- How to Enable Sandbox in Windows 10
- How to Disable Automatic Installation of Suggested Apps in Windows 10
- No Sounds on Windows 10? Here’s How to Fix It
- No Audio Output Device Is Installed in Windows 10 Fix
- Where is the Location of Startup Folder in Windows 10?
- How to Create a Windows 10 Bootable USB
- How To Run Computer Performance Test in Windows 10
- How To Tell If Your Computer Is 32 Or 64-bit Windows 10
- How to Remove Recycle Bin From Desktop on Windows 10
- How to Show My Computer, Recycle Bin Icon on Windows 10
- How To Enable Screen Saver In Windows 10
- How to Enable or Disable Updates For Other Microsoft Products on Windows 10
- How to Disable Windows 10 Startup Delay
- How To Open Emoji Keyboard on Windows 10
- How to Turn On File and Printer Sharing in Windows 10
- How To Optimize Windows 10 For Gaming
- How to Add Shortcuts to the “Send to” Menu in Windows 10
- How to Change the Screen Refresh Rate of Your Monitor in Windows 10
- How to Make a Program Run on Startup in Windows 10
- How to Turn Off SmartScreen in Windows 10
- How to Disable Telemetry in Windows 10
- How to Disable Windows 10 Tracking
- How to Disable Windows 10 Data Collection
- How to Free Up Disk Space in Windows 10
- Fast Way to Delete a Large Folder in Windows 10
- How to Create a Printer Shortcut on Desktop Windows 10
- How to Change Audio Output Device Per Application on Windows 10
- How to Format a Hard Drive or SSD in Windows 10
- How to Switch Between Windows in Windows 10 using Keyboard
- How to Download and Install Windows Media Player for Windows 10
- How to Create a Shortcut on Desktop Windows 10
- How to Block reopening of Programs on startup Windows 10
- How To Limit Windows Update Bandwidth in Windows 10
- How to remove the 3D Objects folder from This PC in Windows 10
- How to Remove Old User Account Pictures in Windows 10
- How to Delete the Hibernation File hiberfil.sys
- How to Show Seconds in System Clock in Windows 10
- How to Open Files and Folders with Single Click in Windows 10
- How to Reset Your Microsoft Account Password for Windows 10
- How to Fix Corrupted Files in Windows 10
- How To Export And Import Start Menu Layout In Windows 10
- How to Stop Automatic Restart After Updating Windows 10
- How to Remove Ads From the Start Menu in Windows 10
- How to Create a Homegroup Network in Windows 10
- How to Disable ads in File Explorer in Windows 10
- How To Fix gpedit.msc Group Policy Editor Missing in Windows 10
- How to Change the Network Connection Priority in Windows 10
- How to Watch Videos While Working on Other Tasks on Windows 10 Computer
- How to Create a System Repair Disk in Windows 10
- How to Customize the Taskbar in Windows 10
- How to Change Taskbar Icons in Windows 10
- How to Show the Control Panel in File Explorer on Windows 10
- How to Uninstall Updates in Windows 10
- How to reset all Local Group Policy on Windows 10
- How To Turn Windows 10 Computer Into a Wi-Fi Hotspot
- How to Reset Network Settings in Windows 10 Using CMD
- How to Disable the Game Bar in Windows 10
- How to Clear Windows 10 Update Cache
- How to Create an Invisible Folder without Any Name in Windows 10
- How to Add Open With to Right-click Menu in Windows 10
- How to Change Default Apps on Windows 10
- How to Prevent Copying Files From USB to PC
- How to Find Your WiFi Password on Windows 10
- How to Hide Your Name and Email Address on Windows Login
- How to Speed Up File Transfer in Windows 10
- How to Remove Power or Shutdown Button from Lock Screen in Windows 10
- How to Start Windows 10 in Safe Mode
- How to Stop Lock Screen ads in Windows 10
- How to Enable Guest Account in Windows 10 using CMD
- How to Restore Windows 10 Image Backup From Hard Drive
- How to Create a System Image in Windows 10
- How to Disable Automatic Update on Windows 10
- How to Stop Programs From Automatically Updating in Windows 10
- How to Take a Screenshot on Windows 10
- Windows 10: Start Menu And Taskbar Not Working
- How to Rebuild a Broken Icon Cache in Windows 10
- How to Turn Off Windows Security Notifications in Windows 10
- How to Preview a File Without Opening it in Windows 10
- How to Permanently Disable Windows Defender on Windows 10
- How to Disable the Action Center in Windows 10
- How To Reinstall Microsoft Edge In Windows 10
- How to Uninstall Microsoft Edge in Windows 10
- How to Change Start Menu and Taskbar Color in Windows 10
- How to Get Windows 7 Start Menu on Windows 10 with Classic Shell
- Why the Start Menu is Slow to Open in Windows 10
- How to Change Login Screen Background on Windows 10
- How to Restore Windows Photo Viewer in Windows 10
- How to Fix Screen Flickering in Windows 10
- How to Remove Windows 10’s Built-in Apps
- How to Fix Black Screen on Windows 10
- How to Remove Search Bar From Taskbar on Windows 10
- How to Disable Windows 10 Peer-to-Peer Updates
- How to Downgrade to Windows 7 From Windows 10
- How to Fix Windows 10 Start Menu And Cortana Not Working
- How to Backup and Restore Registry in Windows 10
- How to Change the Default Installation Location on Windows Using Regedit
- How to Force Restart Windows 10 with Keyboard
- How to Remove Shortcut Arrow from Desktop Icons on Windows 10
- How to Find Computer Specs on Windows 10
- How To Move Your Libraries To Another Drive in Windows 10
- How to Enable Numlock at Windows Startup
- How to Change CMD Color in Windows 10
- How To Increase Font Size In CMD
- How To Assign Letter To Drive In CMD
- How To Get MAC Address In CMD
- How to Open File Explorer Using CMD on Windows 10
- How To Run Batch File On Windows Startup
- How To Run EXE From A Batch File
- How To Run A Python Script From A Batch File
- How to Run PowerShell Script From A Batch File
- How to Run Multiple Batch Files From One Batch File
- Batch File To Copy All Files From One Folder To Another
- How To Compare Strings In Batch Files
- How To Concatenate Variables In Windows Batch File
- How To Clear A Variable In A Batch File
- For Loop Counting From 1 To N in a Batch File
- How to Run Batch File Automatically Every X Minutes
- Batch File To Get and Set System Date
- Batch File To Set Default Programs in Windows 10
- Batch File To Get Computer Name
- Batch File To Get Current Directory
- Batch File To Get Input From User
- Batch File To Get IP Address
- Batch File To Get MAC Address
- How to Add a Registry Key in a Batch File
- Batch File To Create Local User Accounts
- Batch File To Create a Text File
- Batch File To Create a Folder
- Batch File To Create Folders From a List
- Batch File To Write Ping Results To a Text File
- Batch File To Write Variable To a Text File
- Batch File To Write To a Text File
- Batch File To Read XML File
- Batch File To Read CSV / XLS
- Batch File To Read Text File Line By Line into A Variable
- Batch File To List Folder Names
- Batch File To List Folders and Subfolders
- Batch File To List Filenames in a Specified Folder
- Batch File to List All Files in a Folder and Subfolders
- How to Check Internet Connection using Batch File
- How to Check the Size of a File in a Windows Batch Script
- How To Check Batch File Error
- Batch File To Check If Folder Exists
- How to Check If a Path is File or Directory using Batch
- Batch File To Delete Folders Older Than N Days
- Batch File To Delete All Files in Folder Older Than N Days
- Batch File To Delete All Files In Folder
- Batch File To Delete A File If Exists
- Batch File To Check If Multiple Files Exist
- Batch File To Check If File Exists
- Batch File Commands List With Examples
- 8 Batch File Commands You Should Know
- How to Create a Batch File in Windows
- How to Run Batch File in CMD
- How to Run EXE File in CMD
- How to Change the MAC Address on Windows 10
- How to Create a Website Shortcut on Desktop In Windows 10
- 29 Run Commands in Windows You Should Know
- How to Ping IP Address in CMD
- How to Get IP Address Using Ipconfig in CMD
- How to Delete Folder Using CMD in Windows 10
- CMD Commands List You Should Know
- How to Change Lock Screen in Windows 10
- How to Show My Computer Icon on Desktop in Windows 10
- How to Change Compatibility Mode in Windows 10
- How to Uninstall Internet Explorer in Windows 10
- How to Add or Change Desktop Theme in Windows 10
- How to Disable Transparency Effects in Windows 10
- How to Delete and Uninstall Fonts in Windows 10
- How to Install New Fonts in Windows 10
- How to Disable Lock Screen on Windows 10 Using Registry
- How to Customize Action Center in Windows 10
- How to Disable Cortana in Windows 10 using Registry
- Battery Icon Missing From Taskbar in Windows 10 [Solved]
- How to Change Desktop Background in Windows 10
- How to Increase Battery Life of Windows 10 Laptop
- How to Turn off Notifications in Windows 10
- How to Create Keyboard Shortcuts in Windows 10
- How to Change Desktop Icon Size in Windows 10
- How to Turn On Dark Mode on Opera
- How to Turn On Dark Mode on Mozilla Firefox
- How to Turn On Dark Mode on Google Chrome
- How to Turn On Dark Mode on Microsoft Edge
- How to Enable Dark Mode in Windows 10
- How to Increase Mouse Sensitivity in Windows 10
- How to Find Which Programs are Slowing Down Your Boot Time in Windows 10
- How to Defrag the Hard Drive in Windows 10
- How to Copy and Paste Into Command Prompt in Windows 10
- How to Enable the On-Screen Keyboard in Windows 10
- How to Check Laptop Battery Health in Windows 10
- How to Use Offline Maps in Windows 10
- How to Calibrate Your Monitor in Windows 10
- How to Enable God Mode in Windows 10
- How to Increase Processor Speed in Windows 10
- How to Pin a Folder to Taskbar in Windows 10
- How to Pin a Website to Taskbar in Windows 10
- How to Switch Between Desktops in Windows 10
- How to Make Windows 10 Boot Faster
- How to Stop Windows 10 From Sleeping
- How to Set an Alarm Clock on Windows 10
- How to Go Directly to Desktop in Windows 10
- How to Create a New Folder on Windows 10
- How to Reduce Blue Light on Computer Screen on Windows 10
- How to Turn on Speech Recognition in Windows 10
- How to Sync My Settings in Windows 10
- How to Change the Screen Resolution on Windows 10
- How to Create a New User on Windows 10
- How to Turn Off Tablet Mode in Windows 10
- How to Uninstall a Program on Windows 10
- How To Change Password In Windows 10
- How to Take a Screenshot on Windows 10
- Top Keyboard Shortcuts in Windows 10
- How to Speed Up Windows 10 Shutdown
- How to Change Default Browser in Windows 10
- How to Disable the Lock Screen in Windows 10
- How to disable User Account Control in Windows 10
- How to Hide File Extensions in Windows 10
- How to Show Hidden Files and File Extensions in Windows 10
- How to Create a Restore Point with System Protection Enabled in Windows 10
- How to Delete Browsing History on Firefox in Windows 10
- How to Delete Browsing History on Microsoft Edge in Windows 10
- How to Delete Browsing History on Google Chrome in Windows 10
When working with multiple folders, opening them in multiple windows helps. Here’s how to open multiple file explorer instances in Windows.
In Windows, if you have ever tried to open multiple file explorer windows, you will quickly know that there is no visible option or way to do it. For instance, if you click on the file explorer icon in the taskbar twice, it will just open the file explorer and minimizes it. The good thing is that there are quite a few ways to open multiple instances of the file explorer in Windows 10 and 11.
I will list a few of the common methods to open multiple file explorer instances to get you started. Follow any one of the below methods, and you will have any number of File Explorer windows as you need.
Note: The methods and steps shared below work in Windows 10 and 11 operating systems.
Table of contents:
- Use a keyboard shortcut
- Shift + Click on the taskbar
- Right-click on a folder in file explorer
Use the keyboard shortcut to open multiple File Explorer instances
The easiest way to open second, third, or any number of file explorer windows is to use the good old keyboard shortcut.
Related: 50 Must-Know Windows 10 Keyboard Shortcuts
To open multiple File Explorer Windows, press the Win + E shortcut. As soon as you press the keyboard shortcut, Windows will open a new instance of the File Explorer.
You can do it however many times you want. For instance, to open three File Explorer windows, press the keyboard shortcut three times.

Keep in mind that when you press the keyboard shortcut, a new file explorer window will open to the default page: i.e., Quick Access or This PC.
2. Shift + Left Click to launch multiple File Explorer windows
An alternative method is to use the shift-click method. This method is handy if you are a heavy mouse user or don’t like the keyboard’s awkward file explorer shortcut position.
To open multiple file explorer windows using the mouse, hold down the Shift key on your keyboard and click on the File Explorer icon appearing on the taskbar. This action will open a new file explorer window with its default page: i.e., Quick Access or This PC.
The good thing is that you can use this method to open multiple instances of any application as long as it supports opening multiple instances.

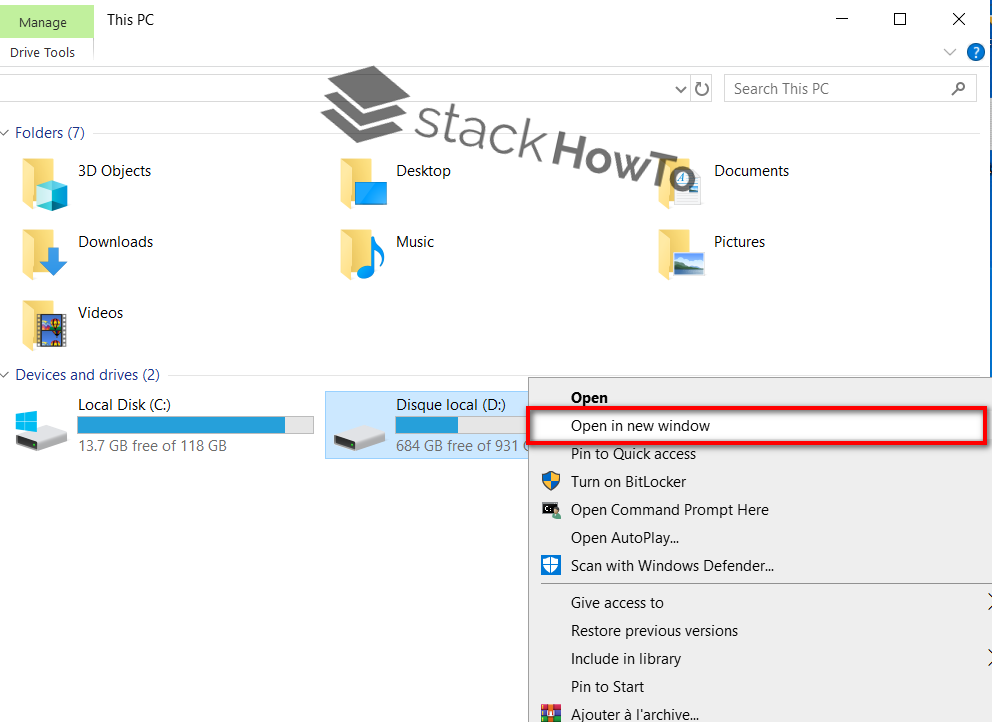
3. Use the right-click option to open a folder in a new window
Sometimes you need to open a specific folder in a new window rather than a new file explorer window with its default page. This method is beneficial when you don’t want to navigate the target folder manually. Thankfully, opening a folder in a new window is pretty straightforward.
To open a folder in a new window, right-click on the target folder and choose the “Open in a new window” option. After selecting the option, the folder will be opened in the new window.

(Optional) Change File Explorer’s default page from Quick Access to This PC
In Windows 10 and 11, the file explorer opens to the Quick Access page by default. The quick access screen gives easy access to your recent folders and files. If needed, you can change the default page from Quick Access to This PC. If you are wondering, This PC page lists all your drives and partitions front and center. This means that all your drives and partitions are a single click away.
To change file explorer from Quick Access to This PC, we will use the folder options tool. So, open the file explorer, click on the “View” tab, and click on the “Options” button. This action will open the Folder Options window.
In Windows 11, click the “Menu” icon (three horizontal dots) on the top navigation bar and choose “Options” from the extended menu.

Choose “This PC” from the “Open file explorer to” dropdown menu in the folder options screen. Click “Ok” to save changes.
That is it. From now on, whenever you open the file explorer, it will open to This PC.
If you like this article, check out how to clear the file explorer address bar history and remove the 3D Objects folder from the File Explorer.
Все способы:
- Приложения и их экземпляры
- Вариант 1: Открытие окон одного приложения
- Способ 1: Комбинации клавиш
- Способ 2: Кнопки мыши и клавиша Shift
- Вариант 2: Открытие окон разных приложений
- Способ 1: Командный файл
- Способ 2: Сторонние программы
- Вопросы и ответы: 2
Приложения и их экземпляры
Как и все операционные системы, Windows 10 поддерживает многозадачность, позволяя открывать сразу несколько приложений, причем одно и то же приложение может быть запущенно в нескольких экземплярах. Большинство штатных приложений Windows 10 поддерживают такую возможность, также открытие нескольких окон поддерживается многими популярными сторонними программами: браузерами, текстовыми редакторами, вьюверами и так далее.
Вариант 1: Открытие окон одного приложения
Открыть несколько окон одной и той же программы можно несколькими способами, в частности с помощью клавиатурных комбинаций.
Способ 1: Комбинации клавиш
Если приложение поддерживает запуск в нескольких экземплярах, для открытия нескольких окон можно использовать комбинацию Shift + N. Этим способом можно также открывать несколько экземпляров папки. Выделите папку или ярлык приложения мышкой и нажмите на клавиатуре Shift + N столько раз, сколько хотите открыть окон этой папки или приложения.
Способ 2: Кнопки мыши и клавиша Shift
Этот способ позволяет открывать окна «Проводника», штатных и сторонних приложений, ярлыки которых закреплены на «Панели задач». Все очень просто: зажмите на клавиатуре клавишу Shift и кликните левой кнопкой мыши по значку «Проводника» или сторонней программы столько раз, сколько хотите открыть ее окон. Также запустить несколько экземпляров приложения можно нажатием по его ярлыку на «Панели задач» средней кнопкой мыши, то есть колесиком. В этом случае зажатие клавиши Shift не требуется.
Вариант 2: Открытие окон разных приложений
Иначе обстоят дела с одновременным открытием нескольких окон разных приложений или файлов. Windows 10 не поддерживает одновременное открытие разных файлов разных форматов, то же касается их ярлыков, однако вы можете их открыть последовательно с помощью простого скрипта или специального стороннего программного обеспечения.
Способ 1: Командный файл
Простой, доступный и эффективный способ, позволяющий открывать несколько разных приложений либо несколько экземпляров одного приложения.
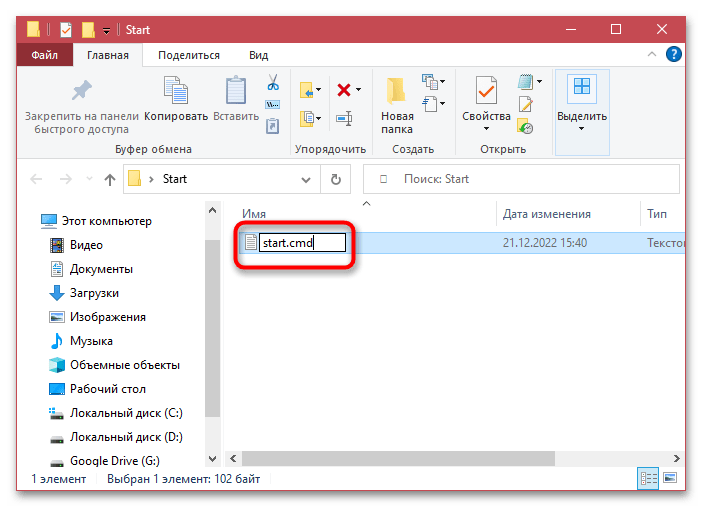
- Создайте в «Блокноте» или любом другом текстовом редакторе текстовый файл и вставьте в него следующий код:
@echo off

Start путь к объекту №1

Start путь к объекту №2

Start путь к объекту №3 - Замените выражение «путь к объекту» полным путем к приложению, файлу или каталогу, учитывайте только, что пути не должны содержать пробелов и кириллических символов. Если путь к объекту содержит пробелы или кириллицу, создайте на такой объект ярлык на английском языке, поместите в папку, путь к которой не содержит пробелов, и используйте в скрипте путь уже к созданному ярлыку.
- Сохраните текстовый файл с кодом и измените его расширение с TXT на CMD или BAT.
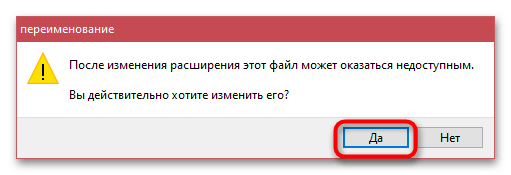
- Подтвердите замену расширения.

При запуске созданного скрипта интерпретатор «Командной строки» последовательно выполнит все команды, открыв указанные программы, файлы и/или каталоги. Если нужно открыть несколько окон для одной программы или папки, просто продублируйте команды столько раз, сколько нужно открыть окон.
Способ 2: Сторонние программы
Для открытия нескольких окон программ, файлов и каталогов можно использовать специальные утилиты, например Open Multiple Files.
Скачать Open Multiple Files с официального сайта
- Скачайте утилиту с официального сайта разработчика и установите. На сайте доступна также и портативная версия приложения.
- Запустив утилиту, перетащите на ее окно объекты, которые хотите открыть. Это могут быть папки, файлы и ярлыки. Нажмите кнопку «OPEN MULTIPLE FILES».

Утилита Open Multiple Files поддерживает работу не только с путями, но и с короткими командами. Нажав кнопку «Add» и выбрав опцию «Add Anything», можно ввести в открывшееся окошко несколько быстрых команд и добавить их в основное окно утилиты.
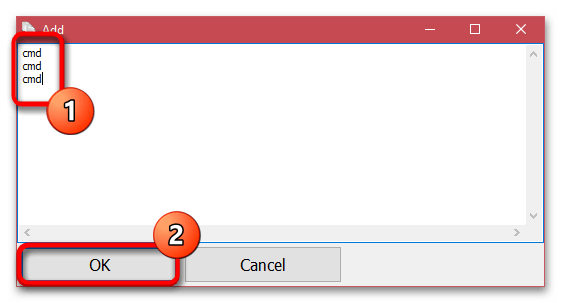
Команды следует вводить каждую с новой строки. Например, добавленные три команды cmd при нажатии кнопки «OPEN MULTIPLE FILES» откроют три окна классической «Командной строки».
Наша группа в TelegramПолезные советы и помощь
Марат Хайрулин, эксперт Microsoft в России, продолжает исследовать нюансы работы с несколькими задачами и рассказывает о совмещении окон и разделении экрана, о вашей личной машине времени для сайтов и документов, и о реальной пользе виртуальных столов.
В прошлой заметке мы писали о том, как современная наука относится к многозадачности и делились небольшими приемами, которые помогут сосредоточиться на одной задаче. А теперь хочтим напомнить (а кого-то может быть и познакомить) с полезными возможностями, которые помогут, если решение вашей задачи требует работы сразу с несколькими приложениями.

Переключение по-старому и по-новому
Переключение между приложениями – наверное то, что большинство из нас делает «на автомате», и никого, конечно, не удивит сочетание клавиш Alt + Tab. Но если одновременно нажать также и Ctrl (то есть Ctrl + Alt + Tab), то эта комбинация зафиксирует меню со всеми открытыми окнами на экране и позволит выбрать нужное приложение одним кликом мыши или касанием пальца (выбрать окно можно также с помощью стрелок на клавиатуре, а открыть – с помощью Enter). Может быть полезно, когда у вас открыто много окон.
Чуть менее известное, но тоже классическое сочетание клавиш Windows + Tab дает больше возможностей, чем кажется на первый взгляд.
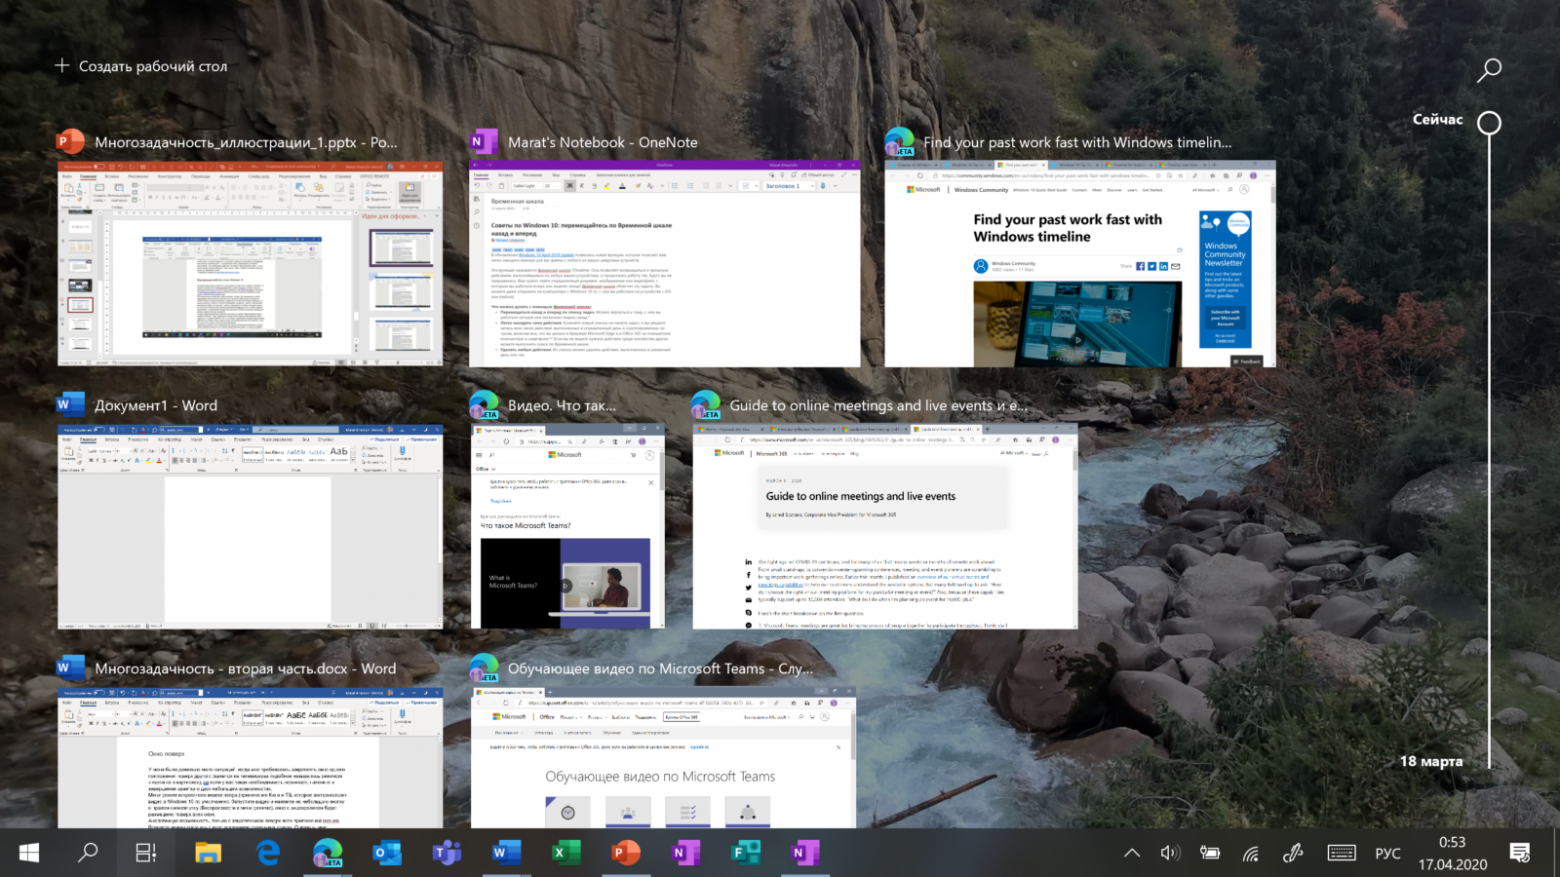
Нажимая эти клавиши в актуальных версиях Windows 10, мы попадаем в раздел «Представление задач». Здесь можно не только переключаться между приложениями, но и воспользоваться «Временной шкалой» и «Виртуальными рабочими столами». К слову, вместо горячих клавиш вы можете кликнуть по кнопке «Представление задач» (обычно она расположена рядом с кнопкой «Пуск») или провести пальцем от левого края к центру сенсорного экрана. Кстати, если у вас современный ноутбук – попробуйте жест для тачпада: проведите по нему тремя пальцами вверх.
Режим Представление задач
«Временная шкала»
«Временная шкала» появилась в Windows 10 два года назад. Она помогает вернуться к задачам, над которыми вы работали ранее на вашем компьютере. При необходимости вы также сможете синхронизировать ее и с другими устройствами с вашей учетной записью*.
Для меня «Временная шкала» стала своеобразной машиной времени. Работа над многими проектами длится несколько дней. И если, допустим, в прошлую пятницу я работал с определенными сайтами и документами, вернувшись к этому проекту в среду, я смогу легко восстановить картину. Я просто отмотаю шкалу до нужной даты – той самой пятницы, увижу и смогу открыть те самые сайты и документы, в которые я тогда был погружен.
Поиск на Временной шкале
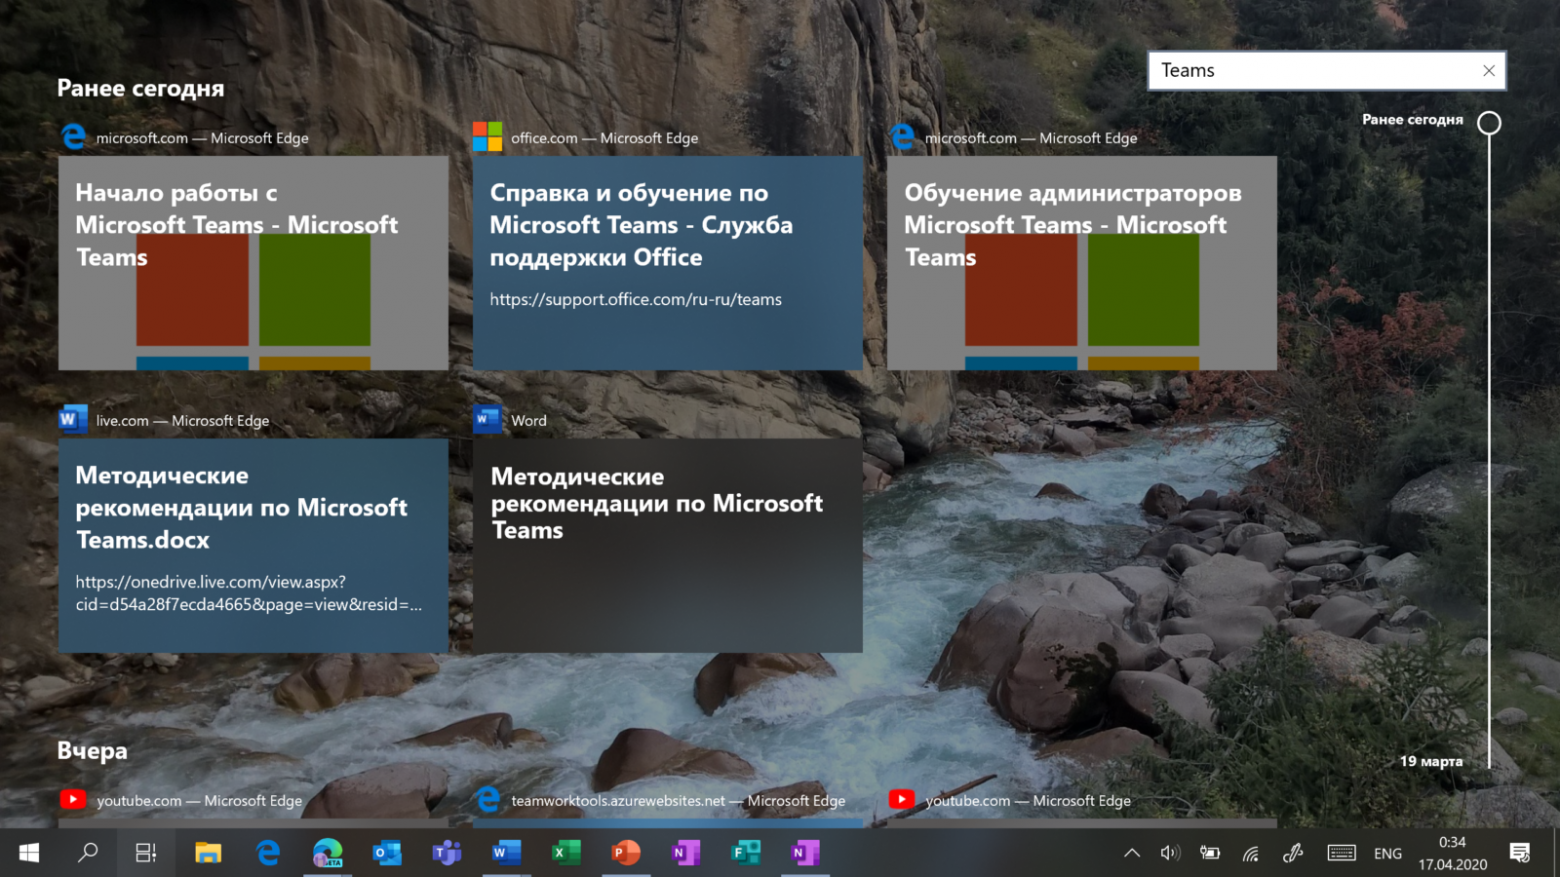
Поиск на «Временной шкале» тоже не раз меня выручал. В отличие от обычного поиска по файлам, я смогу искать не среди всех документов на устройстве (а их может быть очень много), а именно среди тех, с которыми я работал в последние дни. Возможно, вам знакомо сочетание Ctrl + F, запускающее поиск в Проводнике и во многих приложениях. Эта комбинация сработает и на экране «Представление задач»: то есть можно нажать сначала Windows + Tab, а затем – Ctrl + F и ввести искомое слово для поиска по «Временной шкале».
* Подробная справка по настройкам «Временной шкалы».
Виртуальные рабочие столы Windows 10
Концепция виртуальных рабочих столов далеко не нова. Если говорить о Windows, то одним из вариантов их использования была утилита Desktops, которую когда-то (последняя версия вышла в 2012 году) разработал Марк Руссинович. В Windows 10 виртуальные рабочие столы встроены в систему и помогают разделять потоки задач, переключаться между ними.
Если раньше вы не работали с виртуальными столами, для понимания их логики представьте такую аналогию: вам доступно несколько мониторов, на каждом вы можете открыть нужные программы, разделив их по рабочим потокам, например: на одном мониторе – работа с почтой и календарем, на другом – работа с несколькими документами Word, а на третьем – работа с браузером и OneNote. В каждый момент вы смотрите только на один монитор (виртуальный рабочий стол) со своим набором приложений. А переключаясь между виртуальными столами, вы как будто переводите взгляд с одного монитора на другой.
Перетаскивание окна для переноса его на новый виртуальный рабочий стол
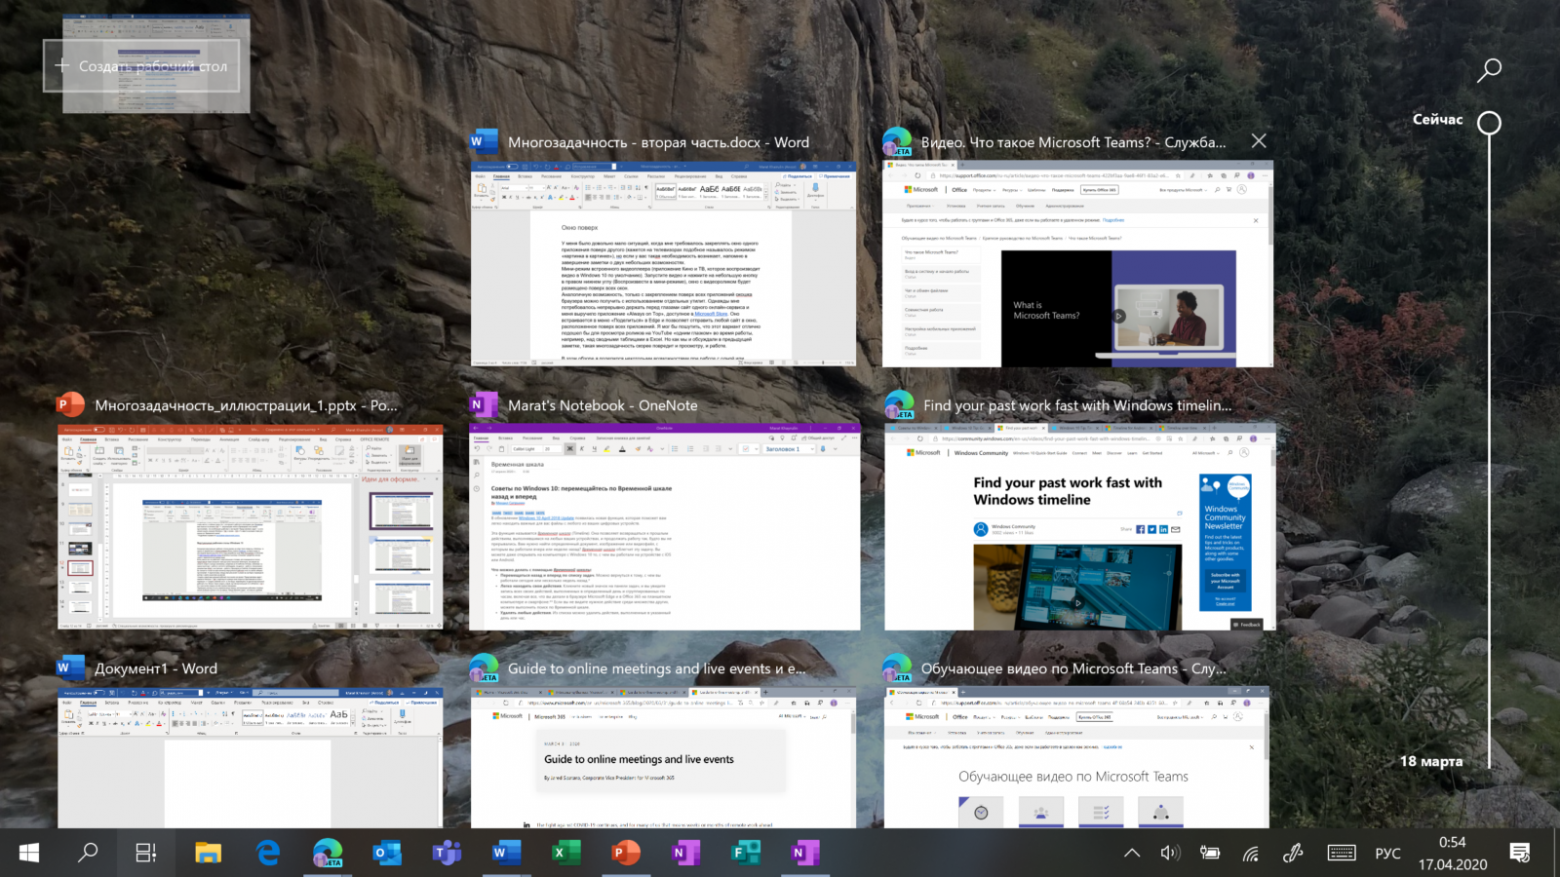
Создать новый виртуальный рабочий стол можно на экране «Представление задач»: нажмите Windows + Tab и перетащите нужные окна открытых приложений на поле с надписью «+ Создать рабочий стол», и они будут перемещены на другой виртуальный рабочий стол. Можно также создать новый, пустой виртуальный стол (Windows + Ctrl + D) и уже затем открыть на нем нужные программы.
«Переводить взгляд» (то есть переключаться между настроенными рабочими столами) можно, выбирая нужный стол на экране «Представление задач», но намного удобнее переключаться с помощью горячих клавиш: Windows + Ctrl + стрелки вправо/влево, а на современных тачпадах – 4 пальца влево или вправо.
Полезные решения для работы с несколькими приложениями
Теперь еще об одной повседневной необходимости – работе с несколькими приложениями одновременно.
Разделение экрана
Первой возможности, о которой хочу напомнить, уже много лет, и в первоначальном виде (под названием Aero Snap) она появилась еще в Windows 7. В Windows 10 ее возможности расширили и назвали Snap Assist. Речь про разделение экрана для закрепления двух (а в Windows 10 – до четырех) приложений.
Snap Assist предлагает выбрать второе окно для закрепления справа
Чтобы это сделать, нужно взять приложение за самую верхнюю полоску, поднести его к правой или левой границе экрана до появления на экране его «тени» и отпустить (тем самым, закрепив первое приложение), а затем в появившихся рядом миниатюрах других приложений выбрать второе для закрепления рядом. Сценарий несложный, работает и для мыши, и для пальца. Еще проще это можно сделать с помощью сочетания клавиш Windows + клавиши со стрелками вправо/влево. Этому сочетанию уже больше 10 лет, но у тех, кто применяет его впервые, и сейчас порой возникает ощущение «цифровой магии».
Любознательным пользователям также напомню, что в Windows 10 можно отправлять приложение в «четвертинку» экрана, перенеся его в угол (или используя дополнительно клавиши Windows + стрелки вверх/вниз). При закреплении двух приложений можно перемещать границу между ними, выделяя какому-то из приложений больше места. Чтобы выбрать приложения для закрепления на экране, можно кликнуть правой кнопкой мыши по их миниатюрам на экране «Представление задач».
Окно поверх
У меня было довольно мало ситуаций, когда требовалось закреплять окно одного приложения поверх другого (кажется, на телевизорах подобное называлось режимом «картинка в картинке»), но если у вас такая необходимость возникает, напомню в завершение заметки о двух небольших возможностях.
Мини-режим встроенного видеоплеера (приложение «Кино и ТВ», которое воспроизводит видео в Windows 10 по умолчанию). Запустите видео и нажмите на небольшую кнопку в правом нижнем углу (Воспроизвести в мини-режиме), окно с видеороликом будет размещено поверх всех окон.
Видео в режиме Окно поверх
Аналогичную возможность, только с закреплением поверх всех приложений окна браузера, можно получить с использованием отдельных утилит. Однажды мне потребовалось работать над документом, постоянно сверяясь при этом с сайтом одного онлайн-сервиса, и меня выручило приложение Always on Top, доступное в Microsoft Store. Оно встраивается в меню «Поделиться» в Edge и позволяет отправить любой сайт в окно, расположенное поверх всех приложений. Я мог бы пошутить, что этот вариант отлично подошел бы для просмотра каналов на YouTube «одним глазком» во время работы, например, над сводными таблицами в Excel. Но как мы и обсуждали в первой заметке, такая многозадачность скорее повредит и просмотру, и работе.
В этом обзоре я поделился некоторыми возможностями при работе с одной или несколькими задачами, которыми пользуюсь сам. В следующих заметках продолжу разговор о приемах, которые помогут сделать нашу «цифровую жизнь» более продуктивной.
Только зарегистрированные пользователи могут участвовать в опросе. Войдите, пожалуйста.
Сколько из лайфхаков вы использовали?
47.12% 2-3. И они пригождаются49
9.62% Ни одного (и теперь это в прошлом)10
30.77% Сижу на Linux/MacOS32
Проголосовали 104 пользователя. Воздержались 10 пользователей.