
On Windows 10, when there is a crash, the system creates a «dump» file containing the memory information at the time of the error, which can help determine the reason for the problem.
The «.dmp» file includes the stop error message, a list of the drivers loaded at the time of the problem, kernel, processor, and process details, as well as other information depending on the type of dump file you have.
Although Windows 10 automatically creates dump files, the only problem is that you won’t find any built-in tools to open this type of file, and this is when the Microsoft Windows Debugging (WinDbg) tool can help. WinDbg is an advanced tool designed for debugging kernel-mode and user-mode code, reviewing processor registries, and analyzing crash dumps.
This guide will walk you through the steps to open a dump file to determine what caused the crash to resolve the problem on your computer.
How to open dump file with WinDbg on Windows 10
On Windows 10, you may find multiple ways to open and review a dump error file, but the easiest way is to use the WinDbg tool available through the Microsoft Store.
Install WinDbg
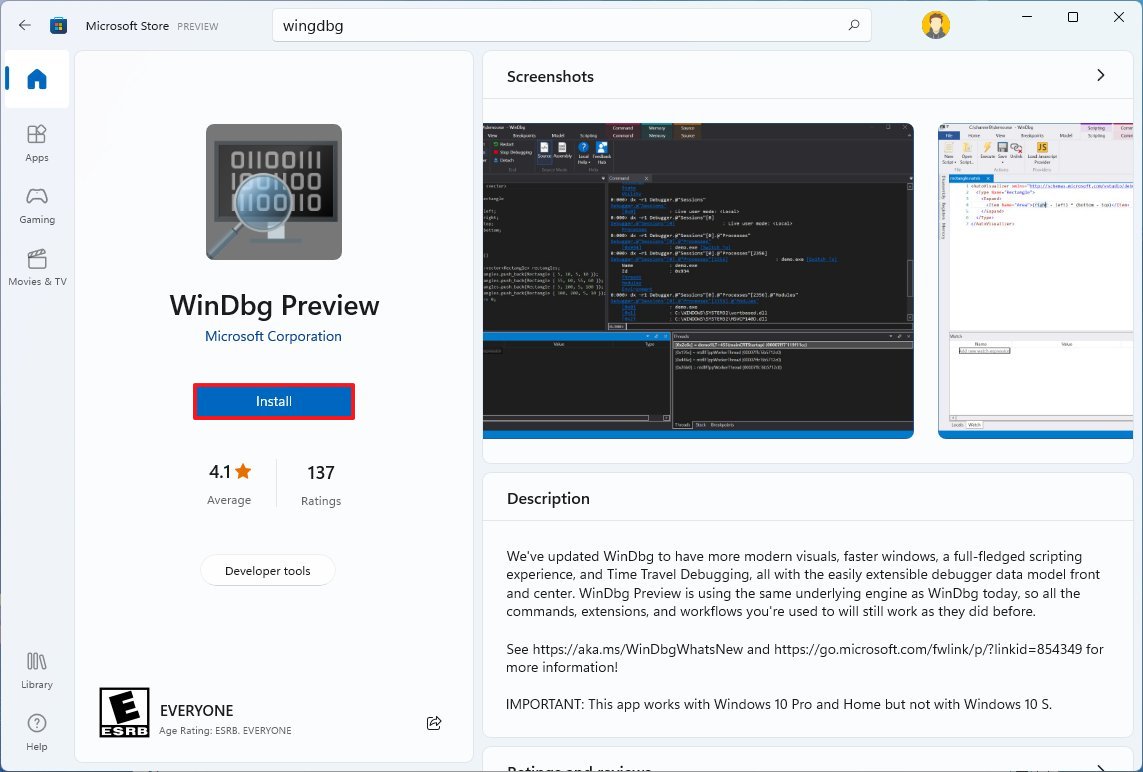
To install the WinDbg tool on Windows 10, use these steps:
All the latest news, reviews, and guides for Windows and Xbox diehards.
- Open the WinDbg download page.
- Click the Install button.
- Click the Open button.
- Click the Install button.
Once you complete the steps, the application will install, and it will be available through the Start menu.
Analyze dump file
To open and analyze a dump file created by a crash on Windows 10, use these steps:
- Open Start.
- Search for WinDbg, right-click the top result, and select the Run as administrator option.
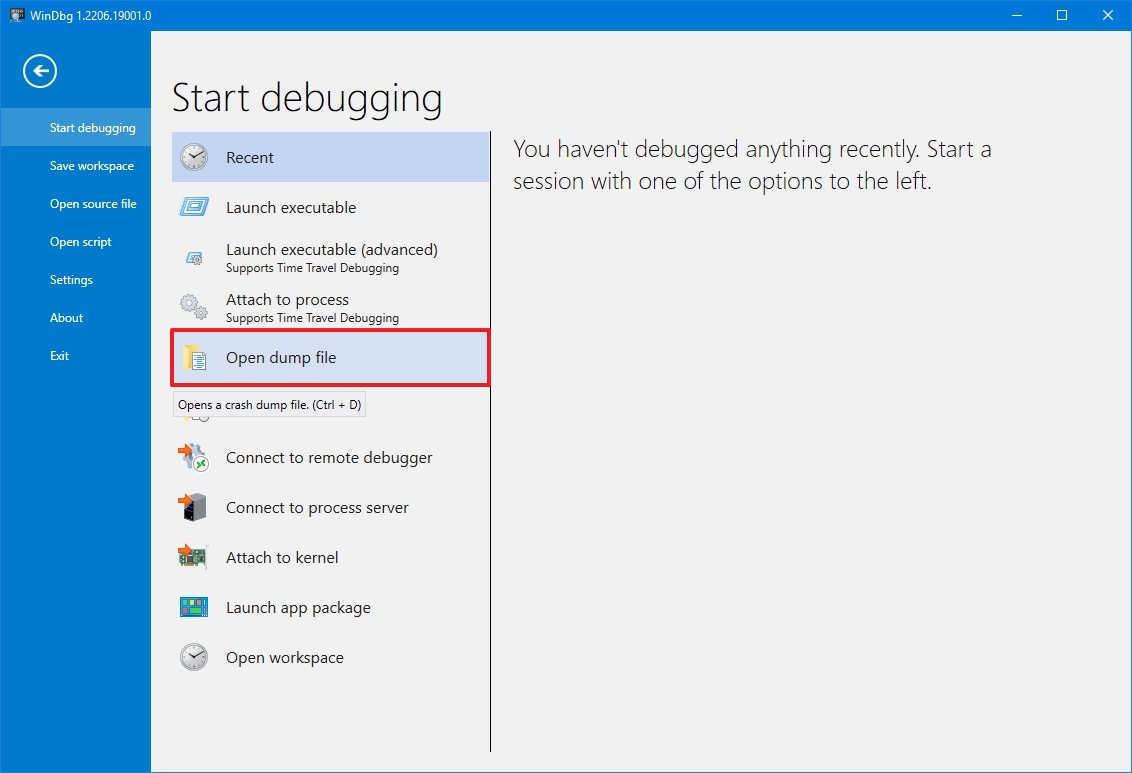
- Click the File menu.
- Click on Start debugging.
- Select the Open sump file option.
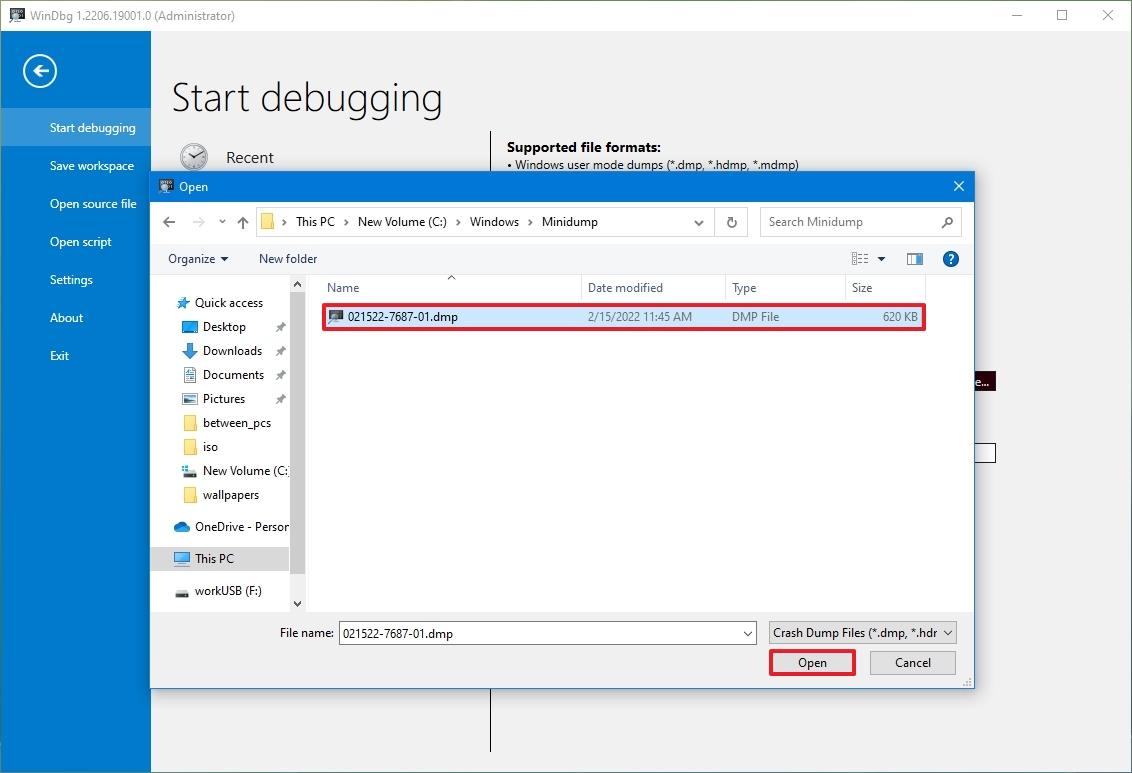
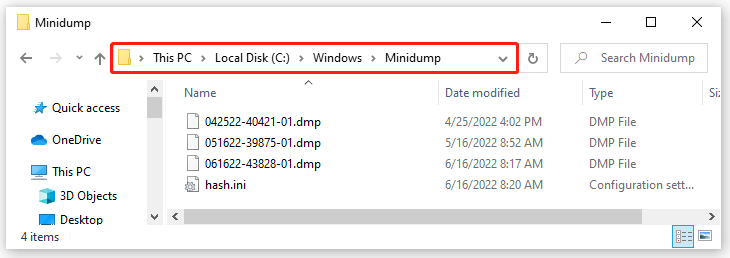
- Select the dump file from the folder location — for example, %SystemRoot%\Minidump.
- Click the Open button.
- Click the Open button again.
- Check the progress bar until it loads the dump file (this may take a while).
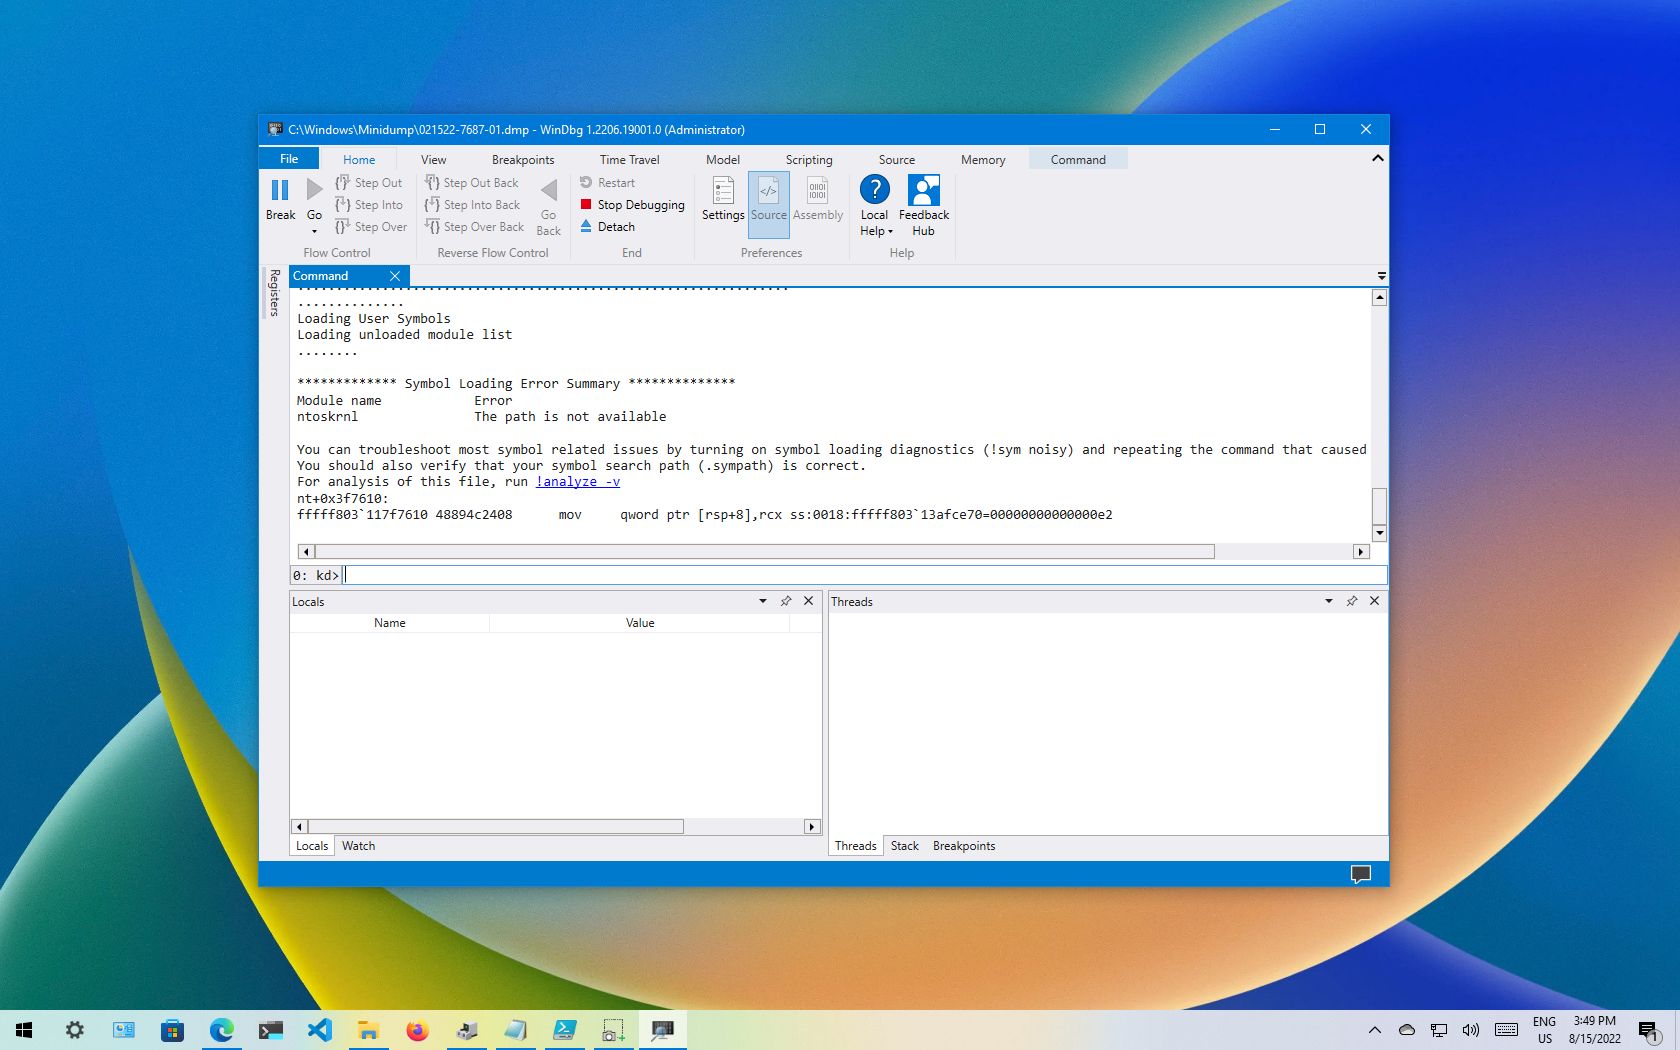
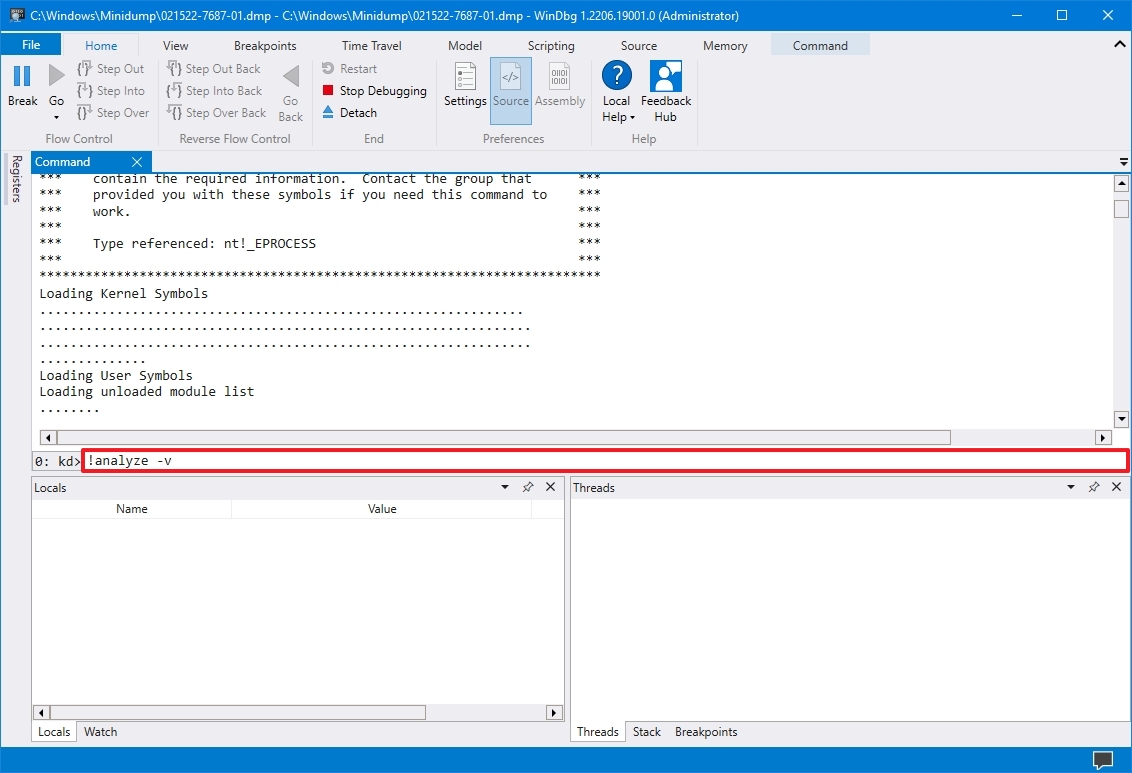
- Type the following command in the run command and press Enter: !analyze -v
- Quick tip: You can also click the !analyze -v link if available from the main area if available after loading the dump file.
- Check the progress bar until the analysis is complete (this may take a long time depending on the data size).
After you complete the steps, the application will return the dump file analyses, which you can then review to determine the reason for the problem to help you resolve the issue.
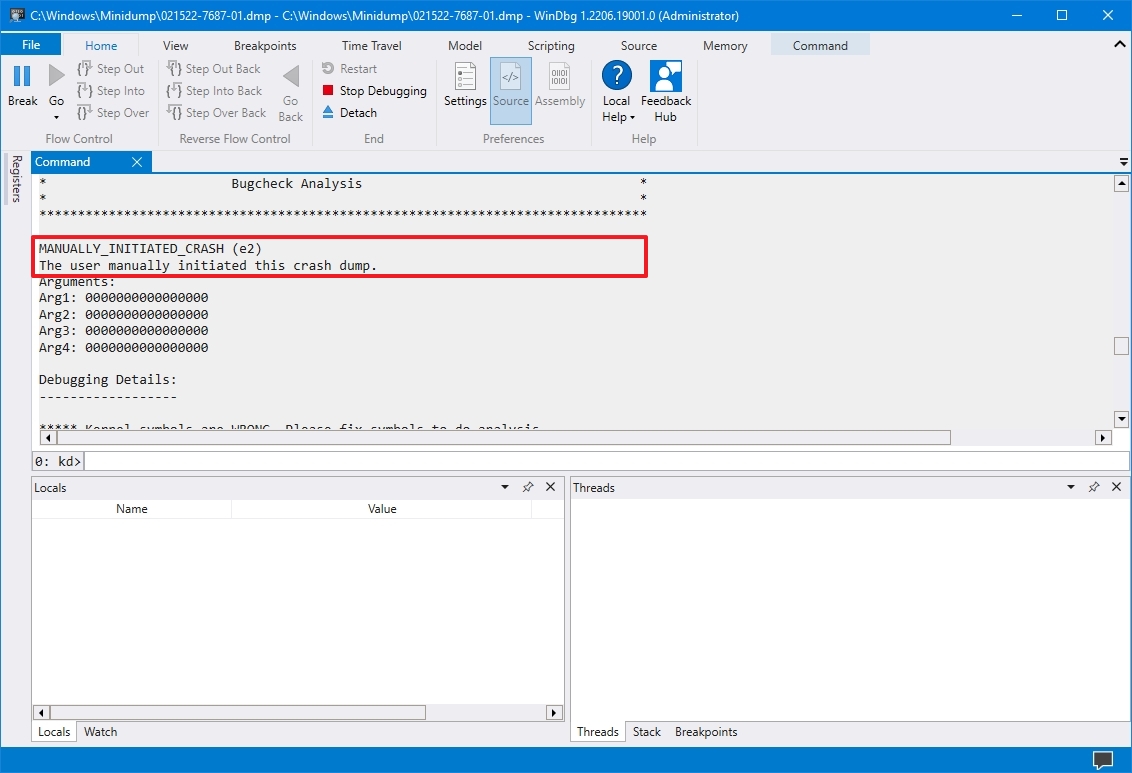
The information will be different depending on the problem. For example, this result points out that this was a manually initiated crash with an «e2» error code, which is correct since, for this guide, we use these instructions to force a dump file. The WinDbg even makes an excellent job describing the crash in a language anyone can understand («The user manually initiated this crash dump»).
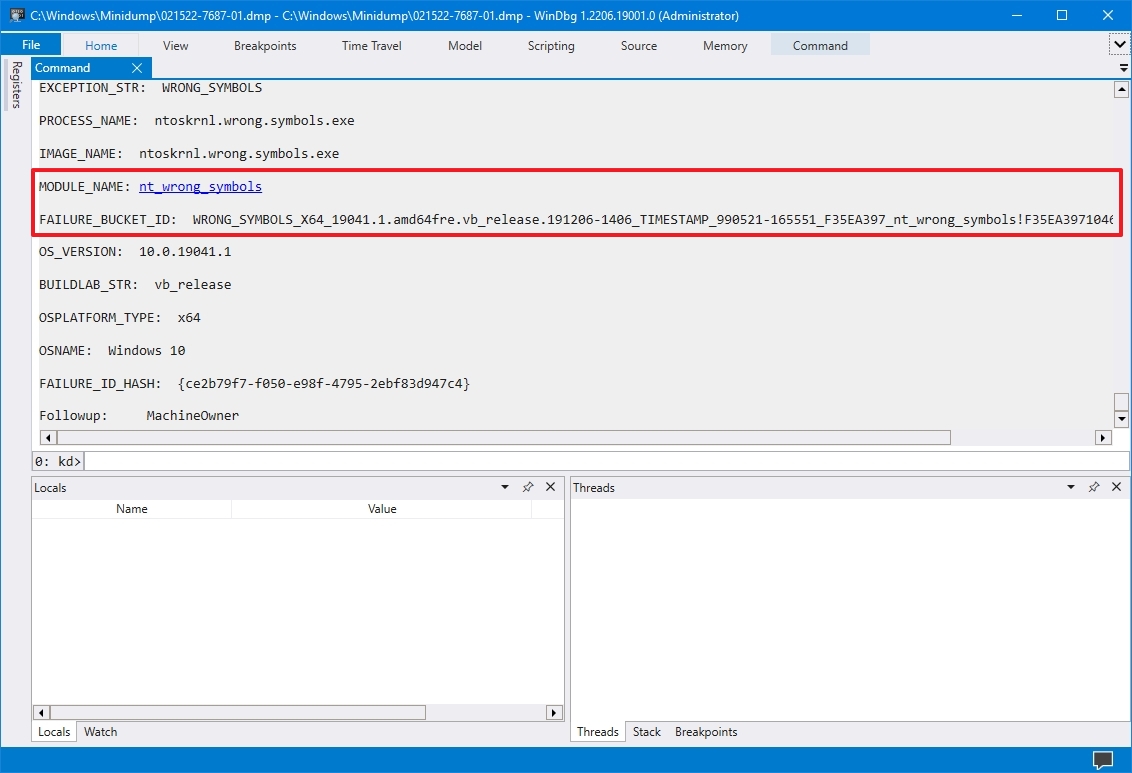
As you continue reviewing the dump file, you will also find more information, such as «FAILURE_BUCKET_ID» and «MODULE_NAME,» which could indicate what is causing the problem.
The information can be overwhelming since it is not meant for regular users. If your computer keeps crashing, you can use this tool to get an idea of the problem. If you cannot figure it out, you can use the hints in the report to search online for more information.
More resources
For more helpful articles, coverage, and answers to common questions about Windows 10 and Windows 11, visit the following resources:
- Windows 11 on Windows Central — All you need to know
- Windows 10 on Windows Central — All you need to know
Mauro Huculak has been a Windows How-To Expert contributor for WindowsCentral.com for nearly a decade and has over 15 years of experience writing comprehensive guides. He also has an IT background and has achieved different professional certifications from Microsoft, Cisco, VMware, and CompTIA. He has been recognized as a Microsoft MVP for many years.
Opening a DMP file in Windows 10 can be a daunting task, but with the right knowledge and tools, it can be a smooth and efficient process. DMP files, also known as dump files, contain important information about system crashes or errors, making them crucial for troubleshooting and diagnosing issues. By learning how to open DMP files in Windows 10, you can gain valuable insights into what caused the crash and take appropriate action.
When it comes to opening DMP files in Windows 10, the first step is to determine the appropriate software to use. One popular option is to utilize the Windows Debugging Tools, which are designed specifically for analyzing dump files. These tools provide a comprehensive set of features and functionalities, allowing you to investigate the crash and understand its underlying causes. With the Windows Debugging Tools, you can extract valuable information from DMP files, such as error codes, memory usage, and stack traces, enabling you to identify potential software or hardware issues and take the necessary steps to resolve them. By following the steps outlined in this guide, you can unlock the power of DMP files on Windows 10 and effectively troubleshoot system crashes.
To open a DMP file in Windows 10, you will need to use a crash dump analysis tool. One of the most common tools used for this purpose is the Microsoft Debugging Tools for Windows. Here are the steps to open a DMP file using this tool:
- Download and install the Microsoft Debugging Tools for Windows.
- Open the WinDbg tool from the Start menu.
- Click on «File» and then «Open Crash Dump».
- Navigate to the location of the DMP file and select it.
- Wait for the crash dump analysis to complete.
This will open the DMP file in the WinDbg tool, allowing you to analyze the crash and troubleshoot any issues.

Introduction: What is a DMP File in Windows 10?
A DMP (Dump) file is a system file that Windows 10 creates when an application or the operating system crashes or encounters a critical error. These files contain information about the state of the system at the time of the crash, which can be useful for troubleshooting and debugging purposes. Opening DMP files in Windows 10 may require specialized tools or software, but once opened, they can provide valuable insights into the cause of a system crash.
Using Visual Studio Debugger to Open DMP Files
Visual Studio is a powerful integrated development environment commonly used for software development. It includes a debugger tool that can be used to open and analyze DMP files in Windows 10. Here’s how you can use Visual Studio Debugger to open DMP files:
- Install Visual Studio: If you don’t have Visual Studio installed on your Windows 10 system, download and install it from the official Microsoft website.
- Open Visual Studio: Launch Visual Studio on your Windows 10 system.
- Go to «File» > «Open» > «File»: In the Visual Studio menu, navigate to «File» > «Open» > «File» to open the file selection dialog box.
- Select the DMP file: In the file selection dialog box, locate and select the DMP file you want to open.
- Choose the Debugging Tools: Visual Studio will prompt you to select the debugging tools to use. Choose the appropriate version based on your Windows 10 architecture (32-bit or 64-bit).
- Analyze the DMP file: Visual Studio will load the DMP file and display its contents. You can explore the threads, call stacks, and other information to understand the cause of the crash or error.
Using Windbg to Open DMP Files
Windbg is a powerful command-line debugger tool provided by Microsoft. It is part of the Windows SDK (Software Development Kit) and can be used to open and analyze DMP files in Windows 10. Here’s how you can use Windbg to open DMP files:
- Download and Install Windbg: If you don’t have Windbg installed on your Windows 10 system, download and install it from the official Microsoft website.
- Launch Windbg: Open the «Start» menu, search for «Windbg,» and launch the application.
- Open the DMP file: In Windbg, go to «File» > «Open Crash Dump» and navigate to the location of the DMP file you want to open.
- Analyze the DMP file: Windbg will load the DMP file and display its contents. You can use various commands and functions in Windbg to analyze the crash dump and identify the cause of the issue.
Using Windows Debugger (WinDbg) to Open DMP Files
Windows Debugger, commonly known as WinDbg, is a debugging tool provided by Microsoft. It is part of the Windows SDK (Software Development Kit) and can be used to open and analyze DMP files in Windows 10. Here’s how you can use WinDbg to open DMP files:
Note: Using WinDbg requires some technical knowledge and familiarity with debugging concepts.
- Download and Install Windows SDK: If you don’t have Windows SDK installed on your Windows 10 system, download and install it from the official Microsoft website.
- Launch WinDbg: Open the «Start» menu, search for «WinDbg,» and launch the application.
- Open the DMP file: In WinDbg, go to «File» > «Open Crash Dump» and navigate to the location of the DMP file you want to open.
- Analyze the DMP file: WinDbg will load the DMP file and display its contents. You can use various commands and functions in WinDbg to analyze the crash dump and identify the cause of the issue.
Using BlueScreenView to Open DMP Files
BlueScreenView is a lightweight and user-friendly tool that allows you to open and analyze DMP files without the complexity of command-line debuggers. Here’s how you can use BlueScreenView to open DMP files in Windows 10:
- Download and Install BlueScreenView: Visit the official website of NirSoft and download BlueScreenView.
- Launch BlueScreenView: Open the downloaded BlueScreenView application.
- Open the DMP file: In BlueScreenView, go to «File» > «Open Crash Dump» and navigate to the location of the DMP file you want to open.
- Analyze the DMP file: BlueScreenView will load the DMP file and display its contents in a user-friendly interface. It provides information about the crash, including the date, time, bug check code, and more.
Exploring Another Dimension of Opening DMP Files
Introduction to another aspect of opening DMP files in Windows 10 and how it can be done using specific tools. Sub-headings for the next section will cover additional methods or tools to open DMP files.
Using Visual Studio Code and WinDbg Extension
Visual Studio Code is a lightweight yet powerful code editor that supports various programming languages and platforms. It has a vast array of extensions available to enhance its functionality. One such extension is the WinDbg extension, which allows you to open and analyze DMP files within Visual Studio Code itself. Here’s how you can use Visual Studio Code and the WinDbg extension to open DMP files:
- Install Visual Studio Code: If you don’t have Visual Studio Code installed on your Windows 10 system, download and install it from the official Microsoft website.
- Install the WinDbg extension: Launch Visual Studio Code, go to the extensions tab on the left-hand sidebar, search for «WinDbg,» and install the WinDbg extension.
- Open Visual Studio Code and create a new workspace: Launch Visual Studio Code, create a new workspace, and open the workspace.
- Open the DMP file: In Visual Studio Code, go to «File» > «Open» and navigate to the location of the DMP file you want to open.
- Analyze the DMP file using the WinDbg extension: With the WinDbg extension installed, you can use its features and commands to analyze the DMP file within Visual Studio Code. The extension provides a familiar interface for working with DMP files while utilizing the powerful debugging capabilities of WinDbg.
Using online DMP file analysis tools
If you don’t have access to or prefer not to install specialized debugging tools, there are online DMP file analysis tools available that allow you to upload and analyze DMP files directly in your web browser. These tools may have limitations compared to offline tools but can provide quick insights and basic analysis. Here are a few popular online DMP file analysis tools:
- OSR Online — NmDbg: This online tool offers basic DMP file analysis features and allows you to explore threads, call stacks, and memory information. It is available at https://www.osronline.com/page.cfm?name=nmdbg.
- BSOD Minidump & Crash Analysis: This online tool offers basic crash analysis for DMP files and provides information about the crash, including bug check codes and faulting modules. It is available at https://www.osronline.com/page.cfm?name=analyze.
- Windows DMP File Analyzer: This online tool allows you to upload and analyze DMP files. It provides detailed crash information, including bug check analysis, stack traces, loaded modules, and more. It is available at https://dmpfileanalyzer.com/.
Important Note:
When using online tools to analyze DMP files, be cautious about the privacy and security of your files. Ensure that you trust the website and its policies regarding data handling and confidentiality.
Using WinDbg Preview
WinDbg Preview is a modern and redesigned version of WinDbg, optimized for Windows 10 and the latest debugging scenarios. It offers a more user-friendly interface and integration with Windows Store applications. Here’s how you can use WinDbg Preview to open DMP files:
- Install WinDbg Preview: If you don’t have WinDbg Preview installed on your Windows 10 system, you can download and install it from the Microsoft Store.
- Open WinDbg Preview: Launch WinDbg Preview from the Start menu.
- Open the DMP file: In WinDbg Preview, go to «File» > «Open Dump File» and navigate to the location of the DMP file you want to open.
- Analyze the DMP file: WinDbg Preview will load the DMP file and display its contents. You can use various commands and features within WinDbg Preview to analyze the crash dump and identify the cause of the issue.
Opening DMP files in Windows 10 requires specialized tools and knowledge of system debugging and analysis. The methods and tools discussed in this article provide different approaches to opening and analyzing DMP files, allowing you to gain insights into system crashes and errors. Choose the method that suits your needs and level of expertise, and make use of the available tools to troubleshoot and resolve issues efficiently.

Opening DMP Files in Windows 10
If you are experiencing system crashes or errors on your Windows 10 computer, you may want to analyze the DMP (Dump) files to identify the cause. These files contain valuable information about the crash, including the memory state at the time of the crash.
To open DMP files in Windows 10, you can use the Microsoft Debugging Tools for Windows. Follow these steps:
- Download and install the Debugging Tools for Windows from the Microsoft website.
- Once installed, open the WinDbg application.
- Go to File > Open Crash Dump and select the DMP file you want to analyze.
- Wait for the analysis to complete, and the crash dump file will be loaded into WinDbg
- You can now use the various commands and features of WinDbg to analyze the crash dump, including examining the stack trace, viewing variables, and identifying the cause of the crash.
By following these steps, you can open and analyze DMP files in Windows 10 using the Microsoft Debugging Tools for Windows. This can help you diagnose and troubleshoot system crashes and errors more effectively.
Key Takeaways: How to Open Dmp File Windows 10
- Use the Windows Debugger tool to open .dmp files in Windows 10.
- Install the Windows Software Development Kit (SDK) to access the Windows Debugger tool.
- Open the Windows Debugger, select File, and then choose Open Crash Dump.
- Navigate to the location of the .dmp file and select it to open.
- Review the contents of the .dmp file, including any error messages or crash details.
Frequently Asked Questions
Welcome to our FAQ section on how to open .dmp files in Windows 10. Below, we have provided answers to the most common questions users have about opening .dmp files on this operating system.
1. How can I open a .dmp file in Windows 10?
To open a .dmp file in Windows 10, you can use the Windows Debugger tool. This tool allows you to analyze the contents of the .dmp file and troubleshoot any issues. Here’s how you can open a .dmp file using the Windows Debugger:
1. Install the Windows Debugger tool, which is available for download from the official Microsoft website.
2. Launch the Windows Debugger tool and go to «File» > «Open Crash Dump».
3. Browse to the location of the .dmp file on your computer and select it.
4. The Windows Debugger will load the .dmp file, allowing you to analyze its contents and diagnose any issues.
Keep in mind that the Windows Debugger tool requires some technical knowledge to use effectively. If you’re not familiar with debugging or analyzing .dmp files, it may be best to seek assistance from a professional.
2. Is there any other way to open a .dmp file in Windows 10?
Yes, there is an alternative method to open .dmp files in Windows 10 without using the Windows Debugger tool. You can use a third-party file viewer that supports .dmp files, such as BlueScreenView. Here’s how you can open a .dmp file using BlueScreenView:
1. Download and install BlueScreenView from the official website.
2. Launch BlueScreenView and go to «File» > «Open Dump File».
3. Browse to the location of the .dmp file on your computer and select it.
4. BlueScreenView will load the .dmp file and display detailed information about the crash, including the error code and the drivers involved.
Please note that third-party file viewers may not provide the same level of analysis and troubleshooting capabilities as the Windows Debugger tool. However, they can still be useful for quickly viewing the contents of a .dmp file.
3. Can I convert a .dmp file to a readable format?
No, you cannot directly convert a .dmp file to a readable format. .Dmp files are binary files that contain information about system crashes and errors, and they are primarily used for troubleshooting and debugging purposes. While you can analyze the contents of a .dmp file using tools like the Windows Debugger or BlueScreenView, they cannot be converted into a human-readable format without specialized knowledge and tools.
4. Can I open a .dmp file on previous versions of Windows?
Yes, you can open a .dmp file on previous versions of Windows, such as Windows 7 or Windows 8. The process is similar to opening a .dmp file in Windows 10, but you may need to use a different version of the Windows Debugger tool that is compatible with your operating system. Additionally, third-party file viewers like BlueScreenView may also work on earlier versions of Windows.
5. Why is it important to open and analyze .dmp files?
Opening and analyzing .dmp files is important for troubleshooting system crashes and errors. These files contain valuable information about the state of your system at the time of the crash, including the error code, the drivers involved, and other relevant details. By analyzing the contents of a .dmp file, you can identify the root cause of the crash and take appropriate actions to resolve the issue, such as updating drivers or fixing software conflicts. This can help improve the stability and performance of your Windows 10 system.
By following the steps outlined in this article, you can easily open DMP files on Windows 10. First, you need to download and install a compatible debugger tool like WinDbg. Once installed, you can launch WinDbg and then open the DMP file by going to the «File» menu and selecting «Open Crash Dump.» After selecting the file, the debugger will analyze the crash dump and provide you with valuable information about the error or crash.
If you are not familiar with using debugger tools, you can also opt for specialized software like BlueScreenView, which offers a more user-friendly interface. This software allows you to open and analyze DMP files with ease, providing you with detailed information about the crash, including the underlying cause and any associated drivers. With the right tools and a little bit of know-how, opening and analyzing DMP files on Windows 10 doesn’t have to be a daunting task.
-
Home
-
Partition Magic
- How to Read and Analyze Memory Dump Files on Windows 10/11
By Ariel | Follow |
Last Updated
Dump files can help find what causes the system crashing error. However, a lot of users are unclear about where and how to read dump files on Windows 10/11. In this post, MiniTool will explain the definition, location, and analyzer tools of the .dmp files.
What Are Memory Dump Files
What are memory dump files? On Windows computers, the system will automatically generate a file named “.dmp/dump/minidump” file each time your computer experiences a system crashing like BSOD. These files can help you identify why your system crashes and prevent it from happening again.
The small .dmp files contain the memory information, the stop error code, kernel mode, processor details, a list of loaded drivers, and so forth. Usually, the Windows 10 dump file location is usually in either the directory of C:, C:minidump, C:Windowsminidump, or %SystemRoot%Minidump.
However, the problem is that there’s no Windows built-in tool to read and analyze minidump files. If you want to read .dmp files, you need to install a memory dump analyzer like WinDbg, NirSoft BlueScreenView, etc.
How to Change the Memory Dump File Type on Windows 10/11
As you might know, there are different types of memory dump files that you can set on Windows 10/11. Moreover, different memory dump file types take up different hard drive spaces. If your hard disk space is running out or limited, you can change the file type to the small memory dump.
Here’s how to change the memory dump file type on Windows 10/11.
Step 1. Press the Win + E keys to open the File Explorer, and then right-click This PC entry and select Properties.
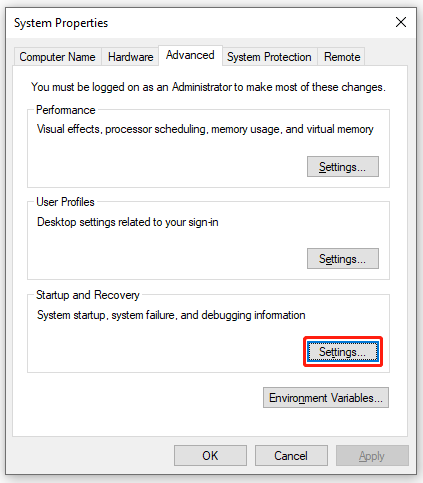
Step 2. Click on the Advanced system settings on the left side of the window.
Step 3. Go to the Advanced tab and click on the Settings button under the Startup and Recovery section.
Step 4. Go to the Write debugging information section and select Small memory dump (256 KB) from the drop-down menu.
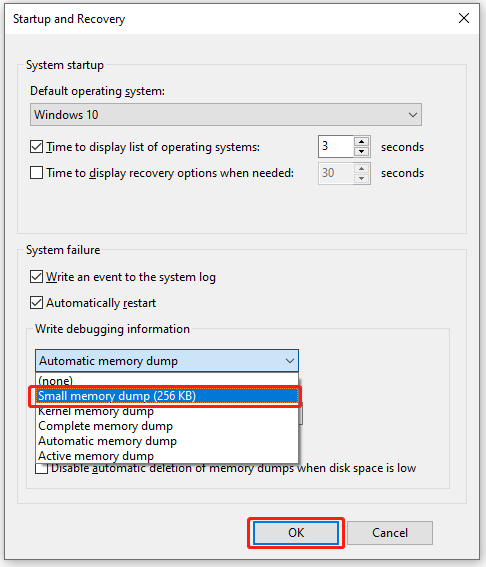
Step 5. If you want to change the Windows 10 dump file location, you can type a new path in the Small dump directory box and click on OK to save the change. After that, restart your computer to make the changes take into effect.
How to Read and Analyze Memory Dump Files on Windows 10/11
How to read dmp files on Windows 10/11? The easiest and fastest way to analyze minidump is to use WinDbg. It is a Microsoft-developed minidump analyzer that can to read .dmp file easily. Here’s how to read dmp files using WinDbg.
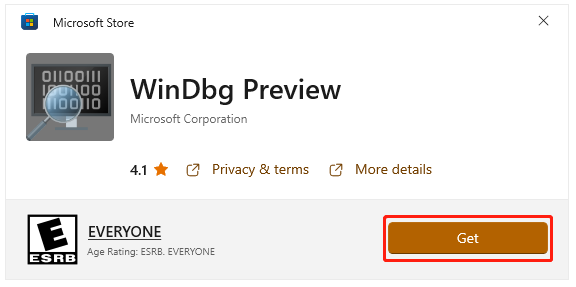
Step 1. Install the WinDbg memory dump analyzer on Windows 10/11.
- Click here to open the WinDbg Preview download page and click on Get in Store app. Also, you can search for WinDbg in Microsoft Store directly.
- Click on Get or Install button to start downloading WinDbg.
Step 2. Once installed, click on Open to run this dmp file viewer.
Tips:
If you can’t analyze minidump files, you need to right-click the WinDbg tool and select Run as administrator to grant it enough access right.
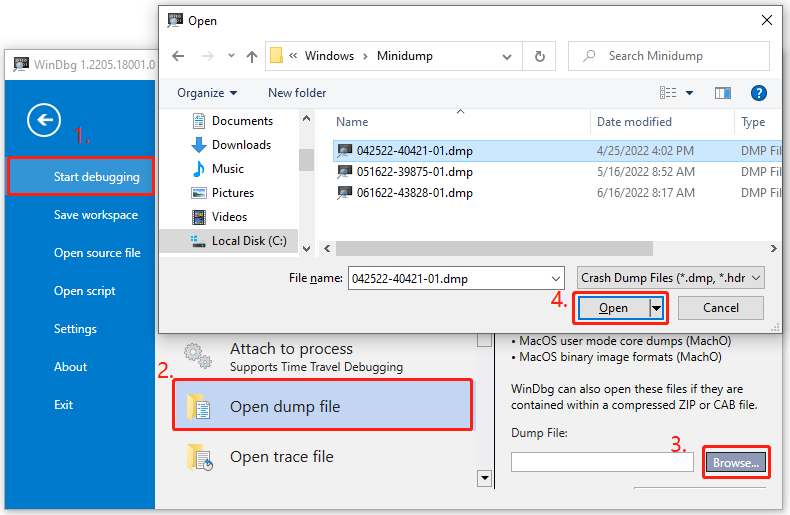
Step 3. In the main interface of WinDbg, click on File > Start debugging > Open dump file in order. Then click on Browse to locate the minidump files, select the .dmp file that you want to analyze, and click on Open.
Step 4. Then the WinDbg minidump analyzer will start loading the dump file. This process may take a while depending on the file size and the level of the dump file, so please wait patiently.
Step 5. Once opened, type “!analyze -v” into the command box at the bottom of the window and click on Enter. This command will start analyzing the .dmp file created by the BSOD issue. When the analysis of the dump file is complete, you can find the possible reasons for the crashing issue and take corresponding solutions to fix it.
Of course, you can use other third-party .dmp file viewers like BlueScreenView, WinCrashReport, and WhoCrashed to analyze minidump files on Windows 10/11. If you are still troubled by the BSOD errors, you can refer to the following several guides:
- 8 Solutions to Fix Critical Process Died Stop Code in Windows 10
- 7 Quick Fixes to Kernel Security Check Failure (Guide 2022)
- Quickly Solve – Your PC Ran into a Problem and Needs to Restart
- Top 10 Methods to Fix Reference by Pointer BSOD (2022 Updated)
- How to Fix Atikmpag.sys BSOD Error Windows 10 in 2022
About The Author
Position: Columnist
Ariel has been working as a highly professional computer-relevant technology editor at MiniTool for many years. She has a strong passion for researching all knowledge related to the computer’s disk, partition, and Windows OS. Up till now, she has finished thousands of articles covering a broad range of topics and helped lots of users fix various problems. She focuses on the fields of disk management, OS backup, and PDF editing and provides her readers with insightful and informative content.
If your PC has recently crashed, you must have faced the Blue Screen of Death (BSOD), which lists the crash’s cause and then the PC shutdown abruptly. Now the BSOD screen is only shown for a few seconds, and it’s not possible to analyze the reason for the crash at that moment. Thankfully, when Windows crashes, a crash dump file (.dmp) or memory dump is created to save information about the crash just before the Windows shutdown.

As soon as the BSOD screen is displayed, Windows dumps the information about the crash from the memory to a small file called “MiniDump” which is generally saved in the Windows folder. And this .dmp files can help you troubleshoot the cause of the error, but you need to analyze the dump file. This is where it gets tricky, and Windows doesn’t use any pre-installed tool to analyze this memory dump file.
Now there is a various tool which can help you debug the .dmp file, but we are going to talk about two tools which are BlueScreenView and Windows Debugger tools. The BlueScreenView can analyze what went wrong with the PC quickly, and the Windows Debugger tool can be used to get more advanced information. So without wasting any time let’s see How to Read Memory Dump Files in Windows 10 with the help of the below-listed guide.
Make sure to create a restore point just in case something goes wrong.
Method 1: Analyze Memory Dump Files using BlueScreenView
1. From NirSoft Website downloads the latest version of BlueScreenView according to your version of Windows.
2. Extract the zip file you download and then double-click on BlueScreenView.exe to run the application.

3. The program will automatically search for the MiniDump files at the default location, which is C:\Windows\Minidump.
4. Now if you want to analyze a particular .dmp file, drag and drop that file to BlueScreenView application and the program will easily read the minidump file.

5. You will see the following information at the top of the BlueScreenView:
- The name of the Minidump file: 082516-12750-01.dmp. Here 08 is the month, 25 is the date, and 16 is the year of the dump file.
- Crash Time is when the crash happens: 26-08-2016 02:40:03
- Bug Check String is the error code: DRIVER_VERIFIER_IOMANAGER_VIOLATION
- Bug Check Code is the STOP error: 0x000000c9
- Then there will be Bug Check Code Parameters
- The most important section is Caused By Driver: VerifierExt.sys
6. In the lower part of the screen, the driver who caused the error will be highlighted.

7. Now you have all the information about the error you could easily search the web for the following:
Bug Check String + Caused by Driver, e.g., DRIVER_VERIFIER_IOMANAGER_VIOLATION VerifierExt.sys
Bug Check String + Bug Check Code eg: DRIVER_VERIFIER_IOMANAGER_VIOLATION 0x000000c9

8. Or you can right-click on the minidump file inside the BlueScreenView and click “Google Search – Bug Check + Driver“.

9. Use this information to troubleshoot the cause and fix the error. And this is the end of the guide How to Read Memory Dump Files in Windows 10 using BlueScreenView.
Method 2: Analyze Memory Dump Files Using Windows Debugger
1. Download Windows 10 SDK from here.
Note: This program contains WinDBG program that we will be using to analyze the .dmp files.
2. Run the sdksetup.exe file and specify the installation location or use default.

3. Accept License agreement then at “Select the features you want to install” screen select only the Debugging Tools for Windows option and then click Install.

4. The application will begin downloading the WinDBG program, so wait for it to be installed on your system.
5. Open Command Prompt. The user can perform this step by searching for ‘cmd’ and then press Enter.

6. Type the following command into cmd and hit Enter:
cd\Program Files (x86)\Windows Kits\10\Debuggers\x64\
Note: Specify the correct installation of the WinDBG program.
7. Now once you’re inside the correct directory type the following command to associate WinDBG with .dmp files:
windbg.exe -IA

8. As soon as you enter the above command, a new blank instance of WinDBG will open with a confirmation notice which you can close.

9. Type windbg in Windows Search then click on WinDbg (X64).
10. In the WinDBG panel, click on File, then select Symbol File Path.
11. Copy and paste the following address into the Symbol Search Path box:
SRV*C:\SymCache*http://msdl.microsoft.com/download/symbols

12. Click OK and then save the symbol path by clicking File > Save Workspace.
13. Now find the dump file you want to analyze, you could either use the MiniDump file found in C:\Windows\Minidump or use the Memory dump file found in C:\Windows\MEMORY.DMP.

14. Double click the .dmp file and the WinDBG should launch and begin processing the file.

Note: Since this is the first .dmp file being read on your system, WinDBG appears to be slow but do not interrupt the process as these processes are being carried out in the background:
A folder called Symcache is being created in C:
Symbols are being downloaded and saved to C:\Symcache
Once the symbols have been downloaded, and the dump is ready to analyze, you will see the message Followup: MachineOwner at the dump text’s bottom.

15. Also, the next .dmp file is processed, it will be quicker as it will have already downloaded the required symbols. Over time the C:\Symcache folder will grow in size as more symbols are added.
16. Press Ctrl + F to open Find then type “Probably caused by” (without quotes) and hit Enter. This is the quickest way to find what caused the crash.

17. Above the Probably caused by line, you will see a BugCheck code, e.g., 0x9F. Use this code and visit Microsoft Bug Check Code Reference for verifying the bug check refer.
Recommended:
- Fix Windows can’t set up a HomeGroup on this computer
- Fix Computer Screen Turns Off Randomly
- How To Fix Right Click Not Working in Windows 10
- Fix The Registry editor has stopped working
That’s it you have successfully learned How to Read Memory Dump Files in Windows 10 but if you still have any queries regarding this post then feel free to ask them in the comment’s section.
Opening a DMP file on Windows 10 might sound intimidating, but it’s actually quite straightforward. A DMP file, or dump file, contains data from a program at the time it crashed. You can use tools like WinDbg or BlueScreenView to open and analyze these files. This guide will walk you through the steps to open a DMP file and understand what caused the crash.
Opening a DMP file will help you diagnose the cause of a system crash. Follow these steps to open and analyze your DMP files using WinDbg.
Step 1: Download and Install WinDbg
First, download and install WinDbg from the Microsoft Store.
WinDbg is a sophisticated tool developed by Microsoft specifically for analyzing DMP files. Simply search for it in the Microsoft Store, click install, and let it do its thing.
Step 2: Open WinDbg
Next, open WinDbg from the Start menu.
Once installed, you can find WinDbg in your Start menu. Click on it to open the application.
Step 3: Configure Symbol Path
Then, configure the symbol path in WinDbg by typing srv*c:symbols*https://msdl.microsoft.com/download/symbols and hitting Enter.
Symbols are essential for interpreting DMP files correctly. This command sets the symbol path to download necessary symbols from Microsoft’s server.
Step 4: Load the DMP File
Now, load the DMP file by going to File > Open Crash Dump and selecting your DMP file.
Navigate through the menus to locate your DMP file. Once found, select it to load it into WinDbg.
Step 5: Analyze the DMP File
Lastly, analyze the DMP file by typing !analyze -v and pressing Enter.
This command tells WinDbg to analyze the loaded DMP file in detail. The analysis might take a few moments, and then you’ll see a detailed report on what caused the crash.
Once these steps are completed, you’ll have a detailed analysis of your system’s crash. The report generated by WinDbg will offer insights into what caused the issue and potentially how to fix it.
Tips for Opening a DMP File on Windows 10
- Use BlueScreenView: This is a simpler alternative to WinDbg, suitable for less technical users.
- Keep System Updated: Ensure Windows and WinDbg are updated to avoid compatibility issues.
- Read Documentation: Microsoft’s WinDbg documentation is helpful if you get stuck.
- Backup Files: Always back up your DMP files before making any changes.
- Check for Common Issues: Sometimes, common errors such as driver issues are the cause of crashes.
Frequently Asked Questions
What is a DMP file?
A DMP file contains a snapshot of a program’s memory at the time it crashed, useful for debugging.
Can I delete DMP files?
Yes, but only after resolving the underlying issue; these files can be removed to free up space.
Is WinDbg free?
Yes, WinDbg is a free tool provided by Microsoft.
Why do I need symbols?
Symbols help translate the raw data in DMP files into human-readable information.
Is there an easier tool than WinDbg?
Yes, BlueScreenView is a simpler alternative that can be easier for beginners to use.
Summary
- Download and Install WinDbg: Find it in the Microsoft Store.
- Open WinDbg: Launch it from the Start menu.
- Configure Symbol Path: Use the command for symbol path configuration.
- Load the DMP File: Navigate to File > Open Crash Dump.
- Analyze the DMP File: Use the
!analyze -vcommand.
Conclusion
Opening a DMP file on Windows 10 is a valuable skill for diagnosing system crashes. With tools like WinDbg, you can delve into the nitty-gritty details of what went wrong. Following the steps outlined above will get you started on understanding and resolving these issues. Don’t forget to keep your tools and system updated, and refer back to Microsoft’s documentation if you run into any snags.
Having a clear grasp of how to open a DMP file can save you a lot of headaches in the long run. It’s not just about fixing what’s broken; it’s also about learning and preventing future issues. So, the next time your PC crashes, you’ll be well-equipped to figure out why and how to fix it. If you’re keen on exploring further, many resources are available online to deepen your understanding. Happy troubleshooting!
Matt Jacobs has been working as an IT consultant for small businesses since receiving his Master’s degree in 2003. While he still does some consulting work, his primary focus now is on creating technology support content for SupportYourTech.com.
His work can be found on many websites and focuses on topics such as Microsoft Office, Apple devices, Android devices, Photoshop, and more.