-
Home
-
News
- How to Open Drive in CMD (C, D, USB, External Hard Drive)
By Alisa |
Last Updated
If you want to open a drive in CMD, be it C drive, D drive, USB flash drive or external hard drive, check how to do it in this tutorial. If you want to manage your hard drive like resize/format/repartition hard drive, recover lost data from hard drive/USB, etc. MiniTool software provides easy and professional solutions.
- How to open drive in CMD?
- How do you open an external hard drive with Command Prompt on a Windows 10 computer?
- How to list hard drives with CMD?
If you are wondering how to open a specific drive in CMD (Command Prompt), you can check the detailed instructions below.
How to Open a Drive (C/D Drive) in CMD
- You can press Windows + R, type cmd, and hit Enter to open Command Prompt window. If you want to open elevated Command Prompt, you should press Ctrl + Shift + Enter.
- After the Command Prompt opens, you can type the drive letter of the desired drive, followed by a colon, e.g. C:, D:, and hit Enter. The CMD.exe will change to the drive letter of the target drive.
- Then, if you want to browse all the root contents of the drive, you can type dir command. If you want to view the contents of different directories, you can use the CD command to change directory in CMD.
How to Open USB Flash Drive or External Hard Drive Using CMD
- You should plug the USB flash drive or external hard drive into the computer.
- After you open Command Prompt, you can type the drive letter of the external removable drive, be it USB flash drive or external hard drive, and type a colon after it. Hit Enter key on the keyboard, and you will access the external drive from Command Prompt.
How to List Hard Drives in CMD
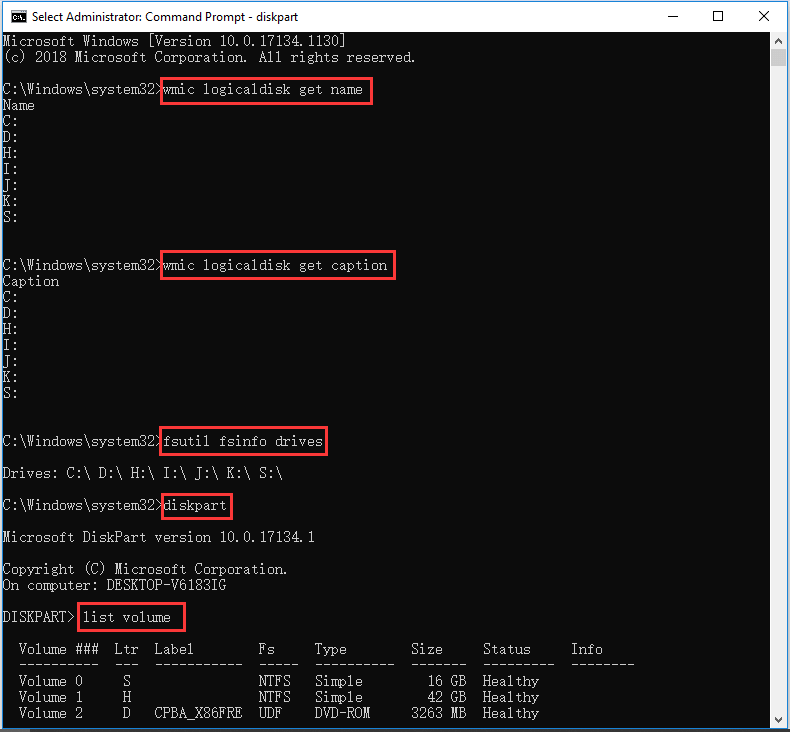
- If you need to simple list all drives, you can use WMIC (Windows Management Instrumentation) command. You can open Command Prompt.
- Then type the command: wmic logicaldisk get name or wmic logicaldisk get caption, and hit Enter to check the list of all drives detected by your computer.
Windows also has another command line tool named Fsutil that helps for file, system and disk management. You can also use it to list drives and files. To list drives, you can type fsutil fsinfo drives and hit Enter.
Alternatively, you can use another command-line tool named Diskpart to get the list of all hard drives with some more details of the drives.
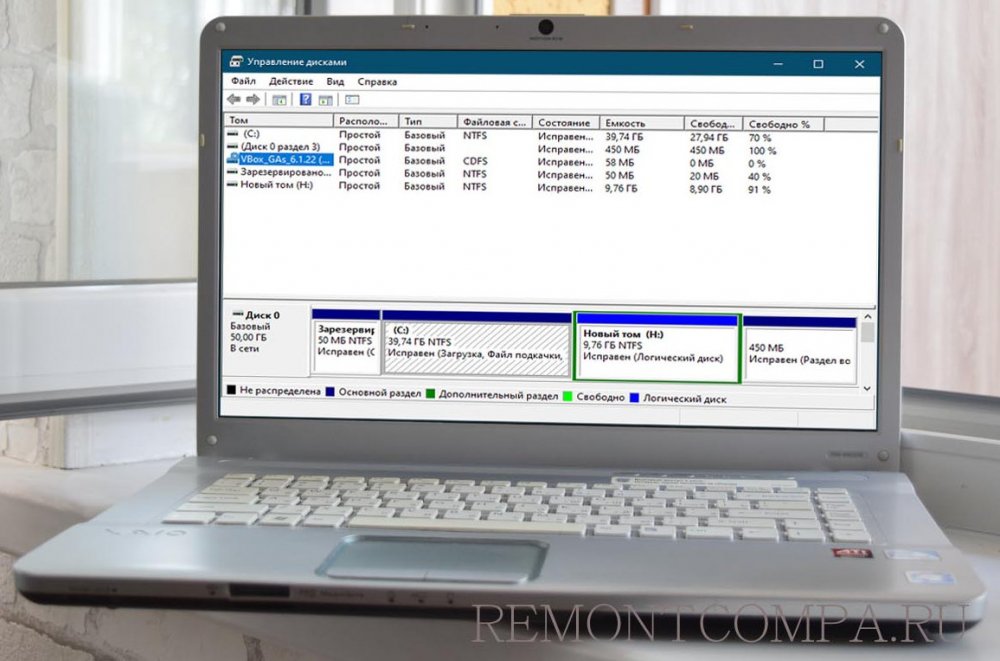
You can open CMD, type diskpart and hit Enter. Then you can type list volume, and hit Enter. You will see that it displays the volume number, drive letter, drive label, formatting system, partition type and size, status, and some other information.
How to Use Command Prompt to Scan and Fix (External) Hard Drive in Windows 10
If your hard drive has some issues, you can also use CMD to scan the repair hard drive errors. The most commonly used two command utilities are CHKDSK and SFC.
After you enter into Command Prompt, you can type chkdsk *: /f /r (replace “*” with the drive letter) and hit Enter. This will run Windows 10 CHKDSK to verify the disk file system integrity and fix logical file system errors, as well as check bad sectors on the hard disk.
You can also type sfc /scannow to run Windows SFC (System File Checker) tool to check and repair corrupt or missing system files in your Windows 10 computer.
To recover mistakenly deleted or lost files from PC and external drives, you can use MiniTool Power Data Recovery. You can easily restore any data from various data loss situations with this best free data recovery software for Windows 10.
Bottom Line
This post introduces how to open drive in CMD and how to list hard drives in CMD. You can easily open C drive, D drive, USB flash drive, external hard drive, etc. with Command Prompt. It also introduces how to check and fix hard drive in Windows 10 with CHKDSK and SFC command utilities.
About The Author
Position: Columnist
Alisa is a professional English editor with 4-year experience. She loves writing and focuses on sharing detailed solutions and thoughts for computer problems, data recovery & backup, digital gadgets, tech news, etc. Through her articles, users can always easily get related problems solved and find what they want. In spare time, she likes basketball, badminton, tennis, cycling, running, and singing. She is very funny and energetic in life, and always brings friends lots of laughs.
How to Open Disk Management in Windows 11/10
Disk Management is an essential utility in Windows operating systems that allows users to manage their disk drives and partitions. This powerful tool can help you create, delete, format, and resize partitions, making it crucial for maintaining an organized and efficient storage system. If you’re looking to open Disk Management in Windows 11 or Windows 10, this comprehensive guide will walk you through various methods to access this utility, along with some useful tips and considerations for managing your disks effectively.
Understanding Disk Management
Before we dive into the methods of accessing Disk Management, it’s essential to understand what this tool does. Disk Management serves several functions, including:
- Creating Partitions: You can divide a disk into separate sections or volumes.
- Deleting Partitions: Removing partitions that are no longer needed.
- Formatting Partitions: Preparing a partition for use by erasing its data and setting up a file system.
- Changing Drive Letters: Assigning or reassigning drive letters to partitions.
- Extending or Shrinking Volumes: Adjusting the size of partitions as necessary.
- Basic Disk vs. Dynamic Disk Management: Understanding the difference and capabilities of each.
Now that we have a basic understanding of Disk Management, let’s explore the various methods to open it in Windows 11 and 10.
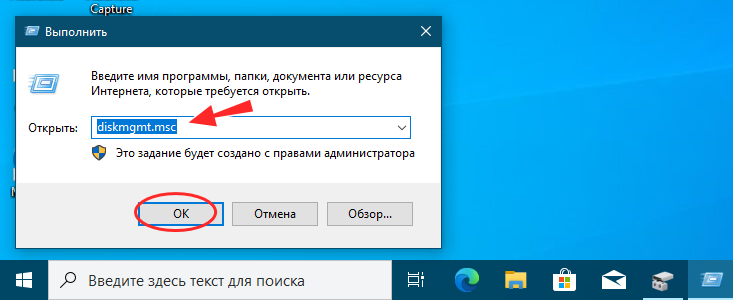
Method 1: Using the Run Dialog
One of the quickest ways to open Disk Management is through the Run dialog.
- Press
Windows Key + R: This command opens the Run dialog box. - Type
diskmgmt.msc: In the text field, typediskmgmt.msc. - Press Enter: After typing the command, press the Enter key.
This will immediately open the Disk Management console, and you can start managing your disks.
Method 2: Using the Search Function
The search function in Windows makes it easy to find and open applications and utilities, including Disk Management.
- Click on the Search Icon: Locate the search icon on your taskbar (it looks like a magnifying glass).
- Type
Disk Management: Enter ‘Disk Management’ into the search bar. - Select
Create and Format Hard Disk Partitions: In the search results, you’ll see an option that reads “Create and Format Hard Disk Partitions.” Click on it to open Disk Management.
Method 3: Accessing Through Control Panel
The Control Panel is another route to access Disk Management.
- Open Control Panel: Click on the Start menu and type “Control Panel,” then press Enter.
- Select
Administrative Tools: Once in the Control Panel, navigate to the “Administrative Tools” section. - Open
Computer Management: In the Administrative Tools list, find and double-click on “Computer Management.” - Navigate to Disk Management: In the Computer Management window, find “Disk Management” in the left sidebar under “Storage.”
Method 4: Using Windows Settings
In Windows 11 and 10, you can access Disk Management through the Settings app.
- Open Settings: Click on the Start menu, then select the gear icon to open Settings. Alternatively, press
Windows Key + I. - Navigate to
System: In the Settings window, click on “System.” - Go to
About: Scroll down and select “About” at the bottom of the System menu. - Click on
Device Manager: In the About section, scroll down to “Related settings” and click “Device Manager.” - Find
Disk Management: Right-click on your computer name in the Device Manager and select “Manage.” In the Computer Management window, click on “Disk Management” from the left sidebar.
Method 5: Using Windows PowerShell
If you prefer a command-line interface, Windows PowerShell provides a straightforward way to access Disk Management.
- Open PowerShell: Right-click the Start button and select “Windows PowerShell” (Admin) or simply search for “PowerShell” in the taskbar search box.
- Enter the Command: Type
diskmgmt.mscand press Enter.
This will launch Disk Management from the PowerShell interface.
Method 6: Creating a Shortcut
If you frequently use Disk Management, consider creating a desktop shortcut for quick access.
- Right-click on Desktop: Anywhere on the desktop, right-click to open the context menu.
- Select
New>Shortcut: From the context menu, hover over “New” and select “Shortcut.” - Enter the Location: Type
C:WindowsSystem32diskmgmt.mscin the location field and click “Next.” - Name Your Shortcut: Give your shortcut a name, such as «Disk Management,» and click “Finish.”
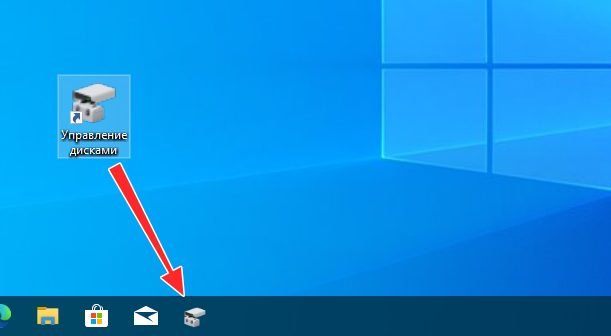
Now you’ll have a convenient shortcut on your desktop to open Disk Management.
Important Considerations When Using Disk Management
While Disk Management is a powerful tool, it’s crucial to use it wisely to avoid data loss or corruption. Here are some important considerations:
- Backup Your Data: Always back up your important files before making any changes to disk partitions.
- Use The Right File System: When formatting partitions, choose the file system that is most suitable for your needs (NTFS for larger files and security features, FAT32 for compatibility with other devices).
- Understand Partition Types: Familiarize yourself with primary, extended, and logical partitions to ensure effective disk utilization.
- Limit Dynamic Disks: While dynamic disks allow for more complex configurations like spanning and RAID, they can complicate recovery if there are issues. If you don’t need dynamic features, stay with basic disks.
Common Disk Management Tasks
After accessing Disk Management, users often perform several common tasks. Below are detailed descriptions of these tasks and how to accomplish them effectively.
1. Creating a New Partition
- Right-click Unallocated Space: If you have unallocated space on a disk, right-click on it and select “New Simple Volume.”
- Follow the Wizard: The New Simple Volume Wizard will guide you through the setup process, including choosing the size of the volume, assigning a drive letter, and formatting the partition.
2. Deleting a Partition
- Right-click on the Partition: Find the partition you wish to delete.
- Select
Delete Volume: From the context menu, choose “Delete Volume.” - Confirm Deletion: Understand that this action will erase all data on the partition, so ensure you have backups.
3. Extending a Volume
- Right-click on the Volume: Find the volume you want to extend.
- Select
Extend Volume: Choose the “Extend Volume” option from the context menu. - Follow the Wizard: Follow the prompts in the Extend Volume Wizard to allocate more space from unallocated space to the selected volume.
4. Shrinking a Volume
- Right-click on the Volume: Choose the volume you want to shrink.
- Select
Shrink Volume: Click on the “Shrink Volume” option from the menu. - Specify Size: Enter how much space you want to shrink and finalize the action.
5. Changing Drive Letters
- Right-click on the Volume: For the volume whose letter you want to change, right-click on it.
- Select
Change Drive Letter and Paths: Choose this option from the menu. - Click
Change: In the dialogue box, you can choose a new drive letter from the dropdown menu.
Conclusion
Disk Management in Windows 10 and 11 is a vital tool for any user needing to configure their computer’s storage. Knowing how to access this feature through various methods provides flexibility and ease of use. Whether you need to create new partitions, delete those that are unneeded, or simply manage your drive letters, this utility has you covered.
In this guide, we’ve discussed multiple methods to open Disk Management, along with detailed steps for common tasks within the utility. Remember to perform these tasks with care to prevent any loss of data. Always back up your files before making significant changes, and ensure your partitions are organized in a way that meets your needs. With the help of Disk Management, you can optimize your computer’s storage for efficiency and better performance.
By following the outlined steps and considerations, you can confidently use Disk Management in Windows 10 and 11 to enhance your computer’s performance and storage management.
Execute DISKMGMT.MSC for quick access
What to Know
- Open Run from the Start menu or Apps screen. Type diskmgmt.msc and press Enter.
- Alternatively, press WIN+X and select Disk Management.
- Or, open Task Manager via Ctrl+Shift+Esc, go to File > Run new task, and enter diskmgmt.msc.
A quick way to open the Disk Management utility in Windows is from the Command Prompt. Disk Management is buried several layers deep, so having a faster way to access this super-tool for your hard drives and other storage devices can come in handy. Follow these easy steps to start Disk Management from the Command Prompt in Windows 11, Windows 10, Windows 8, Windows 7, Windows Vista, or Windows XP.
How to Open Disk Management With a Command
Using the Disk Management command only takes a few seconds once you learn how it’s done.
-
In Windows 11/10/8, open Run from the Start menu or Apps screen (or see the A Quicker Method… section at the bottom of the page for an even faster method for opening this tool).
In Windows 7 and Windows Vista, select Start.
In Windows XP and earlier, go to Start and then Run.
What Version of Windows Do I Have?
Technically, opening Disk Management from the Command Prompt would require that you actually open the Command Prompt program (which you can do if you want; it works the same way). However, running an executable program from the search or Run box accomplishes the same thing.
-
Type the following Disk Management command in the text box:
diskmgmt.mscThen, press the Enter key or press OK, depending on where you ran the command from.
Diskmgmt.msc isn’t the «Disk Management command» any more than any non command-line tool’s executable is a «command.» In the strictest sense, diskmgmt.msc is just the Run command for the program.
-
Wait while Disk Management opens. It should be immediate, but it might take a few moments for the whole program to load.
Now that it’s open, you can use it to change drive letters, partition a drive, format a drive, and more.
The method you use to open Disk Management doesn’t change what you can do with it. In other words, all the same functions exist no matter which shortcut method you use, whether it be with Command Prompt, the Run dialog box, Computer Management, or even File Explorer.
A Quicker Method in Windows 11, 10 & 8
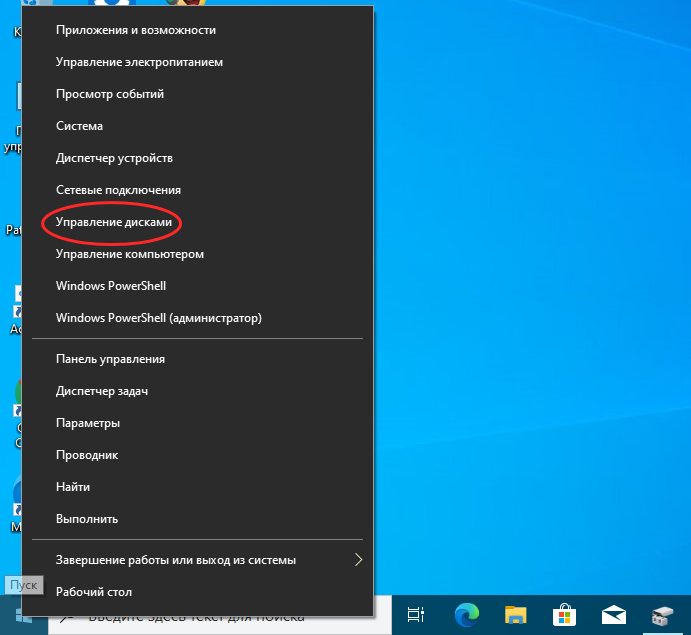
If you’re using a keyboard or mouse with Windows 11, 10, or 8, opening Disk Management via the Power User Menu is even faster than via its Run command.
Just press WIN+X to bring up the menu, then click Disk Management. In Windows 8.1 and newer, right-clicking the Start button works, too.
In Windows 10, you could also execute diskmgmt.msc directly from the Cortana interface, which is nice if you’re used to using that to execute commands already.
Another way to use the Disk Management command is from Task Manager. This definitely isn’t a quicker method than the procedure described above, but it might be your only option if you’re having trouble displaying the desktop or opening menus.
To do this, open Task Manager via Ctrl+Shift+Esc, and go to Run new task (Windows 11) or File > Run new task. Enter diskmgmt.msc and select OK.
The Task Manager method is the exact same as using the Run dialog box. If you compare the two boxes, you’ll notice that they look nearly the same because you’re accessing the same function in Windows: the command line.
FAQ
-
In the Command Prompt, type start ms-settings: and press Enter to immediately launch the Settings app.
Thanks for letting us know!
Get the Latest Tech News Delivered Every Day
Subscribe
Disk Management or diskmgmt.msc is one of the oldest tools in Windows. Although Microsoft hasn’t updated it for many many years, you can still find it in Windows 11 and Windows 10. It’s relatively easy to use and helpful when you need to manage the drives and partitions inside your computer without installing more advanced third-party applications. But, before using it, you need to know how to open it. So, here are all the ways to open Disk Management in Windows 11 and Windows 10:
1. Start Disk Management from the WinX menu
The fastest way to open Disk Management is to use the WinX menu. Right-click or press and hold on the Start button and, in the menu that opens, choose Disk Management.
Press Windows + X followed by K
If you want to achieve the same result using only the keyboard, press Windows + X, followed by K. The Disk Management window opens immediately.
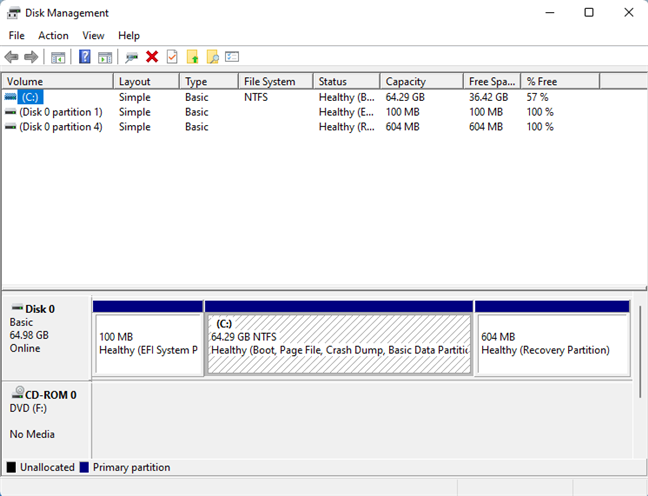
Disk Management in action
TIP: Here are 7 things you can do with the Disk Management tool in Windows.
2. The Run command for Disk Management
Another quick method is this: press the Windows + R keys on your keyboard to open the Run window, and type this command:
diskmgmt.msc
The Run command for Disk Management
Press Enter or click/tap OK to run the command you’ve entered.
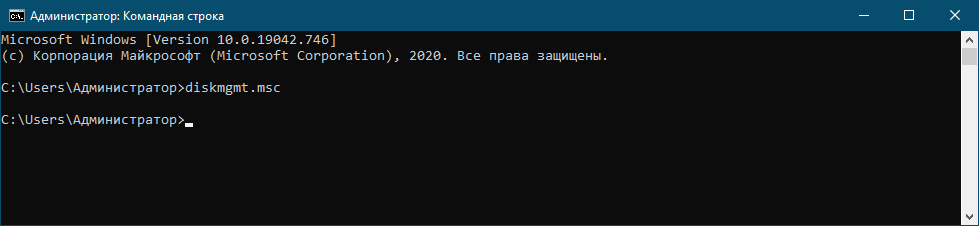
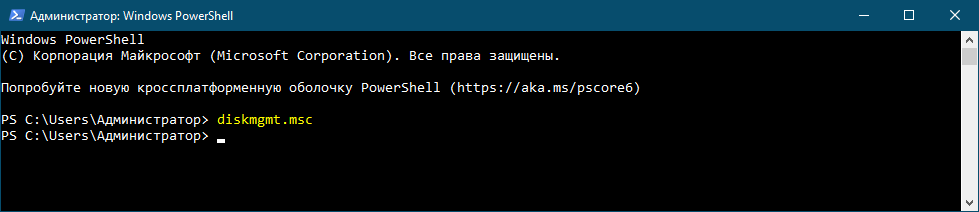
3. Open Disk Management from CMD, PowerShell, or Windows Terminal
Open Command Prompt, PowerShell, or Windows Terminal. It doesn’t matter which command-line environment you prefer. Then, type this command and press Enter:
diskmgmt.msc
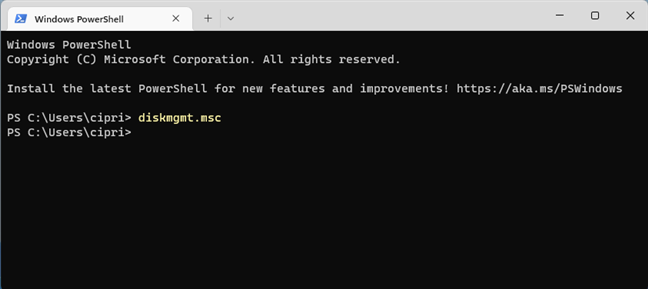
Open Disk Management from CMD
The Disk Management window is opened in seconds.
TIP: If you like working from the Command Prompt, here’s how to use diskpart, chkdsk, defrag, and other disk-related commands.
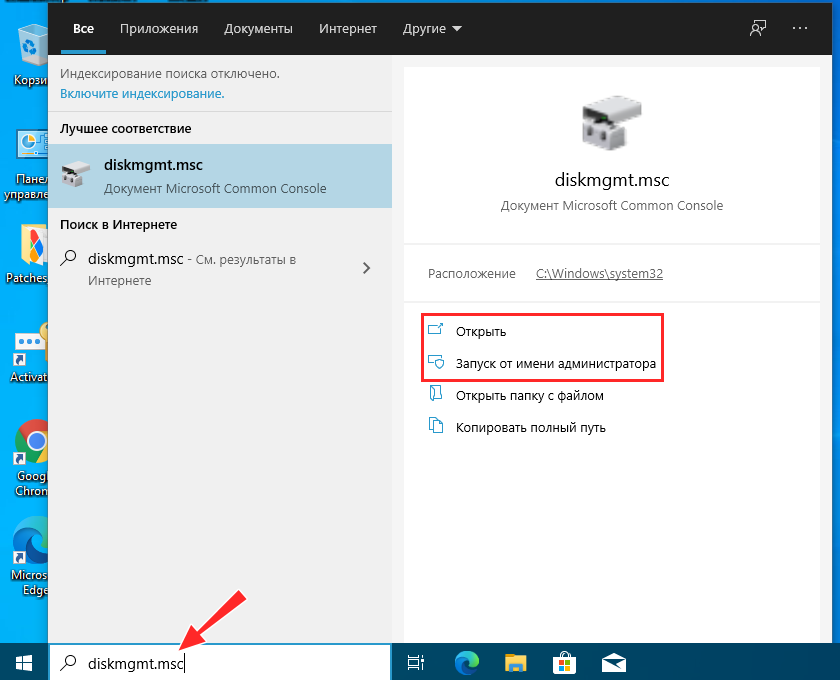
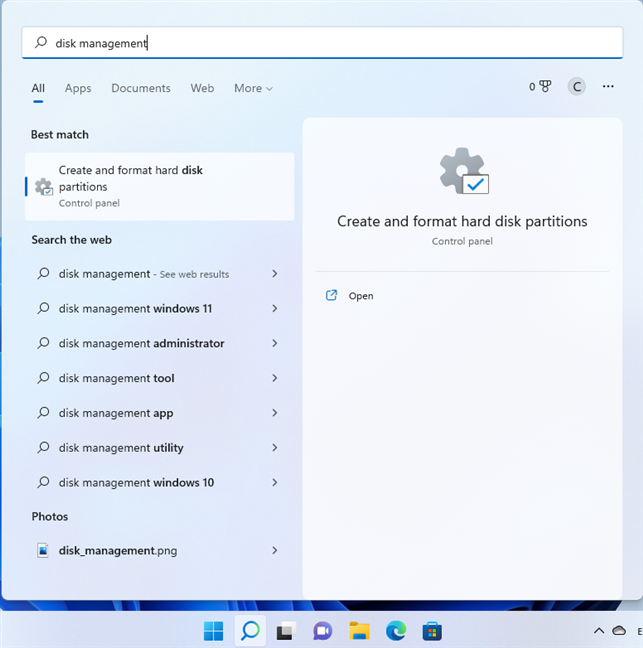
4. Search for Disk Management or diskmgmt.msc
You can also use the Search bar in Windows 10 or the Search icon from Windows 11. Click on it and then type “disk management.” In the list of results, click or tap “Create and format hard disk partitions” to open Disk Management.
Search for Disk Management
You can also search for “diskmgmt.msc” and click or tap on the first result.
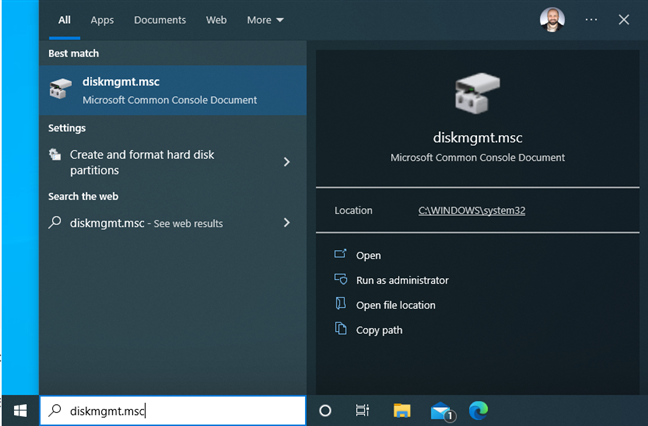
Search for diskmgmt.msc
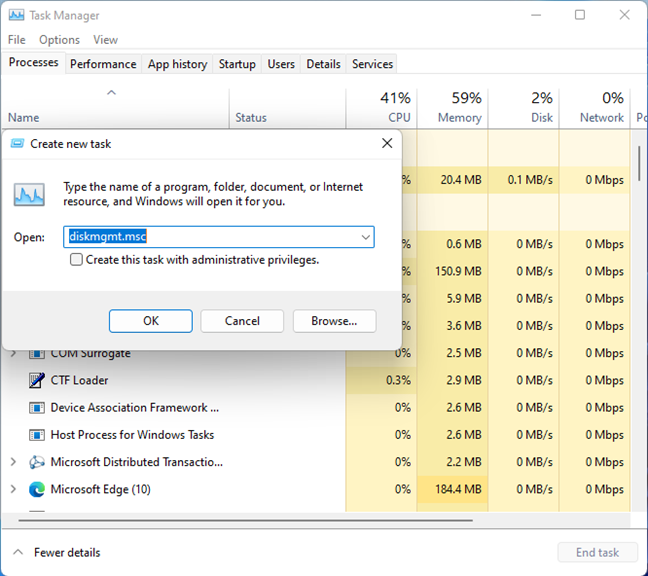
5. Start Disk Management from Task Manager
Open Task Manager by pressing Ctrl + Shift + Escape on your keyboard. If you’re using Windows 10 and the Task Manager opens in its compact view, click or tap More details. Then, click or tap File > Run new task. In the Create new task dialog box, type this command and click or tap OK:
diskmgmt.msc
Run diskmgmt.msc from Task Manager
In Windows 11, you won’t see the compact view. In Task Manager, click or tap “Run new task” in the Processes tab to access the Create new task dialog box.
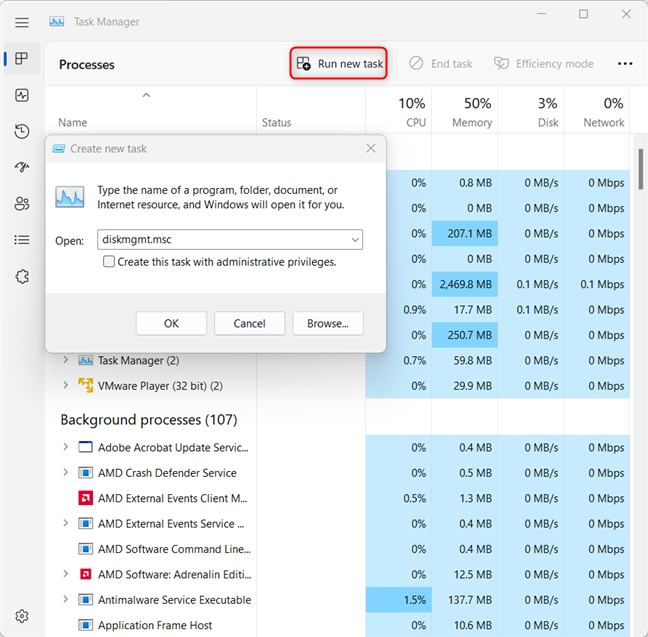
The Task Manager in Windows 11 is a little bit different
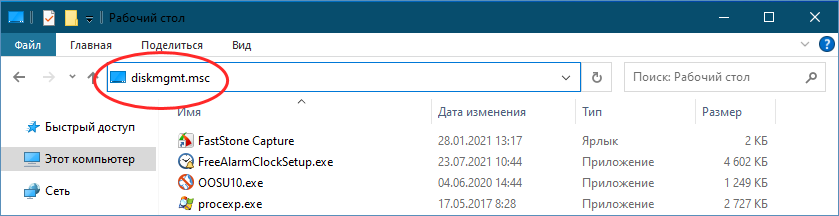
6. Open Disk Management (diskmgmt.msc) from File Explorer
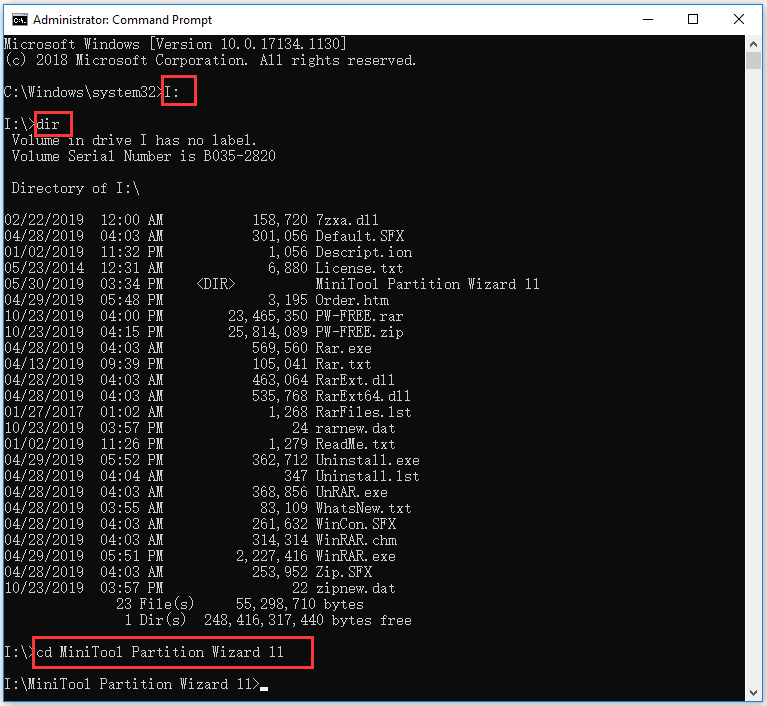
You can also navigate to the physical location of Disk Management’s file on your disk. To do that, open File Explorer (Windows + E) and browse to:
C:\Windows\System32\diskmgmt.msc
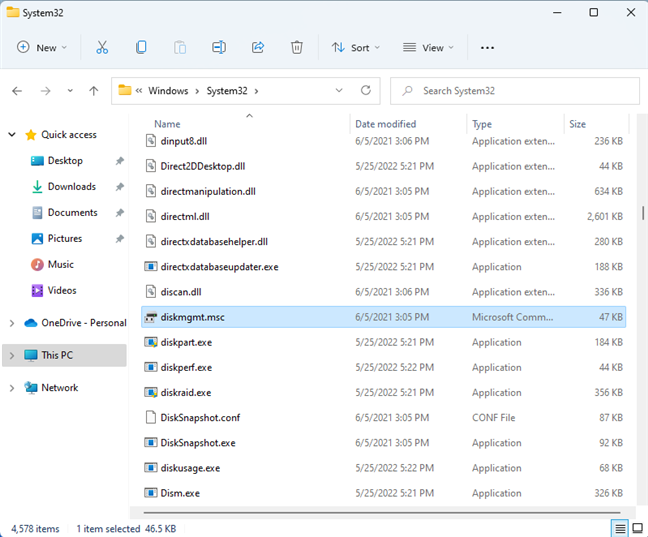
diskmgmt.msc is found in the System32 folder
Double-click on the diskmgmt.msc file to open Disk Management.
7. Create a Disk Management shortcut
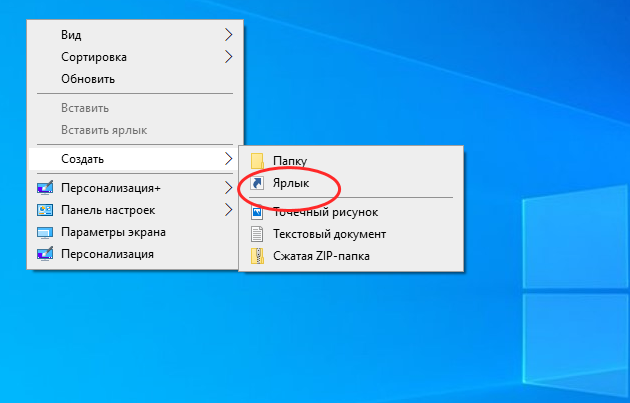
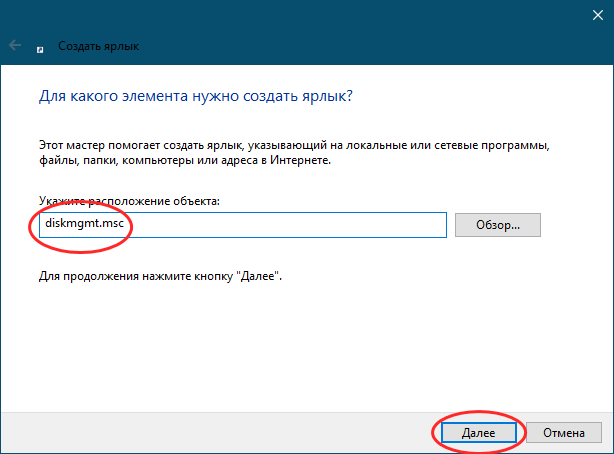
You can create a Disk Management shortcut by yourself and place it on your desktop or someplace else. To make the shortcut, right-click or press and hold on an empty space on your desktop, and choose New > Shortcut.
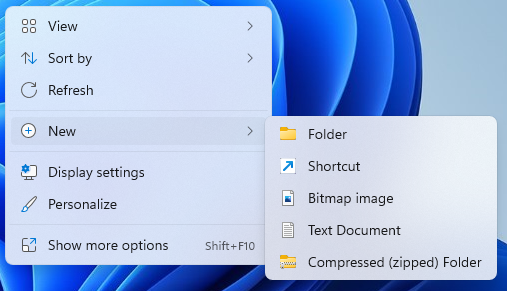
Right-click on the desktop and choose New > Shortcut
In the Create Shortcut wizard, enter diskmgmt.msc as the target.
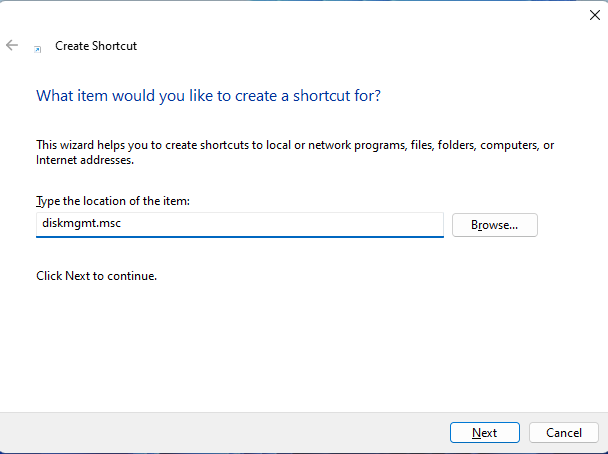
Set the target to diskmgmt.msc
TIP: For help on this topic, here’s how to create shortcuts for files, folders, apps, and web pages in Windows.
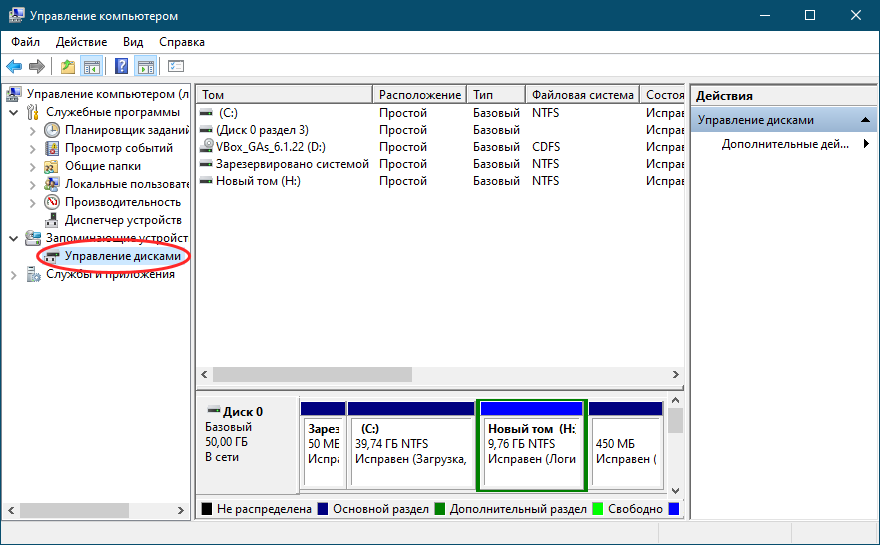
8. Access Disk Management from Computer Management
Disk Management can also be accessed via the more complex Computer Management console. Here are 11 ways to open Computer Management in Windows. Disk Management is part of the Storage section of tools on the left side of Computer Management.
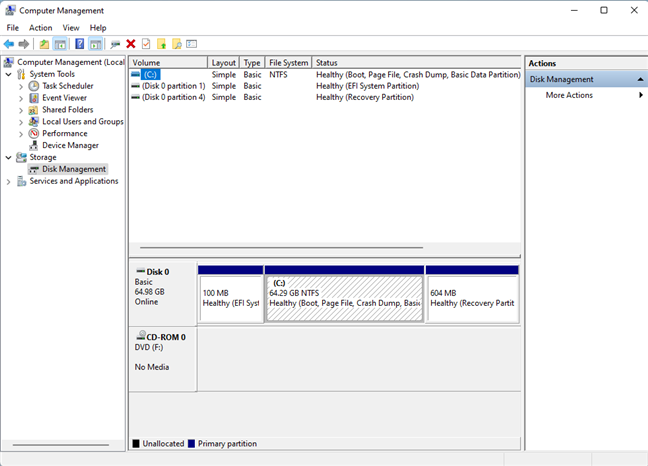
Disk Management is part of Computer Management
How are you using Disk Management?
I use the Disk Management tool in Windows to manage my computer’s partitions and drives. However, the activities I perform most often are changing drive letters and resizing partitions. What about you? Do you use it to format or delete drives? Comment below and share how you use Disk Management.