
Navigating the boot menu in Windows 11 can be essential for troubleshooting, installing a new operating system, or changing system settings. You can access it by restarting your computer and using specific key commands or going through the Windows settings.
To access the boot menu in Windows 11, you’ll need to follow a series of steps that will take you from your desktop to the boot menu options.
Step 1: Open Settings
Go to the Start menu, click on the gear icon to open the Settings.
Opening Settings is your first port of call. This is where you’ll find all the options that allow you to navigate deeper into your system settings.
Step 2: Navigate to System
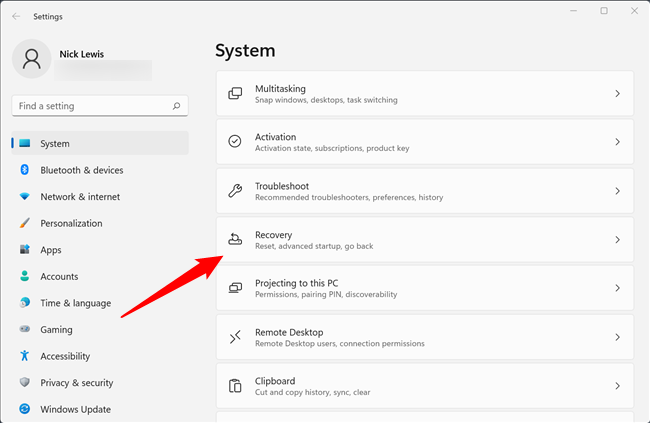
In the Settings window, find and click on the «System» option.
System settings control everything from display options to power settings. It’s like the control room of your computer.
Step 3: Click on Recovery
Within the System settings, scroll down and click on the «Recovery» tab.
The Recovery tab is where you can initiate various troubleshooting and recovery options, including the option to restart into the boot menu.
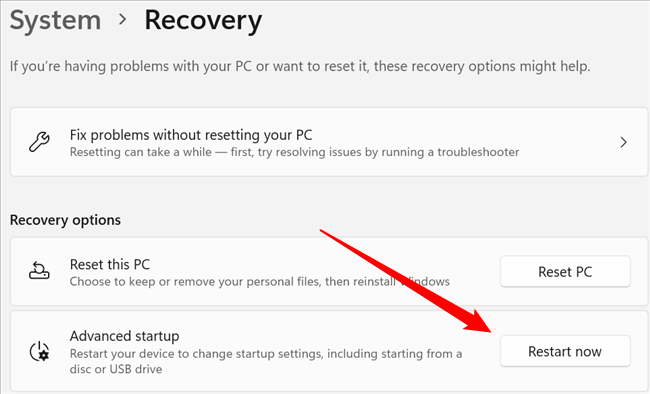
Step 4: Advanced Startup
Under the Recovery options, find the «Advanced startup» section and click on «Restart now».
This will restart your computer immediately and take you to a screen where you can choose advanced startup options.
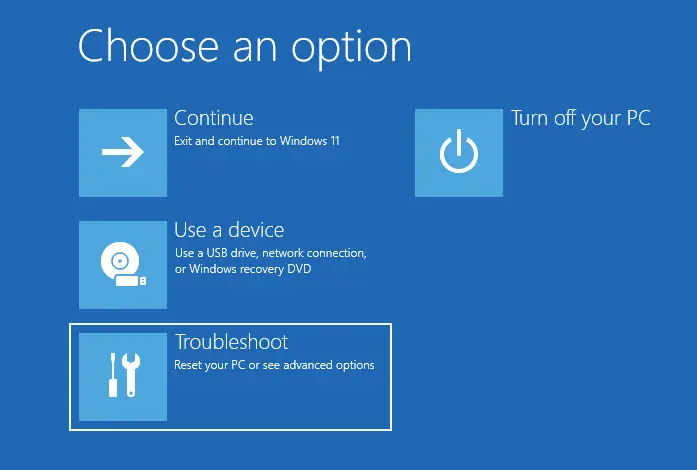
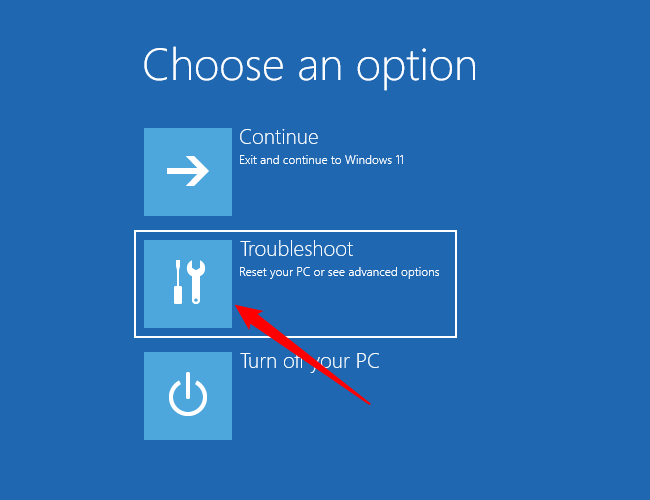
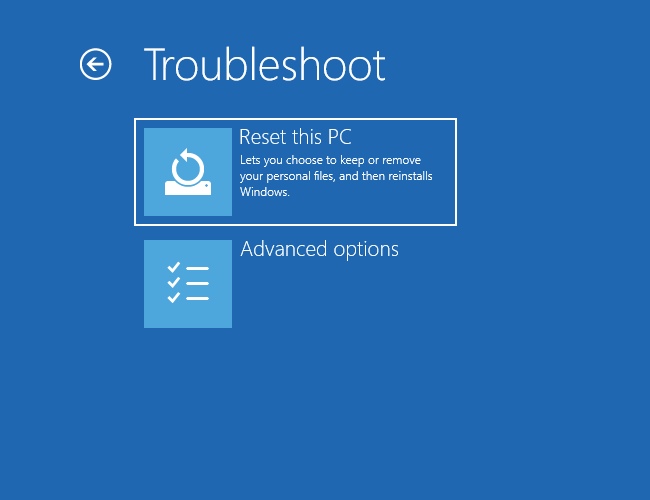
Step 5: Choose an Option
When your computer restarts, you will see the «Choose an option» screen. Select «Troubleshoot».
This screen offers several options for troubleshooting and advanced settings, allowing you to dive deeper into your system’s settings.
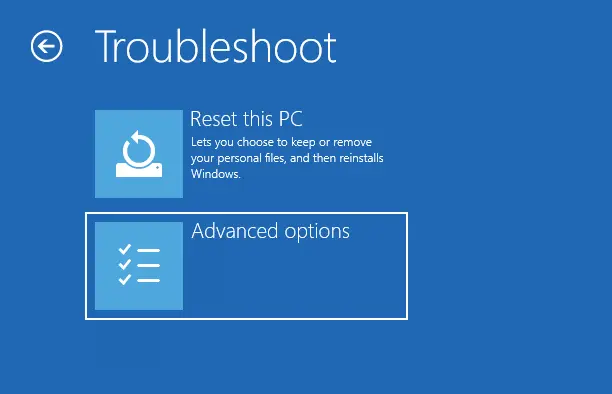
Step 6: Advanced Options
Click on «Advanced options» under the Troubleshoot menu.
Advanced options will give you access to more in-depth settings, including the boot menu.
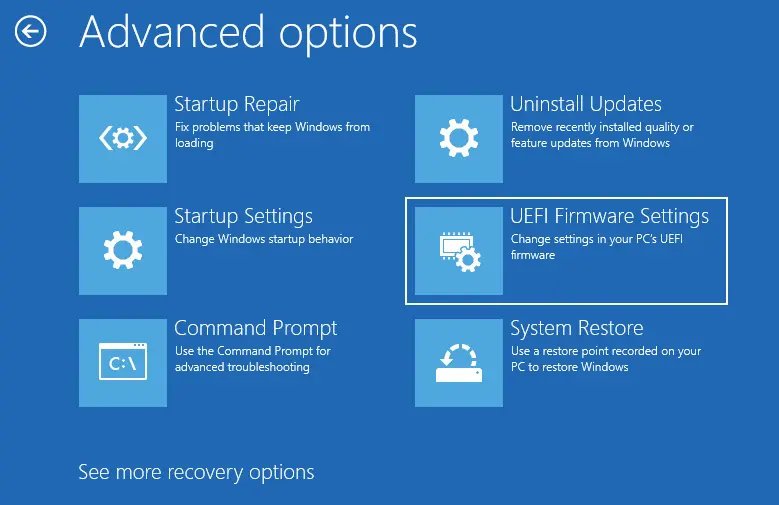
Step 7: UEFI Firmware Settings
Finally, click on «UEFI Firmware Settings» and then click «Restart».
Your computer will restart again, this time taking you directly to the UEFI firmware settings, which is essentially the modern version of the BIOS. Here, you can access the boot menu.
After completing these steps, your computer will bring up the UEFI firmware settings, which will let you access the boot menu. From here, you can change your boot order, troubleshoot, or perform other advanced tasks.
-
Timing Matters:
If you prefer using key commands, press the appropriate key (usually Esc, F2, F12, or Del) as soon as your computer starts up. Timing is crucial. -
Read Your Manual:
Different manufacturers may use different keys to access the boot menu. Check your computer’s manual for specifics. -
Multiple Methods:
You can also enter the boot menu from the login screen by holding down the Shift key while clicking Restart. -
Stay Updated:
Ensure your Windows 11 is up-to-date, as updates can sometimes change system setting pathways. -
Backup First:
Always backup your important data before making changes in the boot menu to avoid any potential data loss.
Frequently Asked Questions
What is the boot menu?
The boot menu is a system startup option that allows you to select different boot devices or troubleshoot your operating system.
How do I access the boot menu on startup?
Press the key specified by your manufacturer (often Esc, F2, F12, or Del) right after turning on your computer.
Can I use the boot menu to install a new operating system?
Yes, the boot menu allows you to boot from installation media like a USB drive or DVD to install a new operating system.
Is it safe to change settings in the boot menu?
It’s generally safe, but make sure you know what you’re doing. Always backup data before making changes.
Is the boot menu the same as BIOS?
The boot menu is a feature within BIOS or UEFI firmware that lets you select the boot device and access other advanced options.
Summary
- Open Settings.
- Navigate to System.
- Click on Recovery.
- Select Advanced startup and click Restart now.
- Choose an Option and select Troubleshoot.
- Click on Advanced options.
- Select UEFI Firmware Settings and click Restart.
Conclusion
Understanding how to enter the boot menu in Windows 11 is a valuable skill for anyone who wants to take control of their computer’s startup options. Whether you’re troubleshooting an issue, installing a new operating system, or changing hardware settings, accessing the boot menu can give you the flexibility you need.
It’s not complicated once you know the steps, and taking a few minutes to learn this process can save you a lot of time and headache in the future. So, next time you run into a problem or need to make a change, you’ll know exactly what to do. For further reading, consider diving into more advanced UEFI/BIOS settings to fully understand what options are available to you. Happy computing!
Matt Jacobs has been working as an IT consultant for small businesses since receiving his Master’s degree in 2003. While he still does some consulting work, his primary focus now is on creating technology support content for SupportYourTech.com.
His work can be found on many websites and focuses on topics such as Microsoft Office, Apple devices, Android devices, Photoshop, and more.
Opening the boot menu in Windows 11 is pretty straightforward. By pressing a specific key on your keyboard right after turning on your PC, you’ll gain access to the boot menu. This lets you choose which device your computer should start from, like a USB drive or a different hard drive. Follow these easy steps to master this task.
Here’s a detailed guide to help you open the boot menu in Windows 11. This menu is crucial when you need to change boot priorities or troubleshoot startup issues.
Step 1: Turn off your computer
Shut down your computer completely.
Make sure your computer is fully powered down before you begin. This will reset the system and prepare it for the next step.
Step 2: Turn on your computer
Press the power button to turn it back on.
As soon as you press the power button, you’ll need to be ready for the next step. Timing is essential here.
Step 3: Press the boot menu key
Right after you power on, repeatedly press the boot menu key (usually F2, F12, ESC, or DEL).
Each computer has a different boot menu key, so check your computer’s manual or the startup screen for the correct key. It’s usually displayed briefly at startup.
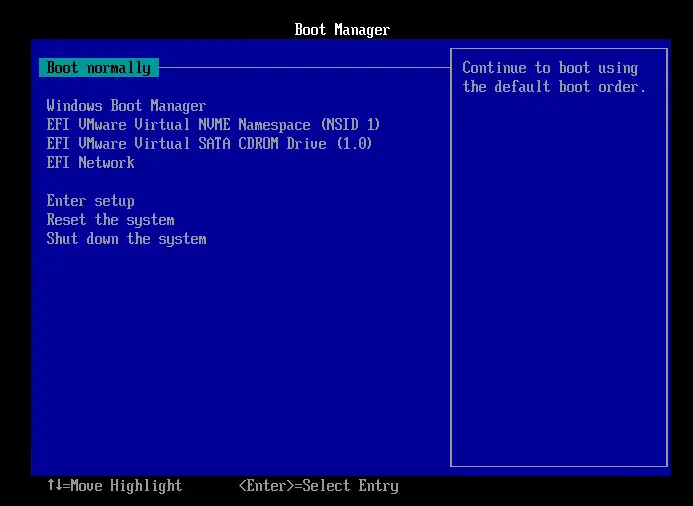
Step 4: Access the boot menu
Once you press the right key, the boot menu will appear on your screen.
If you’ve pressed the correct key at the right time, you’ll see a list of bootable devices. If not, you may need to restart and try again.
Step 5: Choose your boot device
Use the arrow keys to select the desired boot device and press Enter.
Navigate through the list using the arrow keys. Choose the device you want to boot from and confirm your choice by pressing Enter.
After completing these steps, your computer will boot from the selected device. This is useful for a variety of tasks, like installing a new operating system or running diagnostic tools.
- Know Your Boot Key: Different manufacturers use different keys (F2, F12, ESC, DEL). Check the manual or startup screen.
- Timing Is Key: Press the boot menu key immediately after turning on your PC. Missing the window means you’ll need to restart and try again.
- Watch for Prompts: Some computers display a brief message about which key to press for the boot menu.
- Keep Troubleshooting Tools Handy: A bootable USB with diagnostic tools can be a lifesaver if you’re having startup issues.
- Practice Makes Perfect: If you’re new to this, practice a few times to get the hang of it.
Frequently Asked Questions
What is the boot menu?
The boot menu is a menu that allows you to choose which device to boot from, such as a hard drive, USB drive, or CD/DVD.
Why do I need to access the boot menu?
Accessing the boot menu is useful for tasks like installing a new operating system, running diagnostic tools, or booting from an external device.
What if I miss the key press?
If you miss pressing the boot menu key in time, simply restart your computer and try again.
Can I change the boot order permanently?
Yes, you can change the boot order permanently through the BIOS/UEFI settings, but this is different from using the boot menu.
Are the boot menu keys the same for all computers?
No, boot menu keys vary by manufacturer. Common keys include F2, F12, ESC, and DEL, but it’s best to check your computer’s documentation.
Summary of Steps
- Turn off your computer
- Turn on your computer
- Press the boot menu key
- Access the boot menu
- Choose your boot device
Conclusion
Opening the boot menu in Windows 11 is a straightforward but essential skill for anyone who wants to take control of their computer. Whether you’re troubleshooting a problem, installing a new operating system, or just exploring your options, knowing how to access the boot menu can be invaluable. The steps are simple: power down your computer, power it back up, and be ready to press the boot menu key. Once you’re in, you’ll have the freedom to select your preferred boot device.
Don’t be discouraged if it takes a few tries to get the timing right. Practice makes perfect! And remember, the boot menu key varies between different manufacturers, so make sure to check your computer’s documentation for the exact key. By mastering this skill, you’ll open up a new world of possibilities for managing and customizing your computer experience. Happy booting!
Matthew Burleigh has been writing tech tutorials since 2008. His writing has appeared on dozens of different websites and been read over 50 million times.
After receiving his Bachelor’s and Master’s degrees in Computer Science he spent several years working in IT management for small businesses. However, he now works full time writing content online and creating websites.
His main writing topics include iPhones, Microsoft Office, Google Apps, Android, and Photoshop, but he has also written about many other tech topics as well.
Read his full bio here.
The following article provides you with steps on how to access Windows 11 Boot Menu. How to access the boot menu in the Windows or Windows 11 Advanced Startup Options menu on your computer. There are different ways to access Windows 10 and 11 boot options, and in this article, we will show you different ways to access Windows 11 advanced boot options. Let’s have a look at these options.
The Advanced Startup Options Menu is fundamentally a boot menu. A menu where you can access the Windows Startup Settings, Safe Mode, and several other startup methods. You can use these settings to help you access and repair Windows 11. This is required if the operating system has problems running or starting.
Access Windows 11 Boot Options via Windows settings
In Windows 11, right-click on the Start button and then click Settings.
Select Windows Update and then click on Additional options.
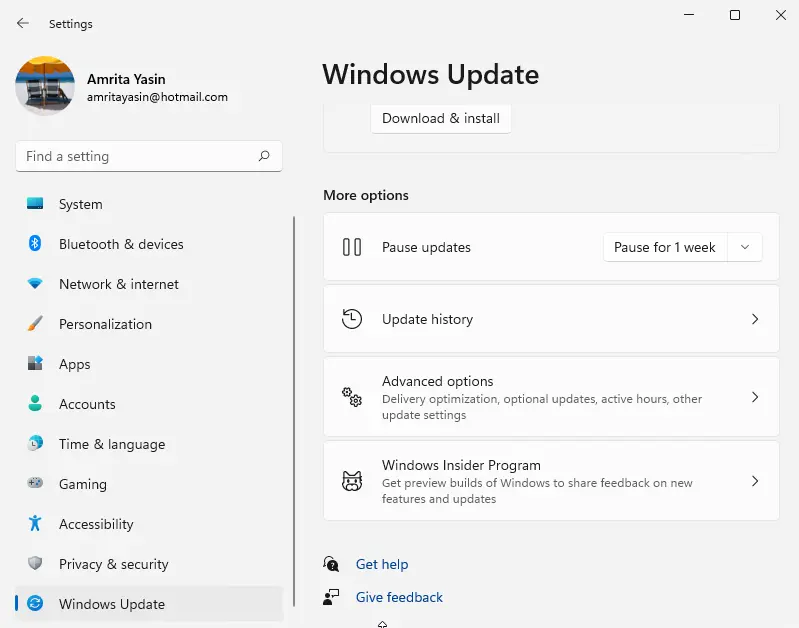
Select recovery under advanced options.
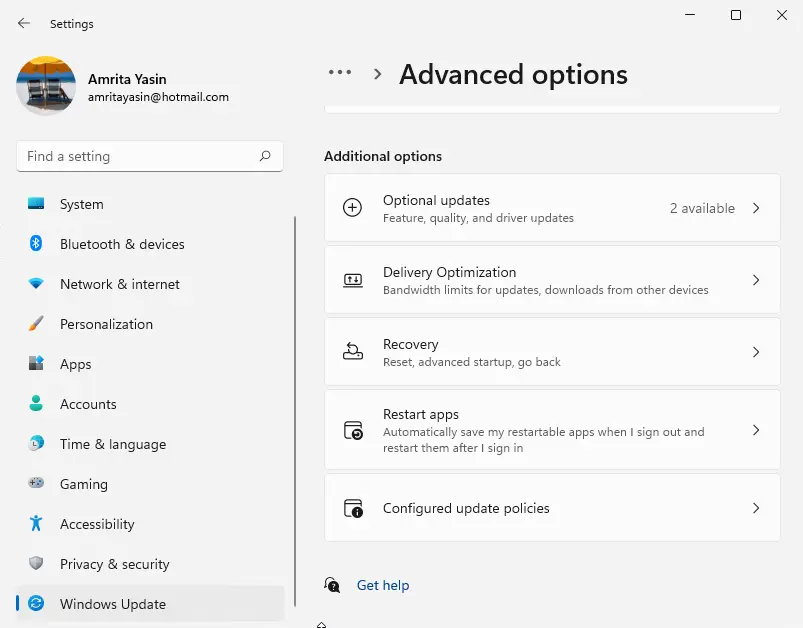
Under recovery, options Click the Restart Now button next to Advanced Startup.
Click Restart Now.
Click Troubleshoot.
Select Advanced options
Choose UEFI Firmware Settings.
If you did not see UEFI Firmware Settings options, then choose Startup Settings instead. When your computer is restarting, press F1, F2, or a different key to access the system BIOS.
Click Restart.

Here is the Windows 11 system BIOS.
Access Windows 11 Boot Menu using Command Prompt
You can also access Windows 11’s advanced boot options with a quick command prompt.
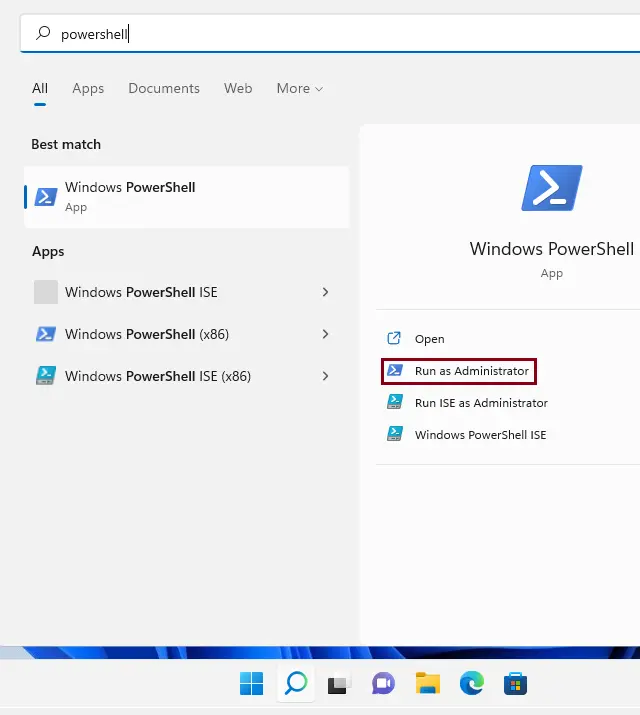
Click on the Windows 11 search button, and then click on Windows PowerShell run as administrator.
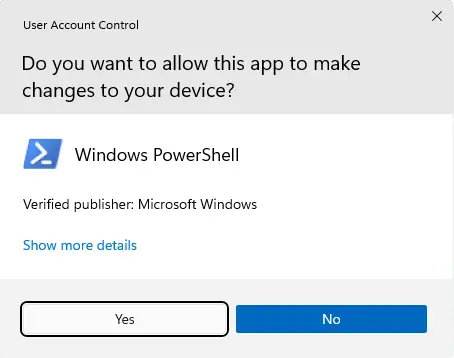
User account control: click yes.
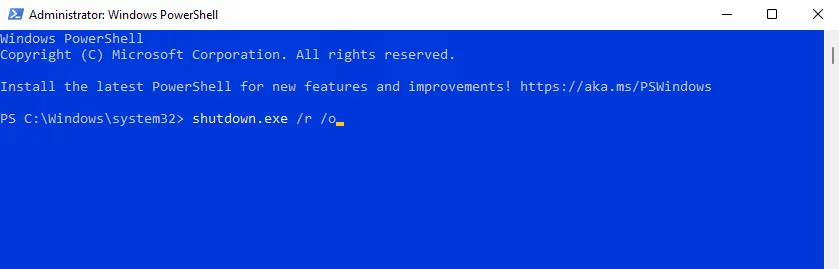
In PowerShell, type shutdown.exe /r /o and then hit enter.
The window will open with a prompt saying you are about to be signed out; just click close, and then Windows 11 will restart to boot options. Nevertheless, it is unlikely that in the above ways, where Windows reboots immediately, there will be a tiny delay before the Windows restart.
Refer to this site for more details on how to access the boot menu in Windows 11.
Jamilhttp://jamiltech.com
A Professional Technology Blog Writer | An energetic professional with more than 20+ years of rich experience in Technology, Planning, Designing, Installation, and Networking.
Download Article
A quick guide to find the Boot menu on Windows to recover or repair
Download Article
- Using a Keyboard
- Using Windows 11, 10, and 8
- Using Windows 7 and Vista
- Using Windows XP
- Video
- Q&A
|
|
|
|
|
Are you trying to get to the Windows Boot menu through the menu or with a key? If you need to access the Boot menu, you can press the F8 key before the Windows starts. You can also open the Boot menu from the Start menu if you’re already logged into your device. Knowing how to access the Boot menu can help troubleshoot your computer if it’s experiencing issues. This wikiHow will show you how to get into the Boot menu on Windows 11, 10, 8, or 7.
Things You Should Know
- Turn on your computer and press the function key for your PC model.
- To reach the menu from Windows, click «Start» → Power button → hold «Shift» and click «Restart». Click «Troubleshoot» → «Advanced options».
- Use the Boot menu to find actions you can use to repair or troubleshoot issues with Windows.
-

To access the Boot menu, you’ll need to press a key before the operating system fully loads.[1]
- If your computer is on, shut it down first. You can also restart it.
-
This will vary depending on your device. Here’s a list of common BIOS keys by manufacturer:[2]
- Acer: Del or F2
- Asus: F9
- Dell: F12
- HP: Esc or F10
- Lenovo: F1 or F2
- Samsung: F2
- You must press this key before the Windows logo appears. When done correctly, your computer will start in Safe mode.


Advertisement
-
It’s usually at the bottom-left corner of the screen.
- On Windows 11, this will be in the bottom center of the screen.
-
This will be underneath the cog icon.
- A pop-up menu will open.
-
You must hold Shift, otherwise your computer will perform a regular restart.[3]
- The computer will power off and back on. Instead of booting to the desktop, you’ll see a blue menu titled “Choose an option.”
-
This will be underneath Continue.[4]
-
You can find this at the very bottom.[5]
-


Advertisement
-
This will open the Shut Down Windows menu.
-
The options will expand.
-
This will be next to Shut down.[6]
-
The computer will now shut down and restart. As soon as the computer restarts, you will need to act quickly—be ready.
-
You’ll need to press it before the Windows logo appears. Continue holding this key until you see the Advanced Boot Options menu.
- If Windows boots to the desktop, repeat this process to try again.


Advertisement
-
This will open the Windows Security menu.
-
You can find this next to Log Off….
-
This will expand the options.
-
This will be next to Shut down.
-
The computer will now restart. As soon as the computer restarts, you will need to act quickly—be ready.
-
Continue tapping this key until you see the Advanced Boot Options menu—this is the Windows XP boot menu.
- If Windows boots to the desktop, repeat this process to try again.


Advertisement
Add New Question
-
Question
My Lenovo turbo boost laptop hangs by showing boot menu when switching on, what to do?
Amin Moghoomi
Community Answer
Try finding your hard drive in the list. And you can try a Windows installation disk to check your hard drive.
-
Question
I want to boot up using my old Windows XP Pro Disk and use it to format my hard drive, which doesn’t have windows XP on it. Can this be done?
Yes, it can. Insert Your disk. Press the bios key. This depends on your computer. Change the boot order. Save the changes. Reboot your computer. When you see «Press Any Key To Boot From CD», press a key. When you get to «Where Would You Like To Install Windows?», select the drive, press Enter, click «Format As Ntfs» Or «Format As Fat».
-
Question
How can I restart my laptop?
Nolan JP
Community Answer
Open the start menu, then push the power button (it looks like an «O» but with an «I» stuck in the top). Then push the button that says «Restart.» The computer will turn off, then back on.
Ask a Question
200 characters left
Include your email address to get a message when this question is answered.
Submit
Advertisement
Video
Thanks for submitting a tip for review!
About This Article
Thanks to all authors for creating a page that has been read 654,338 times.
Is this article up to date?
Sign in to your How-To Geek account

Quick Links
-
What Does the Advanced Options Menu Do?
-
How to Access the Advanced Options Menu
The Advanced Options Menu, sometimes called the Boot Menu, contains tools and configuration options you can use to troubleshoot or repair your PC. Here’s how to use it on Windows 11.
The Advanced Startup Options Menu offers you a handful of utilities. Some of them are as simple as left-clicking the option and you’re done, while others require extensive user interaction. Here is a brief rundown on what the utilities are and what they do.
- Startup Repair: Startup Repair will attempt to automatically fix issues that prevent Windows 11 from booting correctly.
- Startup Settings: Startup Settings allows you to change how Windows 11 Boots. You can do things like enable Safe Mode, debugging, or boot logging, to name a few.
- Command Prompt: The Command Prompt option brings up a Command Prompt window that can be used to run diagnostic or repair commands.
- Uninstall Updates: The Uninstall Updates option will roll back the latest updates installed, including major Windows versions or updates.
- UEFI Firmware Settings: This option restarts your computer and opens the BIOS/UEFI.
- System Restore: System Restore allows you to use a previously created restore point to roll back Windows to a point where it was working correctly.
- System Image Recovery: System Image Recovery is similar to System Restore, but uses a complete system image instead of a restore point. System images are much larger and more complete than restore points and include all of your files, programs, and settings.
Windows 11, unlike Windows 10, does not support systems that are running a BIOS — they must be using UEFI. The UEFI requirement means that the advanced startup menu is always accessible from within Windows.
Within the Settings App
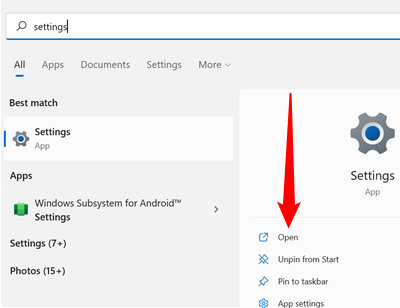
Open the Start Menu, type «Settings» into the search bar, and then click «Open» or hit Enter.
Ensure that you are on the System window. If you aren’t, click «System» in the top left-hand corner of the Settings window. Then scroll down and click «Recovery.»
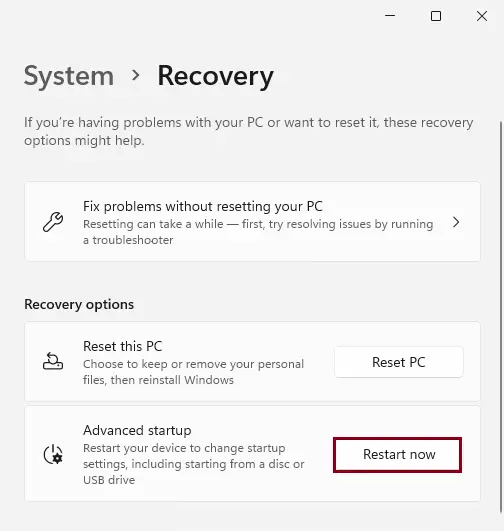
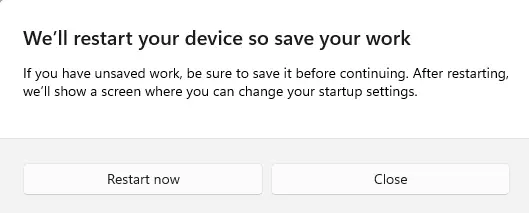
There will be a section titled «Recovery Options.» Look for a section titled «Advanced Startup,» make sure to save anything you’re working on, and then click «Restart Now.» You may get a prompt warning you about unsaved work— if you have already saved everything, don’t worry about it.
Your computer will restart after a few seconds.
By Clicking Restart
If you don’t want to go into the Settings app and navigate through some sub-menus, there is a more efficient way: Shift-clicking the Restart option. Click the Start button or hit the Windows key, click the power icon, then hold Shift and click «Restart.»
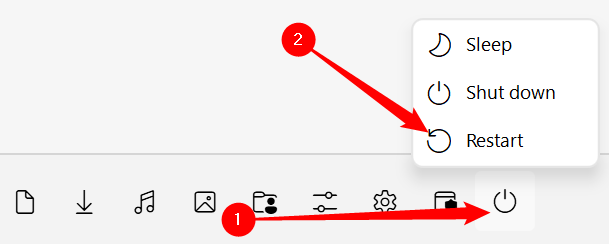
The most obvious place to use this trick is with the Restart option in the Start menu, but it isn’t the only place. Just about anywhere that you see a «Restart» button will work, including the lock or login screen.
After Restarting Your Computer
Your computer will display a blue screen with a few options on it after you click «Restart Now» in the recovery menu, or Shift-click «Restart.» Choose «Troubleshoot» from the listed options.
It is possible there will be more options available to you than are displayed here. For example, the «Choose an option» screen might also feature a «Use a Device» option.
Click «Advanced Options» on the next screen, and you’ll be taken to the Advanced Options menu.
That’s it — you’re at the Advanced Options window.
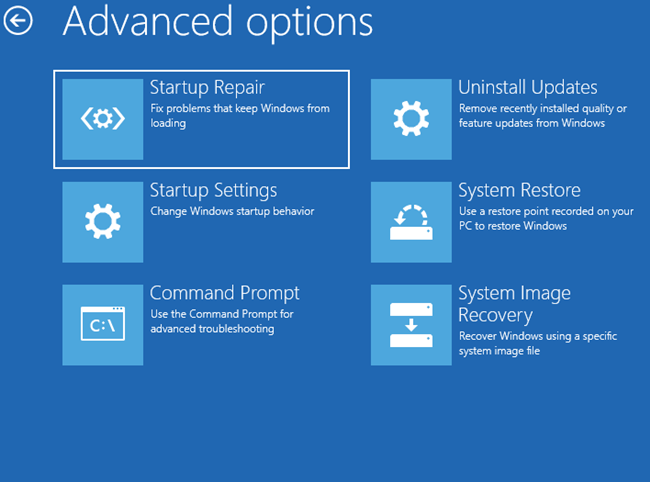
The Advanced Options menu has a number of different utilities available. Some of them are fully automated, like Startup Repair, whereas others require extensive user interaction, like the Command Prompt. Which you use depends a lot on what is wrong with your PC.