Как открепить ярлыки на рабочем столе в windows 11

1. Make use of the Desktop Context Menu
• To begin, go to the desktop and right-click on a blank area.
• Next, go to View and uncheck the box beside Show desktop icons.

(external link removed by moderator)

2. Make use of the Local Group Policy Editor
• To launch the Run command dialogue box, press Win + R.
• To open the Local Group Policy Editor, type gpedit.msc and press Enter.
• Select User Configuration > Administrative Templates > Desktop.
• On the right-hand side pane, double-click the «Hide and disable all items» on the desktop option.
• Select Enabled in the following box, then click Apply and OK.

(external link removed by moderator)

3. Make use of the Registry Editor
• To launch the Run command dialogue box, press Win + R.
• To launch the Registry Editor, type regedit and click Enter.
• Goto HKEY CURRENT USER > Software > Microsoft > Windows > CurrentVersion > Policies > Explorer
• Then, in the right-hand side pane, right-click a blank space and choose New > DWORD (32-bit) Value.
• Enter NoDesktop as the value for the DWORD.
• Set the NoDesktop Value Data to 1 by double-clicking it.
• To save these changes, click OK and then restart your computer.

The Windows 11 taskbar looks good but may not include the icons you want. You may need to pin to the taskbar the apps you use frequently or remove icons for apps or Windows features you don’t use. For example, some people do not like the Widgets from Windows 11 and want them removed from the taskbar. To help you out, here’s everything you need to know about adding or removing icons, apps, and items to/from the Windows 11 taskbar:

How the Windows 11 taskbar is organized

The Windows 11 taskbar is more complicated than you may think, and on it, you find many things:

  • The Widgets icon is alone on the left side of the taskbar. When pressed, this icon opens the Widgets app.
  • The Windows icon is placed towards the middle of the taskbar. When pressed, it opens the Start Menu.
  • Next to it, you find the Search box (or icon) that you can use to find stuff on your Windows 11 computer or device.
  • Standard taskbar items like Copilot, Task view, and Chat.
  • The apps that you have pinned to the taskbar.
  • The system tray icons for OneDrive, Bluetooth, etc. are to the right.

You can see them all highlighted in the image below.

The icons on the Windows 11 taskbar

The icons on the Windows 11 taskbar

And, to make things even more complicated, the taskbar can have hidden system tray icons. To see them, you must click or tap the small arrow pointing upwards. Hovering your mouse over it displays the Show hidden icons tooltip.

Show hidden icons

Show hidden icons

This reveals additional icons hidden from your taskbar’s system tray area. The arrow then points downwards, and clicking it hides the list of hidden icons.

Minimize the hidden icons

Minimize the hidden icons

TIP: Clicking or tapping the system tray’s network, volume, or battery icons opens the Windows 11 Quick Settings.

Adding or removing icons to the taskbar is done differently, depending on the type of icon you want added or removed. I’ll cover each scenario, starting with adding or removing pinned apps to the taskbar.

How to add or remove pinned apps to/from the Windows 11 taskbar

Windows 11 starts with a couple of pinned apps to the taskbar. You should see an icon for File Explorer, Microsoft Edge, and the Microsoft Store. You can add more apps to the taskbar by pinning them or you can remove pinned apps from the taskbar. Let’s see how to do both of these things:

How to pin apps to the Windows 11 taskbar

Let’s assume that you start with the standard taskbar and want to pin an app you use frequently to the Windows 11 taskbar.

The default Windows 11 taskbar

The default Windows 11 taskbar

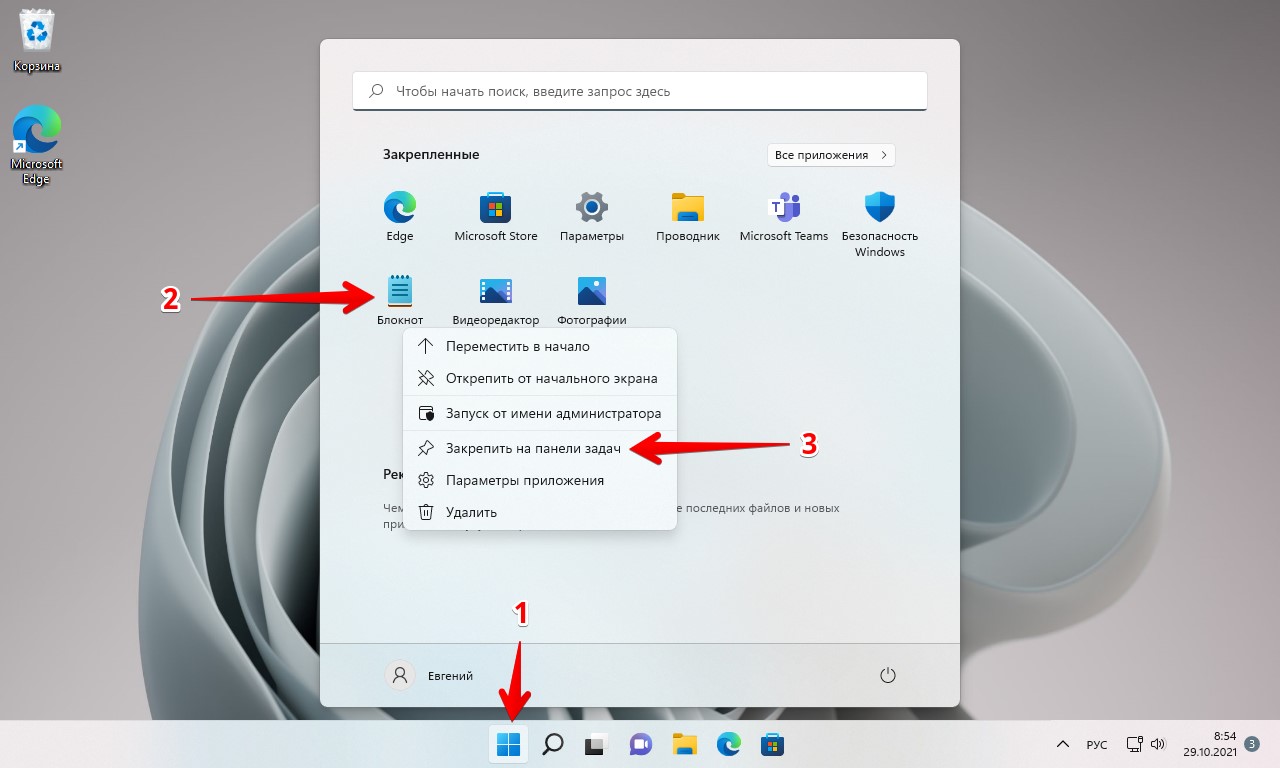
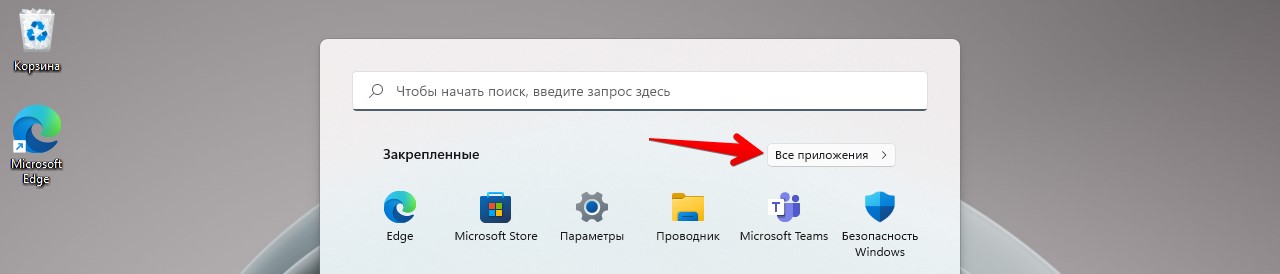
First, click or tap the Windows icon to open the Start Menu and go to All apps.

Click Windows data-lazy-src=

Click Windows > All apps

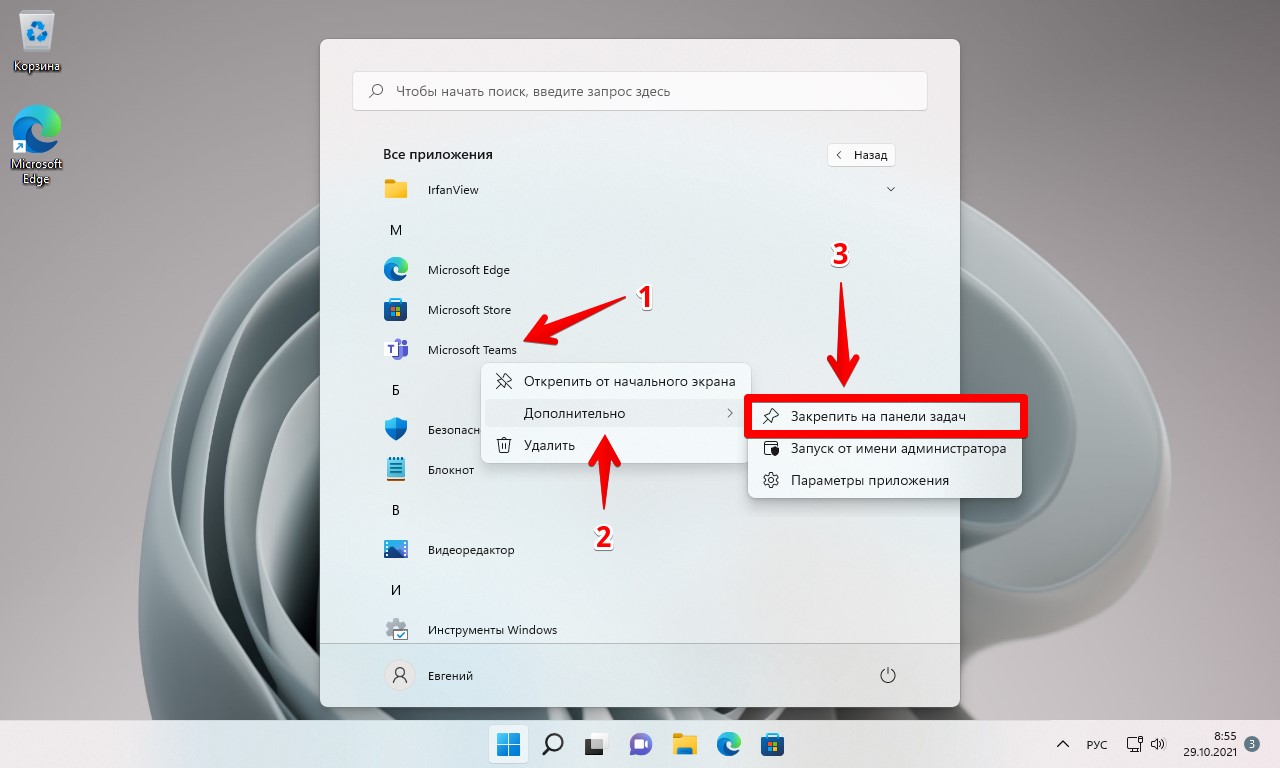
In the list of apps, find the one you want to pin to the taskbar and right-click (or press and hold) on it. In the menu shown, choose More, followed by Pin to taskbar.

Pinning an app to the taskbar

Pinning an app to the taskbar

Notice how your app is now pinned to the taskbar. In my case, I added Excel to the taskbar.

The icon for Excel was added to my taskbar

The icon for Excel was added to my taskbar

How to remove pinned apps from the Windows 11 taskbar

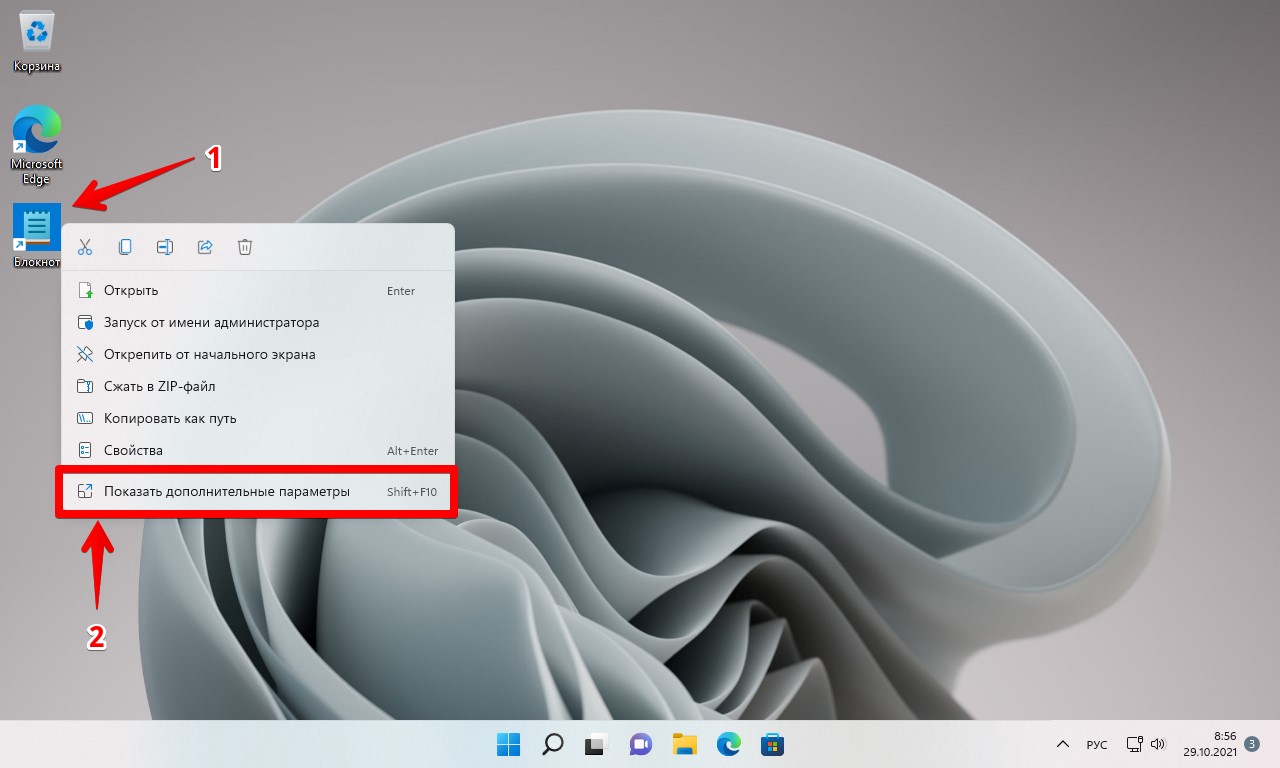
Removing apps from the Windows 11 taskbar is easy: right-click (or press and hold) the icon you want to remove from the taskbar, and in the menu that appears, choose Unpin from taskbar.

Unpin an app from the taskbar

Unpin an app from the taskbar

The icon is immediately removed from the taskbar without any confirmation being required.

Unfortunately, this method doesn’t work for removing all the icons from the Windows 11 taskbar. For example, nothing happens if you right-click on the Chat, Task view, Copilot, and Widgets icons.

Right-clicking these icons doesn't help you unpin them

Right-clicking these icons doesn’t help you unpin them

Also, if you right-click the Windows icon, you see the WinX menu. To remove most of these icons, you need to follow a different procedure, as Windows 11 considers them to be standard taskbar items, not pinned apps.

How to add or remove taskbar items like Widgets, Search, Copilot, Task view, and Chat

To add or remove any of the standard Windows 11 taskbar items, right-click (or press and hold) somewhere on the empty space on the taskbar. In the menu that appears, choose Taskbar settings.

Right-click and choose Taskbar settings

Right-click and choose Taskbar settings

Alternatively, open the Settings app (Windows + I) and go to Personalization > Taskbar. Now, you see all the options for configuring how the taskbar works in Windows 11. On the right, if it is not already expanded, click or tap on the Taskbar items section. This reveals all the standard taskbar items with different switches and options next to them.

The personalization settings for your taskbar

The personalization settings for your taskbar

If you want to remove the icon for items like Widgets, Chat, or Copilot, click or tap the switch next to them and turn it Off, like in the screenshot below. If one of those items is hidden from the taskbar and you want to see it again, click or tap on the switch next to it to turn it On.

Set the switches to On or Off, depending on what you want

Set the switches to On or Off, depending on what you want

If you want to remove the Search box from the Windows 11 taskbar, click or tap the dropdown list next to Search and choose Hide. If Search is missing from your taskbar, you can add it by choosing one of the other options: Search icon only, Search icon and label, or Search box. I prefer the last options but don’t hesitate to try them all before choosing your favorite.

Customizing the Search icon/box

Customizing the Search icon/box

TIP: Don’t fret about removing Search from the taskbar; you can still search for apps and files on your Windows 11 computer from the Start Menu. For details, read this guide on how to use Windows 11’s Search.

For this tutorial, I decided to remove all taskbar items. Here’s how clean my Windows 11 taskbar looks after doing this: I see only the Windows icon (which cannot be removed from the taskbar) and my pinned apps. On the right, I also have the system tray with some icons that are useful to me.

A simpler Windows 11 taskbar

A simpler Windows 11 taskbar

Do you prefer a cleaner taskbar like the one in the screenshot above or the default one from Windows 11? Also, if you don’t want to always see the taskbar, here’s how to hide (and unhide) the taskbar in Windows 11.

How to add or remove system tray icons in Windows 11

Now, it is time to take care of the right side of the taskbar, where you find the system tray. To add or remove icons to this area, right-click or press and hold on the free area on your taskbar and choose Taskbar settings.

Right click and choose Taskbar settings

Right click and choose Taskbar settings

When the Settings app opens and displays the personalization settings for your taskbar, click or tap to expand the System tray icons section. Here you can:

  • Enable the Pen menu by clicking or tapping its switch and turning it On. If you’re running Windows 11 on a touchscreen device with a stylus, you can use this icon to access additional options and apps. If you don’t have a stylus, you won’t need the Pen menu, and it’s better to remove this system tray icon and set it to Off.
  • Click or tap on the dropdown list next to the Touch keyboard and select your favorite behavior:
    • Have the Touch keyboard button appear “When no keyboard (is) attached,”
    • Always show the Touch keyboard icon, regardless of whether there’s a keyboard connected to your Windows device or not,
    • Never show the Touch keyboard button, effectively removing its icon from the system tray. This is the best option if you don’t have a touch screen.
  • Toggle the Virtual touchpad switch On or Off to either show or hide its icon in the system tray. The Virtual touchpad can replace the mouse and help users running Windows 11 on a tablet.

Choose your System tray icons

Choose your System tray icons

As mentioned earlier in this tutorial, other system tray icons can be displayed on the right side of the taskbar. Some always show up on the system tray, while others can be hidden from view. Windows 11 calls this the Hidden icon menu.

The Hidden icon menu

The Hidden icon menu

You can manage all the icons in this menu from the Other system tray icons section of the taskbar settings. If it’s not already open, expand the Other system tray icons section by clicking or tapping on it. Next, you can decide whether to show the Hidden icon menu or hide it completely. If you go for the latter option, its arrow, shown to the left of the system tray, will be removed, and you’ll no longer be able to see any hidden icons in the menu. Instead, they will all be visible in the system tray if enabled using their corresponding switches.

Choose what you want to see in the system tray

Choose what you want to see in the system tray

If you show the Hidden icon menu, you can control what icons are displayed inside it. Turn Off the switch next to each icon you want to remove from the taskbar, but that you want listed in the Hidden icon menu. However, you should remember that the system tray icon for any particular app is only shown when that app is running on your Windows 11 computer or device. It doesn’t matter if you choose to include an app icon in the system tray or only show it in the Hidden icon menu; it will only show up when you start the corresponding app. To help you better understand things, here’s how the system tray looks on my taskbar when I turned Off the Hidden icon menu and enabled the icons for OneDrive, Microsoft Teams, and Bluetooth devices.

The icons I enabled for the system tray

The icons I enabled for the system tray

Notice how the arrow from the system tray, shown in previous screenshots, is gone and how the system tray takes a lot more space and is much more crowded.

NOTE: The Windows 11 taskbar is useful but not as great as it used to be in Windows 10. Here are the things you can’t do with the Windows 11 taskbar.

Which icons did you add or remove to/from the taskbar in Windows 11?

Now you know how to add or remove icons from both the taskbar and the system tray in Windows 11. It doesn’t matter if you want to pin apps, remove apps, add or remove standard taskbar items, or customize which icons are shown in the system tray. This guide covers it all. Before closing, tell me in the comments below which icons you removed or added and why.

Как закрепить и открепить приложение на панели задач. Как закрепить приложение на панель задач из меню пуск и с рабочего стола 

Для быстрого доступа к часто используемым приложениям существует самый простой способ — закрепление на панели задач. Такая возможность имеется во всех версиях Windows, включая и Windows 11.

Как закрепить приложение на панели задач из меню «Пуск»

В Windows 11 это можно сделать буквально за пару кликов. Щелкаем меню «Пуск» на панели задач.

Затем, если мы хотим закрепить приложение на панель задач, которое уже закреплено на начальном экране меню «Пуск» — щелкаем по нему правой кнопкой мыши и в контекстном меню выбираем опцию «Закрепить на панели задач».

Кроме этого, чтобы закрепить приложение, отсутствующее на начальном экране меню «Пуск», нажимаем кнопку «Все приложения» в правом верхнем углу.

Находим приложение в списке, затем щелкаем по нему правой кнопкой мыши, выбираем «Дополнительно» — «Закрепить на панели задач».

Как закрепить приложение на панели задач с рабочего стола

Для этого щелкаем правой кнопкой мыши по ярлыку нужного приложения. Затем нажимаем на опцию «Показать дополнительные параметры».

Это развернет расширенное контекстное меню. Или можно просто нажать сочетание клавиш «Shift+F10» на клавиатуре.

В контекстном меню выбираем пункт «Закрепить на панели задач».

Чтобы открепить приложение, щелкаем правой кнопкой мыши по закрепленному приложению на панели задач. Затем в контекстном меню выбираем опцию «Открепить от панели задач». Эти действия открепят выбранные приложения от панели задач.

Вот пожалуй и все. Теперь вы знаете, как закрепить или открепить нужные или ненужные приложения на панели задач.

Taskbar is an integral part of a Windows computer since it offers a quick access to your most-used applications. Besides letting Windows arrange them, you can also organize those icons to make it easier to access your favorite apps. In this article, we will guide you with effict ways to ungroup taskbar icons in Windows 11. That’ll give you the flexibility to tailor your desktop experience to your preferences. 

Ungroup Taskbar Icons in Windows 11

But why would anyone want to ungroup taskbar items in Windows 11, you might wonder? Ungrouping taskbar icons wills how you all the open applications and you can switch between them seamlessly. Let’s methods to prevent Windows 11 from never combining taskbar buttons.

1. Enable ‘Never Combine Taskbar Icons’ From Settings

This is one of the easiest and most common ways to ungroup taskbar items in Windows 11. Follow the below instructions. 

Step 1: Press the Windows key on your keyboard, type Settings, and click Open.

Note: Press the Windows key + I keyboard shortcut to quickly open Windows Settings.

type Settings

Step 2: From the side pane, go to Personalization. 

Step 3: Under Personalization, choose the Taskbar option. 

choose the Taskbar option

Step 4: Scroll down to the bottom and click on Taskbar behaviors to expand it.

click on Taskbar behaviors to expand it

Step 5: In the expanded menu, next to ‘Combine taskbar buttons and hide labels,’ select Never from the drop-down menu. 

select Never from the drop-down menu

You will immediately see the taskbar icons ungrouped and expanded. It is important to note that this change in setting is only applicable to the primary display device. If you have multiple displays, then continue. 

Step 6: Beside the ‘Combine taskbar buttons and hide labels on other taskbars’ option at the bottom, select Never from the drop-down menu.

‘Combine taskbar buttons and hide labels on other taskbars’ option

That’s that. If, for some reason, you are unable to find any of the options missing from your Settings app, go to Windows Update > Install any pending updates. If you still can’t get through, check out the next method. 

Also read: How to enable clipboard syncing in Windows 11

2. Ungroup Taskbar Icons From Windows Registry

This method is not as straightforward as the above method because we will use the Windows Registry Editor to separate taskbar icons on your Windows 11 machine. Before we begin with the steps, we recommend backing up the Windows Registry. This will help restore your data if things go south.

Step 1: Press the Windows key on your keyboard, type Registry Editor, and click ‘Run as administrator.’ 

Note: Press Windows key + R keyboard shortcut to open the Run dialog box, type regedit.exe, and click OK to open Registry Editor.

type Registry Editor

In the prompt, select Yes.

Step 2: In the top address bar, enter the following path:

HKEY_CURRENT_USER\SOFTWARE\Microsoft\Windows\CurrentVersion\Policies\

Note: You can manually navigate to the section too.

enter the following path

Step 3: Under Policies, right-click, select New, and choose Key.

choose Key

Step 4: Set the new key value name to Explorer by double-clicking it.

Note: If the Explorer key already exists under the Policies key, skip this step. 

Set the new key value name to Explorer

Step 5: Right-click the Explorer key, select New, and choose ‘DWORD (32-bit) Value.’

choose ‘DWORD (32-bit) Value.’

Step 6: Double-click the DWORD Value name, type NoTaskGrouping, and press Enter.

type NoTaskGrouping

Step 7: Double-click the new value, type 1 in the Value Data field, and press OK.

press OK

Finally, reboot your computer to implement the changes. And that’s it! When the system boots back up, you will ungroup taskbar items.

There is another way that lets you separate taskbar icons on a Windows 11 PC; continue reading.

3. Never Combine Taskbar Buttons Using Group Policy

The Local Group Policy Editor helps you control Windows. This also includes ungrouping taskbar items in Windows 11. However, Group Policy Editor is only available for Windows 11 Pro and Enterprise versions. Follow the below instructions.

Note: You can skip this method if you are on Windows 11 Home Edition. If you don’t know your Windows version, read the top ways to check the edition, version, and built-in Windows 11.

Step 1: Press the Windows key on your keyboard, type gpedit, and click Open. You may press the Windows key + I keyboard shortcut to open Settings in Windows.

type gpedit

Step 2: In the left pane, select User Configuration under ‘Local Computer Policy’.

select User Configuration

Step 3: In the right pane, double-click on Administrative Templates. 

double-click on Administrative Templates

Step 4: Select the ‘Start Menu and Taskbar’ option. 

Select the ‘Start Menu and Taskbar’ option

Step 5: Under the ‘Start Menu and Taskbar’ option, double-click on ‘Prevent grouping of taskbar items.’

double-click on ‘Prevent grouping of taskbar items’

Step 6: Choose the Enabled option. Finally, click on Apply, followed by OK.

click on Apply

You have successfully separated taskbar icons from your Windows 11 PC. After that, Windows 11 will never combine taskbar buttons. 

If the above-mentioned methods are too complicated to implement, take an easy route and use third-party applications; keep reading. 

Also read: Ways to remove recommended in Windows 11

4. Ungroup Taskbar Icons Using a Third-Party App

There are many third-party tools available to ungroup taskbar items in Windows 11. One such tool is StartAllBack. This tool helps you configure the layout and set your preferences, enabling your PC to never combine taskbar buttons. Let’s begin with the steps.

Step 1: Go to the StartAllBack website from your preferred browser and download the app.

Go to StartAllBack

Go to the StartAllBack website

Step 2: After download completes, double-click on the setup file and run it. 

Step 3: Select the following installation options: ‘Install for me’ or ‘Install for everyone.’

Select the following installation options

After you select it, the application will be installed immediately, and you may see some changes to your taskbar. 

Step 4: If the app automatically doesn’t start, launch it by pressing the Windows key on your keyboard, typing StartAllBack, and clicking Open. 

Step 5: When it launches, navigate to the Taskbar menu from the side pane. 

navigate to the Taskbar menu

Step 6: Under the ‘Tweak behavior and superpowers’ section on the right side of the Taskbar menu, select Never next to ‘Combine taskbar buttons.’

select Never next to ‘Combine taskbar buttons’

You will immediately see the change in your taskbar. You will have to do one more step if you have multiple displays.

Step 7: Next to ‘On secondary taskbars,’ select Never from the drop-down menu.

select Never from the drop-down menu

The taskbar should now display individual icons with labels instead of grouped icons. If you ever want to go back to grouping the taskbar icons. 

That said, if you have any queries, check out the FAQ section below.

FAQs on Ungrouping Taskbar in Windows 11

1. Can I ungroup specific icons and keep others grouped?

No, the ungrouping setting is global, affecting all icons. There isn’t a built-in option to ungroup specific icons while keeping others grouped.

2. Will ungrouping affect my system’s performance?

Yes, to some extent. Ungrouping icons on the taskbar have a negligible impact on system performance. It’s primarily a visual preference.

3. Will ungrouping taskbar icons persist after updates?

The ungrouping setting should persist after regular Windows updates. However, major feature updates might reset certain settings, so checking after significant updates is advisable.

Untangling the Organized Chaos

Whether it’s about streamlining your multitasking efforts or simply enjoying a cleaner desktop, by knowing how to ungroup taskbar icons in Windows, you can quickly declutter and organize your taskbar according to your workflow and preferences. You may also want to read about ways to access and view all shared folders in Windows 11.

Was this helpful?

Thanks for your feedback!

The article above may contain affiliate links which help support Guiding Tech. The content remains unbiased and authentic and will never affect our editorial integrity.

Понравилась статья? Поделить с друзьями:
0 0 голоса
Рейтинг статьи
Подписаться
Уведомить о
guest

0 комментариев
Старые
Новые Популярные
Межтекстовые Отзывы
Посмотреть все комментарии
  • Windows 10 ltsb 1607 x86
  • Foobar asio windows 10
  • Windows server 2008 server оснастка
  • Windows media player библиотека не отвечает
  • Windows командная строка дата в имя файла