
«Журнал буфера обмена» (Cloud Clipboard) — одна из функций, которая не была включена в Апрельское обновление Windows 10. Это специальная функция для синхронизации содержимого буфера обмена на всех ваших устройствах, связанных с вашей учетной записью Microsoft. Функция доступна в Windows 10, начиная с build 17666.
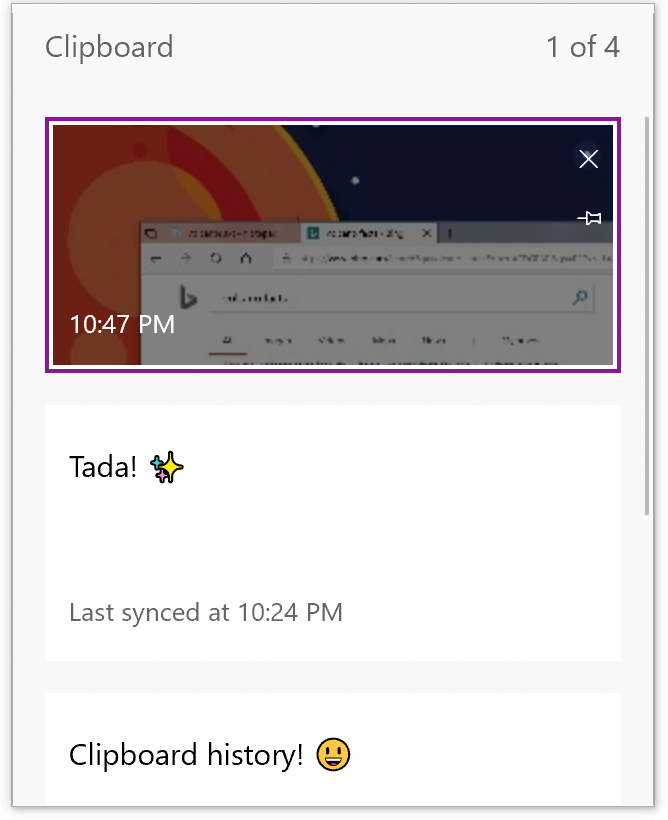
Копируем и вставляем — это то, что мы все делаем, десятки раз в день. Но что вы будете делать, если вам нужно снова и снова копировать одни и те же вещи? Как вы копируете контент на своих устройствах? Сегодня мы рассмотрим данный вопрос и переместим буфер обмена на следующий уровень удобства — просто нажмите клавиши WIN + V, и вам будет представлен новый интерфейс журнала буфера обмена!
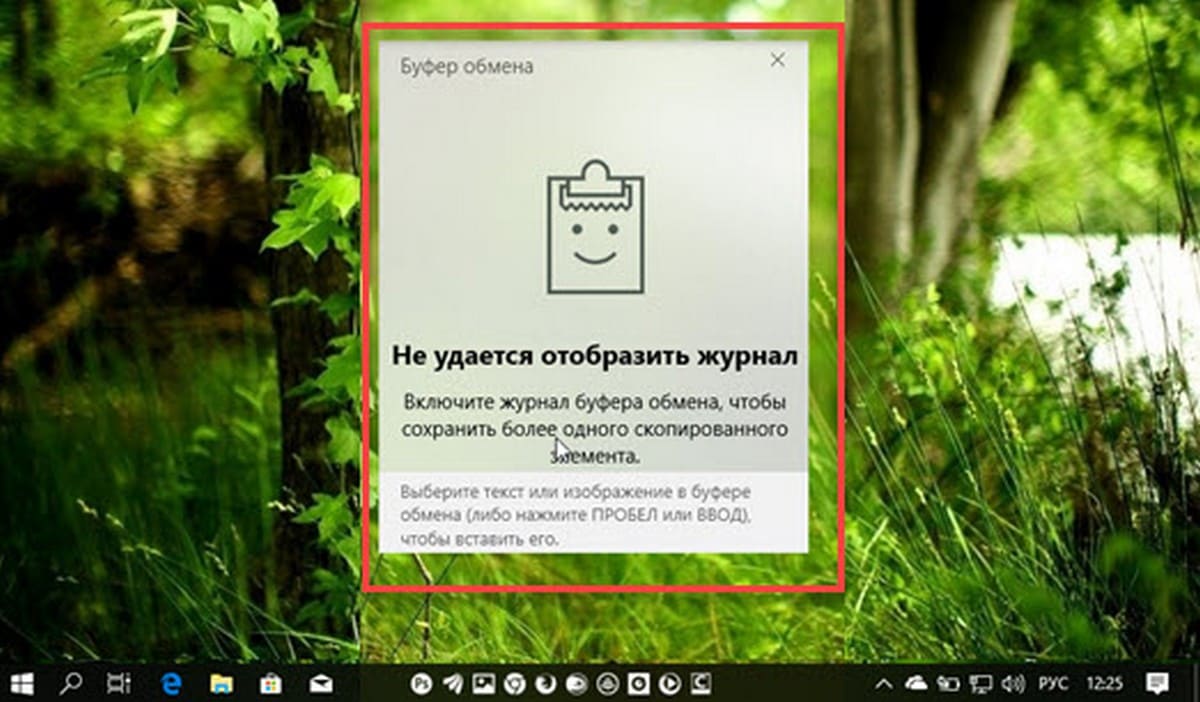
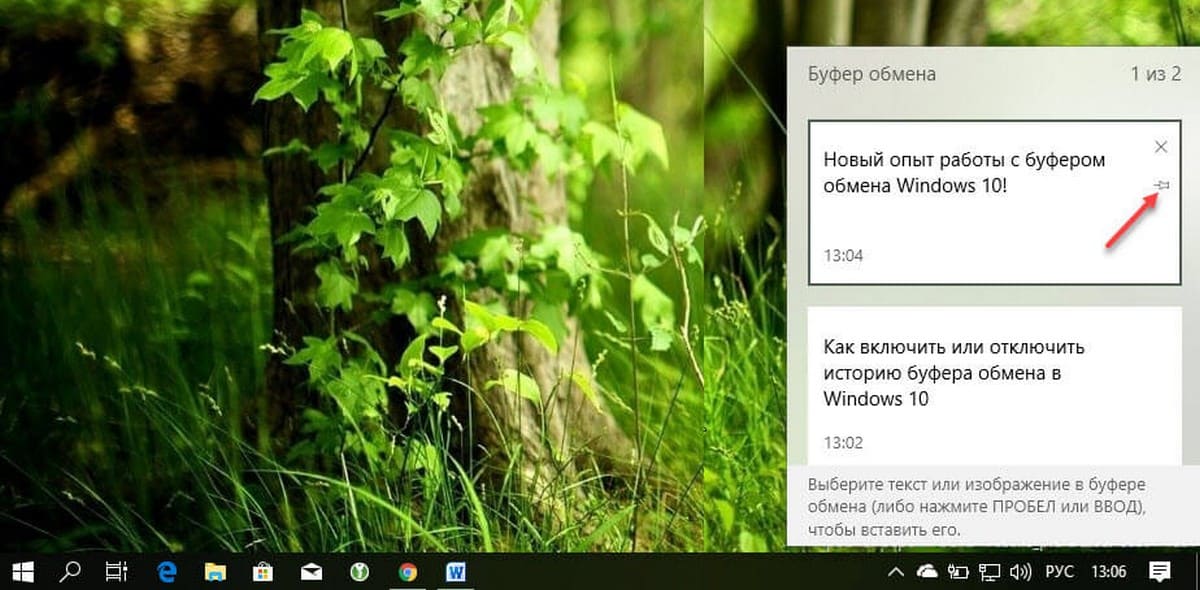
Окно журнала буфера обмена.
Новый опыт работы с буфером обмена Windows 10! Мало того, что вы можете найти, посмотреть и вставить ранее скопированное в истории буфера обмена, но вы также можете закрепить элементы, которые вы уже скопировали, но будете использовать несколько раз. Чтобы закрепить элемент откройте журнал буфера обмена, выберите нужный элемент и нажмите значок булавки или клавишу Insert на клавиатуре.
Журнала буфера обмена использует функцию «Cloud Clipboard», что означает, что вы можете получить доступ к своему буферу обмена на любом ПК с помощью этой сборки Windows или выше. Больше ненужно пересылать на почту, самому себе скопированный текст и изображения на другое устройство.
Чтобы вставить текст или изображение в документ из журнала, нажмите WIN + V выберите нужный фрагмент в истории буфера обмена и нажмите Пробел или Enter.
Примечание: В настоящее время история буфера обмена поддерживает простой текст, HTML и изображения — размером не больше 1 МБ.
Как включить или отключить историю буфера обмена в Windows 10.
В Windows 10 можно включить или отключить функцию «Журнала буфера обмена» с помощью параметров или настройки реестра. Давайте рассмотрим оба способа включить или отключить историю буфера обмена в Windows 10,
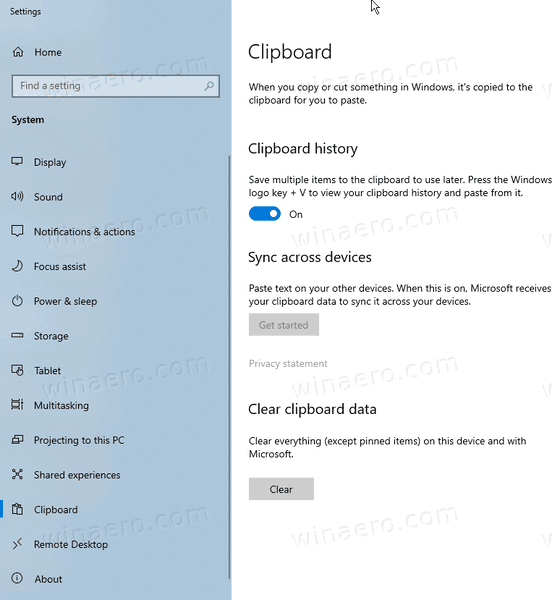
- Откройте приложение «Параметры» нажав сочетание клавиш Win + I или нажмите мышкой на значок шестеренки в меню «Пуск».
- Перейдите в раздел «Система» → «Буфер обмена». (см. картинку ниже)
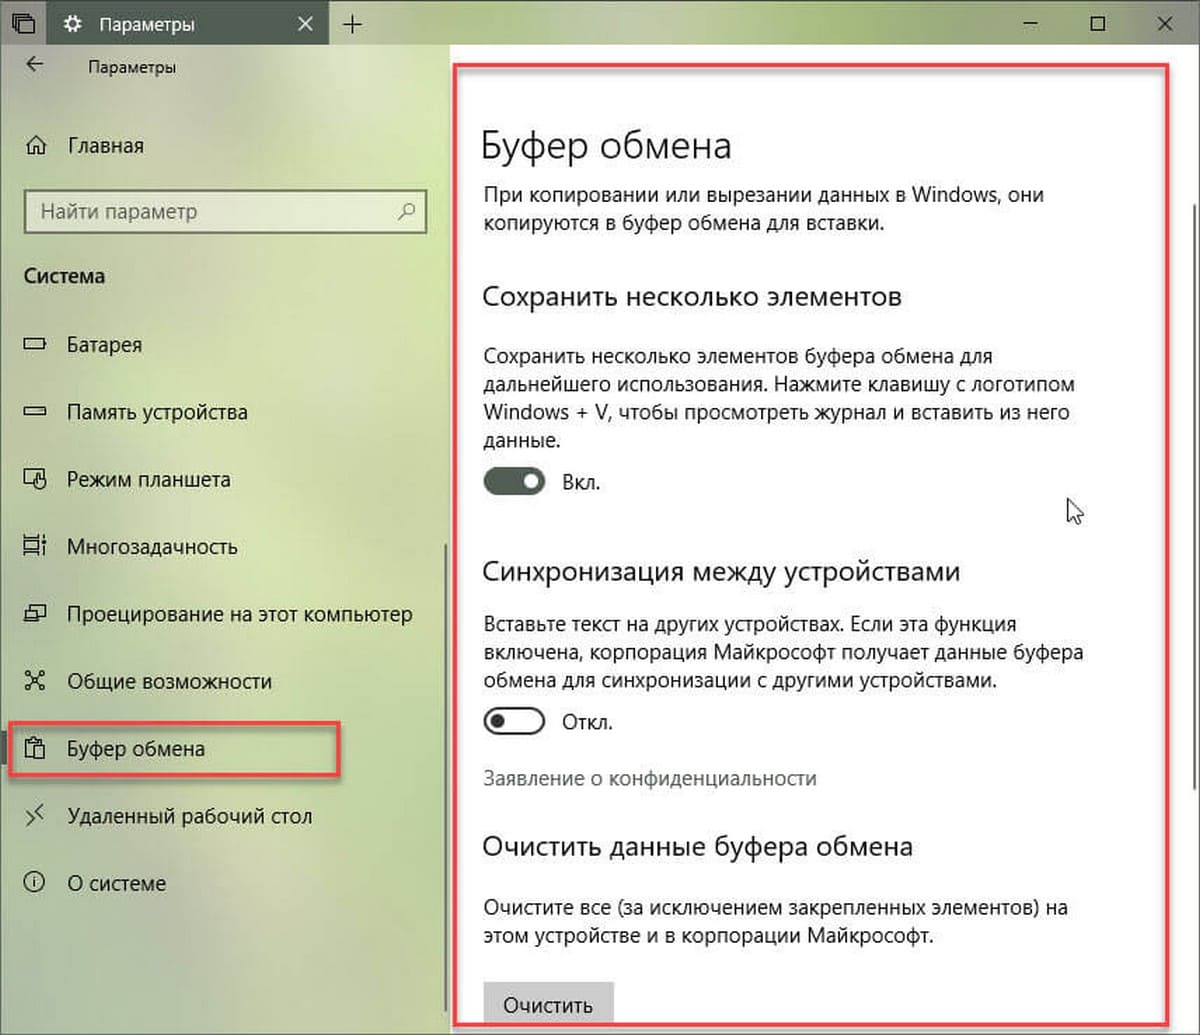
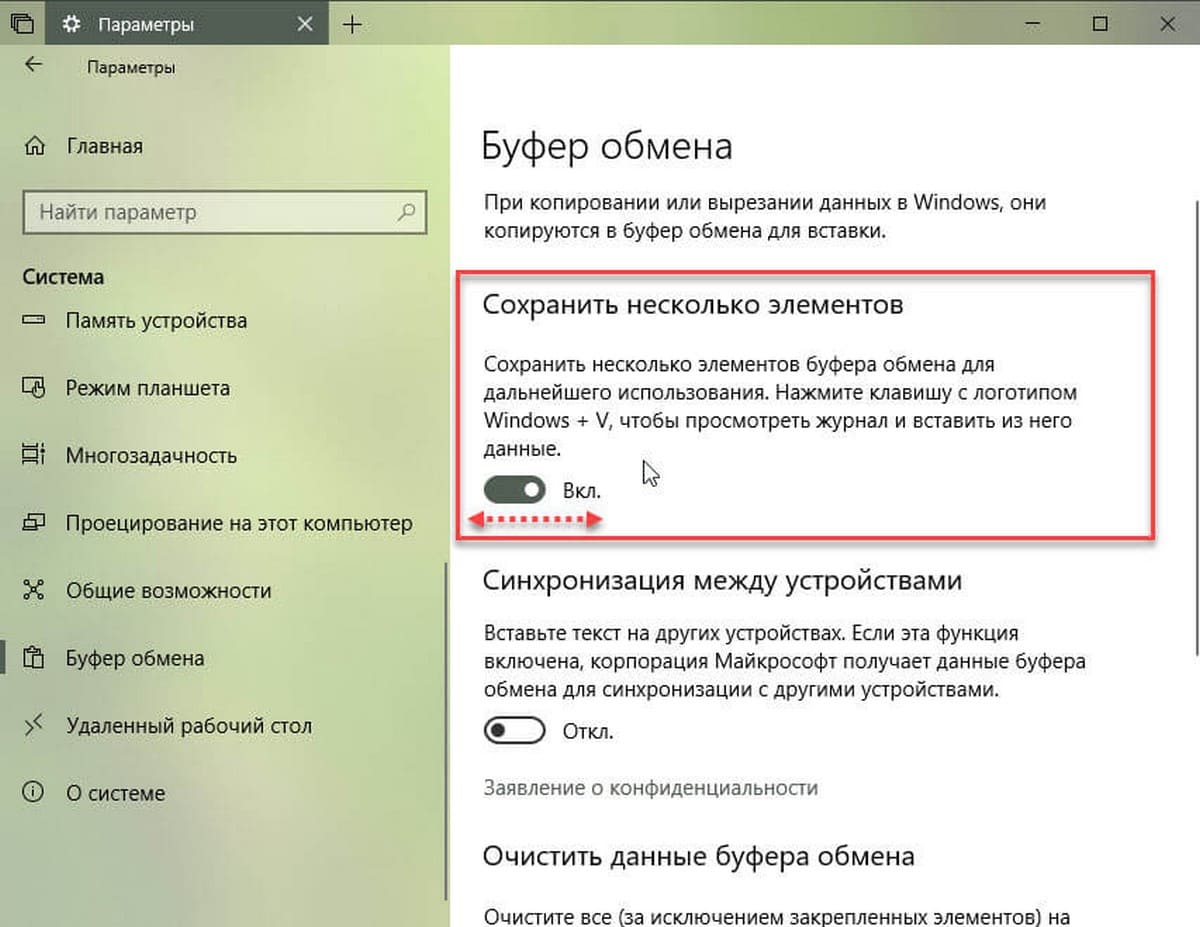
- Справа включите опцию «Сохранить несколько элементов». Это позволит включить функцию «Журнала буфера обмена».
Отключение этой функции отключит облачный буфер обмена и возможность открыть всплывающее окно с помощью клавиш Win + V.
В Windows 10 Build 17666 функция отключена по умолчанию. Итак, чтобы попробовать новую функцию в действии, вам нужно включить ее. Теперь вы знаете, как это можно сделать.
Если вам интересно вы можете управлять историей буфера обмена с помощью настройки реестра. Вот как это можно сделать.
Включение или отключение журнала буфера обмена с помощью правки реестра
- Откройте приложение «Редактор реестра» .
- Перейдите к следующему разделу.
HKEY_CURRENT_USER\Software\Microsoft\Clipboard
- В разделе Clipboard создайте новый параметр DWORD 32-бита с именем EnableClipboardHistory.
Примечание: Даже если вы используете 64-битную Windows, вы все равно должны создать параметр DWORD 32-бита.
- Чтобы включить функцию установите значение EnableClipboardHistory — 1.
Чтобы выключить ее установите значение — 0.
- Чтобы изменения, внесенные с помощью настройки реестра, вступили в силу, вам нужно выйти и войти в свою учетную запись пользователя или перезагрузить ПК.
Все.
Очищаем буфер обмена Windows 10: ручная очистка
Самый быстрый и простой способ удалить объекты из буфера обмена в Windows 10 — это ручное удаление. Поскольку начиная с Windows 10 в буфере могут храниться несколько объектов, их можно открыть с помощью нового инструмента:
- Если опция «Журнал буфера обмена» активирована, вы можете использовать сочетания клавиш [Win] и [V] для доступа к тексту и графике, которые вы копировали в последний раз.
- Чтобы удалить элемент из журнала, нажмите на три точки, расположенные в правом верхнем углу каждого элемента и выберите «Удалить».
- Вы также можете удалить все элементы из буфера обмена, нажав кнопку «Удалить все».
Как отключить Журнал буфера обмена
Начиная с Windows 10, вы можете включить «Журнал буфера обмена», в котором обычно сохраняется более одного элемента. Список легко очистить вручную, также он удаляется автоматически с каждой перезагрузкой системы. Вы также можете отключить Журнал.
- Откройте настройки Windows 10 с помощью сочетаний клавиш [Win] и [I].
- Выберите «Система», а затем в левом столбце нажмите «Буфер обмена».
- Отключите опцию «Журнал буфера обмена».
- Здесь вы также можете очистить Журнал в пункте «Очистить данные буфера обмена».
Как создать сценарий для быстрой очистки буфера обмена
Как и для большинства функций в Windows, для буфера обмена есть короткие команды, которые вы можете ввести в окне «Выполнить» или командной строке, например, чтобы очистить его.
- Выясните, какое имя имеет служба буфера обмена на вашем компьютере. Для этого сначала откройте диалоговое окно «Выполнить» с помощью сочетания клавиш [Win] + [R].
- Введите без кавычек команду «services.msc» и нажмите кнопку «ОК».
- Прокрутите список вниз, чтобы найти службу, называемую «Пользовательская служба буфера обмена».
- Дважды щелкните по этой записи, чтобы открыть свойства службы.
- В разделе «Имя службы» вы найдете обозначение, начинающееся с «cbdhsvc», а затем последовательность чисел. Выделите и скопируйте полное имя службы.
- Создайте новый файл на рабочем столе, щелкнув правой кнопкой мыши по пустому месту и выбрав «Создать» — «Текстовый документ». Задайте файлу имя и откройте его.
- В этом документе в первой строке введите команду «net stop cbdhsvc_#####» без кавычек, а в следующей строке — «net start cbdhsvc_#####». При этом вы должны заменить имя службы, указанное здесь, на имя службы, найденное и скопированное на предыдущем шаге.
- Сохраните файл, щелкните по нему правой кнопкой мыши и выберите [Свойства].
- Измените расширение файла с «txt» на «.bat» и сохраните его, нажав на [OK].
- С этого момента, если вы откроете файл от имени администратора, ваш буфер обмена будет очищен за считанные секунды.
Читайте также:
- Защитник Windows нашел нежелательное приложение — что делать?=«content_internal_link»>
- Как ускорить работу SSD диска: лучшие лайфхаки=«content_internal_link»>
Windows 10 clipboard history is a feature that allows users to see a list of items that they have copied over time. Users can also select a specific item to be pasted from the clipboard history list.
The clipboard history is a set of all data that you copied to the clipboard. This includes texts in various formats (plain text, rtf, html), images, file lists, etc.
In Windows 10, the clipboard history is disabled by default. But the new clipboard has many advantages if used properly. Here are some of the benefits you will get using the Windows 10 clipboard:
- You can copy multiple items and paste them anywhere you want.
- You can pin the item you use frequently. In this way, the item is kept in clipboard memory and can be used without copying the item again.
- You can synchronize the clipboard across multiple devices wherever you login with your Microsoft ID.
If you want to take your clipboard experience to the next level, you must make use of Windows 10 clipboard management.
Let’s begin by enabling the clipboard history feature in Windows 10.
See also: Windows 10 Power Toys
Table of Contents
How to enable or disable Windows 10 clipboard history?
There are four ways to enable/disable clipboard history.
1. Enable or disable Clipboard history using Windows Settings
- Open Windows Settings by pressing Windows key + i
- Go to System –> Clipboard.
- Under Clipboard history, switch the toggle button to ON.


To verify that the clipboard history is enabled, press Windows key + V. This will bring up the list of items you copied in Windows clipboard memory.
Please note that clipboard memory is temporary. It will be erased when you restart the computer. The clipboard history is not maintained upon restart.
You can also disable clipboard history at any time. Just do the following:
- Go to Windows Settings –> System –> Clipboard
- Under Clipboard history, toggle the button to OFF.
2. Enable Clipboard history using Keyboard shortcut
If you want to quickly enable clipboard history, follow these steps:
- Simply press the Windows key + V.
- It will open the clipboard history prompt.
- Click on Turn on.
- Now the clipboard history is turned on, and anything you have copied can be viewed on the clipboard.


3- Enable or disable clipboard history using Windows Registry
If you are an advanced user, you can easily enable clipboard history using the Registry. Here are the steps:
- Open Registry Editor (Run –> regedit)
- Go to the following key:
HKEY_CURRENT_USER\Software\Microsoft\Clipboard - In the right-hand pane, right-click –> New –> DWORD Value. Name it EnableClipboardHistory.
- The following values will enable or disable the clipboard history:
- 1 = Enable clipboard history
- 2 = Disable clipboard history
Please note that you will need to restart the computer for the changes to take effect.
4- Enable or disable clipboard history using Group Policy
If you are a sysadmin or want to enable or disable clipboards for multiple users, the best way is to use the Group Policy settings.
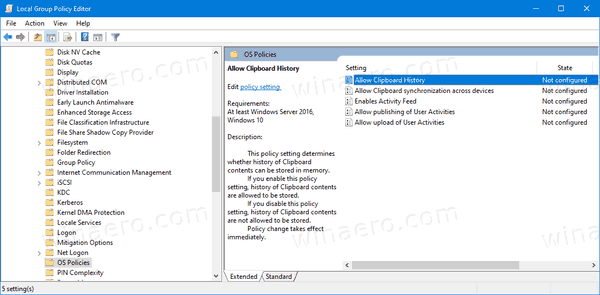
- Open Group Policy Editor (Run –> gpedit.msc)
- Go to Computer Configuration –> Administrative Templates –> System –> OS Policies.
- From the right hand pane, double-click Allow clipboard history.
- Select Enable to enable clipboard history
- Select Disable to disable clipboard history


Please note that this will disable or enable clipboard history for all users in the system.
How to sync clipboard history?
You can sync your clipboard history across various devices.
Follow these steps to enable clipboard history sync:
- Go to Windows Settings –> System –> Clipboard
- Under Sync across devices, click on the Get Started button.
- Follow the instructions to enable synchronization options.


Please note that the sync option requires that you use Microsoft ID instead of your local account to sync all data across devices. All devices that have the same Microsoft ID signed in will share the same clipboard history.
How to clear clipboard history?
You can easily clear clipboard history. There are several ways to do it. However, I am providing a method using Windows Settings:
- Go to Windows Settings –> System –> Clipboard
- In the right-hand pane, under Clear clipboard data, press the Clear button.
This will delete your entire clipboard history.
How do I clear specific items from the clipboard?
- Open the clipboard history list using Windows key + V.
- Click on the three dots in the section of the data you wish to remove.
- Select Delete
- Now this particular thing will be removed from your clipboard history.
Conclusion
Clipboard can be a handy tool, especially when you wish to copy multiple things into a space or into different spaces.
Synchronization feature allows you to use the same copied data to use across different devices so you can paste data on different devices too.
How do you use the clipboard on your Windows 10 computer? Do you use it for copying multiple items or just a single item?
How to Enable or Disable Clipboard History in Windows 10 With Group Policy
Recent builds of Windows 10 come with a new Clipboard History feature. It implements a cloud-powered clipboard, which allows syncing your clipboard contents and its history across devices you use with your Microsoft Account. You can enable or disable the Clipboard History feature in Windows 10 using Group Policy.
The Cloud Clipboard feature is officially called Clipboard History. It is powered by Microsoft’s cloud infrastructure and utilizes the same technologies that made it possible to have your preferences synchronized across your devices, and your files made available everywhere with OneDrive. The company describes it as follows.
Copy paste – it’s something we all do, probably multiple times a day. But what do you do if you need to copy the same few things again and again? How do you copy content across your devices? Today we’re addressing that and taking the clipboard to the next level – simply press WIN+V and you’ll be presented with our brand-new clipboard experience!

Not only can you can paste from the clipboard history, but you can also pin the items you find yourself using all the time. This history is roamed using the same technology which powers Timeline and Sets, which means you can access your clipboard across any PC with this build of Windows or higher.
It is possible to enable or disable the Clipboard History feature in Windows 10 using either Settings or a Registry tweak. Both methods are reviewed in the article
Enable or Disable Clipboard History in Windows 10
If that’s not enough, you can additionally enable or disable Clipboard History with Group Policy.
Enabled (default):
Disabled:
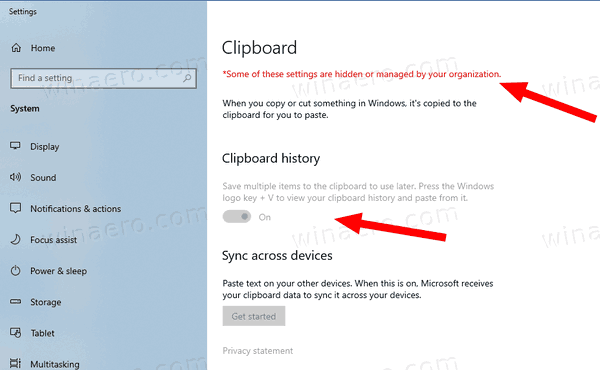
Windows 10 offers you at least two methods, a Local Group Policy Editor option, and a Group Policy Registry tweak. The first method can be used in editions of Windows 10 that come with the Local Group Policy Editor app. If you are running Windows 10 Pro, Enterprise, or Education edition, then the Local Group Policy Editor app is available in the OS out of the box. Windows 10 Home users can apply a Registry tweak. Let’s review these methods.
- Open the Local Group Policy editor app, or launch it for all users except Administrator, or for a specif user.
- Navigate to Computer Configuration > Administrative Templates > System > OS Policies on the left.

- On the right, find the policy setting Allow Clipboard History.
- Double-click on it and set the policy to Disabled to disable the feature for all users.

- Setting the option to Enabled or Not configured will allow the user to change the option in Settings (This is default).
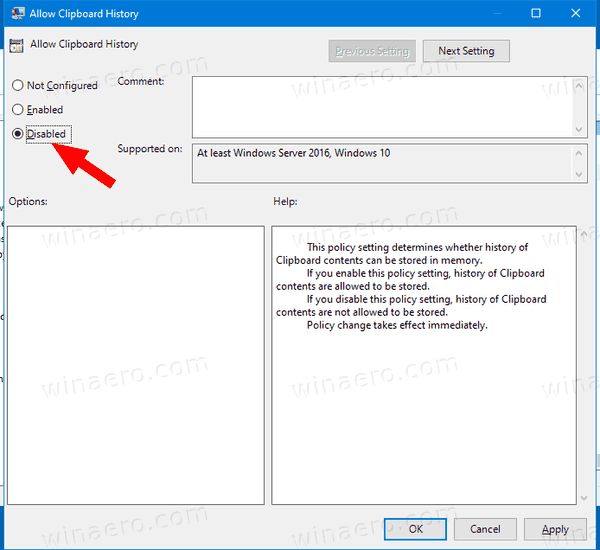
You are done. If someone try to access clipboard history options in Settings, he will find it grayed out if it is disabled with Group Policy.
Tip: See How to Reset All Local Group Policy Settings at once in Windows 10.
Now, let’s see how the same can be done with a Registry tweak.
Enable or Disable Clipboard History in Windows 10 with Group Policy Registry Tweak
- Open Registry Editor.
- Go to the following Registry key:
HKEY_LOCAL_MACHINE\SOFTWARE\Policies\Microsoft\Windows\System
Tip: See how to jump to the desired Registry key with one click.If you do not have such a key, then just create it. - Here, create a new 32-bit DWORD value AllowClipboardHistory. Note: Even if you are running 64-bit Windows, you still need to use a 32-bit DWORD as the value type.
- Set it to 0 to disable the Clipboard History feature.
- Set it to 1 or delete the value to unblock the feature for users.
- To make the changes done by the Registry tweak take effect, you need to restart the OS.
The ready-to-use Registry files are available here:
Download Registry Files
The undo tweak is included.
Tip: You can try to enable GpEdit.msc in Windows 10 Home.
Related posts:
Related articles:
- Add Clipboard History Context Menu in Windows 10
- Pin or Unpin Items in Clipboard History in Windows 10
- Clear Clipboard History in Windows 10
Articles of interest:
- How To See Applied Group Policies in Windows 10
- All Ways To Open Local Group Policy Editor in Windows 10
- Apply Group Policy to All Users Except Administrator in Windows 10
- Apply Group Policy to a Specific User in Windows 10
- Reset All Local Group Policy Settings at once in Windows 10
- Enable Gpedit.msc (Group Policy) in Windows 10 Home
Support us
Winaero greatly relies on your support. You can help the site keep bringing you interesting and useful content and software by using these options:
If you like this article, please share it using the buttons below. It won’t take a lot from you, but it will help us grow. Thanks for your support!
Download Windows Speedup Tool to fix errors and make PC run faster
The Windows Cloud Clipboard feature lets you have a list of multiple copied text in place so you can reuse it. That said, we know for a fact all Clipboard Data is cleared every time the computer restarts, but how do we do it manually? In this post, we are sharing how you can turn on or off and clear the clipboard history in Windows 11/10.

Earlier, there was no feature to turn off the history of the clipboard. You had to use other ways to clear clipboard history. Microsoft did listen to the feedback and it’s here.
Steps to turn on/Off Windows 11/10 Clipboard History:
- Use WIN+X to open the Power menu and select Settings.
- Navigate to Settings > System > Clipboard
- Turn off the toggle under Clipboard history.
It means that we are turning off the Cloud Clipboard feature. The default clipboard will hold one last item, and will not display the data on the clipboard.
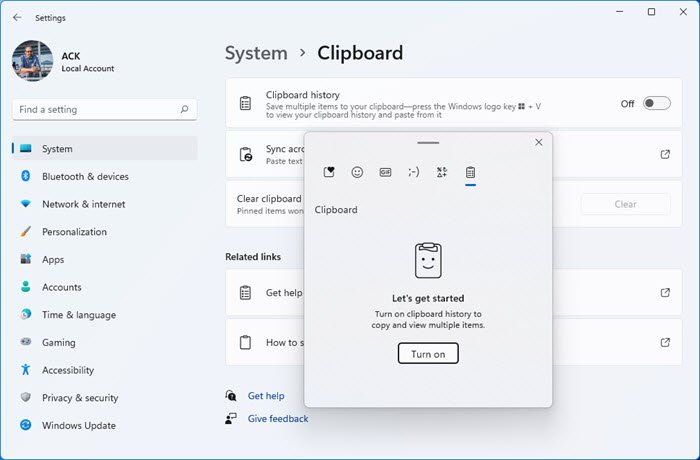
In Windows 11, if you press Win+V to invoke the clipboard manager, you will get a prompt — Turn on clipboard history to copy and view multiple items.
In Windows 10, if you press Win+V to invoke the clipboard manager, you will get a prompt — Cant show history, See all copied items in place, Turn on clipboard history now.

You can choose to turn it on by clicking the available button.
This only hides the existing data and ensures that no copy of the data is maintained.
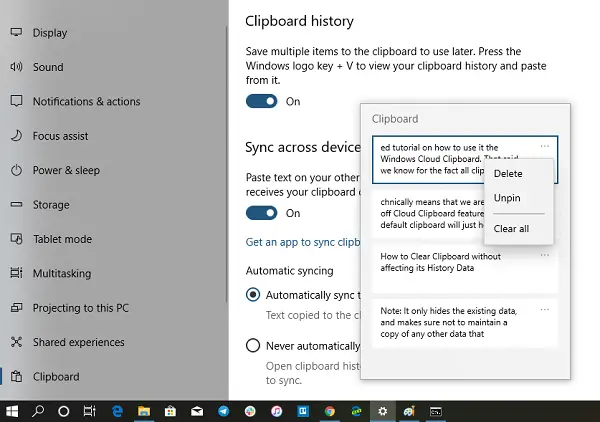
Clear Clipboard without affecting its History Data

There was a trick of using a command prompt to clear clipboard data, i.e., echo off | clip, but it seems to be not working anymore. It creates a new but blank entry on top of the list of copied items. I remember using the software ClipTTL, which was using the same command every 20 seconds to clear things. It will end up adding more blank data to the clipboard.
To clear the clipboard without affecting its History Data, make sure to PIN the items on the clipboard that should stay.
Next, click on the three-dotted menus and click on clear all. It will delete all the entries but will keep the items you have pinned.
While it is sad that you can no more clear things automatically, it’s great that you can turn off the clipboard history.
I hope this helps!
Ashish holds a Bachelor’s in Computer Engineering and is a veteran Windows. He has been a Microsoft MVP (2008-2010) and excels in writing tutorials to improve the day-to-day experience with your devices.