
Некоторые пользователи предпочитают не вводить пароль при входе в Windows и используют различные методы отключения его ввода (способы описаны в инструкциях: Как отключить пароль при входе в Windows 11 и Как убрать пароль при входе в Windows 10). Однако, пароль или ПИН-код может всё равно запрашиваться после выхода из режима сна.
В этой пошаговой инструкции подробно о том, как убрать пароль после спящего режима или выключения экрана в Windows 11 и Windows 10 в интерфейсе параметров, с помощью командной строки, редактора реестра и редактора локальной групповой политики.
Отключение запроса пароля после выхода из спящего режима в Параметрах
Первый способ — использование интерфейса «Параметры» для отключения запроса пароля после выхода из сна:
- В Windows 11 перейдите в Параметры — Учетные записи — Варианты входа и в разделе «Дополнительные параметры» выберите «Никогда» в пункте «В случае вашего отсутствия через какое время Windows должна потребовать повторный вход». Если вы не видите такого пункта, используйте один из далее описанных способов отключения запроса пароля после режима сна.

- В Windows 10 перейдите в Параметры — Учетные записи — Варианты входа и установите «Никогда» в пункте «Требуется вход», при условии, что такой пункт отображается.


В тех же разделах параметров имеет смысл отключить опцию «Динамическая блокировка», если она включена и у вас есть сопряженный с Windows смартфон.
В случае, если в Параметрах указанные пункты отсутствуют, вы можете использовать следующие методы отключения ввода пароля после выхода из спящего режима.
Как убрать пароль после спящего режима в командной строке
Если предыдущий подход по какой-то причине не подходит, можно использовать командную строку, этот метод подойдет как для Windows 11, так и для Windows 10:
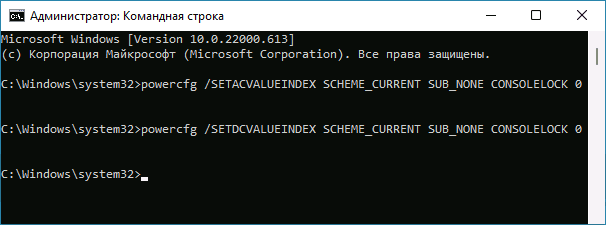
- Запустите командную строку от имени администратора. Для этого можно начать набирать «Командная строка» в поиске на панели задач, нажать правой кнопкой мыши по найденному результату и выбрать пункт «Запуск от имени администратора».
- В командной строке введите команду
powercfg /SETACVALUEINDEX SCHEME_CURRENT SUB_NONE CONSOLELOCK 0
и нажмите Enter. Эта команда применима к ПК и ноутбукам при работе от сети.
- Следующая команда отключает появление окна входа в систему на ноутбуке при питании от батареи
powercfg /SETDCVALUEINDEX SCHEME_CURRENT SUB_NONE CONSOLELOCK 0

После выполнения указанных действий перезагрузите компьютер и проверьте, достигнут ли нужный результат.
Отключение пароля после режима сна и отключения экрана в редакторе реестра
Время до появления запроса пароля после режима сна можно задать в реестре Windows, если установить его равным 0, то запрос пароля появляться не будет. Также стоит изменить некоторые дополнительные параметры, предотвращающие необходимость ввода пароля после отключения экрана. Как это сделать вручную (ниже также есть код готового reg-файла):
- Нажмите правой кнопкой мыши по кнопке «Пуск» и выберите пункт «Выполнить», введите regedit и нажмите Enter.
- Перейдите к разделу
HKEY_CURRENT_USER\Control Panel\Desktop
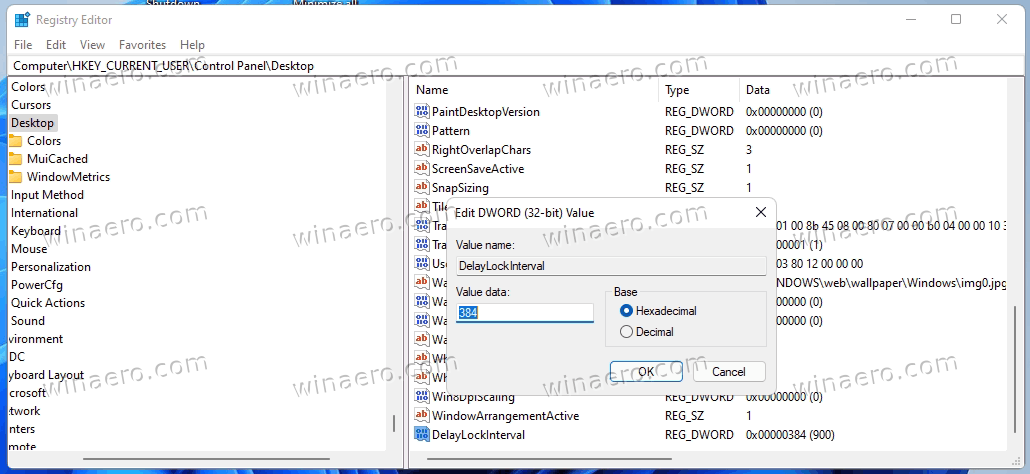
- Нажмите правой кнопкой мыши в пустом месте правой панели редактора реестра и выберите в меню «Создать» — «Параметр DWORD (32-бита)», даже если у вас установлена x64-версия Windows. Укажите имя DelayLockInterval для этого параметра. Его значение должно быть равным 0. Если параметр с этим именем уже присутствует, дважды нажмите по нему и измените значение на 0.
- Создайте раздел реестра
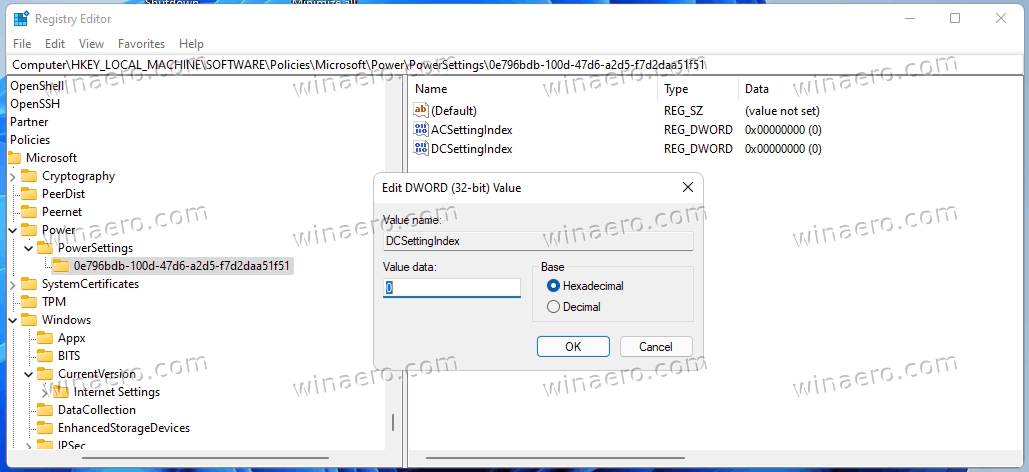
HKEY_LOCAL_MACHINE\SOFTWARE\Policies\Microsoft\Power\PowerSettings\0e796bdb-100d-47d6-a2d5-f7d2daa51f51
а в нём — два параметра DWORD с именами DCSettingIndex и ACSettingIndex и значением 0.
- В разделе реестра
HKEY_LOCAL_MACHINE\SOFTWARE\Policies\Microsoft\Windows\System
создайте параметр DWORD с именем AllowDomainDelayLock и значением 1.
Также вы можете создать reg-файл со следующим кодом и добавить его в реестр вместо его редактирования вручную:
Windows Registry Editor Version 5.00

[HKEY_LOCAL_MACHINE\SOFTWARE\Policies\Microsoft\Power\PowerSettings\0e796bdb-100d-47d6-a2d5-f7d2daa51f51]
"DCSettingIndex"=dword:00000000
"ACSettingIndex"=dword:00000000

[HKEY_CURRENT_USER\Control Panel\Desktop]
"DelayLockInterval"=dword:00000000

[HKEY_LOCAL_MACHINE\SOFTWARE\Policies\Microsoft\Windows\System]
"AllowDomainDelayLock"=dword:00000001
В редакторе локальной групповой политики
Если на вашем компьютере установлена Windows 11 или Windows 10 Pro или Enterprise, вы можете отключить запрос пароля после выхода из режима сна или после выключения экрана в редакторе локальной групповой политики:
- Нажмите клавиши Win+R на клавиатуре, введите gpedit.msc и нажмите Enter.
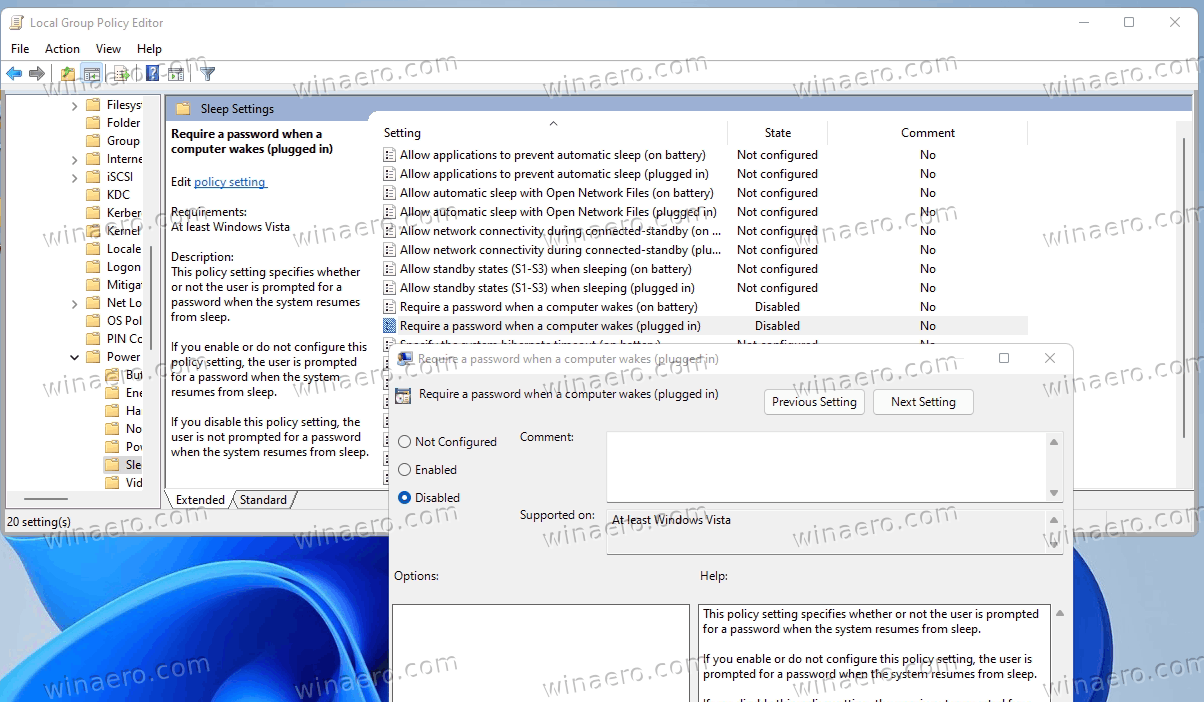
- Перейдите к разделу «Конфигурация компьютера» — «Административные шаблоны» — «Система» — «Управление электропитанием» — «Параметры спящего режима».
- В этом разделе вы найдете два параметра «Требовать пароль при выходе из спящего режима (питание от батареи)» и «Требовать пароль при выходе из спящего режима (питание от сети)». Дважды нажмите по каждому из параметров, установите «Отключено» и примените настройки.

- В разделе «Конфигурация компьютера» — «Административные шаблоны» — «Система» — «Вход в систему» установите значение «Включено» для параметра «Разрешает пользователям выбирать, необходим ли ввод пароля при возобновлении работы из режима ожидания с подключением».

После выполнения указанных действий может потребоваться перезагрузка компьютера, чтобы изменения начали действовать.
И один дополнительный момент: если вы используете заставку Windows (Как включить заставку или скринсейвер в Windows 11, Как поставить заставку в Windows 10), проверьте параметры заставки и убедитесь, чтобы там не была включена отметка «Начинать с экрана входа в систему».
Quick Tips
- You can disable the login requirement on Windows after sleep using the Settings app, Command Prompt, Registry Editor, or Group Policy Editor.
- While disabling the login screen after sleep is convenient, it poses a risk to your computer’s privacy.
Method 1: Disable Login After Sleep From Settings
The easiest way to skip the login screen after sleep mode is by modifying the sign-in options in the Settings app. So, let’s start with that.
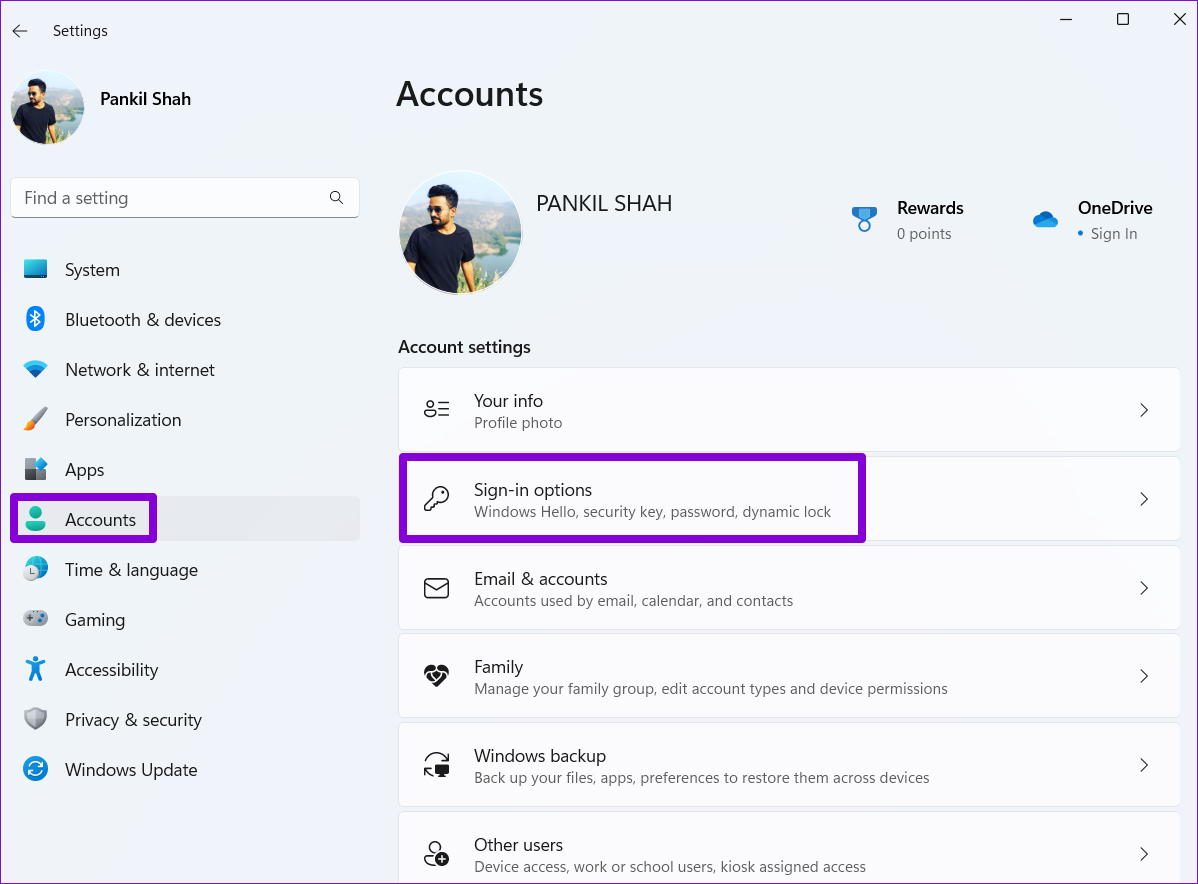
Step 1: Press the Windows key + I to launch the Settings app. Then, go to Accounts > Sign-in options.
Step 2: Under Additional settings, use the drop-down menu next to If you’ve been away, when should Windows require you to sign in again? and select Never.
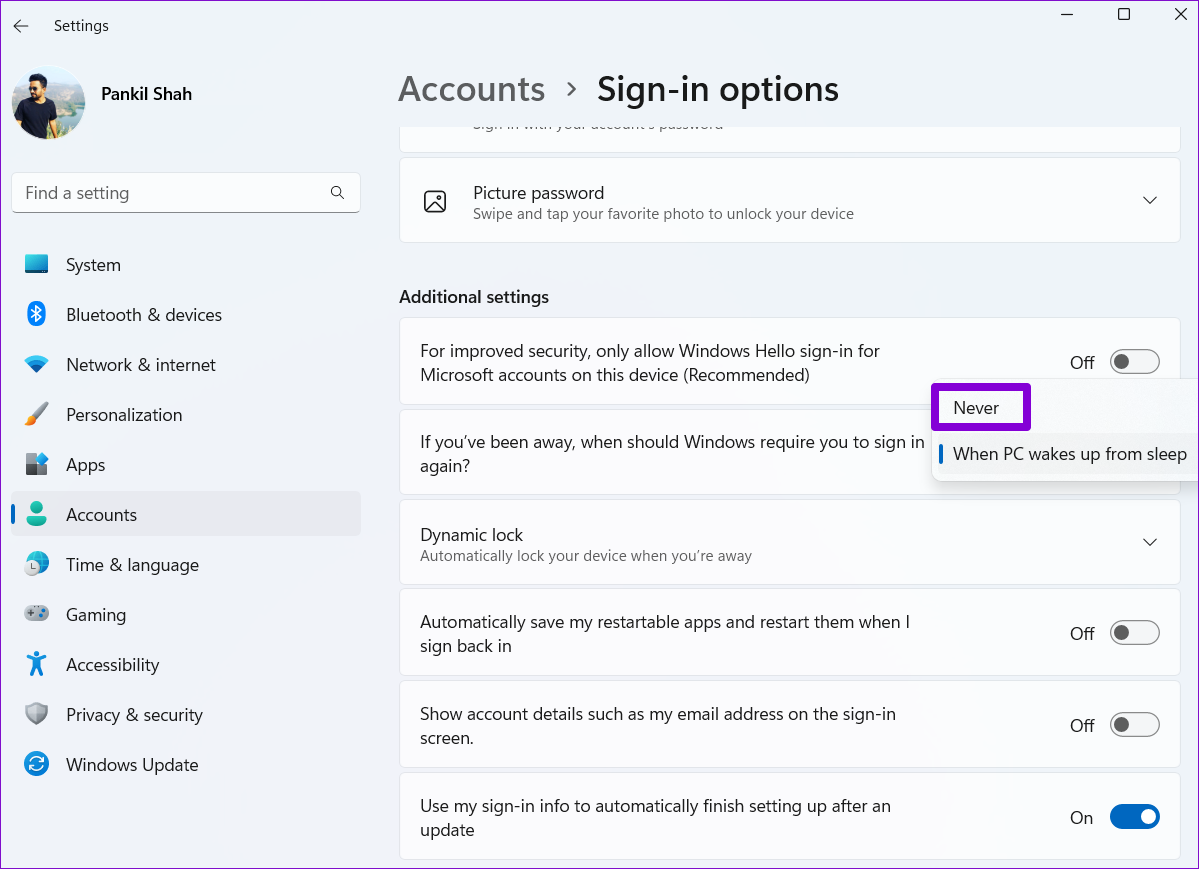
That should do it. Windows will now sign you in automatically when you wake your PC from sleep.
Method 2: Disable Login After Sleep via Command Prompt
Although the above method lets you turn off the login screen after sleep easily, it does not allow you to change this behavior based on whether your device is running on battery or plugged in. For that, use the command prompt on your PC.
Step 1: Right-click on the Start menu and select Terminal (Admin) from the list.

Step 2: Select Yes when the User Account Control (UAC) prompt appears.

Step 3: Run the following command to disable the login screen while your laptop is running on battery.
powercfg /SETDCVALUEINDEX SCHEME_CURRENT SUB_NONE CONSOLELOCK 0

Step 4: Run the following command to disable the login screen while your laptop is plugged in.
powercfg /SETACVALUEINDEX SCHEME_CURRENT SUB_NONE CONSOLELOCK 0

Method 3: Disable Login After Sleep From Registry Editor
Another way to disable the login screen after putting your computer to sleep is by using a Registry Editor. For that, use these steps:
Step 1: Press the Windows key + R to launch the Run dialog. Type regedit in the box and press Enter.
Step 2: In the Registry Editor window, copy and paste the following path in the address bar and hit Enter.
Computer\HKEY_CURRENT_USER\Control Panel\Desktop

Step 3: Right-click on the Desktop registry key, go to New, and select DWORD (32-bit Value) from the sub-menu. Name it DelayLockInterval.

Step 4: Double-click on the newly created DelayLockInterval DWORD and change its value data to 0 (zero).

Step 5: Exit the Registry Editor window and reboot your PC to apply the change.
Method 4: Disable Login After Sleep via Group Policy Editor
You can also use the Group Policy Editor to skip the password prompt after sleep mode on your Windows 11 computer. However, Group Policy Editor is only available for Windows Pro, Enterprise, and Education editions. So, if you’re using Windows Home edition, use one of the methods mentioned above.
Step 1: Press the Windows key + R to launch the Run dialog box. Type gpedit.msc in the Open field and press Enter.
Step 2: In the Local Group Policy Editor window, use the left pane to navigate to the Sleep Settings folder. Here’s the address path:
Computer Configuration\Administrative Templates\System\Power Management\Sleep Settings
Step 3: In the right pane, double-click the Require a password when a computer wakes (plugged in) policy.

Step 4: Select Disabled and click on Apply.

Step 5: Double-click the Require a password when a computer wakes (on battery) policy.

Step 6: Select Disabled and hit Apply.

Was this helpful?
Thanks for your feedback!
The article above may contain affiliate links which help support Guiding Tech. The content remains unbiased and authentic and will never affect our editorial integrity.
Readers help support Windows Report. We may get a commission if you buy through our links.
Read our disclosure page to find out how can you help Windows Report sustain the editorial team. Read more
Sign-in on wake means the system requires you to sign in with your login password when it wakes from sleep mode. Hence, we’ll take you through how to enable or disable Windows 11 passwords after sleep.
Can I change the sleep settings on Windows 11?
Sleep mode in Windows PC is a power-saving state that stops all actions and program activities on the computer. It allows the system to save power by moving running services and open applications to the system memory (RAM).
However, Windows users can change their PC’s sleep settings to suit their preferences. Settings include how long you want the system to wait before going to sleep when you’re not using it and what shortcuts to put your device to sleep.
How do I turn off login after sleep in Windows 11?
1. Use the Settings app
- Press Windows + I to open the Windows Settings app.
- Click on Accounts from the left pane and select Sign-in Options from the right-hand side of the screen.

- Click the drop-down button for If you’ve been away, when should Windows require you to sign in again? option and select Never.

- Apply the changes and put the new settings to the test by putting your system on Sleep mode.


The above steps show how to disable or enable passwords after sleep on Windows 11 without tweaking any advanced directory. Read what to do if the Settings app won’t launch on Windows 11.
2. Use Windows Terminal
- Press Windows + R key to open the Run dialog box, type wt in the text bar, and then press Ctrl + Shift + Enter to open an elevated Windows Terminal.
- Click Yes when prompted by the User Account Control (UAC).
- To enable the password whenever your system wakes from sleep, copy and paste the following commands and press Enter:
- On Battery:
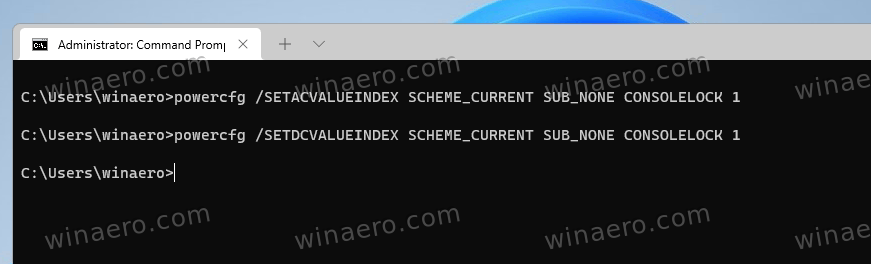
powercfg /SETDCVALUEINDEX SCHEME_CURRENT SUB_NONE CONSOLELOCK 1 - Plugged in:
powercfg /SETACVALUEINDEX SCHEME_CURRENT SUB_NONE CONSOLELOCK 1
- On Battery:
- To disable the password whenever your system wakes from sleep:
- On Battery:
powercfg /SETDCVALUEINDEX SCHEME_CURRENT SUB_NONE CONSOLELOCK 0 - Plugged in:
powercfg /SETACVALUEINDEX SCHEME_CURRENT SUB_NONE CONSOLELOCK 0
- On Battery:
- Close the elevated Windows Terminal and put your system in sleep mode to check if the command is effective.

Running those commands in the Windows Terminal will either disable or enable the password after sleep on Windows 11. Check what to do if Windows 11 monitor won’t go to sleep.
- How to Delete Windows 11 Saved Passwords
- How to Download DirectX 12 Agility SDK [Installation Guide]
- How to Open PPTX File in Windows 11? Use These 4 Ways
- How to Install Windows 7 Icons on Windows 11
3. Use Command Prompt
- Press Windows + R key to open the Run dialog box, type cmd, then click on Run as administrator to open Command Prompt with full privileges.

- Type the following into the Command Prompt depending on what you want to do, and press Enter:
- Disable password when you wake your system sleep on battery:
powercfg /SETDCVALUEINDEX SCHEME_CURRENT SUB_NONE CONSOLELOCK 0 - Disable password when you wake your system sleep when the system is charging:
powercfg /SETACVALUEINDEX SCHEME_CURRENT SUB_NONE CONSOLELOCK 0 - Enable password when you wake your system sleep on battery:
powercfg /SETDCVALUEINDEX SCHEME_CURRENT SUB_NONE CONSOLELOCK 1 - Enable password when you wake your system sleep when the system is charging:
powercfg /SETACVALUEINDEX SCHEME_CURRENT SUB_NONE CONSOLELOCK 1
- Disable password when you wake your system sleep on battery:
- Close the Command Prompt and restart your PC.


This solution will help you disable password on wakeup in Windows 11. Check how to personalize Command Prompt in Windows 11.
4. Use the Registry Editor
- Press Windows + R key to open the Run dialog box, type regedit, then press Ctrl + Shift + Enter to open the elevated Registry Editor.
- Navigate to the following location:
HKEY_CURRENT_USER\Control Panel\Desktop - Right-click on the Desktop registry key and choose New from the drop-down, then Dword (32-bit Value) from the new menu that appears.

- On the right pane, type DelayLockInterval as the name of the new DWORD value.
- Double-click on the newly created DWORD value DelayLockInterval and set the Value data to 0.
- Close the Elevated Registry Editor, then restart your PC to allow the changes to take effect.


Tweaking the Registry Editor will change the wake preference of the system.
Also, you can read our article about Windows PC waking from sleep by itself for steps to fix it.
Further, you may check the steps to fix a computer going to sleep too quickly on Windows 11. Likewise, we have a guide about how to find the Sleep Button on a Windows PC.
In conclusion, you should be able to disable password after sleep on Windows 11 with the steps above. If you have further questions or suggestions, kindly drop them below in the comments section.
Henderson Jayden Harper
Windows Software Expert
Passionate about technology, Crypto, software, Windows, and everything computer-related, he spends most of his time developing new skills and learning more about the tech world.
He also enjoys gaming, writing, walking his dog, and reading and learning about new cultures. He also enjoys spending private time connecting with nature.
You can disable Wakeup Password in Windows 11 for Sleep, Modern Standby, and Hibernate states and stop Windows 11 from asking you for sign-in on wakeup. There are plenty of methods you can use to change this behavior. In this post, we will reviewed them all.
By default, Windows 11 asks you to enter your password to sign-in and wakeup from Sleep, Hibernate, and other power states. This behavior helps to secure your device and your user account. It makes sure that if someone else turns on your «sleeping» laptop or computer, he won’t access your sensitive data.
If you are the only person who use your PC and it never leaves your home, you may want to disable the password and sign-in requirement for sleep states on Windows 11. Here’s how.
We will review a number of methods to disable the password on wakeup in Windows 11. First of all, you can use the Settings app. In certain situations, you may prefer to change it from a command prompt or script. Finally, there are options in Group Policy and in the Registry. Let’s learn the methods to see what works best in your situation.
Disable Wakeup Password in Windows 11 Settings
- Open the Settings app using the Win + I keyboard shortcut.
- Click on Accounts in the left pane.
- On the right, click on Sign-in options.
- For the If you’ve been away, when should Windows require you to sign in again? drop-down option, select Never.

- You can now close the Settings app.
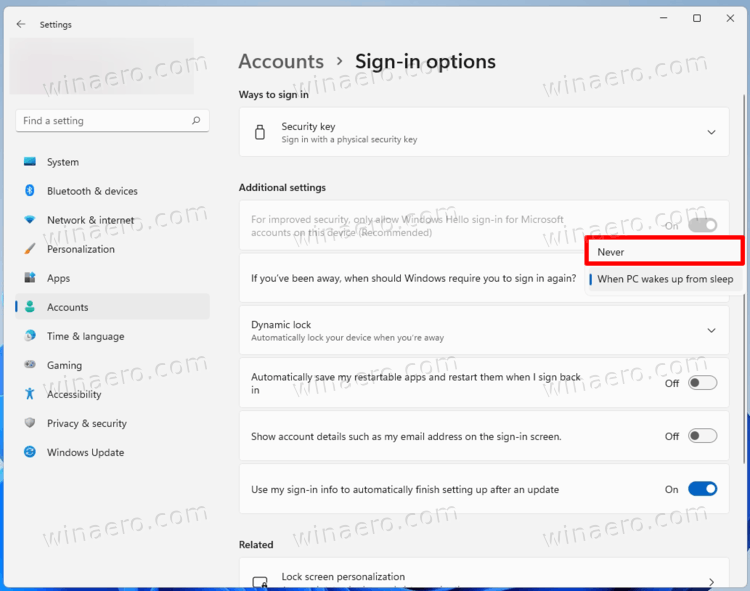
The drop-down menu for this option may include different values. If your device supports Modern Standby, you can set the wake up option to Every Time, 1 minute, 3 minutes, 5 minutes, or 15 minutes. The default option is Every Time, that means that you have to enter your password every time you wake up your device. It is important to note that this option has effect for the current user only.
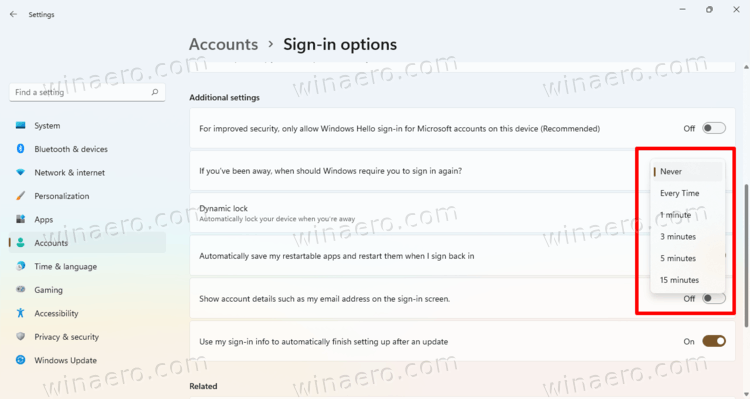
However, if the Modern Standby option is not supported, the only options to choose from are Never and When PC wakes up from sleep. The latter is the default value. Windows 11 uses these options to specify how it should return from Sleep or Hibernate. By changing this option in Setting, you will modify the current Power Plan settings. The change will affect all user accounts.
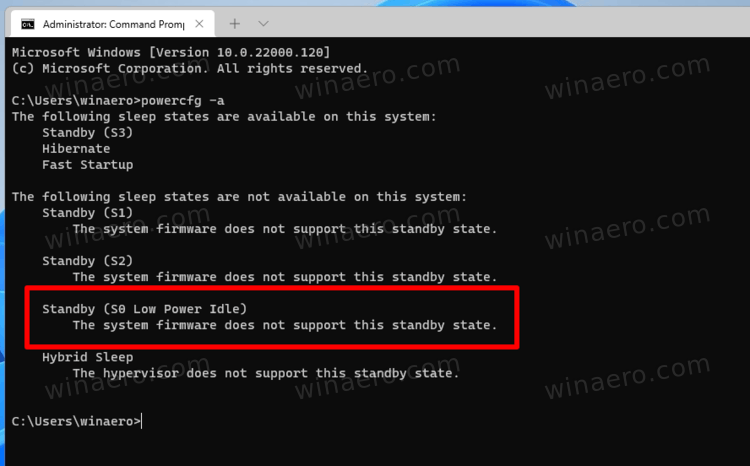
Check if your Windows 11 device supports Modern Standby
Open a new Windows Terminal as Administrator, and type and run the powercfg -a command.
If then command output, see the value for Standby (S0 Low Power Idle) Network Connected or Standby (S0 Low Power Idle) Network Disconnected lines. If one one them says «Available», then your device supports Modern Standby. Mine doesn’t support it:
Alternatively, you can change disable the wakeup password request in Windows 11 using the powercfg tool. This only works when your device doesn’t support Modern Standby. You can launch it from a command prompt, PowerShell, or batch file.
Disable Sign-in Requirement on Wakeup with Powercfg
Once again: This method has no effect if your computer supports Modern Standby.
- Open a new Windows Terminal as Administrator; press Win + X and select Windows Terminal (Admin).
- In either Command Prompt or PowerShell profile, type the following command:
powercfg /SETDCVALUEINDEX SCHEME_CURRENT SUB_NONE CONSOLELOCK 0. This will disable the wakeup password requirement when on battery.
- Now, run the command
powercfg /SETACVALUEINDEX SCHEME_CURRENT SUB_NONE CONSOLELOCK 0to set the same for the plugged in mode.

You can now close the command prompt.
Turn on the Wakeup password requirement using Powercfg
To undo the change you have done with powercfg, use the following commands.
- Enable the password when plugged in:
powercfg /SETACVALUEINDEX SCHEME_CURRENT SUB_NONE CONSOLELOCK 1. - Enable the password when on battery:
powercfg /SETDCVALUEINDEX SCHEME_CURRENT SUB_NONE CONSOLELOCK 1.
Now, let’s see what are the Registry tweaks you can use to configure the Wakeup password requirements on Windows 11.
Registry options to disable Wakeup Password with Modern Standby
- Open the Registry editor, for that press Win + R and type
regeditinto the Run box. - Open the following key
HKEY_CURRENT_USER\Control Panel\Desktop. - In the right pane, modify or create a new 32-bit DWORD value named
DelayLockInterval.
- Change its value to one of the following numbers:
- 0 = ask for password every time.
- 3c = ask the user to sign-in after 1 minute.
- b4 =Windows will ask for user’s credentials in 3 minutes.
- 12c = ask for password in 5 mins.
- 384 = ask for password in 15 mins.
- ffffffff — never ask for password.
- You can now close the Registry Editor app.
The DelayLockInterval value corresponds the review Settings option on devices with Modern Standby. Again, you can save your time by using Registry files.
REG files
Download the ZIP archive using this link and extract the REG files to any folder location. The following files are included in the archive (with self-explanatory names).
- Never Ask for wake password with Modern Standby.reg
- Ask for wake password with Modern Standby Every Time.reg
- Ask for wake password with Modern Standby in 1 minute.reg
- Ask for wake password with Modern Standby in 3 minutes.reg
- Ask for wake password with Modern Standby in 5 minutes.reg
- Ask for wake password with Modern Standby in 15 minutes.reg
Finally, if the above is not enough, you can enforce the desired behavior with Group Policy. But keep in mind that this option has no effect with Modern Standby enabled. It only works with the classic Sleep and Hibernate options. As of the time of this writing, Windows 11 has less options to manage Modern Standby vs the classic power options. Modern Standby doesn’t work like real standby mode, it is more like a screen-off mode with occasional low-power state but auto-wakeup features for certain devices.
Disable Wakeup Password in Group Policy
Note: The Local Group Policy Editor tool is available in the Windows 11 Pro, Enterprise, and Education editions. It is not available in Home editions of the OS, but you can use a tweak from the next chapter.
- Press Win + R, and type
gpedit.mscin the Run dialog to open Group Policy. - Expand open the left pane to
Computer Configuration\Administrative Templates\System\Power Management\Sleep Settings. - On the right, set the Require a password when a computer wakes (plugged in) to Disabled.

- Now, set the Require a password when a computer wakes (on battery) to Disabled too.
- Restart the computer to apply the policies to all user accounts in Windows 11.
You are done.
If you set the mentioned options to «Enabled«, you will force-enable the Sign-in requirement on wake for all users. The corresponding value in the Settings app will be grayed out, and users won’t be able to change it.
The default state of both options is «Not configured«.
If your WIndows 11 edition doesn’t include the gpedit.msc tool, you can apply the following Registry tweak.
Disable Sleep Password in Windows 11 Registry without Modern Standby
This method does work with Modern Standby. It is a corresponding Group Policy tweak for the Group Policies reviewed in the previous chapter.
To disable the Sleep Password in Windows 11, do the following.
- Open the Registry editor app (Win + R >
regedit). - Go to the following key:
HKEY_LOCAL_MACHINE\SOFTWARE\Policies\Microsoft\Power\PowerSettings\0e796bdb-100d-47d6-a2d5-f7d2daa51f51. Create this key if it is missing on your device. - Modify or create the
DCSettingIndex32-bit DWORD value on the right and set its value data to 0.
- Do the same for the
ACSettingIndexvalue.
That will disable the password on wake for all users.
Other values you can set are as follows.
- To enable the wake password, set both
ACSettingIndexandDCSettingIndexto 1. - To let the user to enable or disable the sign-in after Sleep, remove the values from the Registry.
Download Registry Files
To save your time, you can download the ready-to-use REG files from this link. Extract the archive you have downloaded. You will get three files.
-
Disable_wake_password.reg— Use this file to disable the wake password on Windows 11. -
Enable_wake_password.reg— re-enables the sign-in requirement. -
Defaults_for_wake_password.regallows Windows 11 users to configure the feature behavior in Settings.
That’s it.
Support us
Winaero greatly relies on your support. You can help the site keep bringing you interesting and useful content and software by using these options:
If you like this article, please share it using the buttons below. It won’t take a lot from you, but it will help us grow. Thanks for your support!
Ввод пароля или PIN-кода для входа в Windows 11 повышает безопасность, но требует дополнительного времени. Отключайте только, когда уверены, что доступ посторонних к вашему ПК полностью исключен.
Рассмотрим в ознакомительных целях, как полностью отключить запрос системой ПИНа или пароля при возврате в ОС. Возможны варианты — отключение запроса пароля учетной записи или при «пробуждении» из спящего режима. Данная подробная инструкция охватывает методы с применением параметров, командной строки и редактора реестра Windows 11.
Отключение входа Windows Hello в Windows 11
Содержание
- Отключение входа Windows Hello в Windows 11
- Как отключить запрос пароля при входе в Windows 11 через командную строку
- Отключение запроса пароля Windows 11 в редакторе реестра
- Как входить в Windows 11 автоматически без ввода пароля
- Как включить вход в Windows 11 без пароля с утилитой Autologon
- Как отключить запрос пароля Windows 11 через Winlogon в реестре
- Как не вводить пароль Windows 11 при выходе из спящего режима
- Отключите повторный вход в Windows 11 после режима сна в Параметрах
- Как отключить ввод пароля после сна в regedit
- Где в Windows 11 убрать запрос пароля после скринсейвера
Помните, что отключение запроса пароля не означает, что его больше нет. Windows 11 перестанет запрашивать при входе при перезагрузке или включении компьютера после перерыва в работе. Но помнить пароль по-прежнему необходимо. Потребуется для ряда задач хоть и нечасто.
- Клавиатурным сочетанием Win + I откройте Параметры Windows 11. Или щелкните правой кнопкой мыши по «Пуску» и выберите пункт «Параметры».
- Щеклните по «Учетные записи». Выберите «Варианты входа».

- Перейдите в «Дополнительные параметры». Отключите опцию «Для повышения безопасности разрешите вход Windows Hello для учетных записей Майкрософт на этом устройстве».
Данный пункт активен не у всех пользователей. Порой отключить его нельзя. В таком случае воспользуйтесь командной строкой.
Как отключить запрос пароля при входе в Windows 11 через командную строку
Откройте командную строку (Command Prompt) в режиме администратора.
Вставьте в окно командной строки команду:
reg ADD «HKLM\SOFTWARE\Microsoft\Windows NT\CurrentVersion\PasswordLess\Device» /v DevicePasswordLessBuildVersion /t REG_DWORD /d 0 /f
Нажмите Enter.
Отключение запроса пароля Windows 11 в редакторе реестра
Одновременно нажмите Win + R на клавиатуре. Напечатайте regedit.exe в строке «Открыть:» окна «Выполнить». Щелкните «ОК» в нижней части окна или нажмите Enter на клавиатуре.
Перейдите к ветке:
HKEY_LOCAL_MACHINE\SOFTWARE\Microsoft\Windows NT\CurrentVersion\PasswordLess\Device
В свойствах параметра DevicePasswordLessBuildVersion укажите значение 0.
Как входить в Windows 11 автоматически без ввода пароля
Рассмотрим базовый способ отключения запроса пароля при входе в Windows 11. Равно актуален как для локальной учетной записи, так и для аккаунта Майкрософт.
- Нажмите комбинацию клавиш Win + R, чтобы открыть окно «Выполнить». Введите control userpasswords2 или netplwiz в строку «Открыть:». Щелкните «ОК» под полем ввода команд или нажмите клавишу Enter.
- На экране со списком пользователей отключите опцию «Требовать ввод имени пользователя и пароля». Щелкните «Применить», а затем «ОК».
- В окне «Автоматический вход в систему» дважды введите пароль: в поля «Пароль:» и «Подтверждение:». Не допускайте ошибок — малые и большие буквы различаются. Используйте ту клавиатурную раскладку, в которой пароль был создан.
Будьте внимательны. Ведь ОС не укажет на ошибку. Исправить ее также не предложит. Windows 11 станет выводить при входе сообщение о неверном имени пользователя или пароле. Вероятный сценарий — отображение второго пользователя с идентичным именем.
- Вводите пароль учетной записи Майкрософт или локальной учетной записи Windows 11. ПИН-код в данном случае не подойдет.
- Щёлкните «ОК» в нижней части окна.
Как включить вход в Windows 11 без пароля с утилитой Autologon
Используйте программный инструмент Autologon — Sysinternals, чтобы входить в Windows, не вводя имя пользователя и пароль. Загрузите Autologon с официальной страницы.
- Распакуйте архив в удобное вам место на диске вашего ноутбука или настольного ПК. Запустите исполняемый файл программы. Предложит ознакомиться и согласиться с условиями использования. Станет работать только после согласия пользователя с ними.
- В поле Username отобразится имя текущего пользователя. В поле Domain — имя данного PC.
- Напечатайте в строке «Password» актуальный пароль данной учетной записи.
Как показывает практика, Autologon поддерживает оба типа учетных записей Windows 11: локальные и Майкрософт. Без гарантии, что так будет на каждом ПК.
Как отключить запрос пароля Windows 11 через Winlogon в реестре
Нажмите комбинацию клавиш Win + R. Напечатайте regedit.exe в строке «Открыть:». Щелкните по кнопке «ОК» в нижней части окна или нажмите клавишу Enter.
Разверните ветку:
HKEY_LOCAL_MACHINE\Software\Microsoft\Windows NT\CurrentVersion\Winlogon
Двойным щелчком по AutoAdminLogon откройте окно изменения свойств данного параметра. Поменяйте значение на 1.

Щелкните правой кнопкой мыши в правой панели редактора реестра. Выберите «Создать», затем «Строковый параметр».
Показанным выше способом последовательно создайте три параметра:
DefaultPassword
DefaultDomainName
DefaultUserName
В полях «Значение:» окон «Изменение строкового параметра» введите:
- Актуальный пароль текущей учетной записи — для DefaultPassword.
- Имя данного компьютера — DefaultDomainName.
- Имя текущего пользователя — для DefaultUserName.
Если не знаете имя пользователя и (или) компьютера, то посмотрите:
- Имя компьютера в категории Параметры — О системе.
- Имя текущего пользователя в параметре реестра LastUsedUsername.
Пароль станет явно храниться в системном реестре Windows 11. Потенциально доступен каждому, кто может работать за данным ПК.
Закройте приложение «Редактор реестра». Перезагрузите ваш ноутбук или настольный компьютер.
Как не вводить пароль Windows 11 при выходе из спящего режима
Отключите повторный вход в Windows 11 после режима сна в Параметрах
Windows 11 после выхода из сна просит ввести пароль. При желании пользователь может отключить повторный вход в ОС при пробуждении Windows 11.
Нажмите одновременно Win + I, чтобы открыть приложение «Параметры». Перейдите в категорию «Учетные записи». Затем на правой панели окна выберите «Варианты входа».
Прокрутите правую панель до блока настроек «Дополнительные параметры». Щелкните по направленной вниз стрелке, которая находится справа от надписи «Автоматически блокировать устройство в ваше отсутствие». Снимите отметку с опции «Разрешить Windows автоматически блокировать устройство в ваше отсутствие».
Далеко не каждому нравится интерфейс «Параметров» Windows 11. А привычной «Панели управления» как будто бы и нет. На самом деле есть, просто не на виду у начинающих пользователей.
Читайте в «Блоге системного администратора» как в Windows 11 открыть классическую панель управления.
Как отключить ввод пароля после сна в regedit
Отключение повторного входа в Windows 11 после режима сна через Параметры не всегда помогает избавиться от запроса пароля при выходе из спящего режима. Приходится править реестр вручную.
Графическое приложение для внесения изменений в системный реестр Windows называется «Редактор реестра»
Нажмите Win + R одновременно на клавиатуре вашего ноутбука или настольного ПК. Откроется окно «Выполнить» — упрощенный интерфейс ввода и применения команд Windows 11. Введите regedit.exe в строку «Открыть:» Щелкните «ОК» в нижней части окна или нажмите клавишу Enter.
В левой панели создайте раздел:
HKEY_LOCAL_MACHINE\SOFTWARE\Policies\Microsoft\Power\PowerSettings\0e796bdb-100d-47d6-a2d5-f7d2daa51f51
Откройте «папку» нового раздела. Щелкните в пустом месте правой панели окна приложения. Последовательно создайте параметры DWORD ACSettingIndex и DCSettingIndex. Двойным щелчком поочередно откройте окна изменения свойств параметров. Присвойте каждому значение 0.
Где в Windows 11 убрать запрос пароля после скринсейвера
После хранителя экрана (скринсейвер, скринсэйвер, экранная заставка) в Windows 11 может запрашиваться пароль.
Нажмите одновременно клавиши Win + R, чтобы открыть окно «Выполнить:»
Откройте параметры хранителя экрана:
Напечатайте control desk.cpl,,@screensaver в строке «Открыть:»
Нажмите Enter на клавиатуре или щелкните по расположенной в нижней части окна кнопке «ОК»

Чтобы ОС не запрашивала пароль нужно отключить заставку («Нет») или отключить опцию «Начинать с экрана входа в систему». По очереди щелкните кнопки «Применить» и «ОК» в нижней части окна.

Вероятная причина запроса ПИН-кода в Windows 11 связана с мобильным устройством и применяется динамическая блокировка. Смартфон синхронизирован с операционной системой ноутбука или настольного ПК.
Щелкните правой кнопкой мыши по «Пуску» Выберите «Параметры» Войдите в раздел «Учетные записи» Обратите внимание, активна или нет «Динамическая блокировка». Если данная опция включена, примите решение — смириться с запросом ПИНа или отключить.

Помните, запрос пароля или ПИН-кода при входе в Windows 11 — опции безопасности. Затрудняют посторонним доступ к операционной системе вашего ноутбука или настольного компьютера и приложениям. Главное — к содержимому диска, на котором хранятся данные.
Решение о включении или отключении защиты входа в ОС паролем или PIN-кодом каждый пользователь принимает на собственный страх и риск.
Многие пользователи так и не смогли привыкнуть к «Пуску» в центре панели задач. Может быть неудобно после многолетнего опыта с Windows 10/7/Vista/XP/2000/Me/98/95.
Читайте как вернуть кнопку «Пуск» в левый нижний угол.
Какую защиту Windows вы считаете самой надежной? Напишите в комментариях.
3.7
3
голоса
Рейтинг статьи