
Download Article
Get rid of the Xbox Game Bar overlay, temporarily or for good
Download Article
- Disabling Game Bar in Windows 11
- Disabling Game Bar in Windows 10
- Deleting Xbox Game Bar Permanently
- Should I turn off Game Bar?
- Game Mode Won’t Turn Off (Quick Fix)
- Video
|
|
|
|
|
Is Game Bar popping up when you plug your controller into your PC or play certain games? If you don’t want to use the Xbox Game Bar to screen record or access Xbox social gaming features, it may be more of a nuisance than an asset. Fortunately, you can disable the Game Bar and even completely uninstall it. Read on for simple step-by-step instructions on disabling Xbox Game Bar and turning off Game Mode on Windows 10 & 11, plus troubleshooting tips.
Disabling Game Bar: Quick Steps
In Windows 10, open Settings, select Gaming, and toggle off the «Game Bar» switch. In Windows 11, go to Settings > System Components, open Game Bar’s Advanced options, and select Never from the «Background component permissions» menu.
-

You can get there quickly by pressing Windows key + i, or by clicking Settings in the Windows menu.
-
It’s at the top-left corner.
Advertisement
-
You’ll need to scroll down a little bit on the right panel to find it.
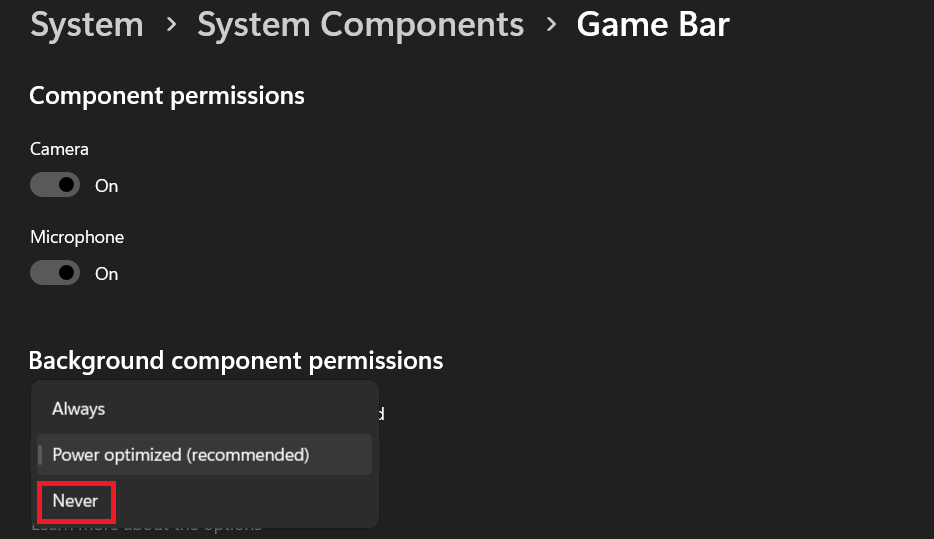
-
-
You’ll see this below the «Component permissions» section. «Power optimized (recommend)» is usually selected by default.
-
This prevents Game Bar from running in the background and responding to the Windows key + G keyboard shortcut.
-
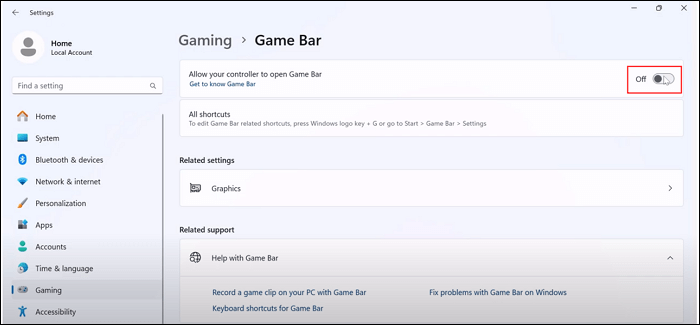
If Game Bar still pops up when you plug in a controller, you can disable that, too. Here’s how:
- Click Gaming in the left panel of the Settings window.
- Click Game Bar.
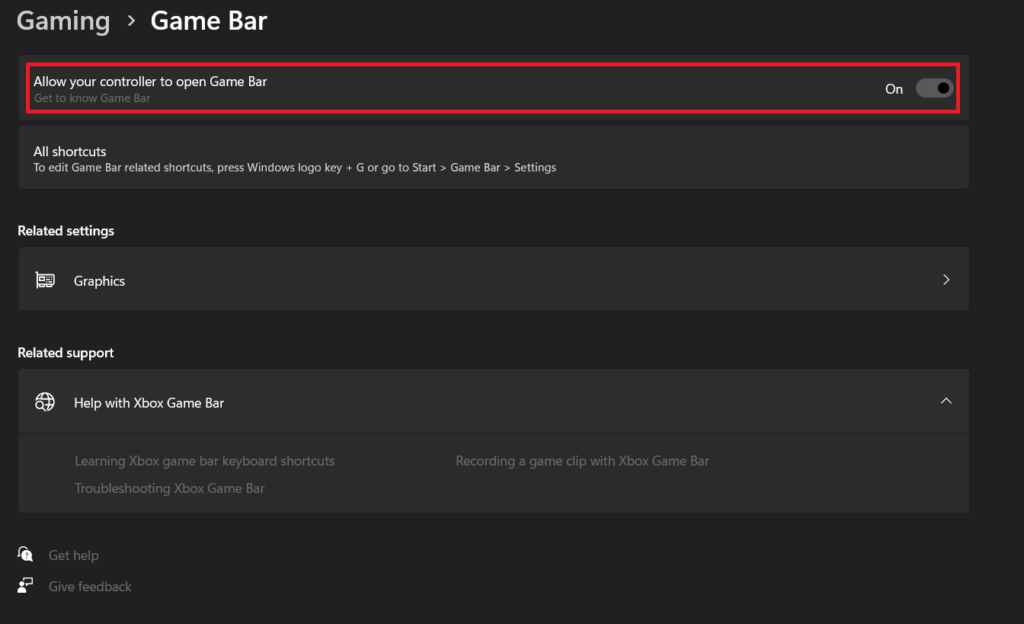
- Toggle off the switch next to «Allow your controller to open Game Bar.»
- At this point, Game Bar features that could get in the way should now stay out of your sight. However, you may still see some annoying pop-ups when you play certain games or plug in a controller. The only fix is to delete Game Bar permanently—jump down to Deleting Xbox Game Bar Permanently to learn how.
-
If you don’t want Windows to disable background apps when you’re gaming, you can turn this feature off:
- Click the back button to return to the Gaming menu, or click the Gaming tab in the left panel.
- Click Game Mode
- Click the «Game Mode» switch to turn the feature off.
- If Game Mode won’t turn off, jump down to our quick fix.


Advertisement
-
You can get there quickly by pressing Windows key + i, or by clicking Settings in the Windows menu.
- This method will disable Game Bar and prevent it from opening when you use keyboard shortcuts or a gaming controller.
-
This option has an Xbox logo.
-
The switch is at the top of the right panel.
- Game Bar is now disabled. If you want to go a step further and permanently uninstall it, jump down to Deleting Xbox Game Bar Permanently.
- If you want Game Bar back, you can return to this screen and select Power optimized (recommended) from the menu.
-
If you don’t want Windows to disable background apps when you’re gaming, you can click the «Game Mode» switch to turn the feature off.[1]
- If Game Mode won’t turn off, jump down to our quick fix.


Advertisement
-
If you want to remove Game Bar permanently on Windows 10 or 11, you’ll first need to remove the preinstalled package in PowerShell, and then add a few registry keys if Game Bar errors still pop up. To open PowerShell as an administrator:
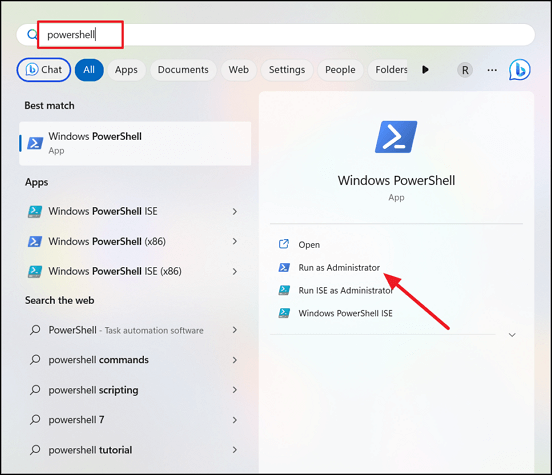
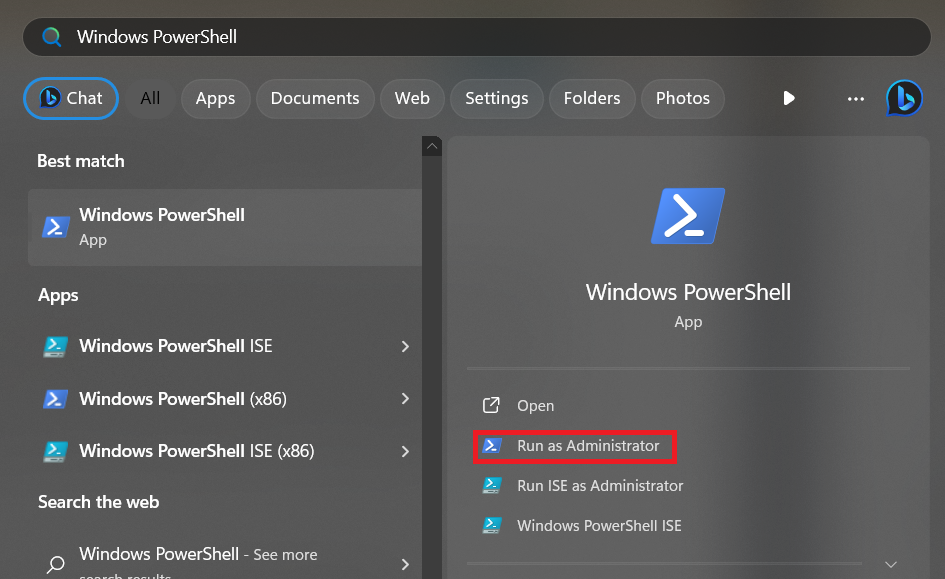
- Type powershell into the Windows search bar.
- Right-click Windows PowerShell.
- Select Run as administrator…
- Click Yes.
-
Paste this line into PowerShell and press Enter:[2]
- Get-AppxPackage Microsoft.XboxGamingOverlay | Remove-AppxPackage
-
If you still see notifications that say «You’ll need a new app to open this ms-gamingoverlay» when you try to play certain games, you’ll also need to add some registry keys to remove Game Bar permanently. You can do this from PowerShell by pasting these two lines, pressing Enter after each.
- reg add HKEY_CURRENT_USER\SOFTWARE\Microsoft\Windows\CurrentVersion\GameDVR /f /t REG_DWORD /v "AppCaptureEnabled" /d 0
- reg add HKEY_CURRENT_USER\System\GameConfigStore /f /t REG_DWORD /v "GameDVR_Enabled" /d 0
- The Game Bar should now be removed. If you want it back, you can reinstall it from the Microsoft Store.


Advertisement
-
Most people don’t need to turn off Game Bar, and can even benefit from features like accessing audio settings and performance stats without Alt-Tabbing out of your game.[3]
There are also plenty of Xbox social features, and the ability to screen-record gameplay with a quick keyboard shortcut.[4]
-
If your PC feels slow, disabling background apps like Game Bar can help speed things up. Also, if you have a high-end graphics card with similar software and overlays (such as NVIDIA Shadowplay or GeForce Experience), having both Game Bar and that software running could be rough on your CPU.


Advertisement
-
This notification usually pops up when you’re using a TV as a monitor. In this case, try switching to a different HDMI port on the TV. If that doesn’t work, go into your TV’s HDMI settings, look in the menus for «Game Mode,» and turn it off.

Ask a Question
200 characters left
Include your email address to get a message when this question is answered.
Submit
Advertisement
Video
Thanks for submitting a tip for review!
About This Article
Thanks to all authors for creating a page that has been read 37,011 times.
Did this article help you?
Is it annoying every time you want to Steam record or take screenshots with your Xbox controller, it is not Steam, but the Windows game bar does it? Do you know how to remove the Microsoft gaming service if you don’t use it? Read this article and get stepwise instructions on how to disable Xbox game bar in Windows 11 and 10.
How to Permanently Turn off Xbox Game Bar?
Game players often complain that Xbox Game Bar screen recording conflicts with Steam gameplay. Some users may find they have no need for this game bar and would like to uninstall it on their laptops and desktops.
However, when pressing the Xbox controller, some users may find that the MS-gaming overlay popup appears again even if they have already turned off the Windows game bar from Windows settings.
So, how to disable Xbox Game Bar in Windows 11 and Windows 10? Here are two ways for you:
- For Windows 11 users, there are two options: 1. Go to Settings to prevent Xbox Game Bar from running in the background. 2. Uninstall Windows Game Bar from PowerShell to permanently remove this feature from your PC.
- For Windows 10 users, turn off the game bar function from the Settings. This can prevent gaming controllers from launching the Windows 10 screen recorder.
Let’s continue to read if you want to delve into more details.
Share this post on your social media to help more users!
How to Disable Xbox Game Bar Windows 11
Users can get rid of Xbox Game Bar on Windows 11 via Settings. This will stop the game bar from running in the background. If you want to disable the MS-gaming service completely, you need to uninstall it from your PC.
Remove Xbox Game Bar via Settings
To turn off the Microsoft game bar from Settings, follow the steps below.
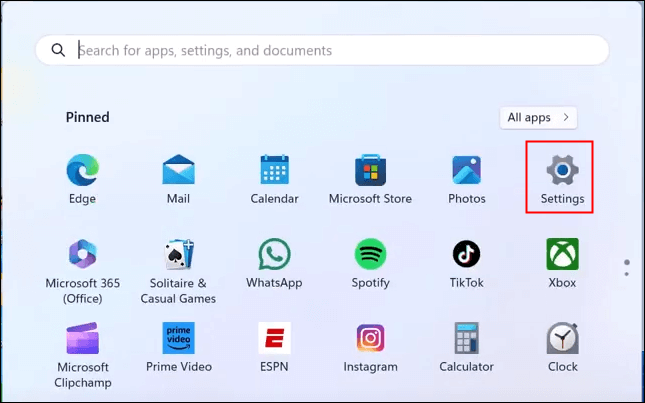
Step 1. Click the Windows button and tap Settings.
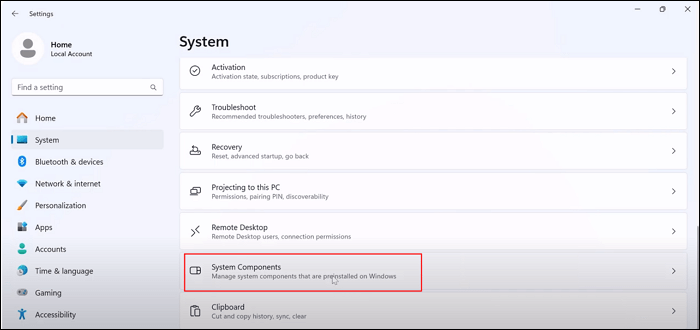
Step 2. Under Settings, go to System > System components > Game Bar.
Step 3. Click the … next to Game Bar and select Advanced options.

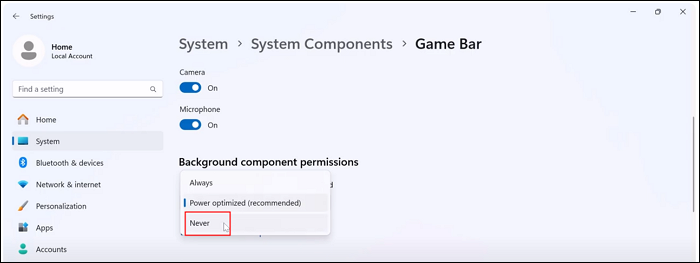
Step 4. Go to Background apps permissions. Click the dropdown menu and select Never.
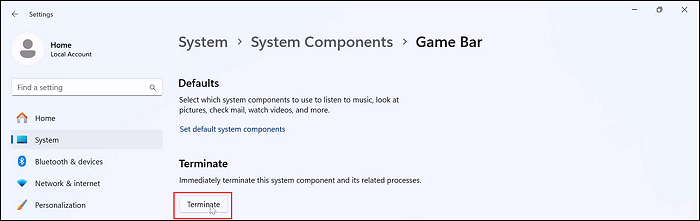
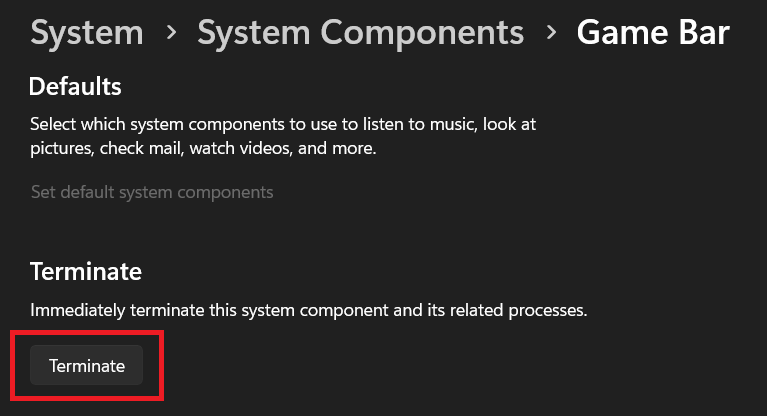
Step 5. Scroll down to find Terminate. Click the Terminate button to stop the game bar app.
Step 6. On the left Settings panel, click Gaming. Go to Game Bar and toggle off Allow your controller to open Game Bar.
Now, the Xbox game bar is being disabled and will not run in the background. Even if you mistakenly launch the game overlay from the controller, it will not pop up.
Uninstall Game Bar Completely from PowerShell
However, you may find when you press the Win + G hotkeys, the game bar still shows up. That is because the method above only disables the Windows game bar. The default game screen recorder is still installed on your PC.
If you want to remove the game bar permanently, you need to uninstall it from the PowerShell. To uninstall Xbox game bar in Windows 11 and 10:
Step 1. Click the Windows button, type powershell, and select Run as administrator.
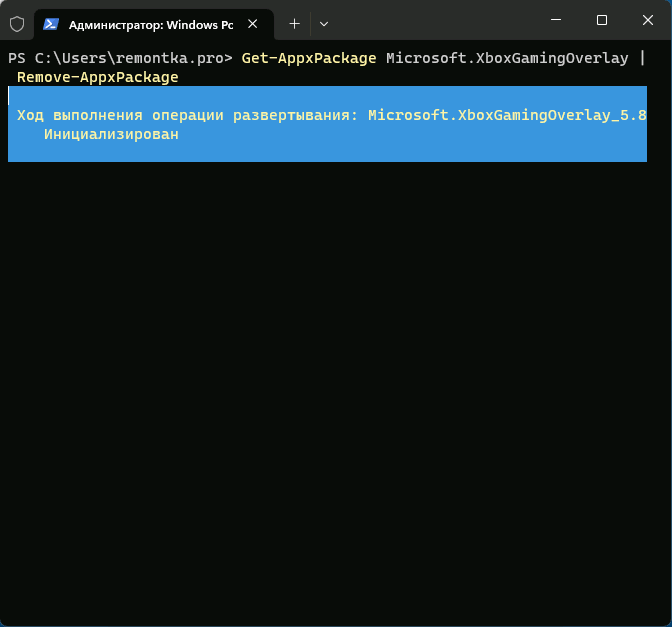
Step 2. Enter the command: Get-AppxPackage Microsoft.XboxGamingOverlay | Remove-AppxPackage. Hit Enter.

Step 3. Wait for the progress bar to finish, check if the Xbox bar is disabled, and close the PowerShell window.
- Notice: To reinstall the Xbox Game Bar, you need to download and install it from the Microsoft Store.
Share this post on your social media to help more users!
How to Disable Xbox Game Bar Windows 10
Windows 10 users can disable the service from Settings. Using PowerShell to disable Xbox Game Bar is only applicable to Windows 11.
Steps on how to remove game bar from Windows 10 are different from that of Windows 11. Check for more details:
Step 1. Press the Windows + I keys together to launch Settings.
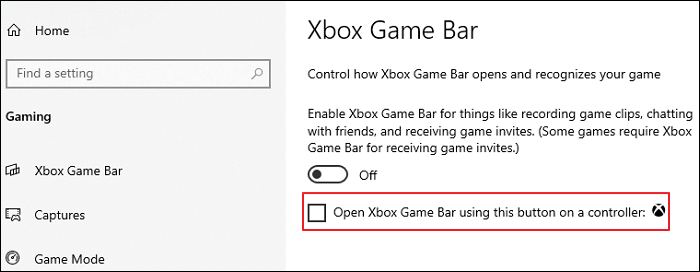
Step 2. Under the Gaming tab, go to Xbox Game Bar and toggle off Enable Game Bar for things like….

Step 3. Toggle off Open Xbox Game Bar using this button on a controller. This prevents your Xbox Series controllers from launching the game bar.
- Notice: To enable the Xbox overlay and widgets, toggle on these options.
Bonus: What Is the Best Xbox Game Bar Alternative
Although Windows Game Bar requires no installation, you can see some issues over the internet, like Xbox Game Bar can’t record and prevents Steam from recording itself. To overcome limitations such as incorrect screen ratio, screen recording without audio, and recordings that are too large, you can try its best free alternative, the Windows screen recorder EaseUS RecExperts.
⭐What makes it stand out:
- Record Xbox Series X gameplay for more than 1 hour.
- Record multiple windows without interrupting.
- Record the game with your face.
- Extract audio from Mov and transcribe audio to text.
- Trim or edit the video.
Let’s see how to record gameplay with EaseUS RecExperts.
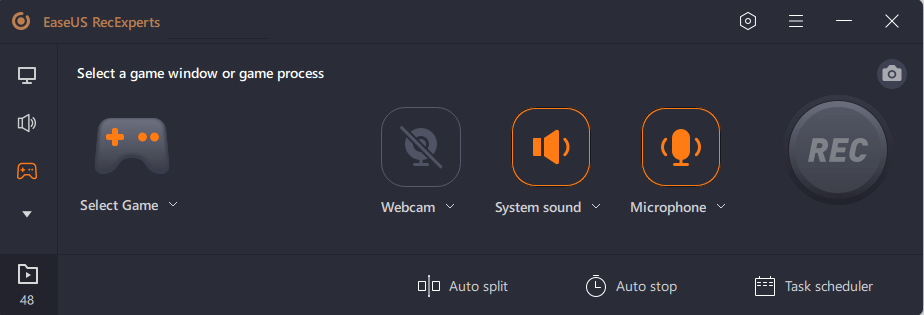
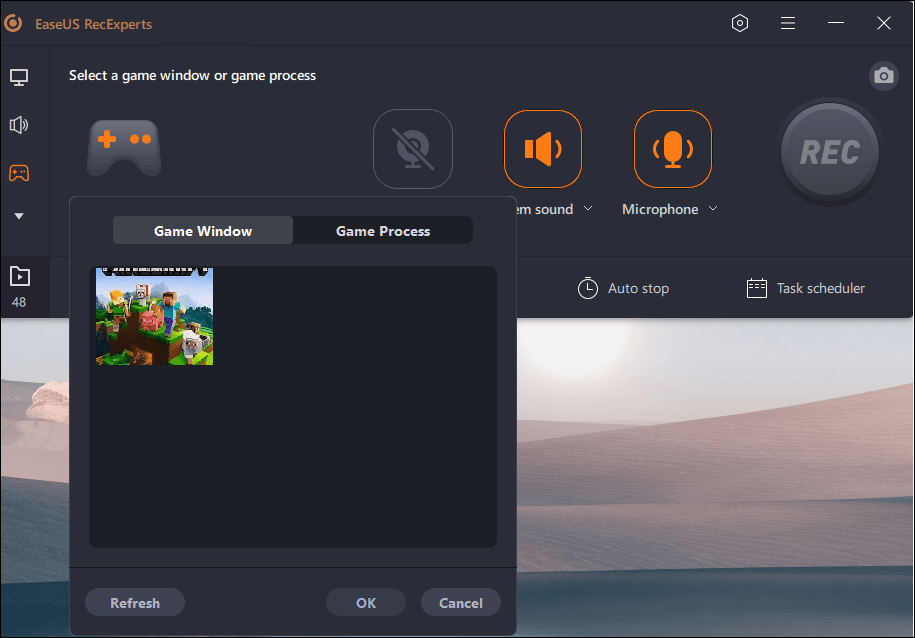
Step 1. Start the gameplay you want to record and launch EaseUS game recorder. Next, select the Game mode.
Step 2. Click the nut icon to open the Settings window, and then click on «Video» to adjust the frame rate (from 1 to 144), video quality, format, etc.
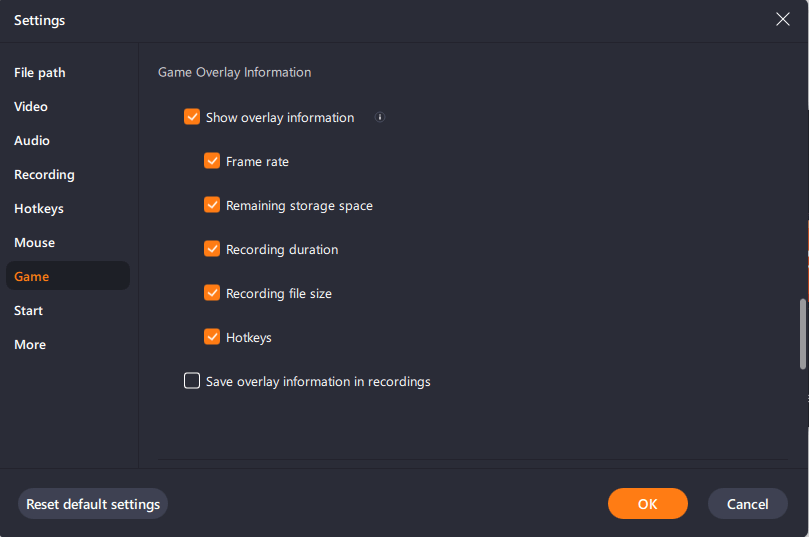
In addition, you can click on the «Game» button to change some game overlay options. Once done, click «OK».
Step 3. Go back to the Game mode interface and click «Select Game» to choose the gameplay you want to capture. Next, click REC to start your game recording.
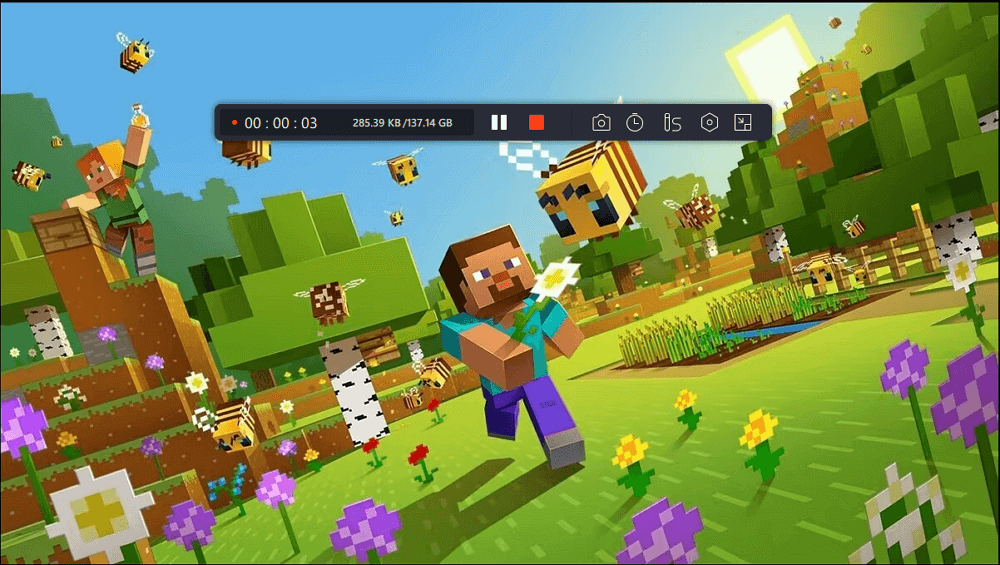
Step 4. You will see a small bar showing the time of your record. If needed, you can take screenshots in recording, or set the specific time to stop the recording by clicking the «Clock» icon on the toolbar.
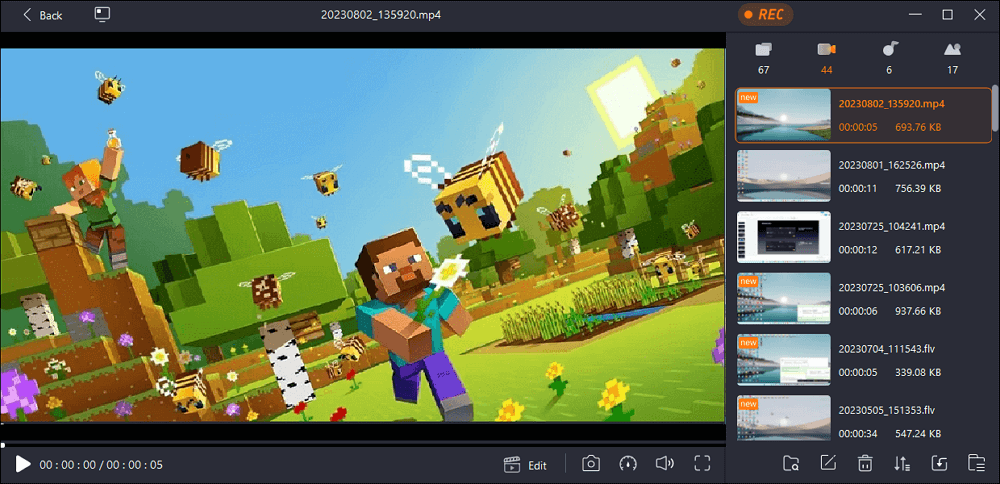
Step 5. Once done, you can watch and edit the recorded footage with the built-in video editor. On the recorded video, you can trim the recordings as you want.
Final Words
Using the methods above, it can be easy to disable Xbox Game Bar on your Windows 11 and 10 computers. You can turn off the MS overlay or remove it completely.
If you are looking for a simpler screen recording utility, try EaseUS RecExperts. With several clicks, you can record single or multiple screens of your gameplay. Download and give it a shot.
Disable Xbox Game Bar Overlay FAQs
Check more frequently asked questions on how to disable the Xbox Game Bar.
1. How to turn off Game Mode?
To turn off Game Mode:
Step 1. Press the Windows + I keys together to launch Windows Settings.
Step 2. Go to Gaming > Game Mode > toggle off Game Mode.
Step 3. Close Settings.
2. Should I enable or disable Xbox game bar?
If you don’t use the Xbox game bar, we suggest turning off this feature to free up resources.
3. Does game bar slow down PC?
Windows Game Bar doesn’t slow down your PCs. Compared with other overlays like Nvidia’s Shadowplay, it has less of an effect on your PC’s performance.
4. How did Xbox game bar get on my computer?
Xbox Game Bar is a built-in screen recording tool in Windows 10 and 11. It helps you record videos and take screenshots while you are playing games or watching other videos. To initiate it, you can press the Win + G shortcut.
Share this post on your social media to help more users!
Некоторые предустановленные приложения Windows 11 и 10 нельзя удалить в параметрах приложений и другими очевидными способами. Одно из таких приложений — Xbox Game Bar. Оно может быть полезным, например, для записи видео с экрана, но далеко не всем пользователям оно нужно.
В этой инструкции подробно о способах удалить Xbox Game Bar как встроенными средствами системы — с помощью PowerShell, так и с помощью сторонних программ-деинсталляторов.
Удаление Xbox Game Bar в PowerShell
Стандартный способ удаления приложения Xbox Game Bar — использование команды Windows PowerShell. Шаги для этого будут следующими:
- Запустите Терминал Windows или Windows PowerShell от имени Администратора. В Windows 11 и 10 сделать это можно в контекстном меню кнопки «Пуск».
- Введите команду
Get-AppxPackage Microsoft.XboxGamingOverlay | Remove-AppxPackage
и нажмите Enter.

- В результате приложение Xbox Game Bar будет удалено для текущего пользователя, но сам пакет приложения останется на компьютере.
- Ещё три варианта команд, которые удаляет все приложения Xbox (не только Game Bar), также запускаем в PowerShell (первая команда оставляет хранящиеся на компьютере пакеты приложений, вторая и третья — удаляет их):
Get-AppxPackage | select-string xbox | Remove-AppxPackage
dism /Online /Get-ProvisionedAppxPackages | Select-String PackageName | Select-String xbox | ForEach-Object {$_.Line.Split(':')[1].Trim()} | ForEach-Object { dism /Online /Remove-ProvisionedAppxPackage /PackageName:$_}

Get-ProvisionedAppxPackage -Online | Where-Object { $_.PackageName -match "xbox" } | ForEach-Object { Remove-ProvisionedAppxPackage -Online -allusers -PackageName $_.PackageName }
Ещё один способ удалить Xbox Game Bar и другие, имеющие отношение к Xbox в PowerShell, указав конкретные пакеты приложений вручную (ключевое в контексте рассматриваемой темы — XboxGamingOverlay):
- Используем команду
Get-AppxPackage | Select-String xbox
чтобы получить имена пакетов.
- Используем по порядку команды
Remove-AppxPackage имя_пакета
для удаления каждого из них, имя пакета можно скопировать в буфер обмена прямо в PowerShell.
- Чтобы удалить их для всех пользователей, используем параметр -allusers
Remove-AppxPackage -allusers имя_пакета
- Для удаления не только установленного приложения, но и соответствующего пакета для всех пользователей:
Remove-ProvisionedAppxPackage -Online -allusers -PackageName имя_пакета
Обратите внимание, что после удаления Xbox Game Bar, вы можете начать получать сообщения об ошибках вида «Вам понадобится новое приложение, чтобы открыть эту ссылку ms-gamingoverlay» или «Получите приложение, чтобы открыть эту ссылку ms-gamingoverlay». Подробно про ошибки ms-gamingoverlay.
Сторонние деинсталляторы

Многие сторонние программы для удаления программ и встроенных приложений Windows позволяют, в том числе, легко удалить Xbox Game Bar. Среди рекомендуемых решений для этих целей:
- BC Uninstaller
- HiBit Uninstaller
Обе программы отлично справятся с задачей удаления Xbox Game Bar с компьютера, а делается это в простом графическом интерфейсе. Но при необходимости вы можете использовать и другие функциональные бесплатные деинсталляторы с функцией удаления встроенных приложений Windows 11 и других версий.
Xbox Game Bar is a gaming overlay integrated into Windows 11 that allows you to shoot movies, record games, take screenshots, share them, talk with friends, while you play your game. It is an overlay of handy widgets for gamers that appears when you click the Windows + G keyboard shortcut. By default, Windows 11 has enabled Xbox Game Bar. However, not everyone finds it useful; even gamers find it buggy and laggy at times. It has been reported to cause games to crash, slow down, or stop working completely in certain situations. You may want to disable Xbox Game Bar in Windows 11 to prevent it from wasting system resources in the background. Moreover, you may need to enable or reinstall Xbox Game bar later on your Windows 11 laptop. Read below to find out how to do so!

Table of Contents
Windows 11 Xbox Game Bar helps you to record your screen, take screenshots and connect with friends during gameplay. Microsft hosts a dedicated page to resolve issues related to Xbox Game bar. Click here to read it.
However, if you do not wish to use these features, then you can disable Xbox Game Bar using any of the following methods.
Method 1: Through Windows Settings
Follow the below steps to disable Xbox Game Bar in Windows 11 through Settings app:
1. Press Windows + I keys together to open Settings.
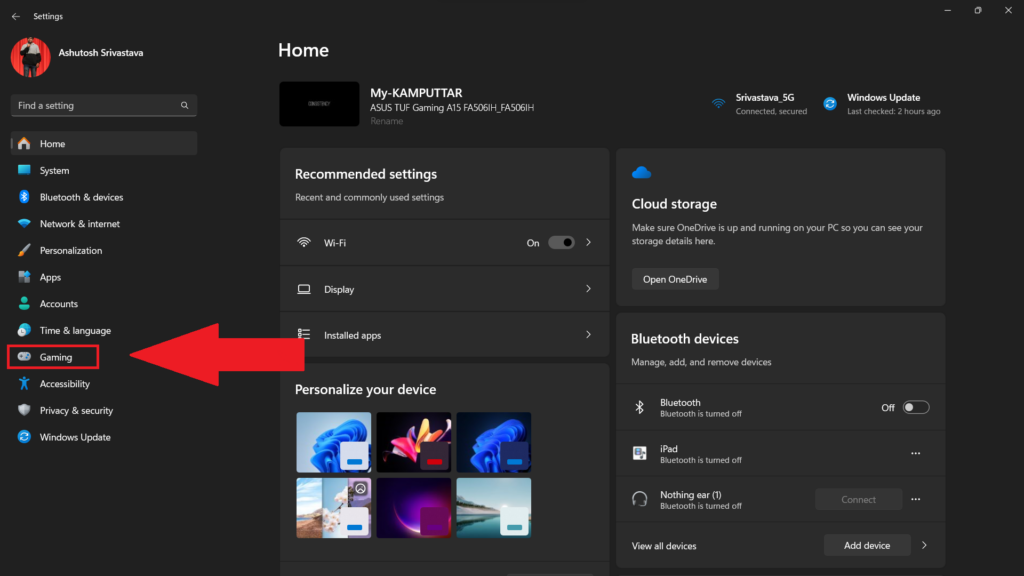
2. Click on Gaming in the left pane.
3. Then, click on the Xbox Game Bar in the right pane, as shown.

4. Switch Off the toggle for Open Xbox Game Bar using this button on a controller option to disable Xbox Game Bar.

5. Next, click on Apps in the left pane and select the Apps & features option in the right pane.

6. Use the App list search bar to search for Xbox.
7. Click on the three-dotted icon for Xbox Game Bar.
8. Then, click on Advanced options, as depicted.

9. Click on the drop-down menu for Background apps permissions and select Never from this list.
Hereon, Xbox Game Bar wouldn’t run in the background and consume system resources.
10. Scroll down and click on the Terminate button to Immediately terminate this app and its related processes.

Also Read: How to Disable Online Search from Start Menu in Windows 11
Method 2: Through Windows PowerShell
You can disable Xbox Game Bar in Windows 11 for a single user or all users collectively using PowerShell commands.
Option 1: For Current User Only
Here are the steps to disable Xbox Game Bar on Windows 11 through Windows PowerShell for a particular or current user:
1. Click on the Search icon and type Windows PowerShell. Then, click on Run as Administrator, as shown.

2. In the PowerShell window, type the following command and press the Enter key.
Get-AppxPackage *Microsoft.XboxGameOverlay* | Remove-AppxPackage

3. Again, type the below command and hit Enter to execute.
Get-AppxPackage *Microsoft.XboxGamingOverlay* | Remove-AppxPackage

Xbox Game Bar will be uninstalled from the computer for the current user.
Also Read: Is The Forest on Xbox One?
Option 2: For All Users
If you want to remove Xbox Game Bar for all the users on the computer, then follow these steps:
1. Launch Windows PowerShell as administrator as earlier.
2. Type the given command and press the Enter key.
Get-AppxPackage -AllUsers *Microsoft.XboxGameOverlay* | Remove-AppxPackage

3. Again, type the following command and hit Enter key.
Get-AppxPackage -AllUsers *Microsoft.XboxGamingOverlay* | Remove-AppxPackage

This will uninstall it for all users on your Windows 11 PC.
Also Read: How to Disable Notification Badges in Windows 11
How to Reinstall & Enable Xbox Game Bar
In case you need an Xbox Game Bar in the future, you can reinstall it and enable it just as easily by using a few PowerShell commands.
Option 1: For Current User Only
Follow the given steps to reinstall Xbox Game Bar for current user only:
1. Launch Windows PowerShell with administrative privileges via search bar.
2. In the PowerShell window, type the following command and press the Enter key to install Xbox and all its related services.
Get-AppxPackage *Xbox* | Foreach {Add-AppxPackage -DisableDevelopmentMode -Register “$($_.InstallLocation)\AppXManifest.xml”}

3. Again, type the below command and hit Enter to execute, if you only wish to install & use Xbox Game Bar.
Get-AppxPackage *Microsoft.XboxGamingOverlay* | Foreach {Add-AppxPackage -DisableDevelopmentMode -Register “$($_.InstallLocation)\AppXManifest.xml”}

Option 2: For All Users
Follow the given steps to reinstall Xbox Game Bar for all users:
1. Launch Windows PowerShell as administrator as instructed earlier.
2. Type the given command and press the Enter key to install Xbox and all its related services.
Get-AppxPackage -allusers *Xbox* | Foreach {Add-AppxPackage -DisableDevelopmentMode -Register “$($_.InstallLocation)\AppXManifest.xml”}

3. Type the given command and press the Enter key, if you only wish to install & use Xbox Game Bar.
Get-AppxPackage -allusers *Microsoft.XboxGamingOverlay* | Foreach {Add-AppxPackage -DisableDevelopmentMode -Register “$($_.InstallLocation)\AppXManifest.xml”}

Also Read: How to Record your Screen in Windows 11
Pro Tip: How to Disable/Enable Other Xbox Apps
Apart from Xbox Game Bar, there are a few other Xbox apps that come pre-installed with Windows 11, such as:
- Xbox App
- Xbox Gaming Services
- Xbox Identify Provider
- Xbox Speech to Text Overlay
Hence, in addition to Xbox Game Bar, you can uninstall these apps for all users, at once, as follows:
1. Open Elevated Windows PowerShell as before.
2. Type the following commands one-by-one and hit Enter after each command.
Get-AppxPackage -AllUsers *Microsoft.Xbox.TCUI* | Remove-AppxPackage
Get-AppxPackage -AllUsers *Microsoft.XboxApp* | Remove-AppxPackage
Get-AppxPackage -AllUsers *Microsoft.GamingServices* | Remove-AppxPackage
Get-AppxPackage -AllUsers *Microsoft.XboxIdentityProvider* | Remove-AppxPackage
Get-AppxPackage -AllUsers *Microsoft.XboxSpeechToTextOverlay* | Remove-AppxPackage

Similarly, you can enable the same for all users, at once, as follows:
1. Open Elevated Windows PowerShell as before.
2. Execute the given command to install & enable Xbox TCUI service:
Get-AppxPackage -allusers *Microsoft.Xbox.TCUI* | Foreach {Add-AppxPackage -DisableDevelopmentMode -Register “$($_.InstallLocation)\AppXManifest.xml”}

3. Replace Microsoft.Xbox.TCUI with Microsoft.XboxApp, Microsoft.GamingServices, Microsoft.XboxIdentityProvider & Microsoft.XboxSpeechToTextOverlay in the command given on Step 2 to enable these components individually.
Note: You can remove -AllUsers in the said commands to make changes to the current user account while keeping the others intact.
Recommended:
- Fix Apps Can’t Open in Windows 11
- How to Change Country in Microsoft Store in Windows 11
- How to Open Registry Editor in Windows 11
- How to Turn Off Windows 11 Camera and Microphone Using Keyboard Shortcut
We hope you learned how to disable or enable Xbox Game Bar in Windows 11 as and when needed. Keep visiting our page for more cool tips & tricks and leave your comments below.
If you’re a PC gamer, you have probably heard of the Xbox Game Bar. It is a built-in gaming overlay in the Windows operating system that gives us quick access to a variety of features, such as screen recording, performance monitoring, gameplay broadcast, game mode, access to the Xbox app, social features, and many more.
However, despite all these good features, there are still some things for which you may want to disable the game bar on your computer. For example, the Xbox Game Bar always runs in the background, and if you have a low-end PC, you may get an FPS boost by turning off the overlay.
Therefore, in this guide, let us see how you can disable the Xbox Game Bar in Windows 11 so that your PC can push itself to deliver the best possible framerates.
How to Disable the Xbox Game Bar in Windows 11
We have compiled a list of four working methods that can help you in getting rid of the Xbox Game Bar on your PC. So, without any further waiting, let’s dive into the methods and disable the Xbox Game Bar in Windows 11.
1. Using the Settings App
The Settings app in Windows 11 has improved over time in all aspects: overall UI and design, functionality, control options, and accessibility. As of now, you can tweak most software-related system-side settings from the Settings app itself. Let’s see how to disable the Xbox Game Bar using the new and powerful Settings app:
1. Press the Win key on your keyboard and click the Cog icon to open the Settings app.
2. From the left section, click on Gaming.
3. In the Gaming section, select the Game Bar option to open Xbox Game Bar settings.
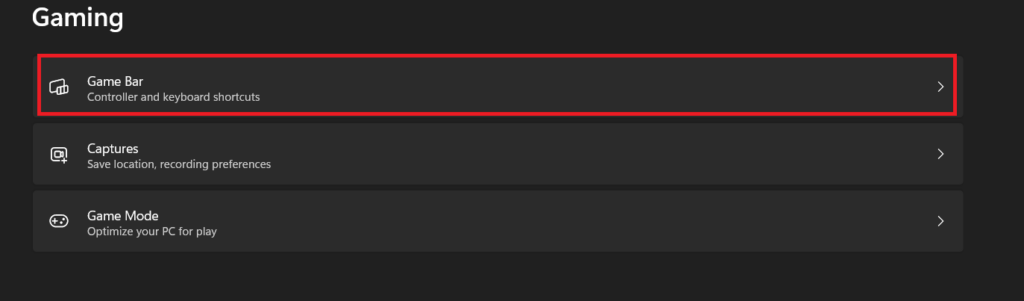
4. Click on the toggle next to Allow your controller to open Game Bar to turn it off.
We know that the Xbox Game Bar is one of those troublesome apps that always stays in the background occupying a chunk of RAM. Therefore, we need to ensure that not only does the app stop running in the background, but also that all its processes stop eating system resources in the background. Here’s how you can do it:
1. Press Win + I on the keyboard to open the Settings app.
2. From the left section, click on Apps.

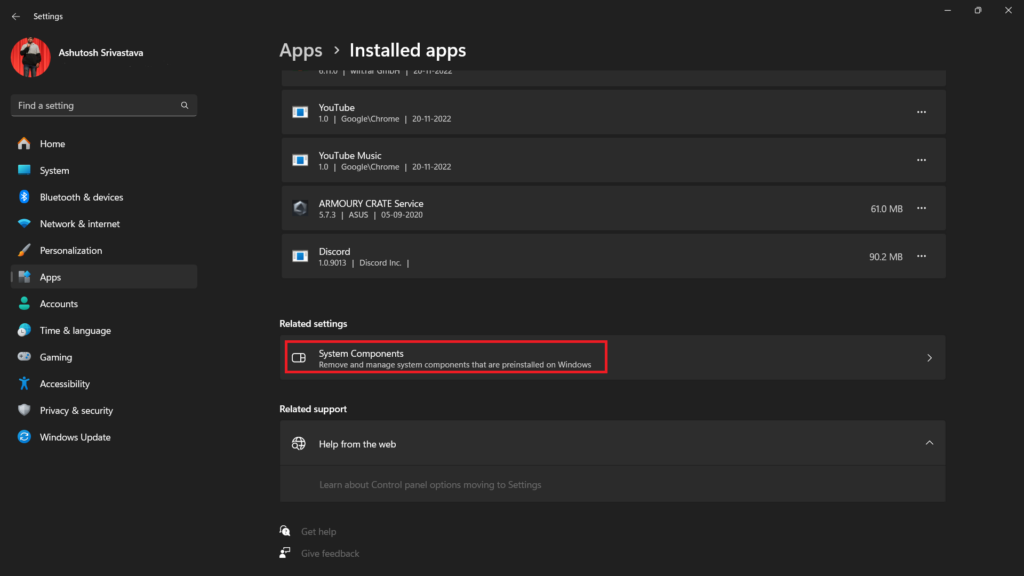
3. Click on Installed Apps in the Apps settings.
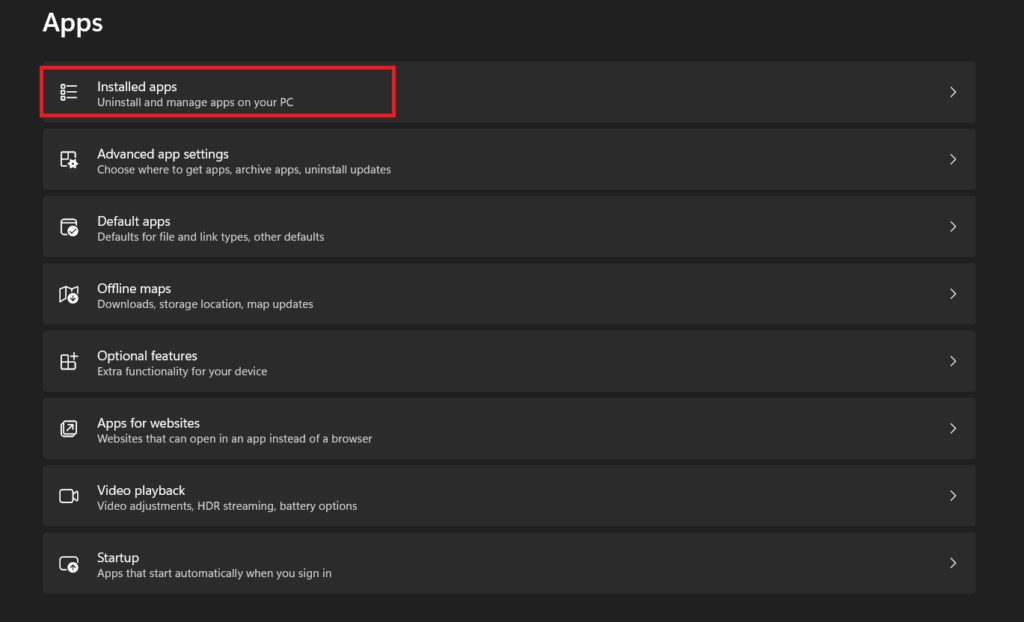
4. Scroll down and click on System Components under the Related Settings section.
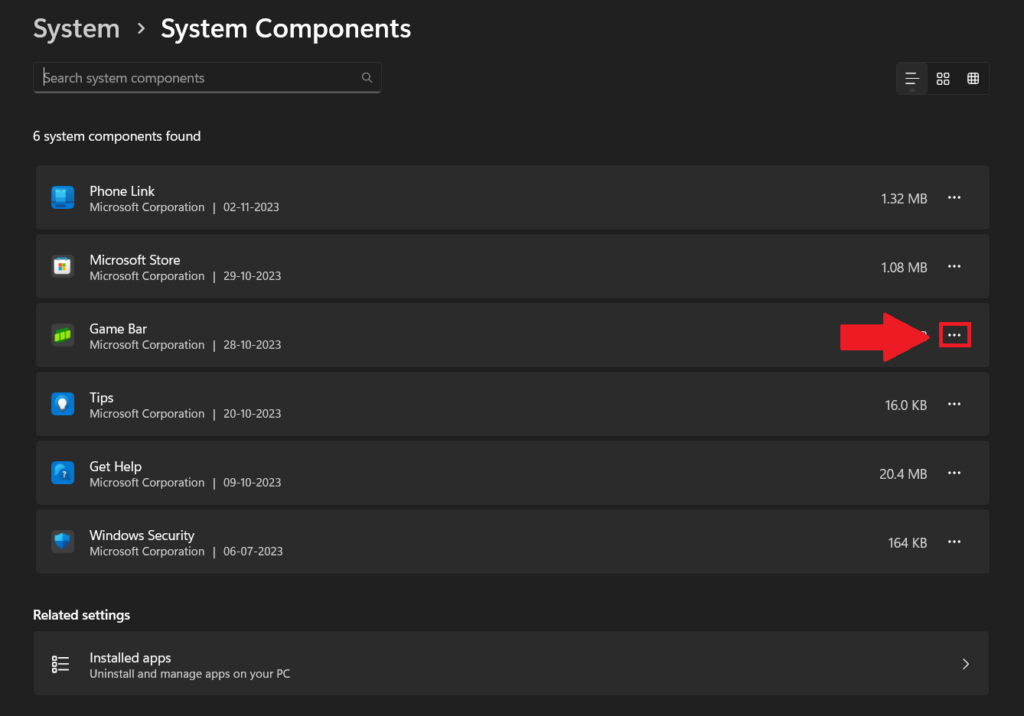
5. Click the kebab menu next to the Game Bar.
6. Select Advanced options.
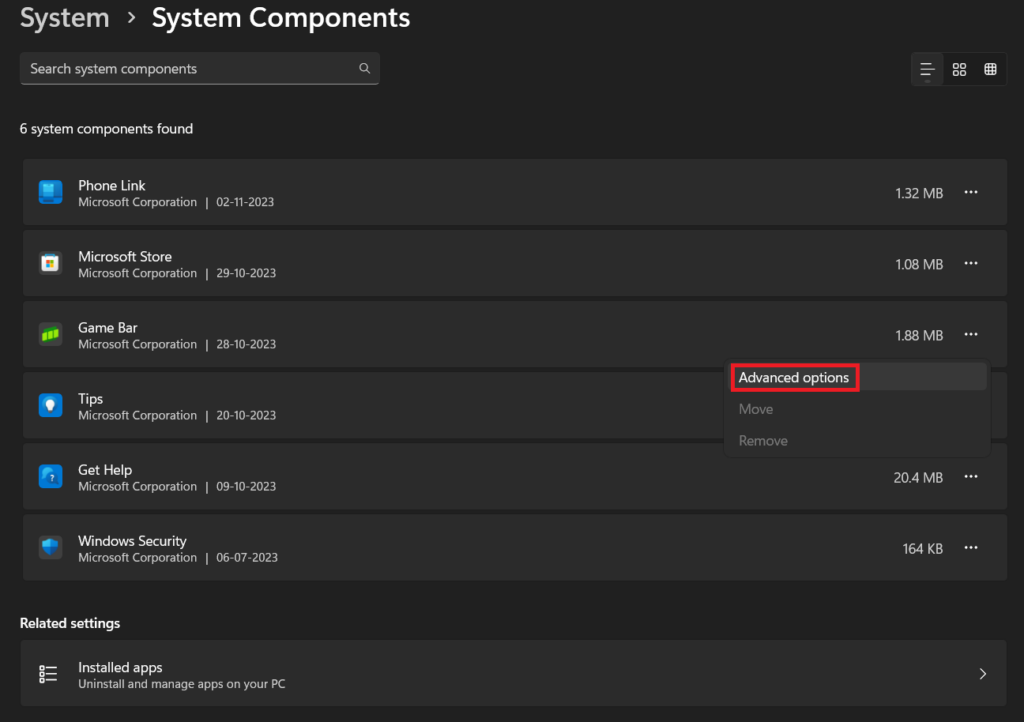
7. On the next screen, change the Background component permission option to Never.
8. Scroll down and click the Terminate button to stop all the active processes of the Xbox Game Bar.
2. Using Registry Editor
Registry Editor in Windows 11 is another powerful tool that allows you to modify the Windows registry. The Registry Editor can also be used to disable the Xbox Game Bar in Windows 11.
However, keep in mind that the registry is a complex database, and it is important to be careful while editing it, as even a slight incorrect change can cause problems with your system. With that in mind, here’s how to disable the Xbox Game Bar using the Registry Editor:
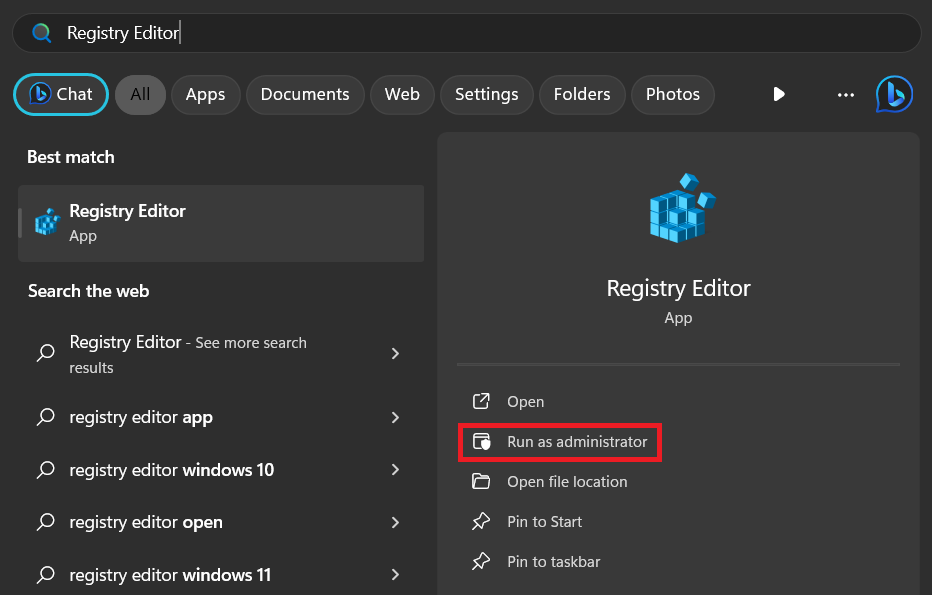
1. Click the Win icon on the taskbar to open the Start Menu.
2. Type Registry Editor in the search bar, and from the search results, click on the Run as administrator option.
3. Paste the given location in the address bar and press the Enter key on your keyboard.
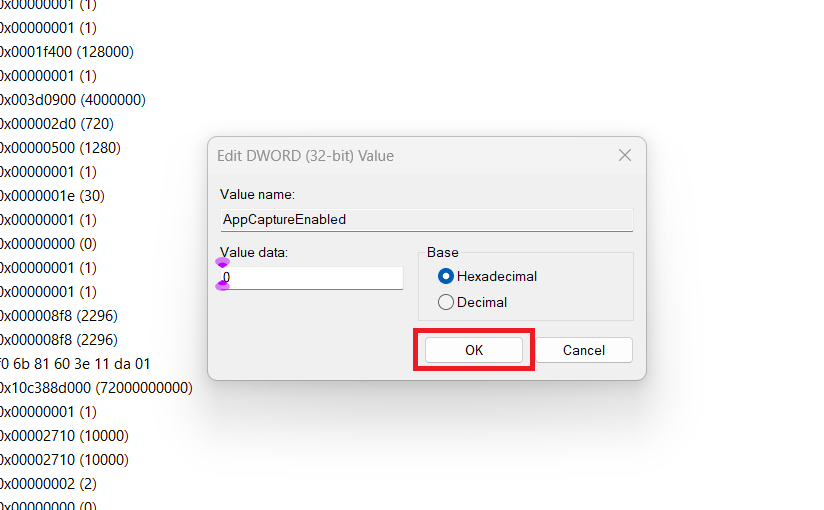
Computer\HKEY_CURRENT_USER\SOFTWARE\Microsoft\Windows\CurrentVersion\ GameDVR4. In the GameDVR folder, double-click on the AppCaptureEnabled option.
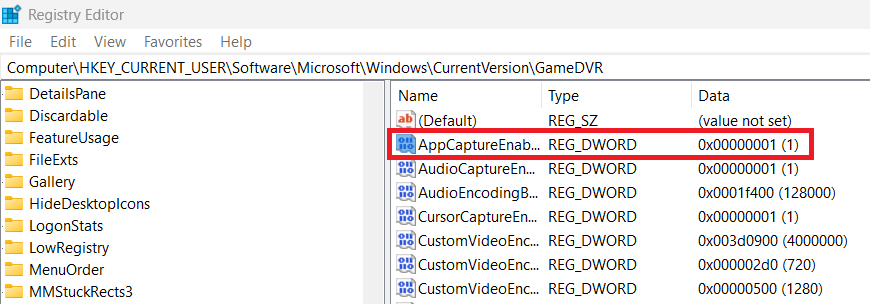
5. Change the Value data to 0 and press the OK button.
After making all the changes, close the Registry Editor and restart your computer to implement the changes.
3. Using Group Policy Editor
Group Policy Editor is a powerful tool for the Pro and Enterprise versions of Windows 11 that allows users to configure policies to control various aspects of the operating system, including user settings, security, and networking.
It is primarily used by system administrators in enterprise environments to manage large numbers of computers, but you can also use it to perform operations on your home computer, such as disabling the Xbox Game Bar.
Follow these steps to disable the Xbox Game Bar using the Group Policy Editor:
1. Click the Win icon on the taskbar to open the Start Menu.
2. Type Edit Group Policy in the search bar and press the Enter key from your keyboard.
3. Navigate to the following path:
Computer Configuration\Administrative Templates\Windows Components\Game DVR4. Double-click on the Allow Game DVR policy setting.
5. Select Disabled and click the OK button.
Now, close the Group Policy Editor and reboot your computer to apply all the changes.
4. Uninstall Xbox Game Bar Using Windows PowerShell/Command Prompt
While all the other methods only allow you to disable the Xbox Game Bar, this method allows you to permanently remove it from your computer, which indirectly means better gaming performance.
The Xbox Game Bar is one of the system-side apps, and there is no option for uninstalling system components in the Settings app. Therefore, to completely remove the Xbox Game Bar, you can only do so using Windows Terminal.
So, without further ado, here are the steps to remove the Xbox Game Bar from your computer:
1. Open the Start Menu.
2. Search for Windows PowerShell and click on Run as administrator.
3. Execute the following command to remove the Xbox Game Bar from your computer.
winget remove --global --name Microsoft.XboxGamingOverlay4. Restart your computer.
If you don’t want to use the Windows PowerShell, don’t worry as you can always do the same using the Command Prompt app. All you need to do is run Command Prompt as an administrator, execute the above-mentioned code, and restart your PC.
FAQs
Why Can’t I Remove Xbox Game Bar?
The Xbox Game Bar is a built-in feature in Windows 11, so you cannot completely remove it from your system settings. However, you can uninstall it using fourth method of this guide.
How Do I Permanently Disable the Xbox Game Bar?
To permanently disable the Xbox Game Bar, you can uninstall it using Windows PowerShell. However, keep in mind that this will also uninstall other gaming-related features on your system, such as the Game DVR and Game Mode.
How Do I Turn Off Windows Recording in Windows 11?
To turn off Windows Recording, open the Settings app and go to Gaming > Xbox Game Bar. Toggle off the Record audio when recording gameplay switch.
How Do I Disable My Xbox Keyboard on My Computer?
To disable your Xbox keyboard on your computer, open the Settings app and go to Gaming > Xbox Game Bar. Toggle off the Enable on-screen keyboard switch.
How Do I Restart My Xbox Game Bar on My Computer?
To restart your Xbox Game Bar on your computer, press Win + G to open it. Then, click on the Settings gear icon and select Restart.
Improve Your FPS by Disabling the Xbox Game Bar
The Xbox Game Bar in Windows 11 is a useful tool for gamers, but if you find it distracting or don’t need its features, you can disable or remove it using various methods.
Whether you choose to temporarily turn it off through the Settings app, disable it via the Registry Editor or Group Policy Editor, or uninstall it using PowerShell or Command Prompt, the choice is yours.
Just remember to proceed with caution when making changes to your system, and always consider your needs and preferences before disabling or removing any built-in Windows features.