
-
Home
-
News
- What Is Windows Sonic for Headphones & How to Turn on/off It?
By Daisy | Follow |
Last Updated
You may see Windows Sonic for Headphones on your Windows. Do you know what it is? How does it work? How to enable or disable it? Now, read this post from MiniTool to get more information.
What Is Windows Sonic for Headphones
What is Windows Sonic for Headphones? Windows Sonic is a platform-level audio tool that can simulate surround sound. Windows Sonic can also use spatial sound effects, which is an immersive audio experience that positions the audio around you Windows Sonic was added to Windows 10 in 2017 and has been launched in an update for Xbox One users.
Advantages of Windows Sonic for Headphones
The following are the advantages of Windows Sonic for Headphones.
Space limitations: You don’t need to set up a wide range of surround sound systems to get a similar audio experience.
Cheap: Windows Sonic for Headphones can be used for free and does not require expensive equipment.
Easy to set up: You can set up it on your computer or Xbox One.
Note: It is not suitable for all settings, such as built-in laptop speakers, but it supports all headsets.
When to Use Windows Sonic for Headphones
When to use Windows Sonic for Headphones? It is suitable for the two situations below.
Play Game: Windows Sonic can help you hear the direction from which footsteps or gunshots are coming.
Watch Movies: Movies with good picture quality and excellent sound are always better. When watching a movie with Windows Sonic for Headphones, you are more likely to hear subtle differences.
Also see: How to Watch YouTube Free Movies (Desktop & Mobile)
How Does Windows Sonic for Headphones Work
How does Windows Sonic for Headphones work? Windows Sonic for Headphones works in a virtual way. The work is done by the software, not the physical device you use. You don’t need to use sonic headphones or dedicated surround sound headphones, just toggle the button on the speaker settings on your computer to activate Windows Sonic.
How to Turn on/off Windows Sonic for Headphones
Then, we will introduce how to turn on and turn off Windows Sonic for Headphones. There are 3 ways available.
Via Settings
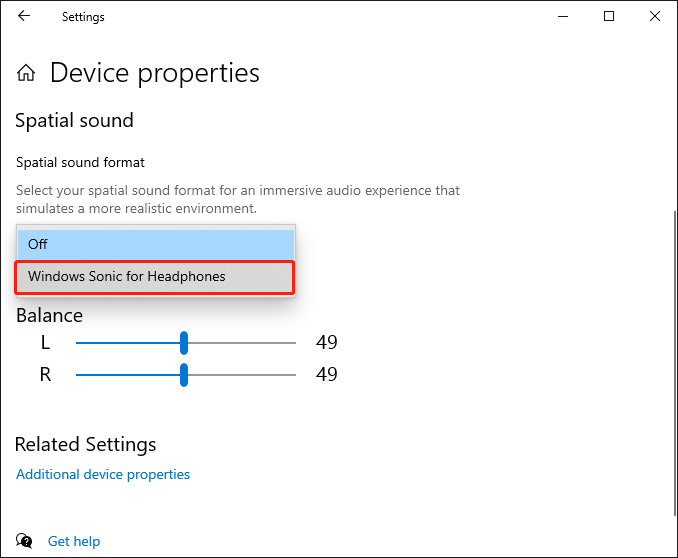
Step 1: Type spatial in the Search box to open the Device Properties interface.
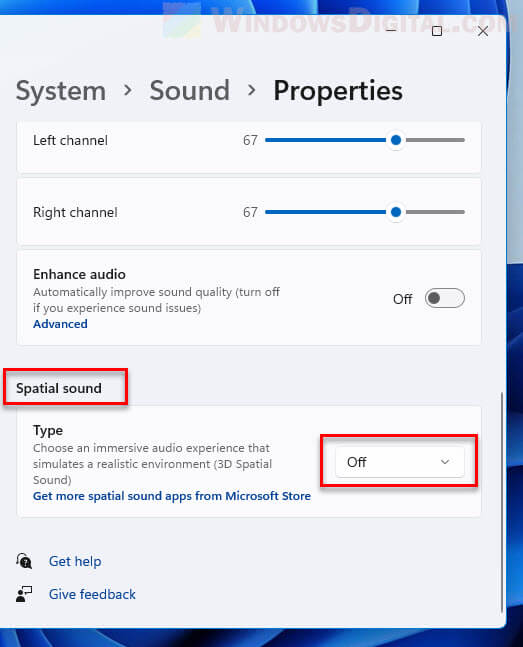
Step 2: Under the Spatial sound part, you should click the dropdown menu to select Windows Sonic for Headphones.
Step 2: If you want to turn off it, you need to repeat step 1 and change Windows Sonic for Headphones to off.
Via Control Panel
Step 1: Type control panel in the Search box to open the Control Panel application.
Step 2: Choose Hardware and Sound > Sound.
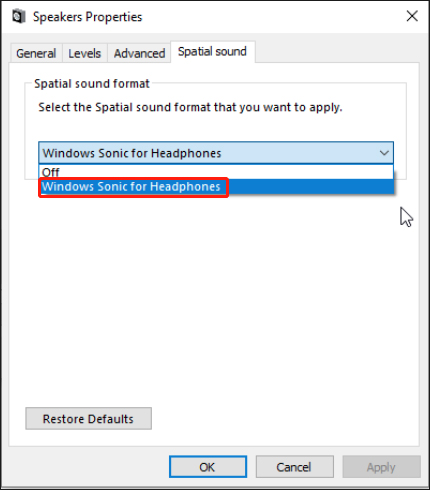
Step 3: Right-click your active audio device and select Properties, then open the Spatial Sound tab. You can use the dropdown menu to turn Windows Sonic for Headphones on or off.
Via System Tray
Alternatively, right-click the audio icon in your system tray (in the bottom-right corner of the screen), then head to Spatial sound (off) > Windows Sonic for Headphones.
Final Words
Here is all the information about Windows Sonic for Headphones. I hope that this post can be helpful to you.
About The Author
Position: Columnist
Having been an editor at MiniTool since graduating college as an English major, Daisy specializes in writing about data backups, disk cloning, and file syncing as well as general computer knowledge and issues. In her free time, Daisy enjoys running and going with friends to the amusement park.
-
Windows 10, professional version.
I much prefer Dolby Atmos for my Spatial Sound manager. Much.
Very often, usually on login occasionally on my starting a media program, Windows Sonic will be set as the sound manager in use, and I’ll have to switch to Dolby.
Now, this is really a minor complaint. I know about six different ways to turn off Windows Sonic and to turn on Dolby Atmos. But if there is some way to disable Windows Sonic or to prevent it from being set as my active sound manager I would love to know about it.
I have searched the internet for something that would prevent my system from turning Windows Sonic back on, but to date, no luck.
Any ideas, people?
Joseph Bonnar -
Given the helpful nature of people using these forums, I have to assume that if I haven’t had a response by now, it’s because nobody here has the answer. There might not BE a solution to my problem.
This is something I can live with, but should somebody ever find a way to give Windows Sonic for Headphones the axe, I will be delighted to buy them a case of their favorite beverage.
Joseph Bonnar -
Of course, just as soon as I put this in writing, someone will come up with something obvioius to prove me wrong. But I think Windows Sonic is one of those uninstallables. You can disable, but not remove.
I know MS won’t hear me, but making anything uninstallable; and worse, forcing anything «to my face» by making even the shortcut unremovable, is a surefire way for me to reject the offending app. I’ve heard good things about the new Edge, but I will never know, because it’s disabled on my computer, and always will be. Sorry for the tangent, Joe.
-
You don’t need to apologize. My only comments about MS Edge and other such «uninstallable» programs Microsoft hands us aren’t printable.
-
I guess you’ve tried searching/Googling (or other search engine) for a solution? I found some discussions of this problem by Googling «dolby atmos keeps switching to windows sonic». Didn’t read all the stuff that came up, but might give those search results a look.
Good luck!
-
Thank you for your response, Eezak. I went back and double checked on DDG using your search suggestion, and I found one thing I hadn’t tried yet.
So we’ll see if this works. -
Well, that one suggestion from elsewhere didn’t work. So in desperation I tried to contact Dolby Support.
It turns out this is a known issue, and Microsoft has promised multiple times to fix it. And never have.
Dolby made one suggestion:
Settings, account, sign in options: Turn «Use my sign-in information to automatically finish setting up my machine after an update or restart» OFF.
So I’m trying that now. -
And I would think contacting Dolby Support for their advice falls under the RTFM umbrella, so I’m a bit embarrassed.
-
try this:
Go to speaker icon in taskbar -> notification area and then right-click on it.
Then go to playback devices -> speaker (playback tab, under playback device) -> properties -> Advanced.
Under exclusive mode, disable checkbox «Allow applications to take exclusive control of this device»
This shouldn’t allow any thing to change the spatial audio format.
-
Thank you for your response.
The problem was resolved; I had to contact Dolby for information on it. As per the representative I spoke with, they were creating a fix for the very problem I was describing.
Three weeks later the app was updated; the update fixed my problem.
Joe Bonnar
Downloads All In One Tweaks
\ Android
\ Anti-Malware
\ Anti-Virus
\ Appearance
\ Backup
\ Browsers
\ CD\DVD\Blu-Ray
\ Covert Ops
\ Drive Utilities
\ Drivers
\ Graphics
\ Internet Tools
\ Multimedia
\ Networking
\ Office Tools
\ PC Games
\ System Tools
\ Mac/Apple/Ipad Downloads
Other News:
Top Downloads
\ News (Tech)
\ Off Base (Other Websites News)
\ Way Off Base (Offbeat Stories and Pics)
Social:
Facebook
\ YouTube
\ Twitter
\ Tumblr
\ Pintrest
\ RSS Feeds
Does the Spatial sound setting keep switching or reverting to Windows Sonic itself on your computer? Some Windows users have complained that their Spatial Sound settings keep changing and reverting to Windows Sonic itself. This condition generally occurs whenever the computer is rebooted or hibernated. As a result, the users who have paid for Dolby Atmos or DTS sound are unable to enjoy a great audio experience while gaming or watching movies.

Spatial sound refers to sound playback technologies that offer an enhanced atmosphere in a 3D virtual space with surround sounds. It is primarily used while watching movies or playing games to enhance the overall experience. You can enable or disable the spatial sound according to your requirement.
This issue could be a result of several factors. It might be due to outdated sound drivers. Or, you might face the issue if you have enabled Exclusive Mode for your playback device. Besides that, the corrupted spatial sound app can be another reason for the same.
How do I turn off Windows Sonic and Spatial sound?
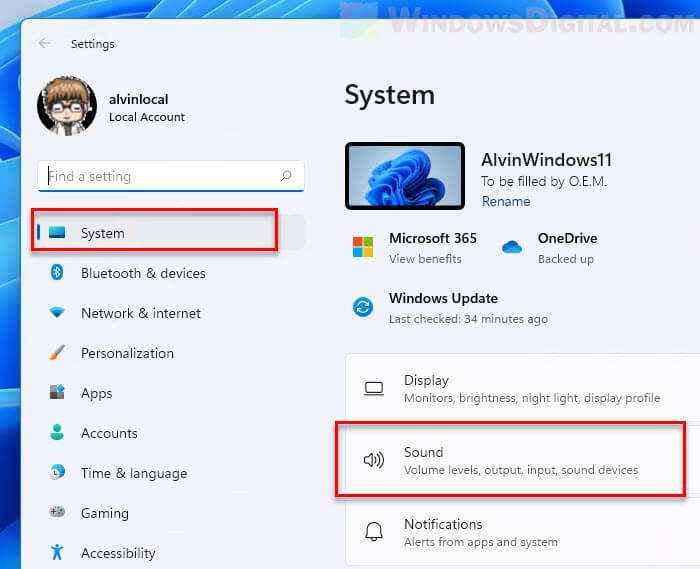
To disable the spatial sound on Windows 11, open the Settings app using Win+I and go to the System > Sound option. Next, under the Output section, select your output sound device to open related settings. After that, scroll down to the end of the page and click on the Spatial audio drop-down option. Next, choose the Off option to turn off the spatial sound.
If the Spatial sound keeps reverting or swirching to Windows Sonic on your PC, you can use the below solutions to fix the issue:
- Run the Playing Audio troubleshooter.
- Disable exclusive control of your playback device.
- Enable Spatial Sound using a dedicated app like Dolby Access or DTS Sound Unbound.
- Update your sound drivers.
- Repair or uninstall and reinstall the Spatial sound app.
1] Run the Playing Audio troubleshooter
Before getting into advanced troubleshooting steps, we recommend you run the inbuilt audio troubleshooter. If there is some generic issue that is why you are facing this problem, the Windows Audio troubleshooter should be able to detect and fix audio-related problems and bugs. Here are the steps to run it:
- Firstly, hit the Win+I hotkey to open the Settings app quickly.
- Now, go to the System tab and click on the Troubleshoot option from the right side.
- After that, press the Other troubleshooters option to view Windows inbuilt troubleshooter.
- Next, scroll down to the Playing Audio troubleshooter and click on the Run button Windows will start detecting audio-related issues on your system and list them on the screen. In addition, it will also recommend suitable fixes that you can use to fix the issues; apply an appropriate fix.
Once done, check if the problem is gone.
See: Razer 7.1 Surround Sound not working in Windows.
2] Disable exclusive control of your playback device
As reported by some affected users, disabling exclusive control for their devices helped them fix the issue. So, you can also try doing the same and see if the issue is resolved.
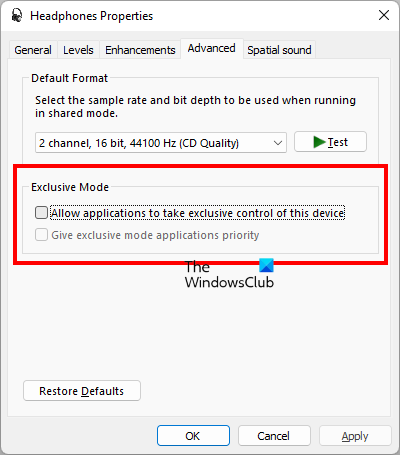
The Exclusive Mode feature lets certain audio applications take exclusive control of your audio device drivers. Now, if enabled, sound optimization, equalizer, or some other app on your computer might be overriding the spatial sound property and causing this issue. Hence, disable the Exclusive Mode for your playback device to fix the issue. Here’s how:
- First, open the Settings app by pressing Win+I and move to the System tab.
- Now, tap on the Sound option and click on the More sound settings option.
- After that, move to the Playback tab and right-click on your active audio playback device.
- Then, select the Properties option from the appeared context menu.
- Next, navigate to the Advanced tab and untick the checkbox associated with the Allow applications to take exclusive control of this device option.
- Finally, click on the Apply > OK button to apply new settings.
See if the problem is fixed now.
Read: Something went wrong while trying to turn on Spatial Sound.
3] Enable Spatial Sound using a dedicated app like Dolby Access or DTS Sound Unbound
If you are unable to change the spatial sound setting from Windows Sonic via Sound Settings, you can use the dedicated app to customize your preferences. In case you use Dolby Atmos, you can download and install the Dolby Access app to change the spatial sound settings. DTS users can get the DTS Sound Unbound app to change their sound configurations.
For example, if you want to use Dolby Access, open Microsoft Store and search for the Dolby Access app. After that, click on the Install button on the app. Once the app is installed, open it and configure settings accordingly.
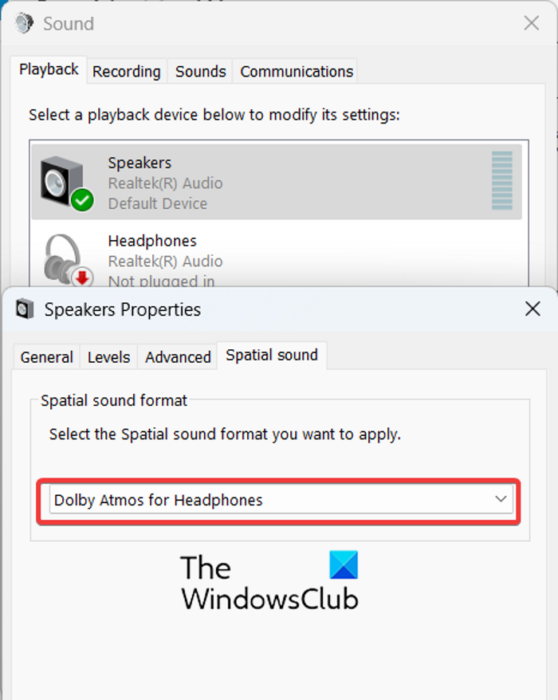
After that, open Settings, click on the Sound > More sound settings option, right-click on your device in the Playback tab, and choose the Properties option. Now, move to the Spatial sound tab and select the Dolby Atmos for Headphones option as Spatial sound format. When done, press the Apply > OK button and reboot your computer. Hopefully, you won’t experience the same issue now.
Read: Fix Channel Surround Sound not working in Windows.
4] Update your sound drivers
If the above solutions don’t work, ensure your audio drivers are up-to-date. Out-of-date and corrupted audio drivers cause audio-related issues on your computer. Hence, update your audio driver and check if the issue is resolved.
To do that, open the Windows Settings using Win+I, navigate to the Windows Update tab, and press the Advanced options > Optional updates option. You can now install audio driver updates by ticking the respective checkboxes and clicking the Download & install button. Lastly, reboot your PC to complete the process and see if the problem is resolved.
You can also directly download and install Audio drivers.
5] Repair or uninstall and reinstall the Spatial Sound app
If you are using a spatial sound application like Dolby Access for customizing your spatial sound preferences, try repairing the app. It might be the corruption associated with the app that is causing the issue. Hence, you can fix it by repairing the app using Settings. Open Settings, go to Apps > Installed apps, click on the three-dot menu button with the app, and select Advanced options. After that, click on the Repair button and check if the problem is resolved.
If repairing the app doesn’t work, uninstall the app by launching Settings. Go to Apps > Installed apps, scroll down to the spatial sound app, and select the three-dot menu button. After that, choose the Uninstall option and follow the prompted steps to complete the process.
Once done, reinstall the app from Microsoft Store and reconfigure it to check if the problem is fixed.
How do I stop Windows from switching to Windows Sonic?
If the spatial sound setting keeps reverting to Windows Sonic on your PC, you can use the dedicated spatial sound app like Dolby Access to change your preferences. Besides that, you can launch the inbuilt audio troubleshooter and check if it is able to address this issue. Additionally, ensure that your sound driver is up-to-date, disable exclusive control, or repair or reinstall the spatial sound app you are using.
Now read: THX Spatial Audio not working on Windows.
If you hear surround sound when playing games or watching movies while knowing that you never turned on any surround sound setting, it’s likely because you have the Spatial Sound feature enabled in Windows 11.
Spatial sound is a feature that creates an immersive audio experience and stimulates a realistic environment without the need to place speakers in numerous parts of the room. Surround sound, on the other hand, requires multiple physical speakers to be placed accordingly to create the 360 degrees surround audio.
Depending on your audio device, you can choose from several spatial sound providers: Windows Sonic for Headphones, Dolby Atmos for Headphones, etc. Spatial sound is technically not surround sound, but an attempt to create a similar immersive audio experience as surround sound.
If you find the sound quality of the game you play or the movie you watch to be somehow terrible or sounds like it’s forced to be surround sound when you only need stereo, try to disable the Spatial Sound setting and see if it fixes the issue. In some cases, you may also need to disable the Enhance Audio option to stop Windows 11 from tweaking and altering your sound quality.
This guide will show you how to turn off surround sound (spatial sound) and disable the Enhance Audio feature in Windows 11.
Turn off surround sound in Windows 11
To turn off the virtual surround sound experience in Windows 11, you need to disable the spatial sound setting. Follow the steps below to turn off the spatial sound feature in Windows 11.
- Open the Settings app via Start or by pressing Win + i keys.

- In Settings, select System from the left pane, and then select Sound from the right.

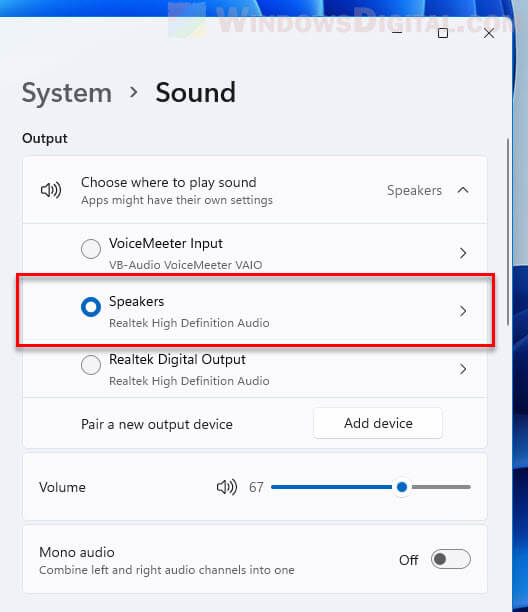
- Under Output, select the audio device (e.g. Speakers or Headphones) which you want to turn off the spatial sound setting for.

- Next, scroll down the settings page until you see the Spatial sound option. Click the drop-down menu next to Type in the Spatial sound section and select Off.

- Restart your computer for changes to take effect.

Disable enhance audio feature
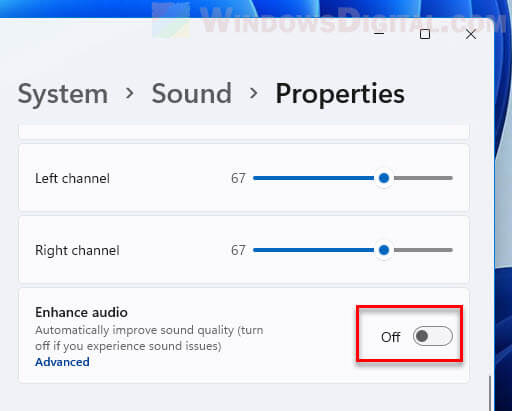
If your game is still giving terrible audio that sounds like surround sound even after turning off the spatial sound setting, try to also disable the enhance audio option to prevent Windows 11 from altering the sound quality of your game.
To turn off the enhance audio feature in Windows 11, follow the same steps in the instruction above until you reach the System > Sound > Properties of your audio device.
Then, next to Enhance audio, click the toggle button to turn it off. You may need to restart your PC for the changes to take effect.
Retry your game or movie and see if it will still produce weird audio quality.
Disable all sound effects and enhancements
If you are still hearing poorer than usual sound quality even after turning off both spatial sound and enhance audio options, try to also manually disable all sound effects and enhancements via your speaker’s or headphones’ properties. Follow the steps below to do so.
- Press Win + i keys to open Settings.
- On the left pane, select System, then on the right, select Sound.
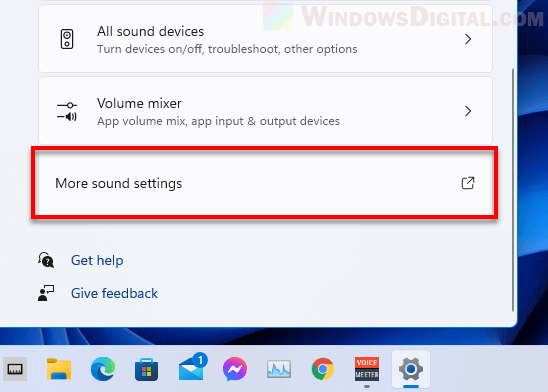
- Next, scroll the Sound settings to the bottom and select More sound settings.

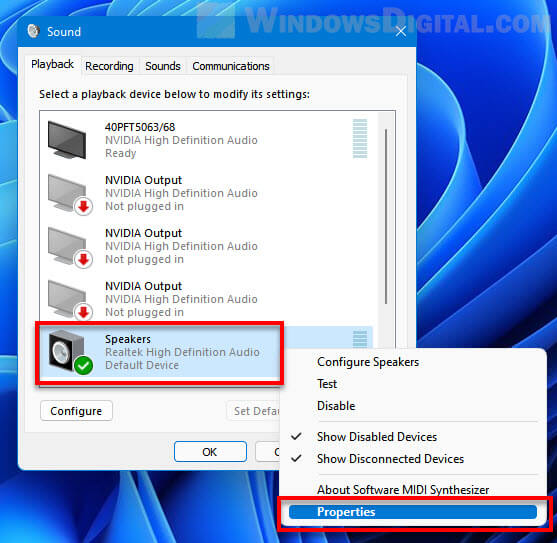
- In the Sound window, right-click your active speakers or headphones and select Properties.

- Next, select the Enhancements tab, and then select the “Disable all sound effects” checkbox. This option will disable all sound enhancements by Windows. Click OK to apply the changes.

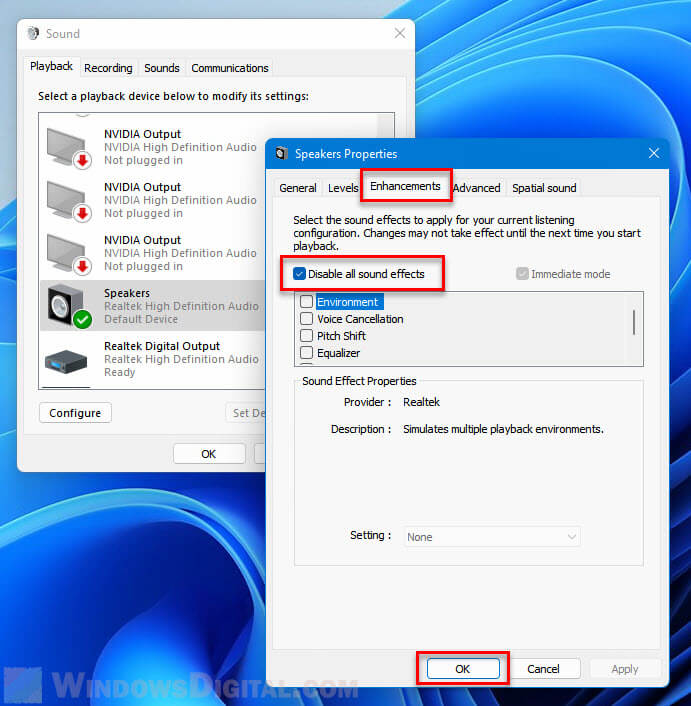
You may need to restart your computer for changes to take effect. After that, retry your game and see if it’ll still produce unwanted surround sound or poor audio quality.
Включаем пространственный звук в Windows 10
Способ 1: Панель задач
Пространственный звук, или Windows Sonic, делает звучание более качественным и объемным, тем самым улучшая восприятие просматриваемого контента или игр. В Windows 10 самый простой способ активировать функцию – это использовать возможности панели уведомлений.
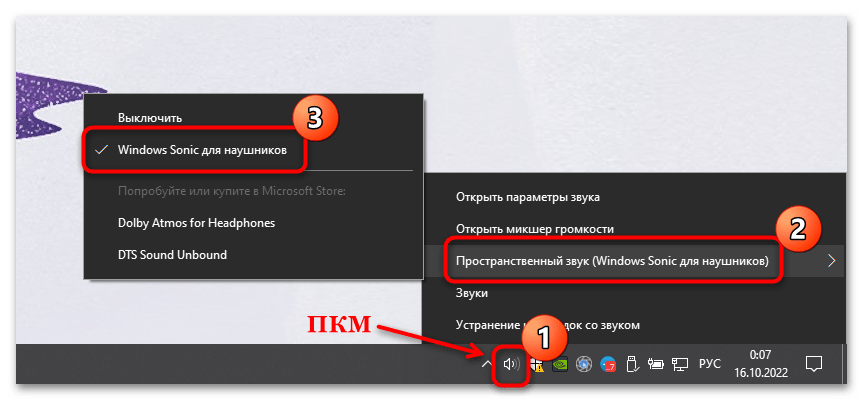
Найдите иконку звука на нижней рабочей панели снизу. Она визуализирована как значок динамика. Щелкните по ней правой кнопкой мыши и наведите курсор на пункт «Пространственный звук». В дополнительном меню выберите «Включить». В некоторых случаях такая опция называется «Windows Sonic для наушников».
Если значка звука нет, то, возможно, его отображение отключено в настройках панели задач. Для включения:
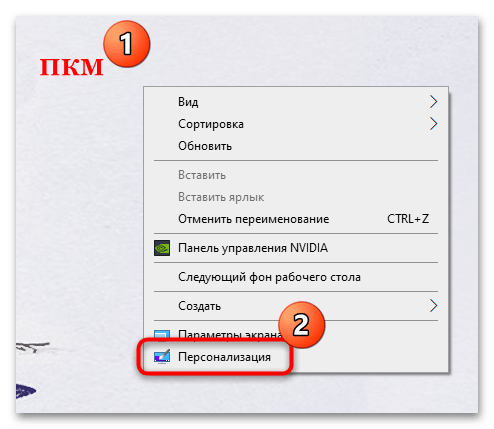
- Щелкните правой кнопкой мыши по свободной области рабочего стола и в контекстном меню перейдите в окно «Персонализация».
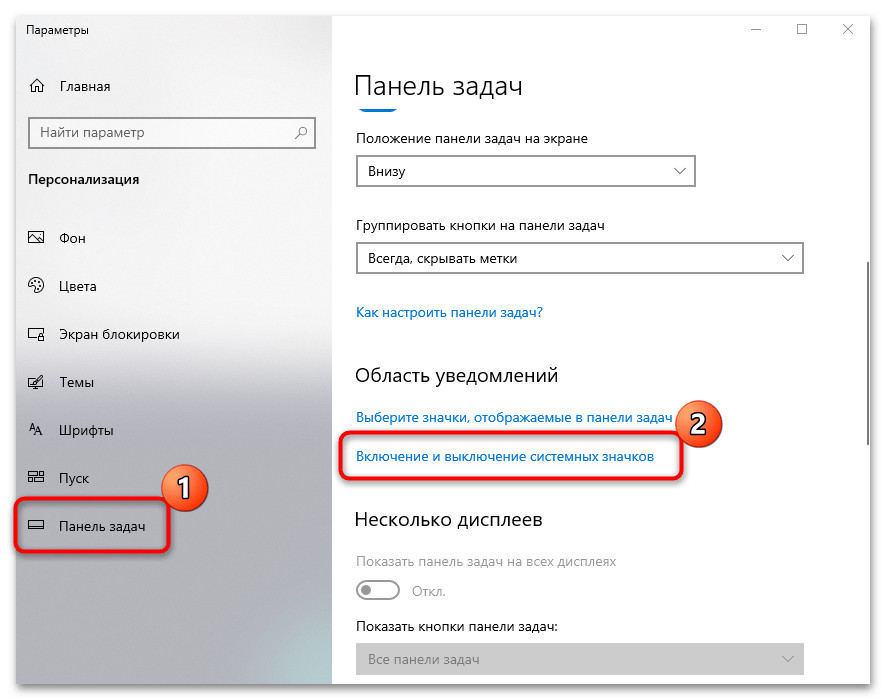
- На панели слева выберите раздел «Панель задач», затем в блоке «Область уведомлений» кликните по строке «Включение и выключение системных значков».
- В списке отыщите «Громкость» и переведите тумблер в активное состояние, если значок отключен.
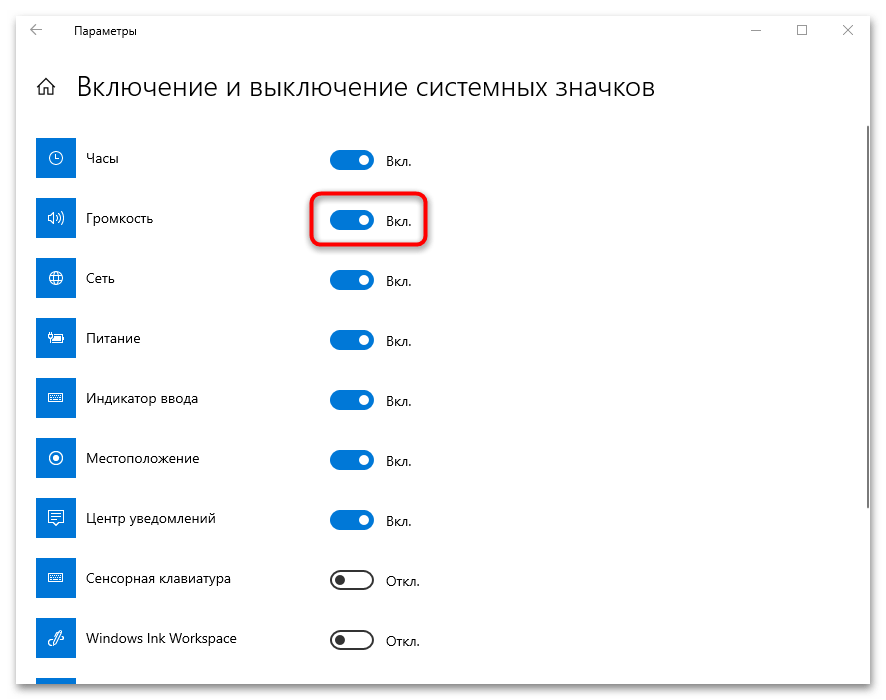
После этого на панели задач появится значок громкости, через меню которого можно включить пространственный звук в Windows 10.
Читайте также: Исправление неполадок «Панели задач» в Windows 10
Способ 2: Свойства звукового оборудования
Включение пространственного звука в Windows 10 также осуществляется через классическую «Панель управления» в разделе с общими настройками звука:
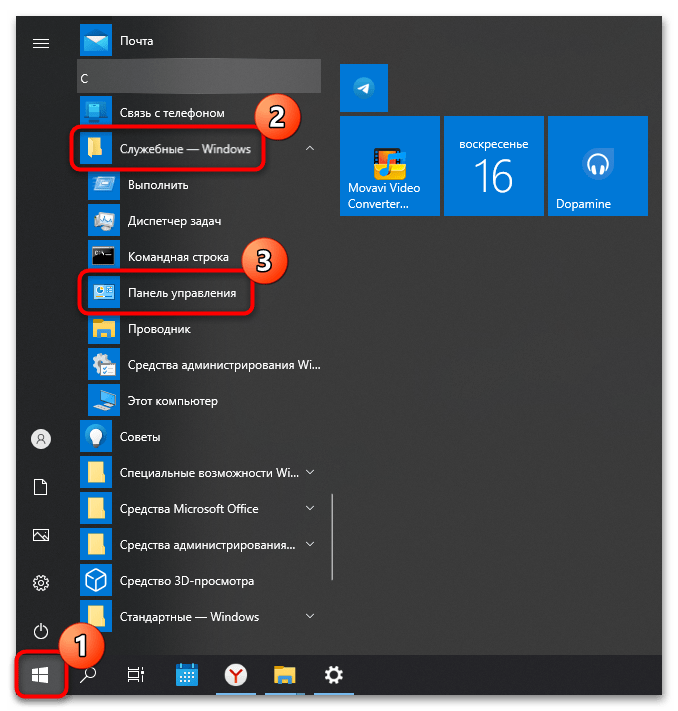
- Откройте «Панель управления». Приложение находится в главном меню в каталоге «Служебные – Windows».
- Нажмите на меню «Просмотр» и для удобства отображения разделов выберите крупные или мелкие значки. Вызовите раздел «Звук».
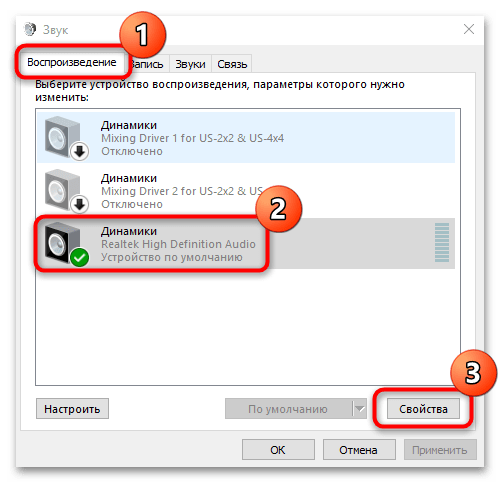
- На вкладке «Воспроизведение» найдите используемое звуковое оборудование: динамики или наушники. Выделите его, кликнув по устройству левой кнопкой мыши, и щелкните по кнопке «Свойства».
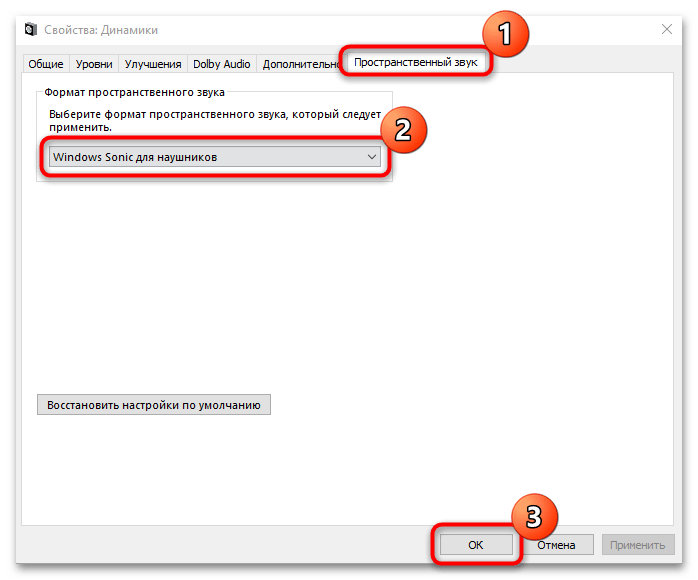
- В новом окне перейдите на вкладку «Пространственный звук». В меню с форматом выберите пункт «Windows Sonic для наушников». После завершения настройки нажмите на кнопку подтверждения.

Следует отметить, что в полной мере добиться объемного звука в наушниках и домашнем кинотеатре можно при технологии Dolby Atmos, активировать которую можно также в окне свойств оборудования на одноименной вкладке.
Читайте также: Решение проблем со звуком в Windows 10
Наша группа в TelegramПолезные советы и помощь