
,
In this tutorial you’ll find instructions to disable the Windows Hello for Business prompt (aka: Windows Hello for Business provisioning), «Use Windows Hello with your account» after adding a PIN and to remove the message «Your organization requires Windows Hello” during OOBE.
When adding a Windows Hello PIN/Fingerprint/Face as sign-in option on a computer joined to Azure AD, or in a Active Directory Domain (on local premises), you must setup a Microsoft Account to access your Organization resources. This is required because, when a device is set up for use in an organization, Windows Hello for Business is automatically enabled.
If for any reason, you don’t setup a Microsoft Account for Windows Hello for Business, you’ll face the following symptoms and problems on your PC:
- In the Windows Hello PIN you’ll face the error: «This option is currently unavailable» with description «Sorry, this PIN isn’t working for your organization’s resources. Tap or click here to fix it».

-
You’ll prompted to «Use Windows Hello with your account», when you setup a PC for first time (Out of the box experience (OOBE)), or after clicking «Tap or click here to fix it» in the Windows Hello PIN options (see the above screenshot).

- You’ll get the Windows Hello PIN error: «Something went wrong. We aren’t able to setup your PIN. 0x801c044f» after trying to fix the problem without adding a MS account.

If you don’t want to use a Microsoft Account in Windows Hello for Business (e.g. in case where a single device is used by several users or if you do not have Azure AD/Office365 accounts in your organization), then you can disable the Windows Hello Provisioning, by using the instructions below.
How to Disable the Windows Hello requirement to use a Microsoft Account in Windows Hello PIN or during OOBE. (FIX:Windows Hello PIN error 0x801c044f).
To force Windows to not ask for a Microsoft Account in Windows Hello PIN/Fingerprint/Face, proceed and disable the Windows Hello for Business provisioning. This will remove both the «Use Windows Hello with your account» prompt in Windows Hello PIN, and will disable the «Your organization requires Windows Hello” prompt during OOBE.
Windows Hello for Business provisioning can be disabled using Group Policy, either locally or in an Active Directory domain, or in Microsoft Intune. According your situation proceed to the corresponding part below.
- Part 1. Disable Windows Hello Provisioning in Windows 10/11 Pro.
- Part 2. Disable Windows Hello Provisioning in Active Directory.
- Part 3. Disable Windows Hello Provisioning in Microsoft Endpoint Manager (INTUNE).
Part 1. How to Disable Windows Hello prompt «Use Windows Hello with your account», in Local Group Policy (Windows 10/11 Pro).
If you want to remove the «Use Windows Hello with your account» prompt, on a standalone computer (not joined to a domain), or to specific domain PCs, proceed as follows:*
* Note: If you want to disable the Windows Hello provision to entire AD domain, follow the instructions on part-2.
1. Run gpedit.msc to open the Local Group Policy Editor.
2. In Local Group Policy, navigate to:
- Computer Configuration\Administrative Templates\Windows Components\Windows Hello for Business
3. At the right open the Use Windows Hello for Business policy.

4. Set the policy to Enabled* and check the option Do not start Windows Hello provisioning after sign-in.

* Note: If you disable this policy, users won’t be able to setup a Windows Hello for Business PIN and they will receive the following message in Windows Hello PIN options: «This option is currently unavailable. Something went wrong».

5. Restart the PC to apply the change.
Part 2. How to Disable Windows Hello prompt in Active Directory (On Premises).
To disable the Windows Hello for Business provisioning in entire AD domain, proceed as follows:
Step 1. Create a new Domain Policy for Hello for Business. *
* Note: In this guide I’ll create a new Domain Policy for the Windows Hello for Business. If you don’t want to create a new policy and you want to apply the changes to the Default Domain Policy, skip to step-2.
1. On your Domain Server, open the Server Manager and from Tools open the Group Policy Management.
2. Under the ‘Domains’ object, right-click on your domain and select Create a GPO in this domain and Link it here.

3. Type a name for the new GPO (e.g. «Hello_Provisioning») and click OK.
Step 2. Enable Windows Hello for Business.
1. Right-click at the new GPO (or in Default Domain Policy), and click Edit.

2. At the left pane navigate to:
- Computer configuration\Policies\Administrative Templates\Windows Components\Windows Hello for Business
3. On the right side, open the Use Windows Hello for Business policy and set it to Enabled and then click Apply > OK. *
* Notes:
1. By setting this policy Enabled you’ll allow users to sign-on with a Windows Hello PIN.
2. If you disable this policy, users won’t be able to setup a Windows Hello PIN and they will receive the message in Windows Hello PIN options: «This option is currently unavailable. Something went wrong».

4. Proceed to next step to disable the Windows Hello for business provisioning.
Step 3. Disable «Use Windows Hello with your account» prompt.
Finally proceed and deploy the following registry change to all computers in Active Directory, in order to disable the Windows Hello provisioning:
1. On the «Hello_Provisioning» GPO (or in default domain policy), navigate to:
- Computer Configuration\Preferences\Windows Settings\Registry
2. Right-click at Registry and select New > Registry item.

3. At the ‘New Registry Properties’ window, apply the following settings and click OK:
- At Action choose: Create
- At Hive select: HKEY_LOCAL_MACHINE
- At Key path type: SOFTWARE\Policies\Microsoft\PassportForWork
- At Value Name type: DisablePostLogonProvisioning
- Value type: REG_DWORD
- Value data: 1
4. Close the Group Policy Management Editor and restart any domain computer to see if the registry change has applied. *
* Note: To see if the registry change has been applied to the workstations:
1. Restart any AD computer (workstation) and login to the Domain.
2. Open Registry Editor and navigate to:
- HKEY_LOCAL_MACHINE\SOFTWARE\Policies\Microsoft\PassportForWork
3. See at right-pane if the DisablePostLogonProvisioning & Enabled REG_DWORD values exist and has Value Data 1. *
* Info: The «Enabled» DWORD value is created automatically when you enable the Windows Hello for Business (Step-1). If the value is not there, follow the same steps above and created it using GPO.


Part 3. How to Disable Windows Hello prompt in Microsoft Endpoint Manager (INTUNE).
To disable the Windows Hello Provisioning in Microsoft Intune:
1. Sign to Microsoft Endpoint Manager admin center with an Intune Administrator role.
2. Select Devices on the left and at the right go to Windows -> Windows enrollment.
3. Open Windows Hello for Business and under Configure Windows Hello for Business, select Enabled.
4. Now create the following PowerShell script and push to the clients the following Registry change via Intune: *
- Set-ItemProperty -Path «HKLM:\SOFTWARE\Policies\Microsoft\PassportForWork» -Name DisablePostLogonProvisioning -Value «1» -Type DWORD
* Note: Select ‘YES’ for «Run script in 64 bit PowerShell Host» when deploying it through Intune.
That’s it! Which method worked for you?
Let me know if this guide has helped you by leaving your comment about your experience. Please like and share this guide to help others.
If this article was useful for you, please consider supporting us by making a donation. Even $1 can a make a huge difference for us in our effort to continue to help others while keeping this site free:
- Author
- Recent Posts
Konstantinos is the founder and administrator of Wintips.org. Since 1995 he works and provides IT support as a computer and network expert to individuals and large companies. He is specialized in solving problems related to Windows or other Microsoft products (Windows Server, Office, Microsoft 365, etc.).
By Timothy Tibbetts |
Windows Hello is an option for Windows 10 and 11 that lets you log on easier by using a PIN you create. However, there are some apps that Windows Hello opens when you don’t want it to. Here are your options to stop Windows Hello from popping up.
How to Disable Windows Hello PIN in Windows 10 and 11 — Settings
Click on Start > Settings > Account > Sign-in options.
Click on Windows Hello Pin on Windows 10 or PIN (Windows Hello) in Windows 11.
Click on Remove.
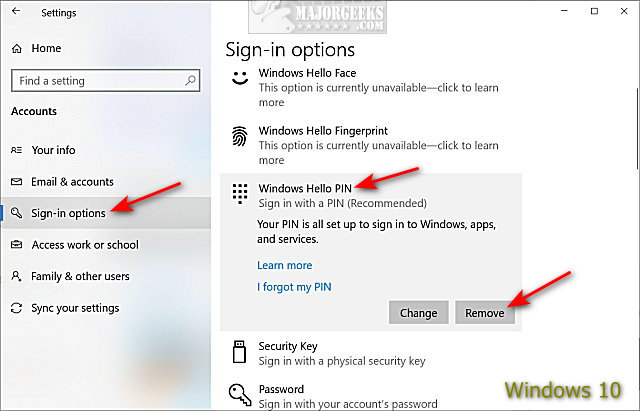
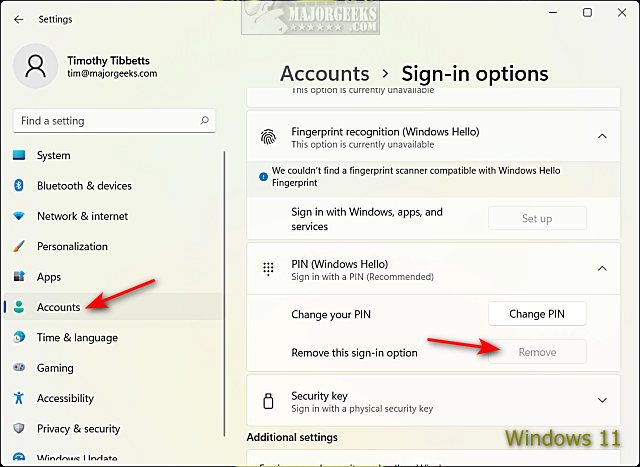
In some cases, if you have a Windows Hello pin set up, you can’t remove the option unless you choose one of the other available sign-in options.
Some users have reported that even by removing a PIN, they still receive a Windows Hello popup. In this case, you can use Group Policy Editor or the Registry Editor.
How to Disable Windows Hello PIN in Windows 10 and 11 — Group Policy Editor
Windows 10 and 11 Home users will need to enable Group Policy Editor or use the Registry method.
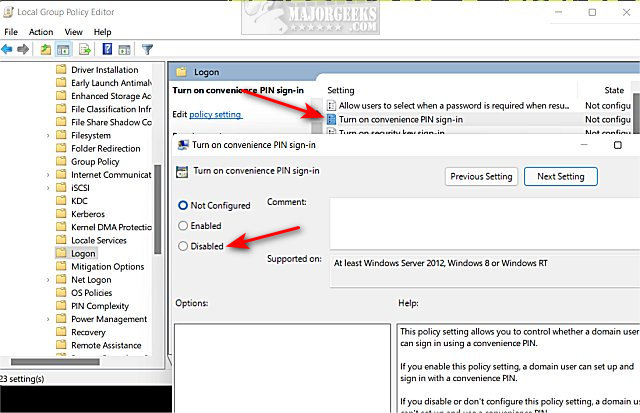
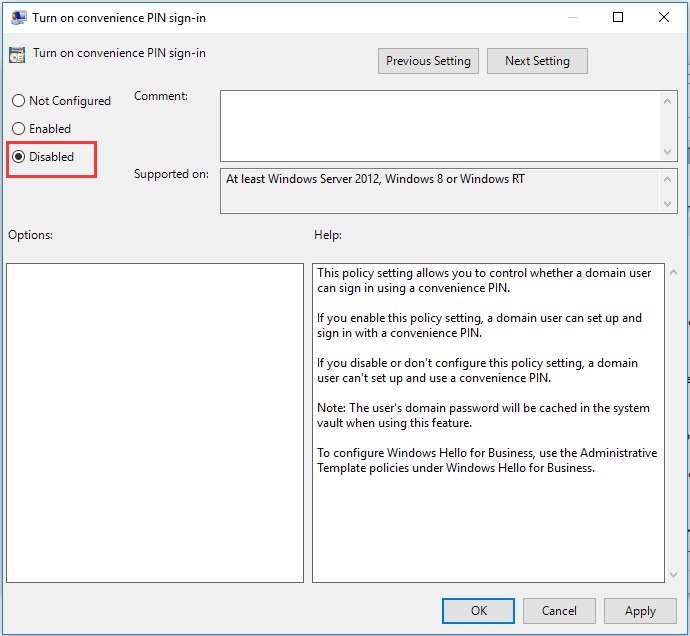
Open the Group Policy Editor and navigate to:
Computer Configuration > Administrative Templates > System > Logon
Double-click on Turn on convenience PIN sign-in
Click on Disabled to disable the prompt or Not Configured for the default setting.
How to Disable Windows Hello PIN in Windows 10 and 11 — Registry Editor
Open the Registry Editor.
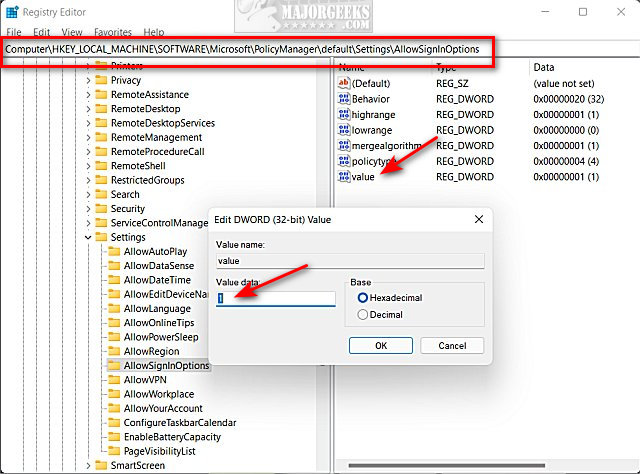
Navigate to:
Computer\HKEY_LOCAL_MACHINE\SOFTWARE\Microsoft\PolicyManager\default\Settings\AllowSignInOptions
Double-click on value on the right pane.
Change the Value data to 0.
Reboot.
Change the Value data back to 1 to enable Windows Hello.
Similar:
comments powered by Disqus
-
Home
-
News
- 3 Ways – Step-by-Step Guide on Disable Windows Hello
By Tina |
Last Updated
Windows Hello is a new feature in Windows 10 that allows users to sign into the operating system using biometric authentication. But some people do not use this feature and want to disable it. This post from MiniTool shows how to disable Windows Hello.
Windows Hello is a more personal, more secure way to get instant access to your Windows 10 devices using fingerprint, facial recognition or a secure PIN. Most PC’s with fingerprint readers already work with Windows Hello, making it easier and safer to sign into your PC.
Windows Hello feature also enables users to sign into the operating system using biometric authentication. But some users do not use this feature and wonder whether it is possible to disable it.
There is no doubt that you can disable Windows Hello. So, in this post, we will show you how to disable Windows Hello.
3 Ways – Step-by-Step Guide on Disable Windows Hello
In this section, we will show you how to disable Windows Hello. If you want to disable Windows Hello pin, the following methods would be very effective.
Way 1. Disable Windows Hello via Settings
At first, Windows Settings allows you to disable Windows Hello. Now, we will show you the tutorial.
- Press Windows key and I key together to open Settings.
- Then choose Accounts.
- On the left panel, choose Sign-in options.
- On the right side, click Remove under Windows Hello section.

When all steps are finished, you have successfully disabled Windows Hello. Some users may say that there is no Windows Hello option in the Windows Settings. So, in order to disable Windows Hello, you can try other ways.
Way 2. Disable Windows Hello via Group Policy
To disable Windows Hello, here is the second way. You can choose to disable it via Group Policy.
Now, here is the tutorial.
- Press Windows key and R key together to open Run box.
- Then type gpedit.msc in the box and click OK to continue.
- Navigate to this path: Computer Configuration -> Administrative Templates -> System -> Logon.
- On the right side, double-click on the Turn on convenience PIN sign in.
- In the pop-up window, click Disabled.
- Then click Apply and OK to save the changes.
Then disable other Windows Hello options. After that, exit the Group Policy window and reboot your computer to check whether the Windows Hello is disabled.
Tip: If your computers are connected to Azure Active Directory, the correct location for that in gpedit.msc is Computer Configuration | Administrative Templates | Windows Components | Windows Hello for Business. In the right side, set “Use Windows Hellow for Buiness” to Disabled.
Way 3. Disable Windows Hello via Registry
To disable Windows Hello, you can do that via the Registry. Now, here is the tutorial.
Tip: Modifying the registry may be a risky thing. So, before proceeding, please back up registries first.
- Press Windows key and R key together to open Run dialog.
- Type regedit in the box and click OK to continue.
- Navigate to the path: HKEY_LOCAL_MACHINE\SOFTWARE\Microsoft\PolicyManager\default\Settings\AllowSignInOptions.
- In the right panel, double-click on the DWORD entry named value and set it to 0.
When all steps are finished, reboot your computer and check whether the Windows Hello is disabled.
Final Words
To sum up, this post has shown 3 ways to disable Windows Hello. If you want to do that, try these solutions. If you have any better idea to disable Windows Hello PIN, you can share it in the comment zone.
About The Author
Position: Columnist
Tina is a technology enthusiast and joined MiniTool in 2018. As an editor of MiniTool, she is keeping on sharing computer tips and providing reliable solutions, especially specializing in Windows and files backup and restore. Besides, she is expanding her knowledge and skills in data recovery, disk space optimizations, etc. On her spare time, Tina likes to watch movies, go shopping or chat with friends and enjoy her life.
Довольно часто после установки операционной системы Windows 10 пользователи жалуются на необходимость каждый раз вводить пароль при включении компьютера, что не всегда удобно. К сожалению, разработчики из Microsoft удобного способа отключить данную функцию не предусмотрели, так что очевидными путями ввод пароля отключить нельзя — нужно копать глубже. Благо, быть программистом совершенно не обязательно, так как манипуляции крайне простые — убрать пароль при входе в систему сможет любой даже не опытный пользователь. Речь именно о том пароле, который появляется при включении компьютера.
Как отключить пароль в Windows 10
Для отключения пароля при входе в операционную систему Windows 10 пользователю необходима смена настроек учётной записи. К счастью, этот способ подразумевает всего три действия.
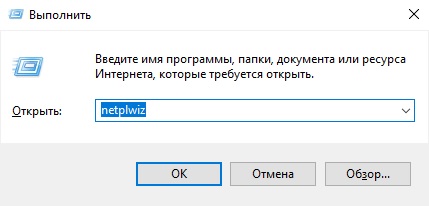
- Нажмите на клавиатуре комбинацию клавиш Windows + R, в появившейся строке введите команду netplwiz, после чего нажмите ОК.

- На экране появится окно учётных записей пользователя. Выберите пользователя, для которого нужно отключить ввод пароля (если в списке пользователей больше одного варианта), после чего снимите галочку в пункте «Требовать ввод имени пользователя и пароля».
- Нажмите на кнопку ОК, после чего появится окно для ввода текущего пароля и его подтверждения. Важно отметить, что если вы используете учётную запись Microsoft, то нужно вводить электронную почту и пароль, которые были использованы при регистрации аккаунта.
Трудности и ошибки, с которыми можно столкнуться
- Иногда снятие галочки не регистрируется системой и пароль всё равно запрашивается при включении компьютера. В этом случае стоит повторно провести операцию.
- У некоторых пользователей может просто не быть в меню пункта «Требовать ввод имени пользователя и пароля».
Для того, чтобы он появился, нужно выполнить несколько простых шага:
- перейти в Параметры — Учётные записи — Варианты входа, после чего удостоверится, что функция Windows Hello отключена;
- нажать на клавиатуре комбинацию клавиш Windows + R, в появившемся окне ввести команду regedit;
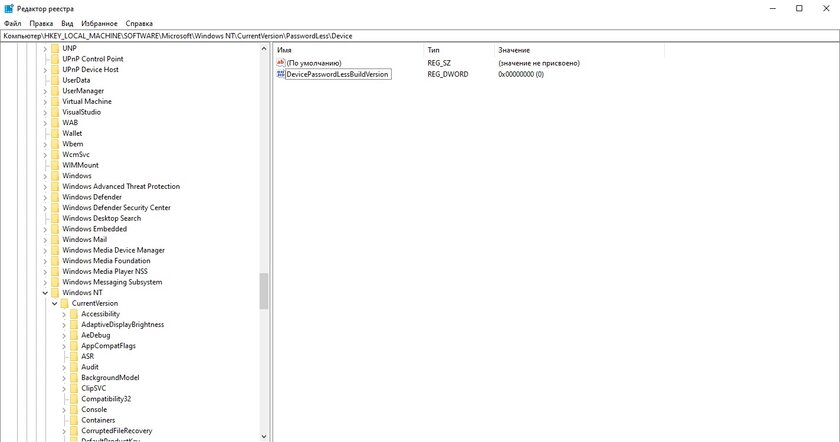
- в адресную строку вписать HKEY_LOCAL_MACHINE\SOFTWARE\Microsoft\Windows NT\CurrentVersion\PasswordLess\Device;
- два раза кликнуть левой клавишей мыши на файл DevicePasswordLessBuildVersion;
- в открывшемся окне изменить значение на 0;

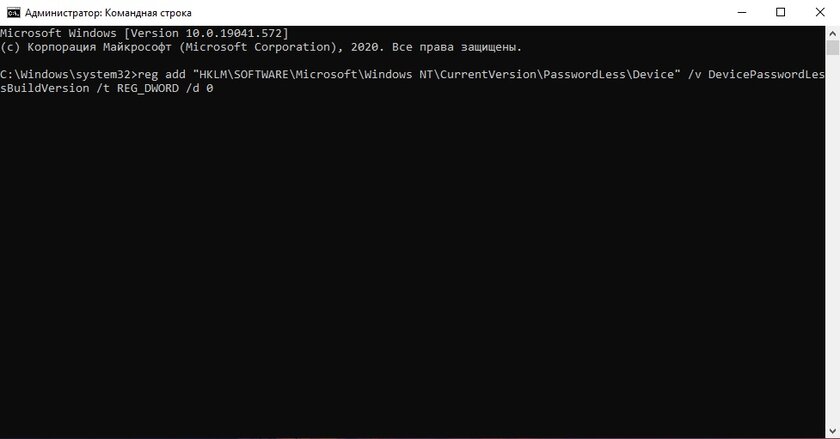
- если вышеуказанного файла у вас нет, запустите командную строку от имени администратора, после чего вставьте команду reg add «HKLM\SOFTWARE\Microsoft\Windows NT\CurrentVersion\PasswordLess\Device» /v DevicePasswordLessBuildVersion /t REG_DWORD /d 0 и нажмите Enter.

После данных манипуляций пункт «Требовать ввод имени пользователя и пароля» в меню настройки профилей появится.
Зачем убирать запрос пароля при включении ПК на Windows 10
Использование пароля на компьютере необходимо в том случае, если его содержимое нужно защитить от доступа третьими лицами. Например, в учебных заведениях, офисах и предприятиях, даже в домашних условиях, если доступ к ПК нужно ограничить. С другой стороны, если вы являетесь единственным пользователем за компьютером или у вас просто нет необходимости защищать доступ к ПК от кого-либо, то необходимость в пароле испаряется. Более того, в некоторых ситуациях окно ввода пароля не только отнимает время, но и не позволяет использовать распространённый сценарий «нажал на кнопку включения ПК — отошёл по делам — вернулся, а компьютер уже полностью загрузился и готов к работе».
К сожалению, в Microsoft делать удобный интерфейс для отключения ввода пароля пока что не планируют — впервые вопросы «как отключить ввод пароля в Windows 10 при включении ПК» или «как убрать пароль на Windows 10» появились ещё в 2017 году, но по сей день пользователям нужно отправляться в редактор реестра или открывать меню настроек профилей. Это очень неочевидный путь, к которому прийти путём проб и ошибок просто не выйдет. С другой стороны, по гайду выше буквально за минуту или две пользователь даже с минимальным набором умений отключит пароль без каких-либо проблем.