
Для работы проектов iXBT.com нужны файлы cookie и сервисы аналитики.
Продолжая посещать сайты проектов вы соглашаетесь с нашей
Политикой в отношении файлов cookie
Если вы увлекались киберспортом или оптимизацией Windows, то наверняка слышали о влияние высокоточного системного таймера HPET на общую производительность ПК. Но знаете ли вы, что, начиная с Windows 10 22H2 и Windows 11, компания Microsoft изменила классическую логику работы системного таймера, и прошлые команды, которые ранее позволяли существенно повысить производительность, более не работают. В этом небольшом материале вы узнаете, как исправить эту проблему и вернуть привычное поведение системного таймера HPET/TSC в новых версиях Windows, существенно ускорив работу своего компьютера.

Чтобы не нагружать вас лишней технической информацией, достаточно будет сказать, что ранее отключение или изменение значений системного таймера HPET глобально влияло на все процессы в Windows, существенно повышая отклик и плавность работы приложений и игр. Теперь же частота прерывания системного таймера HPET/TSC не функционирует на глобальном уровне ОС и не зависит от других процессов. Короче говоря, таймер теперь работает лишь для запущенных на переднем фоне приложений и не может опускаться ниже принудительно заданных значений, что существенно ломает многие старые игры и не позволяет пользователю добиться былой производительности. Подробнее почитать про всё это вы можете, перейдя по ссылке.
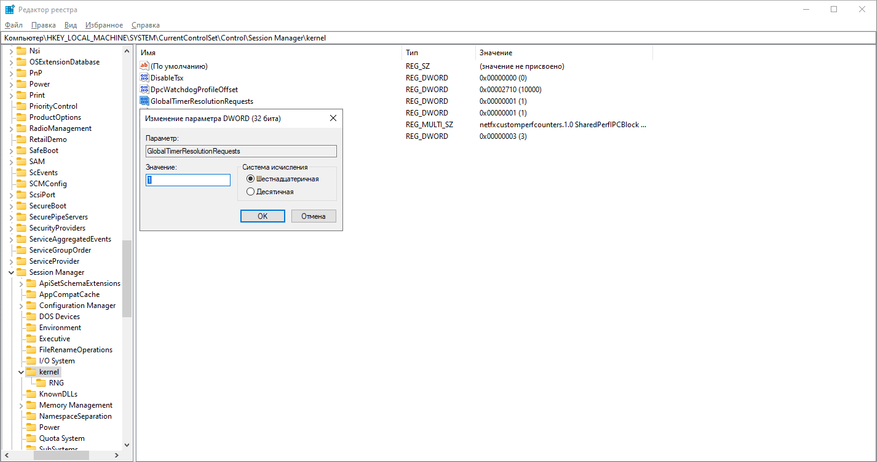
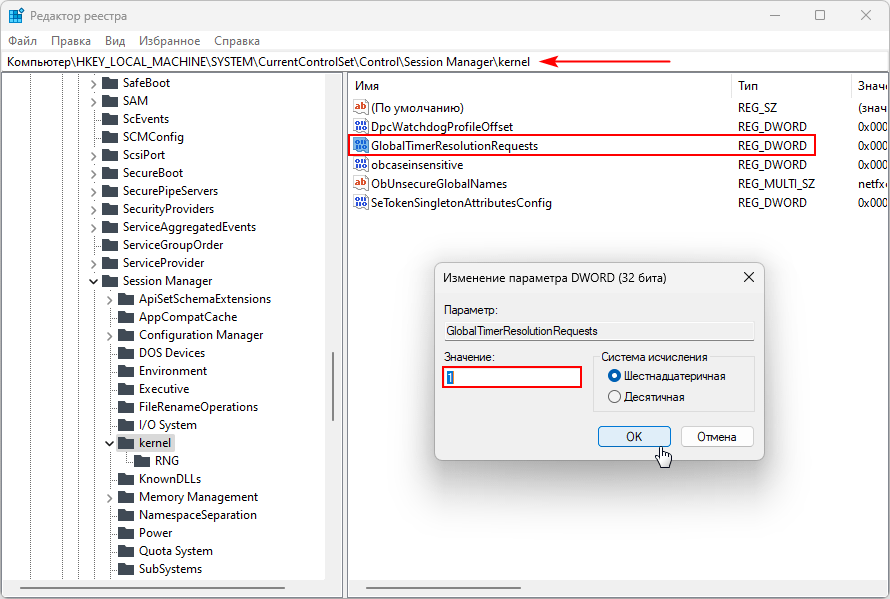
1. Нажимаем Win+R и вводим команду regedit. В появившемся окне переходим в раздел kernel и создаём новый параметр Dword32 с именем GlobalTimerResolutionRequests и значением 1 в шестнадцатеричной системе счисления. Или воспользуйтесь заранее уже готовым файлом с нужными настройками.
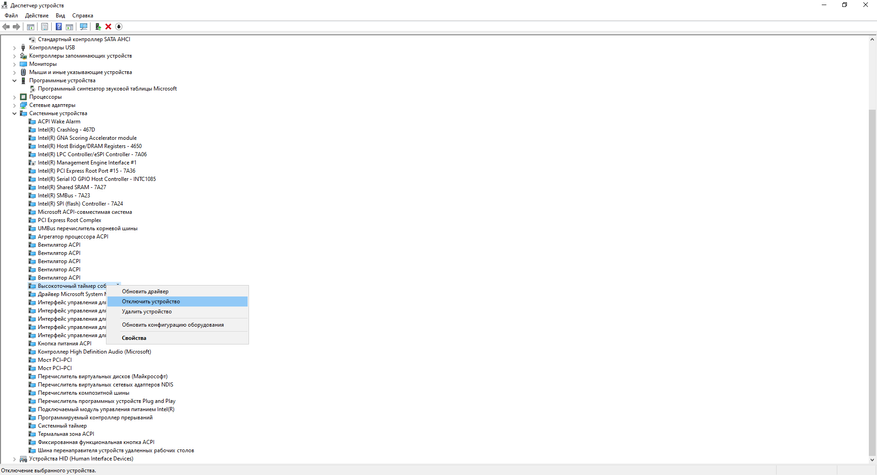
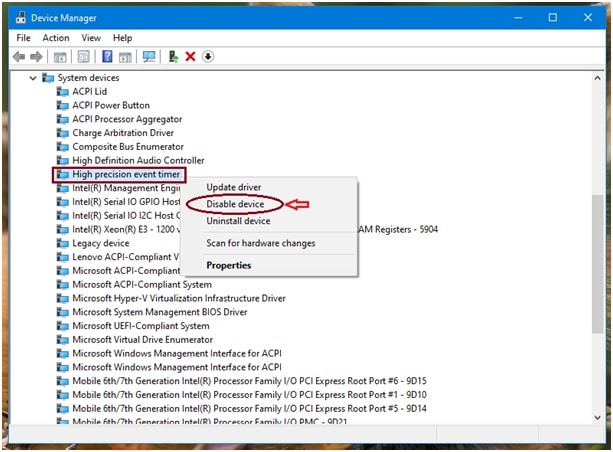
2. Нажимаем правым кликом мыши на «Пуск» и выбираем «Диспетчер устройств». Для отключения HPET и активации таймера TSC мы должны в разделе «Системные устройства» отключить «Высокоточный таймер событий» иногда он подписан как High Precision Even Timer. Правый клик мыши>>»Отключить устройство».
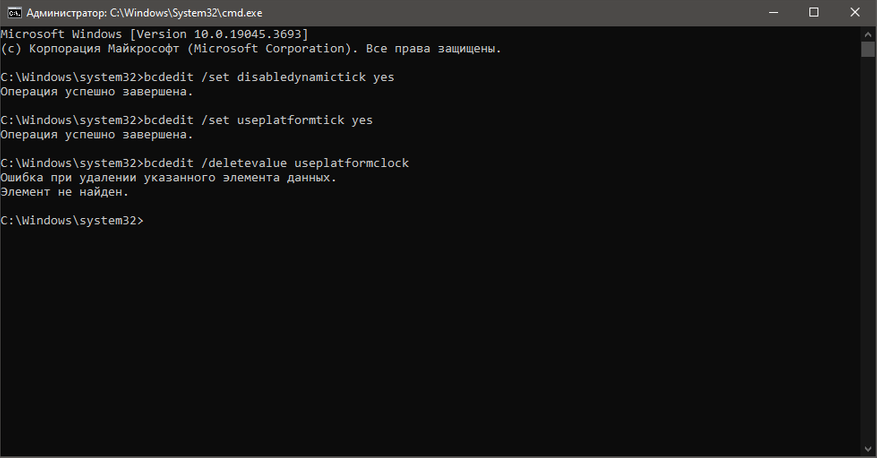
3. Теперь нам осталось только ввести команды для отключения встроенного программного таймера Windows и технологии экономии электроэнергии для ноутбуков. Вновь нажимаем Win+R и вводим команду CMD.
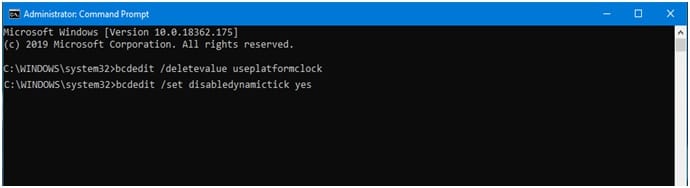
В появившемся окне вводим команды:
bcdedit /set disabledynamictick yes
bcdedit /set useplatformtick yes
bcdedit /set useplatformclock false
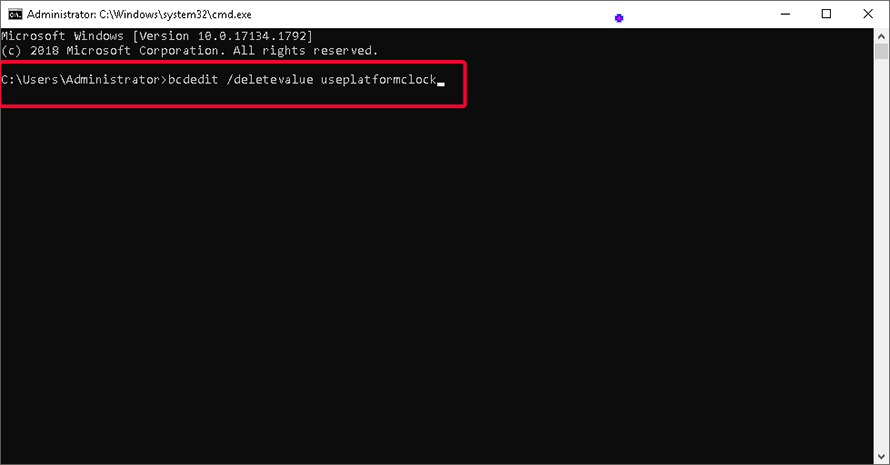
bcdedit /deletevalue useplatformclock
После перезагрузки ПК вы сразу почувствуете разницу в отклике Windows и плавности работы мыши. Однако, чтобы ещё сильнее ускорить работу компьютера, необходимо принудительно зафиксировать значения системного таймера TSC на минимальных значениях.
4. Выполним установку системной службы Windows, отвечающей за минимальное значение системного таймера.
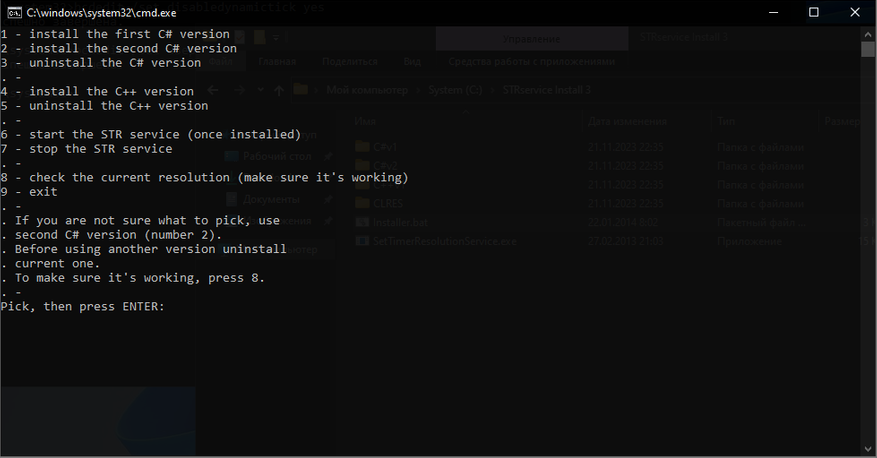
- Скачиваем и извлекаем папку архива в корень любого диска.
- Переходим в папку установщика и запускаем не от имени администратора файл Installer.bat.
- В появившемся окне выбираем желаемый таймер. Я советую 2 или 4.
- Дожидаемся окончания установки. (После установки не удалять папку установщика).
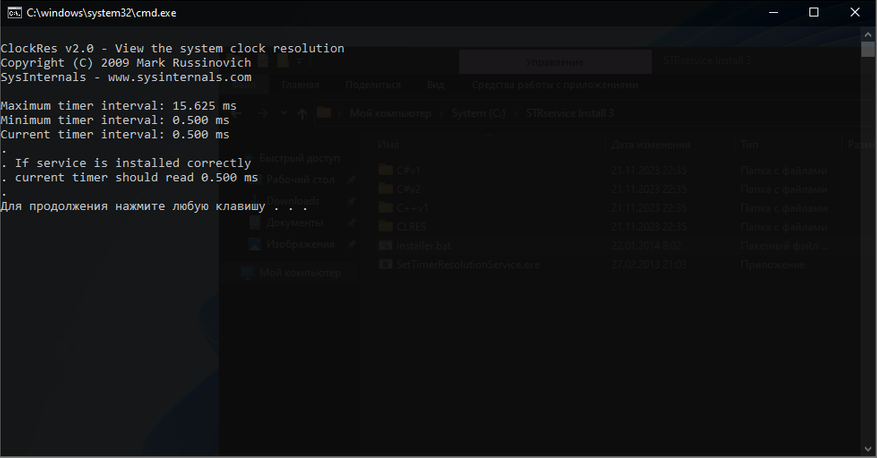
- Проверяем значение таймера, нажав 8.
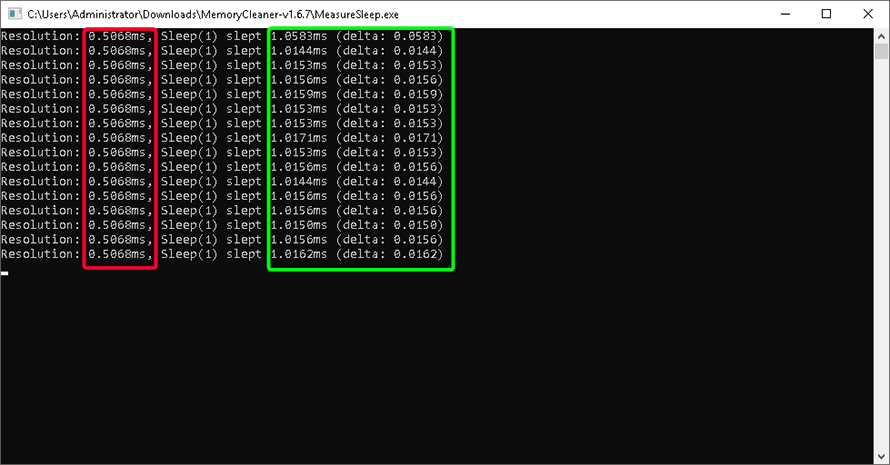
- Если всё прошло успешно, то значение системного таймера будет равняться 0.5 мс.
Если вы заметили отрицательный эффект от отключения системного таймера HPET, то удалите в реестре Windows запись GlobalTimerResolutionRequest и вновь включите «Высокоточный таймер событий» в «Диспетчере устройств». Не забыв удалить системную службу таймера и ввести в cmd следующие команды:
bcdedit /deletevalue disabledynamictick
bcdedit /deletevalue useplatformtick
Вот, собственно, и всё! Всего за пару не хитрых шагов мы исправили оплошность корпорации Microsoft, вернув себе классическое поведение системного таймера Windows, существенно ускорив работу приложений и игр. Не говоря уже о самой ОС. Уважайте свободу, используйте только проверенное ПО и ни в коем случае не позволяйте компаниям диктовать вам свои условия. С вами был Павел. Ещё увидимся!
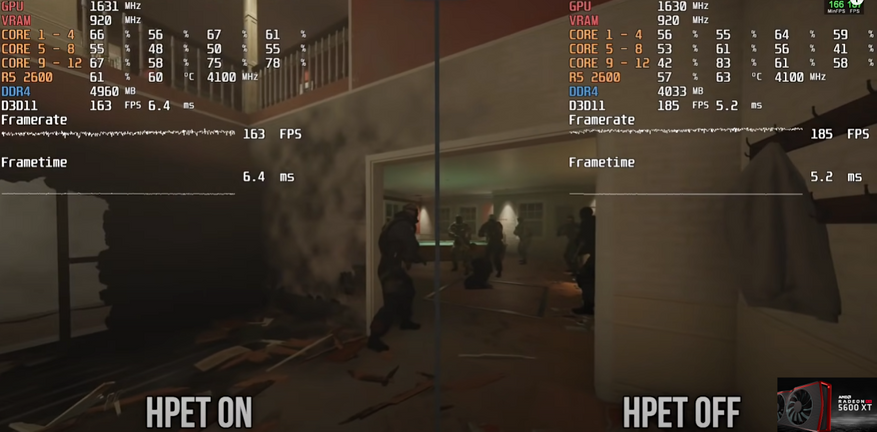
Я провёл дополнительное тестирование в новых играх, используя Windows 10 версии 22H2 (1945.3636). И могу с уверенностью утверждать, что принудительное отключение высокоточного системного таймера HPET позволяет добиться лучшей производительности не только в старых, но и в новых играх. Например, дважды прогоняя встроенный бенчмарк Cyberpunk 2077, отчётливо видна разница в минимальном и среднем FPS. Не говоря уже про отсутствие эффекта «Желе». Миф подтверждён: HPET следует принудительно отключать для максимальной плавности в играх и рабочем ПО!
Сейчас на главной
Новости
Публикации

Модель часов «Танк» от часовой компании Слава сегодня, на мой взгляд, несколько теряется в основном ассортименте, чему, кстати, есть логичное объяснение. Поэтому сделать на ней небольшой…

В середине девяностых годов у нас в стране в
продаже появилось множество новых современных строительных материалов, которые
практичны и удобны в работе. Они применяются как профессиональными…

Когда речь заходит о щуке, большинство представляет себе стандартную зубастую хищницу из речки у деревни: килограмма на три, с пятнистым зеленоватым телом и злобным взглядом. Но в российских…

В эпоху, когда человечество только осваивало космические просторы, Франция сделала неожиданный выбор, отправив в полет не собаку или обезьяну, а кошку по имени Фелисетт. В октябре 1963 года она…

Нержавеющая
сталь — материал, который ассоциируется
с прочностью, долговечностью и
устойчивостью к коррозии. На первый
взгляд, кажется, что это идеальный выбор
для производства…

Зевота — явление, знакомое каждому. Мы зеваем не только от усталости или скуки, но и когда видим, как зевает другой человек. Почему так происходит? Заразна ли зевота? Чтобы…
-
Home
-
News
- How to Disable HPET to Improve Game Performance in Windows 10/11?
How to Disable HPET to Improve Game Performance in Windows 10/11?
By Aurelie | Follow |
Last Updated
HPET is an inbuilt tool in Windows which can be used to synchronize multimedia and provide smoother playback for your computer. However, if you turn it on when gaming, this tool will take away the precious calculation power of CPUs and severely hurt game performance. Therefore, you’d better disable it. In this article on MiniTool Website, you’ll know two ways to disable it.
What Is HPET on Windows 10 and Windows 11?
HPET is short for High Precision Event Timer which is often used for synchronizing multimedia streams, reducing the need to use other timestamp calculations, and smoothing the playback.
However, although HPET can increase the performance of your PC, it triggers FPS loss and latency & freezes in games. If you encounter low FPS or stuttering when gaming, you can try to disable HPET to get better game performance. Some of you might ask, “Is it safe to disable HPET on Windows 10 and 11?” The answer is absolutely yes. In this post, we’ll show you two ways to disable HPET. Without further ado, let’s dive right in.
Tip: Most Windows 10/11 builds disable HPET by default so if you receive a error message after trying the two methods below, don’t worry. It just means that the HPET utility on your PC was already turned off.
How to Disable HPET Windows 10/11?
# Way 1: Disable HPET via CMD
You can disable HEPT to reduce game stuttering by using the CMD command. Here’s how to disable HPET Windows 10/11:
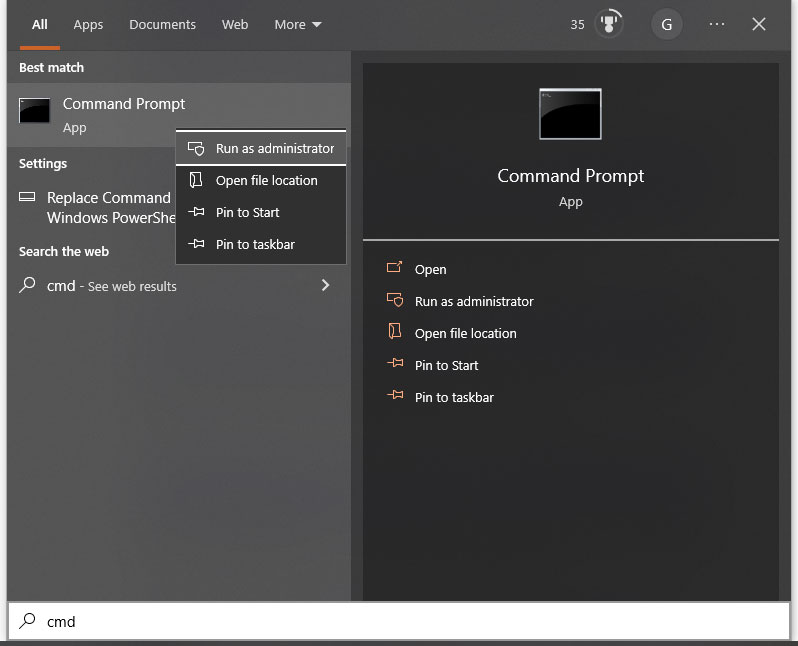
Step 1. Press Win + S at the same time to evoke the search bar.
Step 2. Type cmd to locate Command Prompt and do a right-click on it to choose Run as administrator.
Step 3. Copy & paste the following command and tap on Enter to disable DPET.
bcdedit /deletevalue useplatformclock
bcdedit /set disabledynamictick yes
Step 4. Reboot your computer to make this change effective.
Tip: If your Command Prompt stops working, you can see help from this guide – [Fixed] Command Prompt (CMD) Not Working/Opening Windows 10.
# Way 2: Disable HPET via Device Manager
Another easy way to disable High Precision Event Timer is using Device Manager Settings. To disable HPET Windows 11/10 in this way:
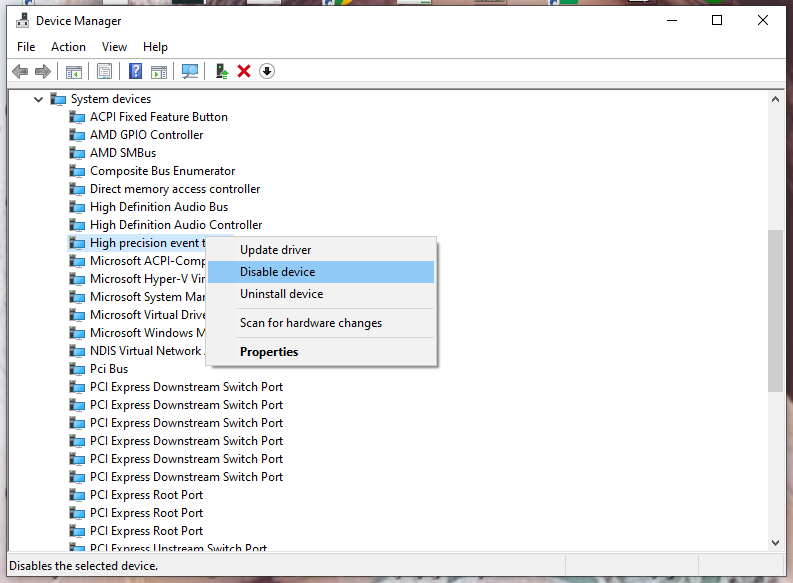
Step 1. Do a right-click on the Windows icon and choose Device Manager in the drop-down menu.
Step 2. Expand System devices, locate High precision event timer and right-click on it.
Step 3. In the drop-down menu, choose Disable device.
Step 4. Press Yes in the warning message to confirm this action.
Other related articles you might be interested in:
# Here Are 10 Tips to Optimize Windows 10 for Gaming
# Two Gaming Features – How to Optimize Windows 11 for Gaming
Final Words
By now, you must get a full picture of what HPET is and how to disable HPET. Try them to see whether the methods mentioned above work properly for you or not. If you have problems or come up with other creative ideas, please feel free to leave a comment below.
About The Author
Position: Columnist
Aurelie is a passionate soul who always enjoys researching & writing articles and solutions to help others. Her posts mainly cover topics related to games, data backup & recovery, file sync and so on. Apart from writing, her primary interests include reading novels and poems, travelling and listening to country music.
Why Disable HPET?
While HPET is an extremely precise timer (14.32MHz) which in theory would mean that it would perform the best, in practice when tuning your system for gaming it seems that HPET is too precise bogging down your machine.
Gaming seems to benefit from comparatively less precise but more stable and consistent timers and ticks (TSC 3.32MHz) that have a beneficial impact on your percentiles and low FPS. In short, the level of precision HPET offers is not needed when gaming and will result in worse performance overall.
How to Disable HPET?
To get rid of HPET you need to open CMD with administrator privileges and type – bcdedit /deletevalue useplatformclock and then restart your machine. This will disable HPET on your machine, and to test that the changes took effect you can either use the bcdedit/enum command (no value for useplatformclock) or use TimerBench (pictured above) which gives you a more beginner-friendly interface.
As explained in this clarification post you do not need to disable HPET in the BIOS or Device Manager because those changes either do nothing or cause issues by enabling outdated system timers.
Once off, your system will use a TSC clock and you will need to then select between running RTC or TSC ticks, TSC sync policy, etc.
Most custom Windows 10/11 builds already have HPET off so if you get an error message after putting in the command it simply means that HPET was already disabled.
Choosing Between TSC & RTC Ticks
Your system clock has already been put in place (TSC) which means the next important component is to figure out the system tick. You can find more information about the system ticks in the clarification post but the short answer is that you will need to test both ticks (TSC+RTC vs TSC+TSC) to see which one runs better on your system.
RTC is an outdated tick that is not dynamic and has no optimizations which might decrease your system performance and conflict with high polling rate mice. RTC is recommended for unoptimized systems or people who just want the process to be as short as possible without further testing.
Most tuned systems should run TSC+TSC since it is a higher precision timer resolution compared to RTC which was intended for legacy applications (still lower precision than HPET clock).
How to Disable Dynamic Tick
Dynamic tick is a power-saving feature enabled on laptops that helps them preserve battery life. If you are aiming for the best possible performance and inputs such a feature being enabled is counterproductive.
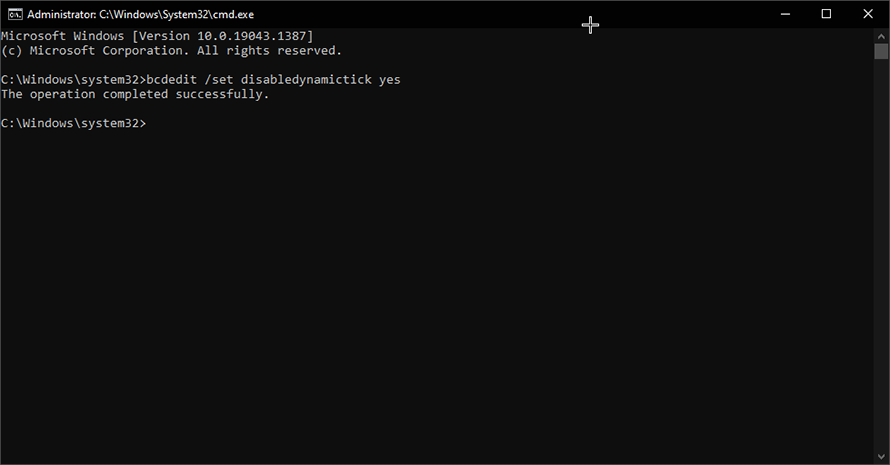
To disable dynamic tick open CMD with administrator privileges and use the command – bcdedit /set disabledynamictick yes. Restart your machine afterward and you should be set (check with bcdedit /enum).
Adjusting Your Windows Timer Resolution
To take full advantage of the bcdedits you have done you need to manually adjust your system’s timer resolution. To do so you can use a simple utility like Memory Cleaner set to your desired timer resolution.
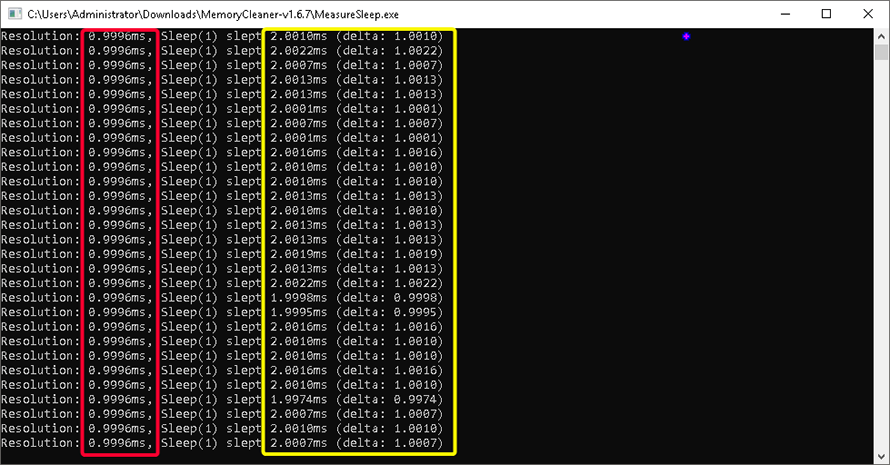
The reason you would do this is because Windows by default runs 15ms on idle and 1ms when you need higher precision for timer resolution values. You can achieve higher precision by using a manual micro-adjusted timer resolution as explained here and test the values using the MeasureSleep utility.
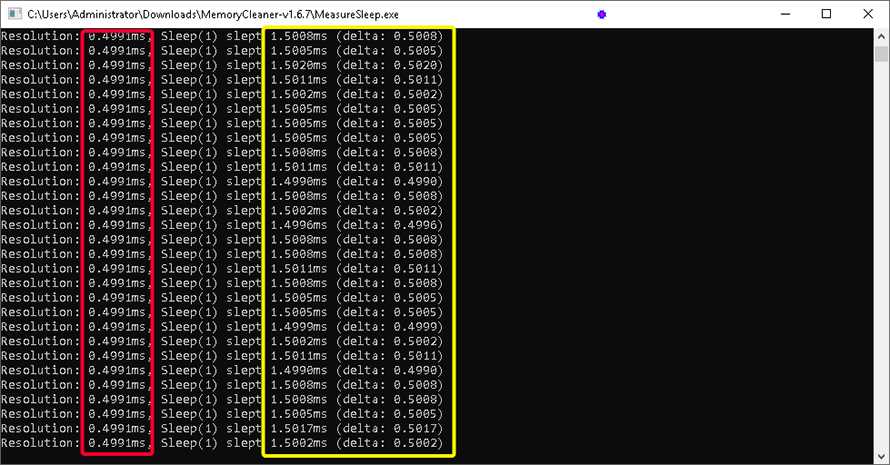
Values used: 5070 – 10000 – 5000
Your Windows timer resolution will behave differently depending on what tick you have chosen to use (RTC/TSC) therefore the values you will settle on will be different. If your system is set up correctly you should be able to achieve 1ms sleep delays with low deltas.
Недавно я собрал новый компьютер, мощный процессор, память, материнская плата и быстрый SSD. Зафиксировал максимально возможную частоту и установил самые низкие тайминги. Но высокий отклик операционной системы Windows 11 сводил на нет мое приобретение.

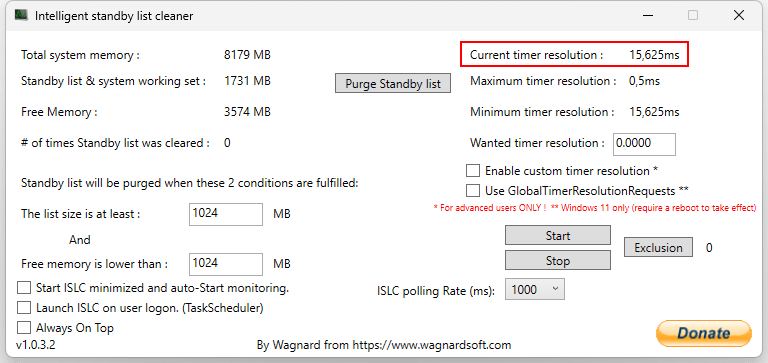
Дело в том что параметры задержки Windows 11 и Windows 10 по умолчанию слишком завышены. Высокочастотный таймер HPET показывает запредельные значения: 15,625 ms. И операционная система даже с мощным процессором и остальным скоростным оборудованием выглядит неповоротливой на отклик.
Давайте попробуем это исправить и вдохнуть положительные ощущения от управления операционной системой Windows 11, запуском программ и прохождением компьютерных игр без сильных лагов.
Как улучшить отклик Windows 11
Как я уже говорил выше, отклик Windows 11 завышен до предела, по умолчанию картина выглядит следующим образом:
Чтобы уменьшить задержки интерфейса, программного обеспечения и постараться улучшить себе игровой процесс сделаем следующее.
1. Сперва создадим резервную копию реестра. После в нем пройдем по такому пути: «Компьютер\HKEY_LOCAL_MACHINE\SYSTEM\CurrentControlSet\Control\Session Manager\kernel» и пропишем новый параметр «DWORD32» с названием «GlobalTimerResolutionRequests» и значением «1» в шестнадцатеричной системе исчисления.
2. Запустим командную строку от имени администратора, в появившемся окне введем по очереди две команды и перезагрузим компьютер:
bcdedit /set disabledynamictick yes
bcdedit /set useplatformtick yes
Примечание. Откатить сделанные изменения можно путем удаления созданной ветки в системном реестре и вводом обратных команд:
bcdedit /deletevalue disabledynamictick
bcdedit /deletevalue useplatformtick
3. Далее, качаем портативный инструмент Intelligent Standby List Cleaner (от разработчика программы DDU которая помогает полностью удалить драйвер NVIDIA), на всякий случай блокируем доступ в Интернет, запускаем и выполняем такую настройку:
- Start ISCL minimized and auto-Start monitoring — поставить галочку.
- Launch ISCL on user logon (TaskSheduler) — поставить галочку.
- Enable custom timer resolution — поставить галочку.
- Use GlobalTimerResolutionRequests — поставить галочку если Windows 11.
- Wanted timer resolution — установить значение 0.0005.
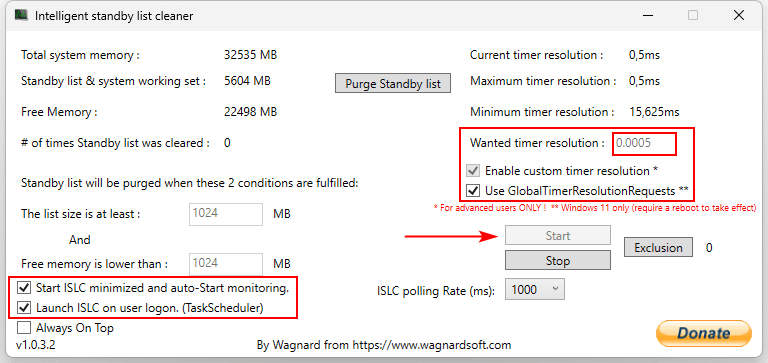
4. Нажимаем кнопку «Start» и проверяем зафиксирован ли таймер — значение «Current timer resolution» должно быть строго равно «0.5ms» и не изменяться. Еще раз перезагружаем свой компьютер и пользуемся более отзывчивой операционной системой Windows.
5. В дополнение можно попробовать подобрать наилучшее значение «ISLC polling Rate«. Увеличенное количество опросов означает более эффективное использование процессора, оперативной памяти, накопителя и даже мышки. Для меня оптимальный вариант оказался «6000«. С отзывчивостью стало ещё лучше.
На заметку. Приложение Intelligent Standby List Cleaner прописывается в автозагрузку и стартует при каждом запуске компьютера. Если её отключить положительного эффекта не будет.
6. Помимо вышеперечисленных манипуляций рекомендуется включить MSI mode для видеокарты и контролера USB. Чтобы это сделать нужно скачать утилиту MSI Util, запустить от имени администратора, найти совою видеокарту и USB Host Controller, напротив них поставить галочки в столбце «MSI«, изменить значение «Interrupt priority» на «Hight» и нажать по кнопке «Apply«.
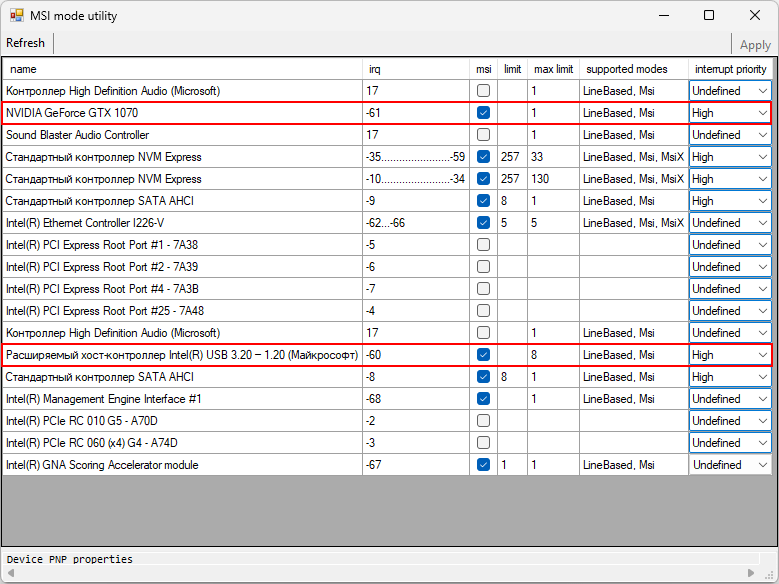
Важно. Данная настройка сбрасывается по умолчанию после обновления драйвера NVIDIA!
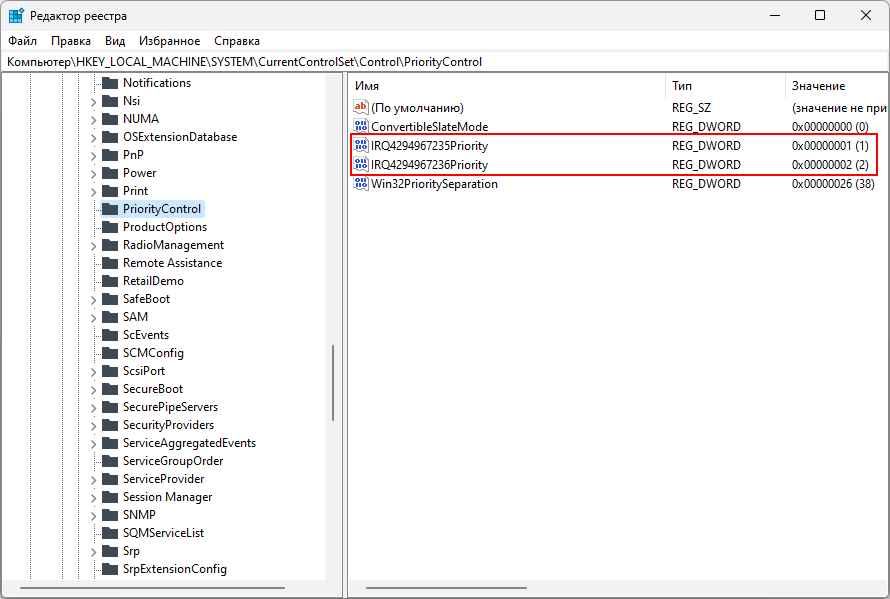
7. После этого необходимо пройти через реестр в раздел приоритетов прерываний — «Компьютер\HKEY_LOCAL_MACHINE\SYSTEM\CurrentControlSet\Control\PriorityControl» и добавить по такому же принципу как выше два параметра:
IRQ***Priority (со значением 1)
IRQ***Priority (со значением 2)
Три звездочки нужно заменить на номер IRQ определенного устройства, первой будет видеокарта, второй USB-контроллер.
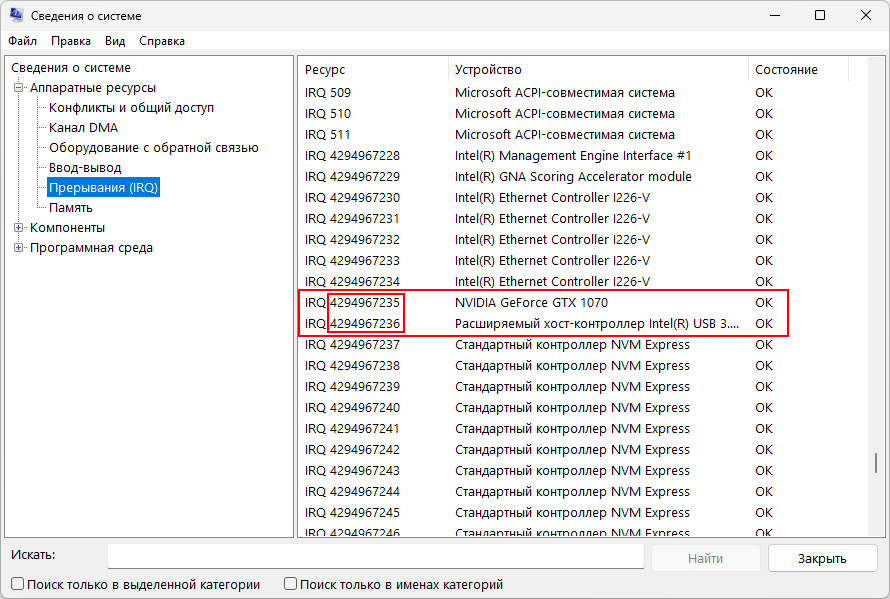
Посмотреть номер IRQ устройства можно запустив через поиск меню Пуск «Сведения о системе«, зайти в раздел «Аппаратные ресурсы>Прерывания (IRQ)«, найти свою видеокарту и USB Host Controller. Скопировать их номера «Ctrl + C«, вставить вместо «Звездочек«, прописать значения и снова перезагрузить компьютер.
Мне данное решение очень помогло, программы и документы стали открываться быстрее, интерфейс Windows 11 теперь более отзывчивый, мышью стало управлять комфортней, а подлагиваний в играх стало меньше, и даже пропало ощущение, что деньги выкинул на новый комп в трубу.
Материал предоставлен нашим пользователем Cтанислав.
You are here: Home/ Windows/ How To Improve Gaming Performance By Disabling HPET Settings?
If you face FPS drops and stuttering, you can try changing the HPET settings to increase the performance of your PC and get smoother gameplay.
HPET stands for High Precision Event Timer (formerly Multimedia Timer) and has been used in PCs for a long time. It is used to produce periodic interrupts, which can be used to synchronize multimedia streams, in turn, providing smoother playback. It also reduces the need for other timestamp calculations. Performance of PC can also be increase by enabling Win32 Priority Separation which you can read here.
We have shown a VIDEO walk through at the end of the post for easy solution.
Brief History Of HPET
Many gamers have pointed out on forums that the HPET bug is causing problems in the gaming performance in certain situations.
The reason for this is pretty simple. Earlier when CPUs had less clock speed and games did not use multithreading in an efficient way, the usage of HPET to retrieve incremental timestamp counter took away precious calculation power of the CPUs and significantly hurt gaming performance.
- But now that the games are efficiently using multithreading and the bottleneck of the 3D performance has shifted to the GPU, and the impact of the event timers reduced. However, game developers started using a lot of timestamp queries to measure performance for animations and movements.
How HPET Affects Gameplay?
The problem has arisen because of a very slow timer interpretation of the HPET on today’s high-performance rigs. The impact of slow HPET depends on actual usage of the timer functions in the game engine and the hardware used.
You can notice the HPET bug causing stutters in gameplay if you run a not graphics heavy game on an overpowered GPU.
Disabling HPET removes the micro-stuttering and screen tearing that may occur during gameplay. It allows unrestricted input-output to occur. This results in a very raw and extremely responsive connection between you and your PC.
- You can sense around 0.1 to 0.15ms delay with HPET on while turning it off can gain you around 3-4 FPS. This may not seem much for day to day use. But with gaming, imagine the FPS drop for every action piling up; this leads to micro-stuttering that is observed during gameplay.
How To Disable HPET?
If you suffer the same issue of HPET causing game lags, here I’ll show you 2 methods to disable HPET.
# Method 1 (Using Device Manager)
You can use the device manager to disable the High Precision Event Timer. I’ll show you how to use device manager settings to disable HPET.
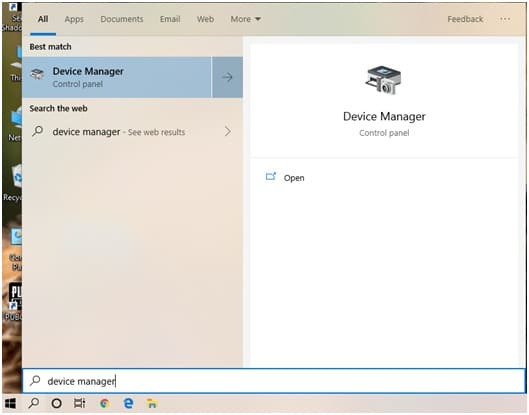
- From search, type Device Manager and press Enter to open settings.
- Locate System devices.
- Right click on High Precision Event Timer and select Disable to stop the HPET service.
Now you know how you can use this simple method to disable HPET using Device manager settings.
I will now show you another method to disable the HPET.
# Method 2 (Using Cmd)
You can also use the cmd to stop the HPET and reduce gameplay stuttering. Follow the steps to disable HPET using cmd
- From Search, enter cmd and select Open as administrator.
- Type the following commands to disable HPET
bcdedit /deletevalue useplatformclock
bcdedit /set disabledynamictick yes
- Restart the PC for the changes to take place.
- Note: In Windows 10, you must use cmd as an admin to make changes to the HPET.
To restore the HPET settings back to on, follow these steps
- Open cmd as Administrator using the steps given above.
- Type the following commands to re-enable HPET
bcdedit /set useplatformclock true
bcdedit /set disabledynamictick no
- Note: disabledynamictick works only on Windows 8.1, 10 or newer.
Conclusion
If you are unsure about the HPET affecting your gameplay, I suggest you run benchmarks on your own system instead of believing others. There is a variety of tools available online that can help you with that, e.g. TimerBench. Use these timer benchmarks to measure if turning off the High Precision Event Timer can affect the timer performance.
Download
So there you have it. Now you know how to disable HPET and improve the system gaming performance. Did you find the methods useful? Comment down below if you found the HPET affecting timer performance.