
The Windows 10 desktop offers a clean and organized space where users can place their most-used files, apps, and folders for easy access. By default, a snap-to-grid method arranges desktop icons on the desktop, automatically aligning them in a uniform layout. However, not everyone wants this format. If you wish to align desktop icons differently, keep reading for some steps to turn the feature on or off.
What does it mean to Align icons to grid?
You’ll notice that the Windows desktop icons automatically align to a structured grid layout. The Align icons to grid feature in Windows makes this possible, ensuring the icons are always neatly arranged with even horizontal and vertical spaces between individual “compartments.” The uniform placement prevents icons from overlapping or being hidden, making finding and accessing specific files or folders easier.
How to turn off Align icons to grid
Users can choose between two methods to modify the icon placement on the desktop: the desktop context menu and the Registry Editor.
Option 1: Use the desktop context menu
Below is the easiest way to change your Windows icon display. Users can change the settings in the desktop context menu to place icons anywhere on the desktop without following a set alignment.
- Right-click on a space on your desktop to open the context menu.
- Hover over View, which will open a submenu.
- Click Align icons to grid from the submenu to uncheck the option.
You should now be able to drag and drop your desktop icons anywhere without aligning them to a grid format.
Option 2: Adjust icon spacing via Registry Editor (Advanced users)
Some users find the grid layout useful but are dissatisfied with the default spacing, usually set to -1125. However, you won’t find an option to change the desktop icon spacing in Settings. If you want to adjust it, you must use the Registry Editor, which is usually only accessed by IT professionals, developers, and advanced users with admin privileges. With the risk of system issues from editing the registry incorrectly, backing it up before you make changes is advised.
- Open the Registry Editor. Press the keyboard shortcut, Windows key + R, and type regedit in the pop-up window or search for Registry Editor in the Start menu.
- Follow this path on the left pane:
HKEY_CURRENT_USER\Control Panel\Desktop\WindowMetrics - On the right pane, double-click the IconSpacing key to open an Edit String window where you can change the horizontal desktop icon spacing (the spaces between columns).
- Input a new value from -480 (minimum, tighter spacing) to -2730 (maximum, wider spacing) and click OK.
- To change the vertical desktop icon spacing (the spaces between rows), double-click the IconVerticalSpacing key and enter any value from -480 to -2730. Then click OK.
- To see the changes, restart your device.
Why turn off the desktop icon alignment?
Some users prefer a more flexible way to organize their desktop. Here are a few reasons why users might want to turn off icon alignment:
- Despite the structure and order that the “Align icons to grid” feature offers, some people want more freedom when arranging their desktop icons.
- Users may not like their files and folders confined in a forced grid layout.
- Users may also wish to just manually organize them in less conventional positions to suit their workflow.
- Most of the time, customizing how users access their desktop icons is just a matter of preference.
Troubleshooting issues
The instructions to align desktop icons differently from the usual layout are relatively straightforward (Option 1), but if you do not follow them correctly, you may encounter some issues, especially after using the Registry Editor (Option 2). Read about common problems and their possible solutions below.
The option is grayed out or not working
Windows Explorer may sometimes glitch and prevent the context menu from functioning correctly. If the option is not working or is grayed out, restart Windows Explorer.
- To do this, press Ctrl + Shift + Esc to open the Task Manager.
- On the left pane, find Windows Explorer under Windows processes.
- Then, right-click on Windows Explorer and select Restart.
You can now check if the option is available by right-clicking on the desktop.
If the option is still grayed out, your IT administrator likely manages the setting, preventing you from making changes. Consider reaching out to your organization’s IT support team for assistance.
The icon positions keep resetting
Make sure to disable the Auto-arrange icons option from the context menu. Follow the instructions in Option 1. You should also disable third-party software like cloud sync services or desktop management tools that may override your icon placement. You can manually adjust the settings in those apps to prevent automatic rearrangement of your desktop icons.
The spacing changes, but the icons still snap to a grid
Confirm that you have disabled the Align icons to grid option in the context menu. If it is disabled and the icons remain in a grid formation, try logging out and back into your account for the changes in the registry to take effect.
Frequently Asked Questions (FAQs)
What’s the difference between “Align icons to grid” and “Auto-arrange icons“?
The “Align icons to grid” feature commands your icons to always snap back to the grid format, but you can manually move them around anywhere on your desktop. On the other hand, the “Auto-arrange icons” is one of the options offered for arranging icons on a desktop. This feature automatically organizes your icons from left to right and top to bottom, preventing manual placement.
Can I place icons anywhere on the desktop after turning off grid alignment?
Yes. After turning off the Align icons to grid AND the Auto-arrange icons features, you can drag and drop your icons anywhere, even on top of each other, so that they overlap.
Does turning off this feature affect multiple monitors?
Turning this feature off can affect how Windows displays the icons across monitors. However, switching between multiple monitor setups can cause the icons to rearrange or reset to the primary display due to a monitor resolution change or layout differences.
Why do my icons keep moving even after disabling grid alignment?
First, your icons may keep moving if you still have Auto-arrange icons enabled. They can also move if you switch monitors, causing a resolution change or display scaling adjustment. Finally, you may have third-party software that forces your icons to reset their positions.
How do I reset icon positions if I want to re-enable grid alignment?
To re-enable the grid alignment, right-click on your desktop, hover over View, and check Align icons to grid. You can now manually rearrange the icons while following the grid format. You can also enable the Auto-arrange icons feature to reset the icons’ default positions.
Understanding personalized icon placement
Customizing your desktop layout, specifically the icon placement, can improve its general appearance to suit your preferences and enhance your workflow. You can control your computer screen view by disabling the feature from the context menu. Always check the auto-arrange settings and restart Windows Explorer to resolve common issues. Keep this guide handy, and you’ll be on your way to a more efficient and visually appealing desktop experience.
Уже неоднократно на разных форумах обсуждался вопрос о том, «Как отключить выравнивание значков Рабочего стола в Windows 10?» Вот только по факту, не кто и не чего конкретного по данному поводу не смог рассказать, а все от того, что основной проблемой данной настройки операционной системы является то, что пользователю необходимо отыскать обход «стандартным» настройкам ОС, и как следствие, мало кто может это сделать самостоятельно или же без использования стороннего программного обеспечения. Именно по этому, мы приняли решение, чтоб именно сегодня, поднять данную тему, рассказать о ней максимум того, что мы знаем и больше не возвращаться к обсуждению данной «проблемы».
Теперь, будь предельно внимательными, так как то, что вам придется выполнять ниже, хоть и выглядит просто, но вот ошибаться в этом, не в коем случае нельзя!
Для начала, вы должны будите перейти в область Рабочего стола –> в пустую область Рабочего стола, кликаем правой кнопкой мыши -> открывается контекстное меню в котором идем через «Вид» в «Выровнять значки по сетке».
Обратите внимание, что пункт «Выровнять значки по сетке» отмечен галочкой, следовательно, выравнивание по сетке у вас активно, если же вы произведете клик по данному пункту, то галочка будет убрана и вы сможете размещать значки на Рабочем столе максимально хаотично.


Казалось бы, вот и все, что еще нужно? Вот только не все так просто, ведь мы предлагаем вам при необходимости, произвести еще более глобальные настройки, которые возможно выполнить только через Редактор реестра.
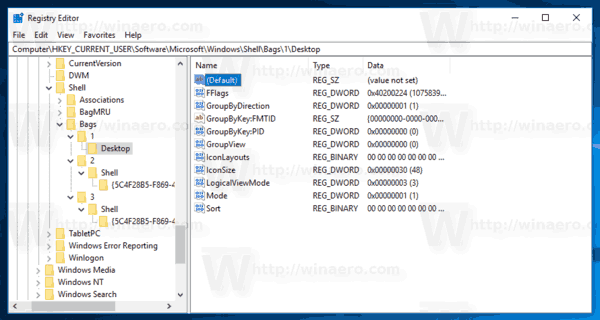
Используем окно поз названием «Выполнить» для того, чтоб прописать в него команду «regedit», теперь, вам необходимо пройти вот по такому пути: «HKEY_CURRENT_USER\SOFTWARE\Microsoft\Windows\Shell\Bags\1\Desktop».
Во вновь открывшемся окне, ваше внимание должно быть приковано к правой его части, где необходимо отыскать 32-битный DWORD-параметр имеющий название «FFlags».
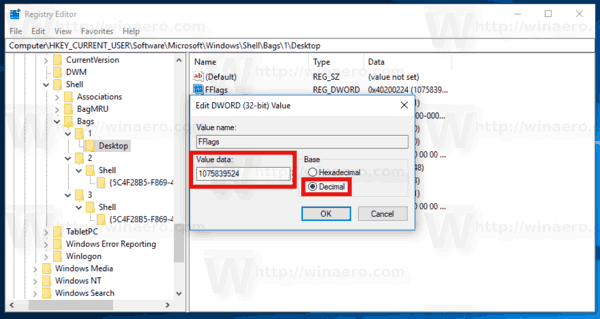
Бывает и такое, что 32-битный DWORD-параметр FFlags отсутствует, тогда, просто создаем его самостоятельно, но не забываем о том, что он может иметь до четырех значений:
• 1075839520 — дает возможность отключить выравнивание и упорядочивание значков Рабочего стола в Windows 10 по сетке.
• 1075839525 — дает возможность включить выравнивание и упорядочивание значков Рабочего стола в Windows 10 по сетке.
• 1075839521 — дает возможность активировать упорядочивание, но при этом, производит отключение выравнивания по сетке.
• 1075839524 — дает возможность отключить упорядочивание, но при этом производит сохранение выравнивания по сетке.
Таким образом, вам нужно дважды кликнуть левой кнопкой мыши по параметру с именем FFlags и произвести замену в его значение на одно из вышенаписанных.

Ну, и последний момент, который не стоит выпускать из виду, так это то, что значения здесь указаны в десятичной системе счисления, соответственно, перед тем, как внести изменения, вы должны будите активировать соответствующую радиокнопку.
Как только вы закончите настройку, то тут же можно перезагрузить систему, ведь только после этого, возможно будет увидеть воочию плоды своей работы.

Согласитесь, что многое, что располагается в операционной системе десятого поколения, смоделировано таким образом, что не возможности это отредактировать под себя. Понятное дело, что в некоторых случаях присутствуют небольшие настройки, но по сути, они на столько минимальны, что практически не играют не какой роли. Именно это и дало нам пищу к размышлению, которая позволяет рассказать вам о том, как убрать выравнивание иконок по сетке на Рабочем столе в Win 10.
Сразу же отметим, что это более сложный способ по сравнению с тем, что вы могли найти на просторах интернета ранее, так как мы расскажем вам сразу о четырех настройках расположения иконок, что в конечном итоге позволит вам сделать свой Рабочий стол именно таким, каким вы хотели видеть его всегда.
Этап № 1 (о нем знают все)
Тут все просто и понятно, так как в свободной области Рабочего стола, вам необходимо кликнуть ПКМ, как только откроется, так называемое «контекстное меню», то вы наведите курсор мыши на «Вид» и с него перейдите на «Выровнять значки по сетке» и собственно кликаете по нему.
После того, как вы наведете курсор мыши на пункт «Выровнять значки по сетке», можно увидеть, что на против него стоит галочка, а если вы кликните по данному пункту, то галочка пропадет. Таким образом, когда галочка есть, иконки на Рабочем столе располагаются по сетке, а когда ее нет, то иконки можно располагать максимально хаотично.


Этап № 2 (о нем мало кто знает)
Предположим, что вышеописанных настроек вам мало, тогда придется воспользоваться «редактором реестра», а для этого, через окно «Выполнить» переходим в командную строку при помощи команды «regedit», после чего, вы должны будите перейти вот сюда: «HKEY_CURRENT_USER\SOFTWARE\Microsoft\Windows\Shell\Bags\1\Desktop».
Найдите 32-битный DWORD-параметр, который имеет имя «FFlags» (если данный параметр у вас имеется). При условии, что данного параметра у вас нет, то его нужно создать и при его создании, вы должны будите выбрать одно из 4х значений:
- 1075839520 — данный параметр, отключит выравнивание по сетке и упорядочивание.
- 1075839525 — данный параметр, включит выравнивание по сетке и упорядочивание.
- 1075839521 — данный параметр, активирует упорядочивание, но деактивирует выравнивание по сетке.
- 1075839524 — данный параметр, отключает упорядочивание, но активирует выравнивание.
Собственно, вы выбираете то значение, которое, как вам кажется, максимально вам подходит и кликнув дважды курсором мышки по «FFlags», производите замену имеющегося параметра, на один из четырех описанных выше.

Вам уже практически удалось убрать выравнивание иконок по сетке на Рабочем столе в Win 10, но не стоит забывать о том, что все числовые значения имеют тут десятичную систему исчисления, а следовательно, до того, как вы будите вносить изменения в систему, произведите активацию радиокнопок.
По окончанию всего вышеописанного, все сохраните и произведите перезагрузку операционной системы Win 10, так как без данного действия, вы не сможете заметить тех результатов, которых хотели добиться от Рабочего стола и расположенных на нем иконок.
Your Desktop is a special folder which shows your background wallpaper that you have chosen and your files, folders, documents, shortcuts and all such items you have stored. It appears every time you sign in to Windows. In this article, will we learn how to disable the Align Desktop Icons to Grid feature for your user account in Windows 10.
Tip: In earlier Windows versions, the Desktop had important icons enabled by default — This PC, Network, Control Panel, and your User files folder. They were all visible by default. However, in modern Windows versions, Microsoft made most of these icons hidden. In Windows 10, only the Recycle Bin is present on the Desktop by default. Also, the Windows 10 Start Menu does not have links to these icons either. You can enable classic Desktop icons as follows:
Enable Desktop Icons in Windows 10
By default, Align Desktop Icons is enabled. If you drag and drop icons anywhere on the Desktop, they will be snapped to a grid and will get auto-arranged. It is possible to disable this feature and to place the desktop icons at any position you like on Desktop. Here is how to disable this feature.
To disable Align Desktop Icons to Grid on Desktop in Windows 10, do the following.
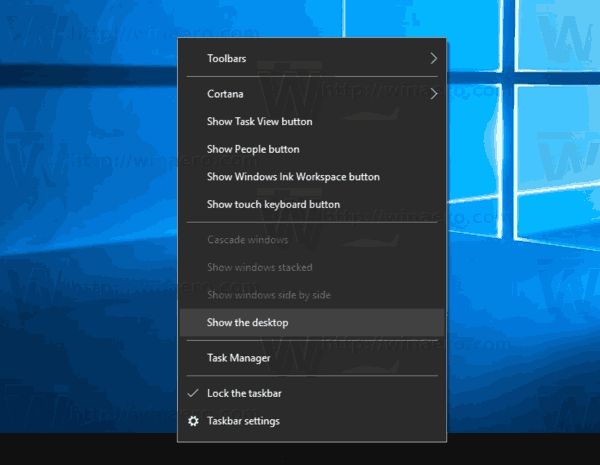
- Minimize all open windows and apps. You can use Win + D or Win + M shortcut keys. Alternatively, you can right-click the taskbar and select «Show the desktop» from the context menu or left click the far end of the taskbar.

Tip: See What is the difference between Win + D (Show Desktop) and Win + M (Minimize All) keyboard shortcuts in Windows
- Right click the empty space on your Desktop and select View — Align icons to grid. This command will toggle the Align icons to grid feature.

When Align icons to grid is disable, a check mark will disappear next to the context menu command’s name.

This is pretty simple.
This feature can be configured with a special Registry tweak. Here is how it can be done.
Disable Align Desktop Icons to Grid with a Registry tweak
- Open the Registry Editor app.
- Go to the following Registry key.
HKEY_CURRENT_USER\SOFTWARE\Microsoft\Windows\Shell\Bags\1\Desktop
See how to go to a Registry key with one click.

- On the right, modify or create a new 32-Bit DWORD value «FFlags». Set it to one of the following values in decimal.
1075839520 — disable Auto Arrange Icons and Align Icons to Grid
1075839525 — enable Auto Arrange Icons and Align Icons to Grid
1075839521 — enable Auto Arrange Icons and disable Align Icons to Grid
1075839524 — disable Auto Arrange Icons but enable Align Icons to GridNote: Even if you are running 64-bit Windows you must still create a 32-bit DWORD value.

- To make the changes done by the Registry tweak take effect, you need to restart the Explorer shell.
That’s it.
Support us
Winaero greatly relies on your support. You can help the site keep bringing you interesting and useful content and software by using these options:
If you like this article, please share it using the buttons below. It won’t take a lot from you, but it will help us grow. Thanks for your support!
Добрый вечер.
Как отключить выравнивание значков по сетке в папке а не на рабочем столе, поиски в Гугл и Яндекс выдают только способы с рабочим столом. Помню в Windows 7 так можно было делать, а вот в десятке не могу найти это.
Вот чего хочу добиться
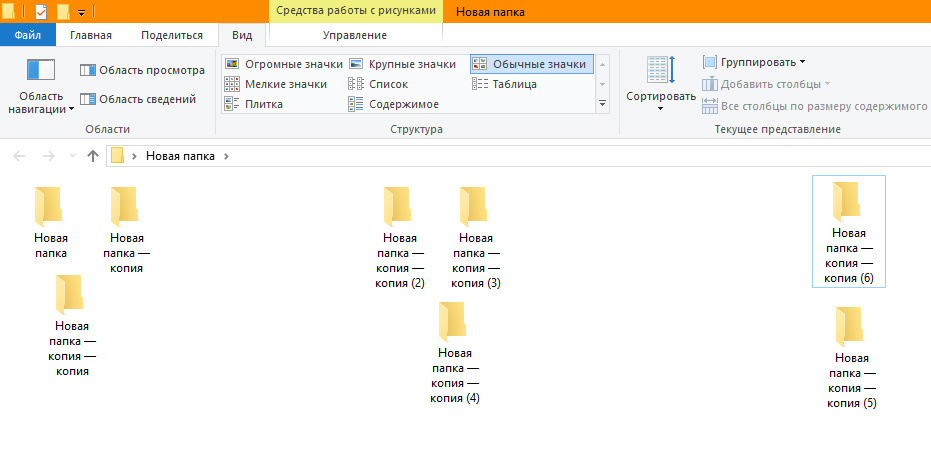
Может есть какие-то программы? но лучше конечно же без программ
-
Вопрос задан
-
535 просмотров
Пригласить эксперта
Я совсем не понимаю, для чего это нужно, но если уж очень хочется…
Гугл говорит, что в семёрке это делалось правкой реестра. Найдите рецепт для семёрки, посмотрите, есть ли аналогичные ключи реестра в десятке? Сделайте архивную копию реестра и пробуйте! Может оно и в 10 работает?
Войдите, чтобы написать ответ
-
Показать ещё
Загружается…