
Горячие клавиши ОС Windows 7, 8, а теперь и Windows 10 сильно облегчают жизнь тем, кто помнит о них и привык использовать. Для меня наиболее часто используемыми являются Win+E, Win+R, а с выходом Windows 8.1 — Win+X (под Win подразумевается клавиша с эмблемой Windows, а то часто в комментариях пишут, что нет такой клавиши). Однако у кого-то может появиться желание отключить горячие клавиши Windows, и в этой инструкции я покажу, как это сделать.
Сначала речь пойдет о том, как просто отключить клавишу Windows на клавиатуре, чтобы она не реагировала на нажатия (тем самым отключаются все горячие клавиши с ее участием), а затем — об отключении любых отдельных комбинаций клавиш, в которых присутствует Win. Все нижеописанное должно работать в Windows 7, 8 и 8.1, а также в Windows 10. См. также: Как отключить клавишу Windows на ноутбуке или компьютере.
Отключение клавиши Windows с помощью редактора реестра
Для того, чтобы отключить клавишу Windows на клавиатуре компьютера или ноутбука, запустите редактор реестра. Быстрее всего это сделать (пока горячие клавиши работают) нажав комбинацию Win+R, после чего появится окно «Выполнить». В него вводим regedit и нажимаем Enter.

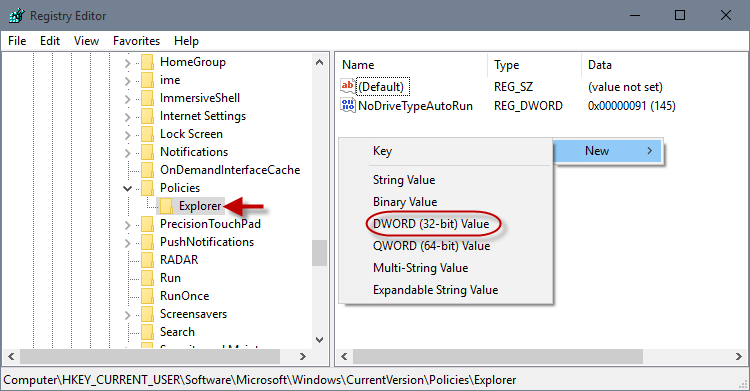
- В реестре откройте раздел (так называются папки слева) HKEY_CURRENT_USER \ Software \ Microsoft \ Windows \ CurrentVersion \ Policies \ Explorer (Если в Policies нет папки Explorer, то кликните по Policies правой кнопкой мыши, выберите «Создать раздел» и назовите его Explorer).
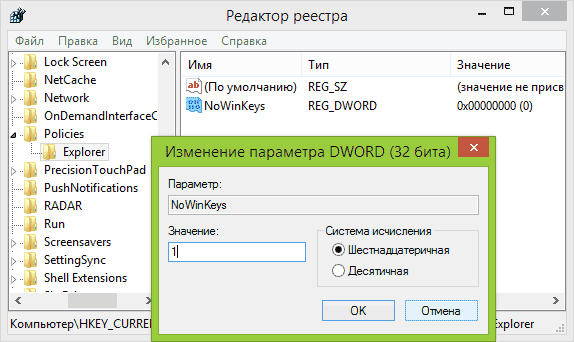
- С выделенным разделом Explorer, кликните правой кнопкой мыши в правой области редактора реестра, выберите «Создать» — «Параметр DWORD 32 бита» и назовите его NoWinKeys.
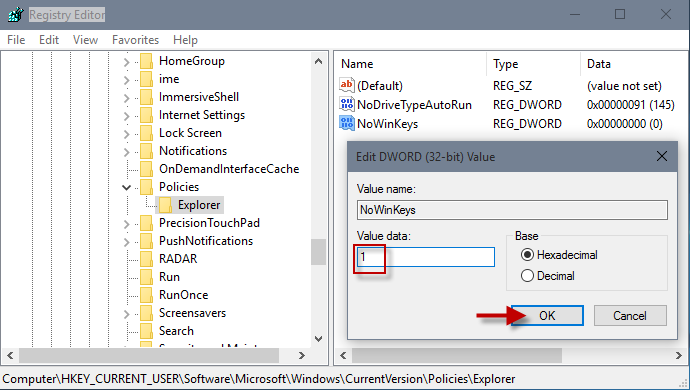
- Дважды кликнув по нему, установите значение 1.
После этого вы можете закрыть редактор реестра и перезагрузить компьютер. Для текущего пользователя клавиша Windows и все связанные с ней комбинации клавиш работать не будут.
Отключение отдельных горячих клавиш Windows
Если вам требуется отключить конкретные горячие клавиши с участием кнопки Windows, то вы тоже можете это сделать в редакторе реестра, в разделе HKEY_CURRENT_USER \ Software \ Microsoft \ Windows \ CurrentVersion \ Explorer \ Advanced
Зайдя в данный раздел, кликните правой кнопкой мыши в области с параметрами, выберите «Создать» — «Расширяемый строковый параметр» и назовите его DisabledHotkeys.

Дважды кликните по данному параметру и в поле значение введите буквы, горячие клавиши для которых будут отключены. Например, если вы введете EL то перестанут работать комбинации Win+E (запуск Проводника) и Win+L (Блокировка экрана).
Нажмите Ок, закройте редактор реестра и перезагрузите компьютер, чтобы изменения вступили в силу. В дальнейшем, если нужно будет вернуть все как было, просто удалите или измените созданные вами параметры в реестре Windows.
Sign in to your MUO account
Quick Links
-
Use the Settings App (for Certain Hotkeys)
-
Disable Shortcuts Using the Group Policy Editor
-
Disable Keyboard Shortcuts Using the Registry Editor
Accidental keystrokes can disrupt your workflow and cause unnecessary interruptions. Fortunately, you can disable keyboard shortcuts on Windows to prevent these issues and create a smoother typing experience. Below, we’ll explore your options for getting rid of unwanted shortcuts.
1. Use the Settings App (for Certain Hotkeys)
The Settings app on Windows can be useful for disabling a few specific Windows shortcut keys, such as those for Windows Narrator, Sticky Keys, Print Screen, Filter Keys, Toggle Keys, and color filters.
Here’s how to disable hotkeys using the Settings app:
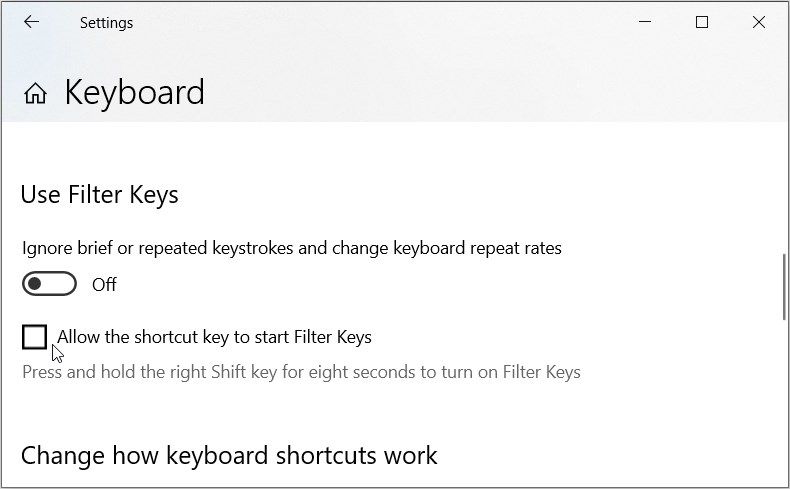
- Type Allow the shortcut key to start Filter Keys in the Start menu search bar and select the Best match.
- Uncheck the Allow the shortcut key to start Filter Keys box to disable this option. When this option is enabled, pressing and holding the right Shift key for about eight seconds will activate Filter Keys.
- Likewise, if you scroll up, you’ll see similar checkboxes for Sticky Keys and Toggle Keys. Uncheck them too.
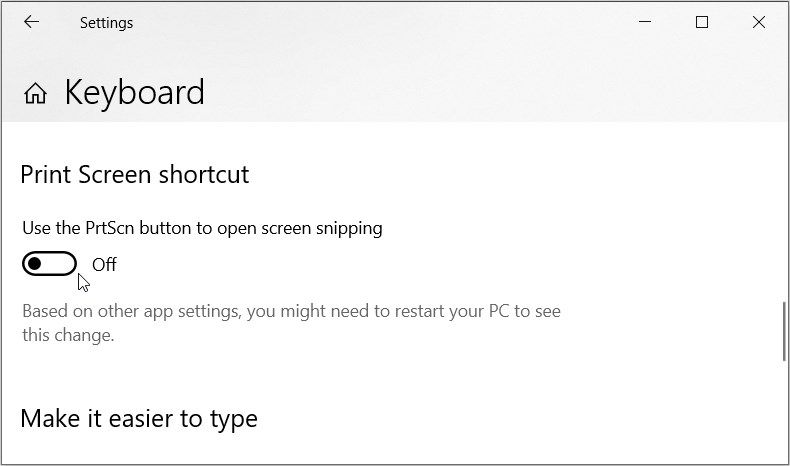
- Next, scroll down and disable the toggle below Print Screen Shortcut to prevent the PrtScn button from opening the snipping tool.
Now, you can follow the set of instructions below to disable keyboard shortcuts for color filters:
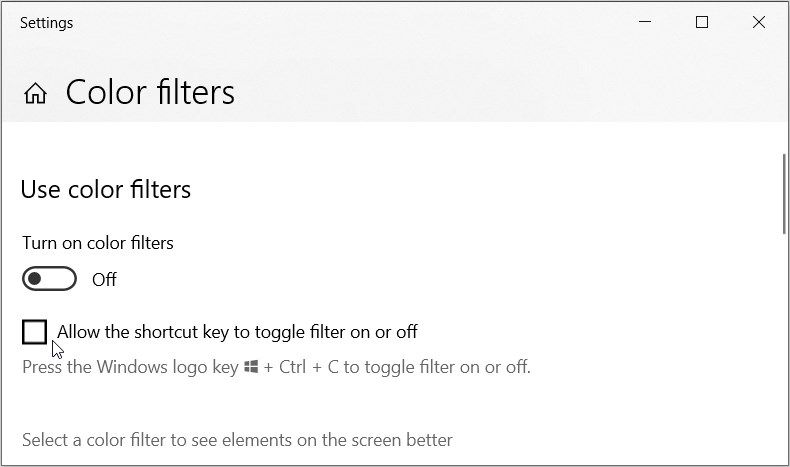
- Now, type Allow the shortcut key to turn color filters on or off in the Start menu search bar and select the Best match.
- Uncheck the Allow the shortcut key to toggle filter on or off box. When this is enabled, pressing Win + Ctrl + C will toggle the color filters on or off.
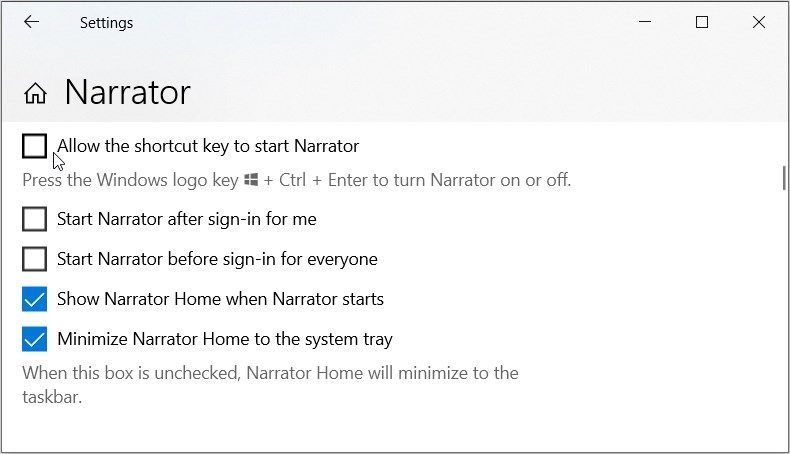
Finally, we’ll show you how to disable keyboard shortcuts for the Narrator feature that describes the content that appears on your screen:
- Type Allow the shortcut key to start Narrator in the Start menu search bar and select the Best match.
- Next, uncheck the Allow the shortcut key to start Narrator box to disable this option. When this option is enabled, pressing Win + Ctrl + Enter will turn Narrator on or off.
2. Disable Shortcuts Using the Group Policy Editor
Unfortunately, the Settings app on Windows doesn’t let you manage all the keyboard shortcuts. That’s where the Group Policy Editor comes in. The Local Group Policy Editor allows you to troubleshoot PC issues and tweak various system settings.
Here’s how to use it to disable the Windows shortcut keys:
- Type Edit group policy in the Start menu search bar.
- Right-click on the Best match result and select Run as administrator.
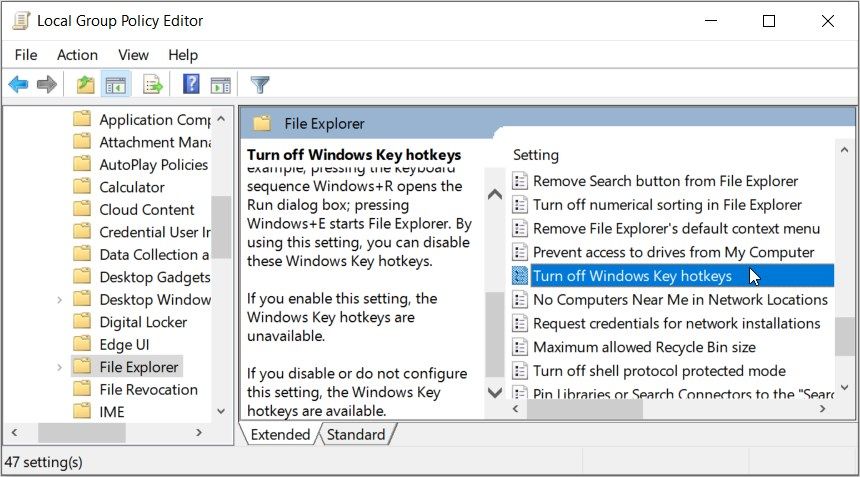
- Navigate to User Configuration > Administrative Templates > Windows Components and click the File Explorer folder.
- Now, scroll down on the right and double-click the Turn off Windows Key Hotkeys option.
- Select Enabled from the window that appears.
Finally, close the Local Group Policy Editor and restart your computer to apply these changes.
3. Disable Keyboard Shortcuts Using the Registry Editor
You can disable the keyboard shortcuts by tweaking a few Registry keys. But before you begin, consider backing up the Windows Registry to ensure you can recover it if issues arise. Now, here’s how to disable keyboard shortcuts using the Registry Editor:
- Type Registry Editor in the Start menu search bar. Right-click on the Best match result and select Run as administrator.
-
Copy-paste the following command into the address bar and press Enter:
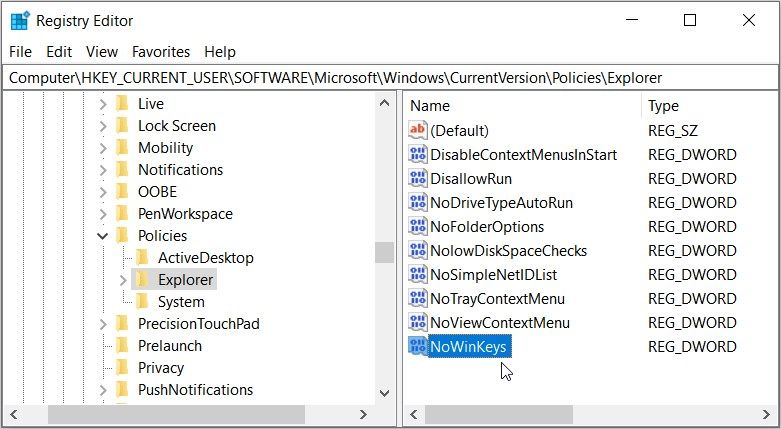
HKEY_CURRENT_USER\Software\Microsoft\Windows\CurrentVersion\Policies - Now, double-click Policies to expand and reveal the Explorer key. If it’s missing, create it by right-clicking the Policies key and selecting New > Key. From there, name this key as Explorer.
- When you’re on the «Explorer» key, right-click on a blank space on the right and select New > DWORD (32-bit) Value. Next, name this value as NoWinKeys and press Enter.
- To disable the hotkeys, double-click on the NoWinKeys value and set the Value data as 1.
Finally, close the Registry Editor and restart your computer to save these changes.
While keyboard shortcuts can improve efficiency and speed up certain operations, they can cause unintended actions if you’re prone to misclicking and interrupt your workflow. Hopefully, with our detailed instructions, you managed to disable all the keyboard shortcuts you don’t really use or need.
,
If you’re looking for a method to disable the Windows hotkeys/shortcuts in Windows 10/11. (e.g. the «Windows key + E» to open Explorer, «Windows key + R» to open the Run command box, etc.), continue reading below.
The Windows key is used in combination with other keyboard keys to make certain Windows tasks easier to perform. However, if you accidentally press any of these combinations, you may open/close programs or activate features you don’t need. In other cases, you may want to disable Windows key shortcuts to prevent others from using them.
In this guide you’ll find two ways to deactivate the keyboard shortcuts on Windows 10/11 OS. *
* Notes:
1. The below methods only disable the following Windows hotkeys on Windows 10/11:
- Windows key + E: This opens the File Explorer window.
- Windows key + R: Opens the Run dialog box.
- Windows key + D: Minimizes all open windows and shows the desktop.
- Windows key + S: This opens the Search bar.
It won’t disable the Windows key shortcuts: Windows + I (Settings), Windows + X (open the quick menu when pressing the right-click on Start menu), Windows + L (Locks Computer), or Windows + Tab (shows all open windows).
2. If you want to all the Windows key combinations, proceed and disable the single Windows key on your keyboard, by using the instructions on this guide: How to Disable Windows Key on Windows 10/11.
Method 1. Disable Windows Hotkeys in Registry. *
The first method to deactivate the Windows key shortcuts is through Windows Registry. To do that:
1. Right-click at Start menu and select Run.

2. Type regedit and press OK (or Enter) to open the Registry Editor.
![image_thumb[4]](https://www.repairwin.com/wp-content/uploads/2023/04/image_thumb4_thumb-2.png "image_thumb[4]")
3. In Registry Editor, navigate to the following path:*
- HKEY_CURRENT_USER\Software\Microsoft\Windows\CurrentVersion\Policies\
4a. Right-click at «Policies» key and chose New > key.

4b. Name the new key «Explorer» and press Enter.
5a. Now, right-click at «Explorer» key and select New > DWORD (32-bit value)

5b. Name the new value as: «NoWinkeys» & press Enter.
5c. Finally, double-click to open the «NoWinkeys» value, type «1» at the value data box and click OK.

6. Close the Registry Editor and restart your PC, or restart Explorer using task manager to apply the setting.
a. Press CTRL + SHIFT + ESC to open Task Manager.
b. At Processes tab, right-click at Windows Explorer and click Restart to apply the change.


7. After you restart the computer or Windows Explorer, the Windows key hotkeys will not work.
To Enable the Windows key hotkeys:
To re-enable the disabled Windows key combinations:
1. Open the registry editor.
2. Navigate to the following path:
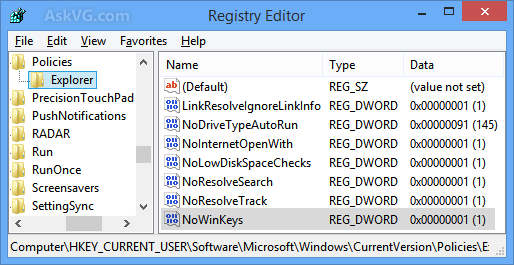
- HKEY_CURRENT_USER\Software\Microsoft\Windows\CurrentVersion\Policies\Explorer
3. Delete the «NoWinkeys» REG_DWORD value, or change its value from «1» to «0«.

Method 2. Disable Windows key hotkeys through Group Policy.
If you using Windows 11/10 Pro version, you can disable the Windows key combinations in Local Group Policy, using the instructions below:
1. Right-click at Start menu and select Run.

2. Type gpedit.msc to open the Group Policy Editor.

3. In Policy Editor, go to the following path:
-
User Configuration > Administrative Templates > Windows Components > File Explorer
4a. At the right-pane open the Turn off Windows Key hotkeys policy.

4b. Select Enabled and click Apply > OK.

5. Close the group policy editor and restart your computer to apply the change.*
* Note: To re-enable the Windows hotkeys, set the «Turn off Windows Key hotkeys» policy to «Disabled» or «Not Configured«.
That’s all folks! Did it work for you?
Please leave a comment in the comment section below or even better: like and share this blog post in the social networks to help spread the word about this solution.
If this article was useful for you, please consider supporting us by making a donation. Even $1 can a make a huge difference for us.
- Author
- Recent Posts
Konstantinos is the founder and administrator of Repairwin.com. Since 1995 he works and provides IT support as a computer and network expert to individuals and large companies. He is specialized in solving problems related to Windows or other Microsoft products (Windows Server, Office, Microsoft 365, etc.).

Microsoft added a ton of new keyboard shortcuts in Windows 10. Sometimes you may want to disable some of them if they interfere with you. The most commonly used keyboard shortcuts can be some combinations of Win key and other keys, such as Win + R, Win + E, Win +X, etc. Now if these shortcuts bring inconvenience and interfere with you, learn how to disable Win + keyboard shortcuts in Windows 10.
- Method 1: through Group Policy Editor
- Method 2: with Registry Editor
Method 1: Disable Win + keyboard shortcuts in Windows 10 through Group Policy Editor
Step 1: Type gpedit in the Search and then click Edit group policy. This will open Local Group Policy Editor.
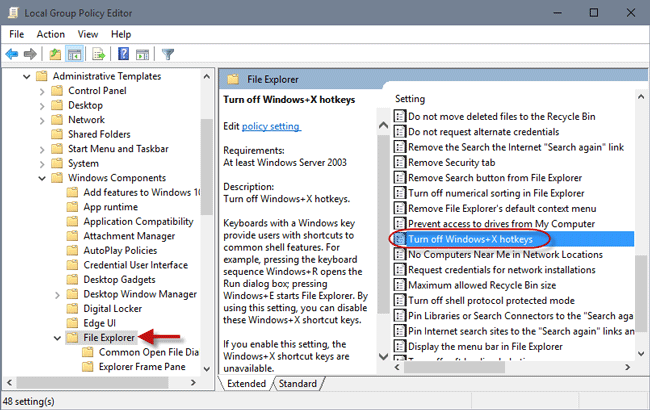
Step 2: Navigate to User Configuration > Administrative Templates > Windows Components > File Explorer. In the right-side pane, find Turn off Windows + X hotkeys and double-click on it.
Step 3: Check Enabled and click OK.

Step 4: Restart the computer to make the settings take effect. Then Win + hotkeys will turn off in your Windows 10.
Method 2: Disable Win + keyboard shortcuts in Windows 10 with Registry Editor
Step 1: Press Win + R to open the Run dialog box. Type regedit and click OK. This will open Registry Editor.
Step 2: Navigate to the key:HKEY_CURRENT_USER\Software\Microsoft\Windows\CurrentVersion\Policies\Explorer. In the right side panel, right click on the blank area and click New > DWORD(32-bit) to create a new key.
Step 3: Name the new key NoWinKeys and double-click on it. Set its value to 1, and click OK.
Step 4: Close Registry Editor and restart Windows 10 to make the settings take effect. Then Win + hotkeys feature will be disabled.
Once you disable the keyboard shortcuts with either way above, Win + X key combinations will be unavailable in your Windows 10 until you enable them, which means Windows can’t open a Run dialog box when you press Win + R, can’t open File Explorer when you press Win + E, and so on. If you want the Win + X hotkeys to back, just enable them.
If you use Windows operating system, you might be very well aware of the WIN key present on your computer’s keyboard. Generally WIN key is used to quickly access Start Menu or Start Screen in Windows. But you can also use WIN key in combination with another key to access other programs or features in Windows. There are many such keyboard shortcuts (hotkeys) available in Windows which use WIN key plus other keys such as:
- WIN+R to launch RUN dialog box
- WIN+E to launch Windows Explorer
- WIN+L to lock
- WIN+P to launch External Display selection screen
- WIN+X to show WIN+X menu (Windows 8 and later)
- WIN+C to show Charms Bar (Windows 8 and later)
- WIN+PrtScn to capture computer screen and save screenshot (Windows 8 and later)
- WIN+S or WIN+F to launch Search
- WIN+D to show the Desktop
- WIN+M to minimize all running programs windows
- WIN+SHIFT+M to restore all running programs windows
- WIN+Break to show System Properties
- WIN+B to set focus on system tray (Taskbar notification area) icons
- WIN+T to set focus on Taskbar buttons
- WIN+number key (0-9) to switch between Quick Launch toolbar or Taskbar buttons
Although these WIN+ hotkeys are very useful and time saving but many people might find these built-in hotkeys annoying. For example, suppose you were using WIN+Arrow keys to change volume level in your Windows XP or Vista PC and when you upgraded your PC to Windows 7, the WIN+Arrow hotkey was automatically assigned to change windows alignment such as restore windows, maximize windows, cascade windows, etc as a part of Aero Snap feature. Now you don’t want this new behavior and want to unbind or disable the built-in Windows 7 hotkey so that you can use your previous hotkey functionality.
There might be many other reasons behind disabling built-in WIN+ hotkeys in Windows. For example you often accidentally press WIN and another key in your keyboard so you may want to disable the WIN+ hotkey feature to prevent it from happening again.
If you also want to turn off WIN+ hotkeys in your Windows, this tutorial will definitely help you.
We have divided this tutorial in 2 parts:
- PART 1: Disable WIN+ hotkeys only
- PART 2: Disable WIN key completely
If you don’t want to disable WIN key but want to disable its hotkeys such as WIN+R, WIN+E, etc, then you’ll need to follow the steps given in part 1 of the tutorial.
If you want to completely disable WIN key so that it no longer works in your system, then you should follow part 2 of this tutorial. Completely disabling WIN key will also disable all its hotkeys.
With the help of following steps, you’ll be able to turn off all WIN+ hotkeys available in your Windows.
You can use following 2 methods to disable WIN+ hotkeys:
- METHOD 1: Using Group Policy Editor (gpedit.msc)
- METHOD 2: Using Registry Editor (regedit)
METHOD 1: Using Group Policy Editor (gpedit.msc)
1. Type gpedit.msc in RUN or Start search box and press Enter. It’ll open Group Policy Editor.
2. Now go to:
User Configuration -> Administrative Templates -> Windows Components -> Windows Explorer
or
User Configuration -> Administrative Templates -> Windows Components -> File Explorer
3. In right-side pane, look for “Turn off Windows+X hotkeys” option.
4. The option would be set to Not Configured. Double-click on it and set it to Enabled.

That’s it. It’ll immediately turn off all WIN+ hotkeys in your system.
PS: To re-enable the hotkeys in future, again set the “Turn off Windows+X hotkeys” option to Not Configured.
METHOD 2: Using Registry Editor (regedit)
If you are using Home edition of Windows OS, you’ll not be able to run gpedit.msc command because this edition doesn’t come with Group Policy Editor.
If you can’t use or don’t want to use Group Policy Editor, you can take help of Registry Editor for the same task. Just follow these simple steps:
1. Type regedit in RUN or Start search box and press Enter. It’ll open Registry Editor.
2. Now go to following key:
HKEY_CURRENT_USER\Software\Microsoft\Windows\CurrentVersion\Policies\Explorer
3. In right-side pane, create a new DWORD NoWinKeys and set its value to 1
4. Close Registry Editor and restart your system. After reboot the WIN+ hotkeys will be turned off in your system.
PS: To re-enable WIN+ hotkeys in future, delete the DWORD NoWinKeys created in step 3.
PART 2: Disable WIN Key Completely
If you want to completely turn off the WIN key in your system so that no one can use WIN key and all its related hotkeys, then this method will help you.
We’ll use the built-in “Keyboard Scancode Mapping” feature of Windows to disable WIN key. If you remember we have used the same feature to disable Caps Lock key in following tutorial:
How to Disable Annoying Caps Lock Key in Windows?
If you follow the tutorial given at the above mentioned link and set the value of Scancode Map binary present in HKEY_LOCAL_ MACHINE\System\CurrentControlSet\Control\Keyboard Layout key to 00 00 00 00 00 00 00 00 03 00 00 00 00 00 5b e0 00 00 5c e0 00 00 00 00, it’ll completely disable WIN key.

But modifying Registry and changing value of a binary is not an easy task, so we are going to use a very easy to use freeware “Sharp Keys” to do the same task automatically.
Sharp Keys is a free software which allows you to disable any desired key or change functionality of a key present on your computer keyboard.
1. First of all download the software using following article:
Download Sharp Keys
2. Run the software and click on Add button. Now click on “Type Key” button given in first section “Map this key (From key)“. It’ll open a small dialog box to detect a key. Now press WIN key and it’ll store the key. Click on OK button.
3. Now leave the value of “To this key (To key)” section set to “— Turn Key Off (00_00)“.
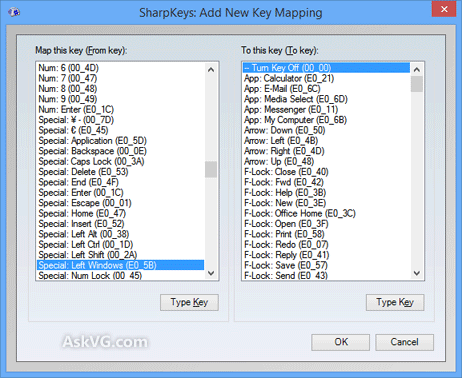
4. Click on OK button and then click on “Write to Registry” button.
If you have two WIN keys (left and right) on your keyboard, repeat the same steps for the other WIN key as well.
It’ll immediately save your settings to Windows Registry. Restart your computer and upon reboot, the WIN key will be disabled completely.
PS: If you want to enable WIN key again in future, run Sharp Keys tool again, select the WIN key entry given in the list and click on “Delete” button. At last click on “Write to Registry” button and restart your system.
Also Check:
How to Disable or Customize “Backspace Key” in Mozilla Firefox?
You are here: Home » Troubleshooting Guides » [Tip] How to Disable All WIN+ Keyboard Shortcuts (Hotkeys) in Windows?