
Отключение помощника в «Windows 11»
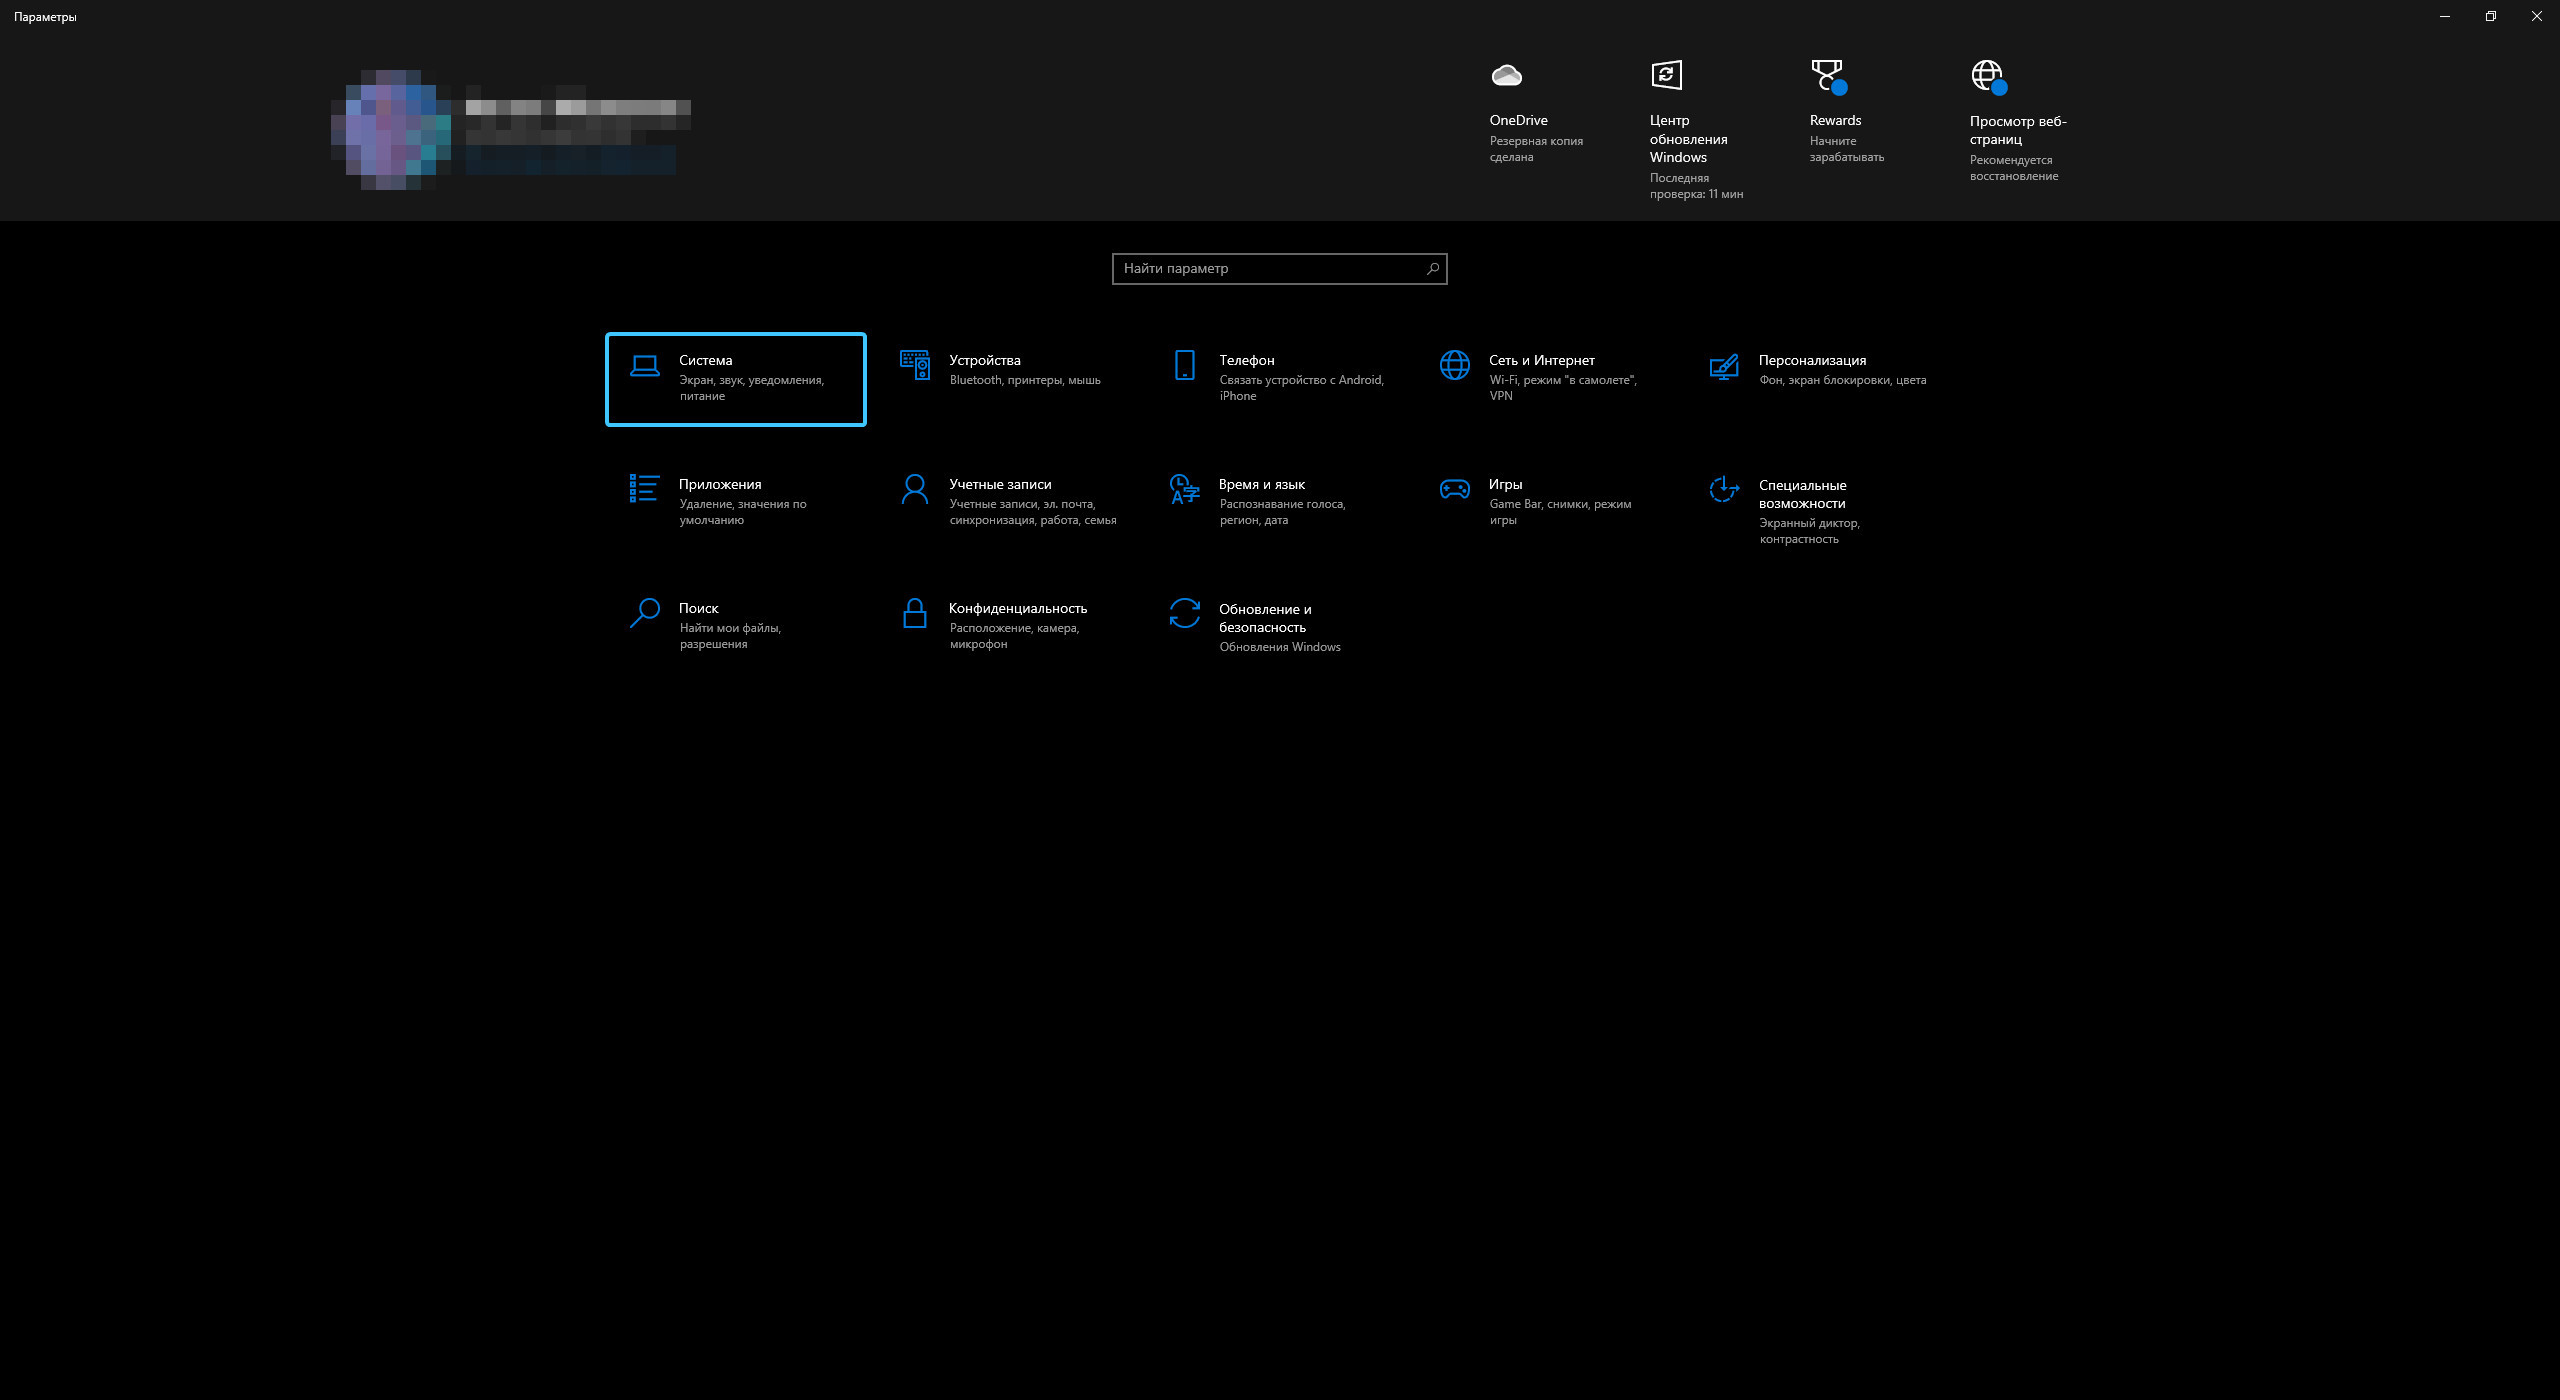
1. Откройте меню «Пуск» и перейдите в «Параметры» операционной системы «Windows 11».
2. В списке откройте категорию «Система». Перейдите в раздел, который называется «О системе».
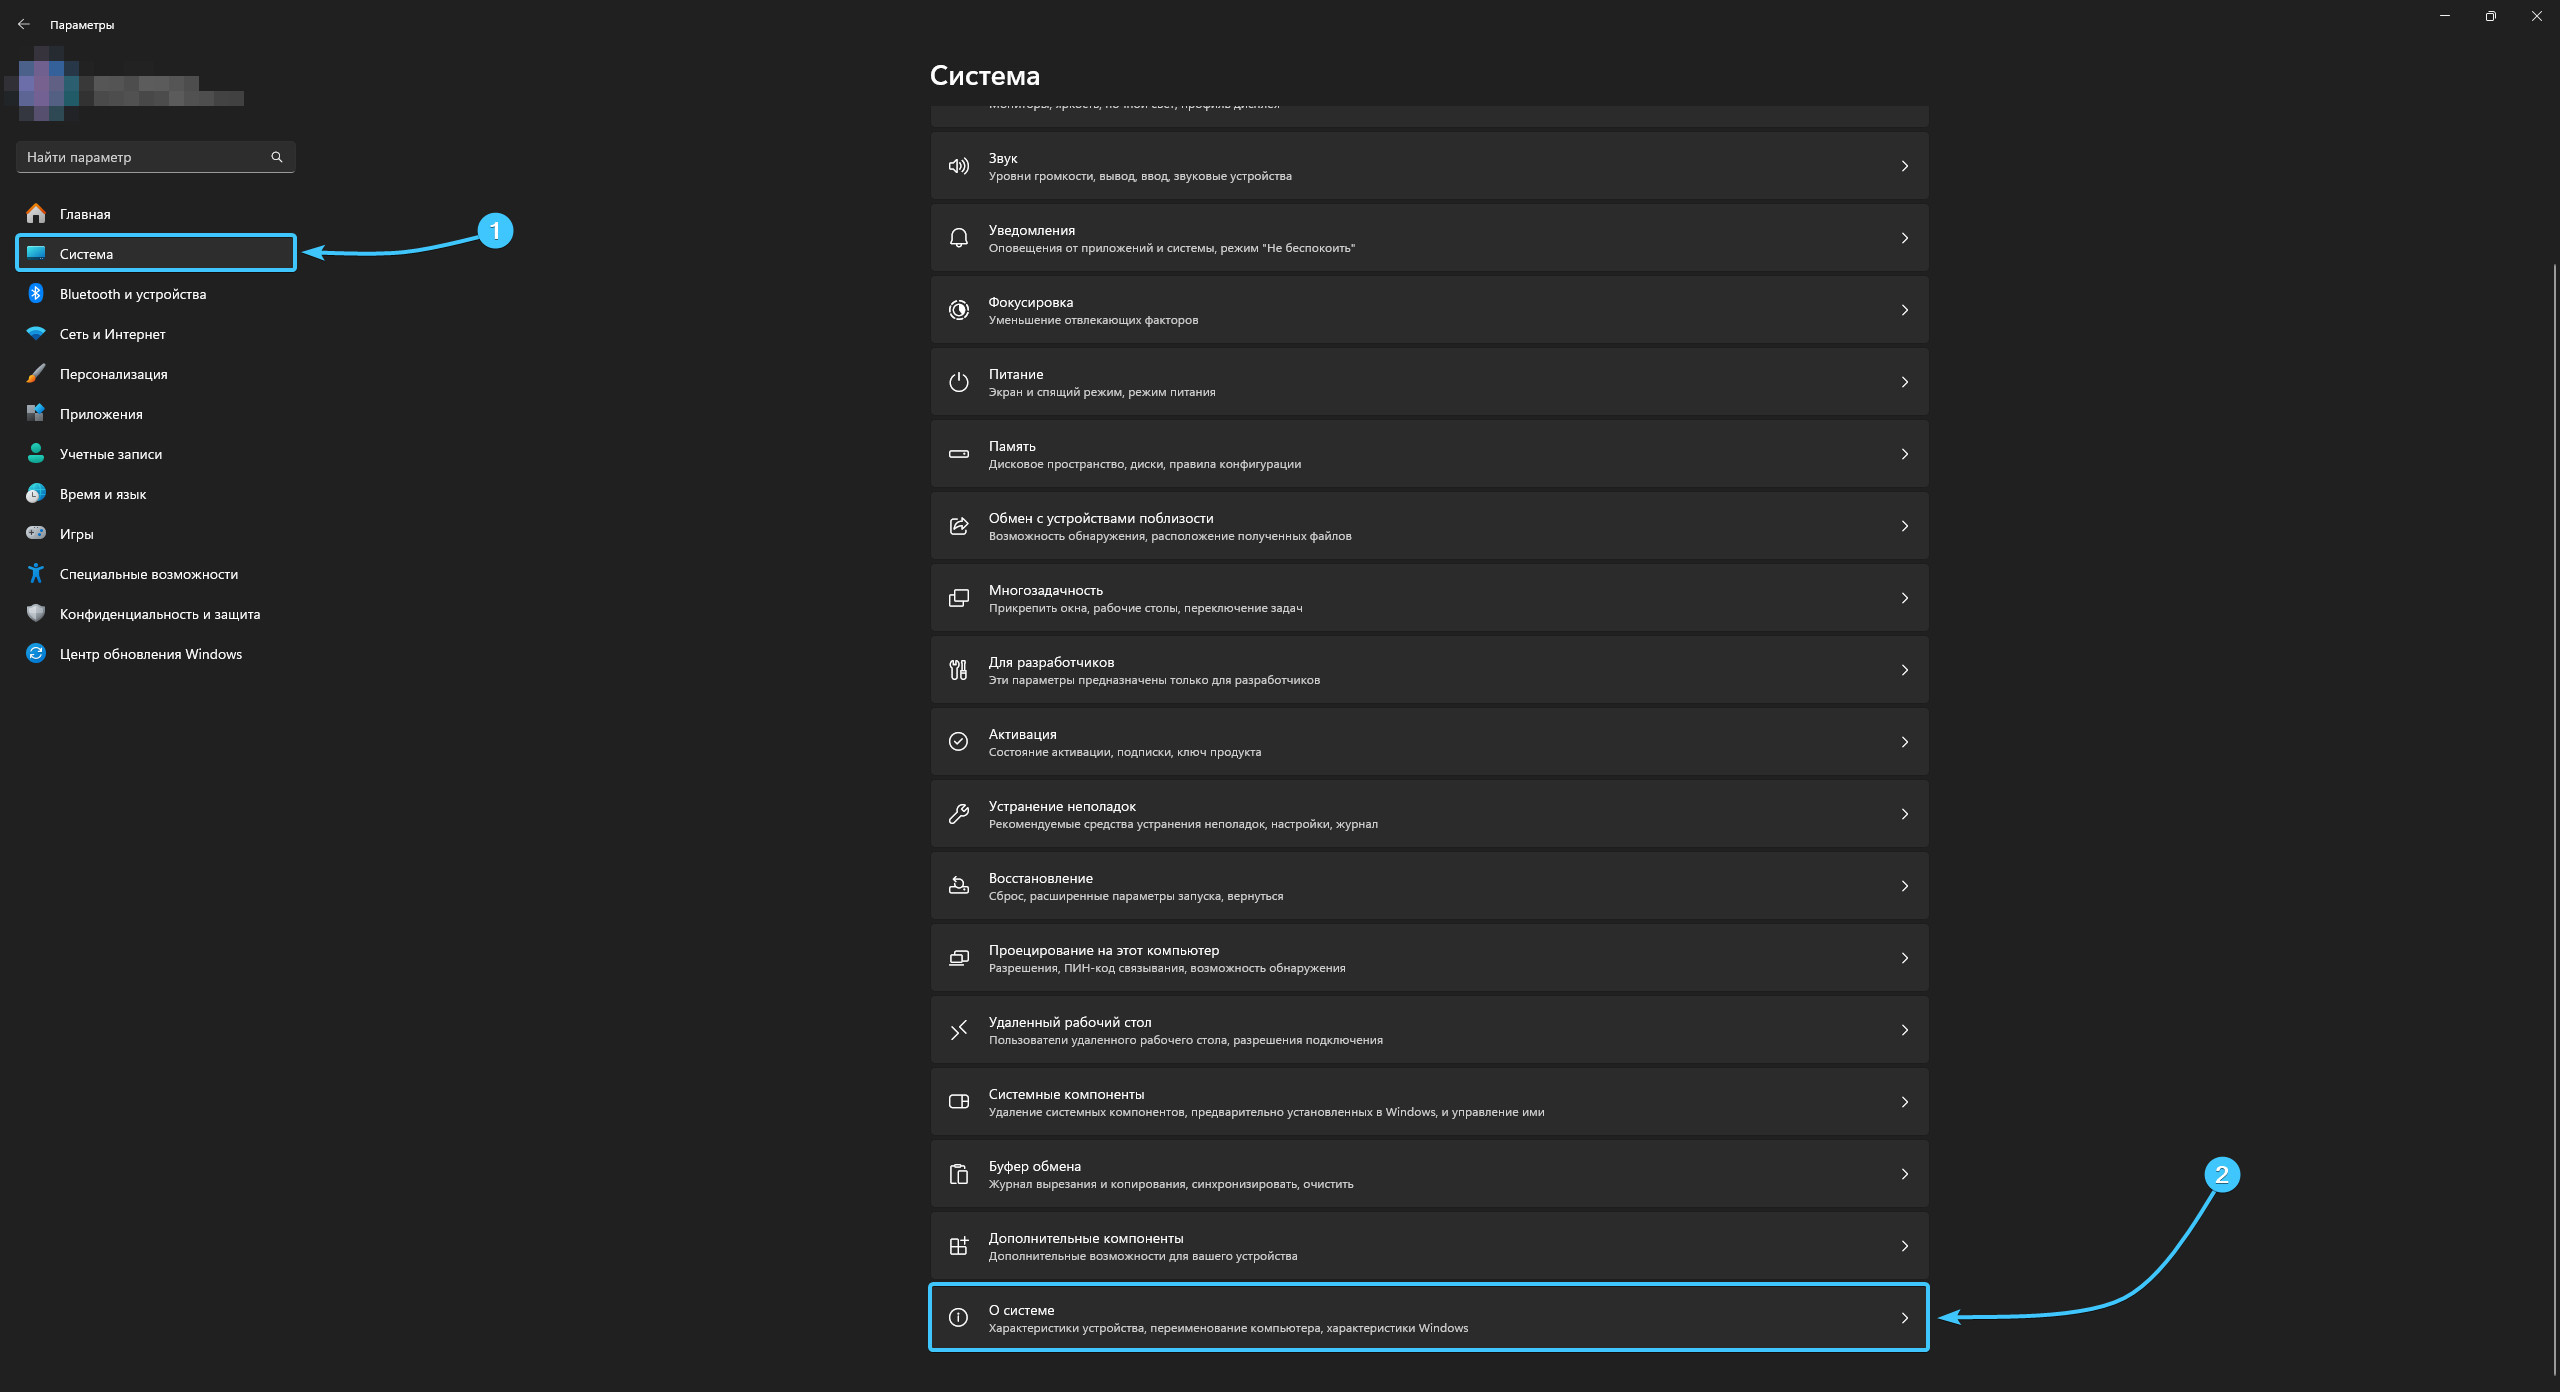
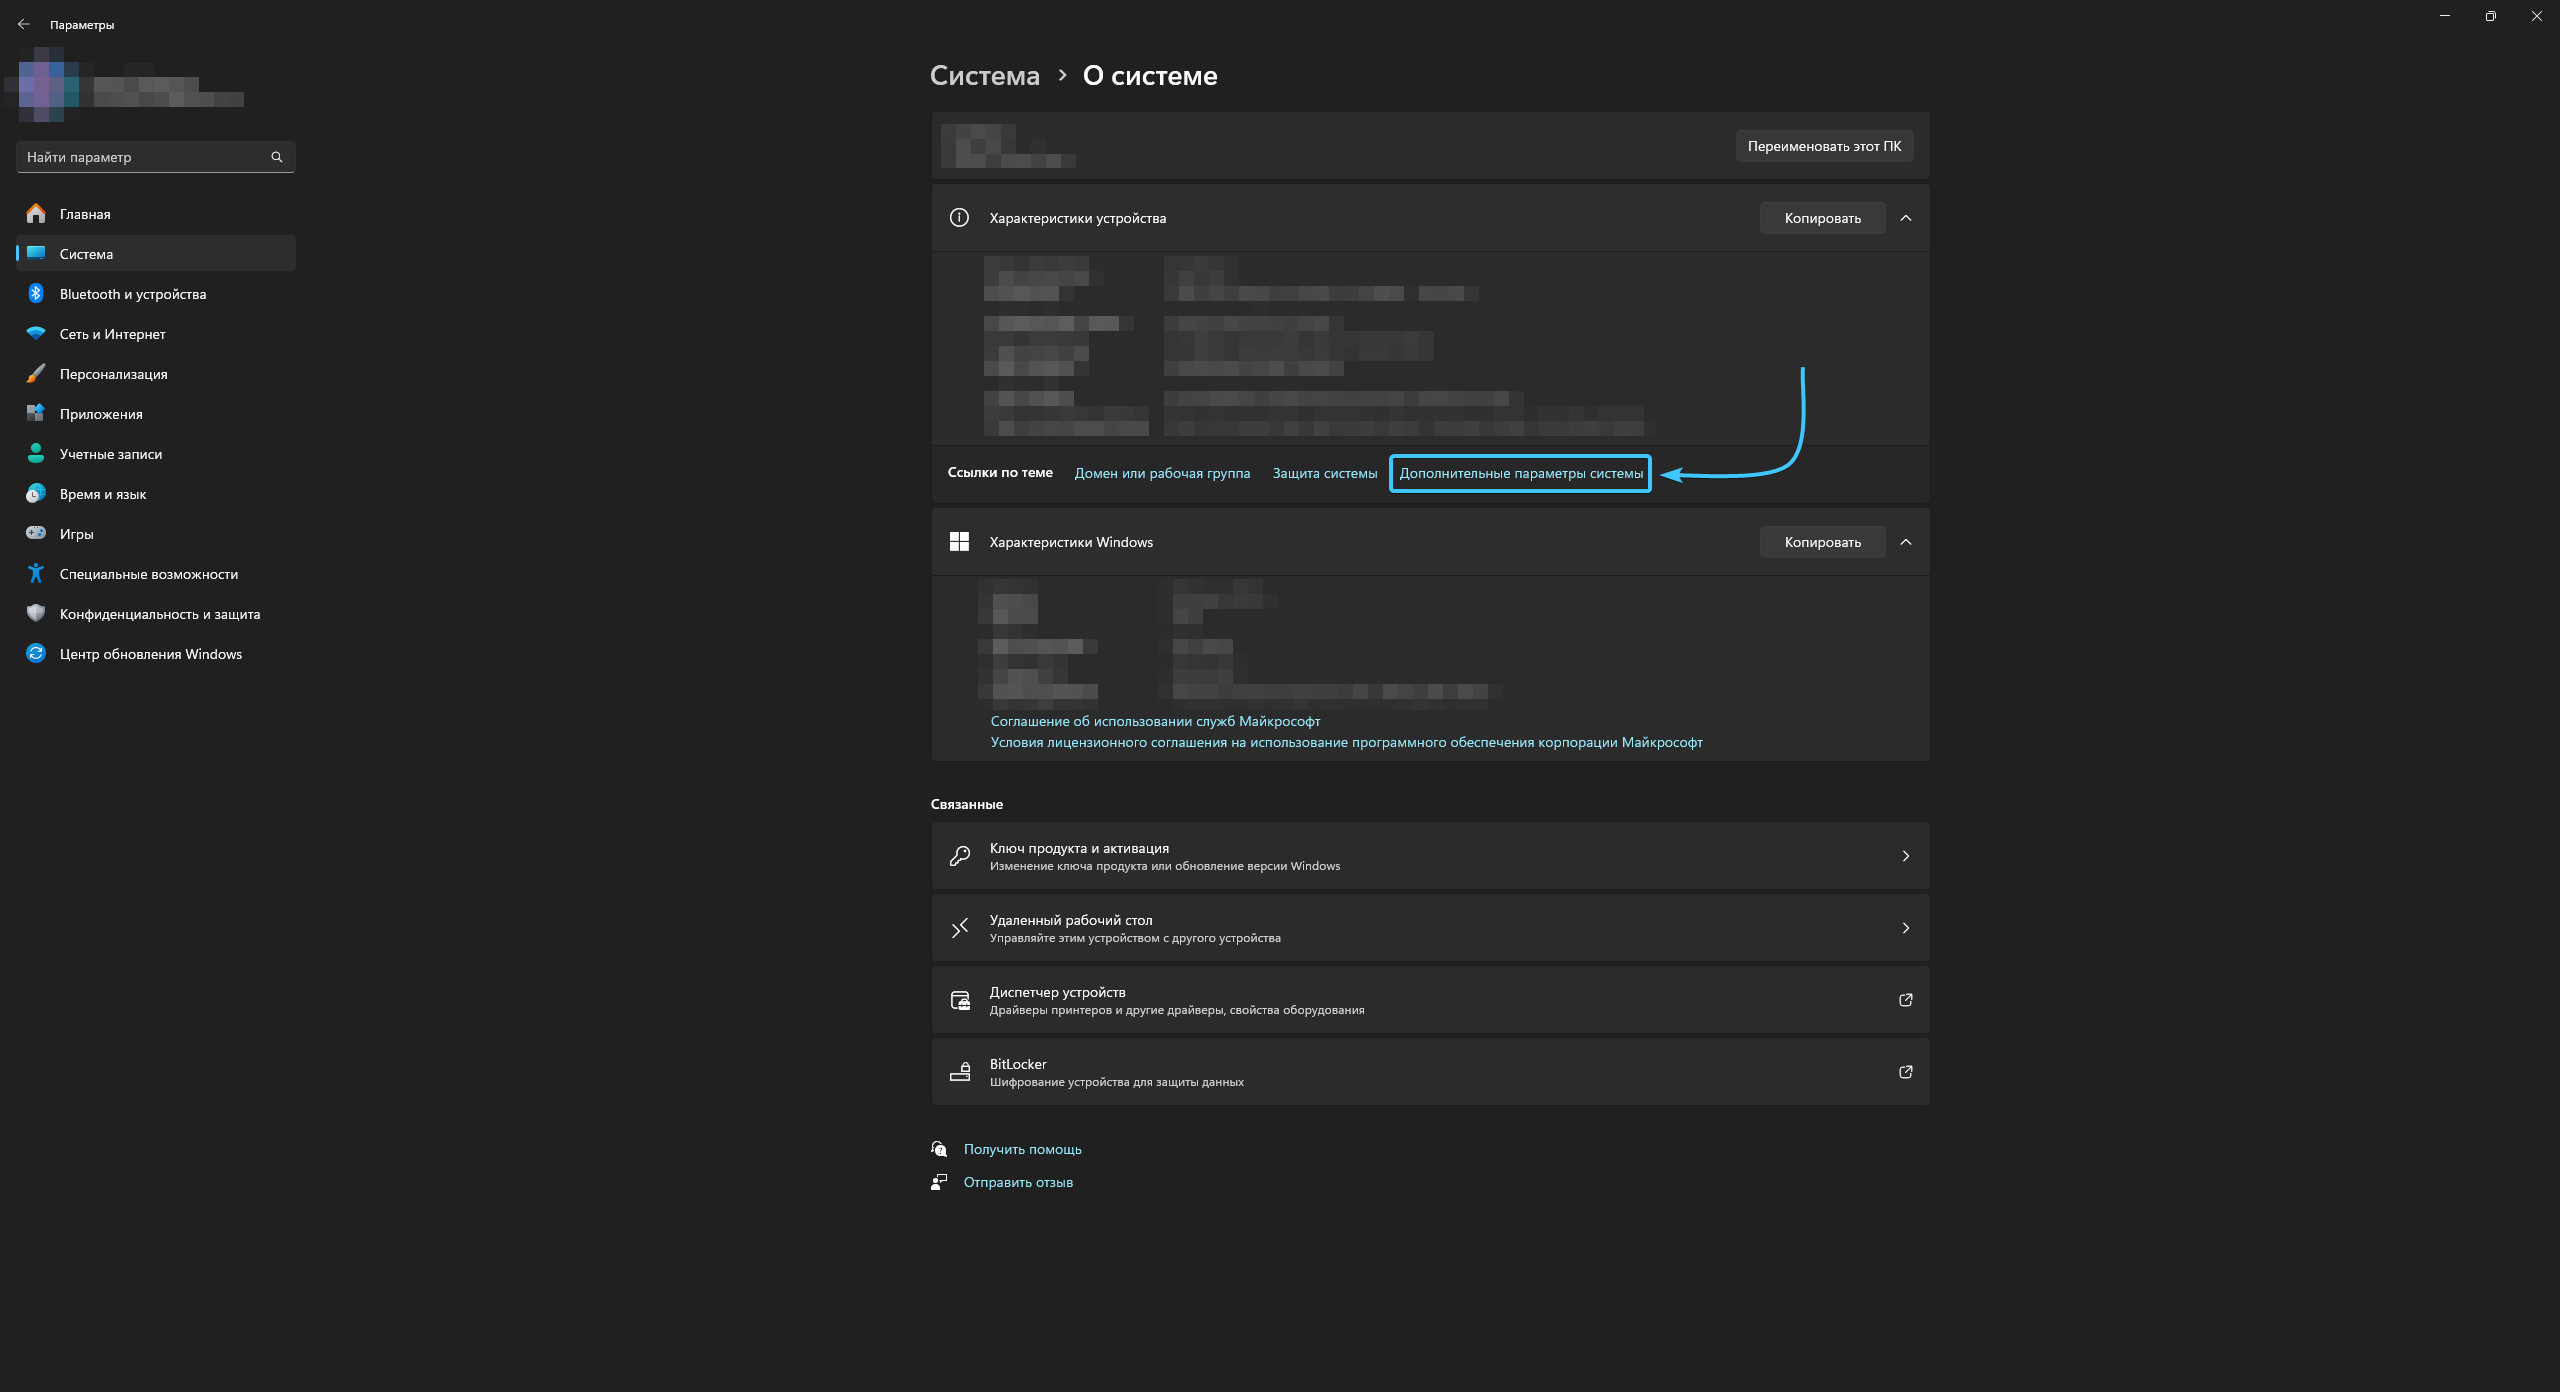
3. В подразделе «Характеристики устройства» нажмите кнопку «Дополнительные параметры системы».
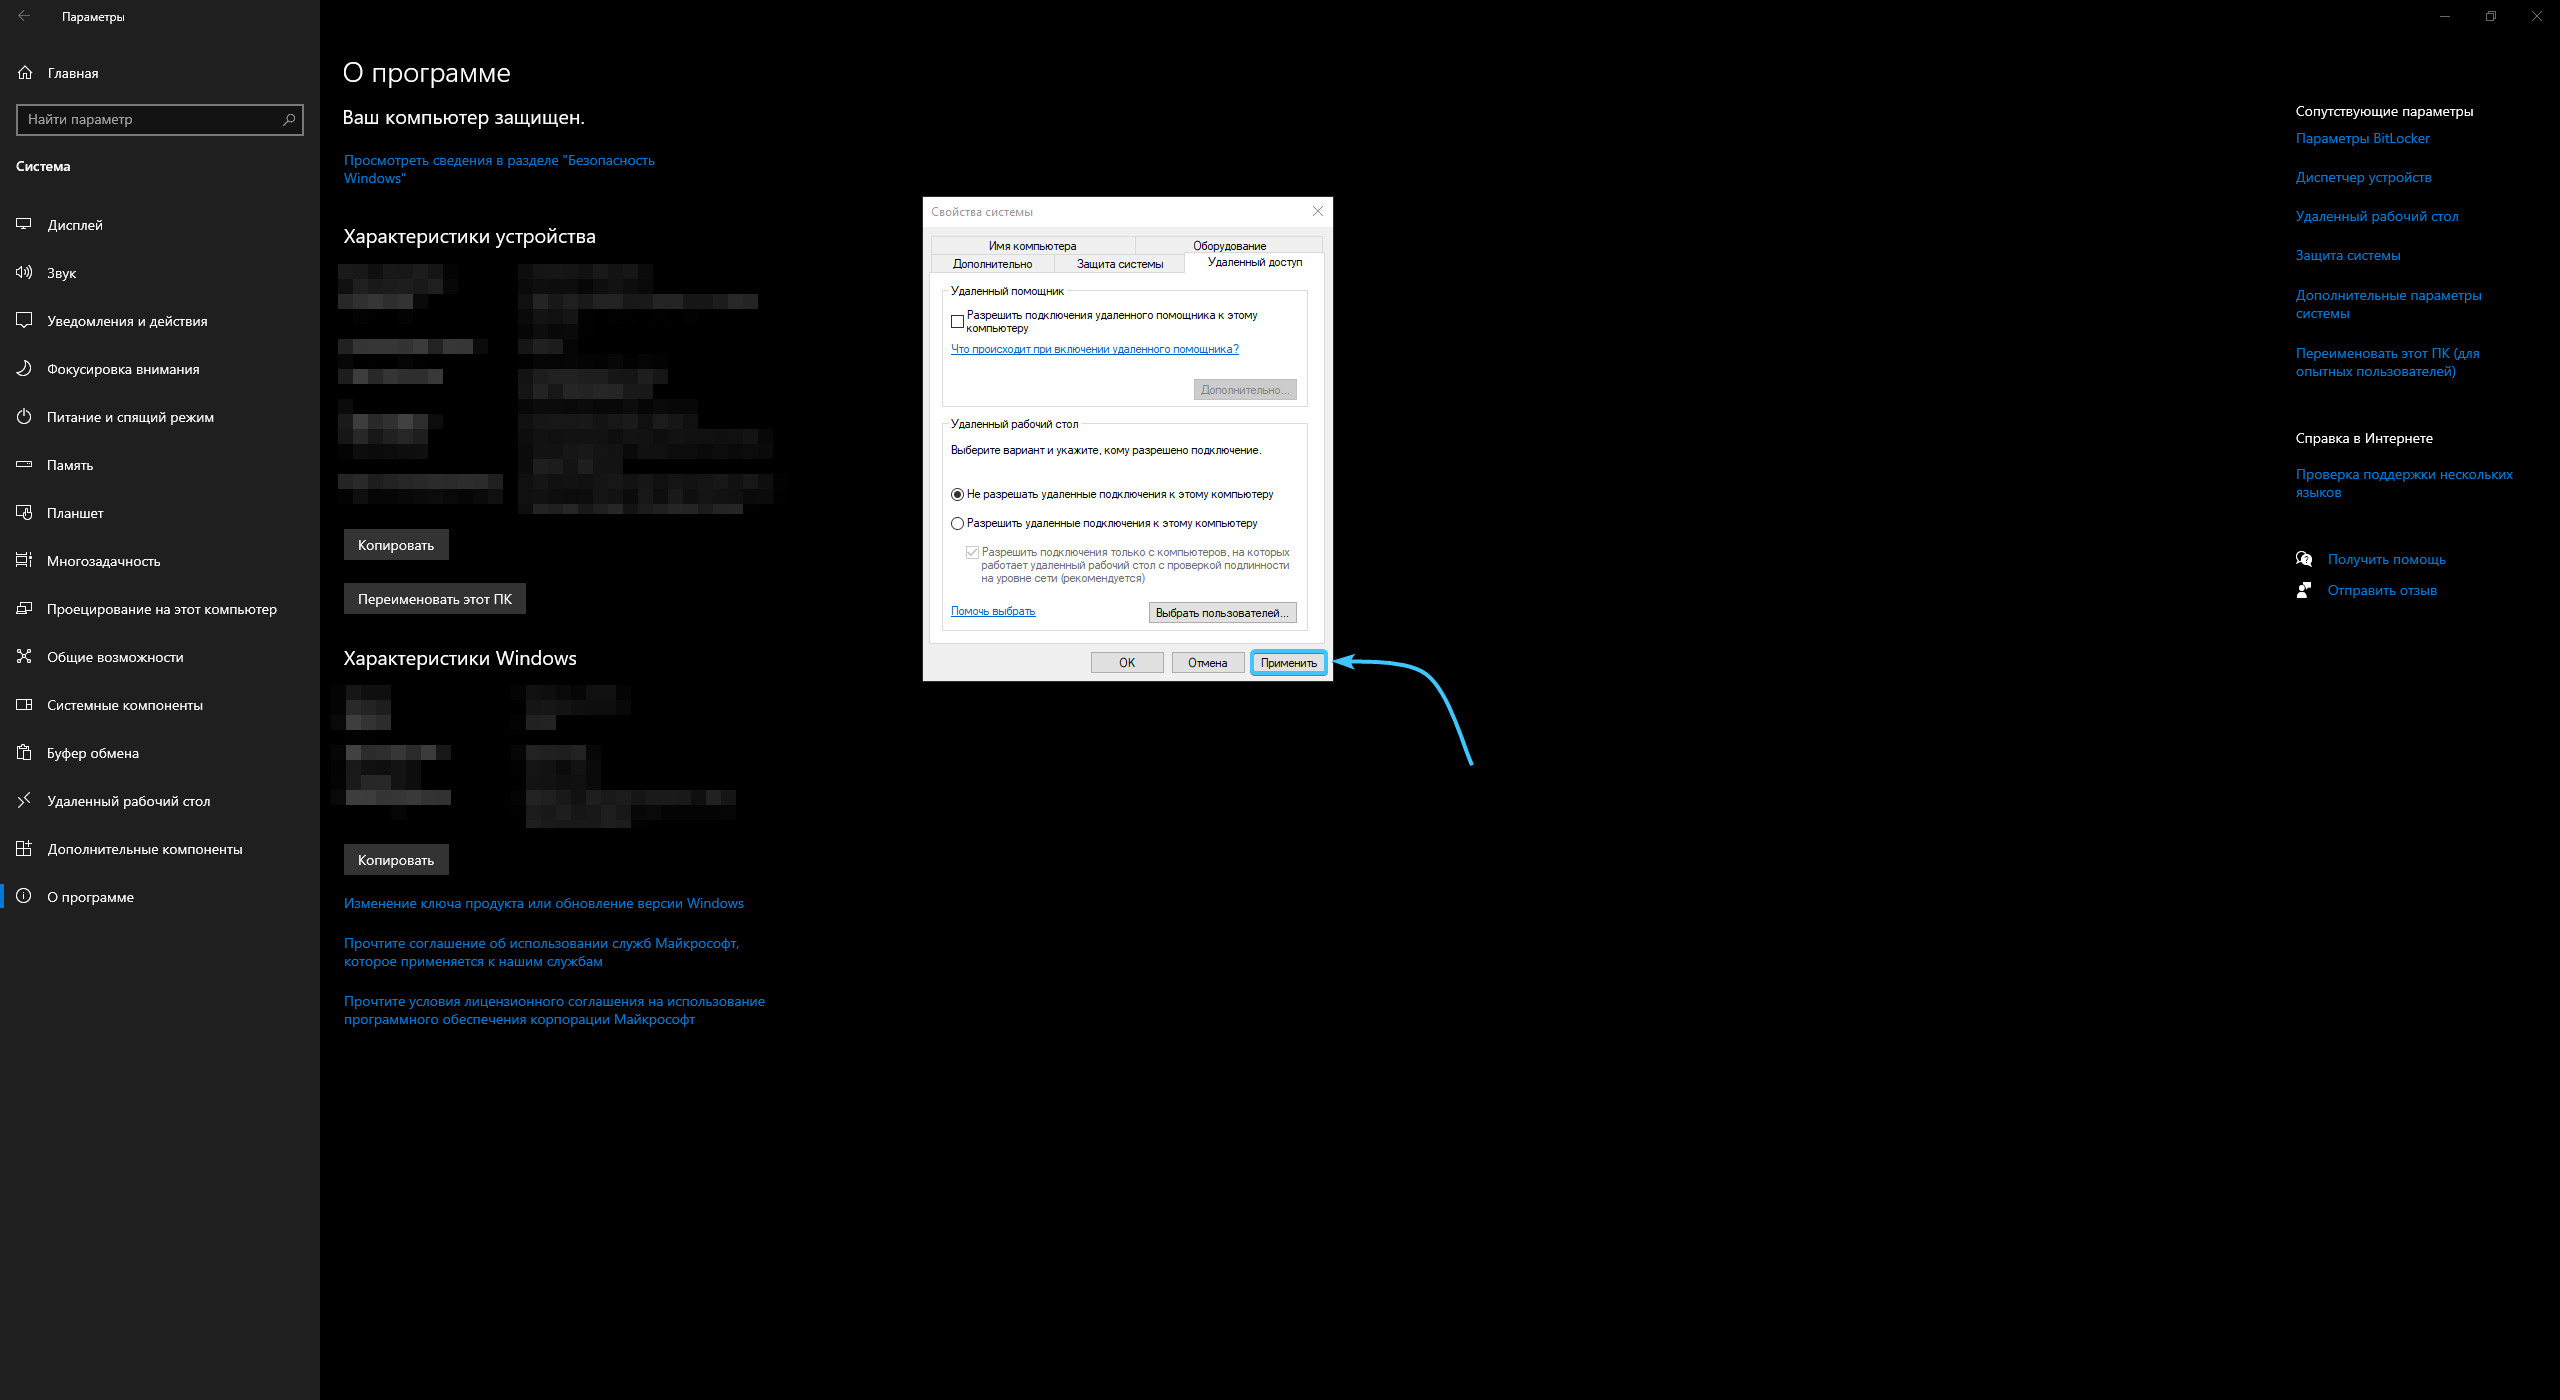
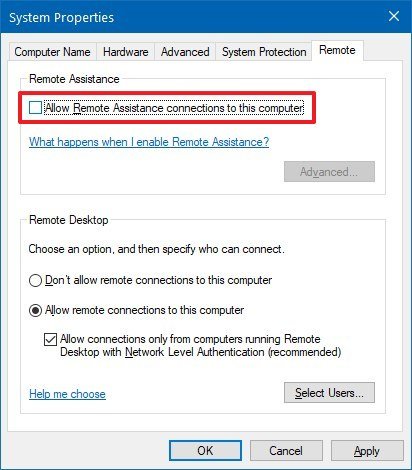
4. Появится окно «Свойства системы». Сверху откройте вкладку под названием «Удалённый доступ».
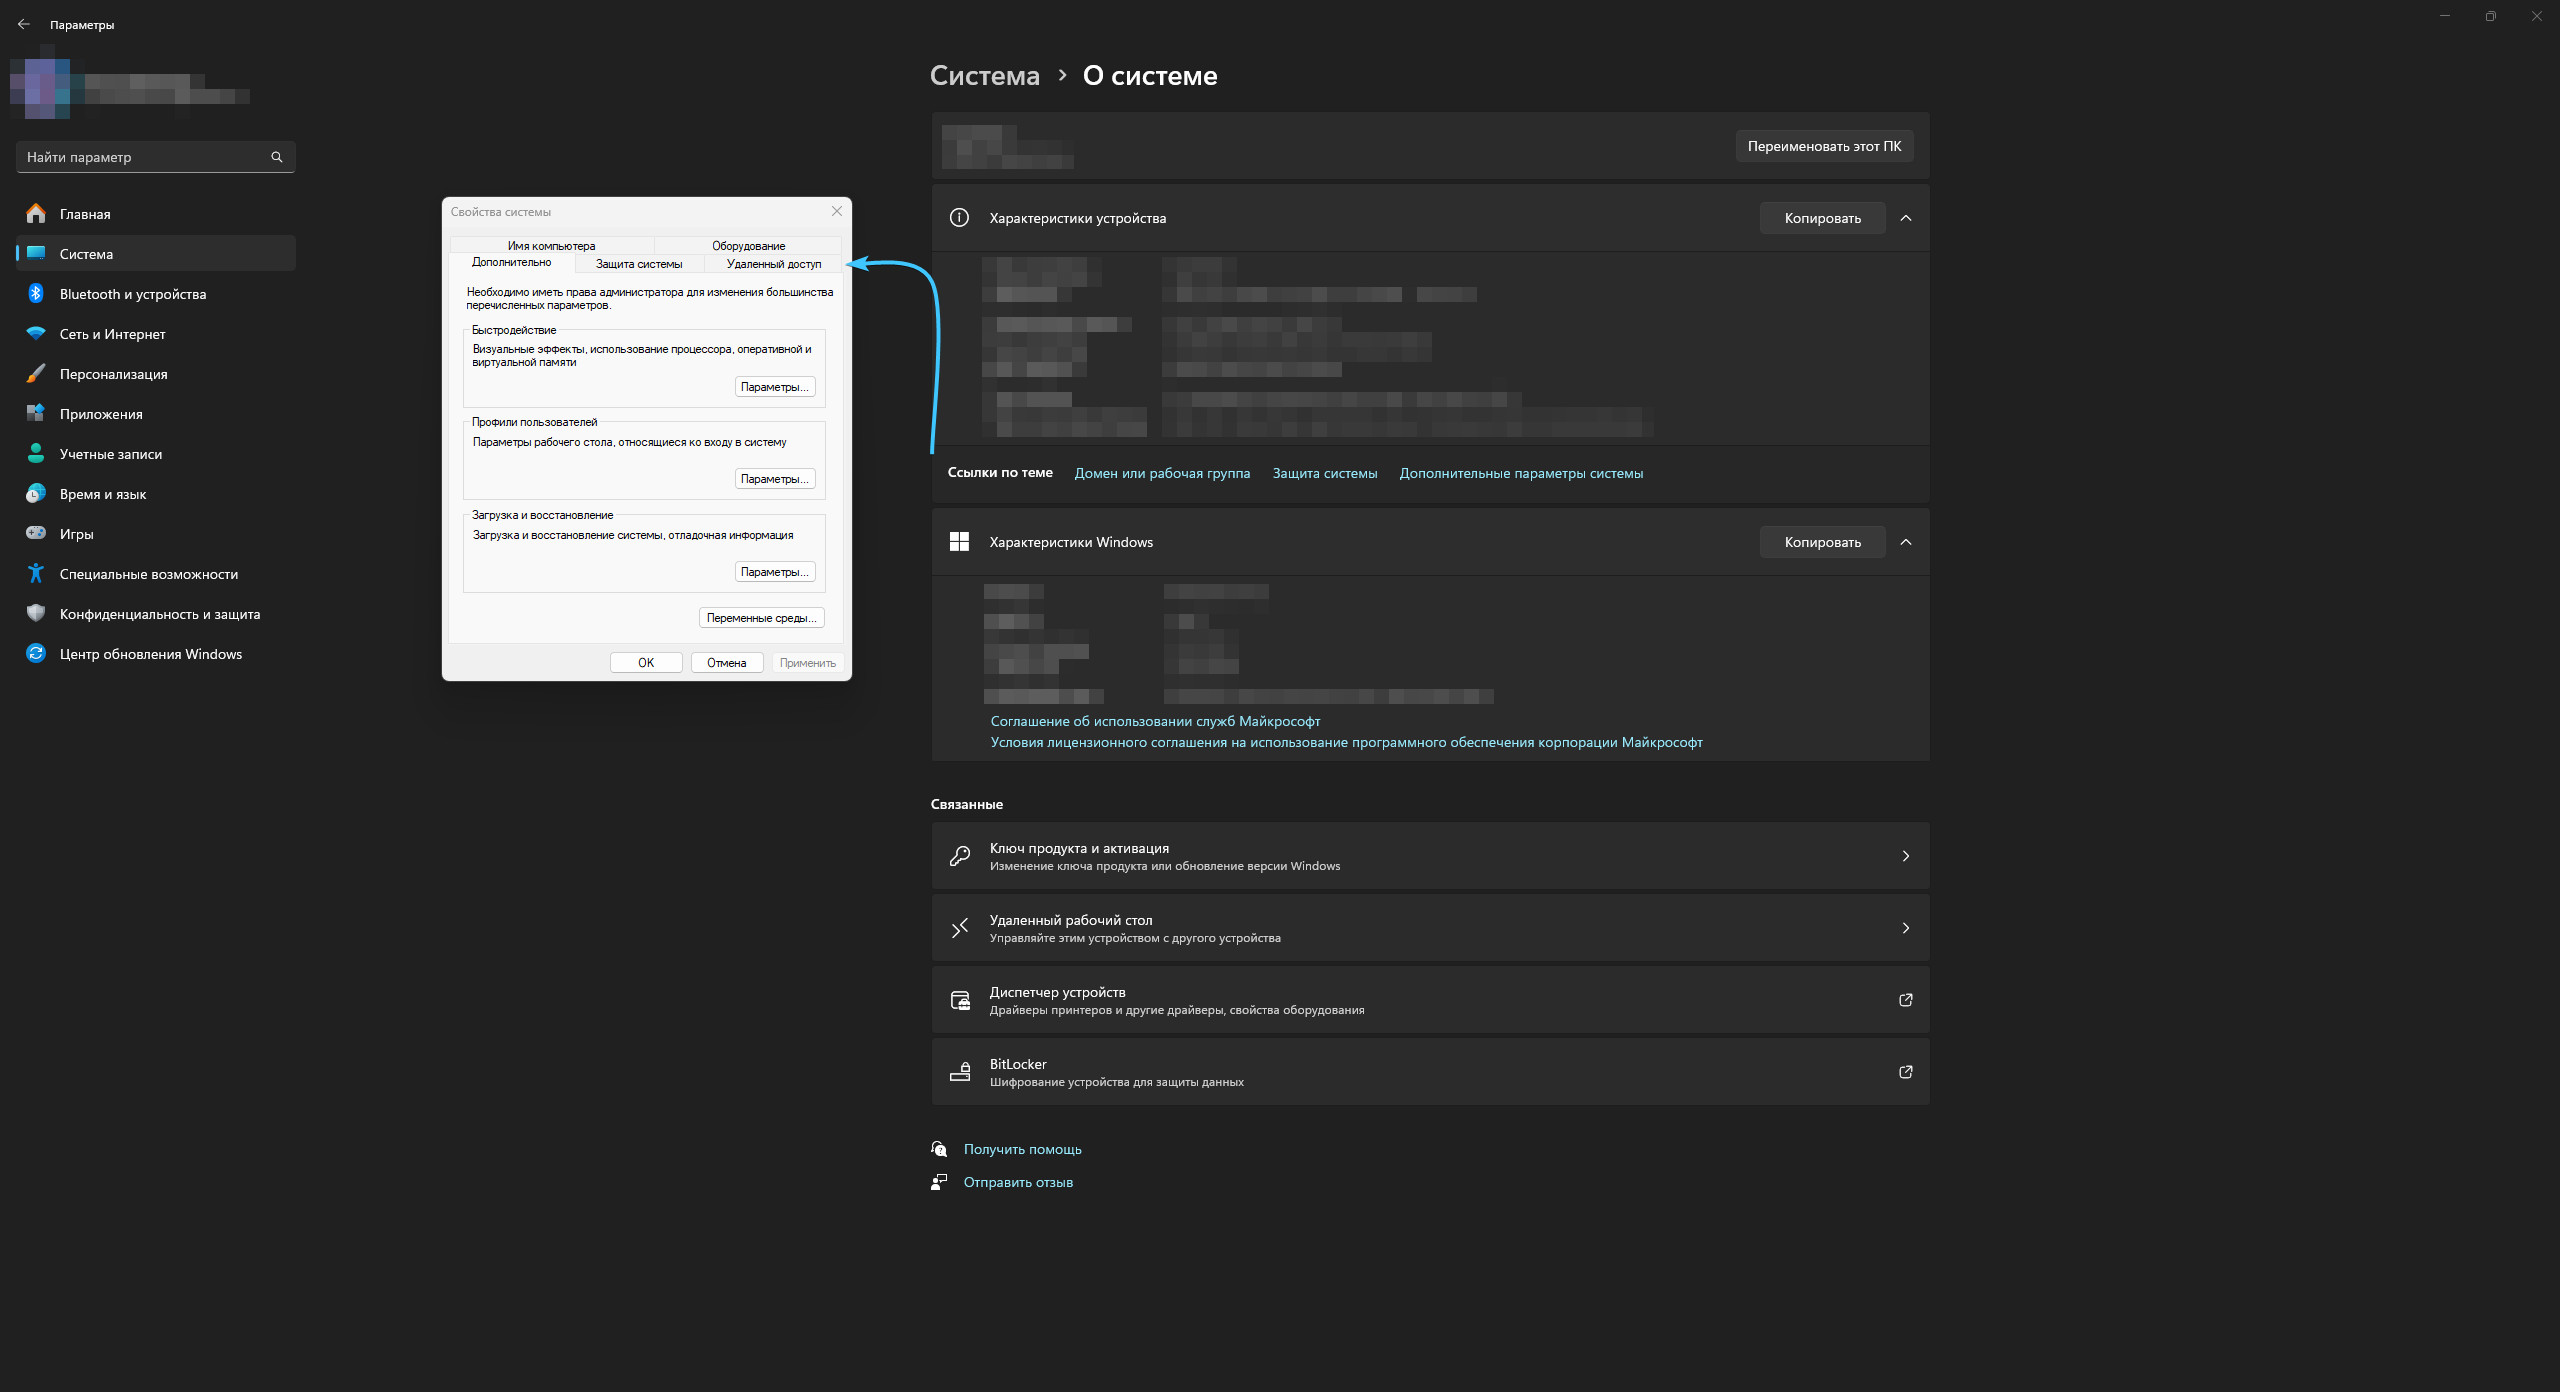
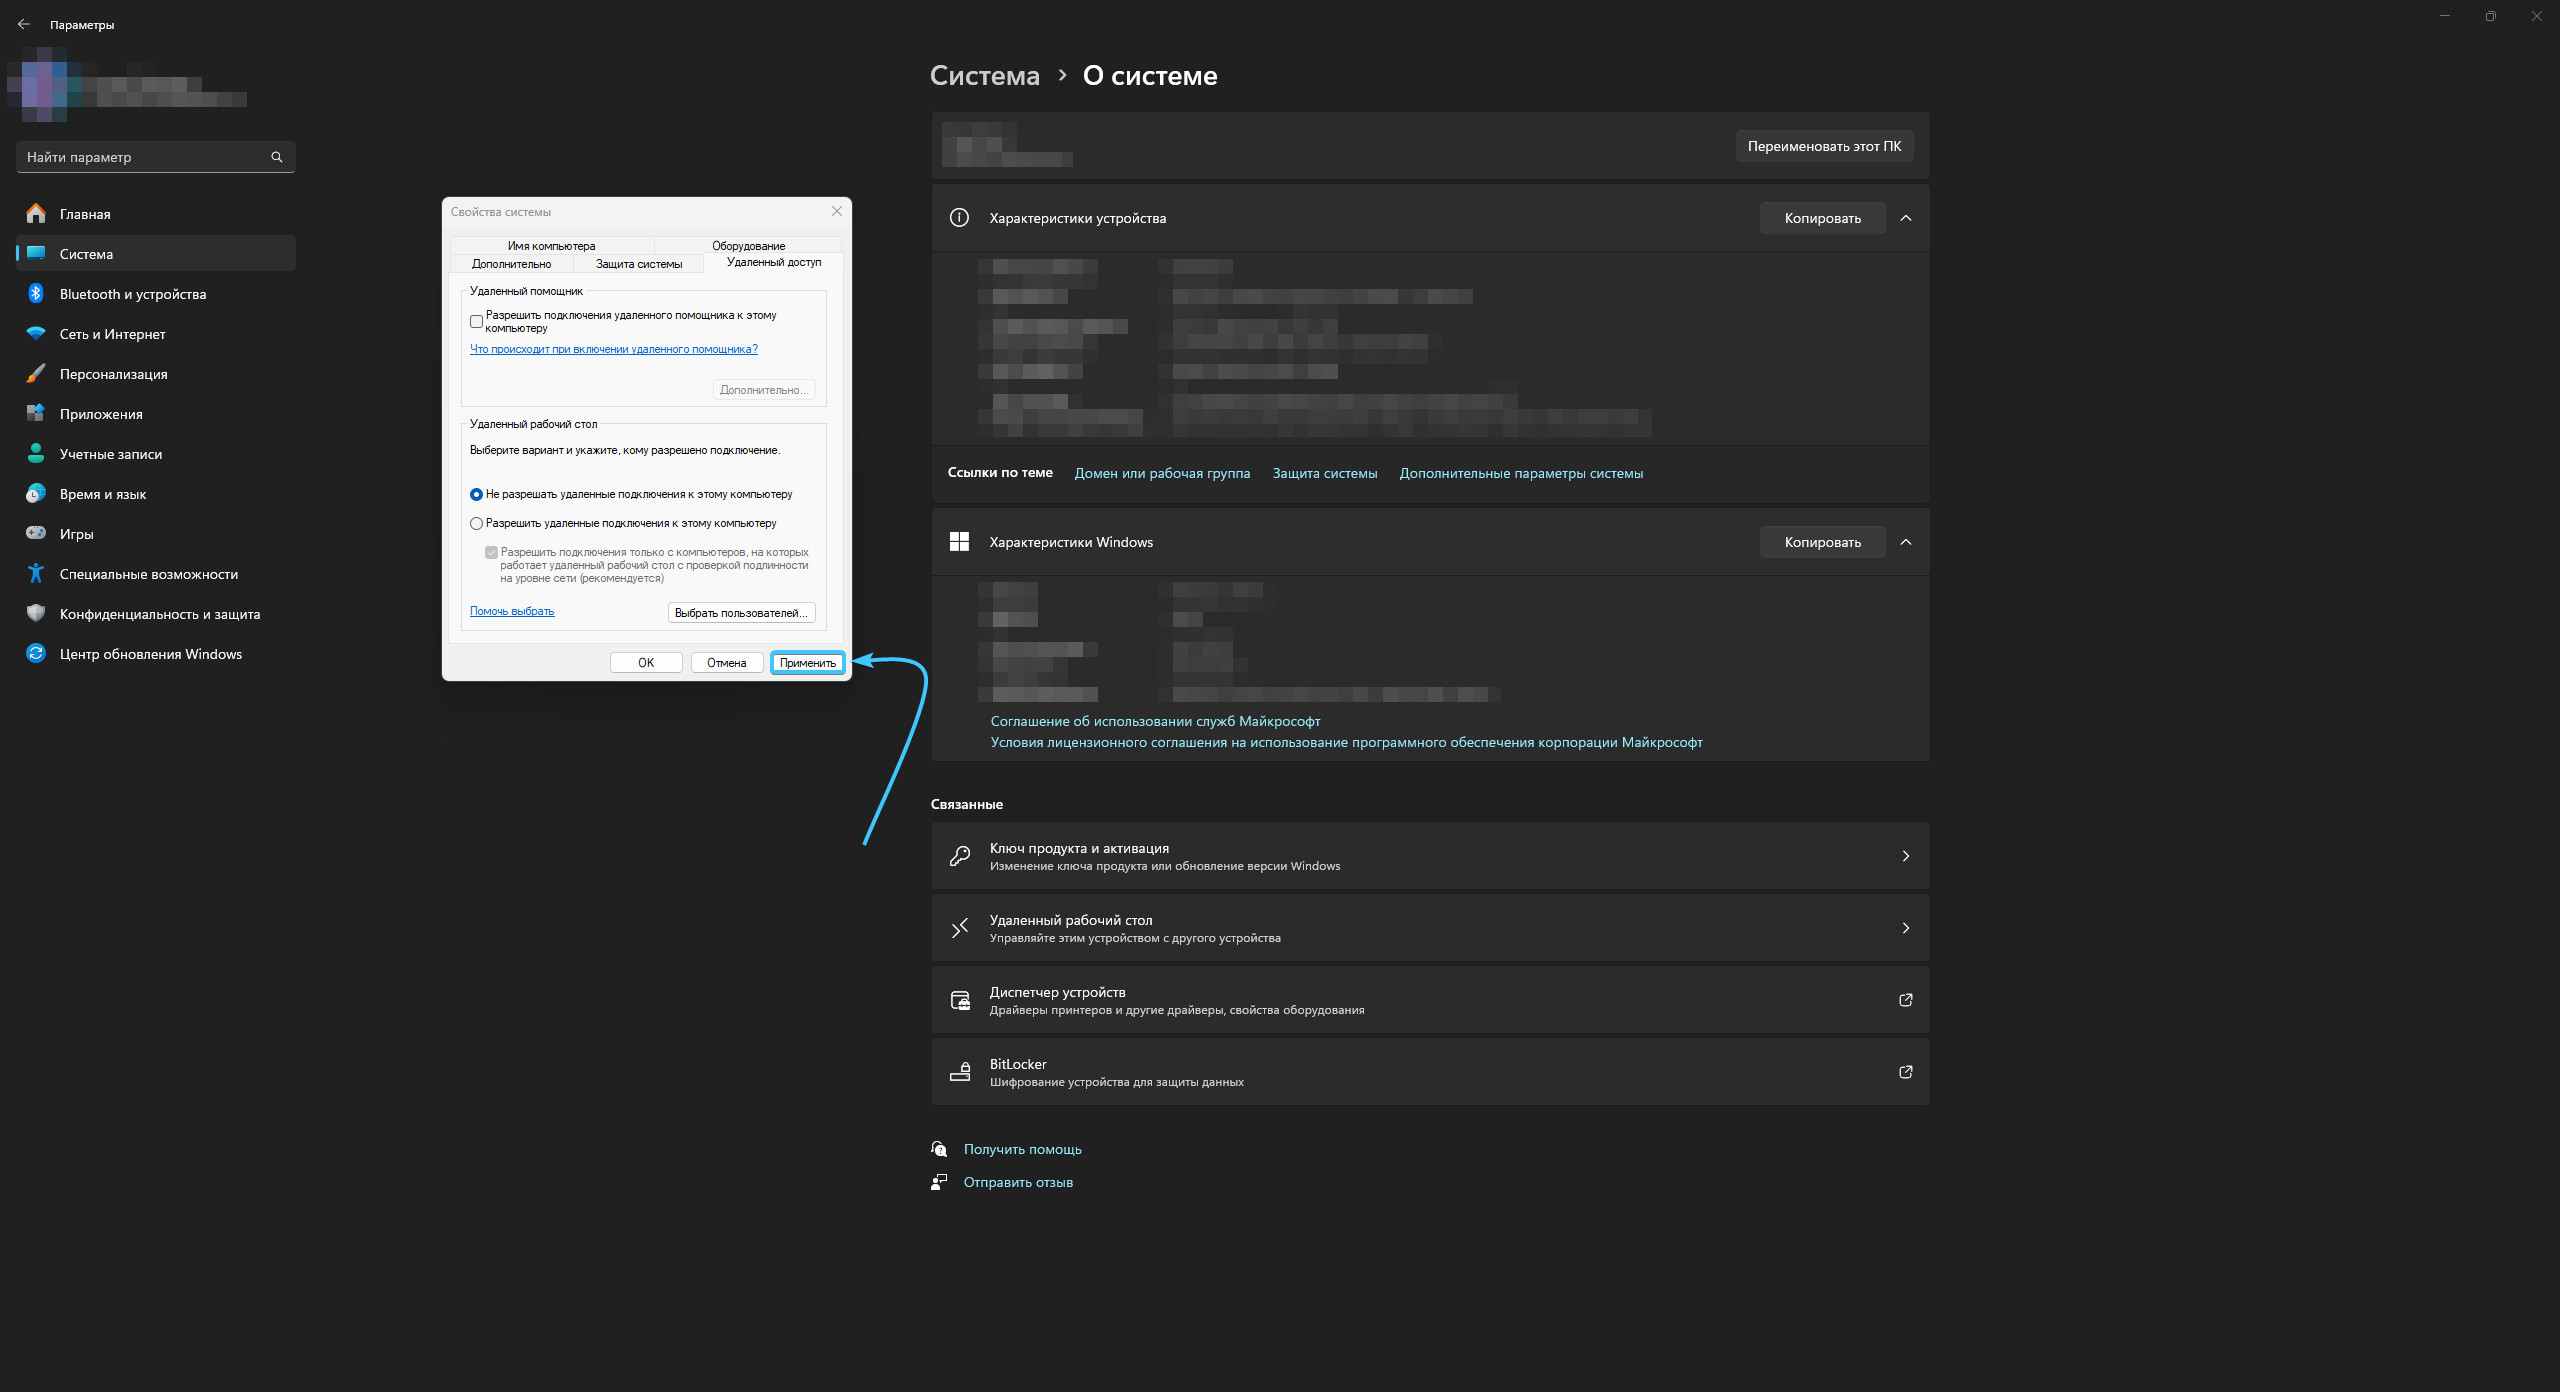
5. Снимите галочку с параметра «Разрешить подключения удалённого помощника к этому компьютеру».
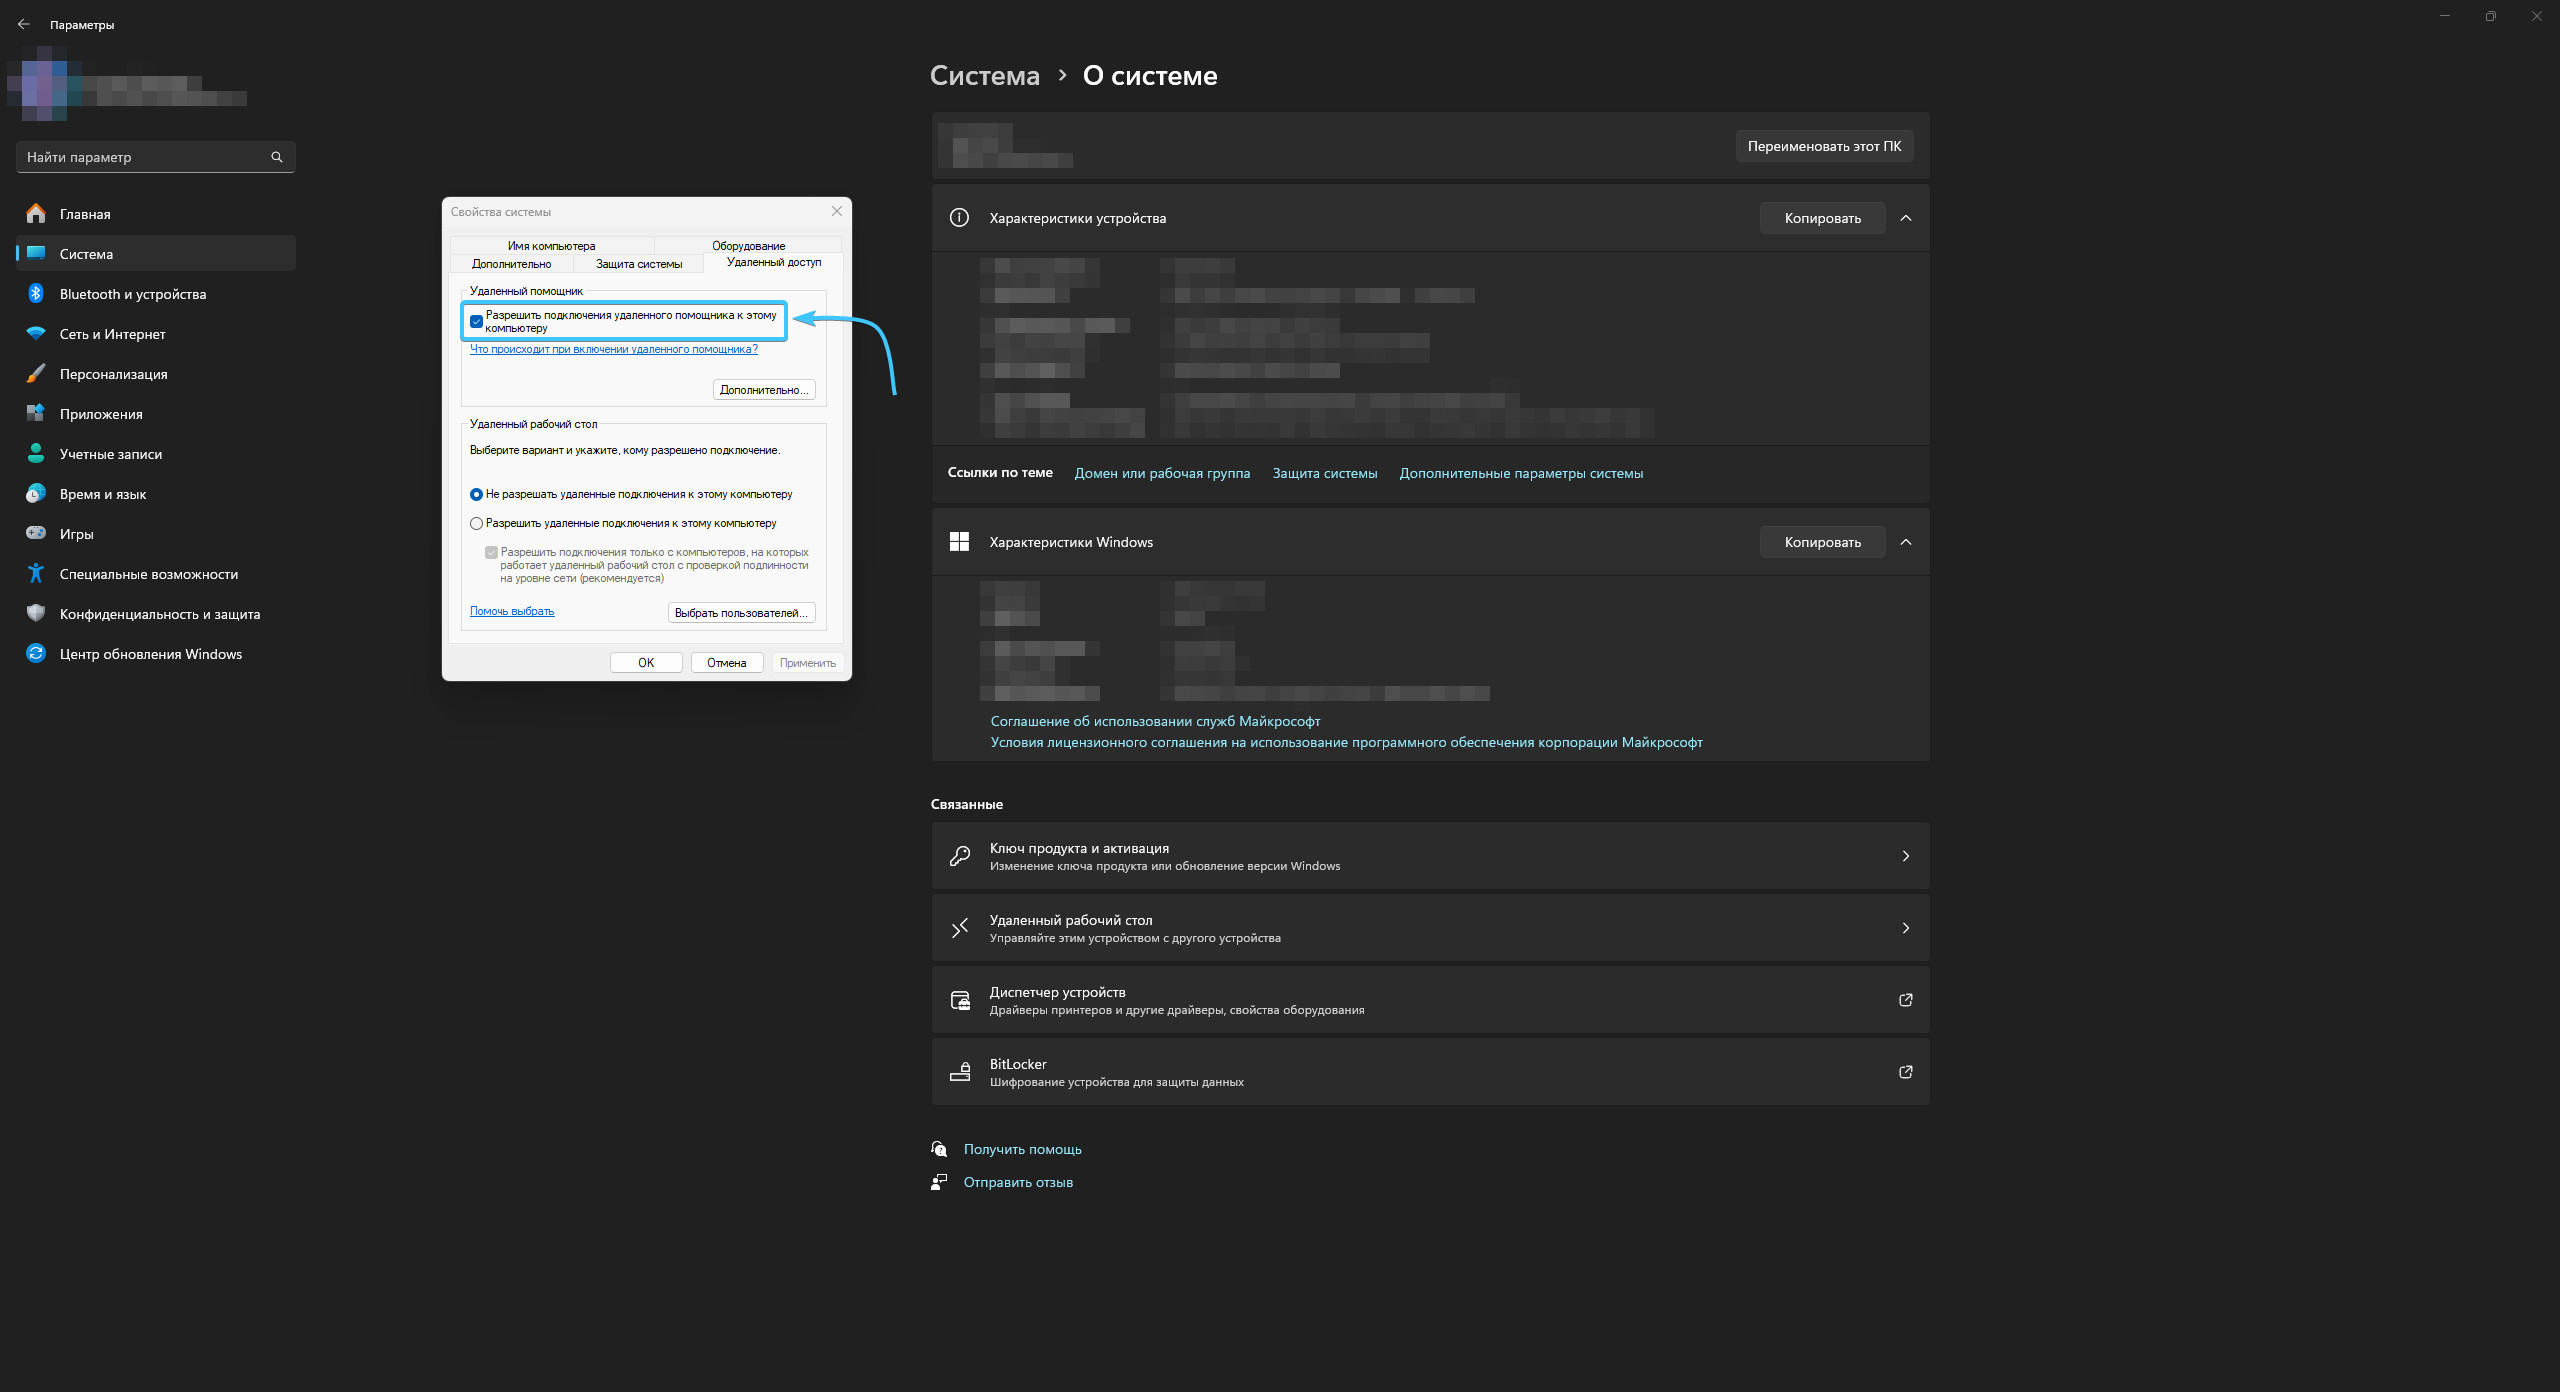
6. Нажмите кнопку «Применить» и перезагрузите устройство. Удалённый помощник успешно отключён.
Отключение помощника в «Windows 10»
1. Откройте меню «Пуск» и перейдите в «Параметры» операционной системы «Windows 10».
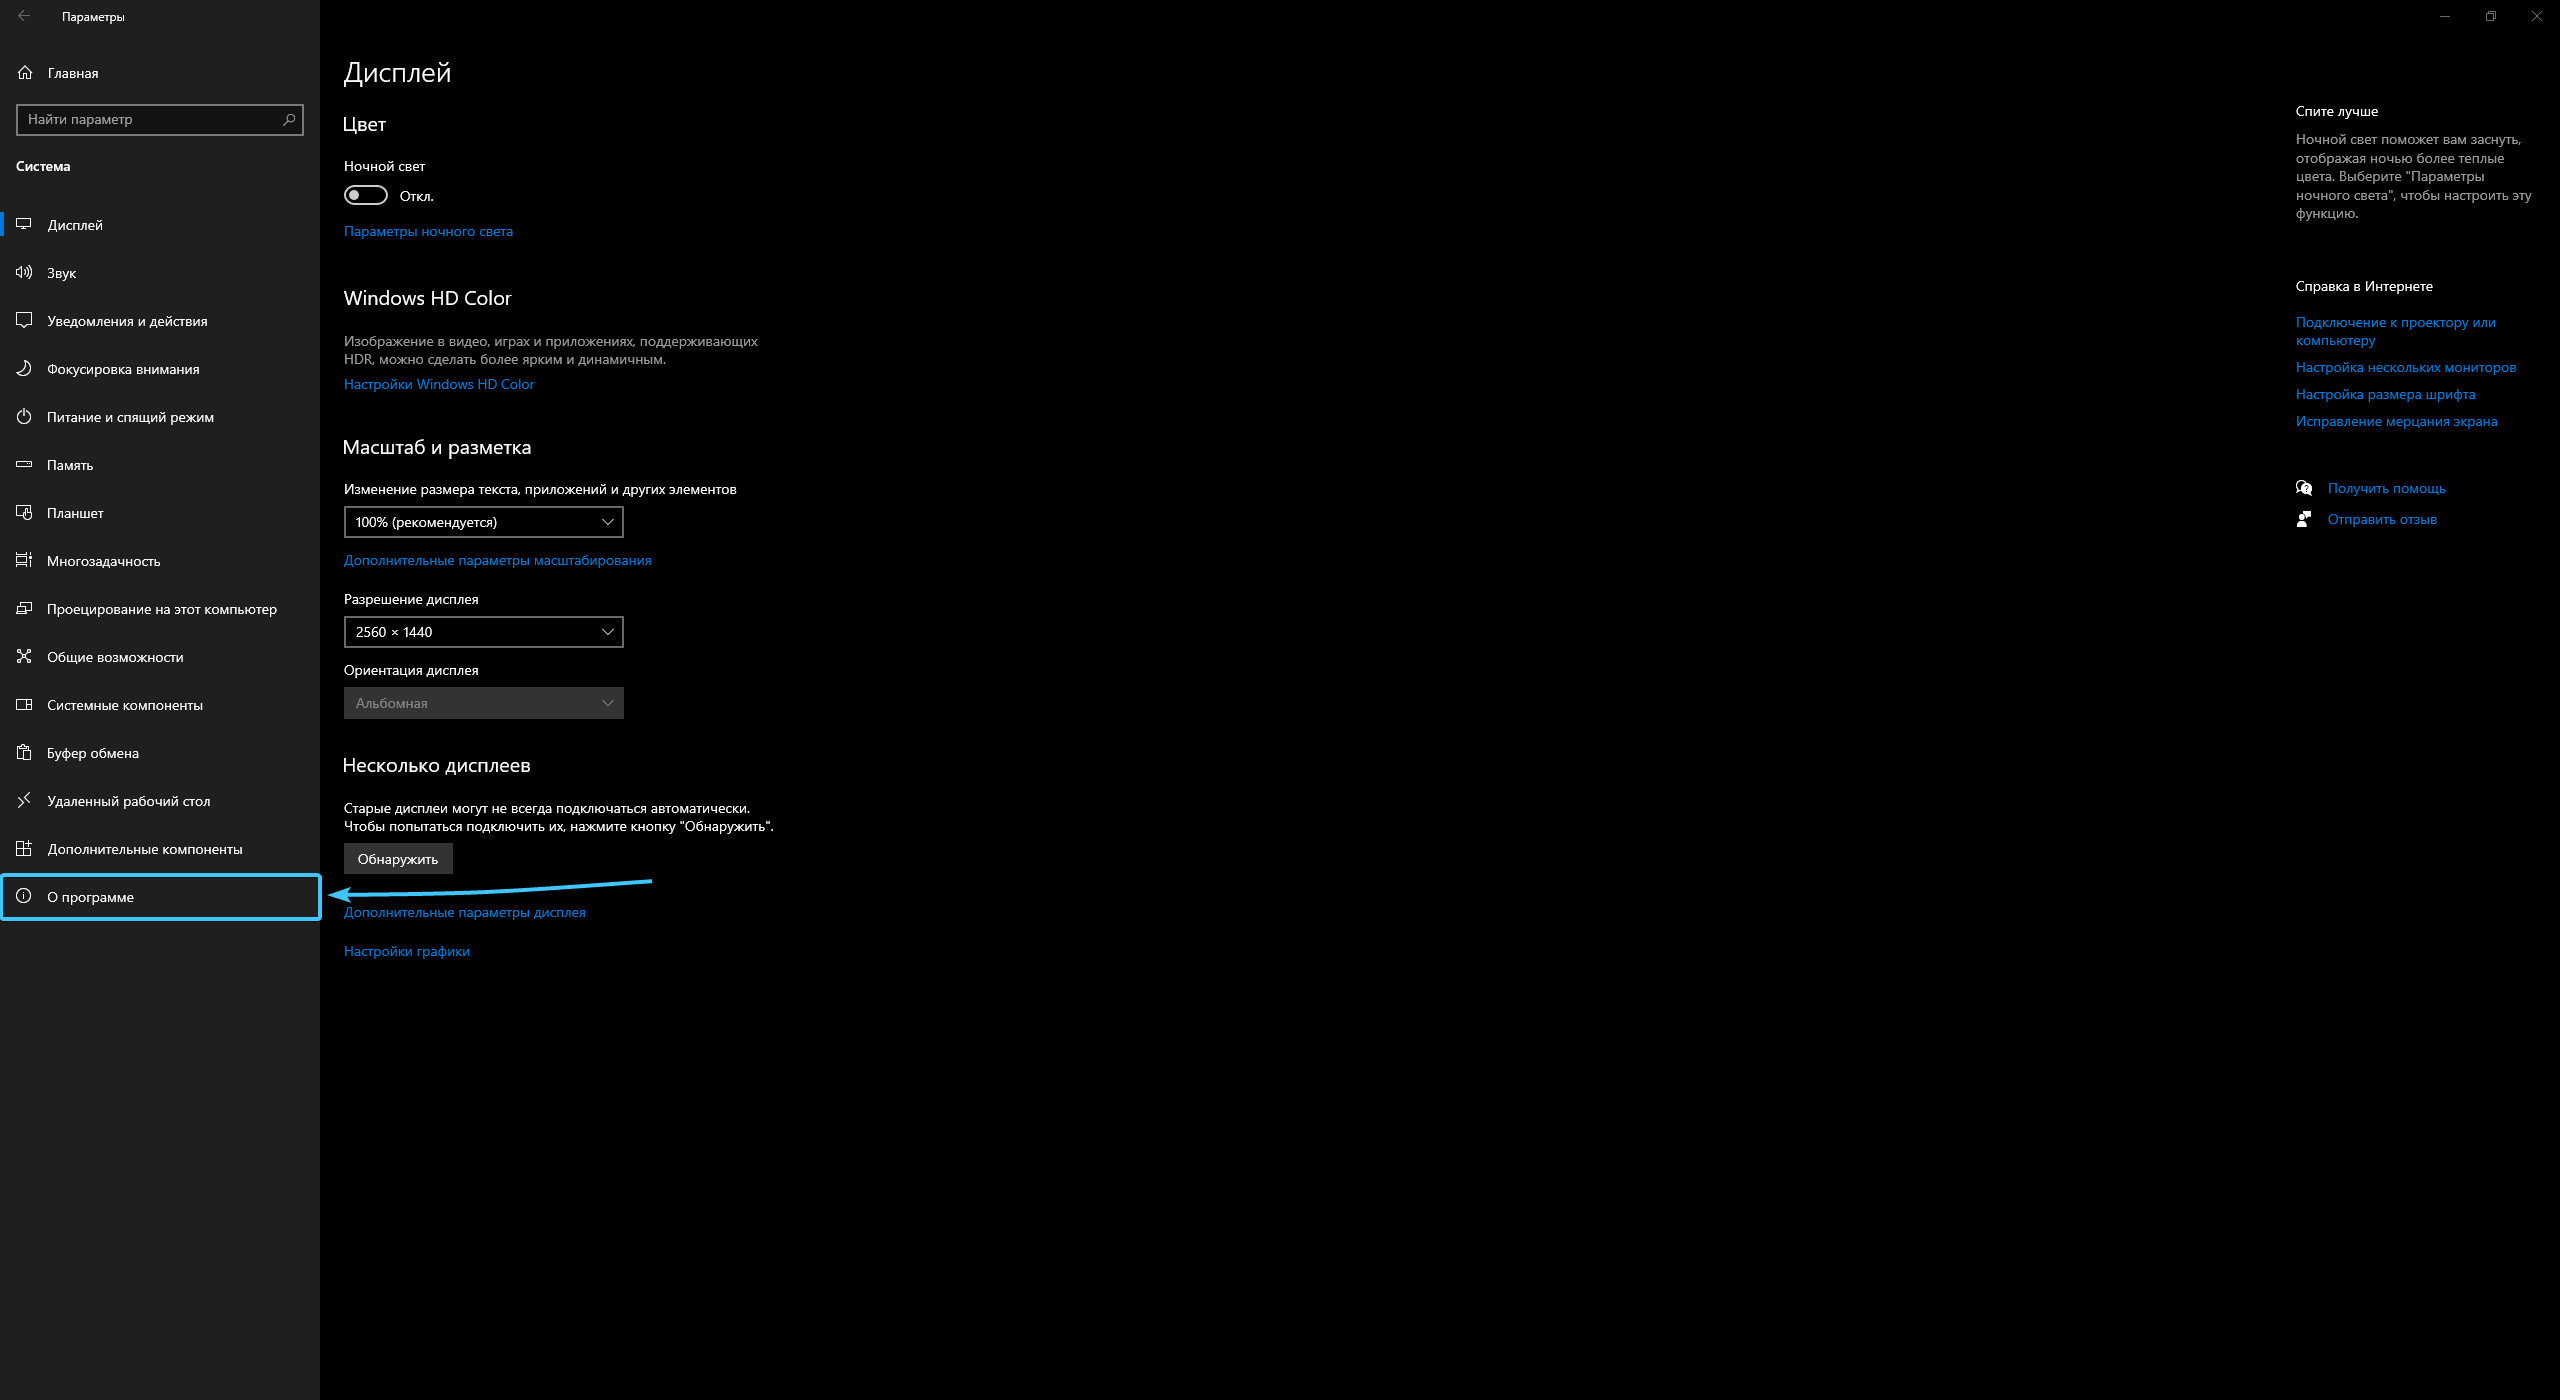
2. Откроется общий список категорий параметров системы. Откройте категорию «Система».
3. Появится список различных разделов категории «Система». Откройте раздел «О программе».
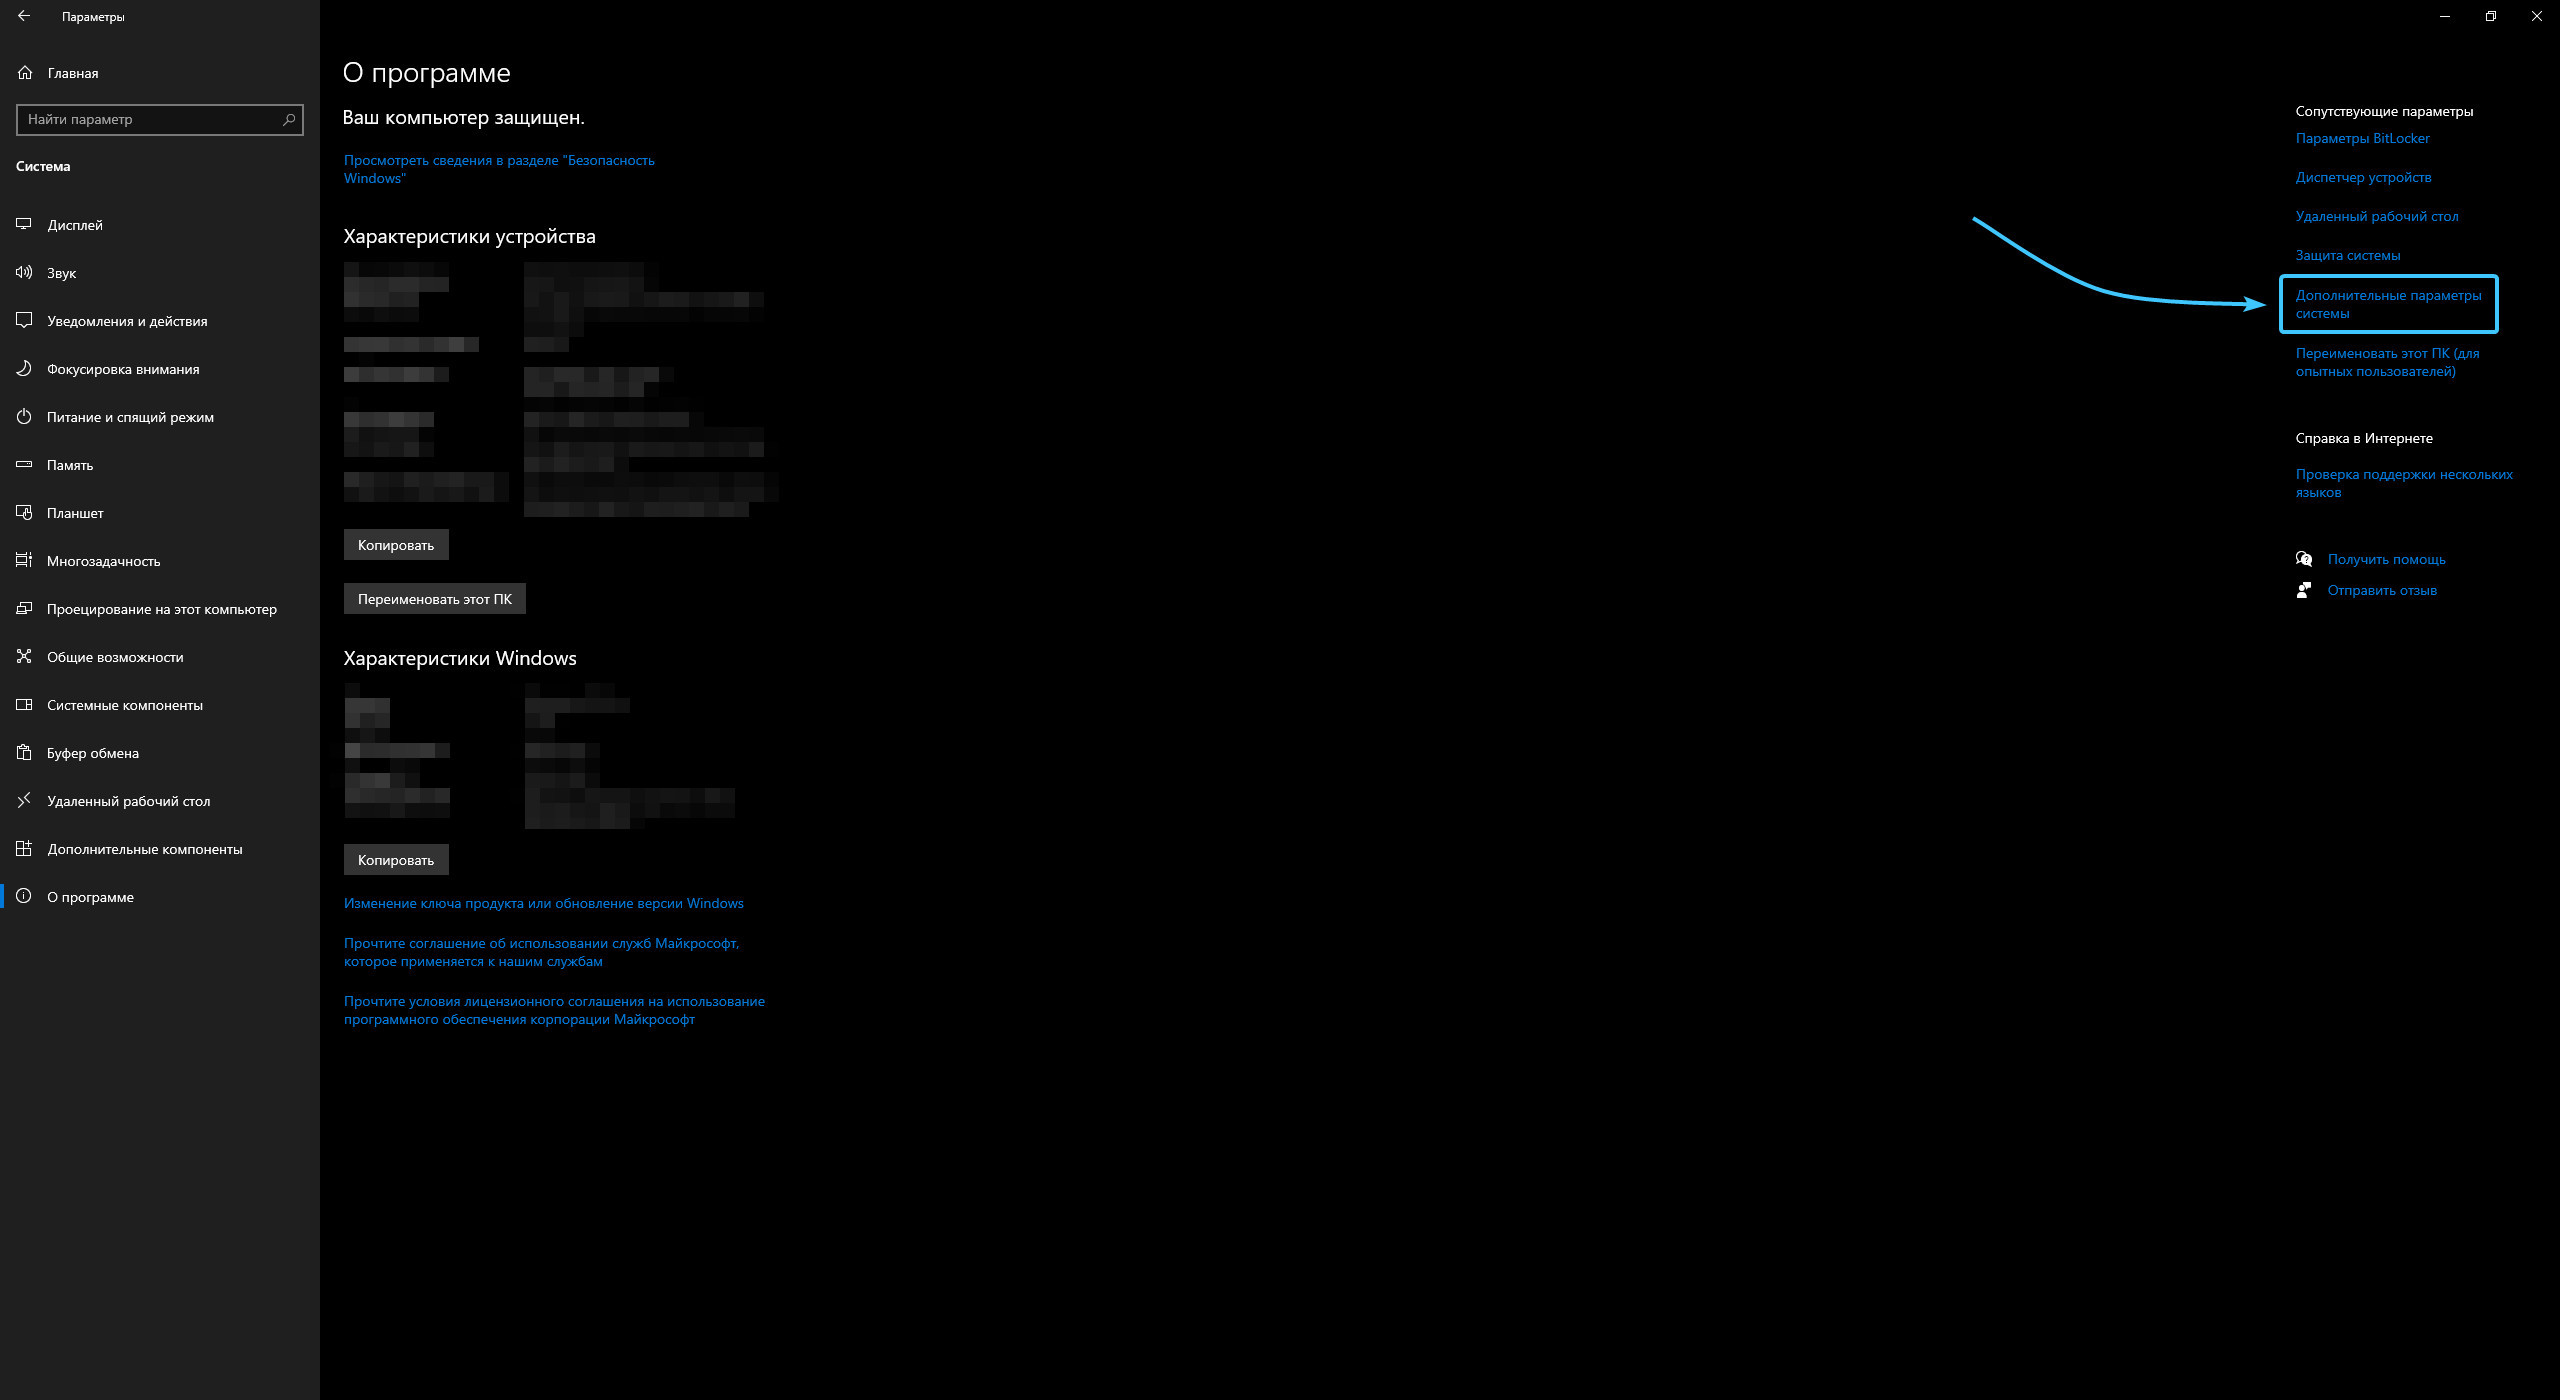
4. Справа находятся сопутствующие параметры. Нажмите кнопку «Дополнительные параметры системы».
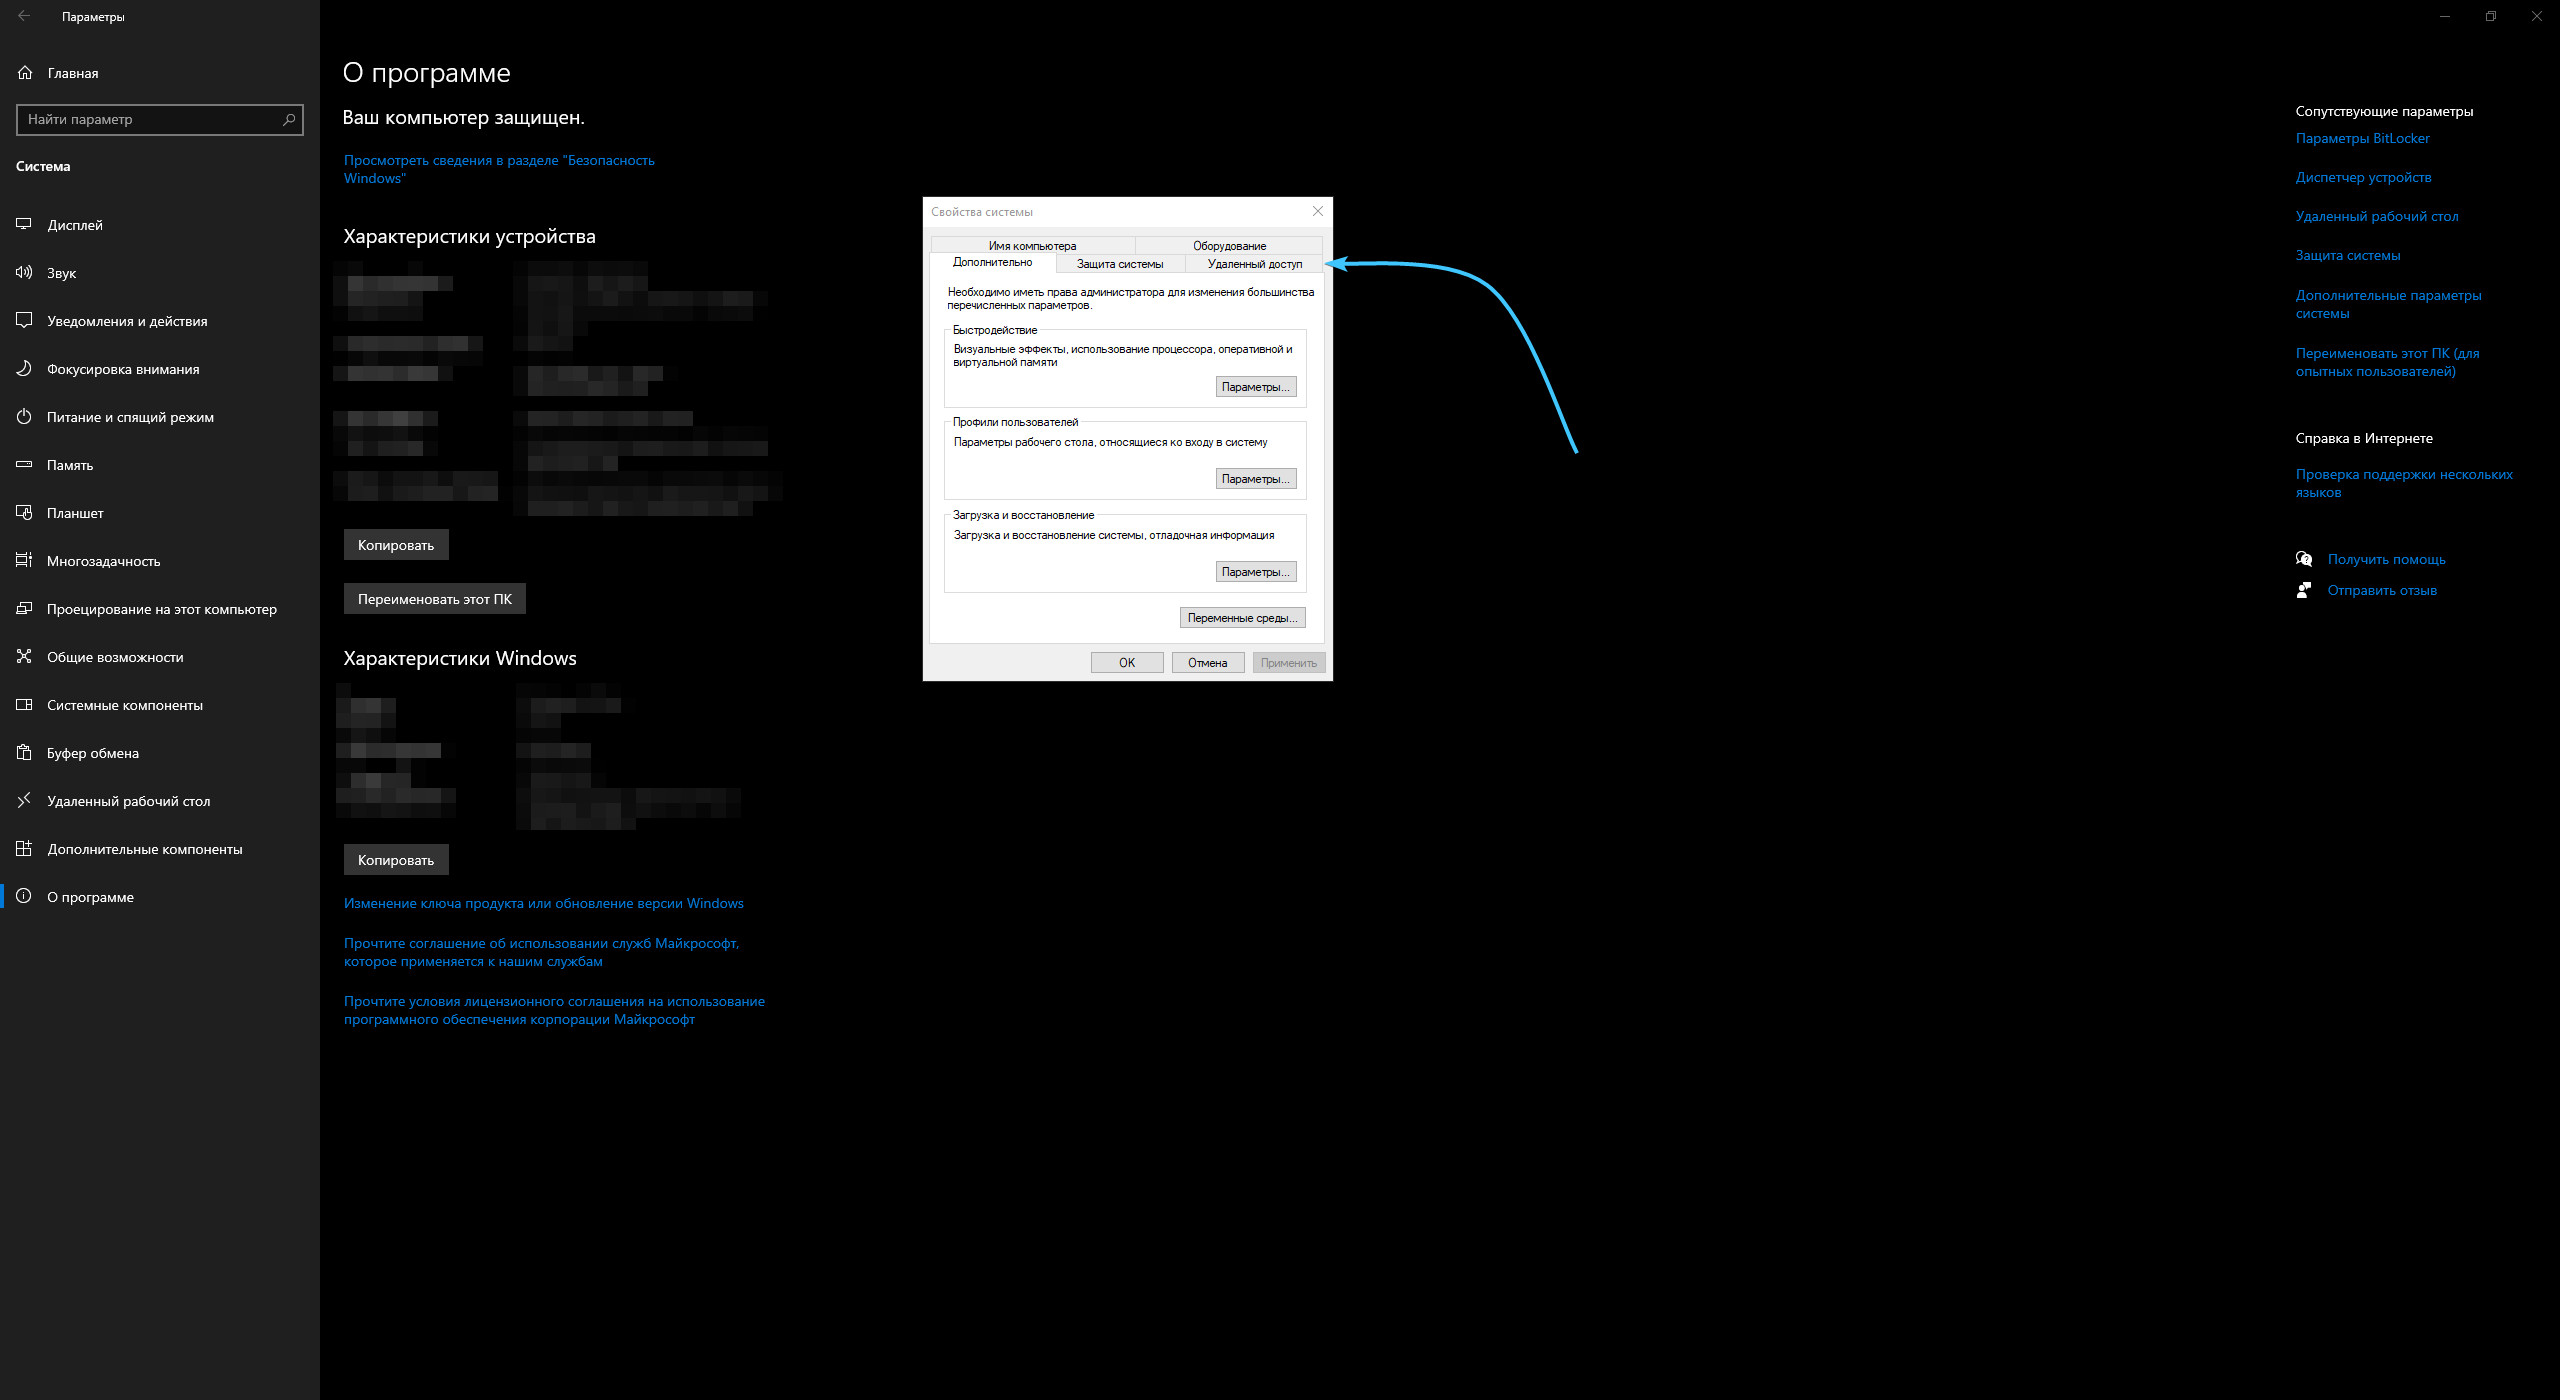
5. Появится окно «Свойства системы». Сверху откройте вкладку под названием «Удалённый доступ».
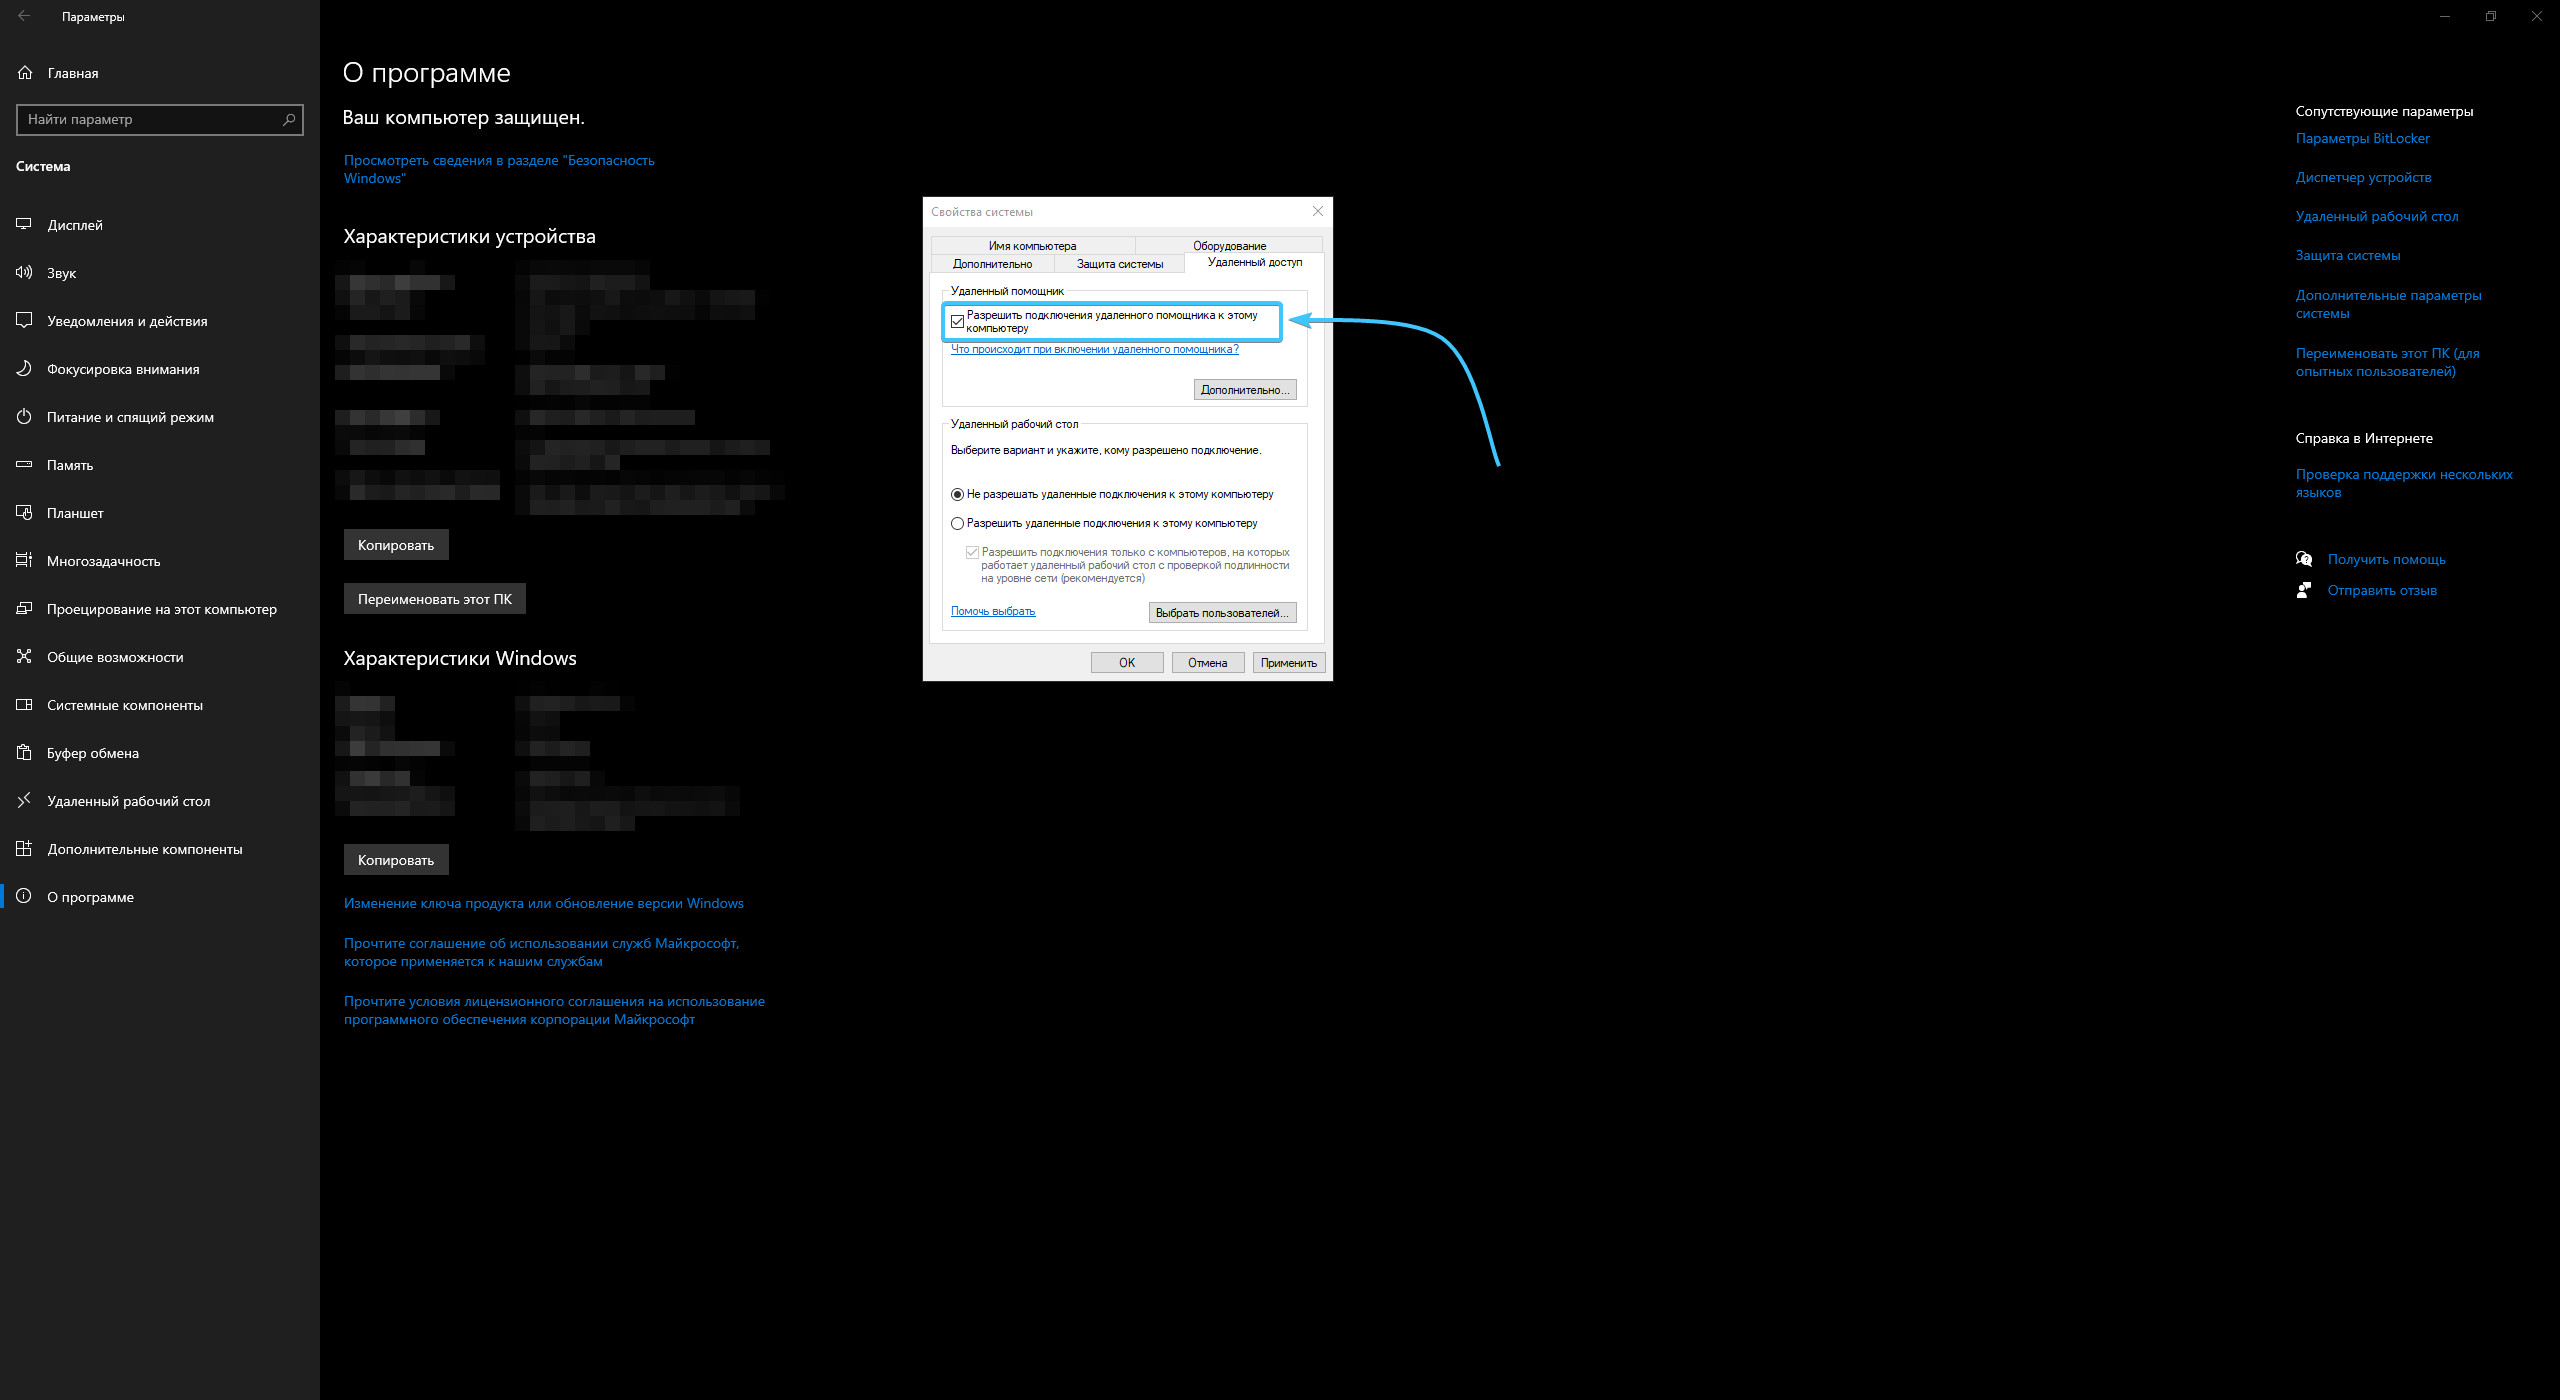
6. Снимите галочку с параметра «Разрешить подключения удалённого помощника к этому компьютеру».
7. Нажмите кнопку «Применить» и перезагрузите устройство. Удалённый помощник успешно отключён.
Другие руководства
- Переключение технологии «DEP»;
- Настройка файла подкачки;
- Диагностика оперативной памяти;
- Диагностика дисковых устройств;
- Режимы питания в «Windows 11»;
- Отключение компонента «Hyper-V»;
- Установка системы «Windows 11»;
- Обновление системы «Windows»;
- Отключение загрузки приложений;
- Установка системы «Windows 10»;
- Добавление схем электропитания;
- Коррекция времени «Windows»;
- Отключение изоляции ядра;
- Удаление приложений в системе;
- Отключение визуальных эффектов;
- Отчёты «MSInfo32» и «DxDiag»;
- Отключение индексации диска;
- Оптимизация дискового устройства;
- Проверка целостности «Windows»;
- Удаление среды «Java options»;
- Восстановление системных шрифтов;
- Отключение параметра отладки;
- Расположение списка приложений;
- Режимы питания в «Windows 10»;
- Сброс операционной системы;
- Активация операционной системы;
- Включение контроля памяти;
- Удаление временных файлов;
- Приостановка обновлений системы.
(Image credit: Windows Central)
On Windows 10, Remote Assistance is a feature that has been around for a long time, and it’s designed to allow someone you know and trust to access your device remotely through the internet.
Usually, it’s a handy tool to let technical support, family members, or friends access your desktop to help you troubleshoot and resolve a problem, set up a program, or modify system settings without the person having to be physically at the location.
However, it’s a feature that comes enabled by default on Windows 10, and if you don’t use it or you need to comply with the security policies in your organization, we recommend disabling it to make your device a little more secure.
In this Windows 10 guide, we walk you through the steps to disable the Remote Assistance feature to prevent your device from being more vulnerable to potential remote attacks.
How to disable Remote Assistance on Windows 10
To disable Remote Assistance on Windows 10, use these steps:
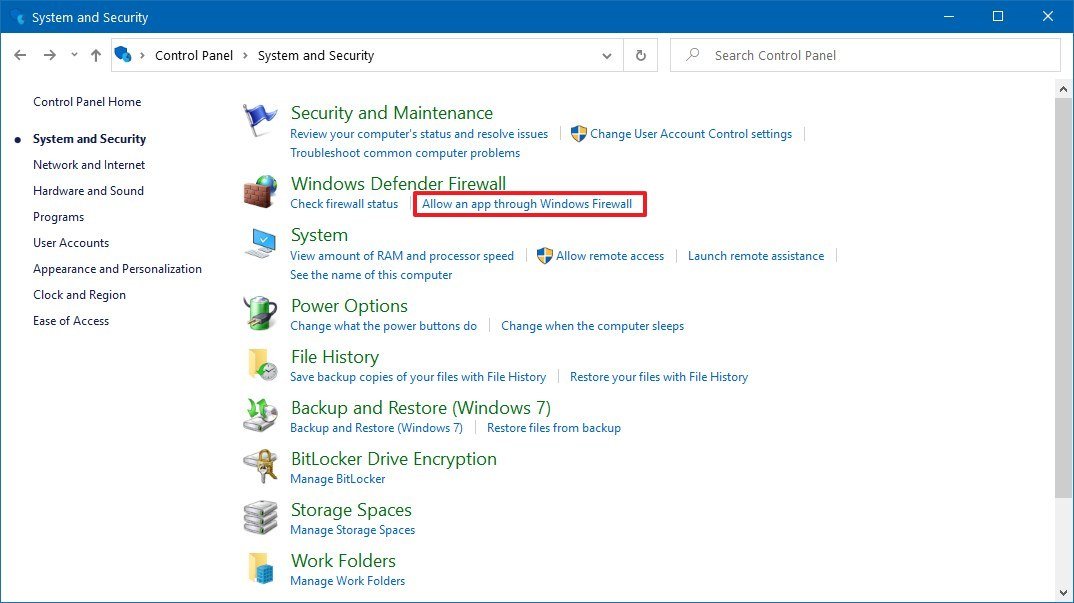
- Open Control Panel.
- Click on System and Security.
- Under the «System» section, click the Allow remote access option.
- Click the Remote tab.
- Under the «Remote Assistance» section, clear the Allow Remote Assistance connection to this computer option.
- Click the Apply button.
- Click the OK button.
Once you complete these steps, the remote connection feature will no longer run on your computer.
If you ever need help resolving an issue on your device, you can enable Remote Assistance again using the same instructions, but on step No. 5, make sure to check the Allow Remote Assistance connection to this computer option.
All the latest news, reviews, and guides for Windows and Xbox diehards.
Closing firewall ports
In addition to disabling the feature, you should also close the service’s firewall ports with these steps:
- Open Control Panel.
- Click on System and Security.
- Under the «Windows Defender Firewall» section, click the Allow an app through Windows Firewall option.
- Click the Change settings button.
- Clear the Remote Assistance option.
- Click the OK button.
After you complete these steps, the ports in the firewall that allow the service to run will close to prevent potential security breaches.
You can also always use the same instructions to revert the changes, but on step No. 5, make sure to check the Remote Assistance option and select in which type of networks («Private» and/or «Public») you want to allow the service to run.
This guide is focused on Windows 10, but these steps should also work on Windows 8 and Windows 7.
Mauro Huculak has been a Windows How-To Expert contributor for WindowsCentral.com for nearly a decade and has over 15 years of experience writing comprehensive guides. He also has an IT background and has achieved different professional certifications from Microsoft, Cisco, VMware, and CompTIA. He has been recognized as a Microsoft MVP for many years.
Download Windows Speedup Tool to fix errors and make PC run faster
Windows Remote Assistance is a good way to give control of your Windows computer to someone you trust. With your permission, your friend or technician can even use your mouse and keyboard to control your PC and show you how to fix a problem – or fix it themselves. In this post, we will see how to enable, set up, and use Windows Remote Assistance in Windows 11/10.
How do I fix Remote device does not support session invitation?
If you see Remote device does not support the session invitation message, then you will have to first set up the Windows REmote Assistance as mentioned in this post via the Control Panel.
Related read: Enable & use Remote Desktop Connection in Windows.
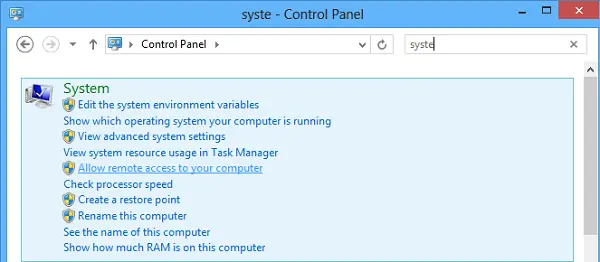
Press Win+X and from the menu, select ‘Control Panel’. Search “System.” The window will display all of the basic specifications of your computer such as model number, CPU configuration, installed memory, etc.
Navigate to the Remote tab in System Properties now and select the Allow remote assistance to this computer option and click hit the ‘Apply’ button. If you uncheck this option, it will disable Remote Assistance.

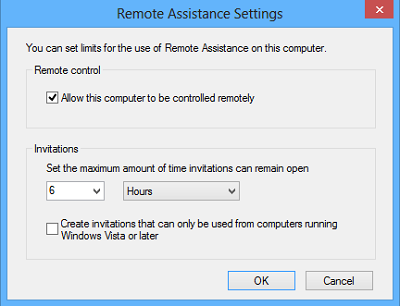
You can even configure certain settings here. For instance, you can set limits for the use of remote assistance, choose to allow the computer to be used remotely, set the maximum amount of invitations.
If you find that your Windows Firewall is blocking Remote Assistance, create a rule to allow it. To do so, open the “Run” dialog box. Type “Firewall.cpl” in the text field and click “OK.’ Windows Firewall control panel will be launched. Go to the left pane and click “Allow an App or Feature through Windows Firewall.”
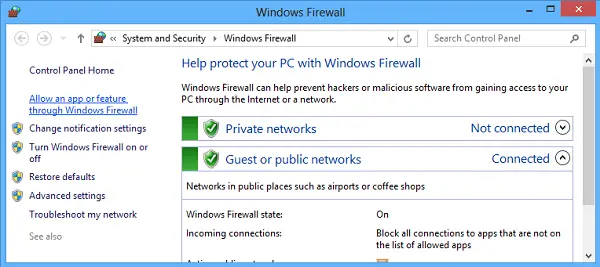
You should find a list of devices that are disabled/enabled through Windows Firewall. Click “Change Settings.”
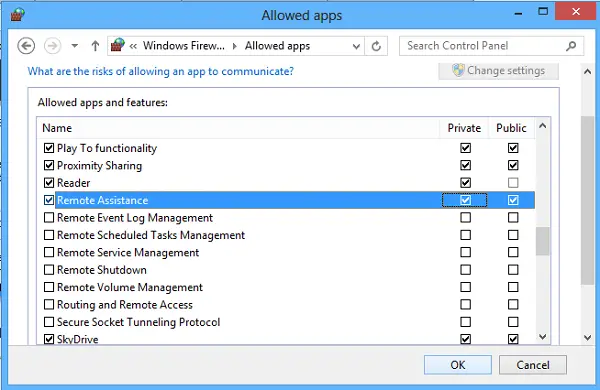
Scroll down until you find “Remote Assistance” option. When you find it, click the option to allow remote assistance.
How do I fix The Computer is not setup to send invitation for Remote Assistance?
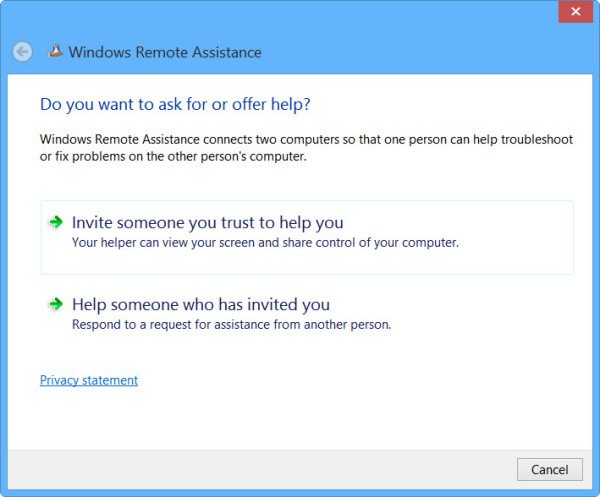
Open an elevated command prompt, type msra.exe and hit Enter to open Windows Remote Assistance. Follow the on-screen wizard. Click on Invite someone you trust to help you or Help someone who has invited you, as the case may be.
Let’s say you want to invite someone to have a look at and operate your computer. Click on Invite someone you trust to help you.
You can generate the invitation as a file or use the email to send an invitation or use Easy Connect. I prefer the Use email to send an invitation.
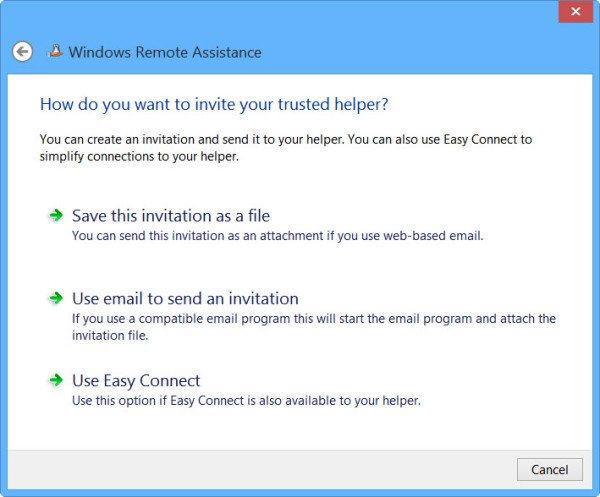
The Invitation file will then be sent to your friend using your email client.
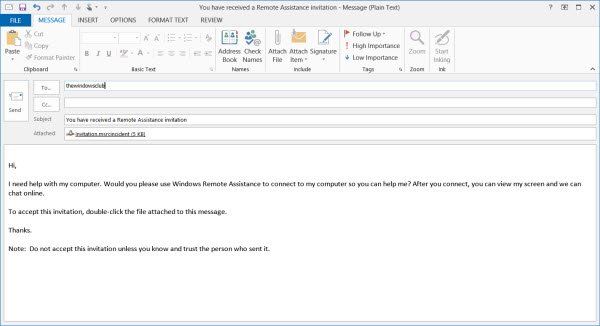
Your friend will then have to enter the code in his Remote Assistance box. After this is done successfully, the two computers will get connected. Once your work is completed, remember to disable this feature.
Read: Cannot start Remote Desktop Services in Windows
Bear in mind, Remote Desktop cannot establish a connection with the Remote Computer until remote access to the server has been enabled, the remote computer turned off, and the remote computer is not available on the network. So, make sure the remote computer is turned on, connected to the network, and the remote access is enabled.
You can now also give or take Tech Support remotely using Quick Assist in Windows 10.
Incidentally, the Microsoft Remote Desktop Assistant tool will help you make your PC ready to use Remote Desktop applications from another device to access your PC.
You might want to have a look at these posts too:
- List of Free Remote PC Access software
- Remote Access PC using Web Browser with TeamViewer Web Connector + TeamViewer.
- NeoRouter – A Zero Configuration Remote Access & VPN Solution
- Remotely access another computer using Chrome Remote Desktop.
Anand Khanse is the Admin of TheWindowsClub.com, a 10-year Microsoft MVP (2006-16) & a Windows Insider MVP (2016-2022). Please read the entire post & the comments first, create a System Restore Point before making any changes to your system & be careful about any 3rd-party offers while installing freeware.
As indicated by its name, the purpose of “Remote Assistance” feature on a Windows computer is to allow a trusted technical support person to diagnose and fix problems on your computer, even if they are located far away from your device.
Hence, when Remote Assistance is not being actively used, you may want to disable this feature, in order to prevent the possibility of anyone trying to gain unauthorized access to your computer.
Depending on your choice, you can disable the Remote Assistance feature on your computer by using the Run Command, Control Panel and also by editing the relevant registry files on your computer.
1. Disable Remote Assistance Using Run Command
An easy way to disable the Remote Assistance feature on a Windows 11/10 computer is by using the Run Command.
Advertisement
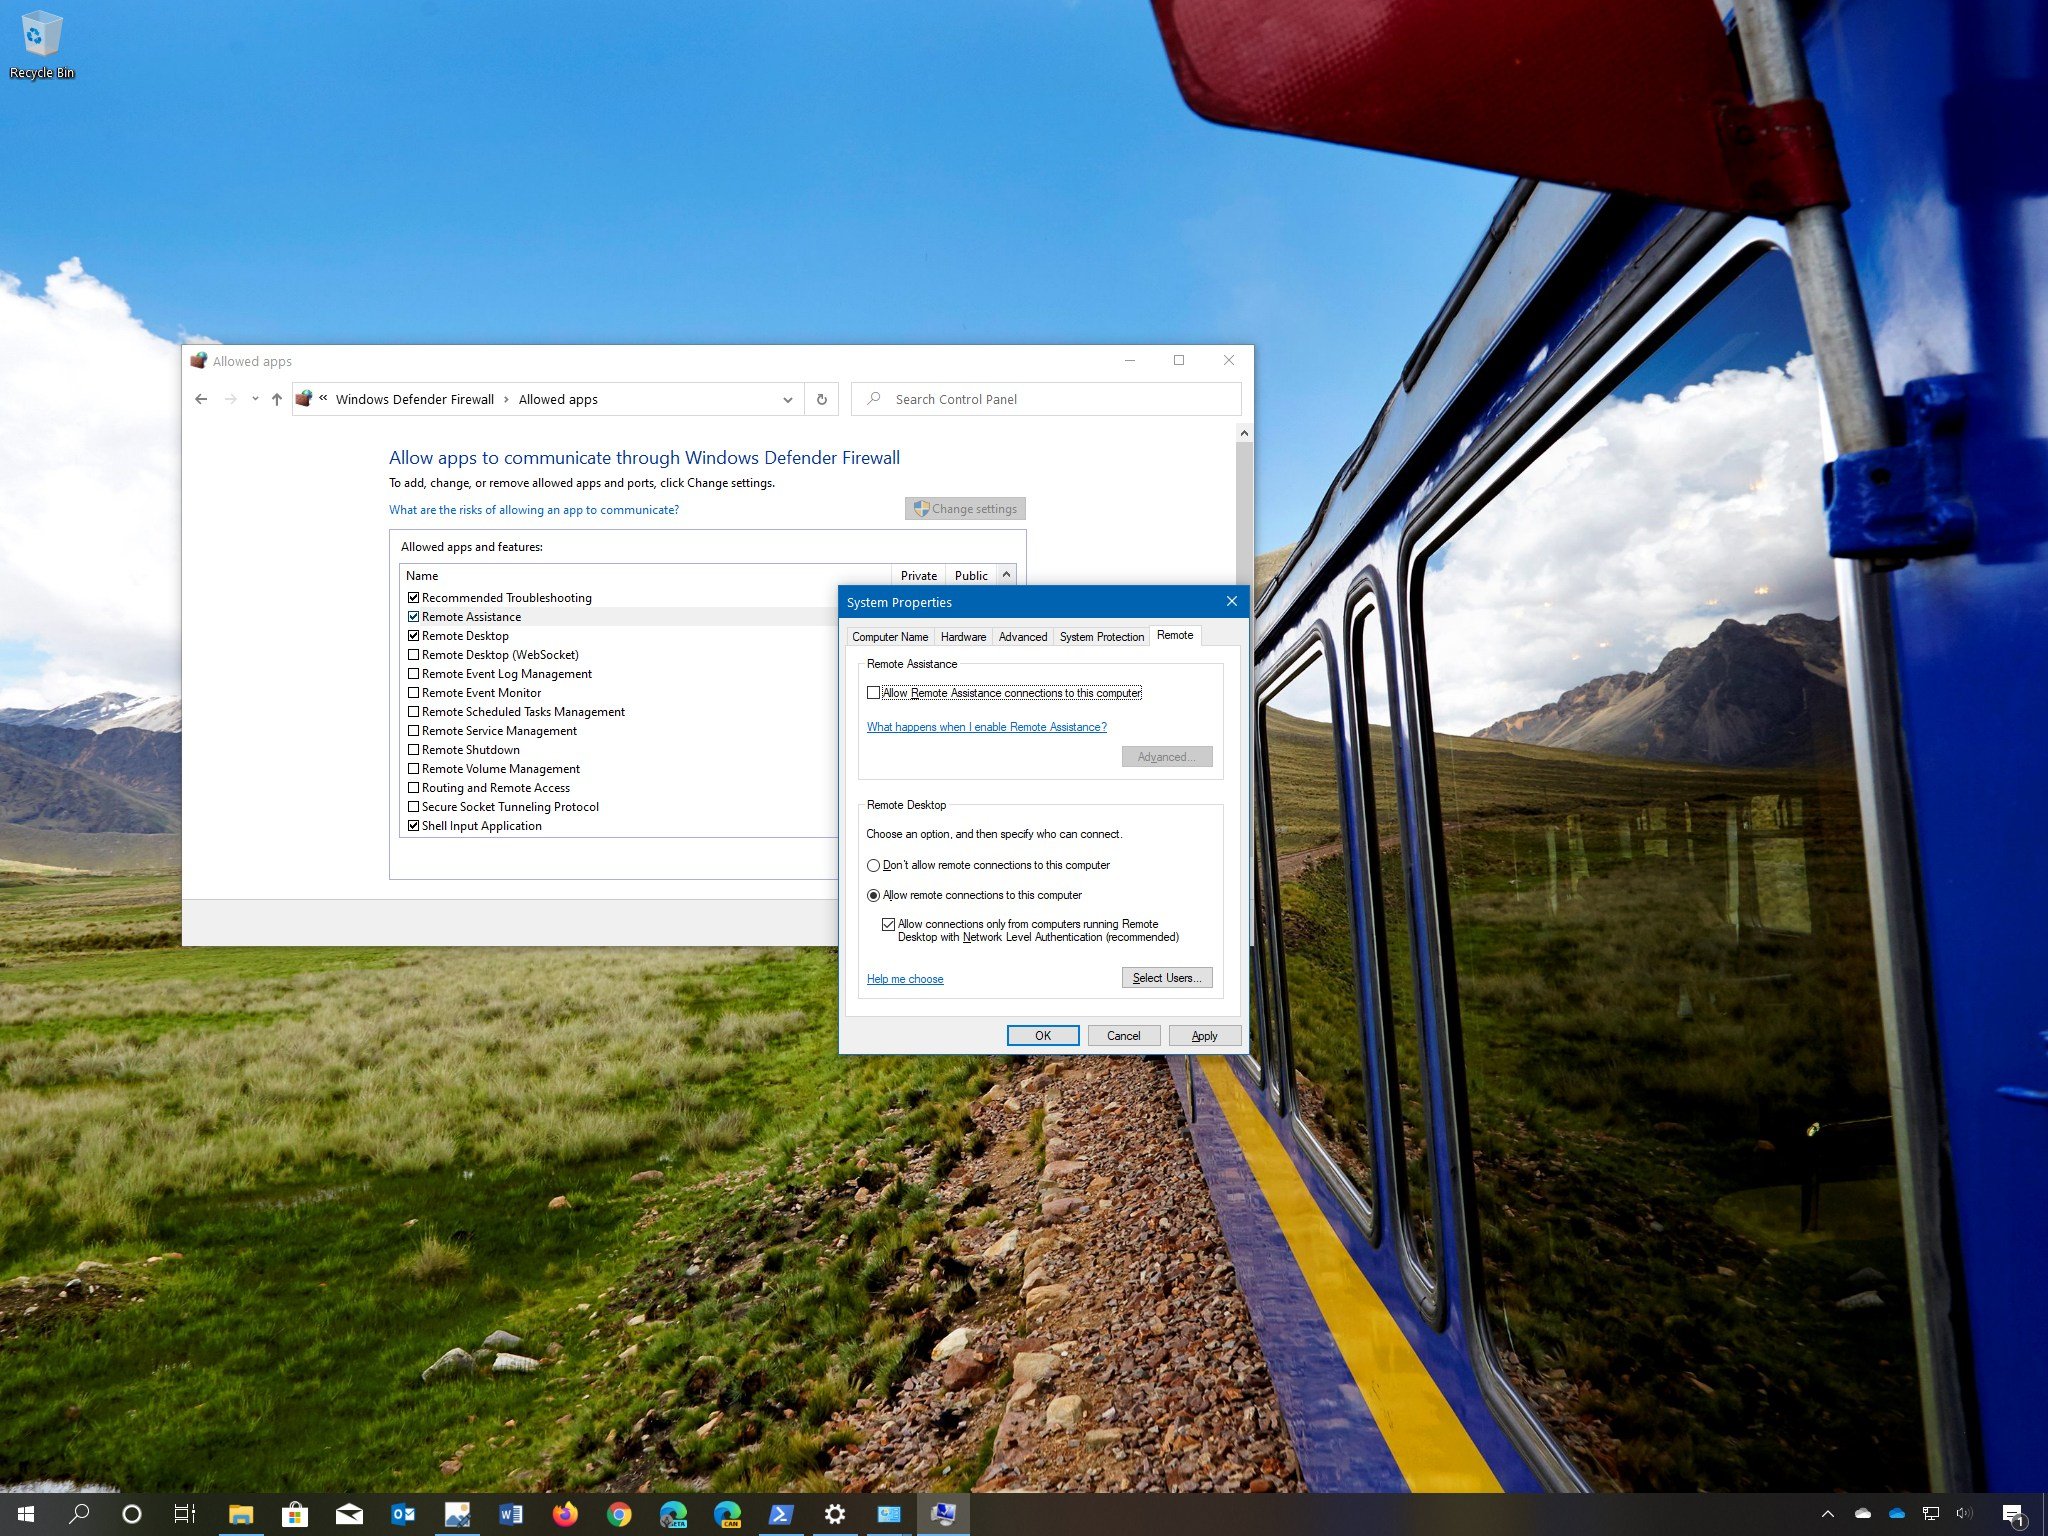
1. Right-click on the Start button and click on Run.
2. In the Run command window, type SystemPropertiesAdvanced and click on OK.

3. On System Properties screen, go to the Remote tab and Uncheck Allow Remote Assistance Connections to this computer option.

4. Click on Apply & OK to save this change on your computer.
At any time, you can enable the “Remote Assistance” feature on your computer by selecting “Allow Remote Assistance” option.
2. Disable Remote Assistance By Using Control Panel
You can also disable the “Remote Assistance” feature on your computer by using Control Panel.
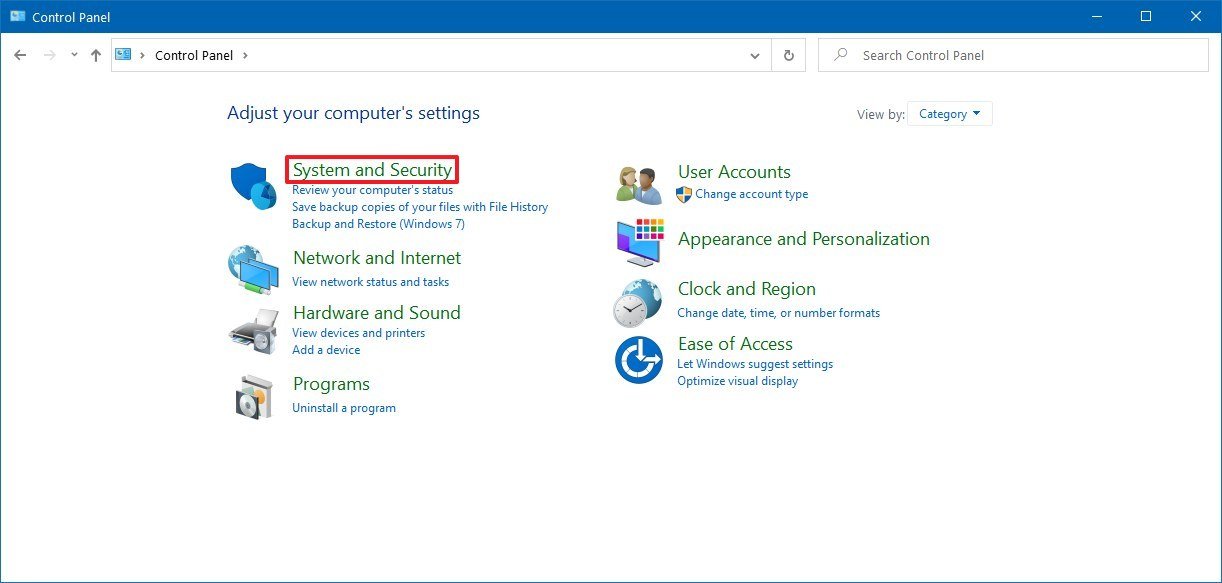
1. Type Control Panel in the Search bar and click on Control Panel App in the search results.

2. On the Control Panel screen, click on System and Security.

Advertisement
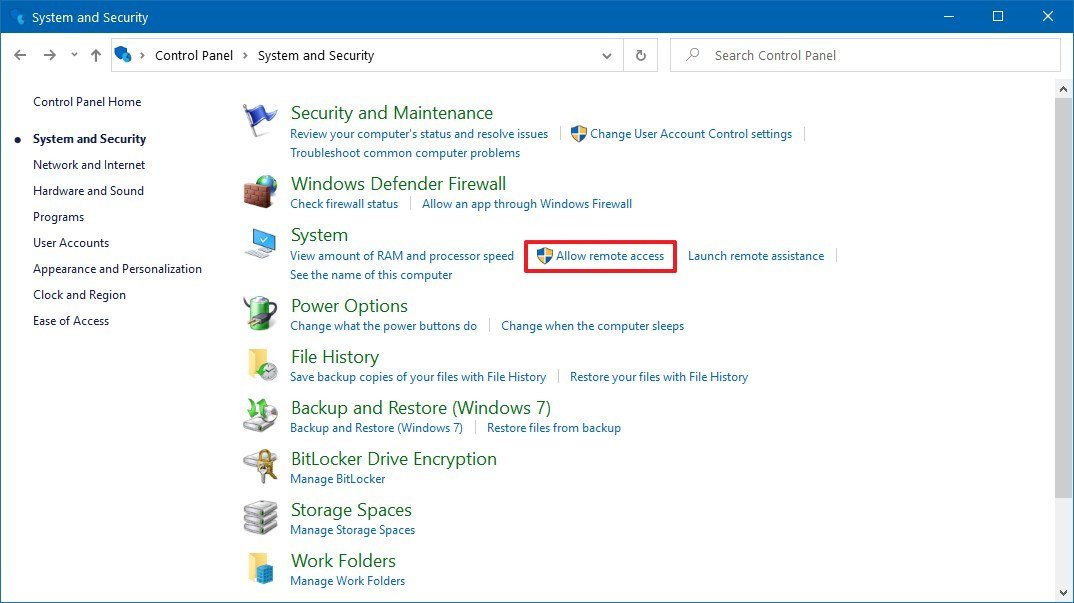
3. On System and Security screen, click on Allow Remote Access option located under “System” section.

4. On the next screen, uncheck Allow Remote Assistance connections to this computer option.
5. Click on Apply and OK to save this setting on your computer.
3. Disable Remote Assistance Using Registry Editor
Another way to disable the “Remote Assistance” feature on a Windows computer is by using Registry Editor.
1. Open Run Command > Type Regedit and click on OK.
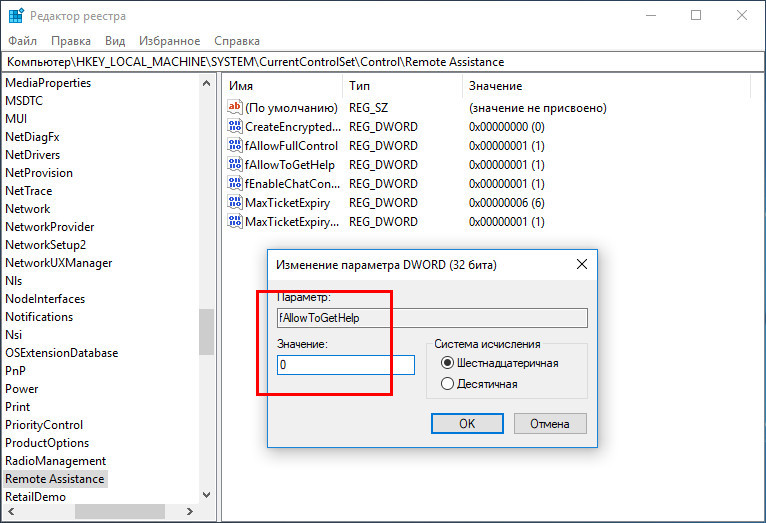
2. On the Registry Editor screen, navigate to HKEY_LOCAL_MACHINE\SYSTEM\CurrentControlSet\Control\Remote Assistance.

3. In the right-pane, double click on fAllowToGetHelp DWORD and change its Value Data to 0.
4. Make sure that you Restart the computer to apply the changes.
If required, you can enable the “Remote Assistance” feature on your computer by reversing the above change.
В составе Windows 10 есть универсальное приложение Quick Assist или иначе удаленный помощник, предназначенный для оказания дистанционной помощи в решении разного рода компьютерных проблем. Если вы не собираетесь им пользоваться, лучше будет его отключить, на что есть свои причины. Никто не может дать гарантии, что в один день эта сетевая услуга не станет очередной уязвимостью, а поскольку Quick Assist включен по умолчанию, вероятность получения доступа к системе вредоносным ПО резко возрастет.
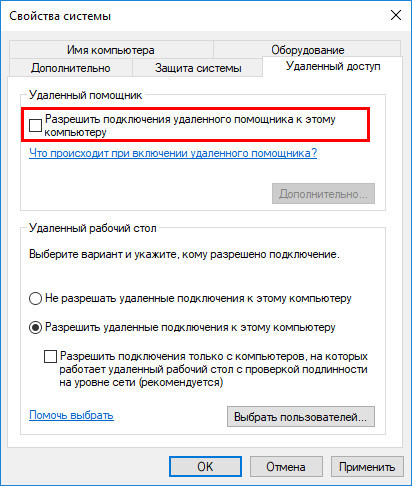
Проще всего отключить удаленный помощник через свойства системы. Выполните в окошке Run (Win + R) команду SystemPropertiesAdvanced, переключитесь в открывшемся окне на вкладку «Удаленный доступ» и снимите галочку с чекбокса «Разрешить подключения удаленного помощника к этому компьютеру».
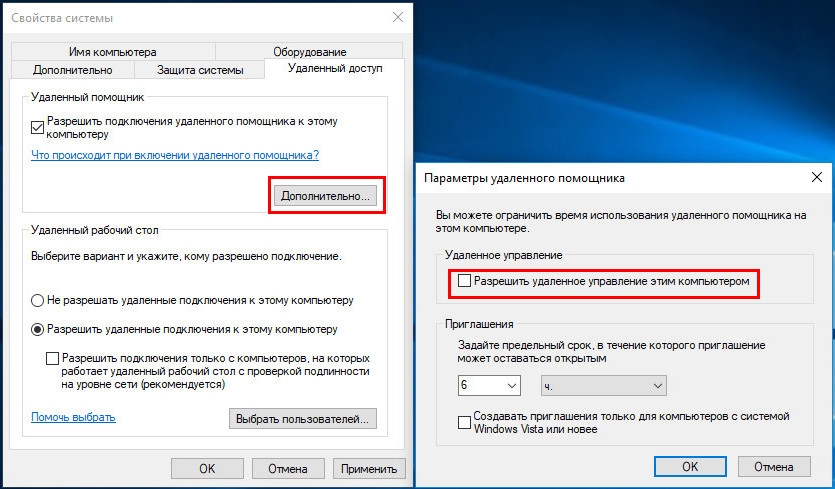
Если всё же вам нужно, чтобы функция оставалась включенной, нажмите кнопку «Дополнительно» и снимите в окошке параметров удаленного подключения птичку с пункта «Разрешить удаленное управление этим компьютером».
Это снизит вероятность взлома.
Отключить удаленный помощник можно также посредством применения твика. Открыв командой regedit редактор реестра, разверните ветку:
HKEY_LOCAL_MACHINE\SYSTEM\CurrentControlSet\Control\Remote Assistance
В правой колонке найдите параметр fAllowToGetHelp и измените его значение с 1 на 0.
Если оного параметра нет, нужно создать его вручную. Тип он должен иметь DWORD. Настройки вступят в силу сразу же.
Ну, и в качестве дополнительной меры можно заблокировать порт приложения в брандмауэре.
Для этого открываем с правами администратора командную строку либо PowerShell и добавляем правило командой:
netsh advfirewall firewall set rule group="Удаленный помощник" new enable=no
Чтобы разрешить подключение, замените в команде «no» на «yes».