В Windows присутствует встроенная функция удаленного рабочего стола, которая может быть удобной, о чем подробнее в статье про Удаленный рабочий стол Microsoft (RDP), с другой стороны — если вы не используете функцию, из соображений безопасности разумным может быть её отключение.
В этой инструкции подробно о способах отключить функцию «Удаленный рабочий стол» в Windows 11 и Windows 10 так, чтобы к вашему компьютеру нельзя было подключиться по локальной сети, а отдельных сценариях — и через Интернет. На близкую тему: Лучшие программы удаленного рабочего стола.
- Отключение удаленного рабочего стола в Параметрах и Свойствах системы
- Как отключить удаленный рабочий стол в реестре, gpedit, службах
- Видео инструкция
Отключение удаленного рабочего стола в Параметрах или свойства системы
Самый простой способ отключить возможность подключения через RDP или Удаленный рабочий стол Microsoft — использовать соответствующие Параметры:
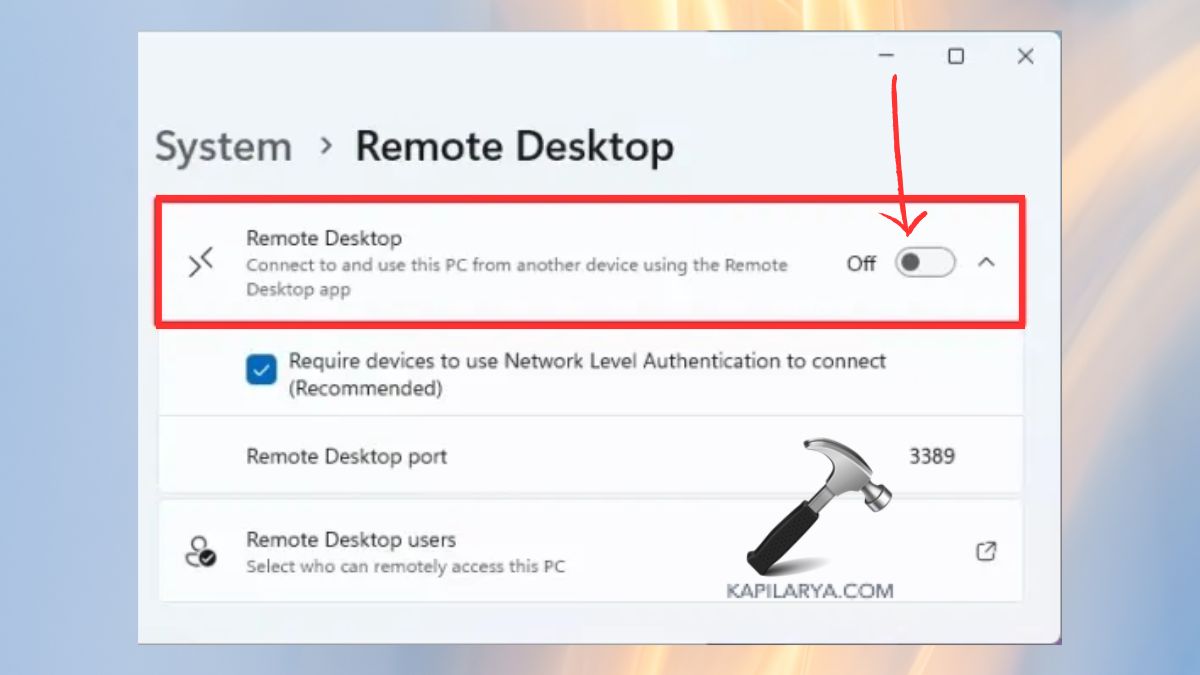
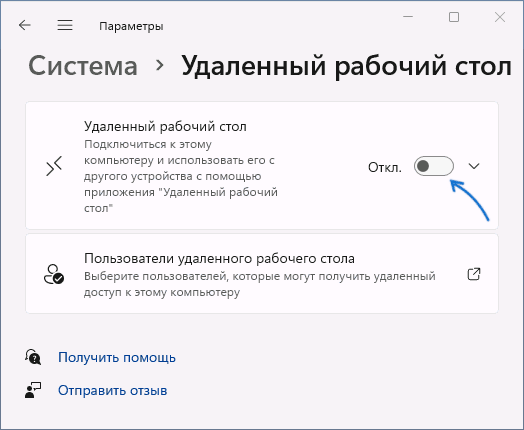
- В Windows 11 зайдите в Параметры (можно нажать клавиши Win+I) — Система — Удаленный рабочий стол. Установите переключатель в положение «Выключено».

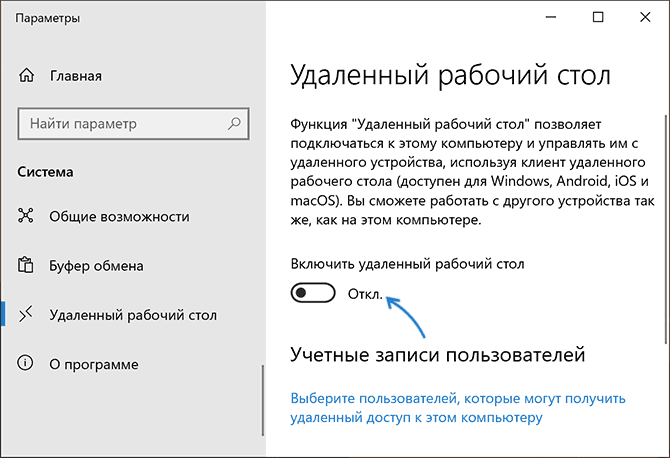
- В Windows 10 откройте Параметры, перейдите в раздел «Система» и откройте «Удаленный рабочий стол» слева. Измените положение переключателя «Включить удаленный рабочий стол».

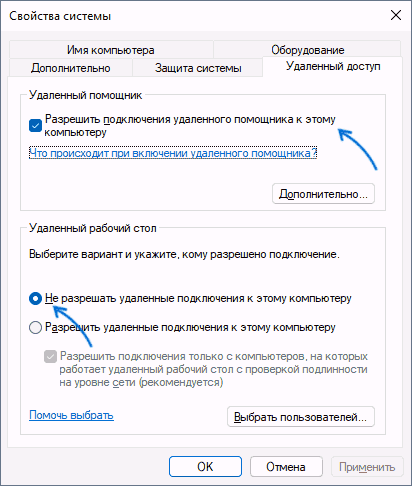
Это действие запретит удаленные подключения к текущему компьютеру или ноутбуку. Но, если цель — полностью исключить такую возможность, дополнительно рекомендую выполнить следующие действия в свойствах системы:
- Нажмите Win+R на клавиатуре, введите команду sysdm.cpl и нажмите Enter.
- Перейдите на вкладку «Удаленный доступ». Обратите внимание: здесь вы тоже можете отключить удаленный рабочий стол в соответствующем разделе.

- Снимите отметку «Разрешать подключения удаленного помощника к этому компьютеру» и примените настройки.
Дополнительные методы отключить удаленный рабочий стол
Помимо описанных выше способов для обычного пользователя, вы можете использовать следующие подходы отключения:
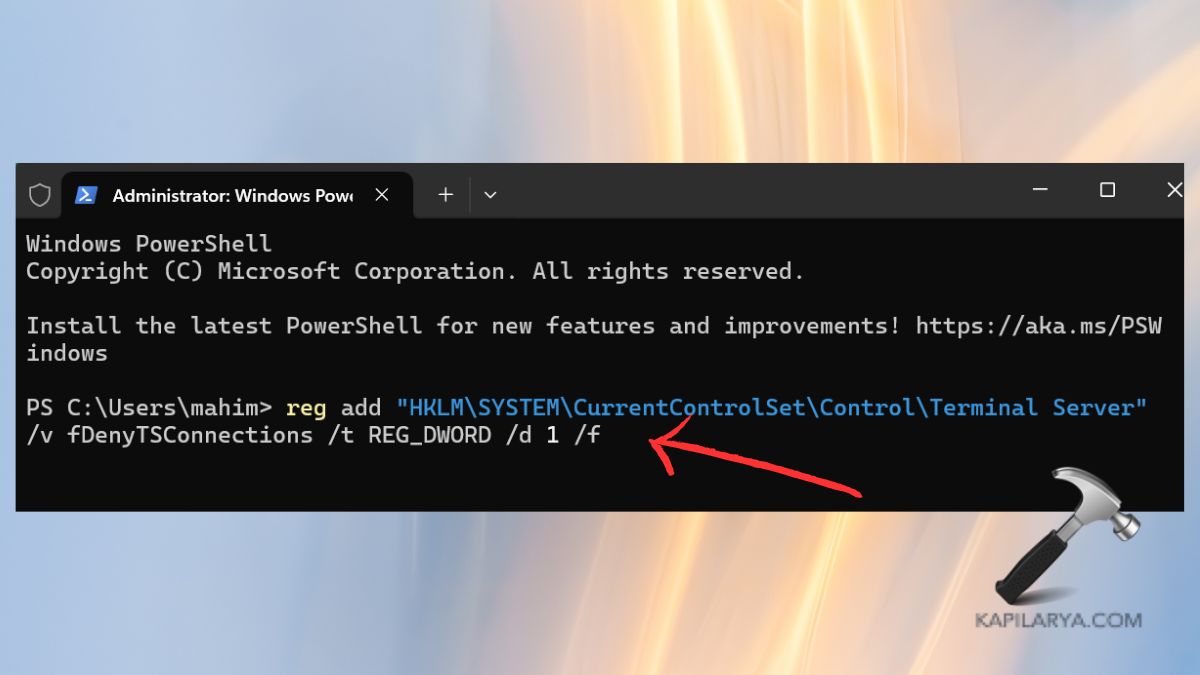
- В реестре, в разделе
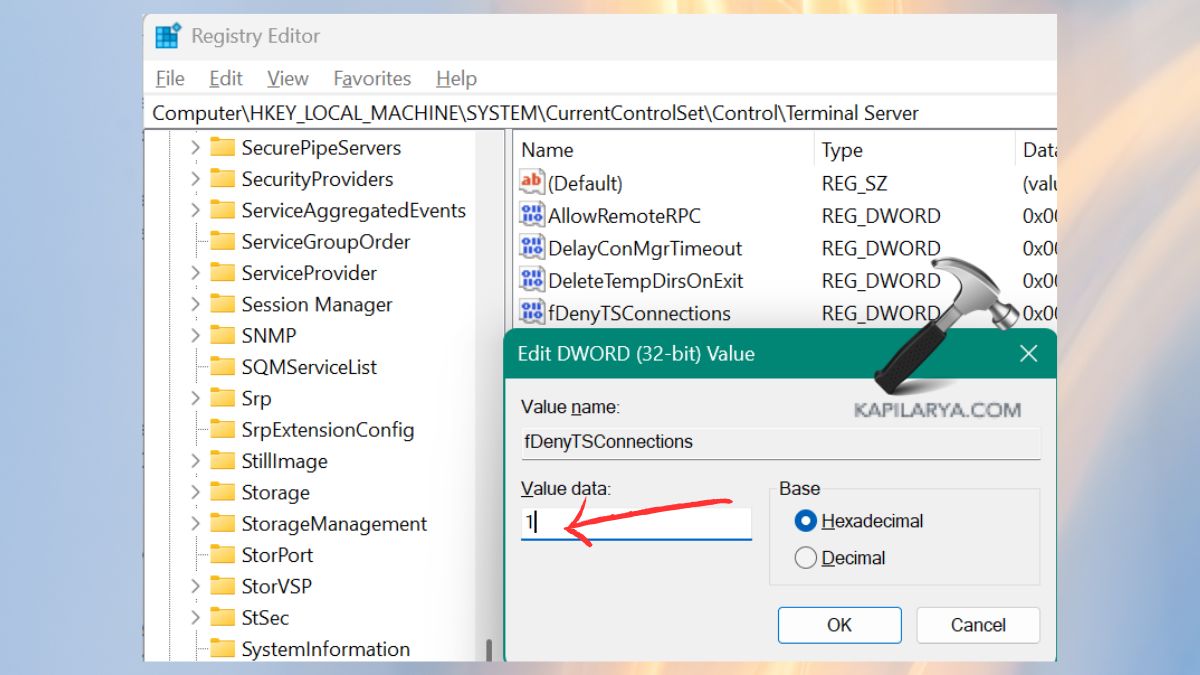
HKEY_LOCAL_MACHINE\SYSTEM\CurrentControlSet\Control\Terminal Server
установить значение 1 для параметра с именем fDenyTSConnections — это будет равносильно отключению RDP в параметрах или свойствах системы.
- В редакторе локальной групповой политики (Win+R — gpedit.msc): Конфигурация компьютера — Административные шаблоны — Компоненты Windows — Службы удаленных рабочих столов — Узел сеансов удаленных рабочих столов — Подключения. В этом разделе отключаем параметр «Разрешить пользователям удаленное подключение».
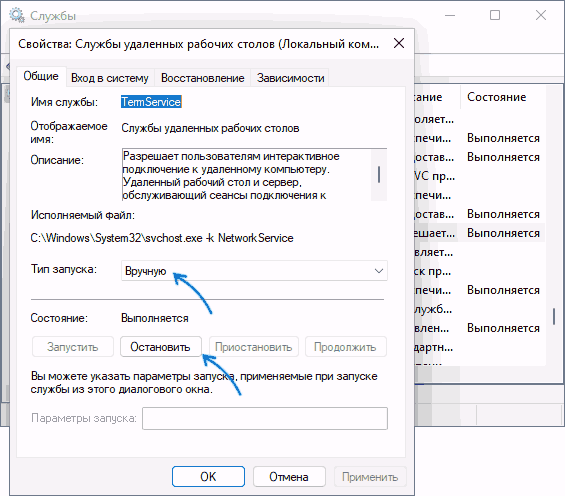
- В службах (Win+R — services.msc) можно остановить две службы и установить их тип запуска в «Отключено». Имена служб: «Службы удаленных рабочих столов» и «Перенаправитель портов пользовательского режима служб удаленных рабочих столов».

Видео инструкция
В случае если ваш вопрос касается не встроенной функции удаленного рабочего стола, а какого-то стороннего решения, то, как правило, бывает достаточно удалить соответствующую программу через Панель управления — Программы и компоненты или Параметры — Приложения.
Quick Links
-
Disable Remote Desktop From Settings
-
Shut Off Remote Desktop Using Command Prompt
-
Use Control Panel to Disable Remote Desktop
-
With Local Group Policy Editor
Summary
- You can disable Windows 11’s Remote Desktop feature by heading to Settings > System > Remote Desktop and turning off the Remote Desktop toggle.
- You can also use commands in Command Prompt and PowerShell to turn off Remote Desktop.
- Later, it’s easy to turn the feature back on if you want.
If you don’t intend to remotely connect to your PC, it’s a good idea to keep the Remote Desktop feature disabled. This ensures your machine is secure even if your login credentials are compromised. Here are a few ways to turn off Remote Desktop on Windows 11.
All methods achieve the same end result, which is to deactivate Remote Desktop. Therefore, feel free to use the method you find convenient.
Disable Remote Desktop From Settings
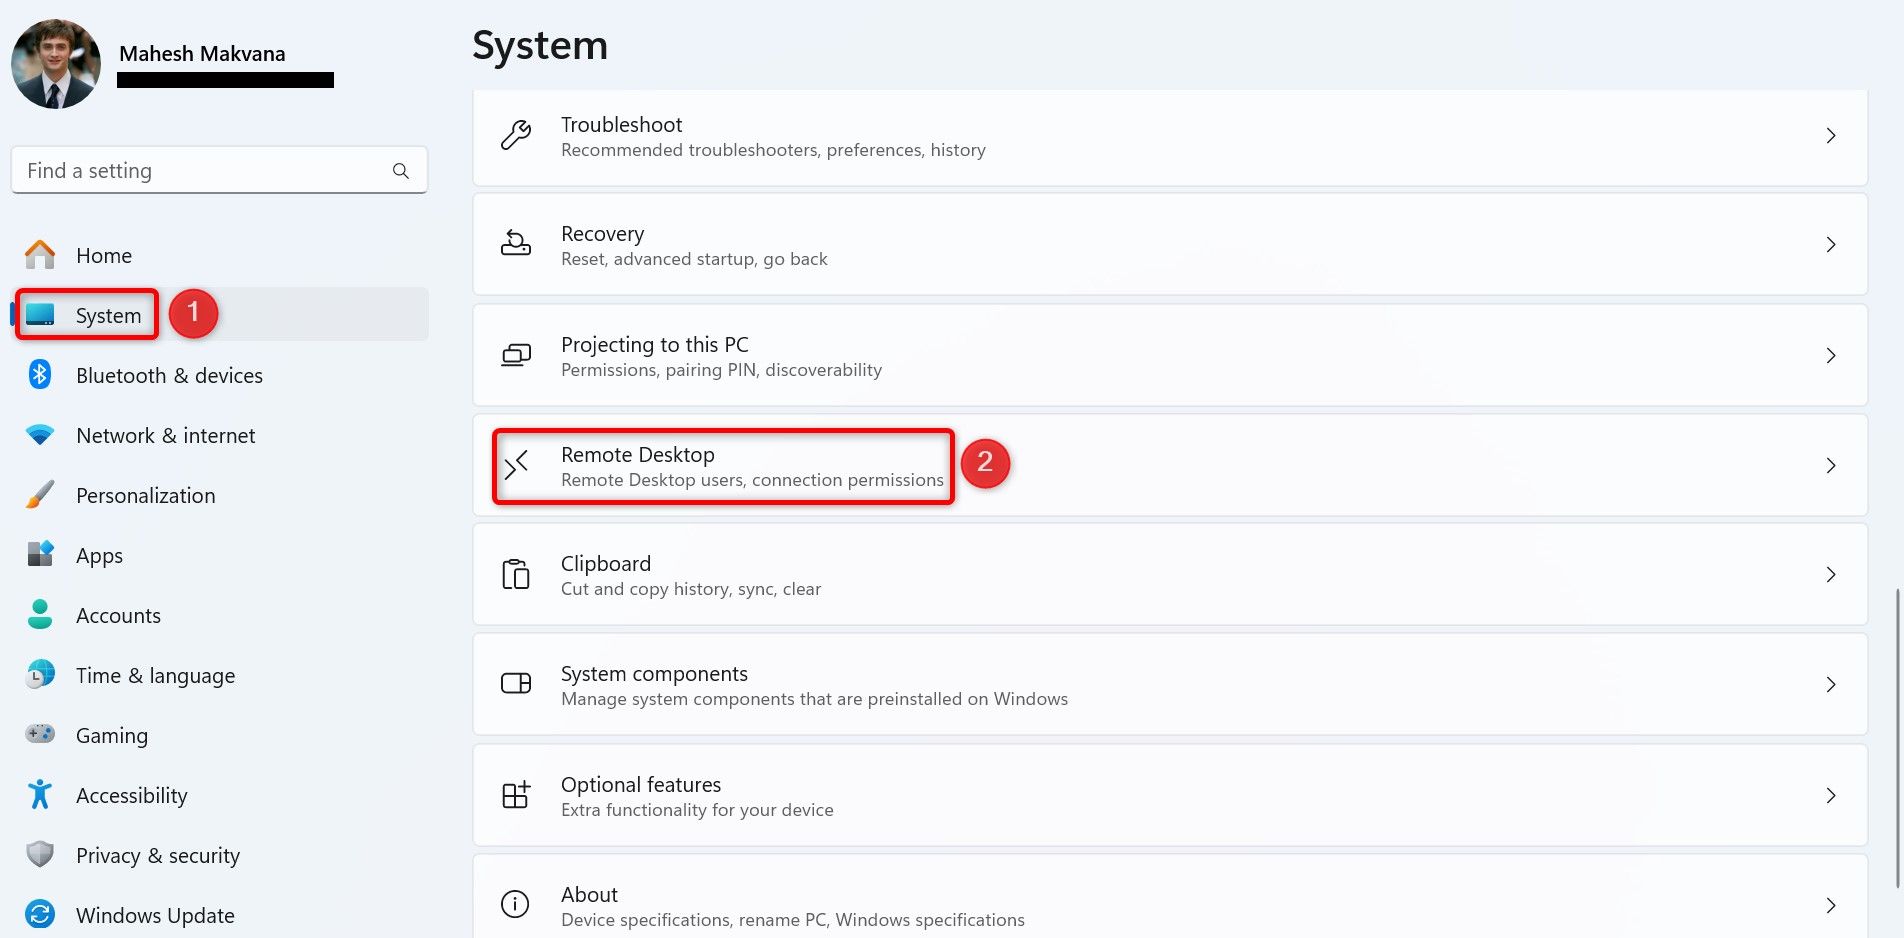
The easiest graphical way to disable Remote Desktop is by using Settings.
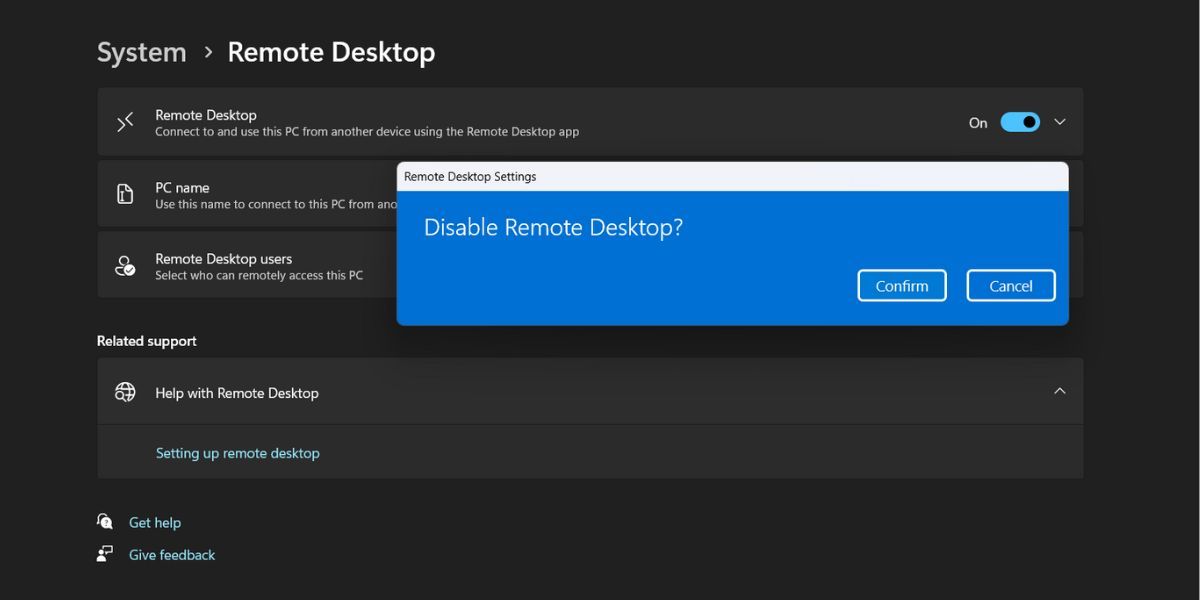
Start by launching Settings using Windows+i. From the left sidebar, select «System.» On the right pane, scroll down and choose «Remote Desktop.»
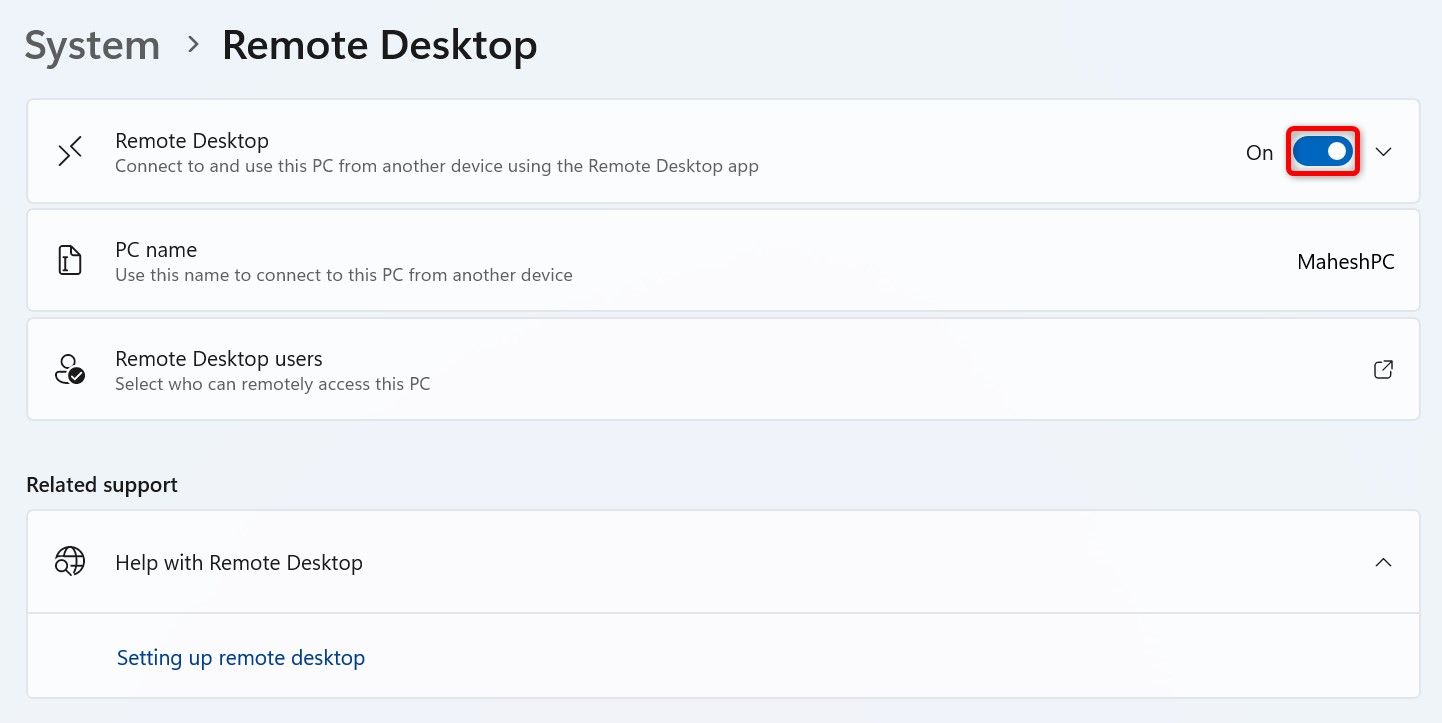
On the following screen, turn off the «Remote Desktop» toggle.
To re-enable Remote Desktop in the future, turn on the «Remote Desktop» toggle.
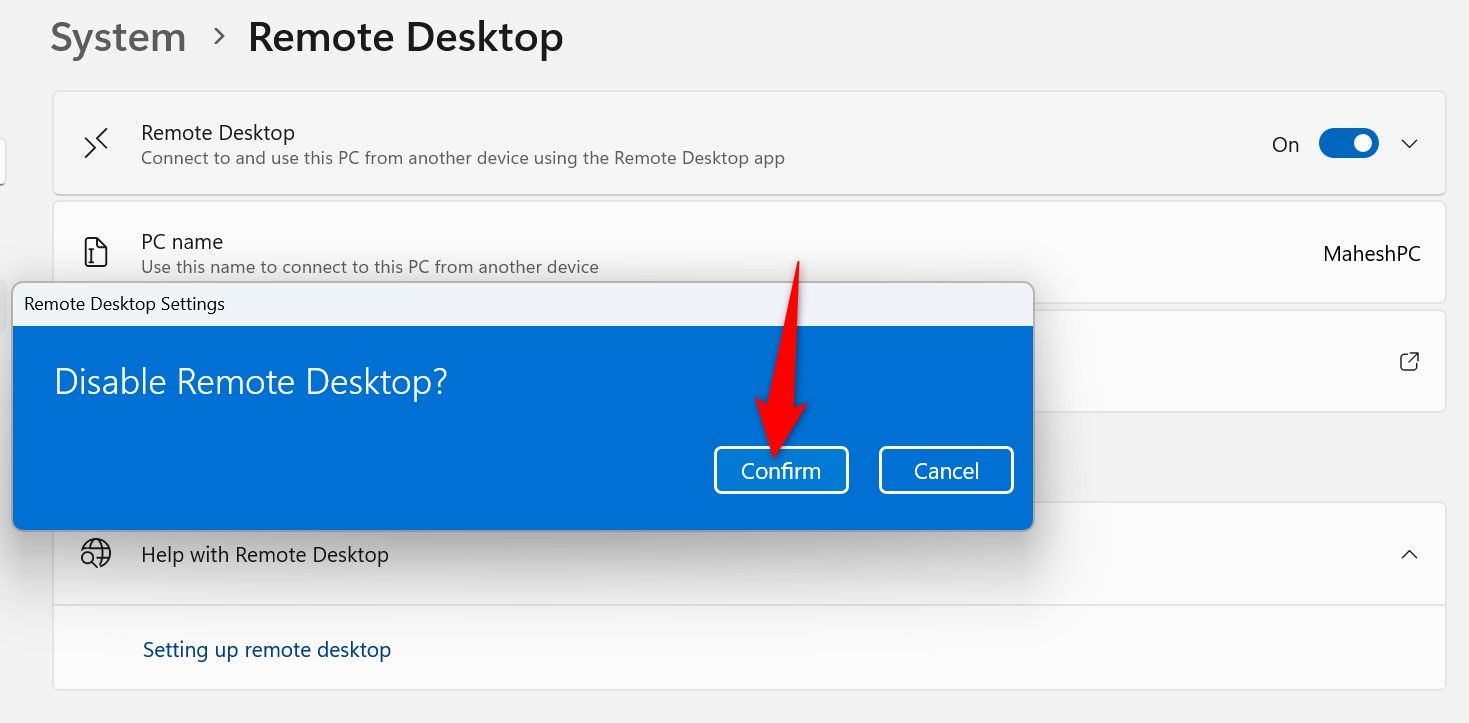
In the Disable Remote Desktop prompt, select «Confirm.»
Remote Desktop is now disabled.
Shut Off Remote Desktop Using Command Prompt
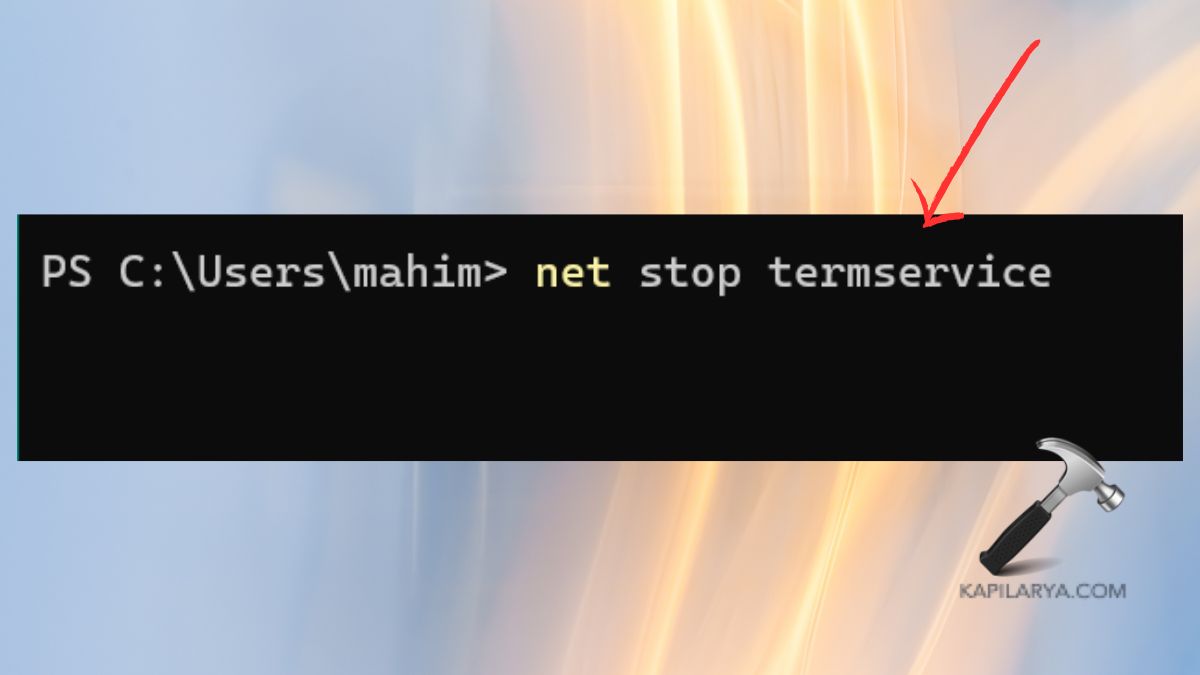
You can use a command in Command Prompt to prevent the Remote Desktop service from launching on your PC’s boot. This doesn’t disable the feature but ensures the feature doesn’t run when your computer turns on.
To use this method, access Windows Search, type Command Prompt, and select «Run as Administrator.»
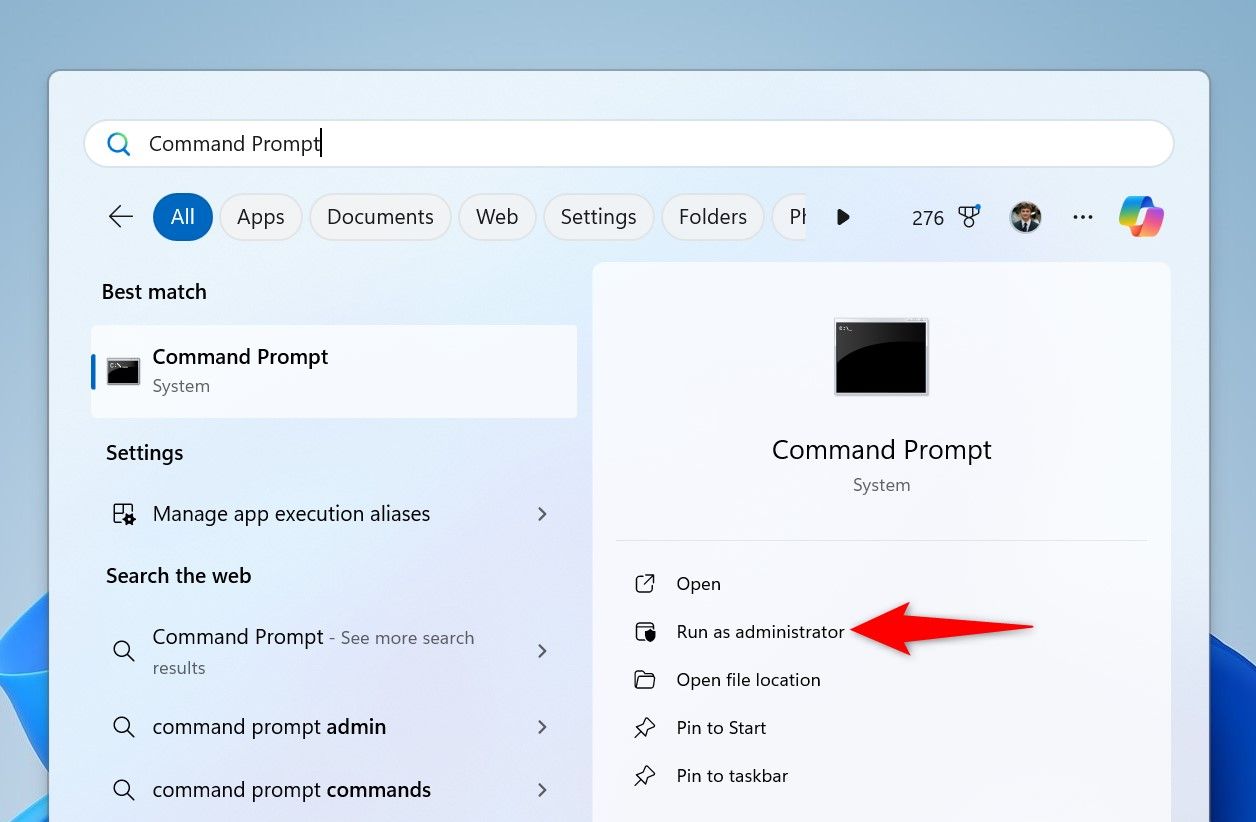
In the User Account Control prompt, choose «Yes.»
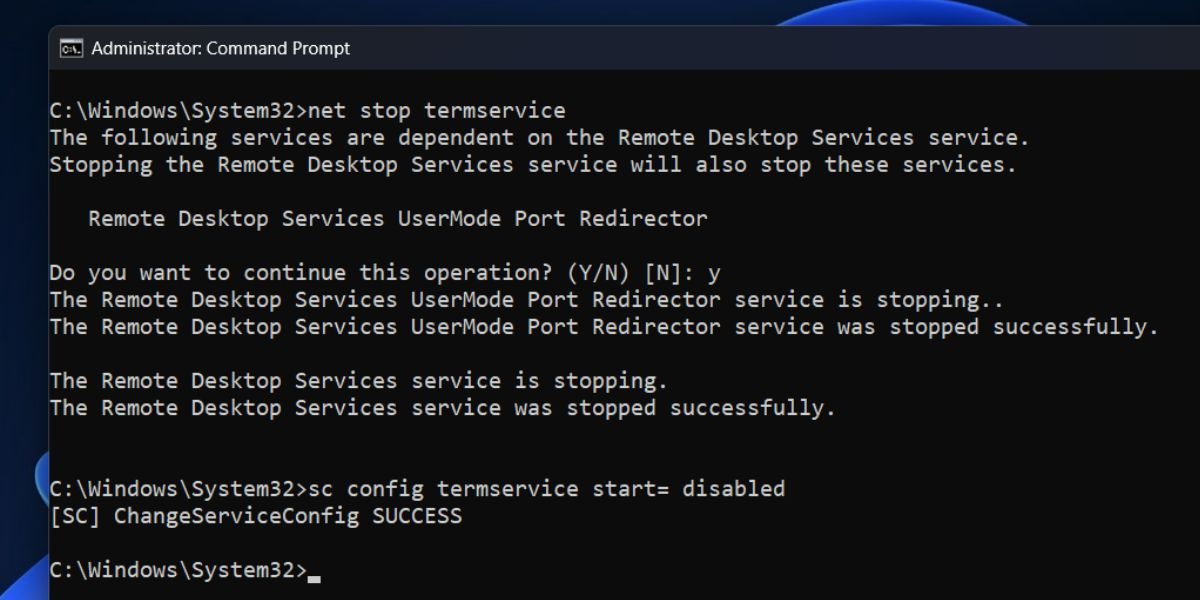
In Command Prompt, type the following command and press Enter. This command stops the Remote Desktop service.
net stop termservice
Next up, type the following command and press Enter. This command prevents the Remote Desktop service from launching on the PC’s boot.
sc config termservice start= disabled
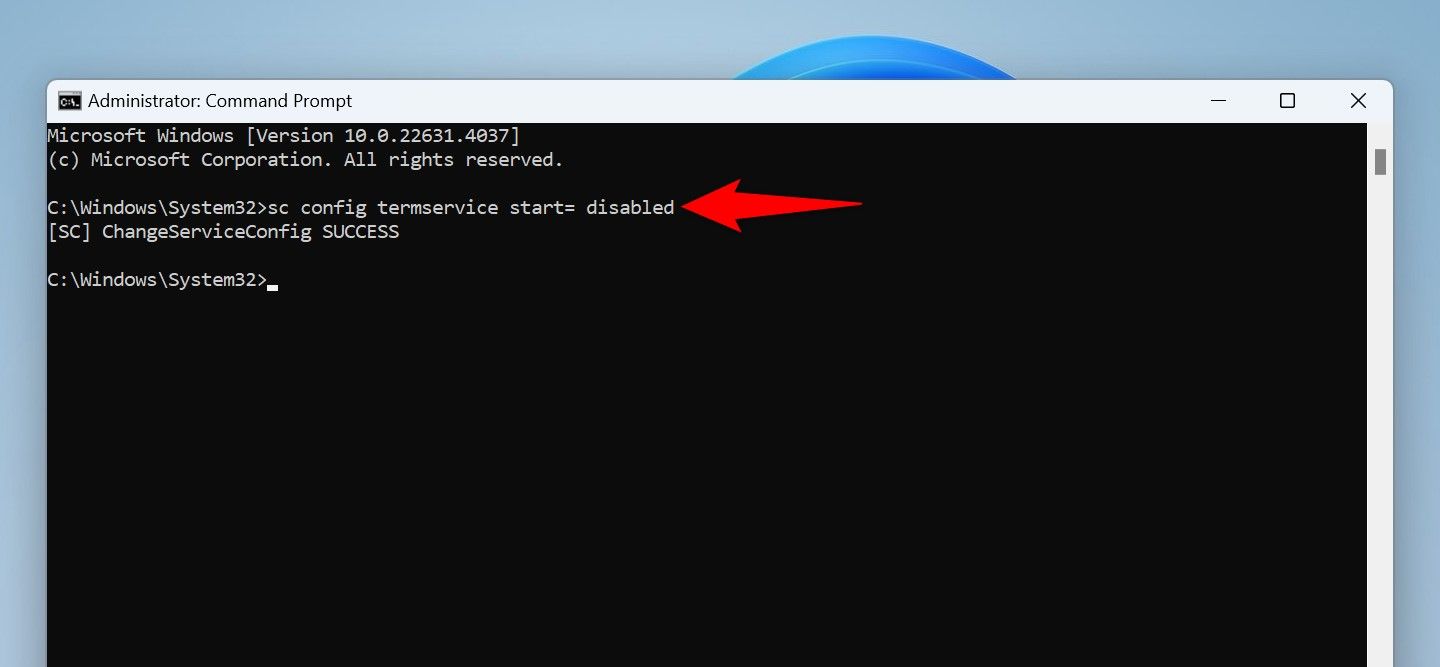
Close the Command Prompt window by typing the following command and pressing Enter:
exit
You’re done.
To re-enable Remote Desktop in the future, run the following commands from an elevated Command Prompt window. Make sure to press Enter after each command.
        sc config termservice start= auto
net start termservice
Use Control Panel to Disable Remote Desktop
You can use the traditional Control Panel utility to turn Remote Desktop on and off.
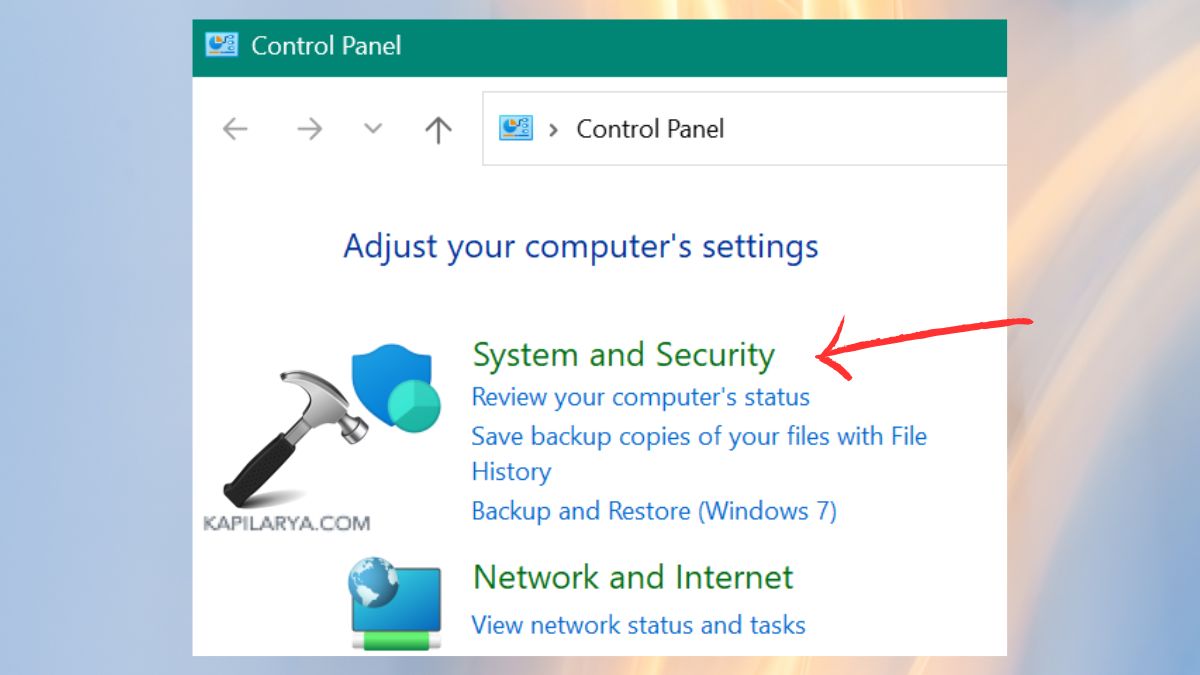
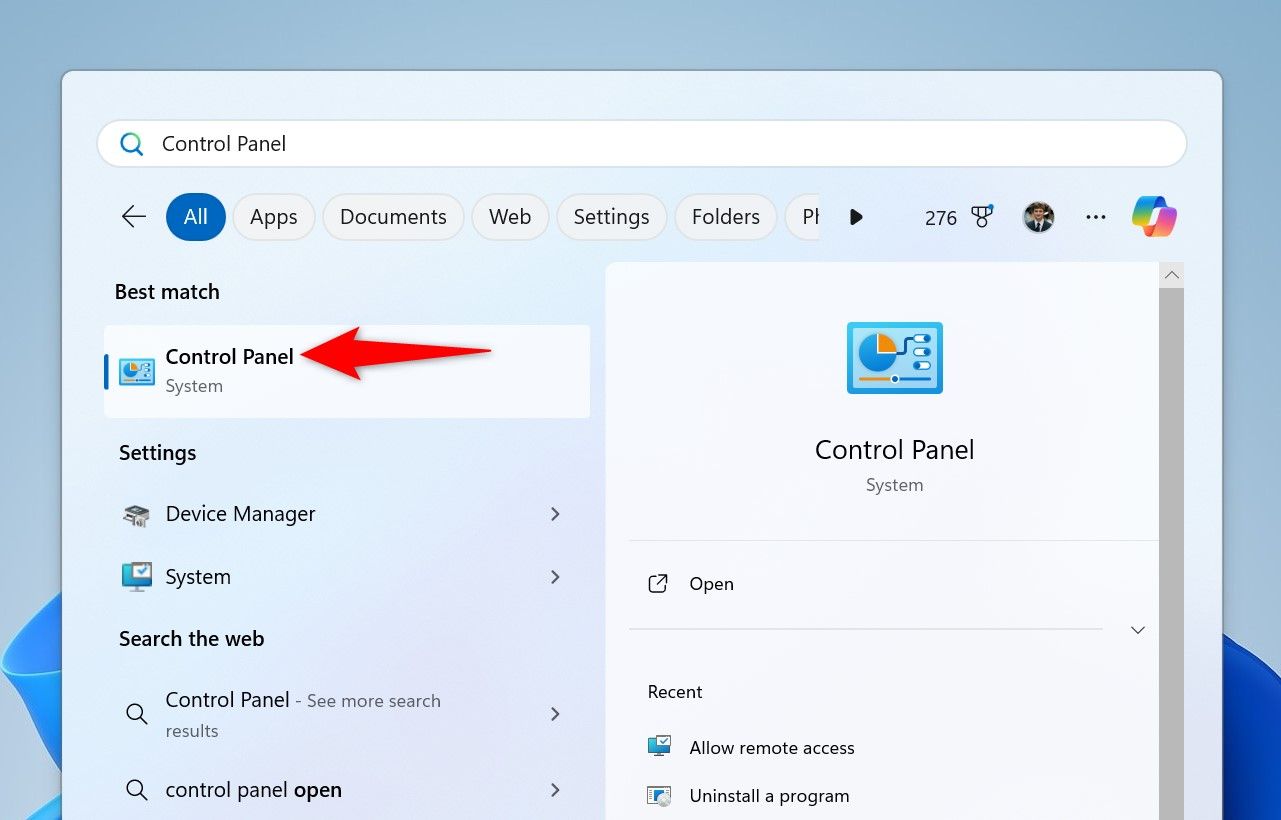
Start by opening Control Panel. One way to do this is to open Windows Search, type Control Panel, and select the utility in the search results.
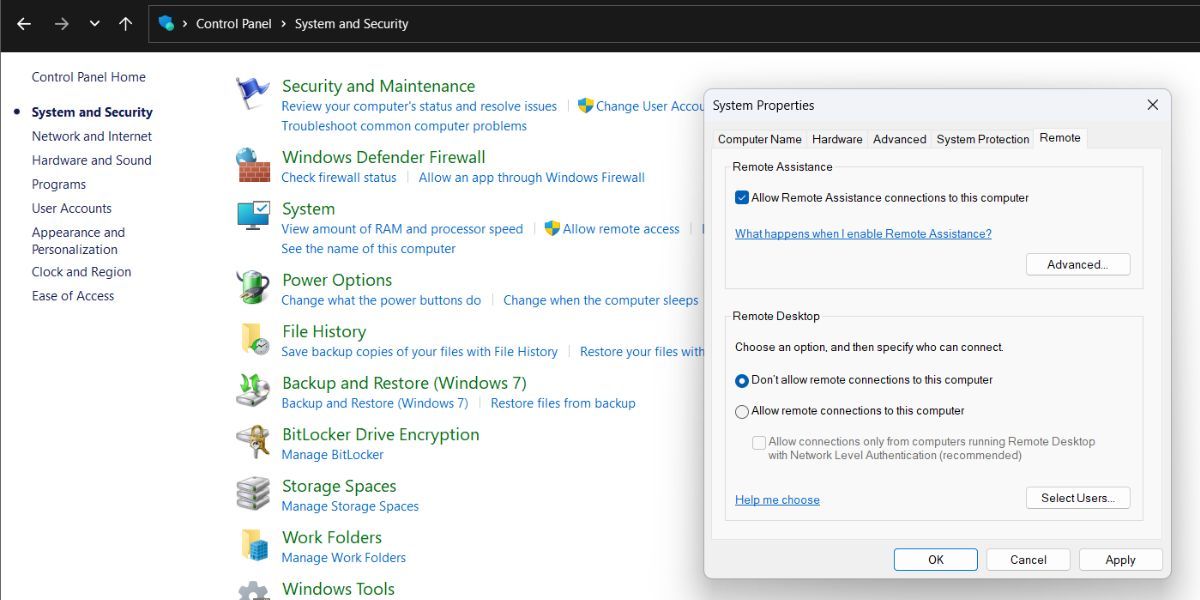
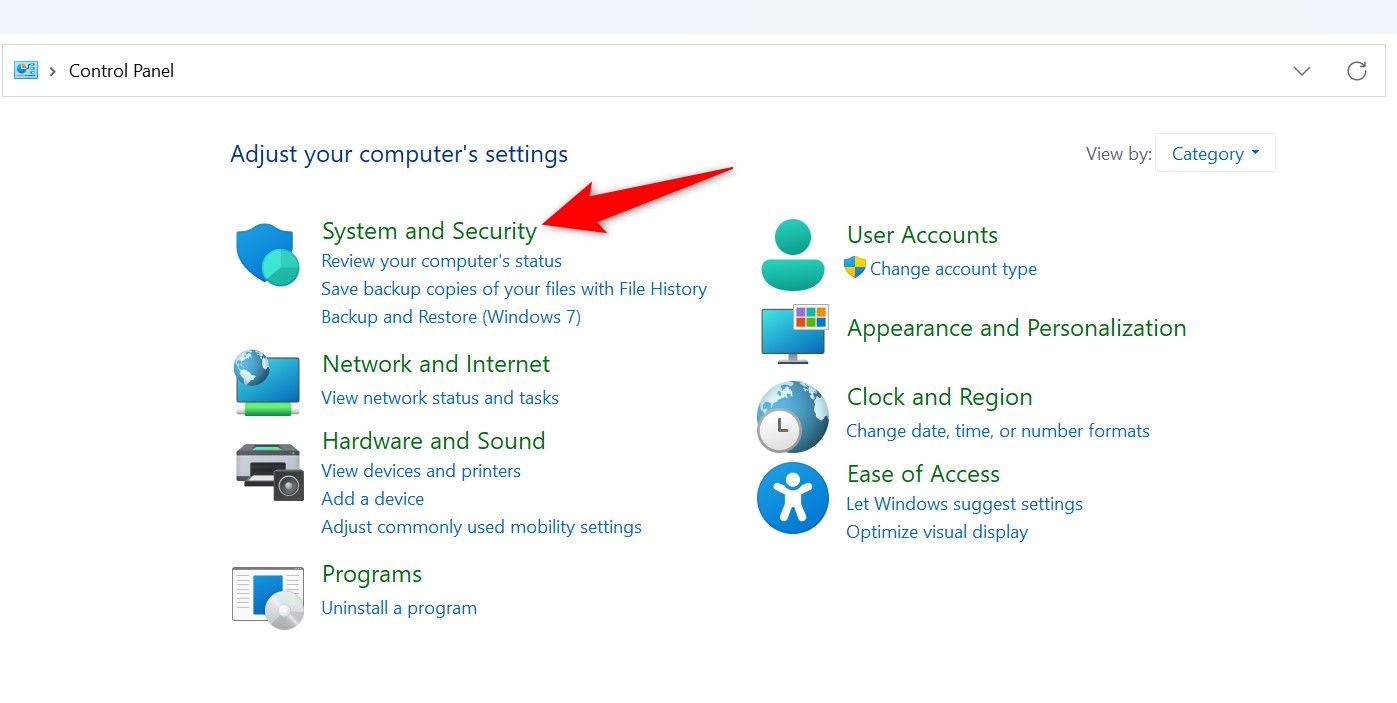
In Control Panel, select «System and Security.»
In the System section, choose «Allow Remote Access.»
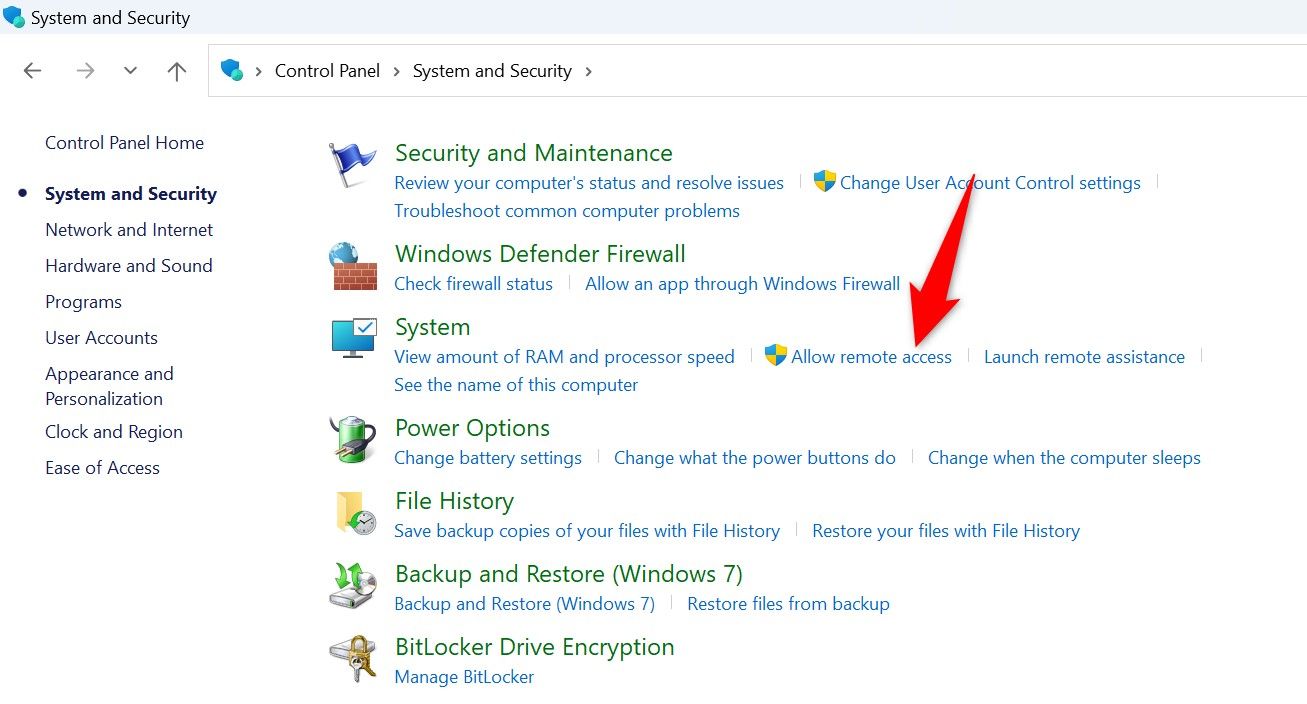
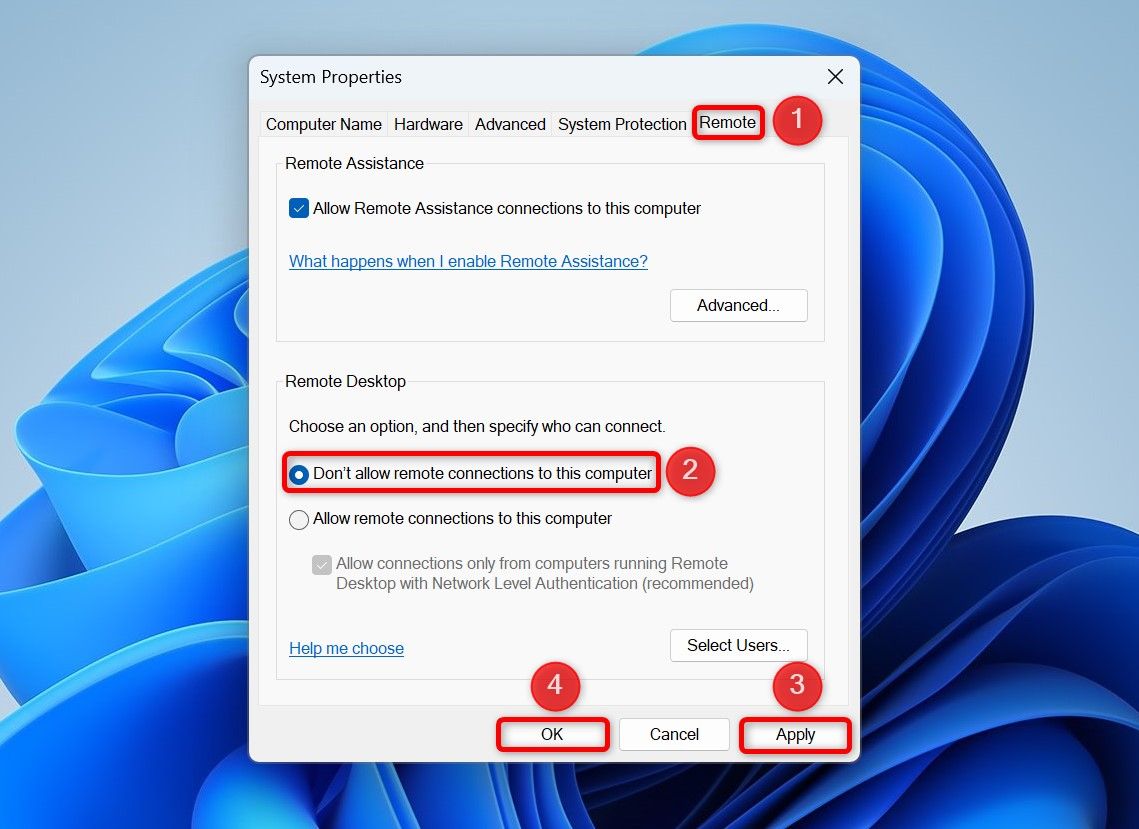
The System Properties window will launch. Access the «Remote» tab and enable the «Don’t Allow Remote Connections to This Computer» option. Then, choose «Apply» followed by «OK.»
To re-activate Remote Desktop, enable the «Allow Remote Connections to This Computer» option.
You’ve successfully disabled Remote Desktop.
Using PowerShell
In PowerShell, you can run a command (called a cmdlet) to change a Windows registry value that disables Remote Desktop.
To use this method, open Windows Search, type PowerShell, and choose «Run as Administrator.»
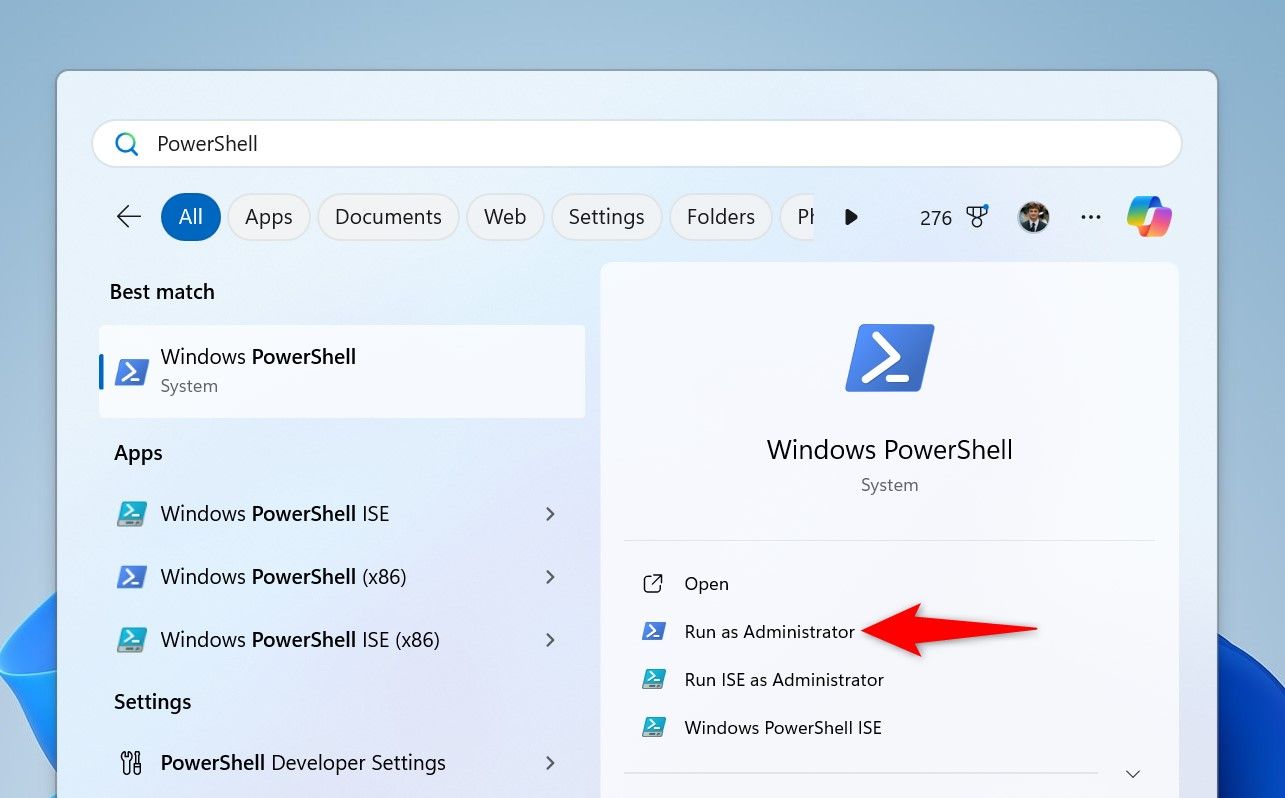
In the User Account Control prompt, select «Yes.»
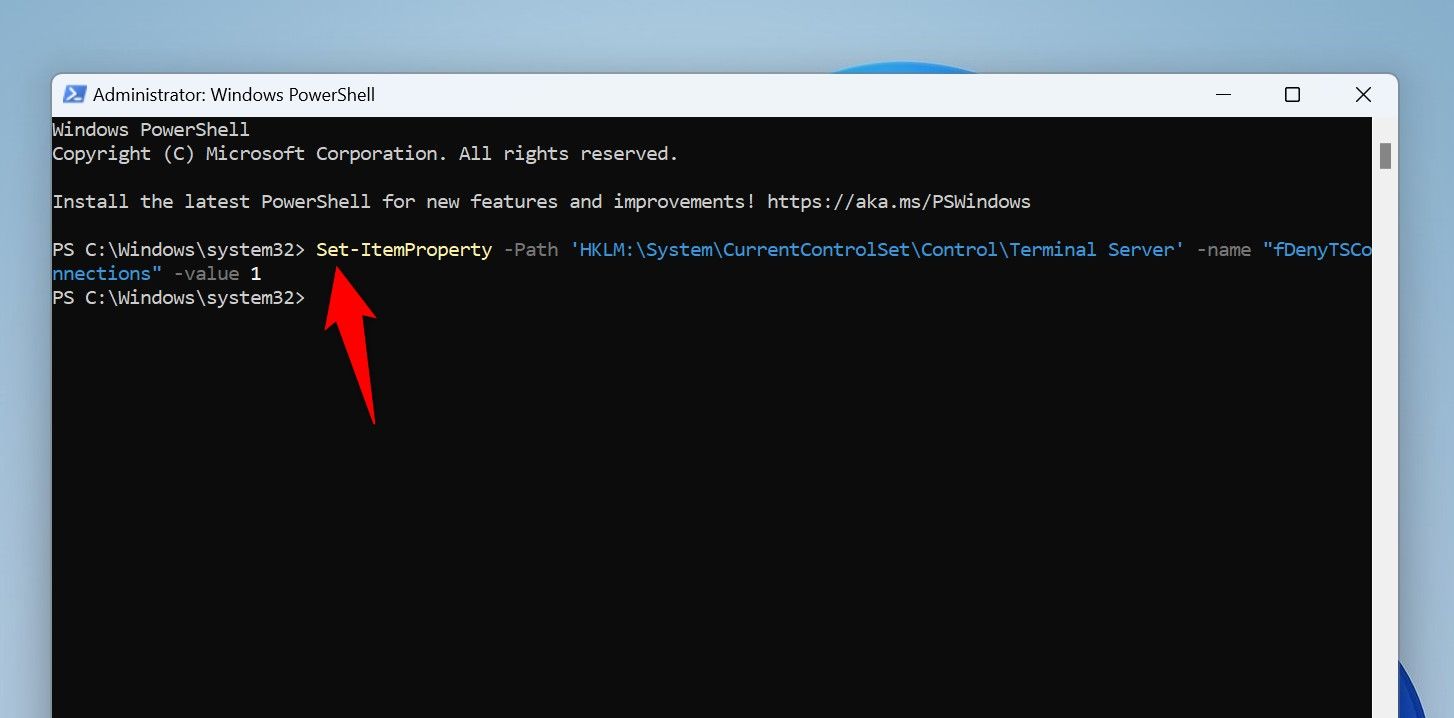
In PowerShell, type the following command and press Enter:
Set-ItemProperty -Path 'HKLM:\System\CurrentControlSet\Control\Terminal Server' -name "fDenyTSConnections" -value 1
Here’s what each parameter does in this cmdlet:
- Set-ItemProperty: This changes the specified registry item’s value.
- -Path: This is the path to the registry item to be modified.
- fDenyTSConnections: This is the name of the item to be modified.
- -value 1: This is the new value for the item.
PowerShell has disabled Remote Desktop. To re-enable the feature in the future, run the following cmdlet:
Set-ItemProperty -Path 'HKLM:\System\CurrentControlSet\Control\Terminal Server' -name "fDenyTSConnections" -value 0
With Local Group Policy Editor
On Windows 11’s Pro edition, you can use the Local Group Policy Editor tool to disable Remote Desktop. Note that this tool isn’t available on Windows 11’s Home edition. We have a guide on how to check your Windows 11 edition, so check that out to find your edition.
To use the method, open the Run dialog box by pressing Windows+R. Type the following in the box and press Enter (or select «OK»).
gpedit.msc
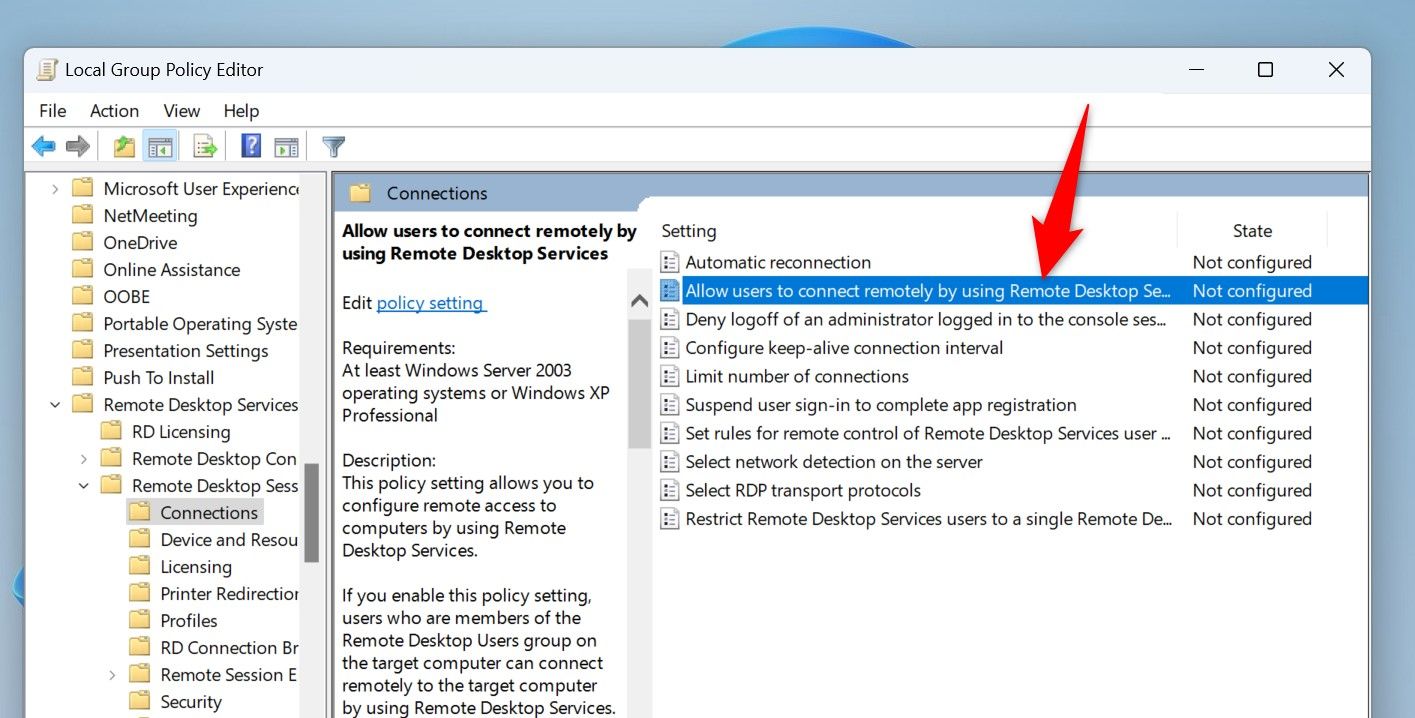
When Local Group Policy Editor opens, navigate to the following path:
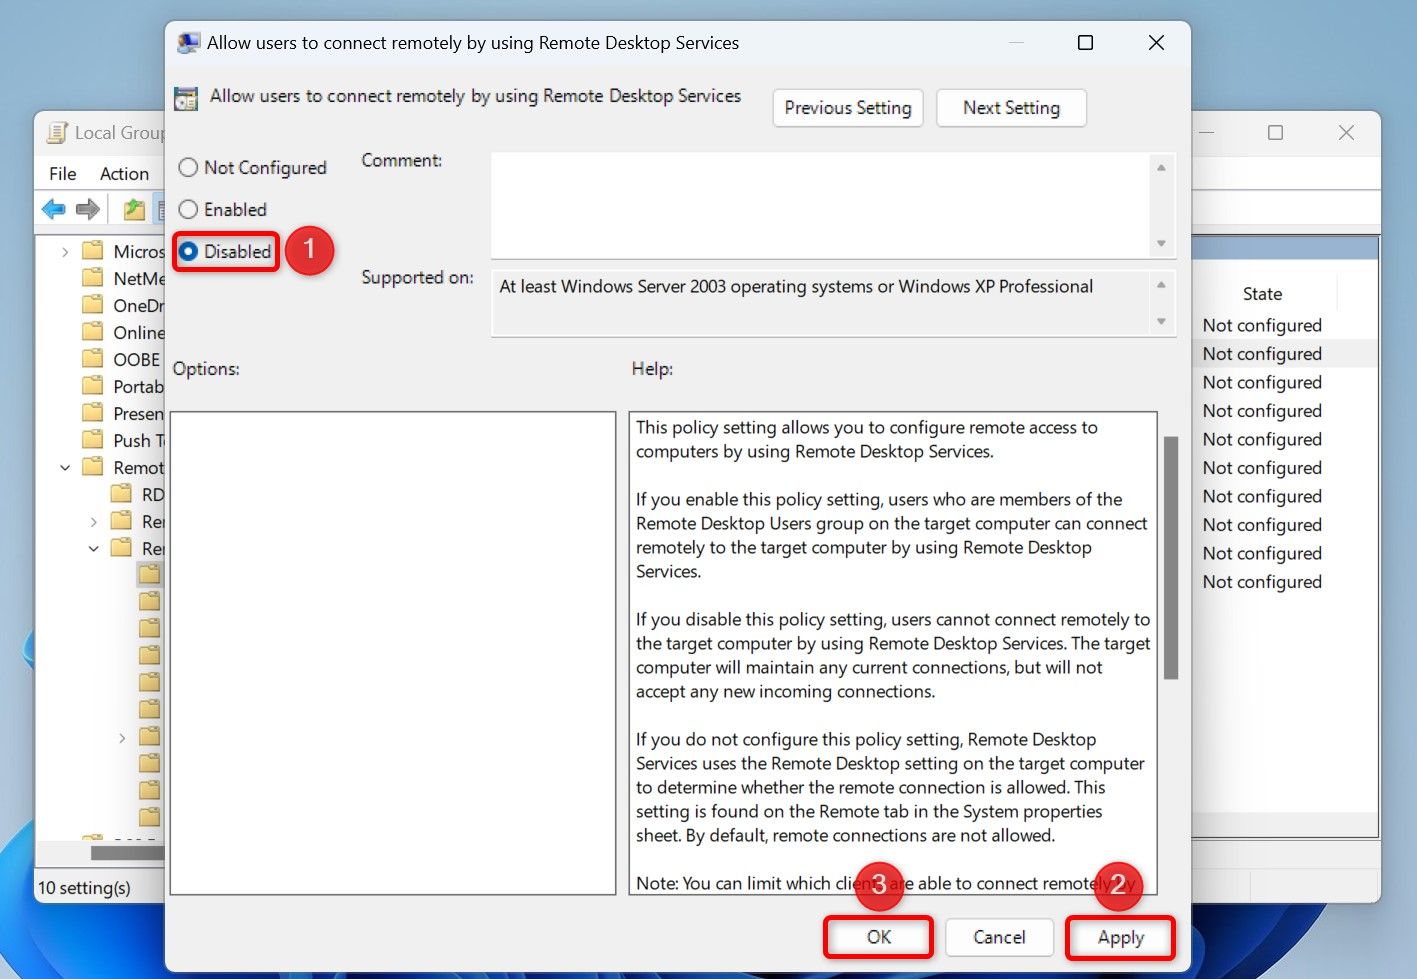
Computer Configuration > Administrative Templates > Windows Components > Remote Desktop Services > Remote Desktop Session Host > Connections
On the right pane, double-click the item that says «Allow Users to Connect Remotely by using Remote Desktop Services.»
On the open window, select the «Disabled» option. Then, at the bottom, choose «Apply» followed by «OK.»
In the future, you can re-enable the feature by choosing «Not Configured.»
Close Local Group Policy Editor.
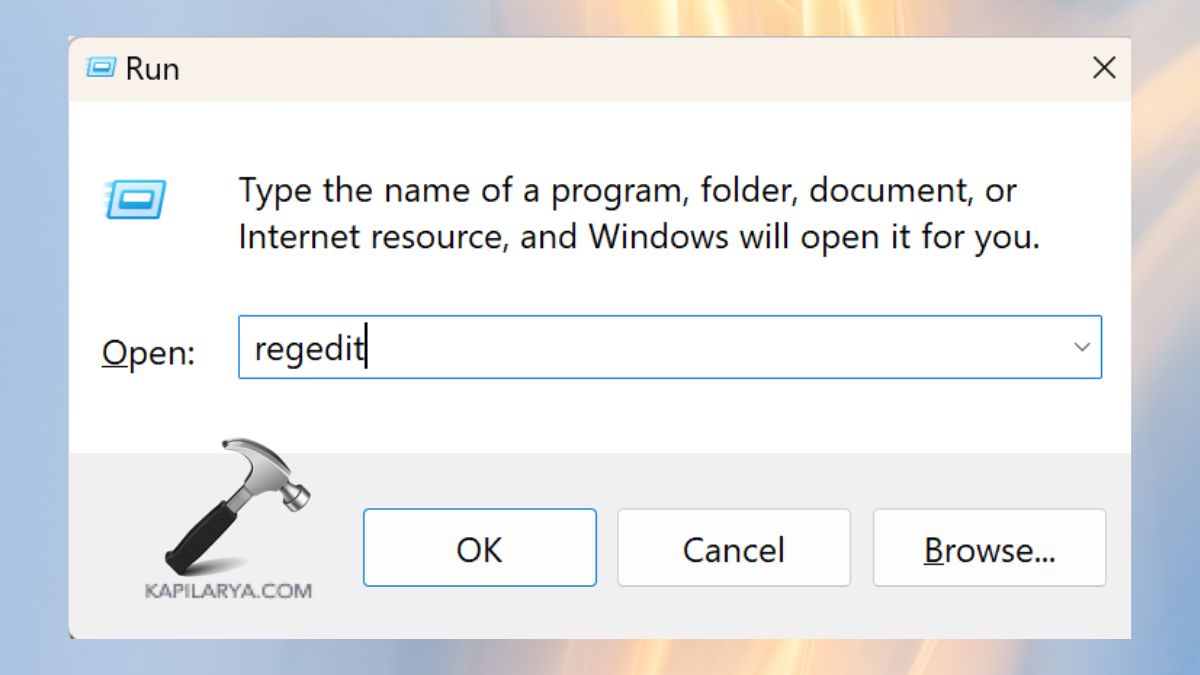
Using Registry Editor
The Registry Editor method works on both Pro and Home editions of Windows 11. You simply change a registry item’s value and that disables Remote Desktop.
Start by launching Run using Windows+R. Type the following in the open box and press Enter or select «OK.»
regedit
In the User Account Control prompt, select «Yes.»
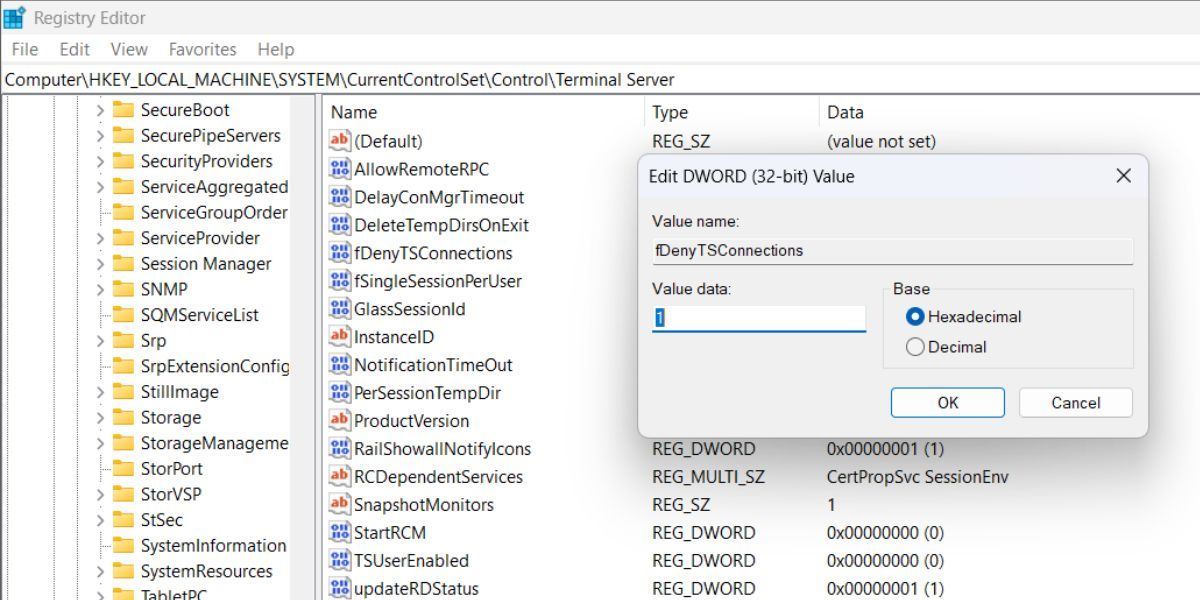
In Registry Editor, navigate to the following path. A quick way to do this is to copy the following path, paste it in Registry Editor’s path box, and press Enter.
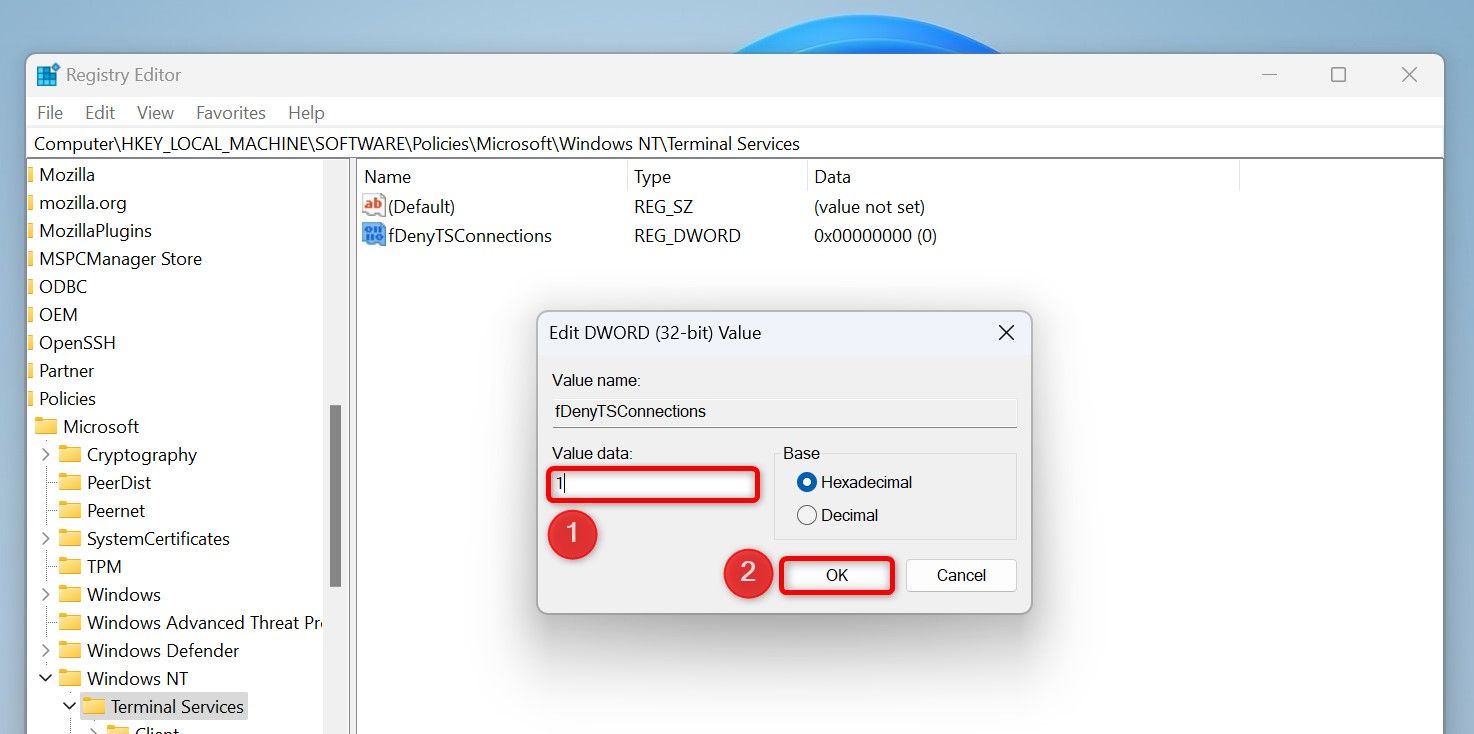
HKEY_LOCAL_MACHINE\SOFTWARE\Policies\Microsoft\Windows NT\Terminal Services
On the right pane, right-click anywhere blank and choose New > DWORD (32-bit) Value.
Type fDenyTSConnections as the new item name and press Enter. Then, right-click the newly created item and choose «Modify.»
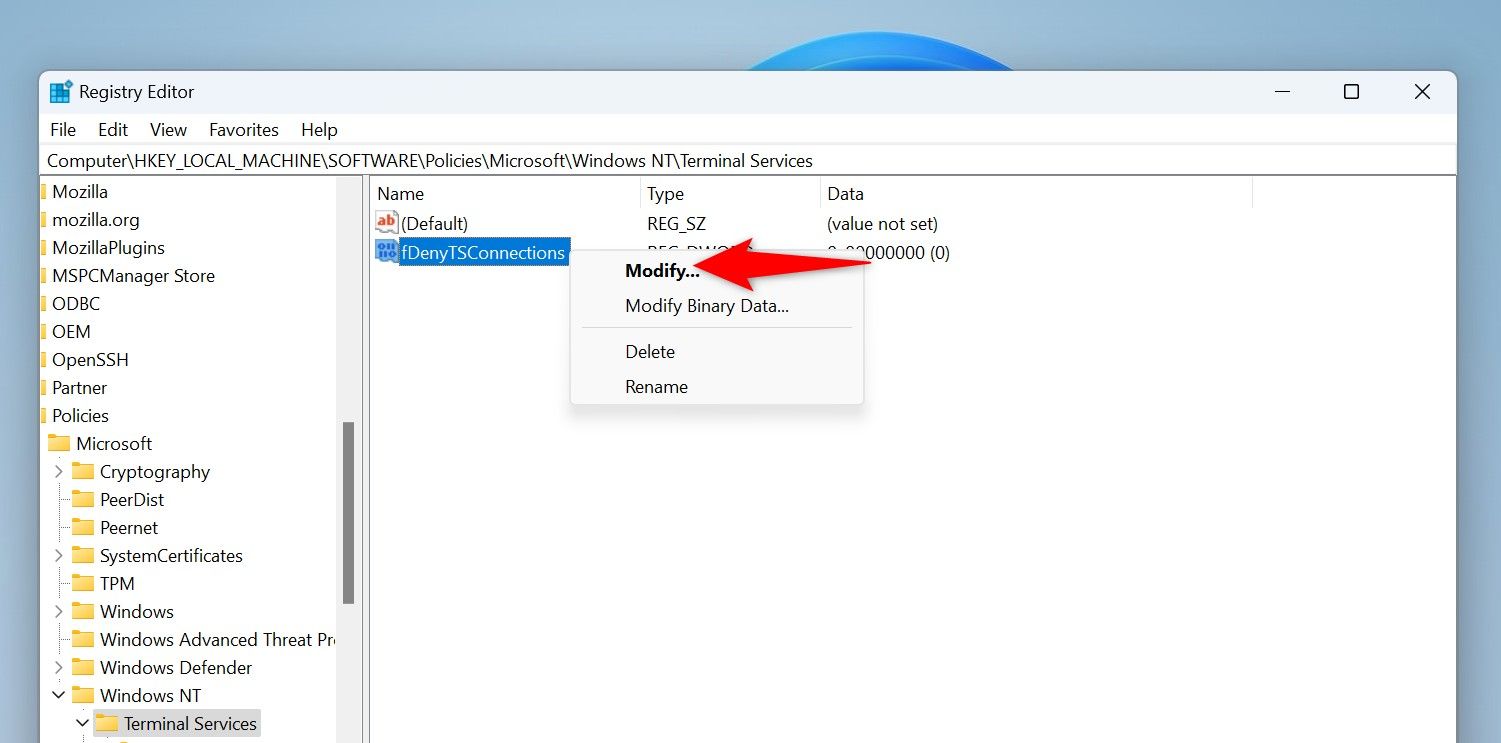
Type 1 in the «Value Data» field and select «OK.»
In the future, you can reactivate the feature by typing 0 in the «Value Data» field.
Close Registry Editor.
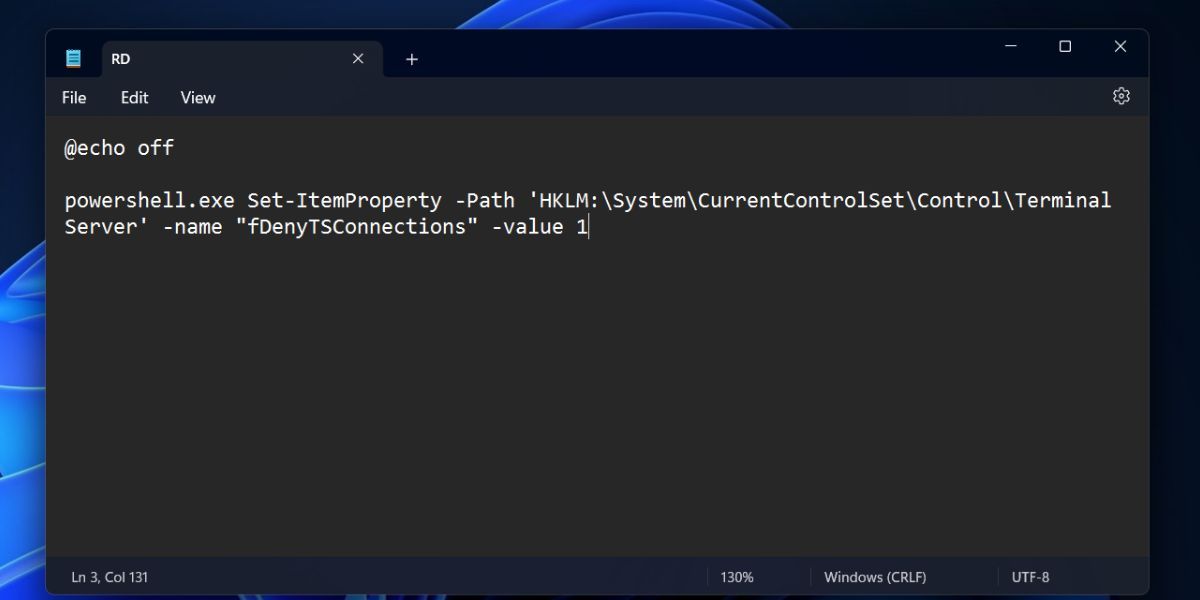
Using a Batch File
If you often need to toggle Remote Desktop off and on, create a batch file to automate the task. This file will turn off the feature if it’s enabled and turn on the feature if it’s disabled. You simply have to double-click the file to make that happen.
To make the batch file, open Windows Search, type Notepad, and select the app in the search results.

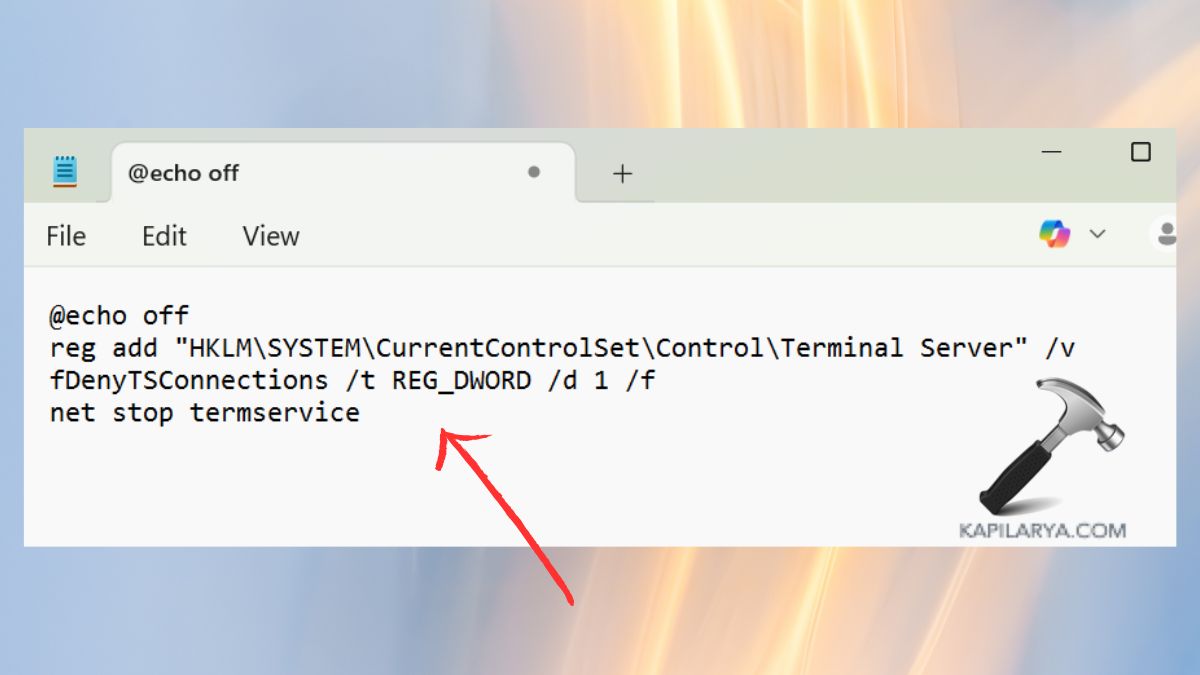
Copy the following code and paste it in Notepad. This code runs a query to check whether Remote Desktop is enabled or disabled. It then toggles the feature on or off, depending on the current status.
@echo offfor /f "tokens=3" %%a in ('reg query "HKEY_LOCAL_MACHINE\SOFTWARE\Policies\Microsoft\Windows NT\Terminal Services" /v fDenyTSConnections') do set fDenyTSConnections=%%a
if "%fDenyTSConnections%"=="0x0" (
echo Remote Desktop is enabled. Disabling...
powershell.exe -Command "Set-ItemProperty -Path 'HKLM:\SOFTWARE\Policies\Microsoft\Windows NT\Terminal Services' -Name 'fDenyTSConnections' -Value 1"
) else (
echo Remote Desktop is disabled. Enabling...
powershell.exe -Command "Set-ItemProperty -Path 'HKLM:\SOFTWARE\Policies\Microsoft\Windows NT\Terminal Services' -Name 'fDenyTSConnections' -Value 0"
)
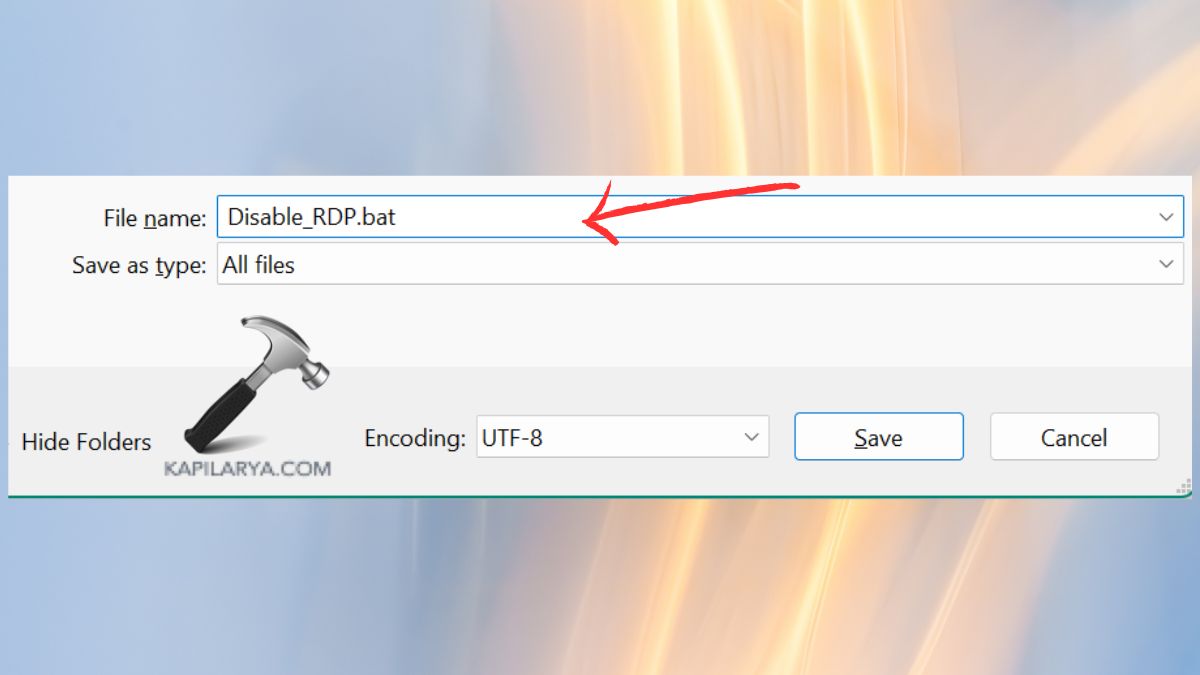
Save the file by choosing File > Save As from Notepad’s menu bar.
Select your desktop as the preferred location to save the file. Click the «Save as Type» drop-down menu and choose «All Files.» Select the «File Name» field, type a name for the file, and add .bat as the file extension. Then, click «Save.»
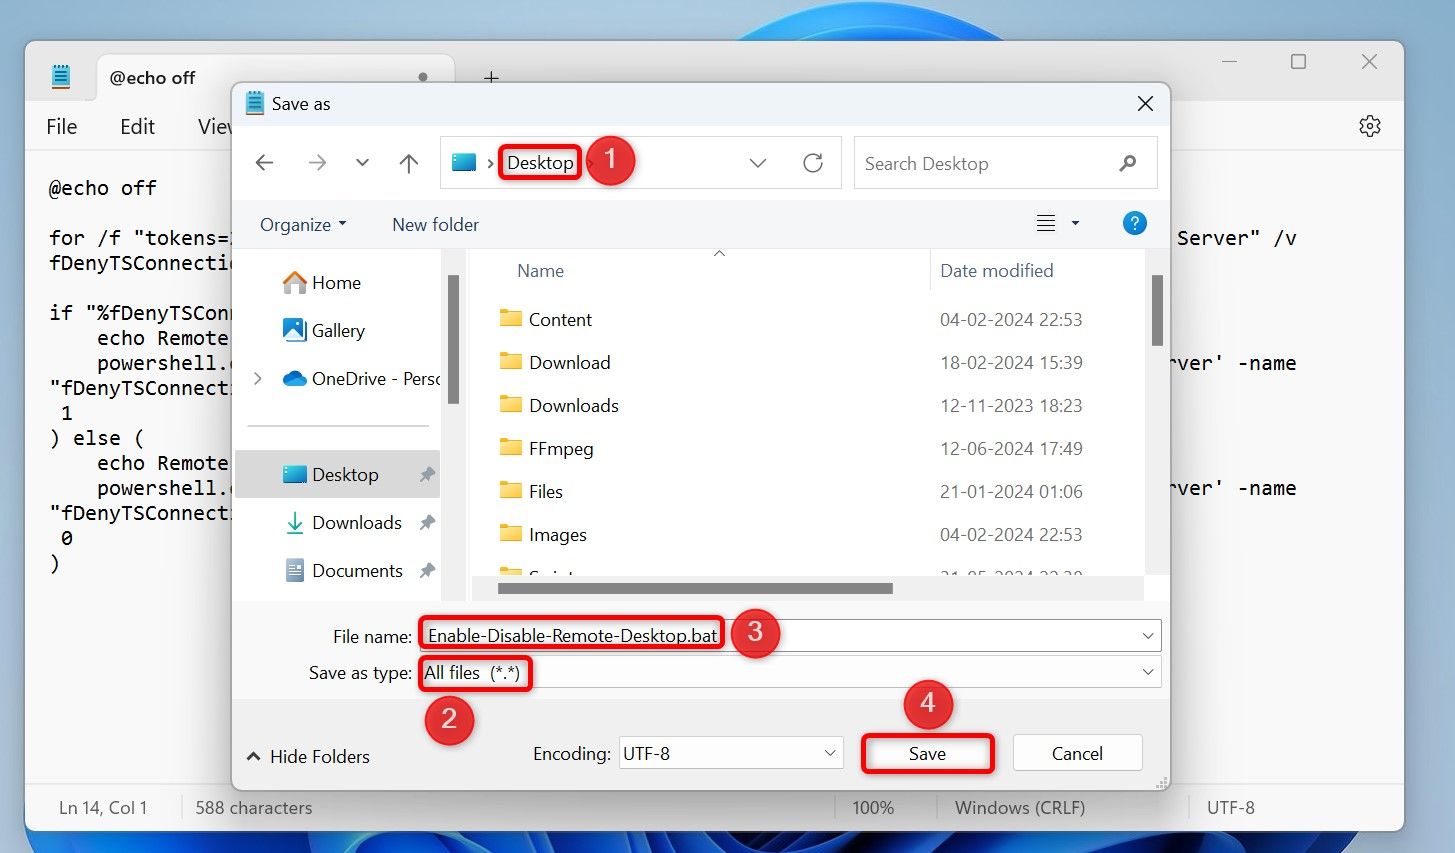
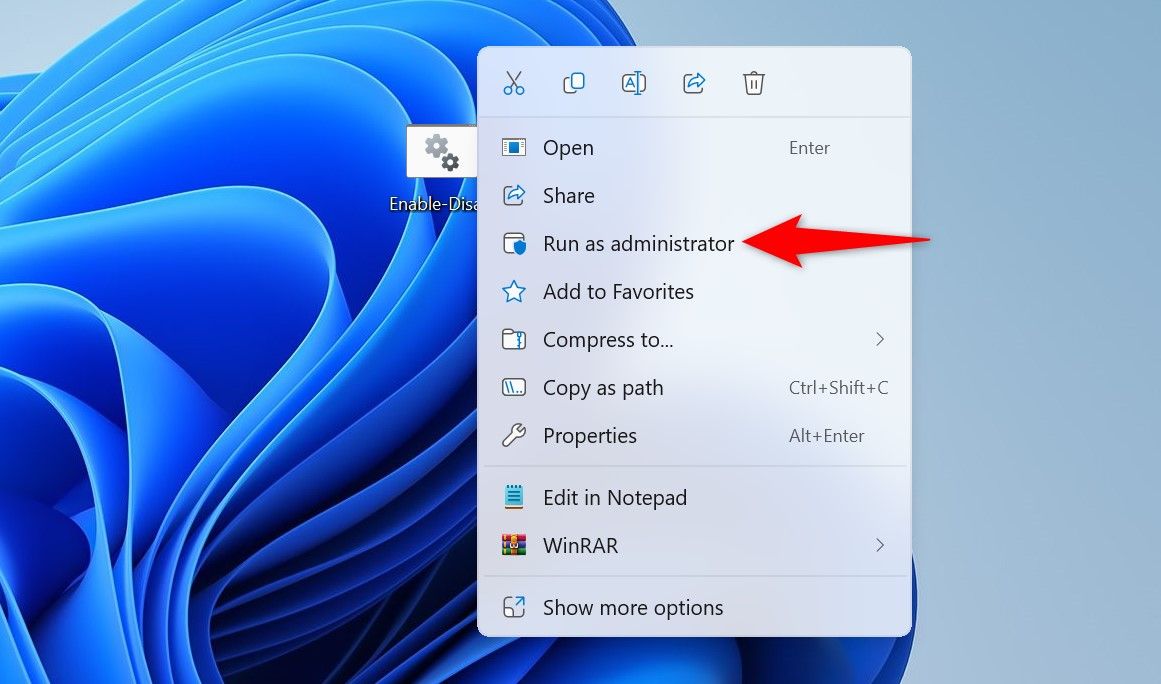
To use the file, right-click the file and choose «Run as Administrator.»
And that’s how you toggle off Remote Desktop when you aren’t using it. It’s easy to turn Remote Desktop back on in Windows 11, and you even have third-party tools for Windows and Mac remote connections. Enjoy!