
Microsoft makes it challenging to install Windows without a Microsoft account, but it is possible if you know the right tricks. You are coming to the right page if you want to install Windows 10 without a Microsoft account. This post will tell you how to install Windows 10 without a Microsoft account.
This article offered by EaseUS can be applied to Windows 10 and Windows 11 installation without a Microsoft account. So now, let’s walk through the Windows 10 installation without a Microsoft account and do it without any hassle.
Can You Install Windows 10 Without Microsoft Account
Windows 10 does not have the «Offline Account» option, formerly used to sign in with a traditional local Windows account. Therefore, Windows 10 cannot be installed without a Microsoft account. Instead, after installing or configuring your new computer with the operating system, you are compelled to log in using a Microsoft account.
But have you ever been stuck on a question like, «Can I install Windows 10/11 without a Microsoft account?»
In a word, yes. You are not required to use a Microsoft account to install Windows.
Previously, the only way to get around the Microsoft account mandate on your home computer was to disable the Internet connection before you were asked to set up a Microsoft account. But now, there are new methods you can use to bypass the Microsoft Account requirement for Windows 10 setup. Keep reading!
This article tells you how to install Windows 10 from a USB via BIOS.
How to Install Windows 10 from USB from BIOS
This guide will tell you everything you need to install Windows 10 from a USB via BIOS. Read more >>
How to Setup Windows 10 Without a Microsoft Account
As mentioned above, many ways exist to set up windows 10 without a Microsoft account. However, we have narrowed it down to 4 of the best and most probably practices. So, let’s talk about each of them.
- Way 1. Using Auto Windows Installation Program — EaseUS OS2Go
- Way 2. Disconnecting from the Internet
- Way 3. Creating a Dummy Account
- Way 4. Using OOBE\BYPASSNRO Command
Way 1. Using Auto Windows Installation Program — EaseUS OS2Go
When installing Windows 10 or 11, you can turn to professional Windows installation programs, like EaseUS OS2Go, for help. This is also the best and easiest way to help you bypass a Microsoft account for Windows 10 setup.
EaseUS OS2Go is a professional Windows To Go creator for Windows 11/10/8/7, which can help you to set up a PC without a Microsoft account and create a Windows 10 live USB. All you need is a USB drive or an external hard drive.
It lets you put your Windows 10 on another computer and create a bootable USB drive for Windows. In addition, you can also use it to install your Windows on a Mac without boot camp.
The following are the reasons why we recommend EaseUS OS2Go to you.
- Create a Windows 10 installation USB drive without ISO
- Install Windows 11 on any PC
- Clone Windows 11/10/8/7 to a USB drive as portable Windows
- Play Windows games on Mac smoothly
- Copy installed Windows to USB
Here is how to install Windows 10/11 with EaseUS OS2Go.
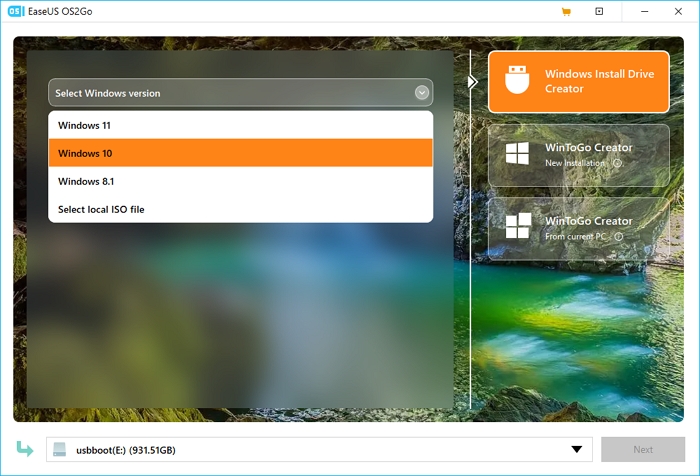
Step 1. Launch OS2Go after installation, and click Windows Install Drive Creator. Select Windows version you want to install.
Step 2. Connect your USB flash drive/external drive to the computer. It will automatically detect your plugged-in device, so you only need to click the Next button.
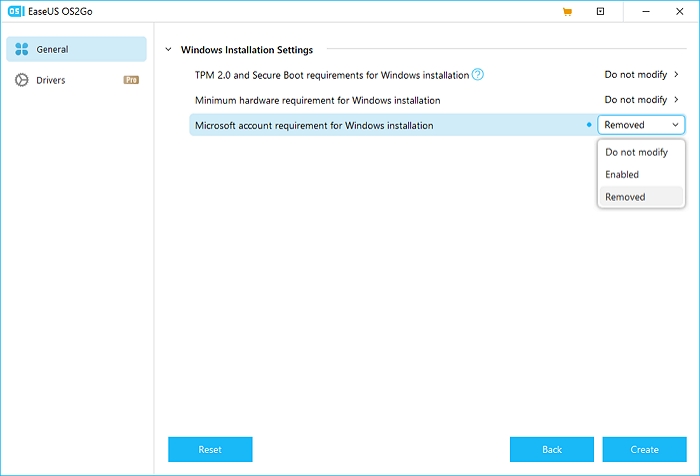
Step 3. Under the Windows Installation Settings tab, select Removed for Microsoft account requirement for Windows installation. Then click Create.
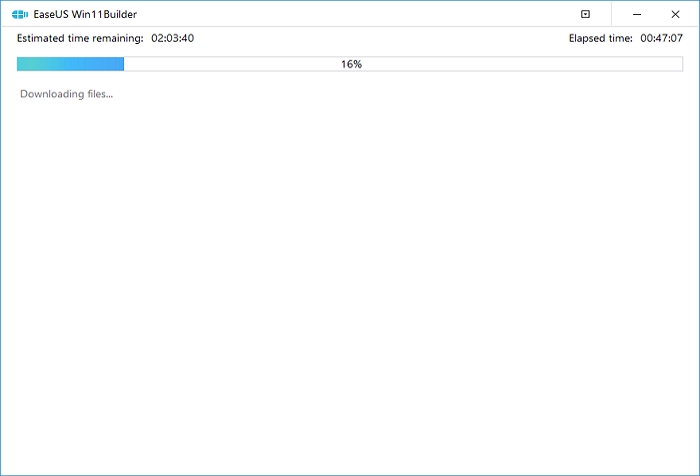
Step 4. The software will empty your plugged-in external device data if it’s a used one. Once the downloading process begins, wait until it is finished or leave for a while to do your job.
Step 5. After downloading the Windows iso image file on the external drive, install Windows from the bootable USB drive on your computer by following the installation wizard step by step.
This will help you to create a Windows 10 bootable USB. Now, you can follow the on-screen instructions to install Windows 10 step by step.
Way 2. Disconnecting from the Internet
If you do not want to use a Microsoft account to install Windows, then a hidden trick can let you skip the sign-in with your Microsoft account option. The following is how to set up your Windows without using a Microsoft account by disconnecting from the Internet.
Step 1. Remove the ethernet cable or turn off wi-fi to disconnect your computer from an internet connection. Avoid any warnings or prompts. A new window will then open and ask, «Who’s going to use this PC?»

Step 2. Enter your desired account name and click Next.
Step 3. Set the password and click Next.
A local user account on Windows will be made as a result. You can now complete the setup and access your PC with the local account.
Way 3. Creating a Dummy Account
Actually, you can still create a local account by following Microsoft’s suggestions. For that, you must create a Microsoft account during installation and switch it to a local user account. Here is what you can do:
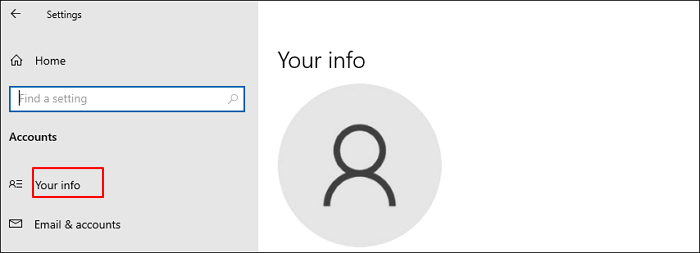
Step 1. Choose Settings > Accounts after logging in with your Microsoft account.

Step 2. On the left pane, click Your Info.
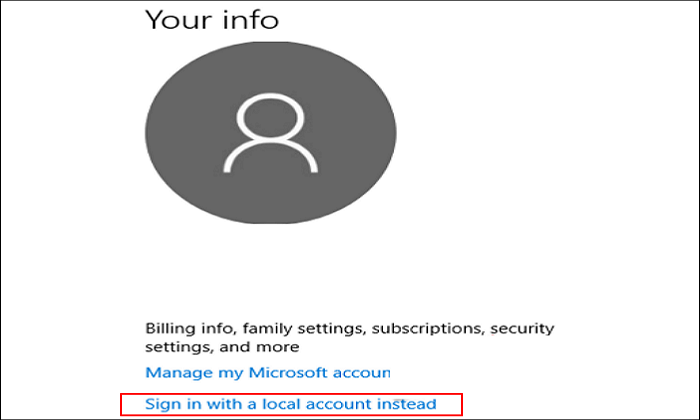
Step 3. After that, select Sign in with a local account instead.
Switching to a local user account is a simple process that Windows 10 will walk you through. You can remove the fake Microsoft account from the system once you’ve created your local account in Windows.
Way 4. Using OOBE\BYPASSNRO Command
The last way to skip a Microsoft account for Windows 10 installation is to use oobe/bypassnro command. It requires a few steps during Windows 10 setup to skip the Microsoft account creation. Follow the steps below when the account sign-in window pops up.
Step 1. Press the Shift + F10 keys to launch the command prompt.
Step 2. Type the following command.
oobe\bypassnro

Step 3. It will show a notice once the reboot is finished. Ignore it and click Next.
Step 4. After that, you must repeat the steps for adding the area, keyboard layout, etc. However, the system will not show the account sign-in window this time.
Now you can complete the Windows 10 setup without any hassle.
Here is also a video on how to install Windows 10 without using a Microsoft account.
If you like this article and find it useful, you can share it on social media.
The Bottom Line
That is all about how to install Windows 10 without a Microsoft account. These 4 methods will surely help you set up Windows 10 without using a Microsoft account. If you do not have much time, you do not have to try them one by one. You can use EaseUS OS2Go to help you bypass a Microsoft account for Windows 10 setup.
EaseUS OS2Go is a practical tool for Windows and Mac users to help create a bootable USB drive. When you encounter the WinToUSB not working issue, it can also help you out. More valuable features are waiting for you to figure out. Just try it!
FAQs
1. What happens if you remove Microsoft account from Windows 10?
Suppose the account you want to remove is a Microsoft account. In that case, you will lose access to all of the Microsoft account services, including OneDrive, Office, Xbox, and even this community forum, as well as everything associated with that account that is stored anywhere.
2. Why do I need a Microsoft account to setup Windows 10?
Your Windows theme and other preferences can be shared among your many PCs. However, a Microsoft account is necessary to use OneDrive to back up or sync your data. Also, you may sign into Windows, Microsoft 365, the Microsoft Store, and Xbox Live with the same account.
3. Does Windows 10 force you to use a Microsoft account?
One of the main issues with Windows 10 is that you have to use a Microsoft account to log in, necessitating an Internet connection. However, despite what would seem to be the case, you are not obliged to utilize a Microsoft account.
If you perform a clean Windows 11 / 10 installation or set up a new user account, you will be asked to log in with a Microsoft account. However, users have reported on multiple occasions that they need to provide their Microsoft account credentials each time they attempt to log into their accounts.
We will show you 3 methods to block/prevent Windows from asking for your Microsoft account credentials. By using these methods, you can also block other users on your computer from being asked for Microsoft account credentials.
Note that disabling a Microsoft account is not the same as removing a Microsoft account. Nevertheless, we have also covered this topic near the end of this post.
Table of Contents
Disable/block Microsoft Account using Group Policy
You can block Windows from asking for your Microsoft account credentials when trying to look into your computer account using the Group Policy Editor. Here is how:
Note: If you are using a Home edition of Windows 10 or 11, learn how to enable gpedit.msc or move on to the next section to use an alternative method.
- Open the Group Policy Editor by typing in gpedit.msc in the Run dialog box.

- Navigate to the following location using the left pane:
Computer Configuration >> Windows Settings >> Security Settings >> Local Polices >> Security Options - Now double-click the policy “Accounts: Block Microsoft accounts” in the right pane.

- From the popup, select either of the following options according to your preferences. When selected, click Apply and Ok.
- The policy is disabled: This option disables the policy, which is the default setting.
- Users can’t add Microsoft accounts: This option disables users on the system from adding a new Microsoft account, but they can still use the one already used to sign in. This is a preferred option for existing Microsoft users who don’t want to add additional Microsoft accounts.
- Users can’t add or log in with Microsoft accounts: This option completely blocks Microsoft account access from your system. You can’t even log in to the system using your existing Microsoft account. You can only create a local account.
- Now run the Command Prompt with administrative rights and paste the following cmdlet to implement the changes.
gpupdate /force


Now you can sign out or restart your computer and log back in, and Windows will not ask for your Microsoft account information. However, you may need to now create a local account.
Disable/block Microsoft Account using Windows Registry
You can also achieve the same using the Windows Registry Editor. You can adapt this method if you are a Windows Home user. here is how to do so:
Note: Misconfiguration of critical values in the system’s registry could be fatal for your operating system. Therefore, we insist that you create a system restore point before proceeding forward with the process.
- Open the Registry Editor by typing in regedit in Run.
- Now paste the following in the navigation bar at the top for quick navigation:
Computer\HKEY_LOCAL_MACHINE\SOFTWARE\Microsoft\Windows\CurrentVersion\Policies\System
- Right-click the System Key in the left pane, expand New from the context menu, and then click DWORD (32-bit) Value.
- Name the new DWORD “NoConnectedUser.”
- Double-click the newly-created DWORD and set its Value Data to either of the following values:
- 0 = Allow Microsoft Accounts
- 1 = Users can’t add Microsoft Accounts
- 3 = Users can’t add or log on with Microsoft accounts
Click OK when done.
- Now restart your computer for the changes to take effect.


The Value Data options you use for the “NoConnectedUser” Value are similar to the 3 options we saw in the Group Policy “Accounts: Block Microsoft accounts” we saw in the last section above.
Block from Switching to Microsoft Account from Registry
You can also implement this method to block local accounts from converting to Microsoft account using the Registry Editor.
- Open the Registry Editor by typing in regedit in Run.
- Now paste the following into the navigation bar at the top for quick navigation:
Computer\HKEY_LOCAL_MACHINE\SOFTWARE\Microsoft\PolicyManager\default\Settings\AllowYourAccount
- Here, double-click on “Value” in the right pane and set its Value Data to 0. Then click Ok.
- Now reboot your PC for the changes to take effect.


When you return, you will see that the option to “Sign in with a Microsoft account instead” is greyed out on the Accounts Settings page.
These are the 3 methods that prevent Windows from asking for your Microsoft account credentials. Let us now show you how to simply remove a Microsoft account and convert it into a local account instead.
How to Remove Microsoft Account
Perform the following steps to remove the Microsoft account from your computer account:
- Navigate to the following:
Settings app >> Accounts >> Email and accounts - Here, click on your Microsoft account to expand it:

- Now click Remove under your Microsoft account, and then click Yes from the confirmation box.


Your Microsoft account will now be removed from your PC.
Final Thoughts
Removing a Microsoft account from your computer account may save you the trouble of not having to put in your credentials. However, you may also lose a few Windows features this way, such as synced Clipboard, Cortana search, etc. You can no longer sync your settings and other data between devices, as the Microsoft account no longer exists on that PC.
If you have to enter your Microsoft account credentials each time while logging in, we suggest you set up a PIN to log in faster, while maintaining your Microsoft account on the PC.
Всем привет! Как-то столкнулся с такой ситуацией при обновлении Windows 10. После очередного обновления и перезагрузке системы при старте появляется синее окно «Войдите с помощью учетной записи Майкрософт». В окне не предусмотрена возможность зайти под локальной учеткой. Или входи под Майкрософтом, или создавай учетку Майкрософта. Кнопка «Далее» или «Отмена» не помогает и невозможно пропустить создание учетной записи. Что делать?
Решение
Как оказалось все довольно просто. Для того, чтобы пропустить создание учетной записи Microsoft необходимо временно отключиться от интернета (вынуть шнур из компьютера, отключить wifi роутер) и попробовать снова. И ура…. наш компьютер даст нам возможность зайти под локальной учеткой. Проверено — работает!
В этой инструкции — пошаговое описание нескольких способов удалить учетную запись Microsoft в Windows 10 в различных ситуациях: когда это единственная учетная запись и вы хотите сделать ее локальной; когда эта учетная запись не нужна. Способы из второго варианта подойдут и для удаления любой локальной учетной записи (кроме системной записи Администратор, которую, однако, можно скрыть). Также в конце статьи присутствует видео инструкция. Также может пригодиться: Как изменить E-mail учетной записи Майкрософт, Как удалить пользователя Windows 10.
В случае если случилось так, что вы не можете войти под своей учетной записью Майкрософт (а также сбросить для нее пароль на сайте MS) и именно по этой причине хотите ее удалить, при этом другой учетной записи нет (если есть — используйте обычный путь удаления), то подсказки о том, как это сделать, активировав скрытую учетную запись администратора (а под ней уже можно и удалить учетку и завести новую) вы можете найти в статье Как сбросить пароль Windows 10.
Как убрать учетную запись Майкрософт и включить вместо нее локальную
Первый, самый простой и заранее предусмотренный в системе способ — просто сделать свою текущую учетную запись локальной с помощью настроек (при этом ваши параметры, настройки оформления и прочее в дальнейшем не будет синхронизироваться на устройствах).
Для того, чтобы сделать это, просто зайдите в Пуск — Параметры (или нажмите клавиши Win+I) — Учетные записи и выберите пункт «Электронная почта и учетные записи». Далее выполните простые шаги. Примечание: предварительно сохраните всю свою работу, так как после отключения аккаунта Майкрософт потребуется выйти из системы.
- Нажмите по пункту «Войти вместо этого с локальной учетной записью».

- Введите текущий пароль учетной записи Майкрософт.
- Введите новые данные, уже для локальной учетной записи (пароль, подсказка, имя учетки, если его нужно изменить).

- После этого вам сообщат о том, что нужно выйти из системы и зайти уже с новой учетной записью.


После выхода и повторного входа в Windows 10, у вас будет использоваться локальная учетная запись.
Как удалить учетную запись Майкрософт (или локальную), если есть другая учетная запись
Второй распространенный случай — в Windows 10 было создано более одной учетной записи, вы пользуетесь локальным аккаунтом, а ненужную учетную запись Майкрософт нужно удалить. Прежде всего, для этого нужно зайти под учетной записью администратора (но не той, что будем удалять, при необходимости предварительно установите права администратора для своей учетной записи).
После этого зайдите в Пуск — Параметры — Учетные записи и выберите пункт «Семья и другие пользователи». Выберите в списке «Другие пользователи» ту учетную запись, которую требуется удалить, кликните по ней и нажмите соответствующую кнопку «Удалить».

Вы увидите предупреждение о том, что вместе с учетной записью в данном случае будут удалены также все данные (файлы на рабочем столе, документы, фото и прочее этого человека — все то, что хранится в C:\Users\Имя_пользователя) этого пользователя (просто данные на дисках никуда не денутся). Если вы предварительно позаботились об их сохранности, нажмите «Удалить учетную запись и данные». Кстати, в следующем способе все данные пользователя можно сохранить.

Через короткий промежуток времени учетная запись Майкрософт будет удалена.
Удаление учетной записи Windows 10 с помощью панели управления
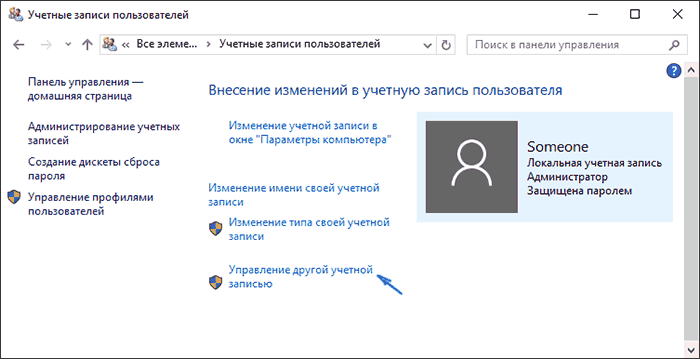
И еще один способ, наверное, самый «естественный». Зайдите в панель управления Windows 10 (включите вид «значки» справа вверху, если там стоит «категории»). Выберите пункт «Учетные записи пользователей». Для дальнейших действий вы должны иметь права администратора в ОС.
- Нажмите «Управление другой учетной записью».

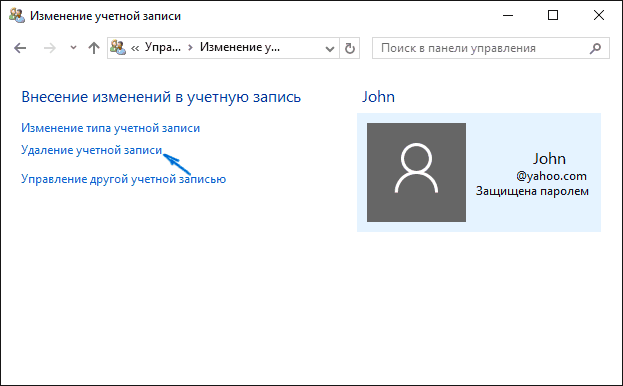
- Выберите учетную запись Майкрософт (подойдет и для локальной), которую требуется удалить.
- Нажмите «Удаление учетной записи».

- Выберите, требуется ли удалить файлы учетной записи или их нужно оставить (при этом, во втором случае они будут перемещены в папку на рабочем столе текущего пользователя).

- Подтвердите удаление учетной записи с компьютера.
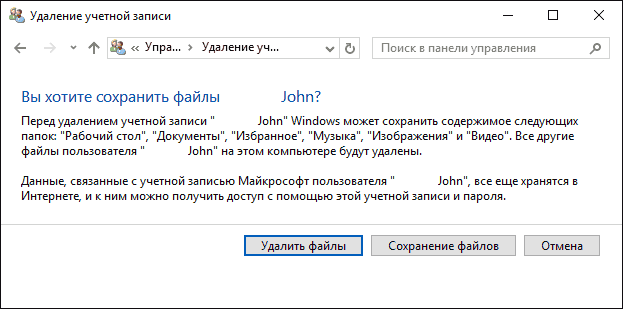
Готово, это все, что нужно, чтобы убрать ненужную учетную запись.
Ещё один способ сделать то же самое, из тех, которые подходят для всех редакций Windows 10 (также требуется быть администратором):
- Нажмите клавиши Win+R на клавиатуре
- Введите netplwiz в окно «Выполнить» и нажмите Enter.
- На вкладке «Пользователи» выберите ту учетную запись, которую нужно удалить и нажмите кнопку «Удалить».

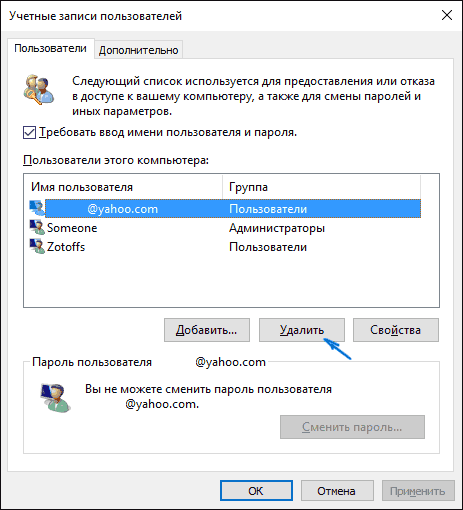
После подтверждения удаления, выбранная учетная запись будет удалена.
Удаление учетной записи Майкрософт — видео
Дополнительная информация
Это не все способы, но зато все перечисленные варианты подходят для любой из редакций Windows 10. В профессиональной версии вы можете, например, выполнить эту задачу через «Управление компьютером» — «Локальные пользователи и группы». Также задачу можно выполнить с помощью командной строки (net users).
Если я не учел какой-то из возможных контекстов необходимости удаления учетной записи — спрашивайте в комментариях, я постараюсь подсказать решение.