
If you’re looking to disable Turbo Boost on Windows 11, you’ve come to the right place. Turbo Boost is a nifty feature that revs up your processor’s speed when you need it most. But if you’re looking to keep things cool and quiet, or save some battery life, you might want to switch it off. It’s not as tricky as it sounds, and with a few simple steps, you can turn it off through your system’s BIOS settings. Let’s dive in to make sure your computer is running just the way you want it.
Disabling Turbo Boost on Windows 11
To disable Turbo Boost in Windows 11, you’ll need to access the BIOS settings on your computer. The BIOS is like your computer’s control center, and it’s where you can change important settings like Turbo Boost. Here’s how to do it:
Step 1: Restart Your Computer
Restart your computer to start the process of accessing the BIOS.
Restarting your computer is essential to access the BIOS because this menu is only available before Windows actually loads. Once your system begins rebooting, you’ll need to be quick on your feet to hit the right key and enter the BIOS.
Step 2: Enter the BIOS
Press the designated key (often F2, F10, DEL, or ESC) during startup to enter the BIOS settings.
Different computers have different keys for BIOS entry. You might see a quick screen flash by during startup that tells you which key to press. If you’re not sure, a quick search with your computer’s model number should help.
Step 3: Locate the Turbo Boost Option
Navigate through the BIOS menu to find the Turbo Boost option, usually under the Advanced or Performance tab.
Take your time while searching for this option; the BIOS interface can be a bit intimidating. But don’t worry—you’re looking for a section related to CPU performance or options.
Step 4: Disable Turbo Boost
Select the Turbo Boost option and set it to Disabled.
Once you find the setting, change its status to ‘Disabled’. This will stop your processor from automatically increasing its speed beyond its base frequency, effectively turning off Turbo Boost.
Step 5: Save and Exit the BIOS
Save your changes and exit the BIOS to allow your computer to boot normally with Turbo Boost disabled.
Be sure to save your changes before exiting. Usually, there’s a specific key to save and exit, but it should be clearly indicated on the BIOS screen. Once you exit, your computer will boot up with Turbo Boost disabled.
After you’ve completed these steps, your processor will no longer automatically increase its speed beyond the base frequency. This means your computer might run a little cooler, quieter, and could even save on battery life.
Tips for Disabling Turbo Boost on Windows 11
- Backup Your Data: Always back up important data before making BIOS changes to prevent data loss.
- Understand the Impact: Disabling Turbo Boost might reduce performance in demanding tasks.
- Check for BIOS Updates: Some systems might have newer BIOS versions that change menu layouts.
- Consider Power Plans: Adjust your Windows power settings for better power management.
- Consult Your Manual: If you’re unsure, check your computer’s manual for specific BIOS access instructions.
Frequently Asked Questions
What is Turbo Boost?
Turbo Boost is a feature that allows the processor to run faster than its base operating frequency for better performance.
Why would someone want to disable Turbo Boost?
Disabling Turbo Boost can help lower heat output and fan noise, and may improve battery life on laptops.
Can I re-enable Turbo Boost after disabling it?
Yes, you can re-enable it by following the same steps and setting the Turbo Boost option to Enabled.
Will disabling Turbo Boost affect gaming performance?
It might, as Turbo Boost can enhance performance during intensive tasks like gaming. Performance may decrease slightly without it.
Is it safe to disable Turbo Boost?
Yes, it’s safe to disable Turbo Boost, but be aware of the potential impact on performance for certain applications.
Summary
- Restart your computer.
- Enter the BIOS.
- Locate the Turbo Boost option.
- Disable Turbo Boost.
- Save and exit the BIOS.
Conclusion
Disabling Turbo Boost in Windows 11 can be a smart move if you’re looking to manage heat and noise or extend battery life. While this feature is useful for boosting performance, not everyone needs it running all the time. Sometimes, keeping your system calm and collected is more valuable than the extra speed Turbo Boost provides.
So if you find your laptop running hot or the fans roaring like a jet taking off, consider turning off Turbo Boost. It’s a simple tweak that could make a big difference in your everyday computing experience.
For further reading, you might want to explore how different power settings in Windows 11 interact with your hardware. Or dive into more BIOS settings to see what other optimizations you can make. Remember, your computer should work for you, and small adjustments like disabling Turbo Boost can tailor your system to better fit your needs.
Matthew Burleigh has been writing tech tutorials since 2008. His writing has appeared on dozens of different websites and been read over 50 million times.
After receiving his Bachelor’s and Master’s degrees in Computer Science he spent several years working in IT management for small businesses. However, he now works full time writing content online and creating websites.
His main writing topics include iPhones, Microsoft Office, Google Apps, Android, and Photoshop, but he has also written about many other tech topics as well.
Read his full bio here.
Intel Turbo Boost is a technology that allows Intel processors to run above their base clock speed to improve performance during demanding tasks. While this feature enhances gaming, video editing, and other demanding applications, some users may wish to disable it. Reasons can vary from wanting to limit CPU heat generation, reduce power consumption, or stabilize performance in specific applications. In this article, we will guide you through the process of disabling Intel Turbo Boost on Windows 11, examining the various methods available and explaining each step in detail.
Understanding Intel Turbo Boost
Before diving into disabling this feature, it’s essential to understand what Intel Turbo Boost is. Turbo Boost technology dynamically increases the processor’s frequency to improve performance when necessary. When your CPU is under heavy load, Turbo Boost can increase its clock speed to enhance responsiveness and performance. Conversely, when the CPU’s load is light, it can slow down, conserving power and reducing heat.
This functionality is usually beneficial, but certain scenarios may necessitate its deactivation, such as:
- Thermal Management: If your system tends to overheat under load.
- Stability Reasons: Some users find that disabling Turbo Boost can lead to more consistent gaming or professional workloads.
- Power Consumption: Users who are battery-conscious may want to disable it to conserve energy.
Methods to Disable Intel Turbo Boost
Disabling Intel Turbo Boost can be accomplished through several methods on Windows 11. Here are the primary approaches:
- Using the BIOS/UEFI Firmware Settings
- Using Intel Extreme Tuning Utility (XTU)
- Using Windows Power Options
- Using Command Prompt
- Using Third-Party Software
Let’s explore each method in detail.
Method 1: Using the BIOS/UEFI Firmware Settings
Disabling Turbo Boost in BIOS/UEFI is one of the most effective methods, as it prevents the CPU from using Turbo Boost at the hardware level.
Steps to Disable Turbo Boost from BIOS/UEFI:
-
Restart Your Computer:
Begin by restarting your PC. -
Enter BIOS/UEFI:
As your system starts, press the designated key to enter BIOS/UEFI. This key varies by manufacturer but is oftenF2,Del, orEsc. Check your motherboard’s manual for the specific key. -
Locate CPU Configuration Settings:
Within BIOS/UEFI, use the arrow keys to navigate to theAdvanced,Performance, orCPU Configurationsection. These names can vary depending on the BIOS version. -
Disable Turbo Boost:
Look for a setting related to Turbo Boost, typically labeled as “Turbo Boost Technology,” “Intel Turbo Boost,” or similar. Change its value toDisabled. -
Save Changes and Exit:
Once you’ve disabled Turbo Boost, navigate to theSave & Exitsection, and select the option to save changes. Your system will reboot with Turbo Boost disabled.
Method 2: Using Intel Extreme Tuning Utility (XTU)
Intel Extreme Tuning Utility (XTU) is a powerful tool that allows users to overclock CPUs and adjust performance parameters. It also provides an option to disable Turbo Boost.
Steps to Disable Turbo Boost Using XTU:
-
Download and Install XTU:
Download Intel XTU from the Intel website and install it by following the on-screen instructions. -
Launch the Application:
After installation, open XTU. -
Locate Turbo Boost Settings:
On the main interface of XTU, you will see categories related to your CPU’s performance. Look for the “Turbo Boost” setting. -
Disable Turbo Boost:
Uncheck the box or toggle the switch to disable Turbo Boost. -
Apply and Save Settings:
Click on the “Apply” button to save the changes. -
Monitor Performance:
XTU also provides options to monitor the CPU temperature and performance metrics. Make sure to check these to ensure your system operates within safe parameters.
Method 3: Using Windows Power Options
If you prefer not to alter system settings through BIOS or software directly designed for overclocking, you can disable Turbo Boost through Windows power settings.
Steps to Adjust Power Settings:
-
Open Power Options:
Right-click on the battery icon in the taskbar and select “Power Options,” or alternatively, navigate toSettings > System > Power & battery. -
Access Additional Power Settings:
Select “Additional power settings” located under “Related settings”. -
Modify Power Plan Settings:
Identify your current power plan and click on “Change plan settings”. Here, select “Change advanced power settings”. -
Adjust Processor Power Management:
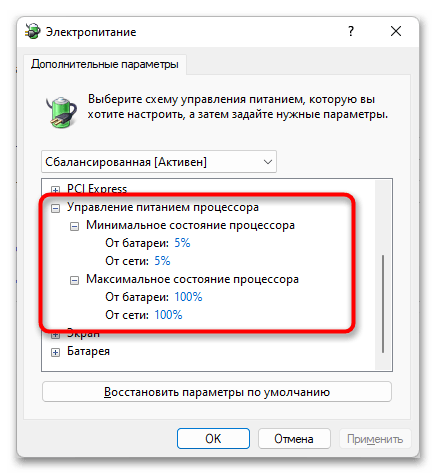
Expand the “Processor power management” section, and further expand “Maximum processor state”. Here, you can set the maximum state to a lower percentage (e.g., 99% to prevent Turbo Boost from kicking in). -
Apply and Save:
Click “OK” to apply the changes, and then exit out of the settings menus.
Method 4: Using Command Prompt
For users who prefer command-line interfaces, the Command Prompt can allow for disabling Turbo Boost via changes to power management settings.
Steps to Use Command Prompt:
-
Open Command Prompt as Administrator:
Search for ‘cmd’ in the Windows Start Menu, then right-click onCommand Promptand select “Run as administrator”. -
Input Power Configuration Command:
In the Command Prompt window, enter the command:powercfg -setacvalueindex SCHEME_CURRENT SUB_PROCESSOR PROCTHROTTLEMAX 99 powercfg -setdcvalueindex SCHEME_CURRENT SUB_PROCESSOR PROCTHROTTLEMAX 99This command sets the maximum processor state to 99%, effectively preventing Turbo Boost.
-
Activate Changes:
To activate the changes, run:powercfg -setactive SCHEME_CURRENT -
Close Command Prompt:
Typeexitand pressEnterto close the Command Prompt.
Method 5: Using Third-Party Software
If you are not comfortable using technical utilities like the BIOS or Intel XTU, third-party applications can also help to manage processor settings.
-
Research Software: Look for well-reviewed third-party applications designed for CPU management. Software like ThrottleStop offers options to disable Turbo Boost conveniently.
-
Download and Install:
Follow the instructions for installation. -
Configure Settings:
Within the application, locate and uncheck any Turbo Boost options, then save your changes. -
Monitor Performance:
As with XTU, these applications often come with performance monitoring features, allowing you to observe your CPU load and temperatures.
Post-Disabling Considerations
-
Monitor System Performance: After disabling Turbo Boost, watch your system’s performance and temperatures. Make sure no adverse effects occur. If the CPU overheats or the system destabilizes, consider reverting changes.
-
Consider Applications: Some applications may benefit from Turbo Boost, while others may perform better without it. Understanding your particular workload can guide your decision.
-
Understand Limitations: As Turbo Boost is a performance-enhancing feature, disabling it may result in reduced performance during demanding tasks.
-
System Updates: Ensure you keep your BIOS and Intel XTU up to date for optimal performance and stability.
Conclusion
Disabling Intel Turbo Boost can significantly affect how your CPU manages power and performance. Whether you choose to proceed through BIOS, Intel XTU, Windows Power Options, Command Prompt, or third-party software, be mindful of the reasons you’re making this change, and monitor your system’s performance and stability thereafter. Ultimately, the choice depends on individual user preferences, workloads, and system management needs. By following this comprehensive guide, you now have the tools necessary to disable Turbo Boost on Windows 11 safely and effectively.
Все способы:
- Способ 1: Изменение текущего плана электропитания
- Способ 2: Ручная дополнительная настройка электропитания
- Способ 3: Отключение «Turbo Boost» через BIOS
- Проверка активности режима Turbo Boost
- Вопросы и ответы: 0
Обратите внимание, что при отключении технологии Turbo Boost любым из представленных в материале методом вы ограничиваете максимальную мощность процессора, не позволяя ему потреблять все доступные ресурсы. В некоторых случаях это может вызвать понижение общей производительности системы. Поэтому если вы обнаружите проблемы с быстродействием, рекомендуем вернуть измененные настройки.
Способ 1: Изменение текущего плана электропитания
При использовании ноутбука нагрузка на процессор временами достигает 100%. Как раз в такие пиковые моменты и должен активироваться режим Turbo Boost в автоматическом режиме, поскольку он по умолчанию включен. Если же у вас возникла необходимость его деактивировать, то вместо полного отключения самого режима для начала можно настроить план электропитания таким образом, чтобы он регулировал нагрузку на ЦП, не позволяя ему работать на полную мощность.
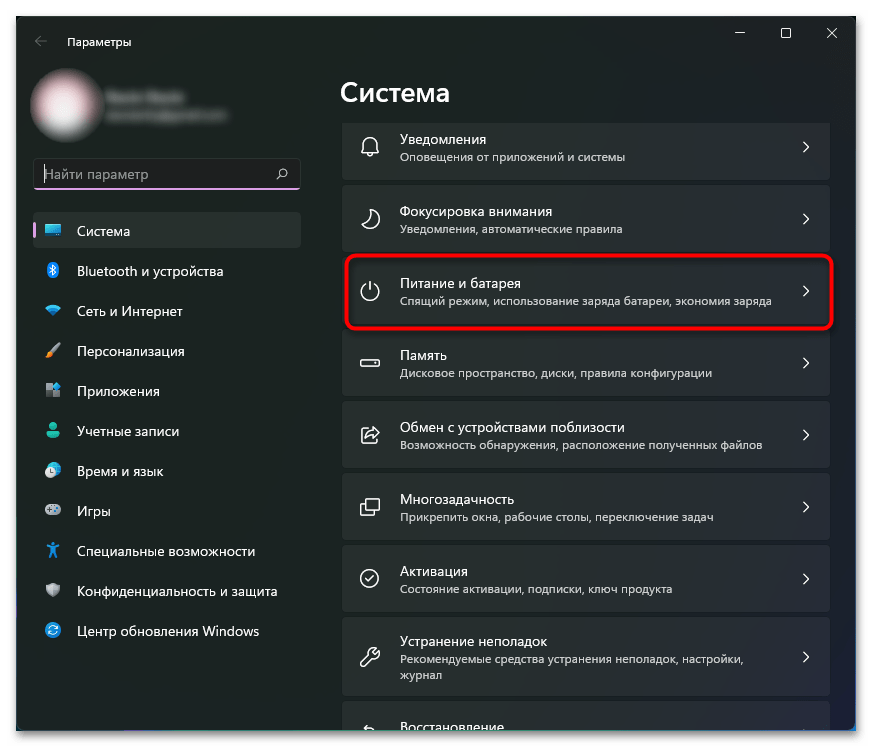
- Откройте меню «Пуск» и перейдите в «Параметры», щелкнув по значку с изображением шестеренки.
- Вы окажетесь в главном разделе под названием «Система». В нем справа выберите категорию «Питание и батарея», нажав по ней левой кнопкой мыши.
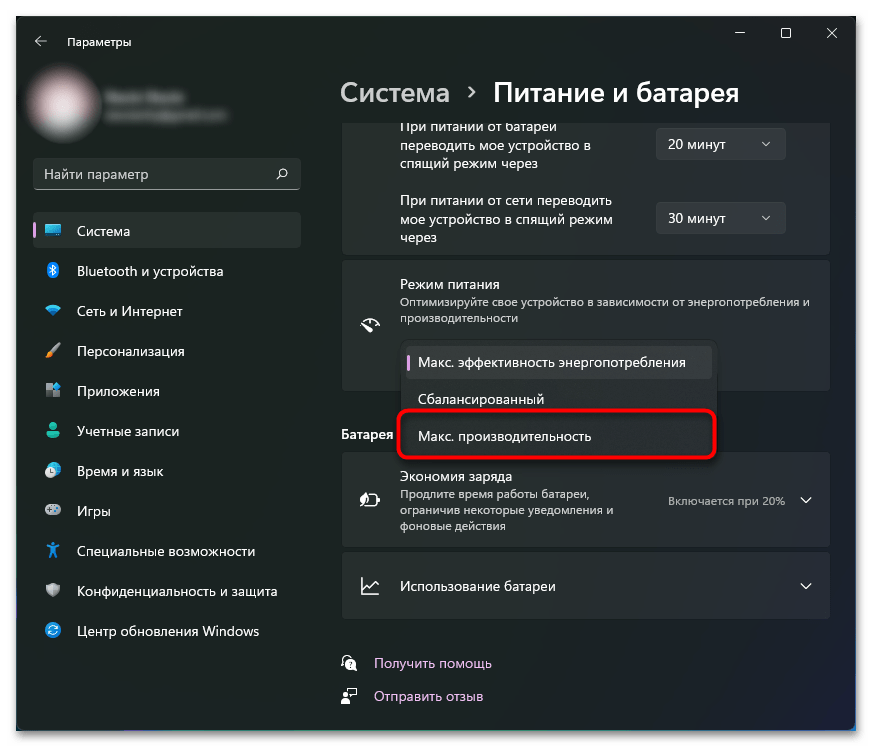
- Отыщите настройку с названием «Режим питания» и посмотрите на ее текущее значение. Если установлен режим «Макс. производительность», значит, никаких ограничений для процессора нет. Попробуйте выбрать «Сбалансированный» или «Макс. эффективность энергопотребления», следя за тем, как в таких режимах будет работать ваш ноутбук.
- Вместе с этим для режима работы от батареи можете установить автоматическое включение экономии заряда, чтобы нагрузка на процессор была еще меньше. Это значительно повысит длительность работы устройства без подключения к сети.


Способ 2: Ручная дополнительная настройка электропитания
При использовании сбалансированного или энергоэффективного плана электропитания нагрузка на процессор все равно может достигать 100%, если вы всегда работаете с подключенным ноутбуком к сети. Поэтому если вам не помог описанный выше метод понизить максимальную нагрузку, можно вручную изменить дополнительные параметры электропитания, что осуществляется так:
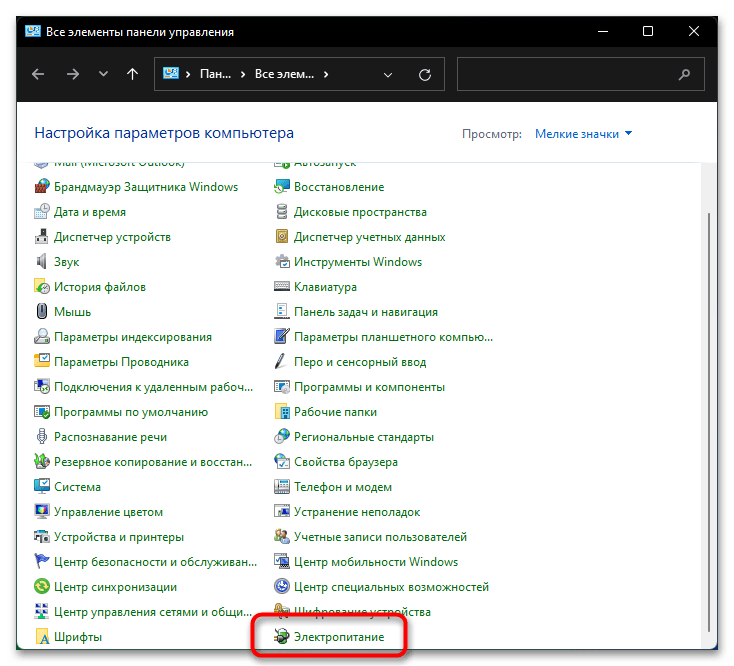
- Откройте «Пуск», через поиск отыщите «Панель управления» и запустите данное приложение.
- В списке с параметрами найдите пункт «Электропитание» и дважды щелкните по нему левой кнопкой мыши, чтобы перейти к настройкам.
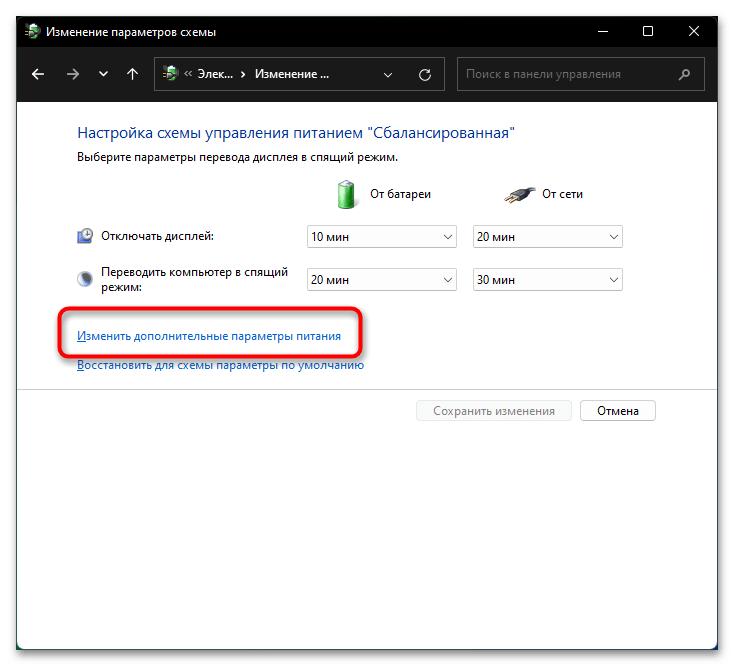
- Изменять можно любую текущую схему, даже если выбрана «Максимальная производительность». Для этого понадобится кликнуть по ссылке «Настройка схемы электропитания».
- Далее найдите надпись «Изменить дополнительные параметры питания» и тоже нажмите по ней левой кнопкой мыши.
- В отобразившемся окне разверните список параметров «Управление питанием процессора». «Минимальное состояние процессора» можно оставить по умолчанию, если значение не установлено как «100%». Для «Максимальное состояние процессора» установите значение меньше ста, чтобы нагрузка никогда не достигала предела. Соответственно, чем меньше процентов вы напишете, тем меньше будет итоговая производительность лэптопа. После применения изменений обязательно перезагрузите Windows, чтобы они вступили в силу.


Способ 3: Отключение «Turbo Boost» через BIOS
Завершающий метод подойдет тем пользователям, кто хочет полностью отключить турбо буст без дополнительных настроек плана электропитания. В этом случае изменения вносятся непосредственно в BIOS, где и находится данная процессорная функция, работающая по умолчанию. Ее расположение примерно одинаковое, поэтому давайте остановимся на UEFI от MSI в качестве примера.
- В первую очередь понадобится отправить ноутбук на перезагрузку и при следующем включении сразу войти в BIOS, используя для этого горячую клавишу. Более детально о выполнении этого процесса читайте в отдельной статье на нашем сайте по ссылке ниже.
Подробнее: Как попасть в BIOS на ноутбуке
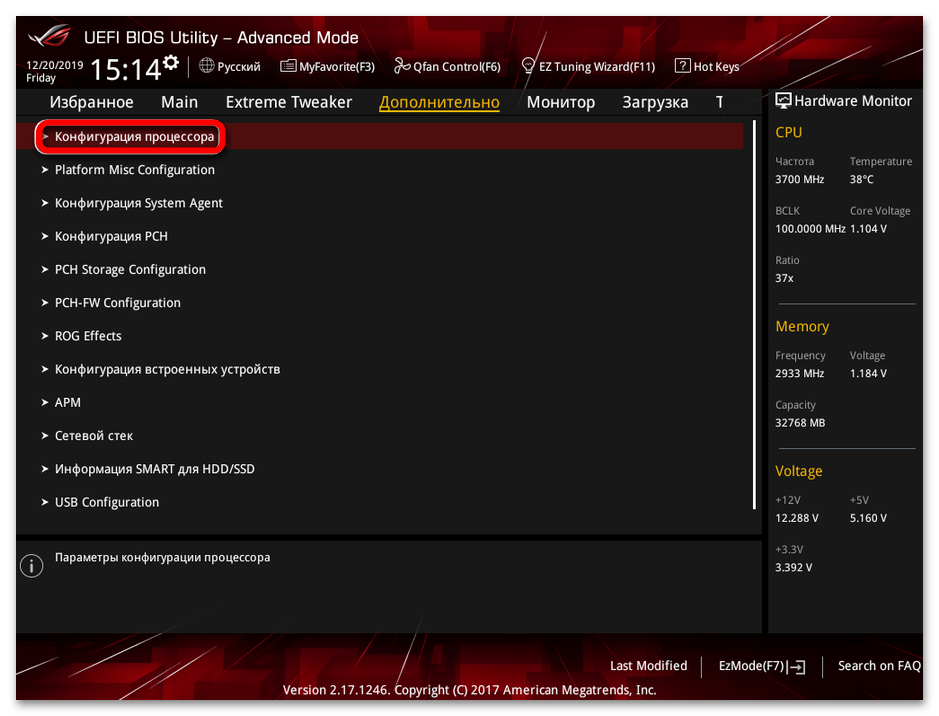
- Далее откройте список дополнительных настроек и найдите пункт «Конфигурация процессора». В английской версии UEFI или BIOS он может называться как «Tweaker».
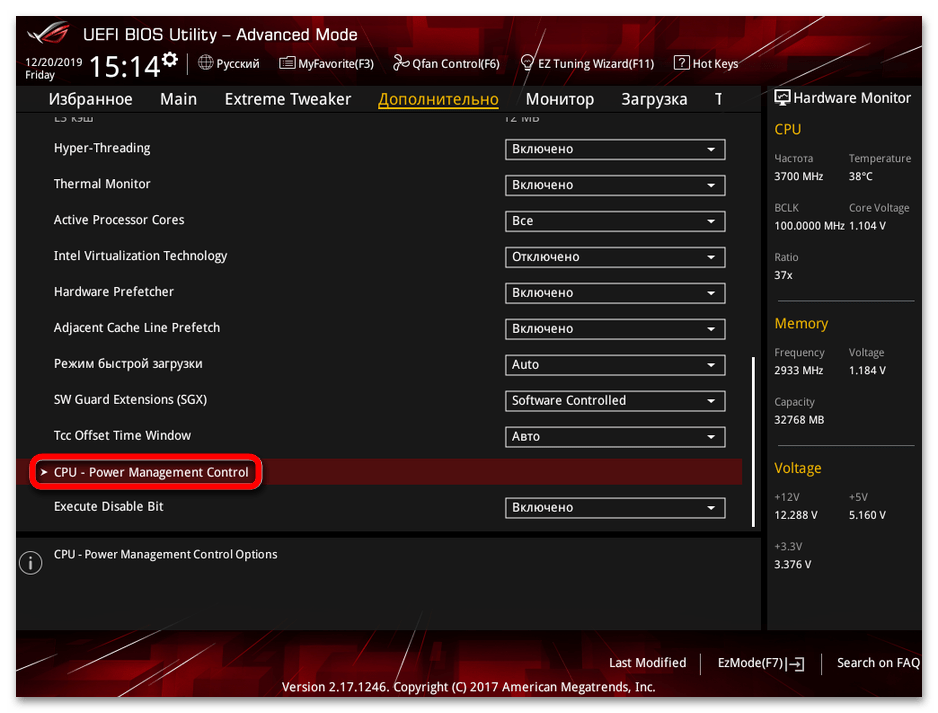
- Найдите раздел с названием «CPU — Power Management Control». Иногда он еще имеет название «Управление питанием процессора», что распространено в полностью русифицированных версиях БИОС.
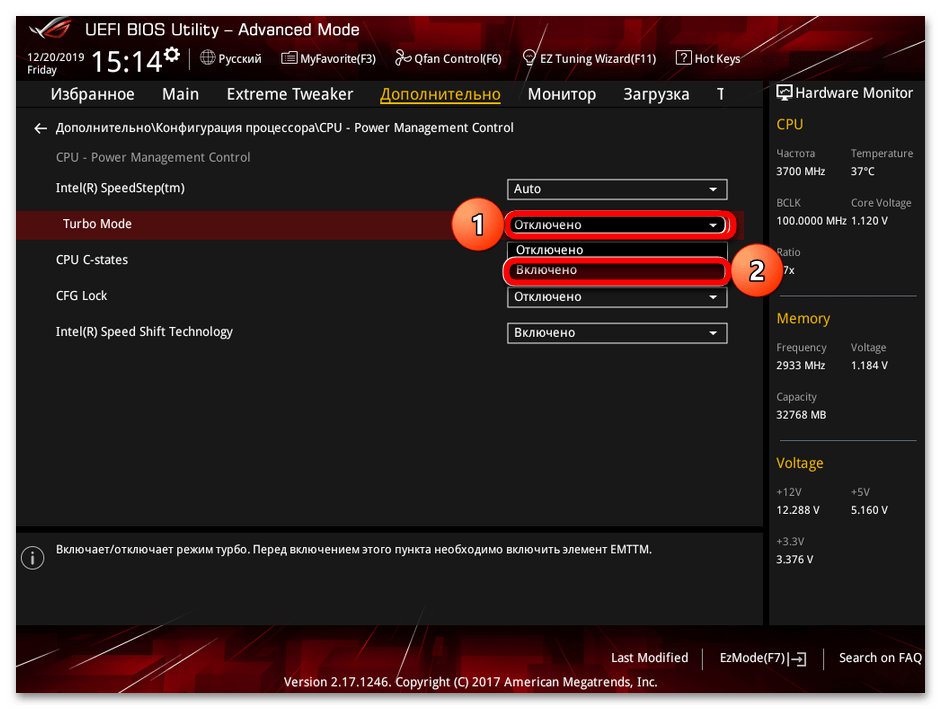
- В списке настроек питания процессора вас интересует «Turbo Mode». Посмотрите на его текущее состояние и выберите значение «Отключено» или «Disabled». Для включения, если вы вдруг решите потом изменить настройку, нужно выбрать «Включено» или «Enabled».
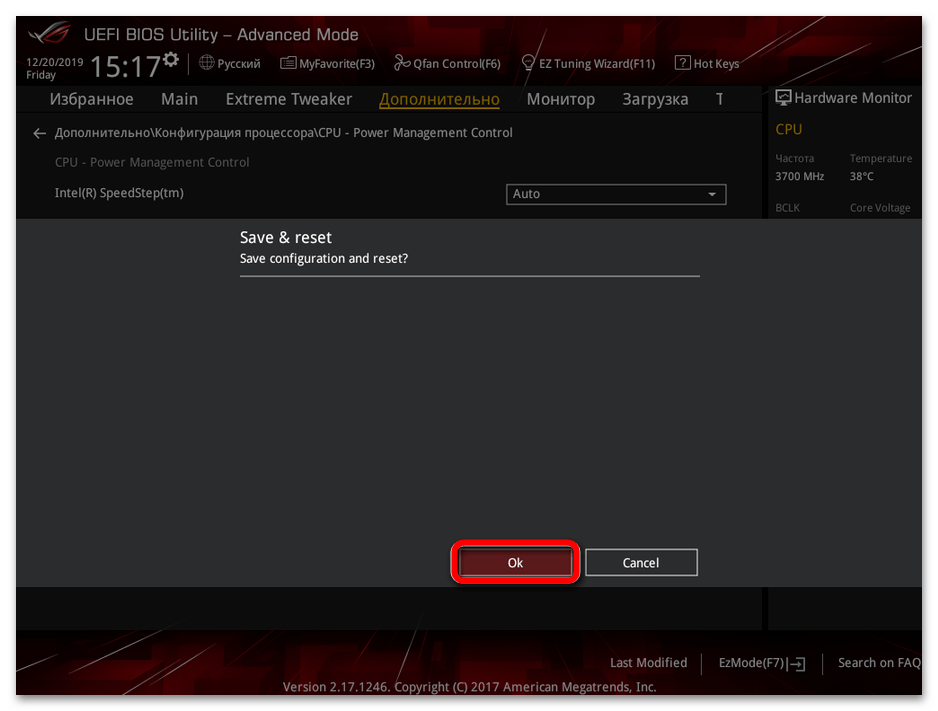
- При выходе из UEFI или BIOS обязательно сохраните настройки и отправьте лэптоп на перезагрузку. В следующем сеансе операционной системы вы уже должны будете заметить, что режим Turbo Boost неактивен.
Проверка активности режима Turbo Boost
Допустим, вы выполнили один или даже все методы данной статьи, чтобы отключить режим турбо буста для вашего процессора Intel на ноутбуке, однако еще не уверены, действительно ли теперь ЦП работает на пониженной герцовке. Для проверки можно использовать лицензионное ПО под названием Intel Turbo Boost Monitor, который скачивается с официального сайта производителя вашего ноутбука.
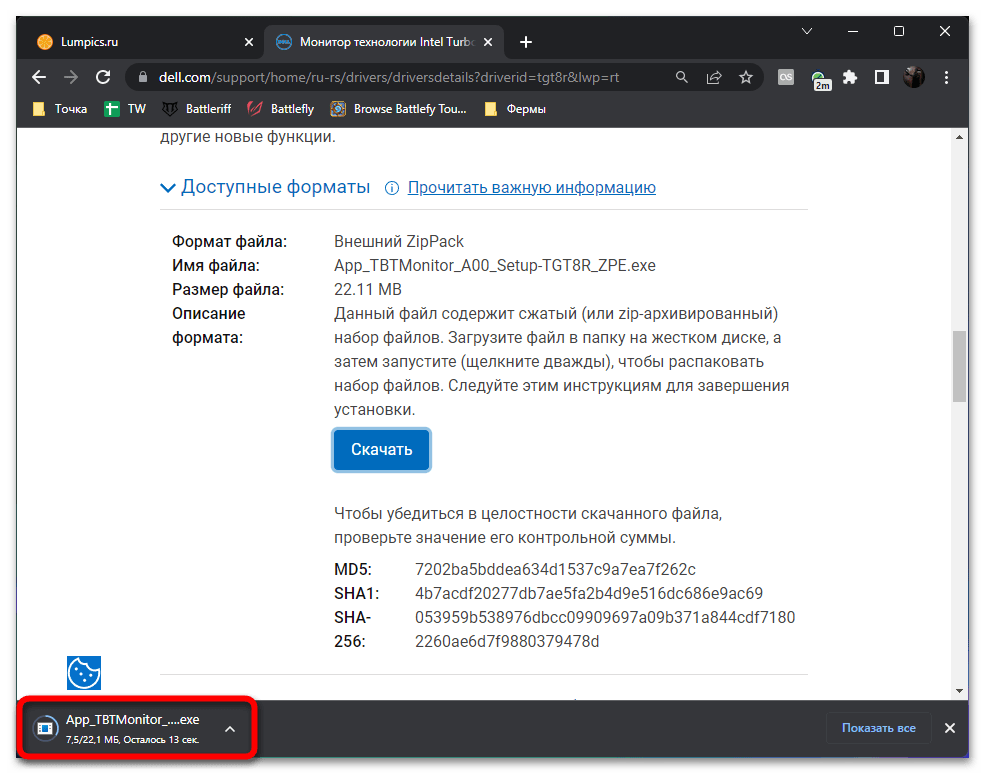
- Найдите страницу лэптопа в сети, откройте раздел с драйверами и проверьте, есть ли подходящая версия Intel Turbo Boost Monitor. Если да, возле нее нажмите кнопку «Скачать» и ожидайте окончания загрузки.
- Программа скачивается как обычный файл инсталляции, который нужно запустить и следовать отобразившимся на экране инструкциям.
- Как только ПО будет установлено, запускайте исполняемый файл и ожидайте появления на экране монитора. Посмотрите на столбец с отображением текущей герцовки. Если значение в нем выше указанного справа (справа показывается стандартная герцовка процессора), значит, режим Turbo Boost активен и процессор работает усиленно. Если герцовка такая же или ниже, значит, вам удалось выполнить поставленную задачу.


Наша группа в TelegramПолезные советы и помощь
Высокая частота процессора, Turbo Boost, гигагерцы и прочее — это отлично, но не во всех случаях. К примеру, при работе на ноутбуке преимущественно от батареи с не особенно ресурсоемкими приложениями, отключив повышение частоты и ограничив максимальную частоту процессора вы получите более тихую работу системы охлаждения и продолжительное время работы от аккумулятора, не особенно потеряв в производительности.
В этой инструкции подробно о способах ограничить максимальную частоту процессора в Windows 11 и Windows 10, используя встроенные средства управления схемами электропитания, не прибегая к сторонним утилитам.
Установка опции «Максимальное состояние процессора» в дополнительных параметрах схемы электропитания
Первый способ — настроить схему электропитания, используемую при работе от батареи, задав максимальное состояние процессора ниже 100% — это отключит ускорение Turbo Boost (когда частота может повышаться выше номинальной частоты процессора) и, даже если мы выставим 99% в значительной мере повлияет на расход заряда и нагрев. Шаги будут следующими:
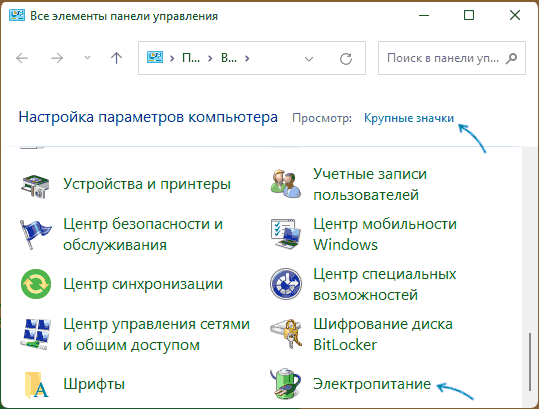
- Откройте Панель управления, для этого в Windows 11/10 можно использовать поиск в панели задач. В поле «Просмотр» установите «Значки» и откройте пункт «Электропитание».

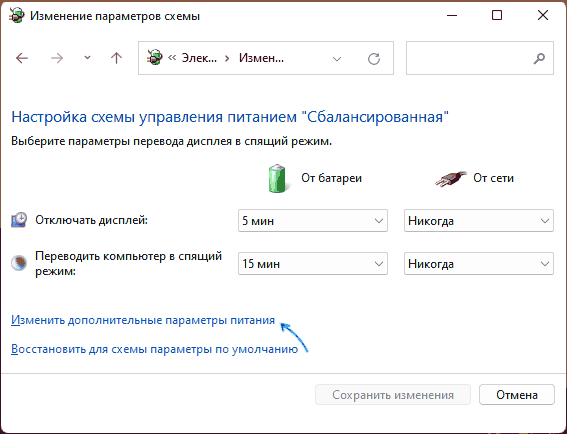
- Нажмите по пункту «Настройка схемы электропитания» у той схемы, которую вы используете при работе от батареи (при условии, что это ноутбук и вы переключаете схемы питания).

- В следующем окне нажмите «Изменить дополнительные параметры питания».

- В дополнительных параметрах раскройте раздел «Управление питанием процессора», а затем задайте собственное значение в пункте «Максимальной состояние процессора». Его можно задать отдельно для питания от батареи и электросети.

- Примените сделанные настройки.


На этом процесс будет завершен — изменения должны начать действовать сразу.
Полезным будет настроить две или более схем электропитания: одну экономичную с ограничением частоты, другую — для случаев, когда нужна высокая производительность. Также вы можете ускорить переключение между имеющимися схемами электропитания: Программы для удобно переключения схем электропитания на ноутбуке или ПК.
К примеру, я на своем основном ноутбуке с горячим Core i7-10870H пишу статьи в бесшумном режиме с ограниченной частотой, и температура процессора держится в пределах 35-40 градусов, при этом каких-либо неудобств нет. А когда необходимо монтировать видео — включаю схему электропитания с высокой производительностью.
Добавление опции «Максимальная частота процессора» в дополнительные параметры электропитания
Возможен вариант, когда ограничение «Максимального состояния процессора» не срабатывает. В этом случае можно установить максимальную частоту процессора. По умолчанию эта опция в дополнительных параметрах электропитания отсутствует.
Чтобы добавить возможность настройки максимальной частоты процессора, используйте один из следующих способов:
В Терминале Windows или PowerShell
- Запустите Windows PowerShell или Терминал Windows от имени администратора, нажав правой кнопкой мыши по кнопке «Пуск» и выбрав соответствующий пункт меню.
- Введите команду
powercfg -attributes SUB_PROCESSOR 75b0ae3f-bce0-45a7-8c89-c9611c25e100 -ATTRIB_HIDE
и нажмите Enter.


В редакторе реестра
- Нажмите клавиши Win+R на клавиатуре, введите regedit и нажмите Enter.
- Перейдите к разделу реестра
HKEY_LOCAL_MACHINE\SYSTEM\CurrentControlSet\Control\Power\PowerSettings\54533251-82be-4824-96c1-47b60b740d00\75b0ae3f-bce0-45a7-8c89-c9611c25e100
- Дважды нажмите по параметру с именем Attributes в правой панели и установите значение 2 для него. Примените сделанные настройки.


В результате, в дополнительных параметрах схемы электропитания в разделе «Управление питанием процессора» появится новый пункт «Максимальная частота процессора».

По умолчанию указано значение «0 МГц», при таком выборе частота не ограничивается. Вручную можно указать любую частоту в пределах номинальной частоты вашего процессора.
Надеюсь, для кого-то из читателей представленная информация окажется полезной. Если остаются вопросы — задавайте их в комментариях, я постараюсь ответить.