
Intel Turbo Boost is a technology that allows Intel processors to run above their base clock speed to improve performance during demanding tasks. While this feature enhances gaming, video editing, and other demanding applications, some users may wish to disable it. Reasons can vary from wanting to limit CPU heat generation, reduce power consumption, or stabilize performance in specific applications. In this article, we will guide you through the process of disabling Intel Turbo Boost on Windows 11, examining the various methods available and explaining each step in detail.
Understanding Intel Turbo Boost
Before diving into disabling this feature, it’s essential to understand what Intel Turbo Boost is. Turbo Boost technology dynamically increases the processor’s frequency to improve performance when necessary. When your CPU is under heavy load, Turbo Boost can increase its clock speed to enhance responsiveness and performance. Conversely, when the CPU’s load is light, it can slow down, conserving power and reducing heat.
This functionality is usually beneficial, but certain scenarios may necessitate its deactivation, such as:
- Thermal Management: If your system tends to overheat under load.
- Stability Reasons: Some users find that disabling Turbo Boost can lead to more consistent gaming or professional workloads.
- Power Consumption: Users who are battery-conscious may want to disable it to conserve energy.
Methods to Disable Intel Turbo Boost
Disabling Intel Turbo Boost can be accomplished through several methods on Windows 11. Here are the primary approaches:
- Using the BIOS/UEFI Firmware Settings
- Using Intel Extreme Tuning Utility (XTU)
- Using Windows Power Options
- Using Command Prompt
- Using Third-Party Software
Let’s explore each method in detail.
Method 1: Using the BIOS/UEFI Firmware Settings
Disabling Turbo Boost in BIOS/UEFI is one of the most effective methods, as it prevents the CPU from using Turbo Boost at the hardware level.
Steps to Disable Turbo Boost from BIOS/UEFI:
-
Restart Your Computer:
Begin by restarting your PC. -
Enter BIOS/UEFI:
As your system starts, press the designated key to enter BIOS/UEFI. This key varies by manufacturer but is oftenF2,Del, orEsc. Check your motherboard’s manual for the specific key. -
Locate CPU Configuration Settings:
Within BIOS/UEFI, use the arrow keys to navigate to theAdvanced,Performance, orCPU Configurationsection. These names can vary depending on the BIOS version. -
Disable Turbo Boost:
Look for a setting related to Turbo Boost, typically labeled as “Turbo Boost Technology,” “Intel Turbo Boost,” or similar. Change its value toDisabled. -
Save Changes and Exit:
Once you’ve disabled Turbo Boost, navigate to theSave & Exitsection, and select the option to save changes. Your system will reboot with Turbo Boost disabled.
Method 2: Using Intel Extreme Tuning Utility (XTU)
Intel Extreme Tuning Utility (XTU) is a powerful tool that allows users to overclock CPUs and adjust performance parameters. It also provides an option to disable Turbo Boost.
Steps to Disable Turbo Boost Using XTU:
-
Download and Install XTU:
Download Intel XTU from the Intel website and install it by following the on-screen instructions. -
Launch the Application:
After installation, open XTU. -
Locate Turbo Boost Settings:
On the main interface of XTU, you will see categories related to your CPU’s performance. Look for the “Turbo Boost” setting. -
Disable Turbo Boost:
Uncheck the box or toggle the switch to disable Turbo Boost. -
Apply and Save Settings:
Click on the “Apply” button to save the changes. -
Monitor Performance:
XTU also provides options to monitor the CPU temperature and performance metrics. Make sure to check these to ensure your system operates within safe parameters.
Method 3: Using Windows Power Options
If you prefer not to alter system settings through BIOS or software directly designed for overclocking, you can disable Turbo Boost through Windows power settings.
Steps to Adjust Power Settings:
-
Open Power Options:
Right-click on the battery icon in the taskbar and select “Power Options,” or alternatively, navigate toSettings > System > Power & battery. -
Access Additional Power Settings:
Select “Additional power settings” located under “Related settings”. -
Modify Power Plan Settings:
Identify your current power plan and click on “Change plan settings”. Here, select “Change advanced power settings”. -
Adjust Processor Power Management:
Expand the “Processor power management” section, and further expand “Maximum processor state”. Here, you can set the maximum state to a lower percentage (e.g., 99% to prevent Turbo Boost from kicking in). -
Apply and Save:
Click “OK” to apply the changes, and then exit out of the settings menus.
Method 4: Using Command Prompt
For users who prefer command-line interfaces, the Command Prompt can allow for disabling Turbo Boost via changes to power management settings.
Steps to Use Command Prompt:
-
Open Command Prompt as Administrator:
Search for ‘cmd’ in the Windows Start Menu, then right-click onCommand Promptand select “Run as administrator”. -
Input Power Configuration Command:
In the Command Prompt window, enter the command:powercfg -setacvalueindex SCHEME_CURRENT SUB_PROCESSOR PROCTHROTTLEMAX 99 powercfg -setdcvalueindex SCHEME_CURRENT SUB_PROCESSOR PROCTHROTTLEMAX 99This command sets the maximum processor state to 99%, effectively preventing Turbo Boost.
-
Activate Changes:
To activate the changes, run:powercfg -setactive SCHEME_CURRENT -
Close Command Prompt:
Typeexitand pressEnterto close the Command Prompt.
Method 5: Using Third-Party Software
If you are not comfortable using technical utilities like the BIOS or Intel XTU, third-party applications can also help to manage processor settings.
-
Research Software: Look for well-reviewed third-party applications designed for CPU management. Software like ThrottleStop offers options to disable Turbo Boost conveniently.
-
Download and Install:
Follow the instructions for installation. -
Configure Settings:
Within the application, locate and uncheck any Turbo Boost options, then save your changes. -
Monitor Performance:
As with XTU, these applications often come with performance monitoring features, allowing you to observe your CPU load and temperatures.
Post-Disabling Considerations
-
Monitor System Performance: After disabling Turbo Boost, watch your system’s performance and temperatures. Make sure no adverse effects occur. If the CPU overheats or the system destabilizes, consider reverting changes.
-
Consider Applications: Some applications may benefit from Turbo Boost, while others may perform better without it. Understanding your particular workload can guide your decision.
-
Understand Limitations: As Turbo Boost is a performance-enhancing feature, disabling it may result in reduced performance during demanding tasks.
-
System Updates: Ensure you keep your BIOS and Intel XTU up to date for optimal performance and stability.
Conclusion
Disabling Intel Turbo Boost can significantly affect how your CPU manages power and performance. Whether you choose to proceed through BIOS, Intel XTU, Windows Power Options, Command Prompt, or third-party software, be mindful of the reasons you’re making this change, and monitor your system’s performance and stability thereafter. Ultimately, the choice depends on individual user preferences, workloads, and system management needs. By following this comprehensive guide, you now have the tools necessary to disable Turbo Boost on Windows 11 safely and effectively.
If you’re looking to disable Turbo Boost on Windows 11, you’ve come to the right place. Turbo Boost is a nifty feature that revs up your processor’s speed when you need it most. But if you’re looking to keep things cool and quiet, or save some battery life, you might want to switch it off. It’s not as tricky as it sounds, and with a few simple steps, you can turn it off through your system’s BIOS settings. Let’s dive in to make sure your computer is running just the way you want it.
Disabling Turbo Boost on Windows 11
To disable Turbo Boost in Windows 11, you’ll need to access the BIOS settings on your computer. The BIOS is like your computer’s control center, and it’s where you can change important settings like Turbo Boost. Here’s how to do it:
Step 1: Restart Your Computer
Restart your computer to start the process of accessing the BIOS.
Restarting your computer is essential to access the BIOS because this menu is only available before Windows actually loads. Once your system begins rebooting, you’ll need to be quick on your feet to hit the right key and enter the BIOS.
Step 2: Enter the BIOS
Press the designated key (often F2, F10, DEL, or ESC) during startup to enter the BIOS settings.
Different computers have different keys for BIOS entry. You might see a quick screen flash by during startup that tells you which key to press. If you’re not sure, a quick search with your computer’s model number should help.
Step 3: Locate the Turbo Boost Option
Navigate through the BIOS menu to find the Turbo Boost option, usually under the Advanced or Performance tab.
Take your time while searching for this option; the BIOS interface can be a bit intimidating. But don’t worry—you’re looking for a section related to CPU performance or options.
Step 4: Disable Turbo Boost
Select the Turbo Boost option and set it to Disabled.
Once you find the setting, change its status to ‘Disabled’. This will stop your processor from automatically increasing its speed beyond its base frequency, effectively turning off Turbo Boost.
Step 5: Save and Exit the BIOS
Save your changes and exit the BIOS to allow your computer to boot normally with Turbo Boost disabled.
Be sure to save your changes before exiting. Usually, there’s a specific key to save and exit, but it should be clearly indicated on the BIOS screen. Once you exit, your computer will boot up with Turbo Boost disabled.
After you’ve completed these steps, your processor will no longer automatically increase its speed beyond the base frequency. This means your computer might run a little cooler, quieter, and could even save on battery life.
Tips for Disabling Turbo Boost on Windows 11
- Backup Your Data: Always back up important data before making BIOS changes to prevent data loss.
- Understand the Impact: Disabling Turbo Boost might reduce performance in demanding tasks.
- Check for BIOS Updates: Some systems might have newer BIOS versions that change menu layouts.
- Consider Power Plans: Adjust your Windows power settings for better power management.
- Consult Your Manual: If you’re unsure, check your computer’s manual for specific BIOS access instructions.
Frequently Asked Questions
What is Turbo Boost?
Turbo Boost is a feature that allows the processor to run faster than its base operating frequency for better performance.
Why would someone want to disable Turbo Boost?
Disabling Turbo Boost can help lower heat output and fan noise, and may improve battery life on laptops.
Can I re-enable Turbo Boost after disabling it?
Yes, you can re-enable it by following the same steps and setting the Turbo Boost option to Enabled.
Will disabling Turbo Boost affect gaming performance?
It might, as Turbo Boost can enhance performance during intensive tasks like gaming. Performance may decrease slightly without it.
Is it safe to disable Turbo Boost?
Yes, it’s safe to disable Turbo Boost, but be aware of the potential impact on performance for certain applications.
Summary
- Restart your computer.
- Enter the BIOS.
- Locate the Turbo Boost option.
- Disable Turbo Boost.
- Save and exit the BIOS.
Conclusion
Disabling Turbo Boost in Windows 11 can be a smart move if you’re looking to manage heat and noise or extend battery life. While this feature is useful for boosting performance, not everyone needs it running all the time. Sometimes, keeping your system calm and collected is more valuable than the extra speed Turbo Boost provides.
So if you find your laptop running hot or the fans roaring like a jet taking off, consider turning off Turbo Boost. It’s a simple tweak that could make a big difference in your everyday computing experience.
For further reading, you might want to explore how different power settings in Windows 11 interact with your hardware. Or dive into more BIOS settings to see what other optimizations you can make. Remember, your computer should work for you, and small adjustments like disabling Turbo Boost can tailor your system to better fit your needs.
Matthew Burleigh has been writing tech tutorials since 2008. His writing has appeared on dozens of different websites and been read over 50 million times.
After receiving his Bachelor’s and Master’s degrees in Computer Science he spent several years working in IT management for small businesses. However, he now works full time writing content online and creating websites.
His main writing topics include iPhones, Microsoft Office, Google Apps, Android, and Photoshop, but he has also written about many other tech topics as well.
Read his full bio here.
Disabling Turbo Boost on Windows 11 can help you manage heat and power consumption better. To do this, you’ll need to access your system’s BIOS or UEFI settings. Here’s a simple guide to help you through the process.
Disabling Turbo Boost in Windows 11 can help your computer run cooler and consume less power. Follow these steps to turn off Turbo Boost.
Step 1: Restart Your Computer
Restart your computer to begin the process of accessing the BIOS or UEFI settings.
When your computer restarts, press the designated key (usually F2, F10, DEL, or ESC) to enter the BIOS/UEFI settings. The key varies by manufacturer, so check your manufacturer’s website if you’re unsure.
Step 2: Enter BIOS/UEFI Settings
Enter the BIOS/UEFI settings to access the advanced settings needed to disable Turbo Boost.
Once inside the BIOS/UEFI, navigate using the arrow keys. Look for a tab or section labeled «Advanced,» «Performance,» or «CPU Configuration.»
Step 3: Locate Turbo Boost Setting
Locate the Turbo Boost setting within the BIOS/UEFI settings.
In the CPU Configuration section, find an option labeled «Intel Turbo Boost Technology» or simply «Turbo Boost.» The setting name might slightly differ depending on your motherboard manufacturer.
Step 4: Disable Turbo Boost
Disable the Turbo Boost by changing its setting from «Enabled» to «Disabled.»
Use the Enter key to change the setting. Once you’ve selected «Disabled,» save your changes by pressing the designated key, usually F10, but check your screen for the specific key.
Step 5: Save and Exit
Save your changes and exit the BIOS/UEFI settings.
Your computer will restart once you exit. Upon reboot, Turbo Boost will be disabled, and your CPU will no longer increase its clock speed beyond the base frequency.
After you disable Turbo Boost, your computer might run a bit cooler and use less power, but you might also notice a slight decrease in performance for tasks that require a lot of processing power.
Tips for Disabling Turbo Boost on Windows 11
- Know Your BIOS Key: Different manufacturers use different keys to access BIOS. Common keys are F2, F10, DEL, and ESC.
- Check Manufacturer’s Website: If you’re unsure about navigating your BIOS, check the website of your computer’s manufacturer for specific instructions.
- Temperature Monitoring: Use software like HWMonitor or CoreTemp to keep an eye on your CPU temperature after disabling Turbo Boost.
- Power Plans: Adjust your Windows power plan settings for better energy management after turning off Turbo Boost.
- Back Up BIOS Settings: Make a note of your original BIOS settings before making changes, so you can revert back if needed.
Frequently Asked Questions
What is Turbo Boost?
Turbo Boost is a technology that allows a processor to increase its clock speed above its base frequency when it’s under heavy load.
Will disabling Turbo Boost harm my computer?
No, disabling Turbo Boost will not harm your computer. It will run at its base frequency, which might reduce performance in some tasks but also reduce heat and power consumption.
Can I re-enable Turbo Boost?
Yes, you can re-enable Turbo Boost by going back into the BIOS/UEFI settings and changing the Turbo Boost option to «Enabled.»
Does disabling Turbo Boost improve battery life?
Disabling Turbo Boost can improve battery life because the CPU will consume less power at its base frequency.
Will my games run slower without Turbo Boost?
Games that heavily rely on CPU performance might run slower without Turbo Boost, as the CPU won’t clock as high under load.
Summary
- Restart your computer.
- Enter BIOS/UEFI settings.
- Locate Turbo Boost setting.
- Disable Turbo Boost.
- Save and exit BIOS/UEFI.
Conclusion
Disabling Turbo Boost on Windows 11 is a straightforward process that involves accessing your BIOS or UEFI settings and making a small change. While this can help you manage your system’s heat and power consumption better, it may come at the cost of slightly reduced performance for high-demand tasks.
Whether you’re looking to extend your laptop’s battery life or simply keep your desktop cooler, knowing how to disable Turbo Boost gives you more control over your system. Don’t forget to keep an eye on your system’s temperatures and performance, and make adjustments as needed. If you’re interested in learning more about optimizing your computer’s performance or managing energy consumption, there are plenty of resources available online. Happy tweaking!
Kermit Matthews is a freelance writer based in Philadelphia, Pennsylvania with more than a decade of experience writing technology guides. He has a Bachelor’s and Master’s degree in Computer Science and has spent much of his professional career in IT management.
He specializes in writing content about iPhones, Android devices, Microsoft Office, and many other popular applications and devices.
Read his full bio here.
Доброго времени суток!
На некоторых компьютерах проблема перегрева стоит постоянно и остро (очень часто на ноутбуках, особенно игровых). И даже если бы удалось ее снизить на 10°С — это могло бы существенно изменить ситуацию…
В этой статье я предложу пару способов (прим.: отключение Turbo Boost и Undervolting), как это можно сделать (на сколько-то градусов температура должна точно упасть! 👌). Однако, не могу не сказать, что способы весьма спорны, хоть и работают. Почему?
- отключение Turbo Boost — этим мы откл. макс. производительность ЦП (заметно будет не всегда, только при ресурсоемких задачах, например: создание архивов, кодирование видео);
- Undervolting — снижение напряжения на ЦП. Операция специфична, и рекомендуется только опытным пользователям (впрочем, с современной утилитой XTU от Intel — все сводится к изменению одного параметра!).
Как бы там ни было, если вы использовали все другие способы снизить температуру ЦП и они не помогли — рекомендую попробовать эти. Ниже покажу все на примерах…
👉 В помощь!
Греется ноутбук: что делать? Температура все время высокая: 85°C+ — https://ocomp.info/greetsya-noutbuk.html
*
Отключение Turbo Boost
Самый простой способ сделать это — воспользоваться настройками электропитания в Windows. Да, конечно, после отключения Turbo Boost производительность несколько упадет, но это будет заметно лишь при выполнении определенного круга задач: например, конвертирование видео станет чуть дольше…
Зато устройство будет меньше греться, не так сильно шуметь, и скорее всего прослужит дольше.
Итак, для начала нужно открыть панель управления, перейти во вкладку «Оборудование и звук/Электропитание». См. скриншот ниже. 👇
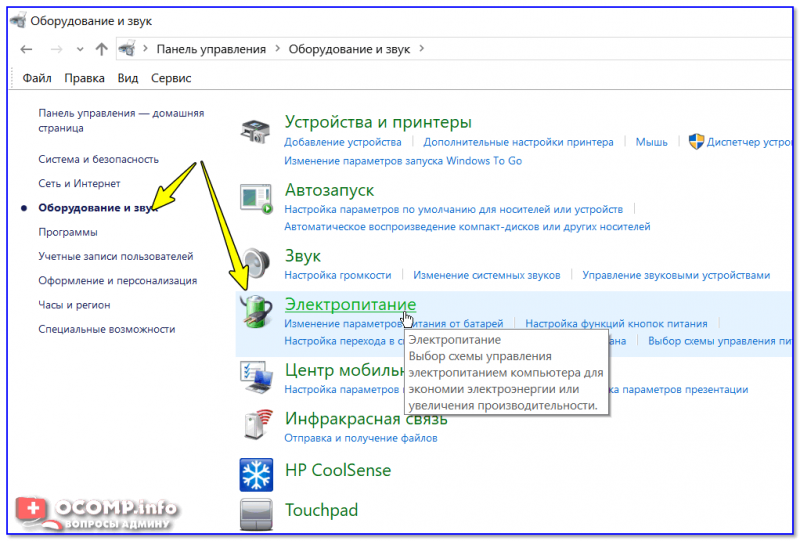
Оборудование и звук — Электропитание
Далее открыть настройки текущей схемы электропитания (в моем примере она одна 👇).
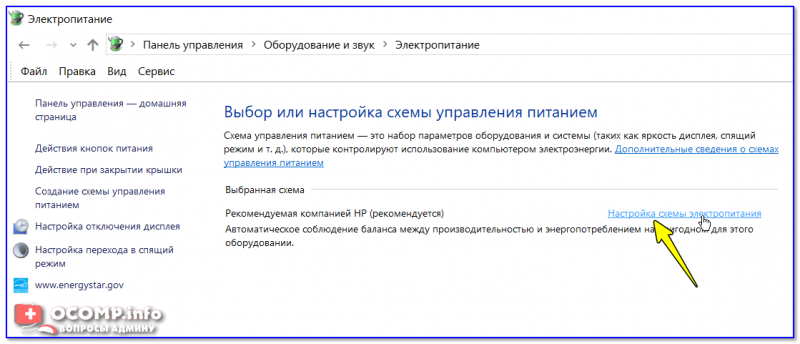
Настройка схемы электропитания
После перейти в настройки дополнительных параметров.
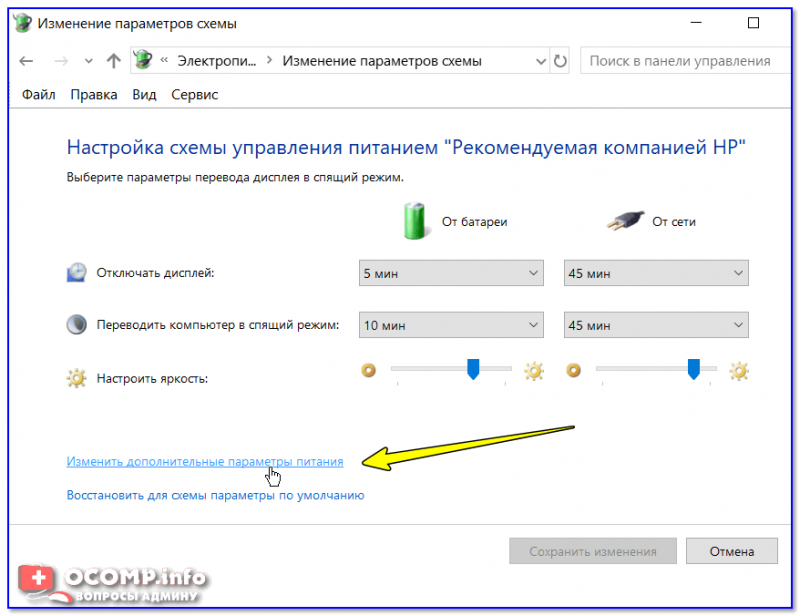
Дополнительные параметры питания
Во вкладке «Управление питанием процессора / Максимальное состояние процессора» поменять 100% на 99%, как на скриншоте ниже 👇.
После сохранения настроек Turbo Boost должен перестать работать, и скорее всего, вы сразу же заметите, что температура несколько упала…
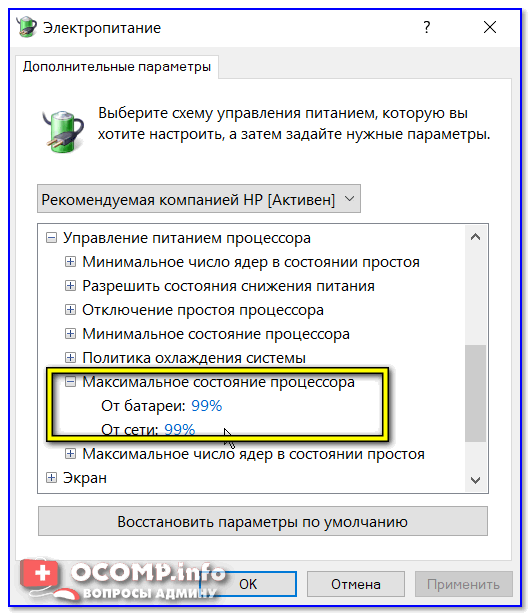
Максимальное состояние процессора 99%
Кстати, уточнить работает ли Turbo Boost можно с помощью спец. утилиты CPU-Z. Она показывает текущую частоту работу процессора в режиме реального времени (а зная тех. характеристики своего ЦПУ, т.е. его частоты работы, можно быстро определить, задействован ли Turbo Boost).
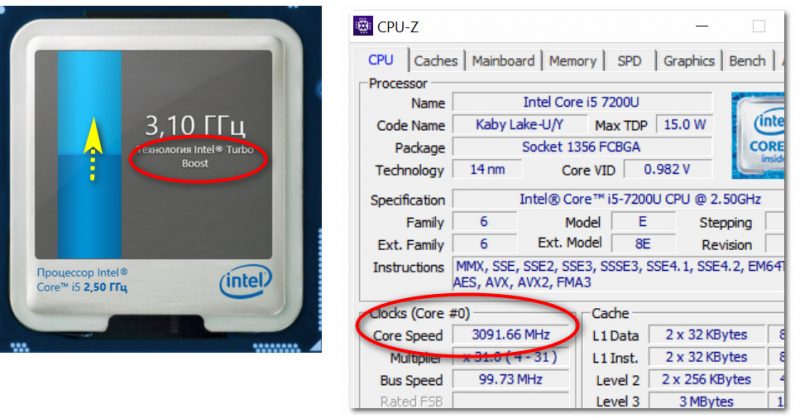
Работает ли Turbo Boost на ноутбуке / Скрин из предыдущей статьи в качестве примера
Нельзя не отметить, что Turbo Boost можно отключить и в 👉 UEFI/BIOS (не на всех устройствах!). Обычно, для этого нужно перевести параметр Turbo Mode в режим Disabled (пример на фото ниже 👇).
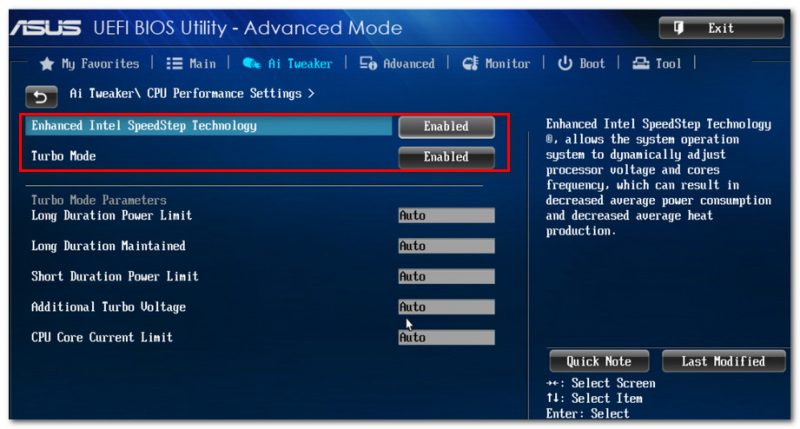
Turbo Boost (UEFI) / Скрин из предыдущей статьи
*
Undervolting (снижение напряжения на ЦП)
Пару слов на простом языке о том, что будем делать.
Производители, как правило, устанавливают напряжение на ЦП с некоторым запасом, обычно в районе +0,070V ÷ +0,200V (чтобы в не зависимости от партии ЦП — у всех пользователей все работало). Ну а лишнее напряжение — повышает температуру…
Разумеется, этот «запас» по напряжению можно уменьшить (это и называется Undervolting). За счет этой операции можно снизить нагрев ЦП под нагрузкой на 5-20°С (в зависимости от модели и партии). Кстати, как следствие, кулер будет меньше шуметь.
Отмечу, что производительность ЦП от Undervolting не падает (т.к. мы только убираем запас по напряжению)! Даже наоборот, если ваш ЦП раньше сбрасывал частоты от нагрева до высокой температуры — сейчас он может перестать их сбрасывать (из-за снижения температуры) и за счет этого вырастет производительность!
Опасно ли это? В общем-то, нет (повышать напряжение при разгоне — вот это опасно! А мы наоборот снижаем…).
Сам я неоднократно снижал напряжение на десятках ПК/ноутбуках (игровых), и никаких проблем не наблюдалось (тем не менее, как всегда, предупреждаю, что все делаете на свой страх и риск).
*
Undervolting для Intel Core
1) И так, сначала необходимо зайти на официальный сайт Intel и загрузить утилиту Intel® XTU. Она предназначена для тонкой настройки работы ЦП. Сразу предупрежу — эта не та утилита, где можно изменять любые параметры и смотреть, что они дадут (так, что ничего не меняйте, если не знаете, что и за что отвечает!).
Intel® XTU
Ссылка на офиц. сайт Intel — https://downloadcenter.intel.com/
Примечание: если у вас не работает текущая версия утилиты — попробуйте поискать на просторах сети более старую (дело в том, что Intel на некоторых ЦП ограничил возможность Undervolting).
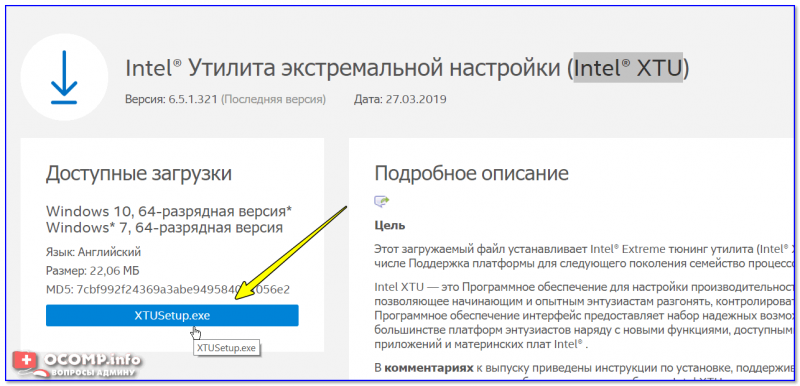
Intel XTU — загрузка и установка утилиты
После установки Intel XTU необходимо будет перезагрузить компьютер.
Кстати!
Безопасный режим
На некоторых машинах Intel XTU работает некорректно, и после ее установки появляется синий экран (не знаю достоверно почему). В этом случае при следующей перезагрузке ОС у вас появится меню выбора режима загрузки Windows — выберите безопасный режим и удалите утилиту.
2) Далее нам нужно запустить XTU и найти один единственный параметр «Core Voltage Offset». По умолчанию, этот параметр должен стоят на «0».
После следует сместить этот ползунок влево на «-0,100V» (в своем примере ниже я подвинул на «-0,110V»), и нажать по кнопке «Apply». Все, напряжение после этой операции было снижено.
Важно! Не устанавливайте параметр Core Voltage Offset в плюс — тем самым вы повышаете напряжение на ЦП.
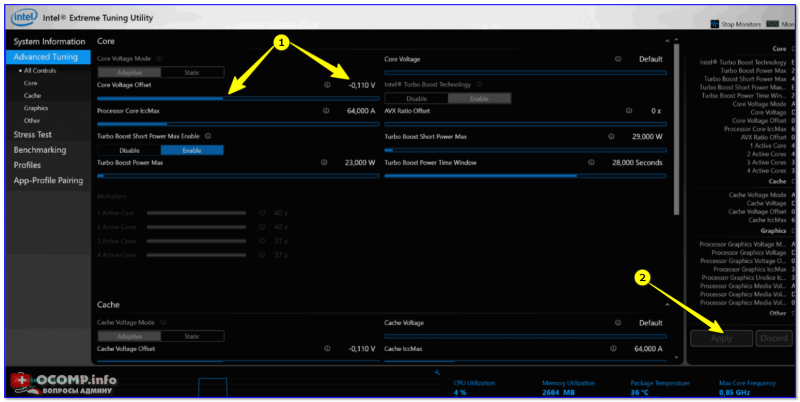
Core Voltage Offset / Intel XTU
3) Теперь нужно запустить какую-нибудь игру (а лучше протестировать на нескольких) и посмотреть на работу компьютера (ноутбука). Если устройство 20-40 мин. работает в норм. режиме (не зависает, не выключается) — значит Undervolting прошел успешно.
Далее можно снова открыть Intel XTU и поменять «-0,100V» на «-0,120V» (например). Кстати, изменять напряжение нужно небольшими шажками, и после каждого — тестировать работу устройства.
Таким образом можно найти оптимальное значение «Core Voltage Offset» (у каждого ЦП оно будет свое).
Кстати!
Как только вы уменьшите напряжение на ЦП на недопустимое значение — компьютер просто выключится или зависнет (возможно появление синего экрана). Если это произошло — значит вы достигли максимума, просто измените Core Voltage Offset на предыдущее значение (при котором все работало).
4) Следить за работой процессора (напряжение, температура, частота и пр.) удобно с помощью утилиты Hwmonitor (ссылка на офиц. сайт). Как видите на скрине ниже, она легко определила, что напряжение было снижено…
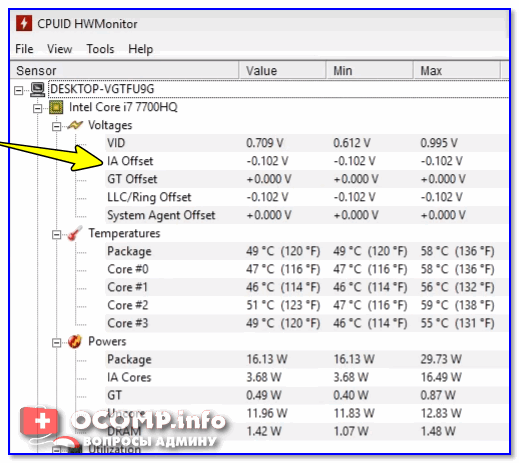
Voltages — Hwmonitor
*
Дополнения по теме приветствуются…
Ну а на этом у меня пока все, удачи!
✌
Первая публикация: 05.07.2019
Корректировка: 25.05.2021