
Windows 11/10 includes a feature known as Memory Compression. It makes better use of available memory on all systems by reducing physical memory utilization. Furthermore, it improves the speed of writing to and reading from disk when this feature is enabled on your computer.
Memory compression helps improve the overall user experience; however, additional CPU resources may be required during compressing and decompressing the data in RAM, which may slow CPU processing on some systems.
Memory Compression is faster than a traditional paging file, but it uses more CPU resources. If you notice your PC is slow, you should try enabling and disabling Memory Compression.
How to View Amount of Compressed Memory in Windows 11/10?
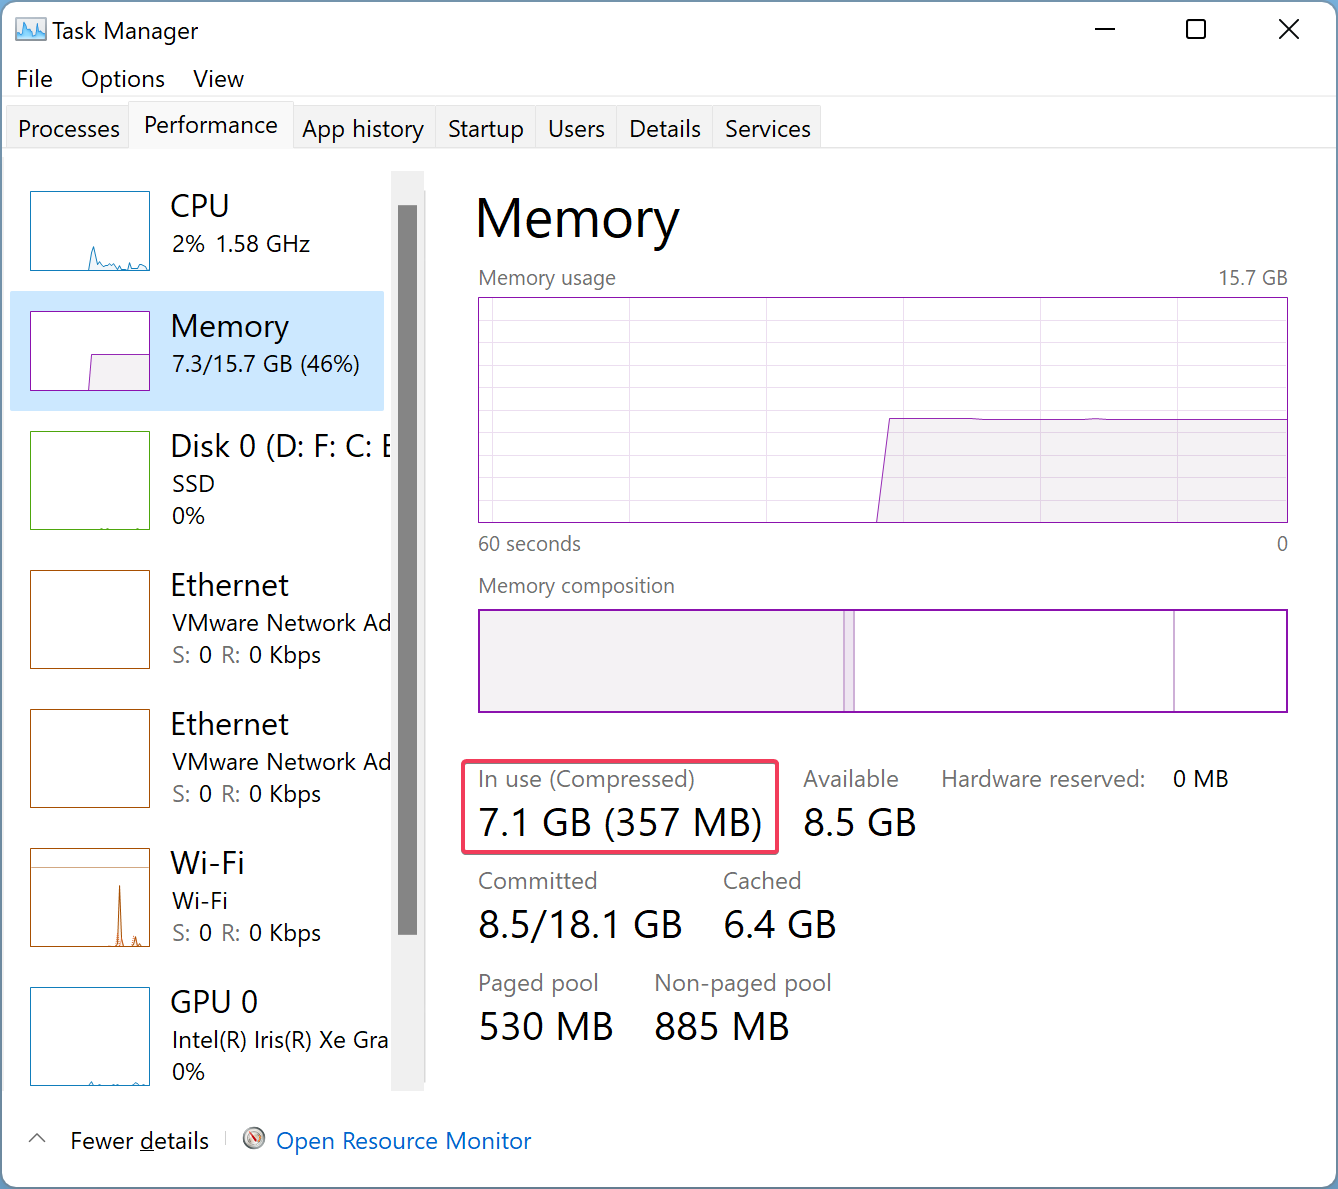
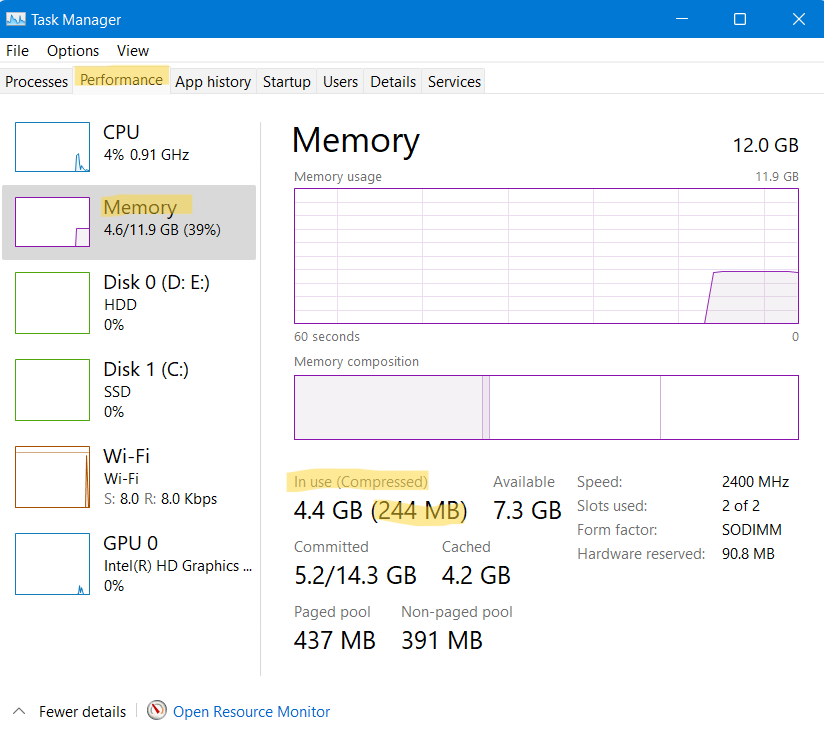
Open the Task Manager by pressing Ctrl + Shift + Esc and navigate to the Performance tab. Click Memory in the left sidebar, and on the right sidebar, you can see how much memory is compressed.
How to See if Memory Compression is Enabled or Disabled?
To view if Memory Compression is enabled or disabled on your Windows 11/10, do the following:-
Step 1. First, open Windows PowerShell with elevated rights.
Step 2. Then, on the prompt of Windows PowerShell, type the following and hit Enter from the keyboard:-
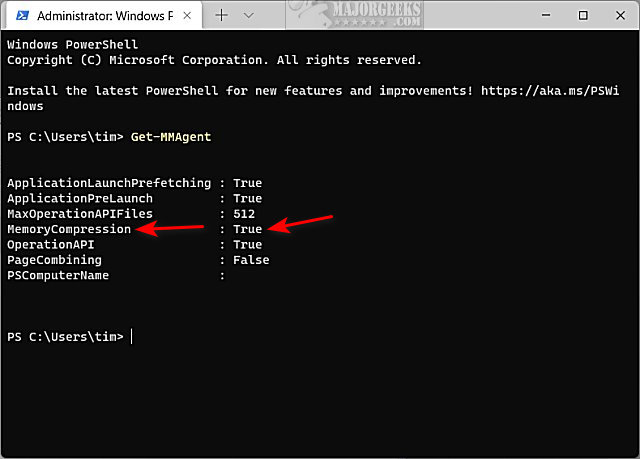
Get-MMAgent
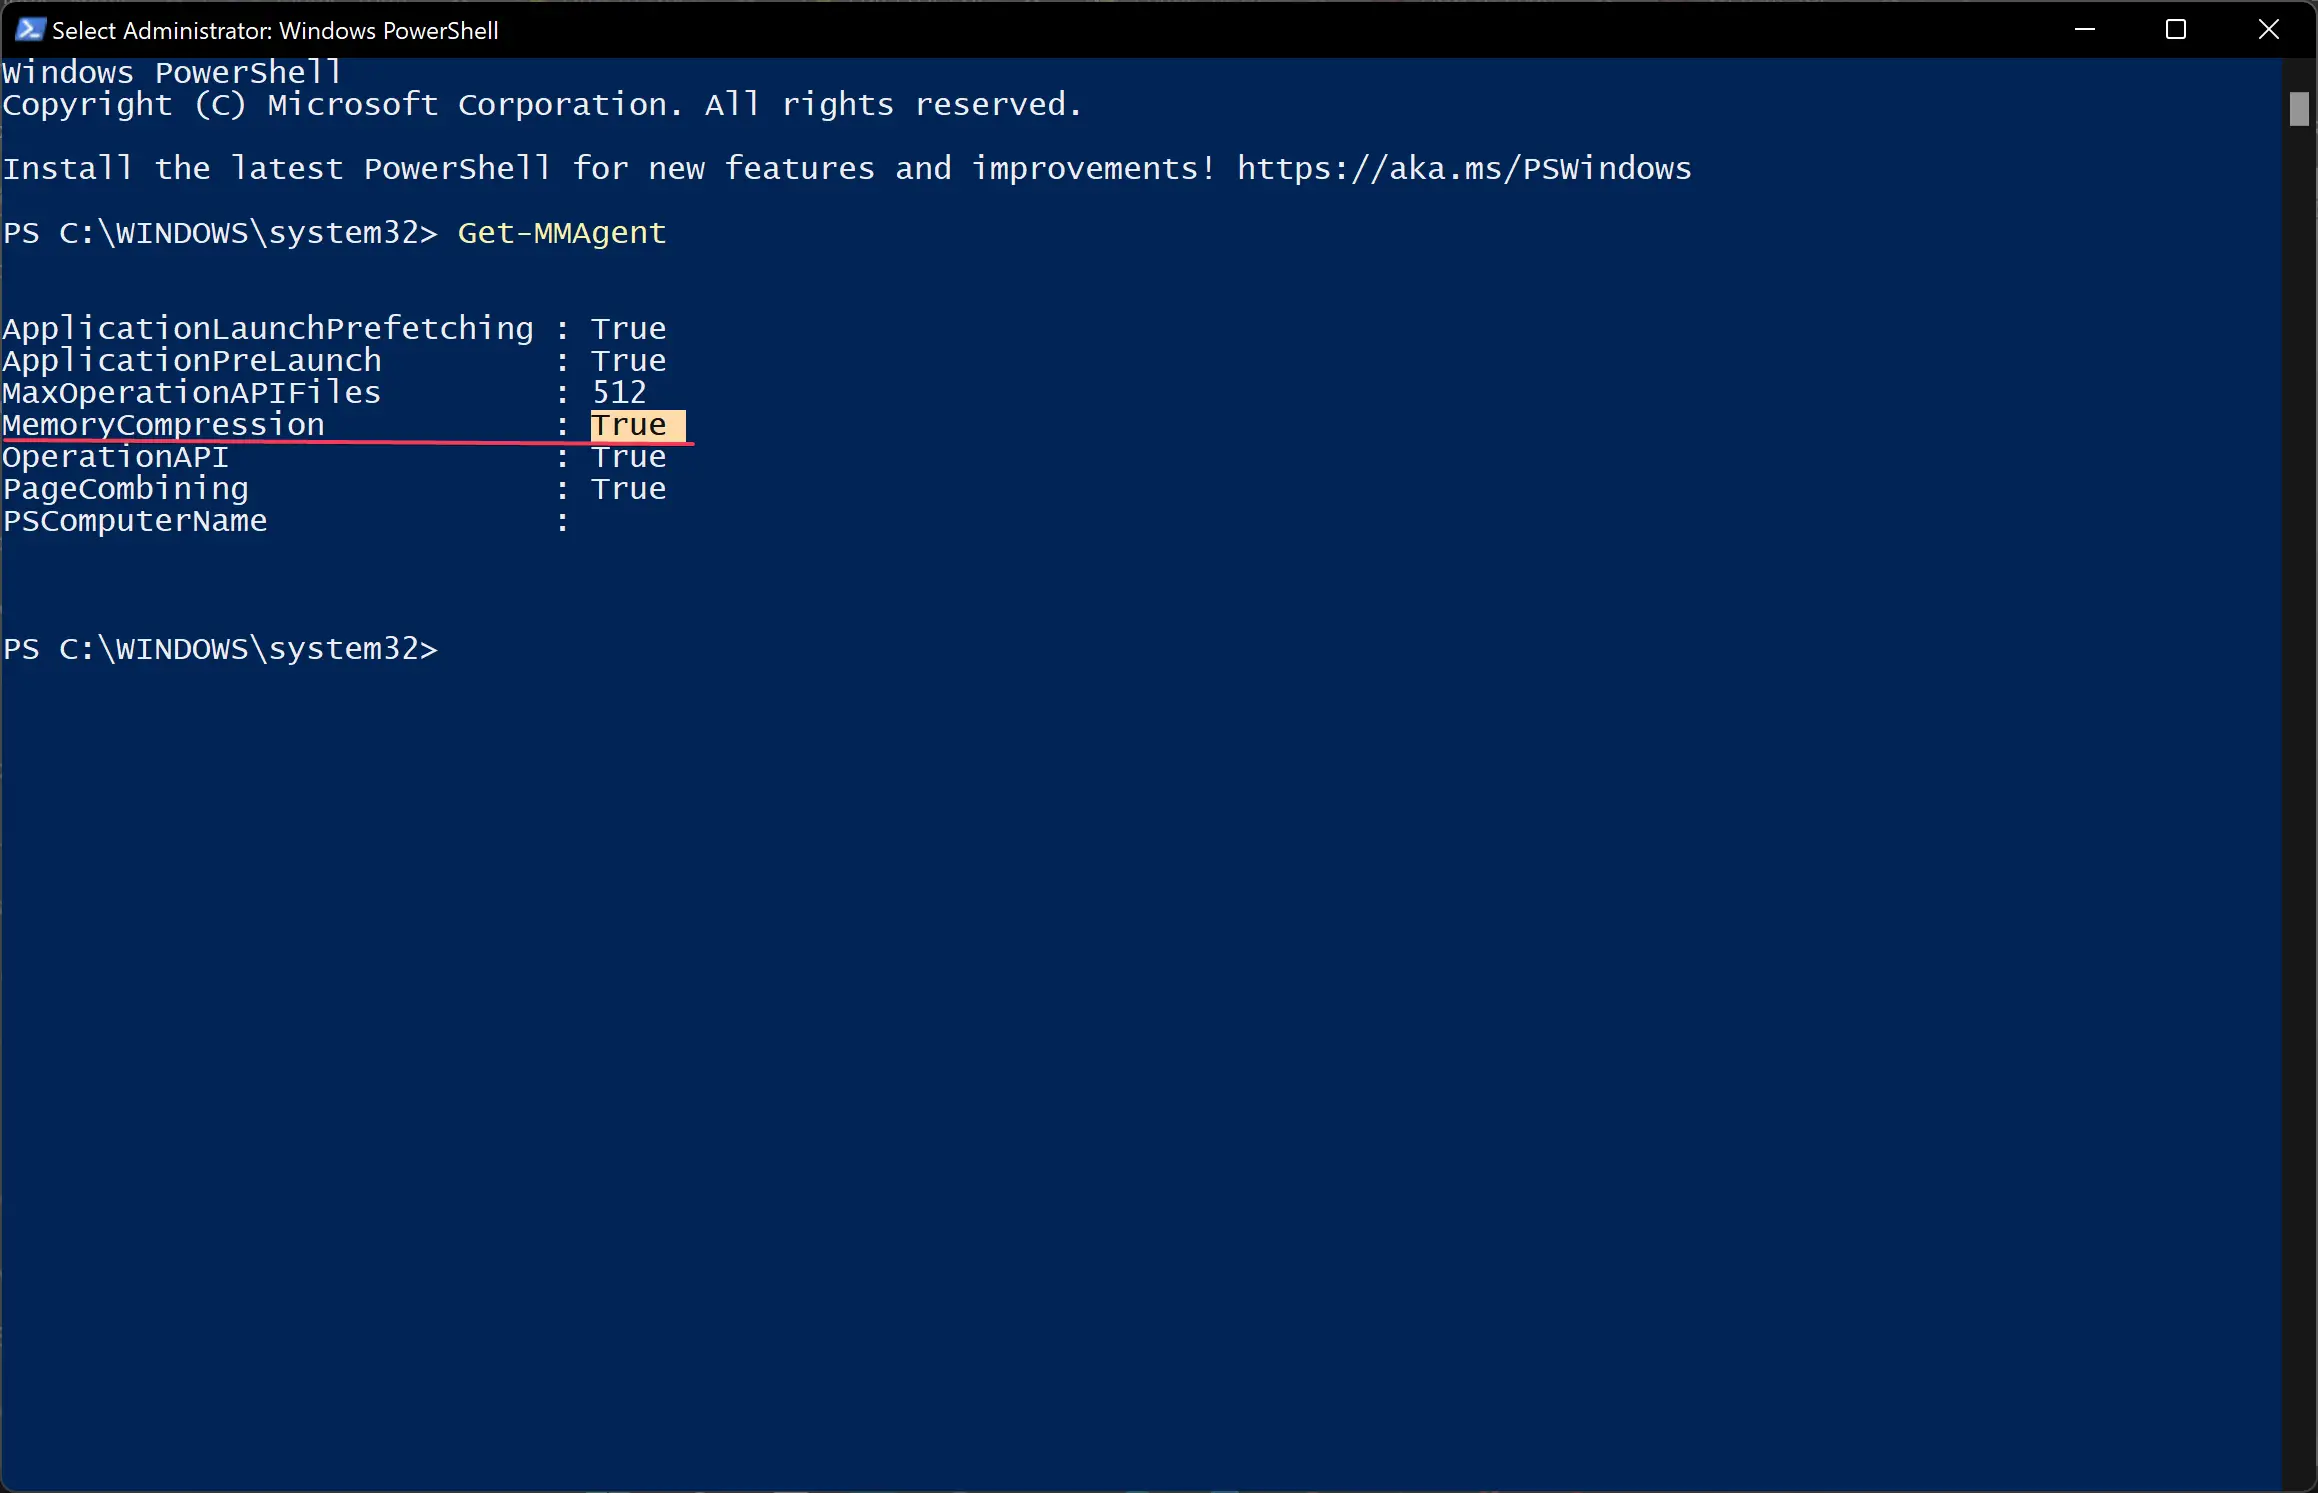
Besides the MemoryCompression field, you can see True for enabled or False for disabled.
How to Turn on Memory Compression in Windows 11/10?
Memory compression features may help low-end systems with little system memory. It compresses the system’s memory by reducing the number of read/write requests and frees up RAM without enacting traditional paging.
To enable Memory Compression in Windows 11/10, do the following steps:-
Step 1. First, open Windows PowerShell with elevated rights.
Step 2. Then, on the prompt of Windows PowerShell, type the following and hit Enter from the keyboard:-
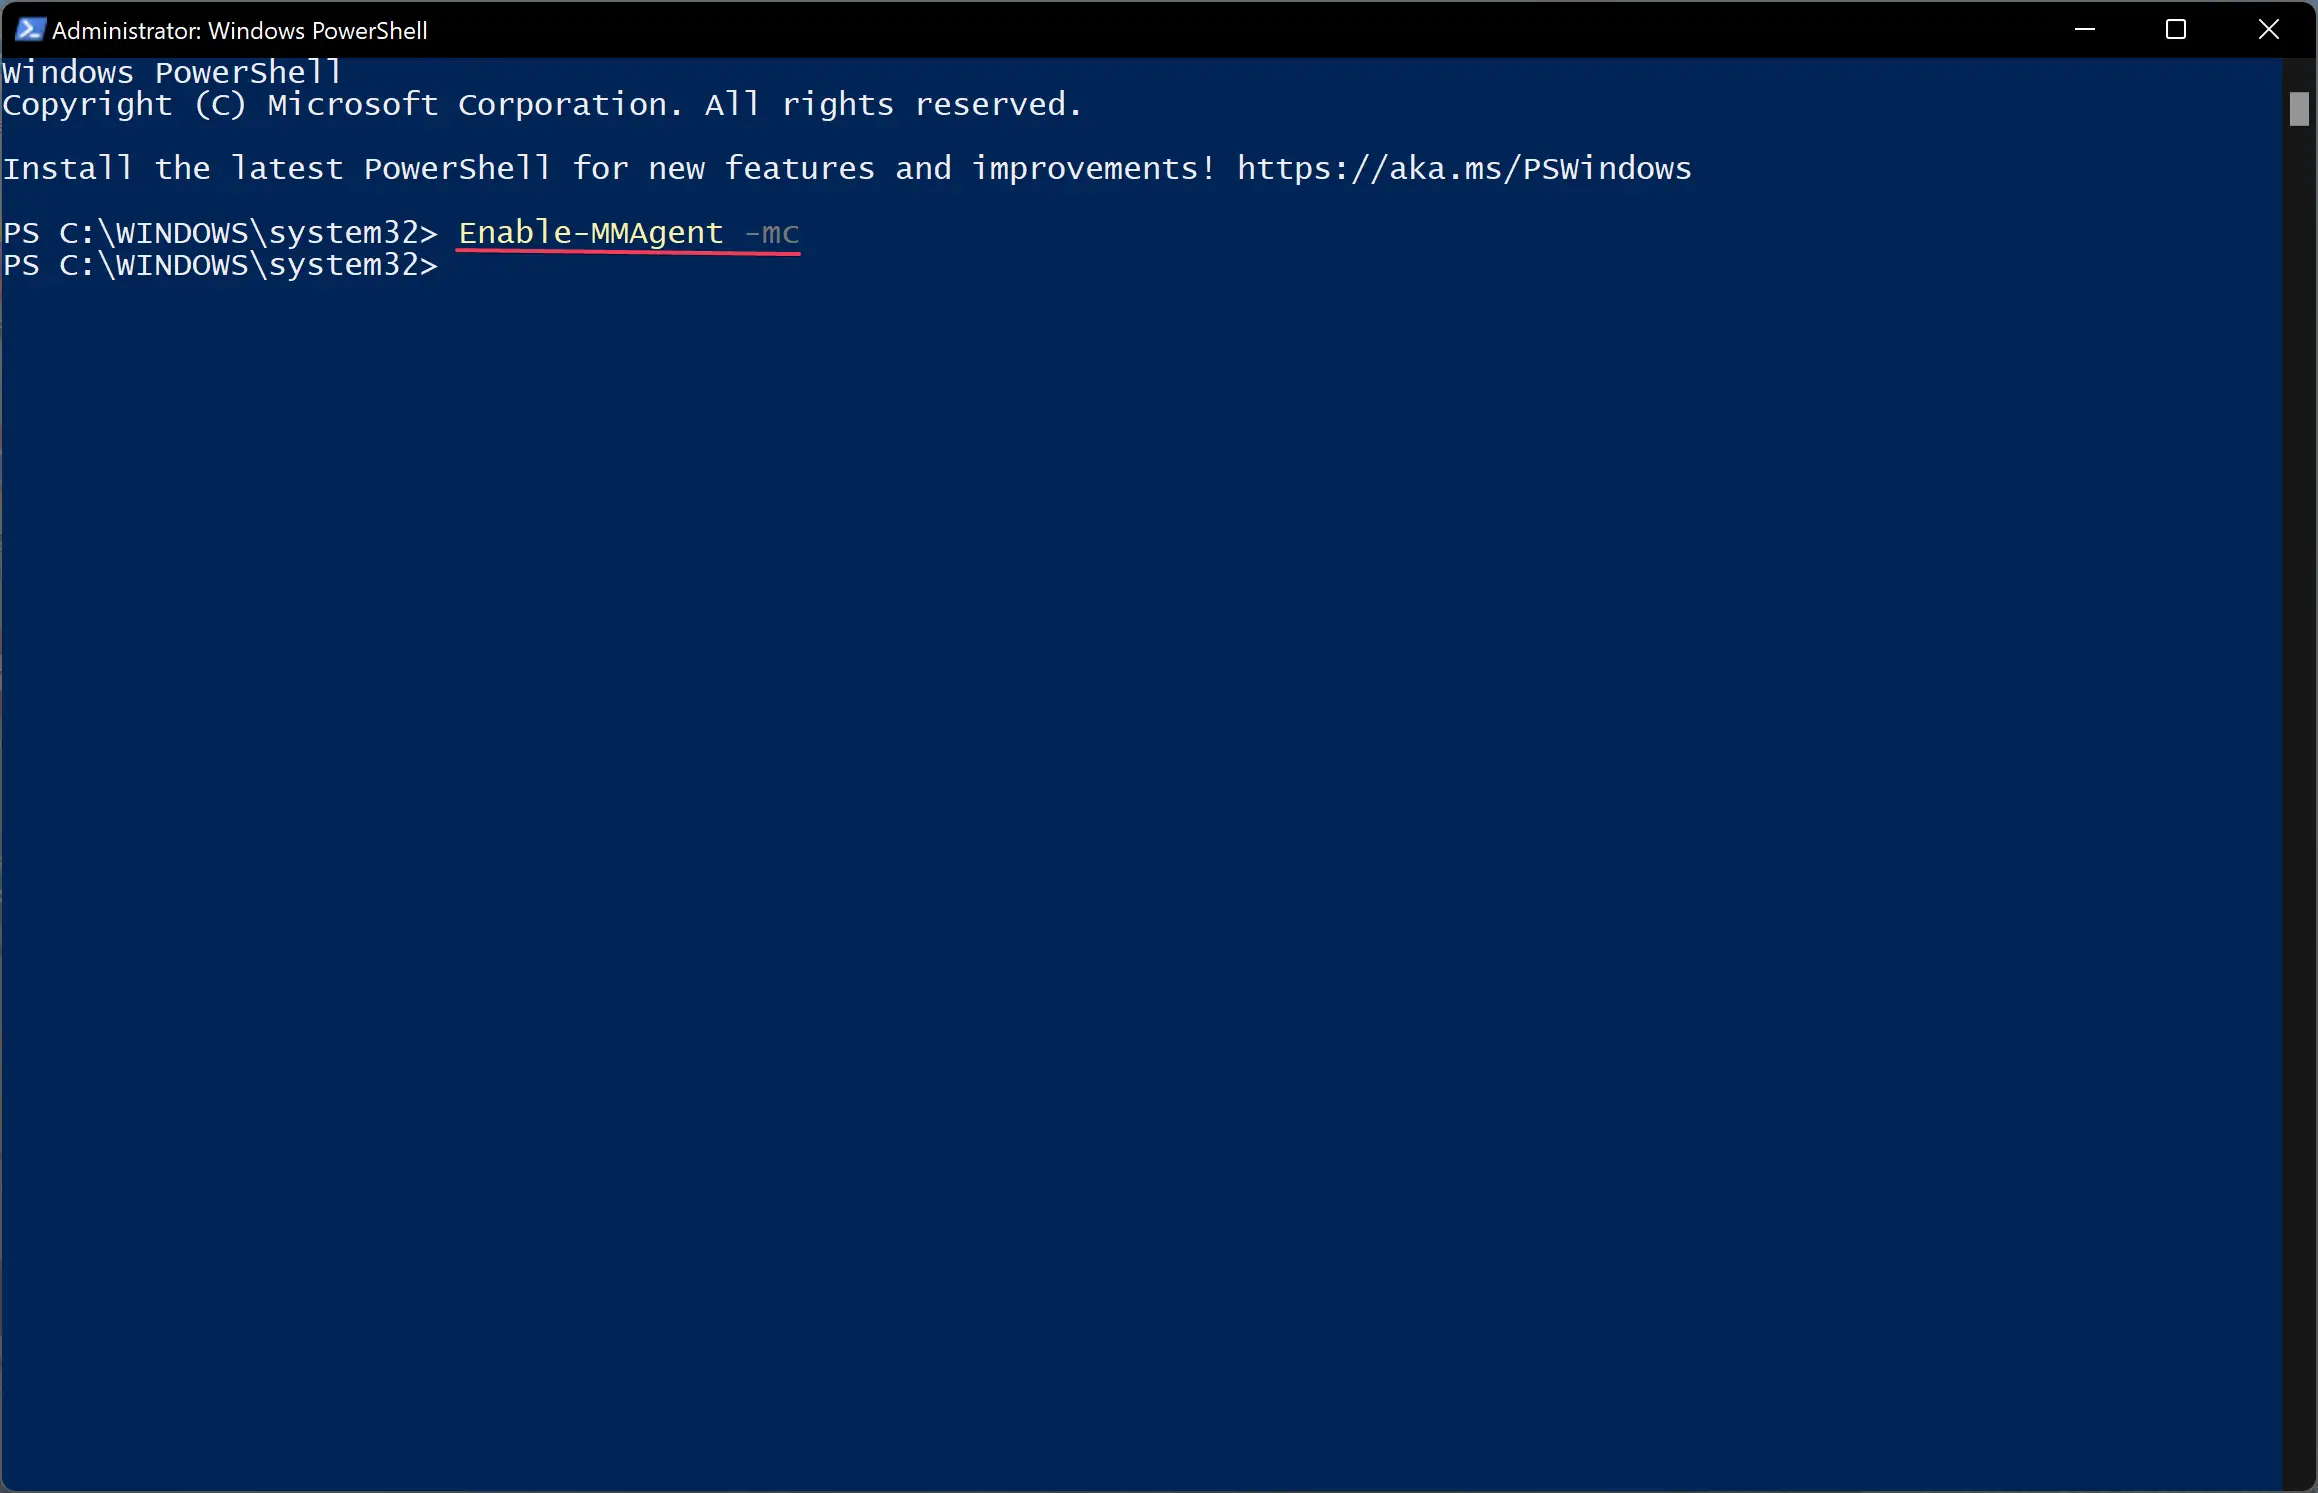
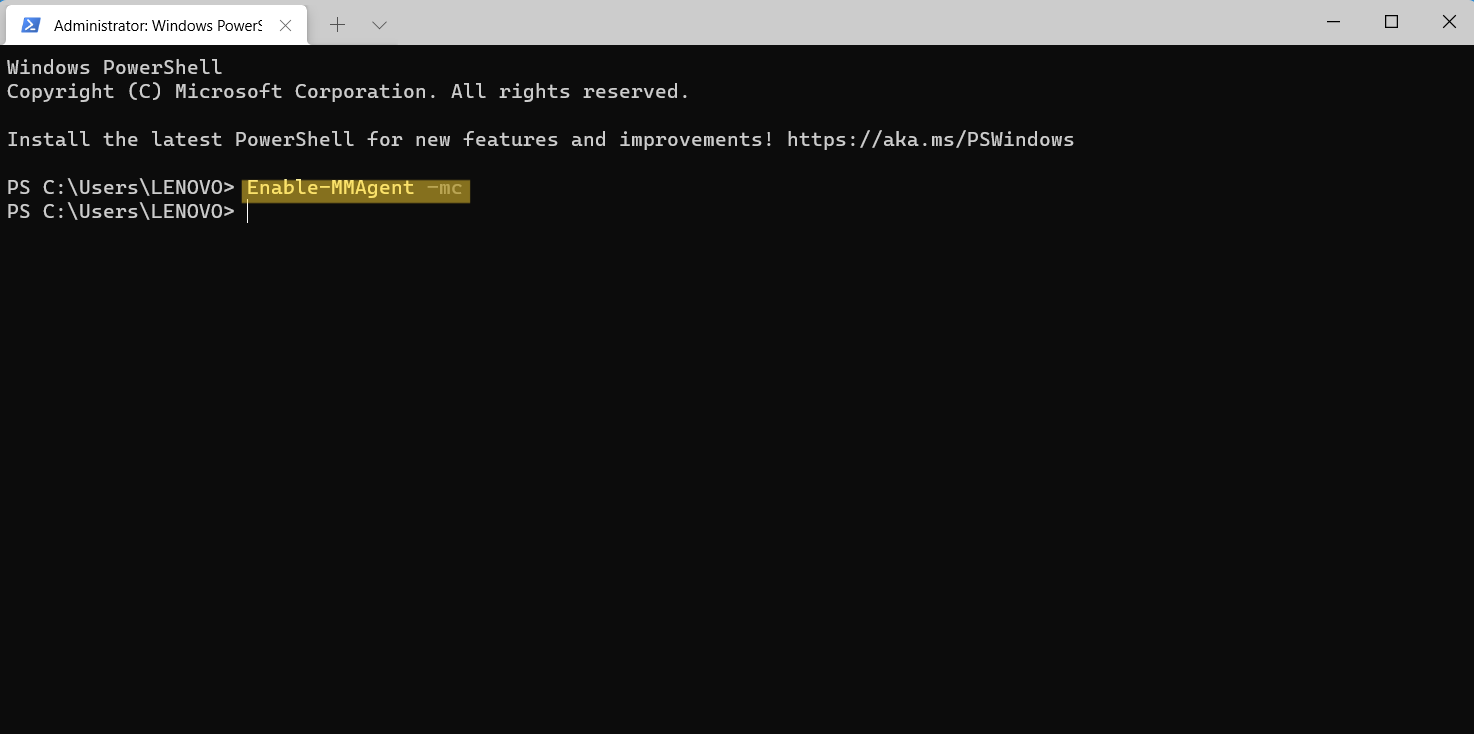
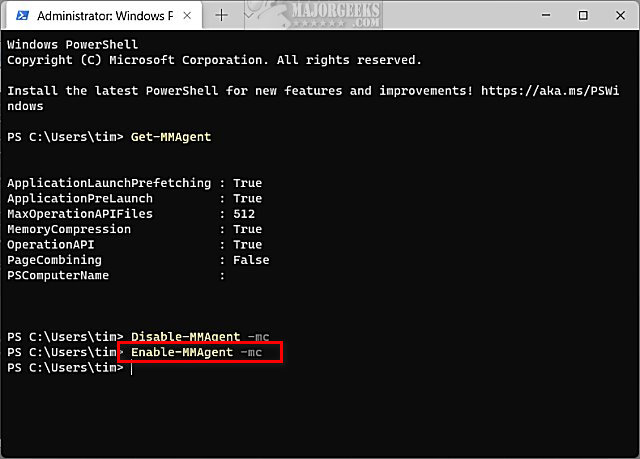
Enable-MMAgent -mc
Step 3. Reboot your computer to apply the changes.
How to Turn off Memory Compression in Windows 11/10?
To disable Memory Compression in Windows 11/10, do the following recommended steps:-
Step 1. First, open Windows PowerShell with elevated rights.
Step 2. Then, on the prompt of Windows PowerShell, type the following and hit Enter from the keyboard:-
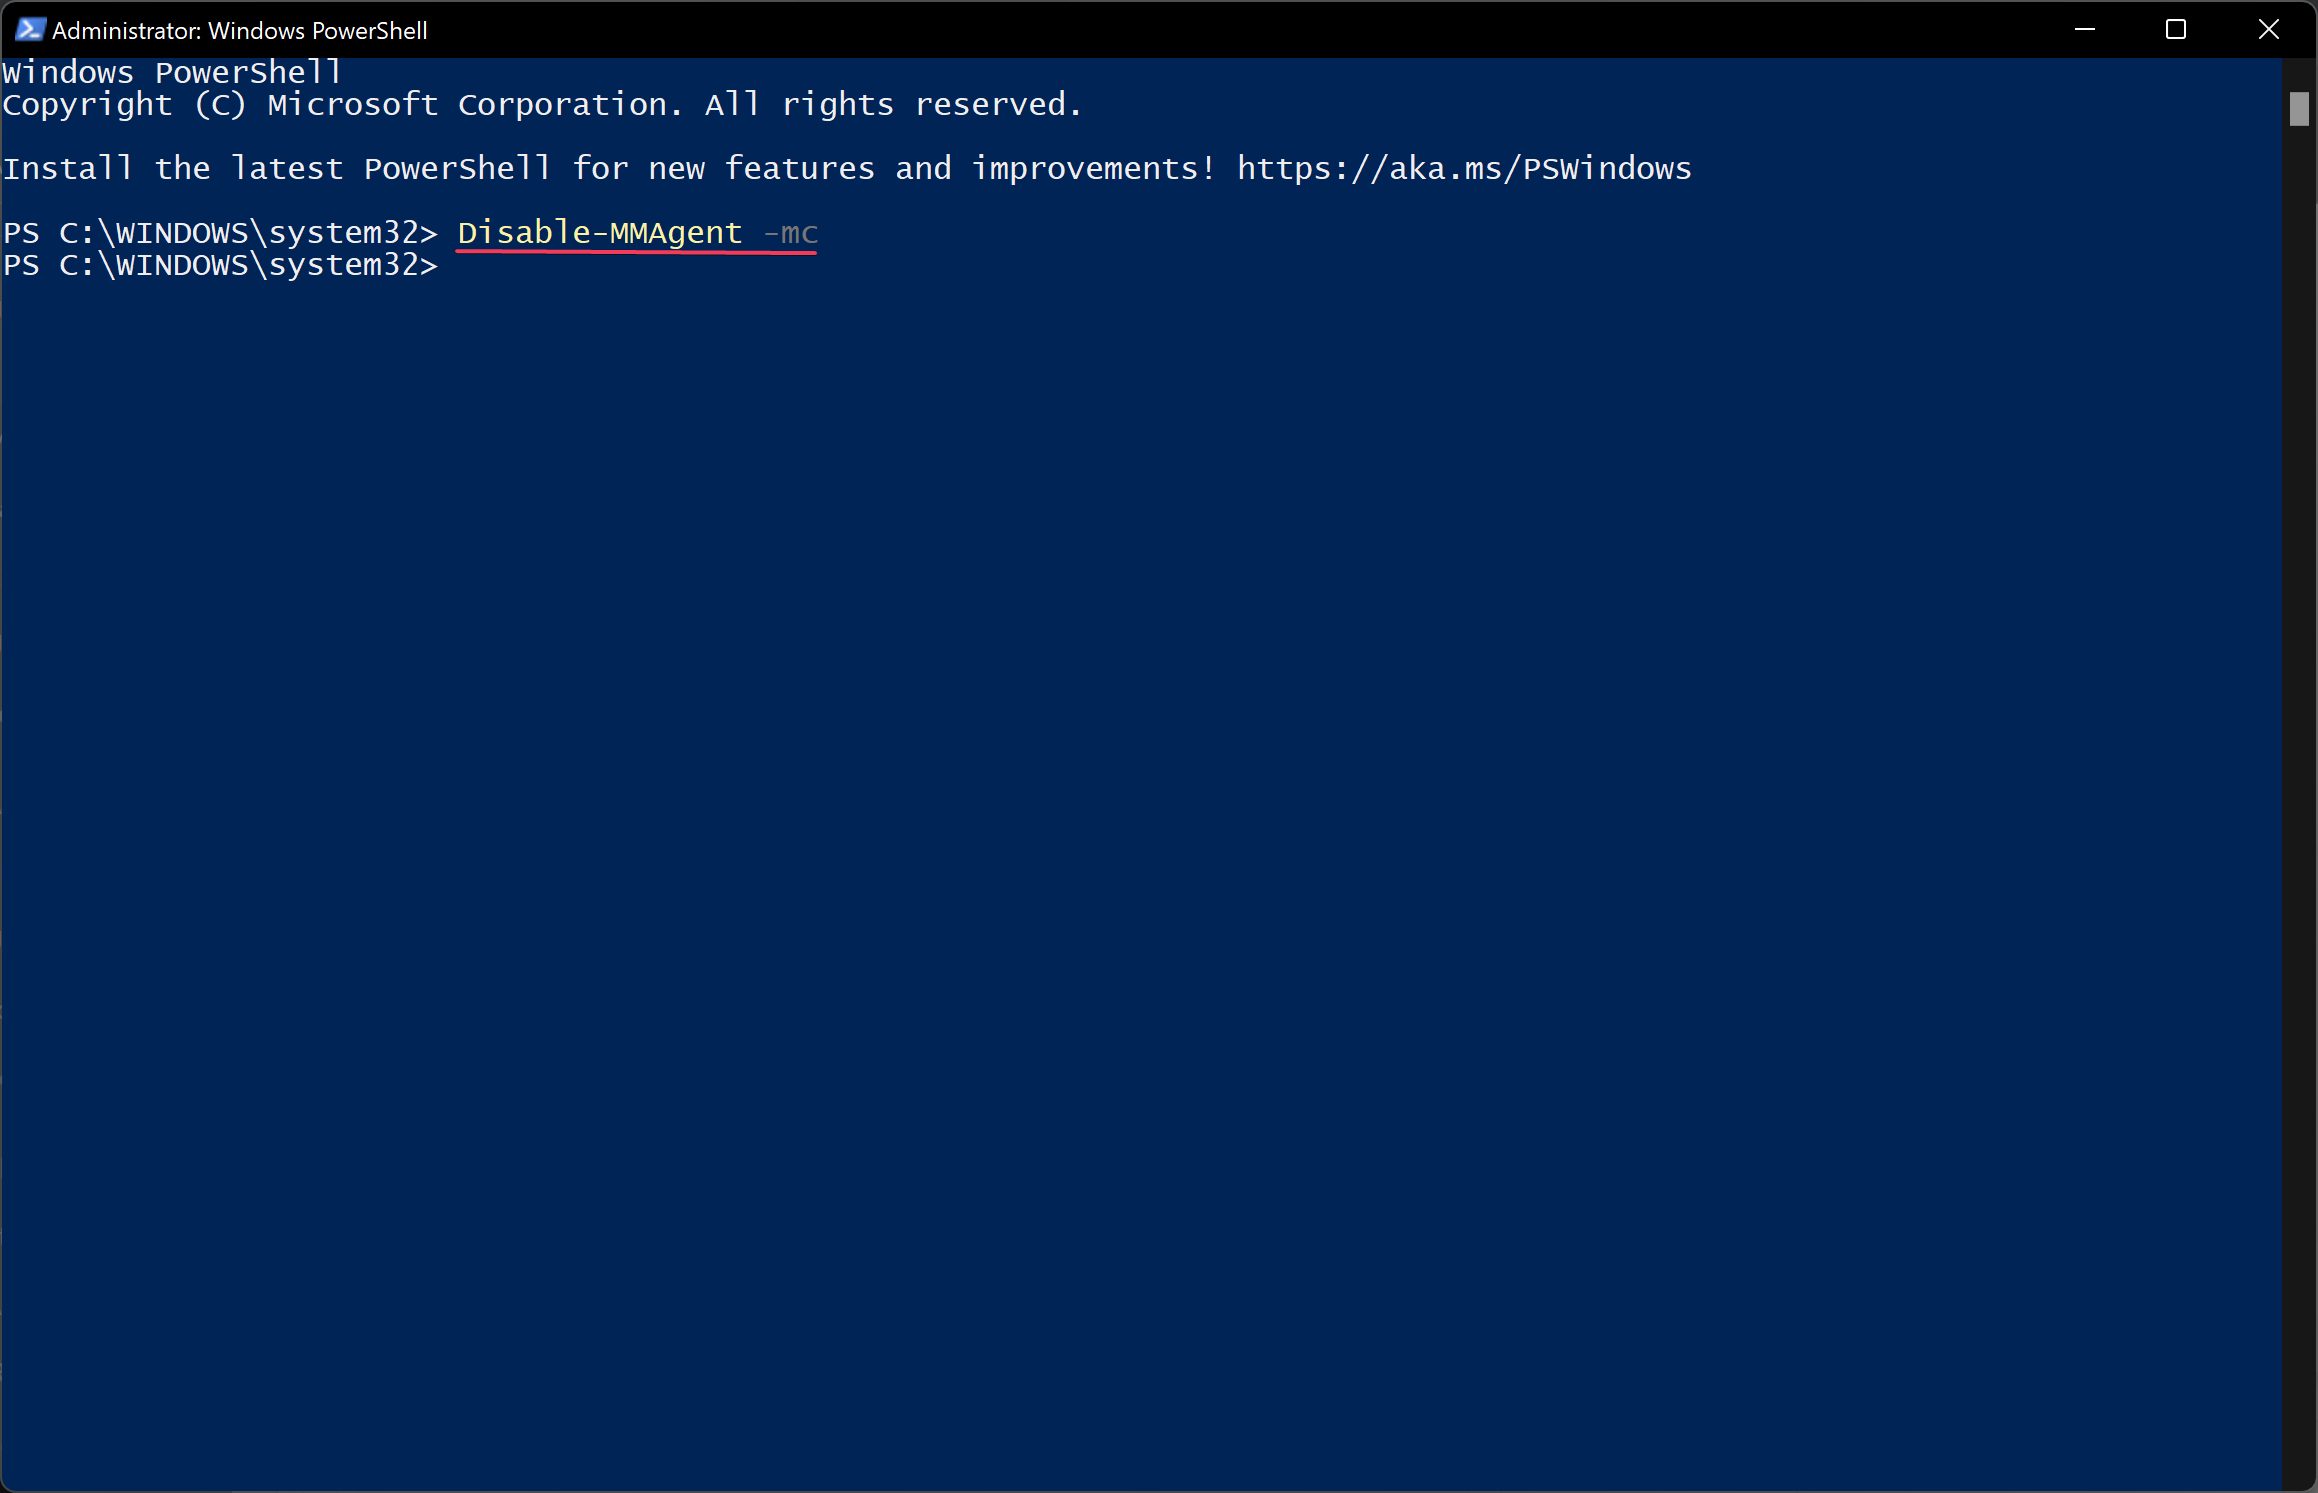
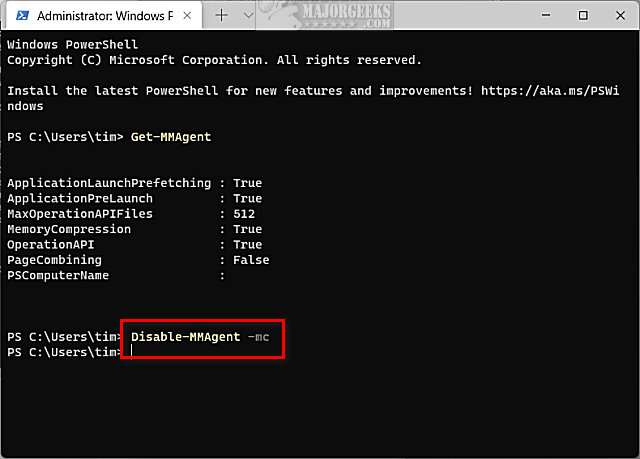
Disable-MMAgent -mc
Step 3. Finally, restart your computer to apply the changes.
Conclusion
In conclusion, Memory Compression is a useful feature available in Windows 11/10 that helps reduce physical memory utilization and improves disk read/write speed, thereby enhancing the overall user experience. Although it may use additional CPU resources for compressing and decompressing data in RAM, which can slow CPU processing on some systems, it is still faster than traditional paging files. Users can view the amount of compressed memory, check whether Memory Compression is enabled or disabled, and turn it on or off using Windows PowerShell with elevated rights. If you have a low-end system with limited memory, enabling Memory Compression may help improve performance. However, if you experience slow performance, you can try disabling Memory Compression to see if it makes a difference.
Readers help support Windows Report. We may get a commission if you buy through our links.
Read our disclosure page to find out how can you help Windows Report sustain the editorial team. Read more
With Memory Compression on Windows 11, your device will run smother even with a limited amount of RAM. In this article, we will show you how to enable or disable Memory Compression on Windows 11.
What is Memory Compression? Memory Compression is a function that compacts the data before writing it to RAM, thus providing more storage on it.
Of course, more data stored in the physical memory translates into a faster running system and better overall performance. This function is enabled by default in Windows 11, but you can disable or reenable it if, somehow, it’s not active.
How do I enable Memory Compression in Windows 11?
- Click the Search bar, type powershell, and click on Run as administrator from the results.
- Type or paste the following command to see if memory compression is already enabled and press Enter to run it:
get-mmagent
- If you see the value True to the right of MemoryCompression, that means it’s activated.
- If the value is False, type the following command to enable Memory Compression on Windows 11 and press Enter:
enable-mmagent -mc
- Restart your PC for the changes to take effect.
- To check if Memory Compression is working, right-click the Start button and select Task Manager from the menu.
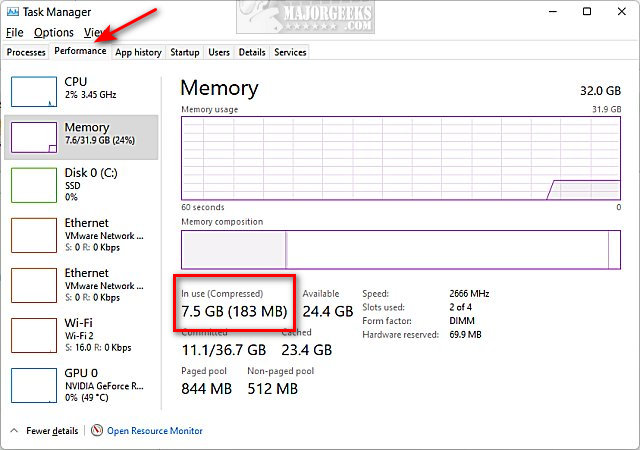
- Now, click on Memory from the Performance tab, and on the bottom, you will see the In use (Compressed) memory.

- If you hover your mouse over Memory composition above, you will see more detail on the status of Memory Compression on your system.


We recommend using the Get-Mmagent command first because the current status of memory management might be already True.
Please note that you can also use Windows Terminal (Admin) in Windows 11 to perform the same commands.
How do I stop Memory Compression in Windows 11?
- Click on the Search field in Windows 11, type powershell, and select Run as administrator to start PowerShell with full privileges.
- Type the following command and press Enter to disable Memory Compression on Windows 11:
disable-mmagent -mc
- Restart your PC for the changes to take effect.

The memory compression feature is great because it optimizes the physical memory utilization so we wouldn’t recommend disabling it.
In fact, you can disable the memory management feature, work on the PC, and turn it back on to see the difference between the states.
If your PC is still running slow, it might be that the PC is not using all the available RAM but the highlighted guide will help you fix that problem.
Why is Memory Compression taking up so much RAM?
Actually, Memory Compression is not taking up RAM. The more compressed memory is processed, the more data can be written on the physical memory.
In other words, a high level of memory compression translates into a better efficiency of memory utilization.
However, high RAM usage means you are running resource-hungry processes and applications which usually also come with high CPU usage. Closing some of them will restore things to normal again.
If the system and compressed memory are causing high disk usage, the highlighted guide will provide the necessary fixes.
You might also be interested in how to fix the insufficient disk space to complete the operation error.
We hope that you managed to enable or disable Memory Compression on Windows 11 and now, the system is running smoothly.
If you have any questions or suggestions on this subject, don’t hesitate to use the comments section below.
Claudiu Andone
Windows Toubleshooting Expert
Oldtimer in the tech and science press, Claudiu is focused on whatever comes new from Microsoft.
His abrupt interest in computers started when he saw the first Home Computer as a kid. However, his passion for Windows and everything related became obvious when he became a sys admin in a computer science high school.
With 14 years of experience in writing about everything there is to know about science and technology, Claudiu also likes rock music, chilling in the garden, and Star Wars. May the force be with you, always!
Do you know how to enable or disable Memory Compression in Windows 11/10? In Windows 11, there is a feature called Memory compression. This feature was introduced in Windows 10, which lets you store more data in the RAM than it usually could. As its name suggests, memory compression stores part of the memory pages in a compressed manner in RAM. For instance, if your apps require to store 4GB data, then Windows might have 3 GB uncompressed data and 0.5 GB compressed data. Now, this compressed data would have actually taken up 1 GB in RAM.
With this feature, Windows 11/10 can compress a part of RAM for reducing the page swap out. So, Memory compression is helpful for Windows users who do not have much physical memory. Now, let’s see how to enable or disable Memory Compress in Windows PC.
Page Contents
Enable or Disable Memory Compression in Windows 11/10
Part 1: How to Check if Memory Compression is Enabled
1. Firstly, open Task Manager on your system. After that, go to Performance and choose Memory.
2. Within the In Use (Compressed) section, you could check how much memory is compressed. The memory displayed in the brackets is the compressed one. However, if the compressed memory is displayed as 0 MB, then this feature is disabled on your Windows PC.
Part 2: Enable or Disable Memory Compression in Windows 11/10
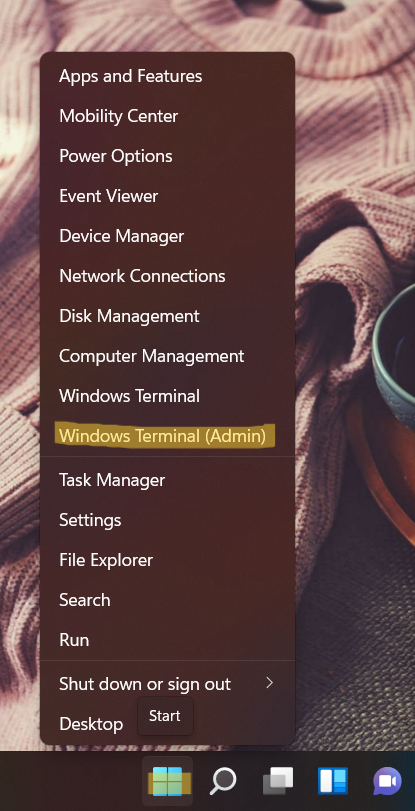
1. To disable Memory Compression, open Windows Terminal (Admin) by right-clicking on the Windows Start button. For Windows 10 users, open Windows PowerShell as administrator.
2. Now, run the following command to disable Memory Compression:
Disable-MMAgent -mc
Once executed, run another command as follows:
Get-MMAgent
Now, you will be able to see whether the Memory Compression feature is disabled on your system successfully or not. If False is written next to MemoryCompression, it means it is disabled now.

3. To enable Memory Compression, run the following command:
Enable-MMAgent –mc
Now, reboot your Windows system for applying the changes. Once done, check if this feature is on or not through Task Manager.
So, this is how you can turn on or off the Memory Compression feature on your Windows 11/10 PC hassle-free.
RELATED ARTICLES

This tutorial will show you how to enable or disable Memory Compression in Windows 10 and Windows 11.
Memory Compression allows Windows 10 and Windows 11 to make better use of available memory on all systems by reducing physical memory utilization, resulting in fewer pagefile IO operations and a reduced reliance on disk. Furthermore, it improves the speed of writing to and reading from disk when MM determines paging must be enacted. Microsoft expects users to experience improved overall responsiveness and usability on all devices running Windows 10 and Windows 11.
Microsoft enabled the Memory Manager (MM) to compress infrequently-accessed memory pages which reduces the amount of reads and writes to the disk (pagefile) and therefore improves responsiveness. Compressing memory reduces the amount of memory used per process, allowing the operating system to maintain more applications in physical memory at a time before enacting traditional paging.
When Memory Manager’s policy does dictate paging, the data being written to or read from the disk is already compressed to typically around 40 percent of its original size. This compression improves the performance of other unrelated operations on the system by reducing a major source of interfering IO load. The end result is a snappier, more responsive experience with improved app launch performance and consistency.
Memory Compression is faster than using the page file, but does use more CPU resources. Your system may not perform as fast as it would if it didn’t need to compress data in memory. If you see a lot of compressed memory and suspect it’s the reason your PC is a bit slow, the only solution for this is to install more physical memory (RAM) or disable Memory Compression.
You must be signed in as an administrator to enable or disable Memory Compression.
Contents
- Option One: See if Memory Compression is Currently Enabled or Disabled
- Option Two: Enable Memory Compression
- Option Three: Disable Memory Compression
EXAMPLE: See amount of compressed memory in Task Manager

Option One
See if Memory Compression is Currently Enabled or Disabled
1 Open Windows Terminal (Admin). and select Windows PowerShell.
2 Copy and paste the Get-MMAgent command into Windows Terminal (Admin), and press Enter. (see screenshot below)
3 Look to see if MemoryCompression shows as True (enabled) or False (disabled).
4 You can now close Windows Terminal (Admin) if you like.

Option Two
Enable Memory Compression
This is the default setting.
1 Open Windows Terminal (Admin). and select Windows PowerShell.
2 Copy and paste the Enable-MMAgent -mc command into Windows Terminal (Admin), and press Enter. (see screenshot below)
3 Close Windows Terminal (Admin).
4 Restart the computer to apply.

Option Three
Disable Memory Compression
1 Open Windows Terminal (Admin). and select Windows PowerShell.
2 Copy and paste the Disable-MMAgent -mc command into Windows Terminal (Admin), and press Enter. (see screenshot below)
3 Close Windows Terminal (Admin).
4 Restart the computer to apply.
That’s it,
Shawn Brink
By Timothy Tibbettson 12/22/2022 |
A newer feature introduced in Windows 10 and continuing with Windows 11 is Memory Manager or MM. Windows 10 & 11 use Memory Manager by default, but you can enable or disable it.
Memory Manager (MM) was designed to compress infrequently-accessed memory pages, which reduces the number of reads and writes to the disk (pagefile) and therefore improves responsiveness. Compressing memory reduces the amount of memory used per process, allowing the operating system to maintain more physical memory applications before enacting traditional paging.
Memory Manager is on by default, but some people claim to reduce lag if they have a high-end CPU. Before proceeding, remember that it is recommended that you leave Memory Manager on.
Video tutorial:
How to See if Memory Compression is Enabled or Disabled in Windows 10 & 11
Press the Windows Key + X and click on Task Manager.
Click on the Performance tab.
Look for In use to see if memory compression is on or off.
All of the following steps require you to next open Windows Terminal as Administrator.
Type in Get-MMAgent and press Enter.
Look for MemoryCompression.
How to Disable Memory Compression in Windows 10 & 11
Type in Disable-MMAgent -mc and press Enter. Wait a few seconds to complete.
Reboot your computer to apply the change.
How to Enable Memory Compression in Windows 10 & 11
Type in Enable-MMAgent -mc and press Enter. Wait a few seconds to complete.
Reboot your computer to apply the change.
Similar:
comments powered by Disqus