
Microsoft Windows 11/10 has a default file compression system that automatically compresses the files or folders that are not used for a long time and when the drive is out of space.
When the files or folders are compressed on Windows 11/10, you will see two blue arrows on the files and folders, which indicates the specific files or folders are compressed. Usually, the system automatically compresses the files and folders to reduce the size.
However, if you have enough drive space on your system, you can disable the automatic NTFS file compression process.
In this post, I will show you four effective and proven methods to disable the automated file compressing on your Windows 11/10 computer.
Let’s get started.
Follow our guide on how to Disable Accidental Drag and Drop in Windows 11
In Windows 11/10, the automatic files or folders compression process is useful if your system drive space is out of space. The NTFS file compression process is a minimal program that does not impact your system performance.
But, if you don’t need to compress your files or folders automatically, you can disable the NTFS file compression process to stop the compression of your files or folders. Follow the steps below to turn off the file compression process.
Here are the steps to disable file compression on Windows 11/10:
1. Use File Explorer
The first, most effective, and easiest way to turn off automatic file compression on your Windows 11/10 is using the properties window through file explorer. You can decompress your files, folders, or an entire drive using this approach.
Here are the steps to disable file compression using Windows File Explorer:
2. Use Command Prompt
Using the Command Prompt is another tested method to disable the NTFS file compression. Applying a single command in the command prompt, you can quickly shut down the automatic file compression system on your Windows 11/10.
Here are the steps to disable file compression using the Command Prompt:
Also related: How to Unblock Websites on Windows 11
3. Use Local Group Policy Editor
Using the Local Group Policy Editor, you can also disable the automatic NTFS file compression process on your Windows 11/110. By enabling a policy in Group Policy Editor, the automatic file compression process is disabled permanently.
Here are the steps to disable file compression using the Group Policy Editor:
4. Use Registry Editor
The last but not least method to disable the automatic file compression on your Windows 11/10 PC is modifying or creating a registry value using the Registry Editor.
Here are the steps to disable file compression using the Registry Editor:
Also read, Schedule Windows 11 to Wake from Sleep Automatically
How to Enable NTFS File Compression on Windows 11/10
Enabling the automatic NTFS file compression on Windows 11/10 is similar to disabling the file compression process.
If you need to enable the automatic NTFS file compression system after disabling it, then you can do it whenever you need. Follow the steps below to turn on the file compression on Windows 11/10.
Here are the steps to enable the file compression on Windows 11/10:
1. Use Command Prompt
The first method to enable the NTFS file compression on Windows 11/10 is executing a command in the Command Prompt.
Here are the steps to enable the file compression using the Command Prompt:
2. Use File Explorer
Using the Windows File Explorer, you can enable the file compression on your Windows 11/10. Follow the steps below to do it.
Here are the steps to enable file compression using Windows File Explorer:
Related content you should read: Remove Bloatware From Windows 11/10
3. Use Registry Editor
Registry Editor is another tested way to enable the NTFS file compression on your Windows 11/10 computer.
Here are the steps to enable the file compression using the Registry Editor:
4. Use Local Group Policy Editor
The last but not least effective method to turn on the file compression is modifying a policy in the Local Group Policy Editor. You can easily enable file compression using the Local Group Policy Editor.
Here are the steps to enable the file compression using the Group Policy Editor:
Read more on how to Fix Update Error Code 0x80004005 in Windows 11
Is File Compression the Same as a ZIP archive?
The Windows in-built file compression feature differs from other third-party ZIP archives tools. The major difference between these two file compressions processes is functionality.
Usually, a ZIP archiver is used to compress the files or folders to reduce the overall file size, and the file is compressed until the files are extracted. Compressing the files or folders means creating a specific compressed file archive.
You can move the compressed files to another drive or external USB drive without decompressing the files. Until you decompress the files, it remains compressed.
On the other hand, when you compress files using the Windows default file compressing tool, the files or folders are only compressed on that particular drive. But, when you copy or move the compressed files to another drive, the files are no longer compressed.
Frequently Asked Questions (FAQs)
Why does Windows 11 keep compressing my files?
Windows 11 keeps compressing your files and folders due to the lower space of your drive. When the system drive space is full, the system automatically compresses different files and folders that have not been used for a long time to reduce the file size and save the drive space.
Why is my computer automatically compressing files?
Your computer automatically compresses files to reduce the file size to save drive space. The Windows system automatically compresses files or folders if your system drive runs out of space.
Should I enable file and folder compression in Windows 11?
Yes, you can enable the file and folder compression in Windows 11 whenever you need. Also, you can disable the Windows default file and folder compression.
Why do my folder icons have two blue arrows?
Your folder icons have two blue arrows because your folder is compressed. The two blue arrows indicate that the file or folder is NTFS compressed.
How do I get rid of double blue arrows on icons?
Disable the Windows default file compression tool using the File Explorer, Command prompt, or Registry Editor to get rid of double blue arrows on icons.
Final Thoughts
The Windows built-in file compressing process, also known as NTFS file compression, allows users to compress files and folders on an NTFS drive. This tool helps to reduce the file size to save drive space when your drive is full.
Following the four effective approaches to disable the automatic file compression I described in this post, you can easily disable the NTFS file compression system within minutes. Here, I describe different ways to enable the Windows default file compression tool.
That’s all for now, folks. I hope this post is helpful and insightful as well. Follow our other articles to know more about different topics.
See you in the next one.
Windows 11 keeps compressing files in the C: drive? How do I stop Windows from automatically compressing files? This problem usually happens when your PC is running out of disk space. In this tutorial we’ll show you 4 methods to disable file compression in Windows 11 / 10.
Method 1: Disable File Compression Using Group Policy
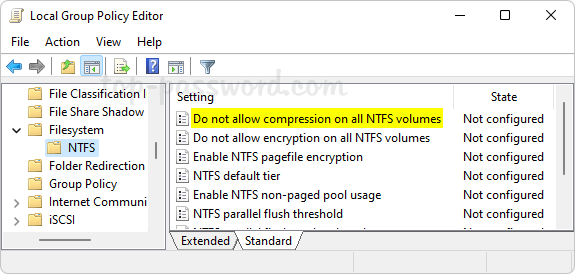
Open Local Group Policy Editor and browse to: Computer Configuration\Administrative Templates\System\Filesystem\NTFS. On the right pane, double-click the policy “Do not allow compression on all NTFS volumes“.
Select the Enabled option. Click Apply and then OK.
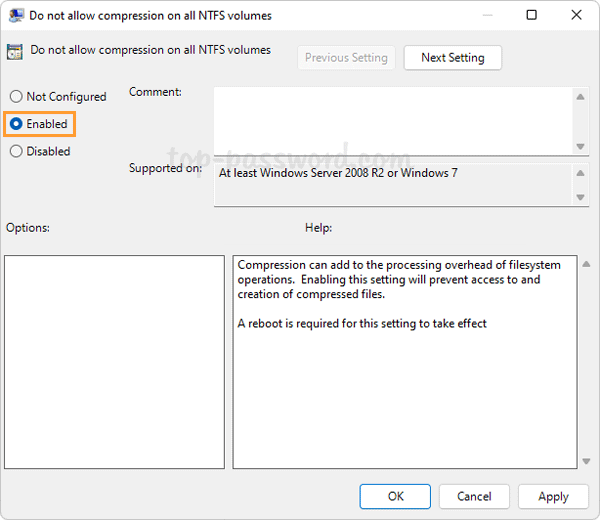
Reboot your computer to make the changes take effect. The next time you try to enable file compression, you’ll get the error message “Compression is disabled for this volume“.
Method 2: Disable File Compression Using Registry Editor
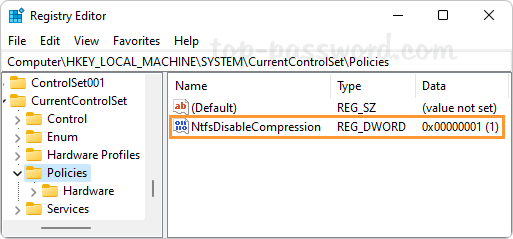
Open Registry Editor and navigate to: HKEY_LOCAL_MACHINE\SYSTEM\CurrentControlSet\Policies. In the right pane, right-click the blank area and select New -> DWORD (32-bit) Value.
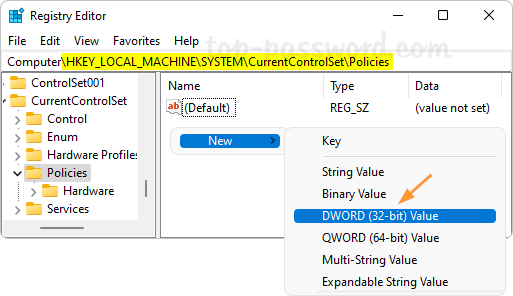
Name the newly-created DWORD NtfsDisableCompression, and then change its value data to 1 for turning off automatic file compression.
Close Registry Editor and restart your computer to apply the changes.
Method 3: Disable File Compression Using Command Prompt
Open the Command Prompt as administrator and then run this command to disable file compression:
fsutil behavior set disablecompression 1
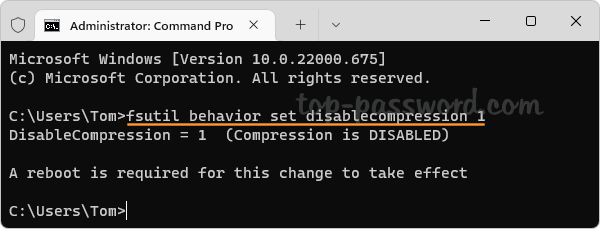
A reboot is required for this change to take effect. Whenever you need to enable file compression again, execute the following command:
fsutil behavior set disablecompression 0
Method 4: Uncompress Your Files in File Explorer
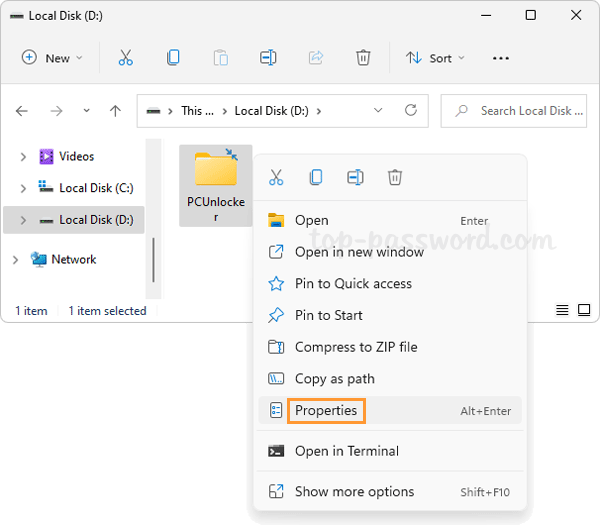
Right-click a compressed folder or file in File Explorer, and then select Properties from the context menu.
Under the General tab, click the Advanced button.
In the Advanced Attributes dialog, uncheck the box which says “Compress content to save disk space“. Click OK.
When you’re back to the Properties dialog, click Apply. A pop-up will appear, and you can choose “Apply changes to this folder, subfolders and files” and click OK.
After uncompressing, two blue arrows will no longer show up in the icons of your folders or files.
- Previous Post: 2 Methods to Change Screenshot Location in Windows 11
- Next Post: 2 Methods: Always Show Scrollbars in Windows 11

This tutorial shows you how to disable the File Compression feature in Microsoft Windows.
Contents
- 1 Windows 10, 8, 7, and Vista Command
- 2 Windows Group Policy
- 3 Windows 2000 and XP NTFS Volumes
Windows 10, 8, 7, and Vista Command
- Select the “Start” button, then type “CMD“.
- Right-click “Command Prompt“, then choose “Run as administrator“.
- If prompted for a password, enter credentials for an account that has administrator rights.
- Type the following then press “Enter“.
fsutil behavior set disablecompression 1
You should receive a message that says “NOTE: Changes to this setting require a reboot to take effect.” Restart the computer to make the change stick.
If you wish to enable it again, you can use the command fsutil behavior set disablecompression 0
Windows Group Policy
- From the Group Policy Editor, navigate to “Computer Configuration” > “Administrative Templates” > “System” > “Filesystem” > “NTFS“.
- Open the “Do not allow compression on all NTFS volumes“.
- Select the “Enabled” radio button, then select “OK“.
Windows 2000 and XP NTFS Volumes
- Hold down the “Windows key” , then press “R“.
- Type “regedit” and select “OK“.
- Navigate to the following:
- HKEY_LOCAL_MACHINE
- SYSTEM
- CurrentControlSet
- Control
- FileSystem.
- Look for an entry on the right side for “NtfsDisableCompression“. If it doesn’t exist, you will need to create it. To do so, right-click on “FileSystem“, then select “New” > “DWORD Value“. Give the value a name of “NtfsDisableCompression“. Press the “Enter” key when you are done.
- Right-click the “NtfsDisableCompression” entry and click “Modify“.
- To disable compression set the “Value data” to “1“. (To enable compression again, set the Value data to 0 or delete NftsDisableCompression)
- Restart the computer to apply changes.
Now when trying to compress a folder, the following error will be produced:
An error occurred applying attributes to the file:
{file path and filename}
Access is denied.
Author Mitch Bartlett
Through my career that spans over 20 years I have become an expert in Microsoft Systems Administration, Android, and macOS. I started this site as a technical guide for myself and it has grown into what I hope is a useful knowledgebase for everyone.
Do you know what Memory Compression is? Do you have any idea how to enable or disable Memory Compression? In this article from MiniTool, you can learn detailed information about Windows Memory Compression.
What Is Memory Compression
Before learning how to enable or disable Memory Compression in Windows 10, you need to have a basic understanding of Memory Compression.
Memory Compression, as the name suggests, is used to compress your data memory so that your RAM can store more data than normal, so as to ensure the normal running speed of the computer.
When not using memory compression, your PC stores additional data on the page file on the hard drive storage. However, the computer can read data from the hard drive significantly slower than RAM, which can cause your computer to run significantly slower.
How to Enable Memory Compression
Now let us see how to enable Memory Compression in Windows 10.
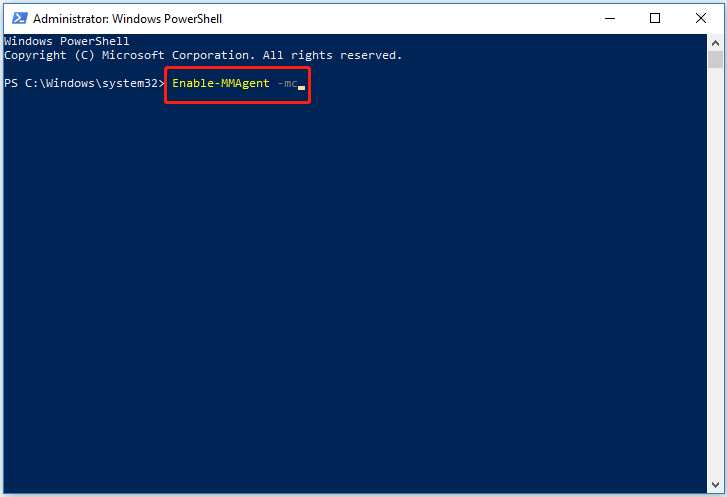
Step 1. Type PowerShell in the Windows search box and right-click Windows PowerShell to select Run as administrator.
Step 2. Select Yes in the pop-up UAC window.
Step 3. In the new window, type Enable-MMAgent -mc and press the Enter key on your keyboard.
Step 4. After the command line is executed, you can restart your computer.
To check whether the Memory Compression has been turned on successfully and see how much memory Windows has compressed, you can do the following steps:
First, right-click the Windows logo key and select Task Manager.
Second, under the Performance section, move on to the Memory tab, then you can see the compressed memory in the “In use (Compressed)” part.

How to Disable Memory Compression
Now you should know how to enable Memory Compression. However, you may ask: Should I disable Memory Compression or keep it turning on?
As mentioned earlier, Memory Compression aims to improve system performance by storing parts of memory pages in compressed form in RAM. Therefore, it is generally not recommended to disable Memory Compression. However, when this memory management process consumes high CPU resources, you may consider turning it off.
Step 1. Run Windows PowerShell as administrator.
Step 2. Input Disable-MMAgent -mc in the command window and press Enter to execute the command line.
Now the feature of Memory Compression has been disabled.
Does Deleting Files Reduce RAM Usage
Searching in Google, you will find that many users are wondering if deleting personal files can reduce RAM usage. Deleting files will only reduce storage usage, but not RAM usage. To reduce RAM usage, you can try restarting your computer, quitting running programs, uninstalling unwanted applications, and scanning for viruses.
For more information about reducing memory usage, you can refer to this post: How to Fix Windows 11 High Memory Usage? Here Are Easy Fixes.
However, what if you have deleted some files by mistake? Can you recover deleted files without bringing any damage to the original data? Fortunately, the answer is positive.
Here the best data recovery software – MiniTool Power Data Recovery is recommended. It is an easy-to-use file restore tool designed for recovering files (documents, pictures, emails, videos, etc.) in various data loss situations, such as OS crash, accidental deletion, viruses attack, and so on.
It supports recovering files from USB flash drives, internal hard drives, external hard drives, CDs/DVDs, and other file storage devices. And it is fully compatible with all Windows systems, such as Windows 11, Windows 10, Windows 8, and Windows 7.
MiniTool Power Data Recovery Free Edition can help you recover up to 1 GB of data totally for free. So, you can click the button below to download it and have a try.
MiniTool Power Data Recovery FreeClick to Download100%Clean & Safe
Final Words
In a word, this article introduces how to enable and disable Memory Compression and how to recover deleted or lost files using the professional data restore tool – MiniTool Power Data Recovery.
If you have any suggestions for MiniTool data recovery software, please feel free to contact us via [email protected].
В Windows 10 появилось сразу несколько усовершенствований, касающихся экономии места на жестком диске. Одна из них — возможность сжать системные файлы, включая предустановленные приложения с помощью функции Compact OS.
Задействовав Compact OS, вы можете сжать Windows 10 (двоичные файлы системы и приложений), освободив тем самым чуть более 2-х гигабайт места на системном диске для 64-разрядных систем и 1.5 Гб для 32-разрядных версий. Функция работает для компьютеров с UEFI и обычным БИОС.
Проверка статуса Compact OS
Windows 10 может включать сжатие самостоятельно (или же оно может быть включено в предустановленной системе производителем). Проверить, включено ли сжатие Compact OS вы можете с помощью командной строки.
Запустите командную строку (правый клик по кнопке «Пуск», выбрать нужный пункт в меню) и введите следующую команду: compact /compactos:query после чего нажмите Enter.

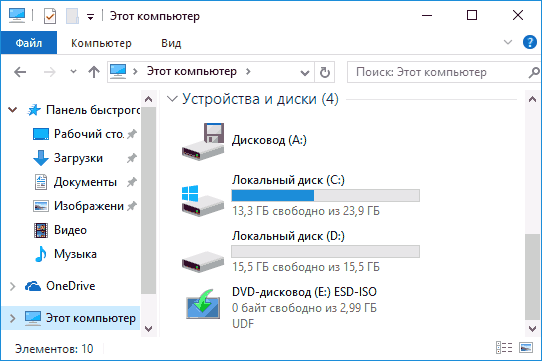
В результате в окне командной строки вы получите сообщение либо о том, что «Система не находится в состоянии сжатия, поскольку оно не является полезным для этой системы», либо о том, что «система находится в состоянии сжатия». В первом случае вы можете включить сжатие вручную. На скриншоте — свободное место на диске до сжатия.
Отмечу, что по официальной информации Microsoft, сжатие является «полезным» с точки зрения системы для компьютеров с достаточным количеством оперативной памяти и производительным процессором. Однако, у меня с 16 Гб RAM и Core i7-4770 в ответе на команду было именно первое сообщение.
Включение сжатия ОС в Windows 10 (и отключение)
Для того, чтобы включить сжатие Compact OS в Windows 10, в командной строке, запущенной от имени администратора введите команду: compact /compactos:always и нажмите Enter.

Начнется процесс сжатия файлов операционной системы и встроенных приложений, который может занять довольно-таки продолжительное время (у меня на абсолютно чистой системе с SSD заняло около 10 минут, однако в случае HDD время может быть совсем другим). На изображении ниже — размер свободного места на системном диске после сжатия.

Для отключения сжатия тем же способом используйте команду compact /compactos:never
В случае если вас интересуют возможности установки Windows 10 сразу в сжатом виде, то рекомендую ознакомиться с официальной инструкцией Microsoft на эту тему.
Не знаю, будет ли кому-то полезной описываемая возможность, но вполне могу предположить сценарии, самым вероятным из которых мне кажется высвобождение места на диске (или, вероятнее, SSD) недорогих планшетов с Windows 10 на борту.