
If you try to re-arrange files or folders in Explorer in Windows 10, then you will see that they will be automatically auto-arranged and aligned to a grid. In previous Windows versions, you could freely arrange icons inside folders in Explorer, but this feature is not available in Windows 10. By default, you could not disable auto arrange and align to grid option in Windows 10 File Explorer but don’t worry as in this post we will show you how to disable auto arrange in Folders in Windows 10.

Table of Contents
Make sure to create a restore point just in case something goes wrong.
Step 1: Reset all the folder views and customizations
1. Press Windows Key + R then type regedit and hit Enter to open Registry Editor.
2. Navigate to the following registry key:
HKEY_CURRENT_USER\Software\Classes\Local Settings\Software\Microsoft\Windows\Shell
3. Make sure to expand Shell, where you would find a sub-key named Bags.
4. Next, right-click on Bags then select Delete.

5. Similarly go to the following locations and delete the Bags sub-key:
HKEY_CURRENT_USER\Software\Microsoft\Windows\Shell
HKEY_CURRENT_USER\Software\Microsoft\Windows\ShellNoRoam
6. Now restart Windows Explorer to save the changes, or you could restart your PC.
Step 2: Disable Auto Arrange in Folders in Windows 10
1. Open Notepad then copy & paste the following as it is:
REM --- 1. Step: Add keys
REM --- 1a for General Folders
REG ADD "HKCU\Software\Classes\Local Settings\Software\Microsoft\Windows\Shell\Bags\AllFolders\Shell\{5C4F28B5-F869-4E84-8E60-F11DB97C5CC7}" /v FFlags /t REG_DWORD /d 0x43000001 /f
REG ADD "HKCU\Software\Classes\Local Settings\Software\Microsoft\Windows\Shell\Bags\AllFolders\Shell\{5C4F28B5-F869-4E84-8E60-F11DB97C5CC7}" /v Mode /t REG_DWORD /d 0x00000004 /f

REM --- 1b for Documents Folders
REG ADD "HKCU\Software\Classes\Local Settings\Software\Microsoft\Windows\Shell\Bags\AllFolders\Shell\{7D49D726-3C21-4F05-99AA-FDC2C9474656}" /v FFlags /t REG_DWORD /d 0x43000001 /f
REG ADD "HKCU\Software\Classes\Local Settings\Software\Microsoft\Windows\Shell\Bags\AllFolders\Shell\{7D49D726-3C21-4F05-99AA-FDC2C9474656}" /v Mode /t REG_DWORD /d 0x00000004 /f

REM --- 1c for Music Folders
REG ADD "HKCU\Software\Classes\Local Settings\Software\Microsoft\Windows\Shell\Bags\AllFolders\Shell\{94D6DDCC-4A68-4175-A374-BD584A510B78}" /v FFlags /t REG_DWORD /d 0x43000001 /f
REG ADD "HKCU\Software\Classes\Local Settings\Software\Microsoft\Windows\Shell\Bags\AllFolders\Shell\{94D6DDCC-4A68-4175-A374-BD584A510B78}" /v Mode /t REG_DWORD /d 0x00000004 /f

REM --- 1d for Picture Folders
REG ADD "HKCU\Software\Classes\Local Settings\Software\Microsoft\Windows\Shell\Bags\AllFolders\Shell\{B3690E58-E961-423B-B687-386EBFD83239}" /v FFlags /t REG_DWORD /d 0x43000001 /f
REG ADD "HKCU\Software\Classes\Local Settings\Software\Microsoft\Windows\Shell\Bags\AllFolders\Shell\{B3690E58-E961-423B-B687-386EBFD83239}" /v Mode /t REG_DWORD /d 0x00000004 /f

REM --- 1e for Videos Folders
REG ADD "HKCU\Software\Classes\Local Settings\Software\Microsoft\Windows\Shell\Bags\AllFolders\Shell\{5FA96407-7E77-483C-AC93-691D05850DE8}" /v FFlags /t REG_DWORD /d 0x43000001 /f
REG ADD "HKCU\Software\Classes\Local Settings\Software\Microsoft\Windows\Shell\Bags\AllFolders\Shell\{5FA96407-7E77-483C-AC93-691D05850DE8}" /v Mode /t REG_DWORD /d 0x00000004 /f

REM --- 2. Step: Export everything under the key AllFolders in a separate file AllFolders.reg
REG EXPORT "HKCU\Software\Classes\Local Settings\Software\Microsoft\Windows\Shell\Bags\AllFolders" AllFolders.reg

REM --- 3. Step: Delete everything under the key Bags
REG DELETE "HKCU\Software\Classes\Local Settings\Software\Microsoft\Windows\Shell\Bags" /f

REM --- 4. Step: Import again exported file AllFolders.reg
REG IMPORT AllFolders.reg

REM --- 5. Step: Delete exported file AllFolders.reg
del AllFolders.reg
Source: This BAT file has been created by unawave.de.
2. Now from Notepad menu, click on File then select Save as.
3. The “Save as type” drop-down select All Files and name the file as Disable_Auto.bat (.bat extension is very important).

4. Now navigate to where you want to save the file and click Save.
5. Right-click on the file then selects Run as administrator.
6. Restart your PC to save changes.
Step 3: Test if you can Disable Auto Arrange in Folders
1. Open File Explorer then navigate to any folder and switch the View to “Large icons“.
2. Now right-click in an empty area inside the folder then select View and make sure to click on “Auto arrange” to uncheck it.
3. Try to drag the icons freely wherever you want.
4. To undo this feature run a system restore.
Recommended:
- Add Open command window here as administrator in Windows 10 Context Menu
- Enable or Disable App Notifications on Lock Screen in Windows 10
- Change Compatibility Mode for Apps in Windows 10
- How To Change Default Programs in Windows 10
That’s it, and you successfully learned How To Disable Auto Arrange in Folders in Windows 10 but if you still have any queries regarding this tutorial then feel free to ask them in the comment’s section.
|
Winston Mint 625 / 446 / 70 Регистрация: 29.04.2019 Сообщений: 2,160 |
||||
Не могу отключить автоматическое упорядочивание файлов и папок29.06.2019, 18:57. Показов 15155. Ответов 27 Метки нет (Все метки) Здравствуйте. Disable_Auto_Arrange.reg
Но файлы и папки при выборе вида «Расширенная плитка» все равно автоматически выстраиваются по алфавитному порядку. То есть, если я перемещаю файлы и папки как мне нужно, то они то перемещаются, но при выходе из папки где перемещал, и заходе опять в эту папку, файлы и папки все равно автоматически выстраиваются по алфавитному порядку, т.е. отключение автоматического упорядочивания не сработало. До этого у меня была Windows 10 Enterprise 2016 LTSB Build 14393 Version 1607 и там срабатывало отключение автоматического упорядочивания файлов в папках проводника. Помогите, пожалуйста отключить автоматическое упорядочивание
2 |
|
625 / 446 / 70 Регистрация: 29.04.2019 Сообщений: 2,160 |
|
|
30.06.2019, 17:54 [ТС] |
|
|
Столько советов. Я прямо не знаю даже с какого начать
0 |
|
Супер-модератор 8814 / 4717 / 571 Регистрация: 13.03.2013 Сообщений: 16,765 Записей в блоге: 16 |
|
|
01.07.2019, 14:57 |
|
|
1 |
|
625 / 446 / 70 Регистрация: 29.04.2019 Сообщений: 2,160 |
|
|
01.07.2019, 18:05 [ТС] |
|
|
Сообщение от Maks Winston Mint, Слетает расположение ярлыков на рабочем столе при перезагрузке и пкм. — обновить Maks, не работает ничего по вашей ссылке. Подскажите, как правильно внести изменения в реестр, чтобы изменения фиксировались там и не пропадали?
0 |
|
Супер-модератор 8814 / 4717 / 571 Регистрация: 13.03.2013 Сообщений: 16,765 Записей в блоге: 16 |
|
|
01.07.2019, 21:18 |
|
|
Сообщение от Winston Mint Тут просто винда новая и на ней все больше и больше полезных фичей негодяи «программеры» из микрософт удаляют. У меня установлена точно такая же версия и сборка не более 10 ПК, и ни на одном из них нет такой проблемы.
0 |
|
625 / 446 / 70 Регистрация: 29.04.2019 Сообщений: 2,160 |
|
|
01.07.2019, 23:26 [ТС] |
|
|
Сообщение от Maks У меня установлена точно такая же версия и сборка не более 10 ПК, и ни на одном из них нет такой проблемы. Я очень за вас рад. Вы или по теме или проходите мимо. И научитесь читать про что спрашивают.
0 |
|
Супер-модератор 8814 / 4717 / 571 Регистрация: 13.03.2013 Сообщений: 16,765 Записей в блоге: 16 |
|
|
02.07.2019, 06:19 |
|
|
Winston Mint, я всего лишь поинтересовался у Вас о чистоте сборки дистрибутива, который Вы установили.
0 |
|
625 / 446 / 70 Регистрация: 29.04.2019 Сообщений: 2,160 |
|
|
02.07.2019, 08:29 [ТС] |
|
|
Сообщение от Maks как специалиста в области Windows Специалист, не способный понять о чем речь идет. Добавлено через 2 минуты Сообщение от Maks Если Вы не в состоянии ответить на простейший вопрос Если вы не в состоянии понять, о чем спрашивают, то лучше проходите мимо. А не грузите всякими лицензиями. Ваши лицензии проблемы не решают. Добавлено через 5 минут Добавлено через 1 минуту Сообщение от Maks Желаю Вам удачи в решении Вашего вопроса Пока я сам его не решу, никто не поможет, по крайней мере здесь. Так как я понял, что здесь нет специалистов. Добавлено через 2 минуты Сообщение от Maks я всего лишь поинтересовался у Вас о чистоте сборки дистрибутива, который Вы установили С какой целью? Выведать, купил я винду или нет? Не купил, скачал на торренте.
0 |
|
15903 / 7926 / 755 Регистрация: 03.01.2012 Сообщений: 32,863 |
|
|
02.07.2019, 10:25 |
|
|
Может, реестр восстанавливается из «более влиятельной» ветки HKEY_LOCAL_MACHINE? А править суммарную ветку HKEY_CLASSES_ROOT не приходило в голову? Миниатюры
1 |
|
Супер-модератор 8814 / 4717 / 571 Регистрация: 13.03.2013 Сообщений: 16,765 Записей в блоге: 16 |
|
|
03.07.2019, 06:31 |
|
|
Сообщение от Winston Mint Disable_Auto_Arrange.reg Этот твик Вы взяли из статьи, применимой к Windows 7. Folder Options X Не по теме: Winston Mint, (ака ОСЕТР) на другом форуме Вы более детально расписали проблему, даже скриншоты приложили.
1 |
|
625 / 446 / 70 Регистрация: 29.04.2019 Сообщений: 2,160 |
|
|
03.07.2019, 07:29 [ТС] |
|
|
Сообщение от Maks Этот твик Вы взяли из статьи, применимой к Windows 7 Maks, да, но Сообщение от Winston Mint До этого у меня была Windows 10 Enterprise 2016 LTSB Build 14393 Version 1607 и там срабатывало отключение автоматического упорядочивания файлов в папках проводника. точно так же срабатывало, как и в Windows 7. Но в этой новой Windows 10 уже не срабатывает(( Сообщение от Maks Стандартными средствами можно, разве что, отключить числовую сортировку Пробовал, не срабатывает(( Сообщение от Maks В качестве альтернативного варианта воспользуйтесь программой Folder Options X Тоже не срабатывает, потому что в новой винде 10 какую то пакость сделали, сильно проводник испаганили(( Добавлено через 3 минуты Сообщение от Maks на другом форуме Вы более детально расписали проблему, даже скриншоты приложили. Maks, да так же само описал проблему и там, только да, здесь скрины не приложил.
0 |
|
625 / 446 / 70 Регистрация: 29.04.2019 Сообщений: 2,160 |
|
|
03.07.2019, 08:12 [ТС] |
|
|
Сообщение от gecata Может, реестр восстанавливается из «более влиятельной» ветки HKEY_LOCAL_MACHINE? gecata, я ж не знаю, может и восстанавливается. Как тогда сделать, чтобы он не восстанавливался. Сообщение от gecata А править суммарную ветку HKEY_CLASSES_ROOT не приходило в голову? Приходило. Туда эти параметры с файла Disable_Auto_Arrange.reg вносятся, в раздел HKEY_CURRENT_USER сейчас стали тоже вносится
0 |
|
625 / 446 / 70 Регистрация: 29.04.2019 Сообщений: 2,160 |
|
|
03.07.2019, 08:35 [ТС] |
|
|
Только вот не вносится 1 раздел Добавлено через 16 минут Я хочу переместить папку Фильмы и поставить её после папки Музыка: Она перемещается Но если выйти с папки D: и зайти опять в папку D:, всё опять становится на круги своя(( То есть отключение автоматического упорядочивания файлов в папках не сработало((
0 |
|
625 / 446 / 70 Регистрация: 29.04.2019 Сообщений: 2,160 |
|
|
03.07.2019, 08:42 [ТС] |
|
|
И после того как я папку Фильмы переместил и вышел с папки D: и зашёл опять в папку D:, внесенные в реестр значения с файла Disable_Auto_Arrange.reg пропали(( Она меня уже бесить начинает эта винда
0 |
|
15903 / 7926 / 755 Регистрация: 03.01.2012 Сообщений: 32,863 |
|
|
03.07.2019, 10:31 |
|
|
Winston Mint, А нет ли подкаталогов, аналогичных тем подкаталогам, что вы пытаетесь править, в вашей ветке HKEY_USERS\.DEFAULT ? (Выделила слово «вашей», потому что у меня в дефолтном юзере такого подкаталога нет. И, думаю, что у тех, у кого этой проблемы нет, тоже такого нету. Но должен же приказ об откате ваших правок откуда-то поступать! И, если другие подкаталоги вашего реестра не откатываются, то логичнее всего думать, что он поступает от аналогичных веток реестра «старших по званию»
1 |
|
497 / 162 / 71 Регистрация: 07.01.2014 Сообщений: 258 |
|
|
03.07.2019, 10:45 |
|
|
Сообщение было отмечено Winston Mint как решение РешениеСообщение от Winston Mint У меня сейчас установлена Windows 10 Enterprise LTSC build 17763.316 v1809 (март 2019). Сообщение от Winston Mint До этого у меня была Windows 10 Enterprise 2016 LTSB Build 14393 Version 1607 и там срабатывало отключение автоматического упорядочивания файлов в папках проводника. Эта функция была сломана в обновлении Windows 10 Creators Update (версия 1703). Об этом написано в дополнении к статье, в которой был изложен способ отключения упорядочивания, на одном известном форуме. This tutorial no longer works starting with the Windows 10 Creators Update version 1703. While you can still arrange items how you like, they will now reset back to their original position whenever you close/open or refresh (F5) the folder window.
2 |
|
625 / 446 / 70 Регистрация: 29.04.2019 Сообщений: 2,160 |
|
|
03.07.2019, 15:31 [ТС] |
|
|
Сообщение от Wladislaw Эта функция была сломана в обновлении Windows 10 Creators Update (версия 1703). Об этом написано в дополнении к статье, в которой был изложен способ отключения упорядочивания, на одном известном форуме. Wladislaw, можете дать ссылку на эту статью, хотя бы в личку. Пожалуйста. Может там кто нибудь нашел решение. Зараннее спасибо! Добавлено через 4 минуты Сообщение от gecata И, думаю, что у тех, у кого этой проблемы нет, тоже такого нету gecata, просто по умолчанию в Windows включено автоматическое упорядочивание и люди просто не знают, что его можно было отключить, или им не надо вообще его отключать. Поэтому у них и проблемы такой нет. А вот сейчас, как видите, негодяи в микрософт сделали так, что невозможно отключить и тому, кому это надо((
0 |
|
625 / 446 / 70 Регистрация: 29.04.2019 Сообщений: 2,160 |
|
|
03.07.2019, 15:56 [ТС] |
|
|
Сообщение от gecata А нет ли подкаталогов, аналогичных тем подкаталогам, что вы пытаетесь править, в вашей ветке HKEY_USERS\.DEFAULT ? Не, в разделе DEFAULT нету. Есть в HKEY_USERS\S-1-5-21-1121785060-3142625063-2087056990-1001\Software\Classes\Local Settings\Software\Microsoft\Windows\Shel l\Bags\AllFolders\Shell\
0 |
|
15903 / 7926 / 755 Регистрация: 03.01.2012 Сообщений: 32,863 |
|
|
03.07.2019, 16:03 |
|
|
Winston Mint, А эта ветка и есть ваш CURRENT_USER (то есть, это та ветка, которая загружена в данный момент в качестве текущего пользователя) Добавлено через 1 минуту
1 |
|
497 / 162 / 71 Регистрация: 07.01.2014 Сообщений: 258 |
|
|
03.07.2019, 16:09 |
|
|
Winston Mint, статья на tenforums. Она найдется, если вставить в Google половину второго предложения из приведенной мною цитаты до слова original включая его. Здесь не совсем понятный запрет на публикование ссылок на другие форумы, хотя вроде бы их все равно публикуют. Но решения там все равно на данный момент нет.
1 |
Table of contents
- What Is the Purpose of “Group By” in Windows 11 File Explorer
- How to Disable File Grouping in Windows 10 File Explorer?
- How to Disable File Grouping in Windows 11 File Explorer?
- How to Disable File Grouping for All Folders in Windows 10/11
- How to disable file grouping for all files and folders in Windows 10:
- How to disable file grouping for all folders in Windows 11
- How to Enable Local or Universal File Grouping
- Disabling the Group by Folder View in Windows 10/11: Explained
- FAQ
With Windows Explorer on Windows 10 and 11, arranging your files and folders according to your preferred order is just a few clicks away.
The operating system’s native file browser lets you do a lot of cool stuff in addition to the routine copy, paste, move, and launch operations.
When viewing a folder full of files or subfolders, you can cycle between multiple icon views (extra large, large, medium, small) or dispense with icons altogether and give prominence to details or file content.
You can decide to sort your files according to one of the default attributes, such as name, type, size, and date modified, or in ascending or descending order.
You can also decide to group similar items, with each set of groupings ordered by name, size, type, etc.
However, if you don’t want it, you can disable the feature. This guide will show you how to disable the “Group by folder” view in Windows 10 and 11.
What Is the Purpose of “Group By” in Windows 11 File Explorer
If you’re using Windows 11, you must have noticed the major improvements in File Explorer. File Explorer now has a new, streamlined context menu, allowing users to quickly access popular commands.
Likewise, a new update announced in April 2022 has added tabs to File Explorer, a feature that works just like in Microsoft Edge. It lets you open multiple tabs for each section of File Explorer or folder. What’s more, you can create new or close open tabs.
The “Group by” feature is still available in Windows 11 and is similar to what’s in Windows 10 File Explorer. This feature allows you to organize your files and folders as you please.
However, the grouping feature isn’t always useful, and users might want to disable it. Keep reading to learn how to turn off “Group by” in File Explorer in Windows 11.
Now, just like in Windows 10 File Explorer, your files or folders can be arranged in ascending or descending order.
To check this, simply open any folder and click “Sort.” You should see which option is activated.
Also read:Windows Tweaks: How to Customize Your Windows 10/11
How to Disable File Grouping in Windows 10 File Explorer?
Turning off file grouping in Windows will undo all grouping arrangements and revert files and folders to their default order. This can be useful in certain situations where linear sorting proves to be a sufficient method of arranging files.
To turn off file grouping in Windows 10:
- On your desktop, click the Windows Explorer icon to launch it or press the
Windows key + E. - Navigate to any folder of your choice whose files you want to degroup.
- Click View at the top left to access the View tab.
- In the View tab in the Current view group, click the Group by dropdown arrow to reveal a list of selectable attributes.
- Select None from the list.
Download Auslogics BoostSpeed
Your one-stop PC maintenance and optimization tool, this program will clean, speed up, repair, and tweak your system to ensure maximum speed and efficiency.
How to Disable File Grouping in Windows 11 File Explorer?
Here’s how to remove the group view in File Explorer in Windows 11:
- Launch File Explorer using the
Win + Ekeyboard shortcuts or simply click on the File Explorer icon on your taskbar. - Click the Sort option on the File Explorer command bar.
- Select the Group by option and click on (None) to ungroup all items in the folder.
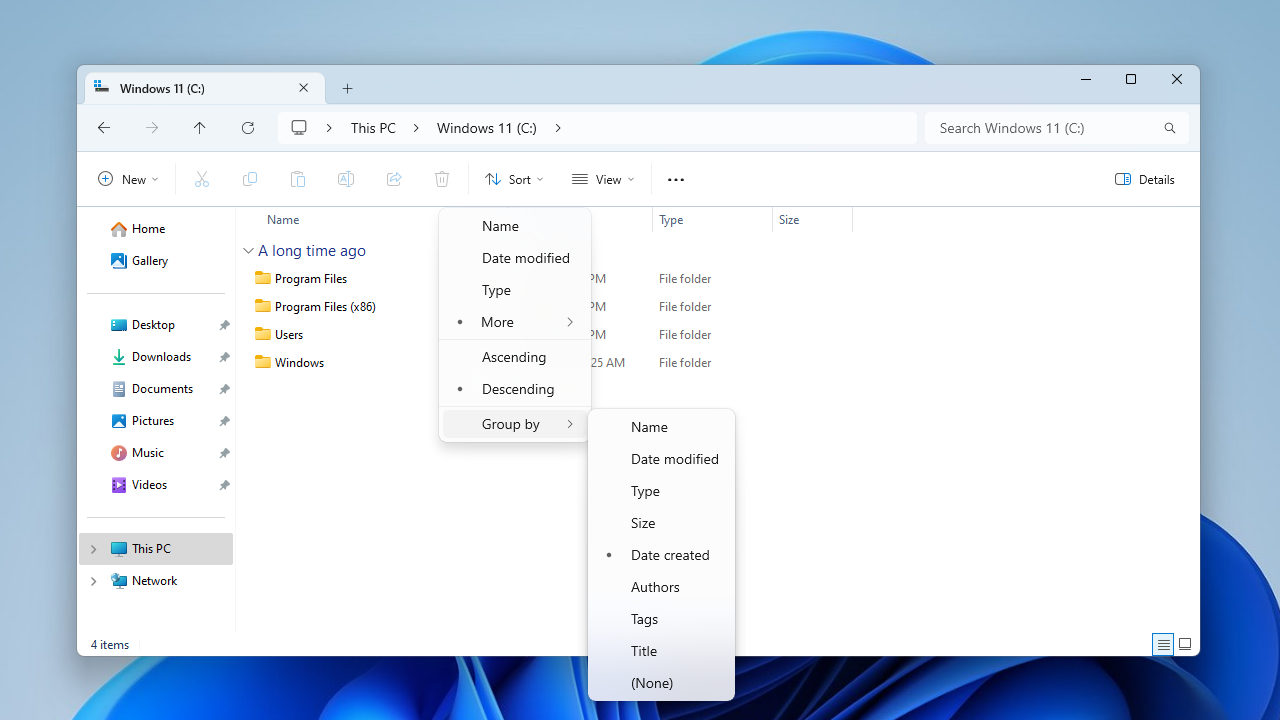
Alternatively:
- Launch File Explorer and open the folder with file grouping enabled.
- Right-click an empty area in the folder and select Group by > (None).
Note
If you don’t see the (None) option, the folder you’ve opened doesn’t currently have grouped items.
Also read:How to Fix File Explorer Lag in Windows 11
How to Disable File Grouping for All Folders in Windows 10/11
If you would like to make file grouping universally disabled across your system, you can do that too.
Disabling file grouping in all your folders will undo all the “Group by” settings you have applied to any folder anywhere on your computer.
At least one folder structure should already be disabled in order to successfully disable systemwide file grouping. Then, it becomes a matter of applying the settings in that file folder across your entire system.
How to disable file grouping for all files and folders in Windows 10:
- On your desktop, click the Windows Explorer icon to launch it or press the
Windows key + E. - Navigate to any folder of your choice that already has file grouping disabled.
- Click View at the top left to access the View tab.
- In the View tab in the Show/hide group, click on the Options icon.
- In the Folder Options dialog, click View to access the View tab.
- Click the Apply to Folders button to make the in-folder setting systemwide.
- Click OK.
How to disable file grouping for all folders in Windows 11
You can also disable file grouping for all the folders in your Windows 11 machine. The procedure is slightly different from Windows 10 due to the upgrades applied to the new File Explorer.
But don’t worry, it’s quite straightforward:
- Bring up File Explorer by pressing the
Win + Ekeys simultaneously. - Next, navigate to the folder that already has file grouping disabled.
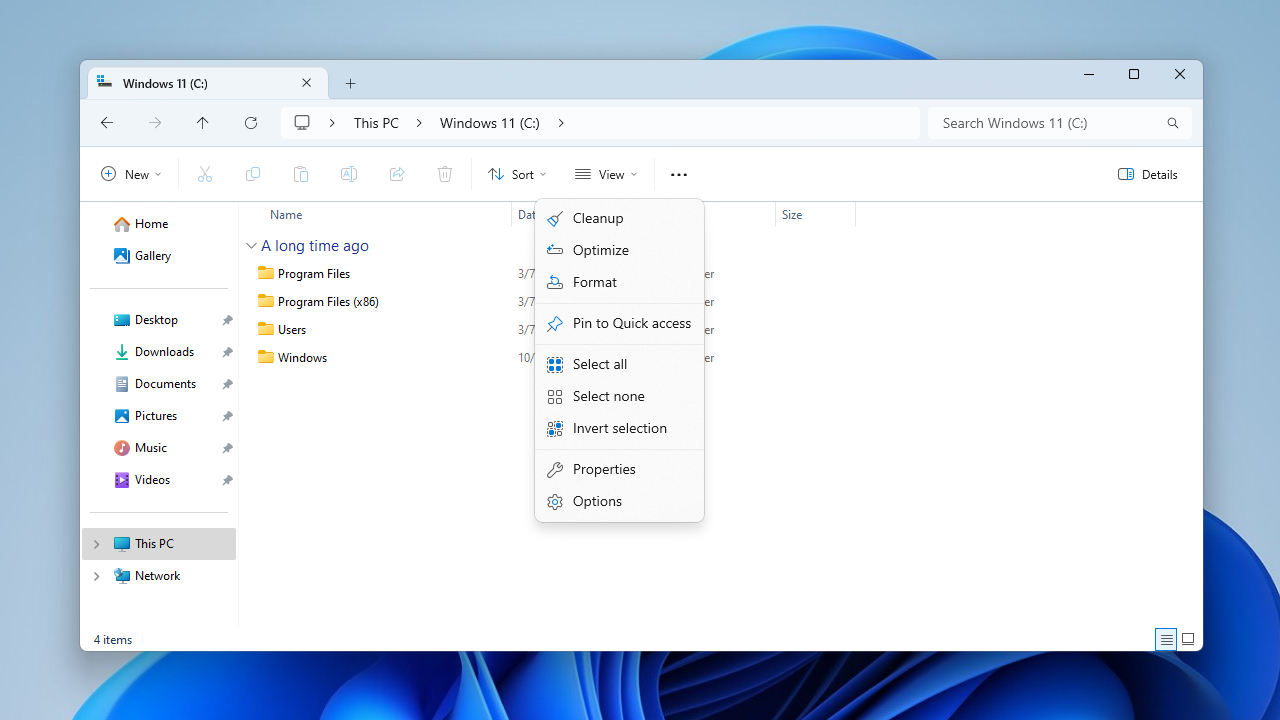
- Click the three dots at the top right on the new command bar and select Options.
- On the Folder Options screen that pops up, click on Apply to Folders and select Yes.
- Select Apply > OK to effect the changes.
This setting will disable file grouping on all folders in your system.
How to Enable Local or Universal File Grouping
If you wish to enable file grouping again, just follow these steps:
In Windows 10:
- On your desktop, click the Windows Explorer icon to launch it or press the
Windows key + E. - Navigate to any folder of your choice whose files you want to group.
- Click View at the top left to access the View tab.
- In the View tab in the Current view group, click the Group by dropdown arrow to reveal a list of selectable attributes.
- Select your desired attribute from the list (date, type, size, etc.).
In Windows 11:
- Launch File Explorer using the
Win + Eshortcut keys. - Open the folder whose files you want to apply file grouping to.
- Click on Sort > Group by, and then select your preferred attribute from the list (name, date modified, size, type, etc.).
Once you’ve decided that you’d make your preferred file grouping attribute applicable across all files and folders, do the following to apply systemwide file grouping according to your preferences:
In Windows 10:
- On your desktop, click the Windows Explorer icon to launch it or press the
Windows key + E. - Navigate to any folder of your choice that already has file grouping enabled.
- Click View at the top left to access the View tab.
- In the View tab in the Show/hide group, click on the Options icon.
- In the Folder Options dialog, click View to access the View tab.
- Click the Reset Folders button to make the in-folder setting systemwide.
- Click OK.
In Windows 11:
- You can launch File Explorer by clicking on the icon on your taskbar or using the
Win + Ehotkeys. - Select the three dots at the top right and click on Options.
- On the View tab, click on Reset Folders to apply the setting systemwide.
- Click Apply > OK.
Download Auslogics BoostSpeed
Your one-stop PC maintenance and optimization tool, this program will clean, speed up, repair, and tweak your system to ensure maximum speed and efficiency.
Disabling the Group by Folder View in Windows 10/11: Explained
In conclusion, Windows Explorer in both Windows 10 and 11 offers a range of customization options to arrange and organize your files and folders according to your preferences.
The “Group by” feature allows you to group items based on various attributes, such as name, type, size, and date modified.
However, if you find file grouping unsuitable for your needs, you can easily disable it.
Whether you’re using Windows 10 or the upgraded File Explorer in Windows 11, the steps to disable file grouping are straightforward.
By following the instructions provided, you can revert to linear sorting and arrange your files and folders in the default order.
If you wish to re-enable file grouping, the process is equally simple. Just select the desired attribute for grouping, and you can apply it either to individual folders or systemwide.
FAQ
Where is File Explorer located in Windows 10?
In Windows 10, File Explorer is typically located in the taskbar, which is the bar at the bottom of the screen. It is represented by a folder icon labeled “File Explorer.” You can click on this icon to open File Explorer and access your files and folders.
How to remove groups in File Explorer?
To remove groups in File Explorer, right-click on an empty area within the folder, select Group by, and choose (None) to remove the grouping.
How to search by date in File Explorer?
To search by date in File Explorer, use the search bar at the top right of the window. Type “datemodified:” followed by the desired date or a range of dates to search for files modified on specific dates.
How to stop Quick Access from adding folders in Windows 11?
In Windows 11 File Explorer, click on the three dots at the top right and access Options. Under the General tab, change the Open File Explorer to setting to This PC to prevent Quick Access from automatically adding folders.
