
О том, что такое Superfetch, мы писали в представленном по ссылке ниже материале, в нем же рассказывается, что в некоторых случаях эта служба только вредит нормальной работе ОС и её может потребоваться отключить. Сделать это можно тремя способами: через специальную оснастку, посредством «Редактора реестра» и «Командной строки».
Способ 1: Управление службами
Самое простое в в своей реализации решение – отключение через менеджер служб.
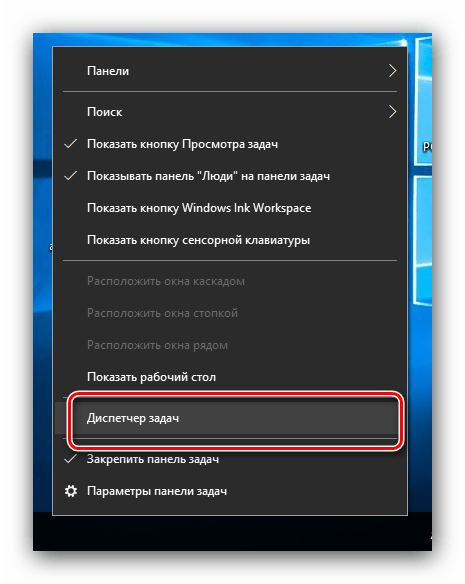
- Первым делом вызовите «Диспетчер задач» – например, наведите курсор на панель задач, кликните правой кнопкой мыши и выберите соответствующий пункт контекстного меню.

Читайте также: Как открыть «Диспетчер задач» в Windows 10
- Далее откройте раздел «Службы» и найдите там пункт «SysMain», в описании которого должно значиться «Superfetch» либо «SysMain». Щёлкните ПКМ по этой записи и выберите «Отключить».
- Закрывайте «Диспетчер задач» и вызовите окно «Выполнить» сочетанием клавиш Win+R. Введите в этом окне код
services.mscи нажмите «ОК». - Просмотрите список рабочих процессов и найдите среди них «Superfetch». Дважды кликните по ней левой кнопкой мыши.

В окне свойств щёлкните по кнопке «Остановить», а затем установите тип запуска как «Отключена».

Если требуемая запись отсутствует, проведите описываемую манипуляцию со службой SysMain.
- Нажмите «Применить» и «ОК», после чего закрывайте все окна и перезагружайте компьютер.


Данный метод чаще всего эффективен и прибегать к иным обычно не требуется.
Способ 2: «Командная строка»
Альтернативный вариант решения поставленной задачи заключается в использовании «Командной строки».
- Откройте «Поиск», в котором введите запрос
cmd. Далее найдите результат «Командная строка», выделите его и воспользуйтесь пунктом «Запуск от имени администратора» в меню справа.
Читайте также: Запуск «Командной строки» от имени администратора в Windows 10
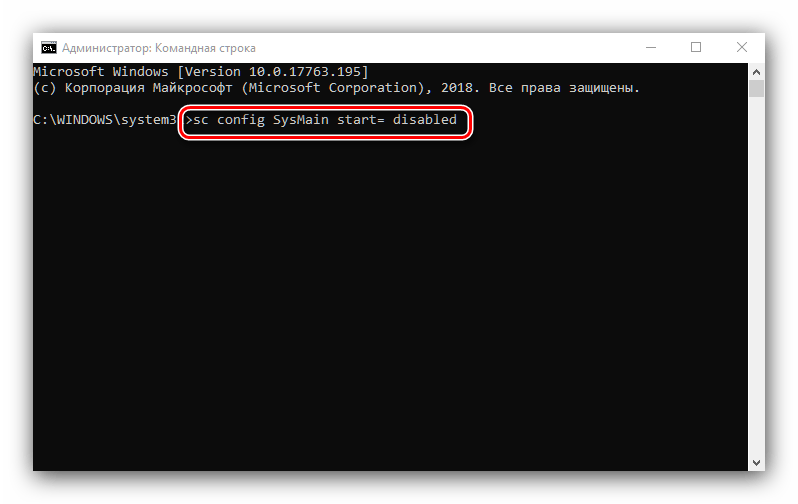
- Введите в окне следующую команду:
sc config SysMain start= disabledПроверьте правильность ввода и нажмите Enter.
- После этого закройте «Командную строку» и перезагрузите машину.

Задействование интерфейса ввода команд технически ничем не отличается от использования рассмотренной в предыдущей части статьи оснастки, но состоит из меньшего количества шагов.
Способ 3: Системный реестр
В некоторых ситуациях обычной остановки службы может оказаться недостаточно. Здесь на помощь приходит реестр ОС.
- Вызовите средство «Выполнить» (об этом рассказывается в первом способе), введите команду
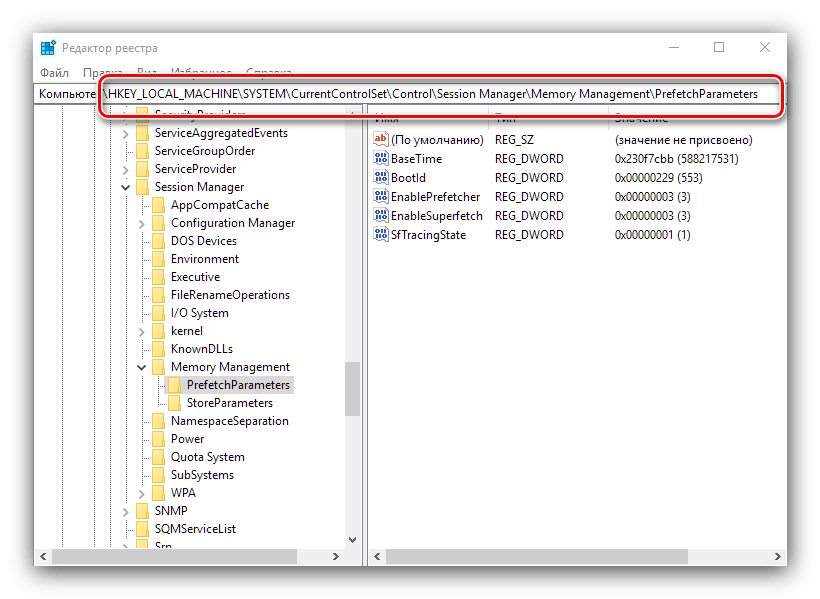
regeditи нажмите «ОК». - После запуска «Редактора реестра» перейдите по следующему пути:
HKEY_LOCAL_MACHINE\SYSTEM\CurrentControlSet\Control\Session Manager\Memory Management\PrefetchParameters - Найдите запись с именем EnableSuperfetch, выделите её, затем воспользуйтесь пунктами «Правка» – «Изменить».

Если запись с таким именем отсутствует, её понадобится создать – выберите соответствующий пункт в меню «Правка», а тип записи установите как «Параметр DWORD (32 бита)».
- Значение параметра задайте как «0», после чего нажмите «ОК».


После внесения всех изменений закрывайте оснастку и перезагрузите целевой ПК или ноутбук. Как правило, настройка через реестр позволяет раз и навсегда отключить Superfetch.
Подводя итоги, отметим, что выключать отключить службу Superfetch в Windows 10 рекомендуется только владельцам SSD, тогда как пользователи обычных винчестеров могут столкнуться с замедлениями в работе своего компьютера.
Наша группа в TelegramПолезные советы и помощь
Last Updated :
07 Nov, 2022
Windows Vista introduced the Superfetch (SysMain) capability, which is still a part of the Windows operating system. It is a built-in service designed to speed up startup times and enhance performance by preloading frequently used apps in RAM. It was, however, primarily developed for older PCs. For contemporary PCs running Windows 10 and Windows 11, it is less necessary. You may easily stop Superfetch on Windows 11 if you’re experiencing sluggishness (such as 100% disc use). Windows 11’s Superfetch feature can be disabled to potentially increase overall PC speed.
We’ll show you how to turn off Windows 11’s Superfetch if you’re having a sluggish experience.
What is Superfetch?
A service that monitors your PC usage is called Superfetch, or SysMain as it is presently known. Windows chooses the app you’ll use based on the data the service collects. The speed at which your most frequently used apps launch is consequently enhanced.
With Windows Vista, the function known as Superfetch was added. The Superfetch service’s official description claims that it “maintains and enhances system performance over time,” yet this is ambiguous and doesn’t cover all the bases. It silently monitors RAM consumption trends in the background while learning the kind of programs you often use. These programs are “often utilized” over time, therefore Superfetch preloads them into RAM in advance.
While keeping SysMain enabled should be acceptable, you might want to turn it off to determine whether your PC is running slowly. Speeds and boot times can be increased by disabling it. Superfetch is referred to as “Service Host: SysMain” in the Windows Task Manager. The idea is that by having the app cached in memory, it will start much more quickly when you want to use it.
Is Disabling Superfetch Safe?
Yes! If you want to turn it off, there are no negative side effects. Keep your system on if it’s functioning properly. However, try turning it off and see if it helps if you are experiencing high HDD utilization difficulties, high RAM usage, or performance degradation during RAM-heavy tasks. Keep it off if it does. If not, switch it back on.
How to disable superfetch in windows 10/11?
Speed can be increased and 100% disc utilization can be resolved by disabling Superfetch or SysMain. Disabling it, however, could have problems on older PCs. It’s a good idea to turn it off and see whether your PC performs better. Turn it back on if there isn’t a discernible difference.
There are 2 different methods for disabling superfetch in windows 10/11:
- Method 1: Disable Superfetch on Windows 10/11 via Service Manager
- Method 2: Disable Superfetch on Windows 10/11 via Terminal
Let’s go through both methods.
Method 1: Disable Superfetch on Windows 10/11 via Service Manager
Step 1: To open the Run dialogue, use the keyboard shortcut Windows key + R.

Step 2: After entering services.msc, click OK.

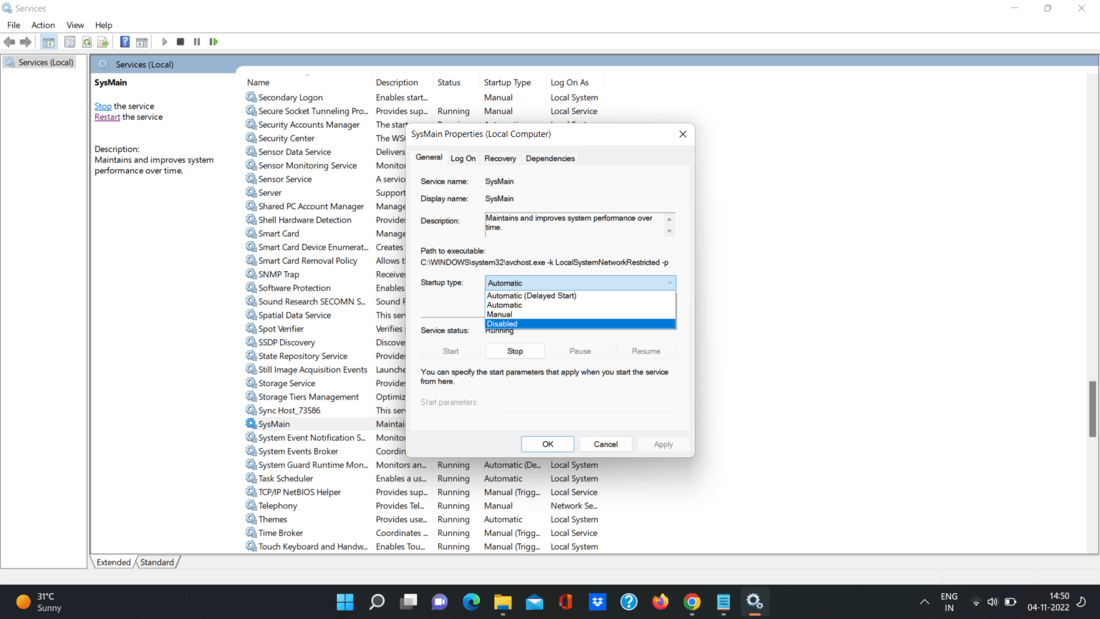
Step 3: Double-click the SysMain option when the Services console appears, then click the Stop button.

Step 4: Then choose Disabled from the dropdown menu next to Startup type by clicking it.
Step 5: To exit the Services panel, click Apply and OK.

You should experience a boost in system speed now that Superfetch (SysMain) is off. It should also become better if your disc consumption is large.
After making the changes, you might wish to restart Windows 11 to be sure the problem is resolved.
Method 2: Disable Superfetch on Windows 10/11 via Terminal
Using the Windows Terminal, PowerShell, or an earlier command prompt will also disable Superfetch. All three tools can be used with these directions.
On the command line or in the Terminal, deactivate Superfetch by typing the following command: Alternatively, you may use your keyboard’s Windows key or click the Start button.
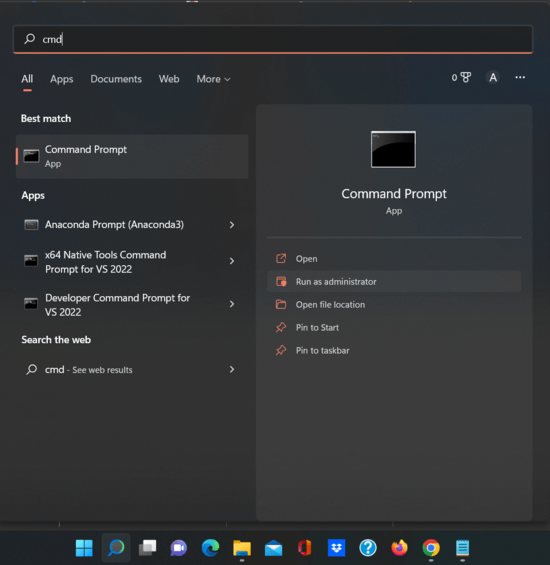
Step 1: Look for Windows Terminal or cmd.
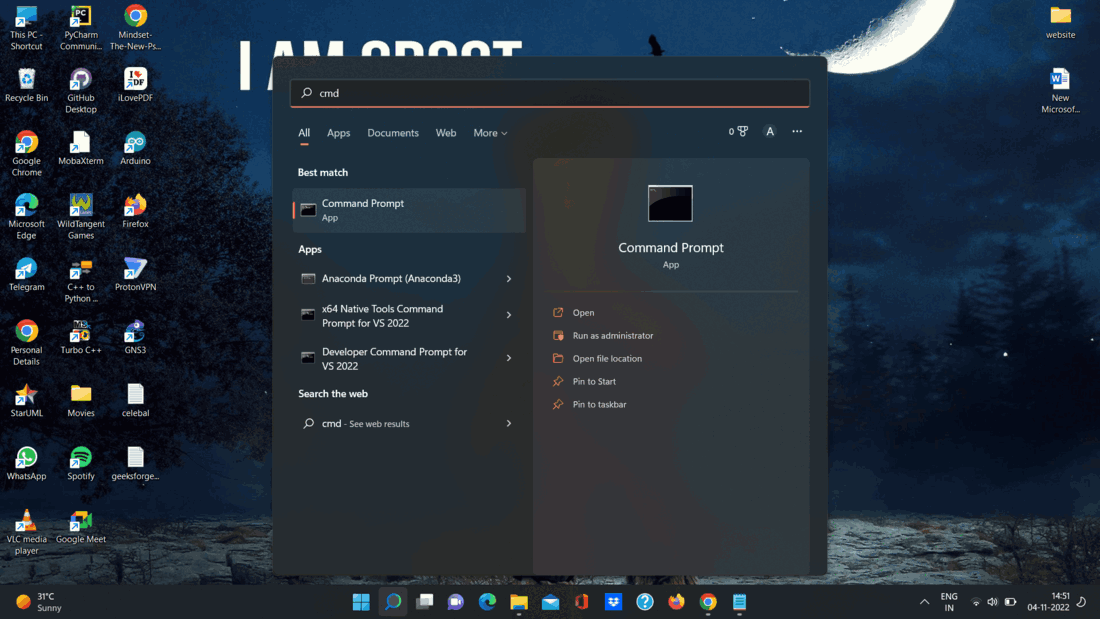
Step 2: On the right, select Run as Administrator.
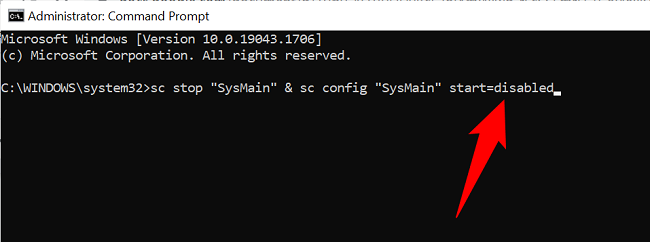
Step 3: Run the following command in the prompt:
sc stop “SysMain” & sc config “SysMain” start=disabled
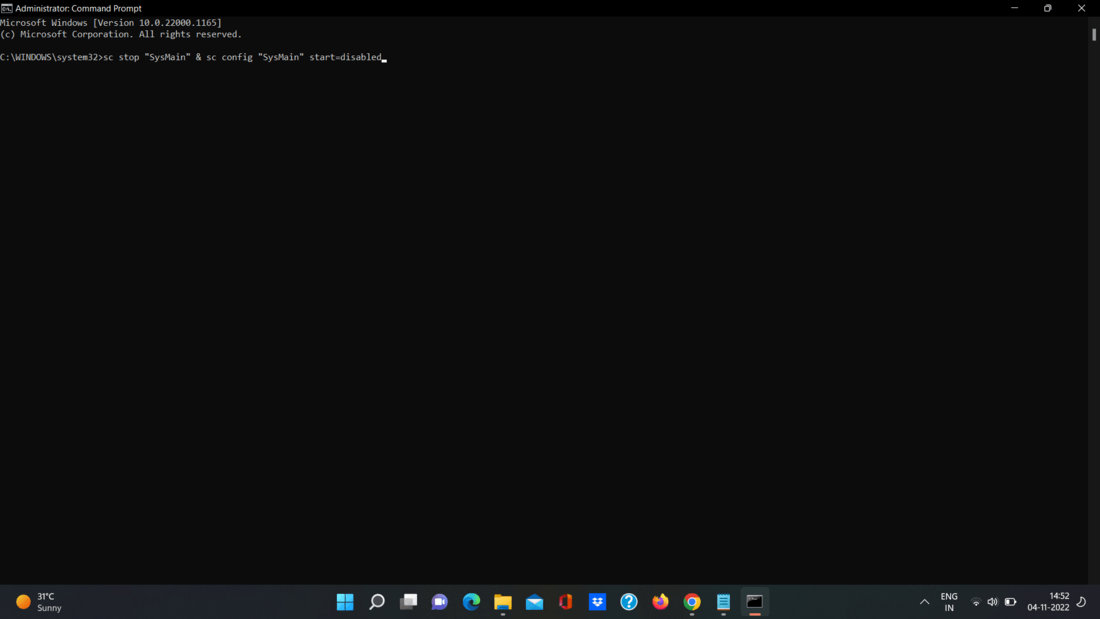
Step 4: The following screen should appear after you perform the command, indicating that it was successful.

When you run the command, Superfetch will be turned off and won’t launch when you restart your computer.
Sign in to your How-To Geek account
Quick Links
-
What Is Superfetch and How Does It Work?
-
Disable Superfetch (SysMain) Graphically on Windows 10 and 11
-
Turn Off Superfetch (SysMain) From Command-Line on Windows 10 and 11
Superfetch (known as SysMain in Windows 10 and Windows 11) is a built-in Windows service that preloads your frequently used apps in the RAM. If you experience sluggish performance on your PC, you may want to turn this feature off. Here’s how to do that.
What Is Superfetch and How Does It Work?
Superfetch was introduced with Windows Vista and it’s now known as SysMain on the latest versions of Windows 10 and 11. This Windows service runs in the background and analyzes your PC usage.
Based on your usage, the service determines what apps you’re most likely to use. Then, it preloads those apps in your PC’s RAM so you can open those apps quickly. In other words, this service speeds up the launching of the most used apps on your PC.
While you probably want to keep SuperFetch enabled most of the time, you may want to try disabling it if you’re experiencing extreme sluggishness on your PC. Turning off Superfetch will help speed things up a bit.
The process to disable Superfetch is the same for both Windows 10 and Windows 11 PCs. Also, you have both graphical and command-line methods to turn off the feature.
Disable Superfetch (SysMain) Graphically on Windows 10 and 11
To turn off Windows’ Superfetch service graphically, use the Services window on your PC.
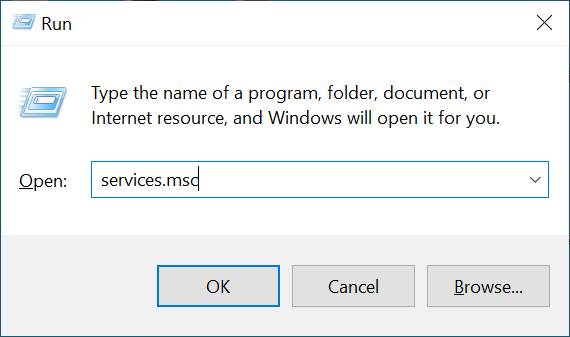
Get started by opening the «Run» box using Windows+R. Then, type the following in the box and press Enter:
services.msc
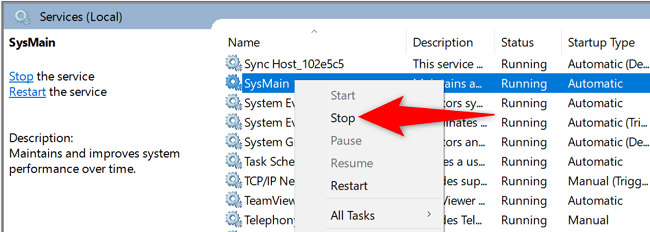
On the «Services» window, in the right pane, find the entry named «SysMain.» Then right-click this entry and choose «Stop.»
To quickly locate «SysMain» on the list, click any entry on the list and start typing «sysmain» (without quotes) on your keyboard.
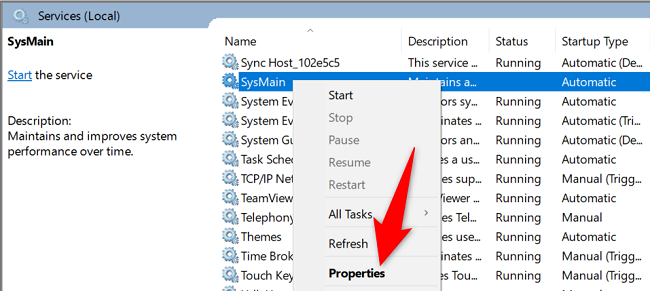
Allow the «Service Control» window to stop the service. Then, right-click the same «SysMain» entry and choose «Properties.»
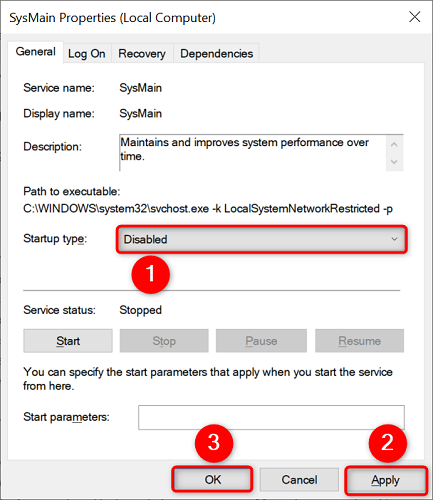
On the «SysMain Properties» window, click the «Startup Type» drop-down menu and select «Disabled.» Then, at the bottom, click «Apply» followed by «OK.»
In the future, to reactivate Superfetch, click the «Startup Type» drop-down menu and choose «Automatic.»
And that’s it. Superfetch (SysMain) is now disabled on your Windows PC.
Turn Off Superfetch (SysMain) From Command-Line on Windows 10 and 11
If you prefer a command-line method, you can run a command from Command Prompt to turn Superfetch off.
To do that, first, open the «Start» menu and search for «Command Prompt». On the right pane, click «Run as Administrator.»
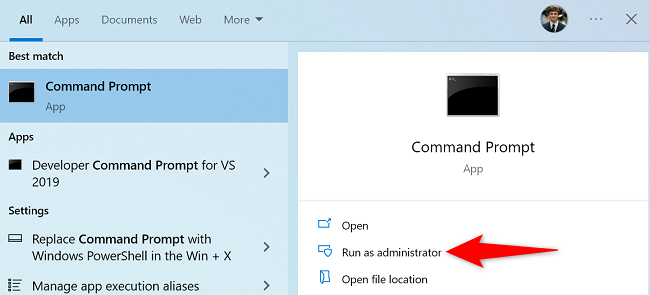
Select «Yes» in the «User Account Control» prompt.
When the Command Prompt window launches, enter the following command and press Enter:
sc stop "SysMain" & sc config "SysMain" start=disabled
And you’ve successfully turned off Superfetch (SysMain) on your Windows computer.
While you’re at it, consider learning other ways to speed up your Windows PC.
Disable SuperFetch in Windows 10: SuperFetch is a concept that was introduced in Windows Vista and onwards which is sometimes misinterpreted. SuperFetch basically is a technology that empowers Windows to manage the random access memory more efficiently. SuperFetch was introduced in Windows for two major goals to achieve.
Reduce the Boot Time – The time taken by the Windows to open up and load the operating system in the computer which includes all the background process which are essential for the smooth running of Windows is known as boot up time. SuperFetch reduces this booting time.
Make Applications Launch Faster – SuperFetch second goal is to launch the applications faster. SuperFetch does this by pre-loading your applications not only based on the most frequent apps used but also on the time when you use them. For example, if you open an app in the evening and you continue to do it for some time. Then with the help of SuperFetch, the Windows will load some part of the application in the evening. Now whenever you will open the application in the evening then some part of the application is already loaded in the system and the application will be loaded fast thus saving the launching time.

In computer systems having old hardware, the SuperFetch can be a heavy thing to run. In newer systems with the latest hardware, SuperFetch works with ease and the system also responds well. However, in systems that have gone old and which are using Windows 8/8.1/10 in which SuperFetch is enabled can go slow due to hardware limitations. In order to work properly and without hassle it is advised to disable the SuperFetch in these kinds of Systems. Disabling SuperFetch will enhance system speed and performance. To disable SuperFetch in Windows 10 and to save a lot of your time follow these methods which are explained below.
Table of Contents
3 Ways to Disable SuperFetch in Windows 10
Make sure to create a restore point just in case something goes wrong.
Disable SuperFetch with the help of Services.msc
The services.msc opens up the services console which enables the users to start or stop various Window services. So, in order to disable SuperFetch using services console follow these steps:
1.Click on the Start menu or press the Windows key.
2.Type Run and press Enter.
3.In the Run window type Services.msc and press Enter.
4.Now search for SuperFetch in the services window.
5.Right-click on SuperFetch and select Properties.

6.Now if the service is already running then make sure to click on the Stop button.
7.Next, from the Startup type drop-down select Disabled.

8.Click on OK and then Click on Apply.
In this way, you can easily disable the SuperFetch using services.msc in Windows 10.
Disable SuperFetch using Command Prompt
To disable SuperFetch using Command Prompt follow these steps:
1.Click on the Start menu or press the Windows key.
2.Type CMD and press Alt+Shift+Enter to Run the CMD as administrator.
3.In the Command Prompt type the following command and hit Enter:
sc stop “SysMain” & sc config “SysMain” start=disabled

To restart it again, type the following command
sc config “SysMain” start=auto & sc start “SysMain”
4.After the commands run Restart the system.
This is how you can disable the SuperFetch using Command Prompt in Windows 10.
Disable SuperFetch using Windows Registry Editor
1.Click on the Start menu or press the Windows key.
2.Type Regedit and press Enter.
3.In the left side pane Select the HKEY_LOCAL_MACHINE and click it to open.
Note: If you can directly navigate to this path then skip to step 10:
HKEY_LOCAL_MACHINE\SYSTEM\CurrentControlSet\Control\Session Manager\Memory Management\PrefetchParameters
4.Inside the folder open the System folder by double-clicking on it.
5.Open Current Control Set.
6.Double-click on Control to open it.

7.Double-click on Session Manager to open it.

8.Double click on Memory Management to open it.

9.Select Prefetch Parameters and open them.

10.In the right window pane, there will be Enable SuperFetch, right click on it and select Modify.

11.In the value data field, type 0 and click on OK.

12.If you are unable to find Enable SuperFetch DWORD then right-click on PrefetchParameters then select New > DWORD (32-bit) Value.
13.Name this newly created key as Enable SuperFetch and hit Enter. Now follow the above steps as stated.
14.Close all the Windows and Restart the computer.
Once you restart the system the SuperFetch will be disabled and you can check it by going through the same path and the value of Enable SuperFetch will be 0 which means it is disabled.
Myths about SuperFetch
One of the biggest myth about SuperFetch is that disabling SuperFetch will increase the system speed. It is not at all true. This depends totally on the hardware of the computer and the operating system. One cannot generalize the effect of SuperFetch that it will slow the system speed or not. In systems where hardware is not new, the processor is slow and on that they are using an operating system like Windows 10 then it is advisable to disable SuperFetch, but in newer generations computer where hardware is up to mark then it is advised to enable SuperFetch and let it do its work as there will be less boot up time and application launch time will also be minimum. SuperFetch is purely dependent on your RAM size also. The larger the RAM the more good work SuperFetch will do. SuperFetch results are based on hardware configurations, generalizing it for every system in the world without knowing the hardware and the operating system the system is using is just baseless. Moreover, it is recommended that if your system is running well then leave it on, it will not degrade your computer’s performance anyway.
Recommended:
- Turn Your Smartphone into a Universal Remote Control
- How to Close and Delete Your Microsoft Account
- Fix Mobile hotspot not working in Windows 10
- How To Use Windows 10 New Clipboard?
I hope this article was helpful and you can now easily Disable SuperFetch in Windows 10, but if you still have any questions regarding this tutorial then feel free to ask them in the comment’s section.
55
55 people found this article helpful
Don’t let this Windows service adversely affect your computer’s performance
Updated on October 23, 2021
What to Know
- Press Windows key+R, enter services.msc. Right-click Superfetch > Stop, right-click Superfetch > Properties > Startup type > Disabled.
- Use Registry: Press Windows key+R, enter regedit. Expand contents, select PrefetchParameters, double-click EnableSuperfetch, enter 0.
- If you disabled Superfetch but still experience slowness caused by high disk usage, try diagnostics tracking or search indexing.
This article explains how to disable the Windows 10 Superfetch service if you believe it’s making your PC sluggish and slow to react.
How to Disable Superfetch via Windows Services
The Superfetch feature can be toggled on and off through the Windows Services interface.
-
Press Windows key+R.
-
The Windows Run dialog should now be visible, usually located in the lower-left corner of your screen. Type services.msc in the field provided, then select OK.
-
The Services interface should appear, overlaying your desktop and open application windows. Locate Superfetch, found on the right side of the window within the alphabetized services list.
-
Right-click Superfetch, then select Stop.
-
A Service Control dialog containing a progress bar will now appear as Windows attempts to stop the Superfetch service. This may take a while, so be patient.
-
Right-click Superfetch, then select Properties.
-
Select the Startup type drop-down menu and select Disabled.
-
Select Apply, then select OK.
-
Superfetch is now disabled. To re-enable it at any time, repeat the steps above, but choose Automatic as the Startup type value.
How to Disable Superfetch Through the Registry
You can also disable SuperFetch in the Windows 10 registry by modifying the EnableSuperfetch value.
-
Press the following keyboard shortcut combination: Windows key+R
-
The Windows Run dialog should now be visible, usually located in the lower-left corner of your screen. Enter regedit in the field provided and then click OK.
-
A User Account Control dialog should now be displayed, asking if you want to allow the Registry Editor app to make changes to your device. Select Yes.
-
The Windows Registry Editor should now be displayed. Click the arrow next to HKEY_LOCAL_MACHINE, located in the left menu pane, to expand its contents.
-
Do the same for the following folders and options, in this order: SYSTEM > CurrentControlSet > Control > Session Manager > MemoryManagement.
-
Select PrefetchParameters.
-
A list of values and their corresponding settings should now be displayed on the right side of the Registry Editor interface. Double-click EnableSuperfetch.
-
Enter 0 in the Value data field.
Superfetch can be re-enabled at any point by changing this value to 3.
-
Select OK.
-
Select File > Exit from the Registry Editor menu. Superfetch should now be disabled.
What Is Superfetch?
The Windows 10 Superfetch service is supposed to guess which applications you may opt to use, then load their corresponding data and necessary files into memory beforehand, but it can end up slowing your PC to a crawl instead. If you believe your PC is sluggish and not reacting as quickly as you’d expect, disabling Superfetch could help speed things up.
Other Ways to Fix High Disk Usage Problems
If you’ve disabled Superfetch but are still experiencing slowness issues caused by high disk usage or other resource-related problems, one or more of the following can be the culprit.
- Diagnostics tracking: This built-in feature collects data about your PC’s configuration as well as any issues Windows may encounter, sending it all to Microsoft to help improve future versions of the operating system.
- Search indexing: All files and folders stored on your hard drive are indexed by Windows, making it easier and quicker to search for a specific title, type, or even for individual contents within a file.
- Windows Tips: You may notice that tips or suggestions appear at different points while using Windows. While helpful, these originate from an application that is constantly running in the background and could utilize valuable resources.
- Malware: A common cause of PC slowness and crashes, viruses and other types of malware can wreak havoc on disk usage, CPU cycles and more.
Thanks for letting us know!
Get the Latest Tech News Delivered Every Day
Subscribe