
The Snipping Tool is the default screen-capture application built into Windows. Most users use this application for capturing screenshots. If you, too, use it quite frequently, then it’s always desirable to assign the tool, a hotkey to open it in an instant. But if you have reasons to disable it, this tutorial will show you how to enable or disable the Snipping Tool or the Print Screen button in Windows 11/10/8/7 using the Group Policy or the Registry Editor.
Using Group Policy Editor or GPEDIT
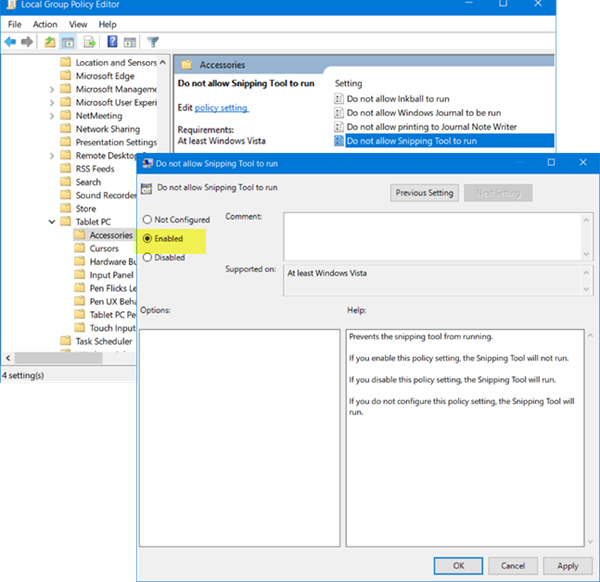
Type ‘gpedit.msc’ in Start Search and hit Enter to open the Local Group Policy Editor. Next, navigate to the following setting:
User Configuration > Administrative Templates > Windows Components > Tablet PC > Accessories.
Here, on the right-side, double-click on ‘Do not allow Snipping Tool to run’ to open its Properties and select ‘Enabled’ option to disable the Sniping Tool in Windows 10.
This GPO prevents the snipping tool from running. If you enable this policy setting, the Snipping Tool will not run. If you disable this policy setting, the Snipping Tool will run. If you do not configure this policy setting, the Snipping Tool will run.
To enable the Snipping Tool again, select Not Configured and then click Apply button.
Read: Disable Print Screen button to open screen snipping in Windows 11
Using Registry Editor or REGEDIT
Run regedit to open the Registry Editor and navigate to the following key:
HKEY_LOCAL_MACHINE\SOFTWARE\Policies\ Microsoft\TabletPC

Double-click on DisableSnippingTool and change its value data from 0 to 1 to disable the Snipping Tool in Windows 10. To enable the Snipping Tool again, you may change its value back to 0.
If the TabletPC Key doesn’t exist, you will have to create it along with the DWORD (32-bit) Value DisableSnippingTool.
Read: Snipping Tool Tips & Tricks.
NOTE: Windows 11/10 allows you to uninstall (or reinstall) the Snipping Tool via Settings > Apps > Apps & features > Optional features.
Hope this works for you!
Как удалить Скриншотер?
Программу можно легко удалить одним из следующих стандартных способов:
- Пуск → Приложения → Скриншотер → Удалить (Uninstall)
- Windows 10/11: Пуск → Параметры → Приложения и возможности
- Windows 7: Пуск → Панель управления → Программы и компоненты
Если все-таки по какой-то причине не удалось корректно разустановить Скриншотер стандартным способом, рекомендуем скачать бесплатную версию программы Revo Uninstaller для очистки системы от остатков приложений, автозагрузок и т.п.
Статья была полезна?
Спасибо за отзыв
Что-то пошло не так
Всё ещё нужна помощь?
Свяжитесь с нами
Свяжитесь с нами
We’re always talking about screenshot or screencasting tools. You’ll find there’s no shortage of these tools for Windows 10 and they have just about every feature imaginable. Windows 10 has a native screenshot feature too as well as a dedicated app for taking time delayed screenshots and annotating them. That said, if you have a system that you want to disable screenshots and screencasts on, you can do so with an app called ScreenWings.
ScreenWings is a free app however, we should warn you that due to the nature of the app, it is flagged as dangerous/malicious by several anti-virus apps/services if you scan it on VirusTotal. If you choose to use it, do so at your own risk. It’s a portable app so you’re not installing anything which may set your mind at some ease.
Download and run ScreenWings. When the app first runs, you see the little window in the screenshot below. Click inside the monitor image that shows the Windows logo.
When you click it, you’ll see the app’s logo appear on your screen and the monitor image inside this window will turn black, as shown below (edited since the app prevents screenshots when enabled).
Once the app is running, you can run any screenshot tool you want. It will appear to work but the screenshot will be all blacked out. Nothing will be captured. Likewise, if you’re running a screen recording tool, the tool will record an all black video.
This tool is great if you have sensitive data on your screen and you can’t lock your system or you have to leave it unlocked. We should warn you that it can interfere with screen sharing tools as well so if you need to share your screen with someone but want to keep them from taking screenshots, this tool isn’t gong to be of any help. You might need to look for a screen sharing tool that can, itself, prevent users from taking screenshots.
We often talk about how essential it is to have a screenshot feature but it is just as essential that users have some sort of option to disable it. It is possible that some apps find a way around ScreenWings. The app doesn’t exactly run in a super-secret mode. You can access it from the system tray so if anyone figures out what you’re using to disable screenshots on Windows 10, they will, very easily, be able to quit the app.

Fatima Wahab
Fatima has been writing for AddictiveTips for six years. She began as a junior writer and has been working as the Editor in Chief since 2014.
Fatima gets an adrenaline rush from figuring out how technology works, and how to manipulate it. A well-designed app, something that solves a common everyday problem and looks
Обычно вопрос об удалении приложения «Ножницы» в Windows 11 и Windows 10 задают пользователи, которые столкнулись с тем, что при нажатии клавиши Print Screen скриншот не создаётся автоматически, а открывается панель, с помощью которой предлагается сделать снимок экрана или его области. Здесь сразу отмечу: простое удаление приложения «Ножницы» не изменит этого поведения: панель продолжит появляться и решение описано в отдельной инструкции про то, что делать, если Print Screen открывает «Ножницы».
Если же удаление приложения «Ножницы» требуется по иным причинам, ниже — простые способы его выполнить.
Параметры
Приложение «Ножницы» можно удалить в «Параметрах», какие-либо дополнительные средства обычно не требуются:
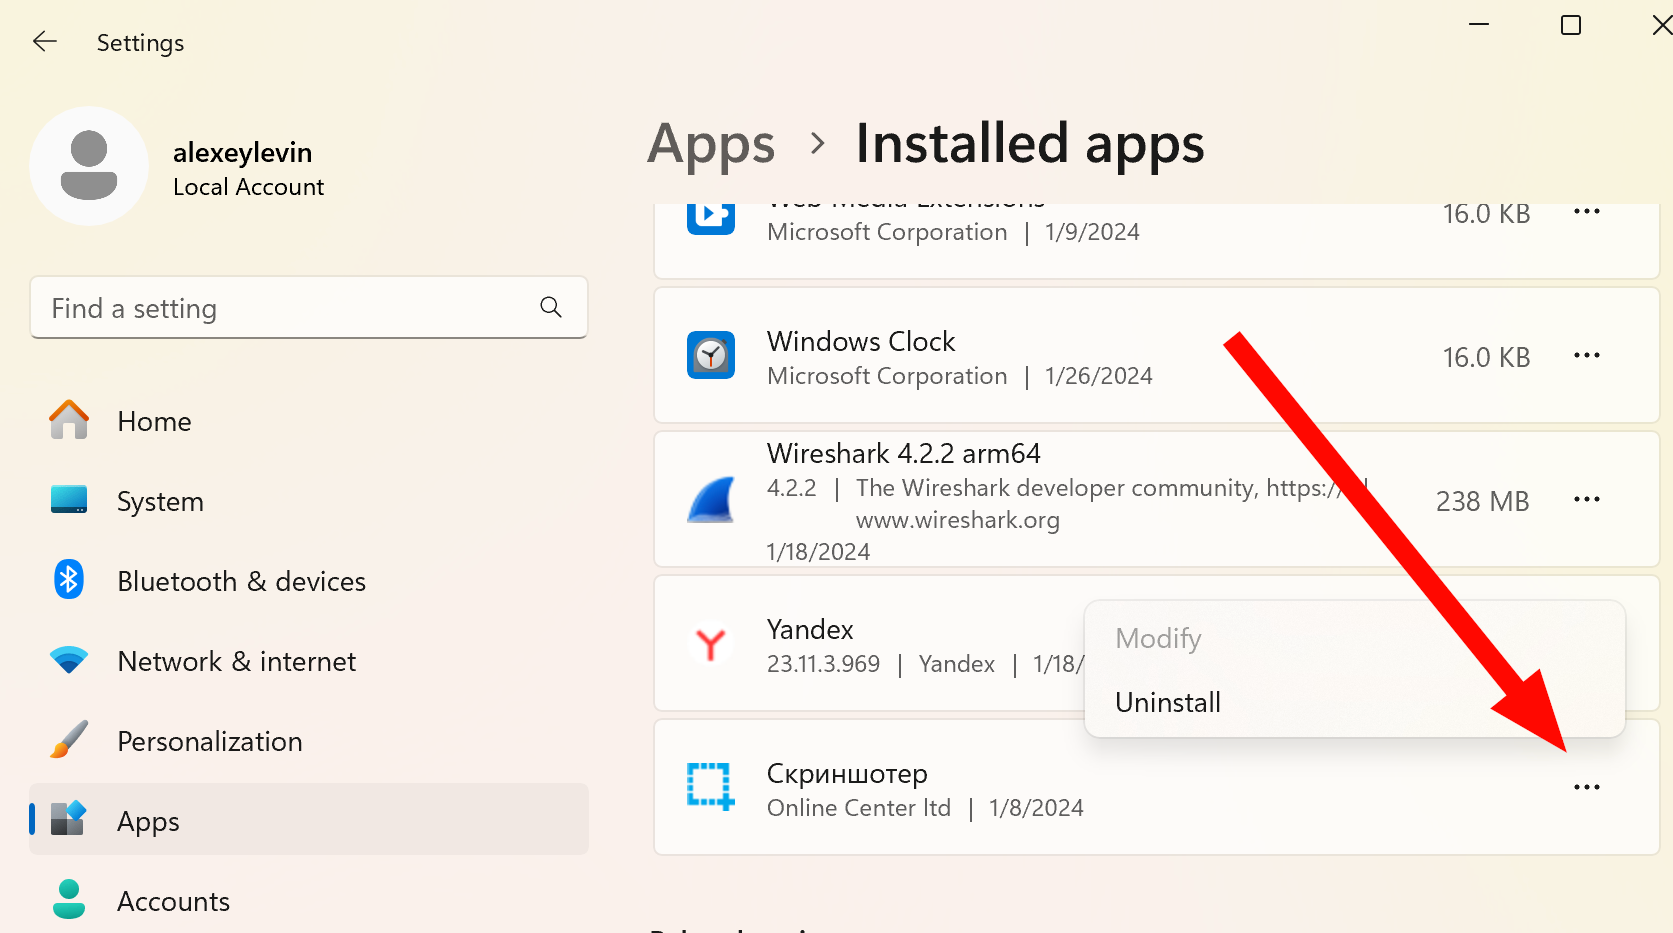
- Откройте «Параметры» — «Приложения» — «Установленные приложения» (в Windows 11) или «Приложения и возможности» (в Windows 10).
- Найдите приложения «Ножницы» в списке (Snipping Tool или Snip & Sketch в англоязычном варианте) и нажмите по трем точкам справа (в Windows 11) или по имени приложения.

- Выберите пункт «Удалить» и подтвердите удаление приложения.

Обычно приложение удаляется без каких-либо проблем, а использовать дополнительные средства не требуется.
Однако, в некоторых случаях вы можете увидеть сообщение об ошибке «Не удалось удалить Ножницы. Операция не выполнена. Повторите попытку через несколько минут».

В этой ситуации удаление действительно может сработать через несколько минут, либо можно использовать способы удаления приложения в Windows PowerShell (Терминале Windows).
Команды для удаления приложения «Ножницы»

Для того, чтобы удалить приложение «Ножницы» с компьютера вы можете использовать одну из следующих команд:
get-appxpackage *ScreenSketch* | remove-appxpackage
winget uninstall --name Snipping Tool
Для их выполнения откройте Терминал или Windows PowerShell от имени администратора (можно сделать в меню по правому клику на кнопке «Пуск»), введите команду и нажмите Enter. Если приложение есть на компьютере, оно будет удалено.
Дополнительная информация
Некоторые дополнительные нюансы, касающиеся приложения «Ножницы» и его удаления:
- Как было отмечено в начале статьи, даже после удаления приложения при нажатии клавиши Print Screen может открываться панель действий, при этом она перестанет работать. Для того, чтобы клавиша перестала открывать эту панель, следует зайти в Параметры — Специальные возможности — Взаимодействие — Клавиатура и отключить параметр «Используйте клавишу Print Screen для открытия захвата экрана». Ещё один вариант — создать reg файл со следующим кодом и запустить его, согласившись на добавление данных в реестр:
Windows Registry Editor Version 5.00

[HKEY_CURRENT_USER\Control Panel\Keyboard]
"PrintScreenKeyForSnippingEnabled"=dword:00000000
- Если в дальнейшем вам потребуется снова установить «Ножницы», вы можете найти приложение в Microsoft Store по запросу «Фрагмент и набросок», «Ножницы» или «Snipping Tool».
- Для удаления приложения можно использовать и сторонние программы, например, BC Uninstaller.
Кстати, приложение может быть удобным в некоторых случаях: например, когда требуется сделать снимок области экрана произвольной формы или записать видео с экрана без установки дополнительных программ.
Whenever you are reaching out forums for support, a screenshot can help you to get better assistance. Basically screenshot is the picture of your screen showing relevant information to others so that they can help you out. In Windows 10, you can press + PrtScr or + Fn + PrtScr keys to capture screenshot natively. Also, some UWP or Desktop apps you will use on Windows may have ability to take screenshots. In this article, we’ll see how you can allow or prevent apps to take screenshots in Windows 10.
To maintain privacy of your system, Microsoft has implemented many privacy settings in Windows 10. For controlling the ability of apps to take a screenshot, we have to configure one of those privacy settings. Here are the steps you will need to follow for this.
Page Contents
Allow or prevent apps to take screenshots in Windows 10
Method 1 – Using Settings App
1. Right click Start Button or press + X keys and select Settings.
2. In the Settings app, go to the Privacy and then Screenshots and apps.
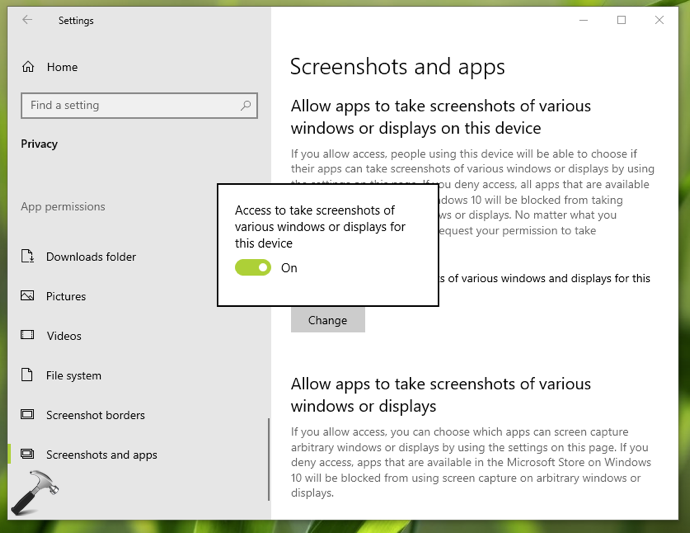
3. Under Screenshots and apps, in the right pane, click on Change button. A pop-up will appear, in which you can turn On or Off the Access to take screenshots of various windows or displays for this device option. By default, the option is On and it means apps can take screenshots. If you set it to Off, apps will not be able to take screenshots on your Windows device.
4. If you want to block only Desktop apps to take screenshot, scroll down in that window. Set the option Allow desktop apps to take screenshots of various windows or displays to Off.
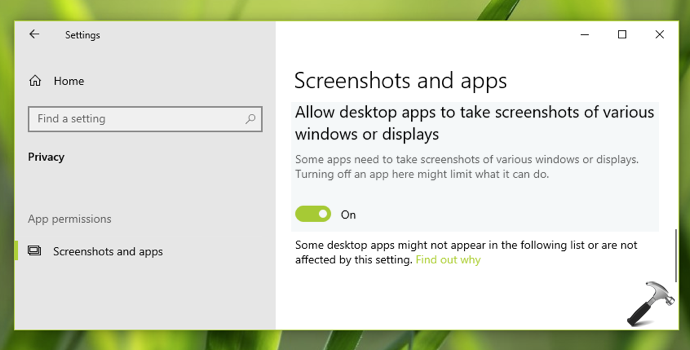
Your settings should be saved and applied immediately.
Method 2 – Via Registry
You can also allow or prevent apps to take screenshot using registry. IT Pros can deploy below mentioned setting to client machines using this guide.
Registry Disclaimer: It is recommended to create a System Restore point first, if you’re not familiar with registry manipulation.
1. Run regedit command to open Registry Editor.
2. In left pane of Registry Editor window, go to:
HKEY_CURRENT_USER\SOFTWARE\Microsoft\Windows\CurrentVersion\CapabilityAccessManager\ConsentStore\graphicsCaptureProgrammatic

3. In the right pane of graphicsCaptureProgrammatic registry key, you’ll find Value named as registry string set to Allow by default. You can set its Value data to Deny to block apps to take screenshot.
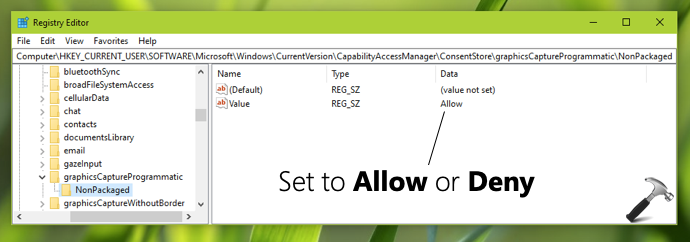
4. To block only Desktop apps to take screenshot, go to this registry key:
HKEY_CURRENT_USER\SOFTWARE\Microsoft\Windows\CurrentVersion\CapabilityAccessManager\ConsentStore\graphicsCaptureProgrammatic\NonPackaged
5. Set the Value registry string (REG_SZ) to Deny to block Desktop apps from taking screenshots.
6. Close Registry Editor and sign out, sign in back to make changes effective.
That’s it!