
Что такое синхронизация и как она работает
При включении компьютера запускается Центр синхронизации Windows. При работе синхронизация всегда выполняется в фоновом режиме для сохранения копий сетевых файлов и папок для последующего их использования в автономном режиме.
Эта функция полезна, если вам нужен доступ к сетевым файлам, даже если вы не подключены к сети. Центр синхронизации может нагружать память устройства, а при повсеместном распространении Интернета функция может быть не актуальной.
Если синхронизация более не нужна, ее можно отключить. Описанные методы могут работать только для определенных версий Windows.
Как отключить синхронизацию на Windows
Через панель управления
В Windows 10 можно отключить Центр синхронизации за несколько шагов:
-
Через системный поиск найдите Панель управления и запустите её.
-
Нажмите на выпадающее меню у строки «Просмотр» => Центр синхронизации.
-
В новом окне на панели слева кликните по строке Управление автономными файлами.
-
Нажмите на «Отключить автономные файлы», затем подтвердите настройки, нажав на «ОК» внизу. Перезагрузите компьютер.
Через редактор групповой политики
-
Нажмите на сочетание клавиш Win + R, чтобы вызвать диалоговое окно Выполнить. Потом в строке Открыть выполните команду
gpedit.msc, нажав на кнопку ОК. -
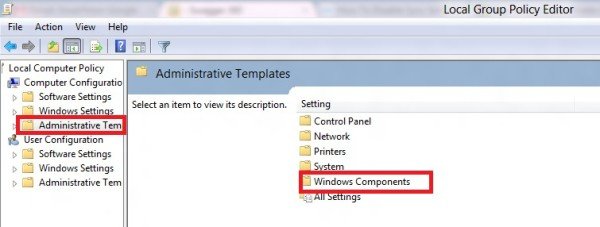
На панели слева в разделе Политика «Локальный компьютер» => Конфигурация компьютера => Административные шаблоны.
-
В папке Сеть нажмите на Автономные файлы, а в центральной части окна в списке найдите строку Разрешить или запретить использование автономных файлов и дважды кликните по ней.
-
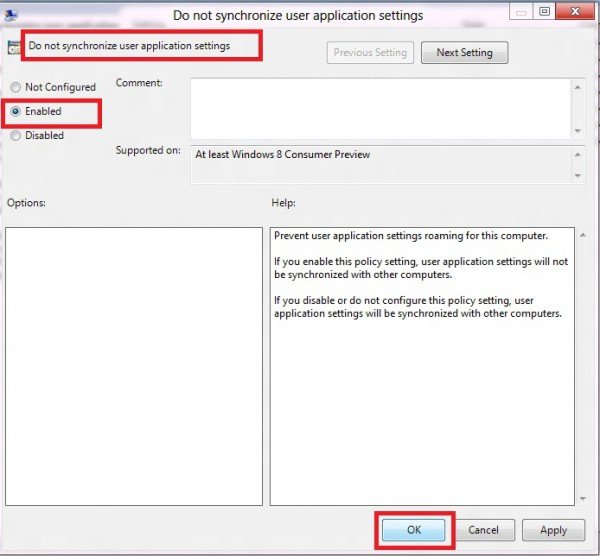
Отметьте пункт Отключено в новом окне, затем примените и сохраните настройки.
-
После редактирования параметров локальной политики закройте редактор и перезагрузите систему.

Источник фото: freepik.com
Quick Tips
- Windows allows you to sync various settings, such as your wallpapers, passwords, language, and more when using the same Microsoft account.
- Enabling sync settings can be helpful if you work on multiple Windows devices.
- You can turn sync settings on or off using the Settings app, Registry Editor, or Group Policy Editor.
Method 1: Turn Sync Settings On or Off Using the Settings App
The Settings app gives you several options for managing your account preferences, including the ability to enable or disable sync. Whether you want to configure a single setting or stop syncing altogether, you can use the following steps to manage sync settings in Windows.
Step 1: Press the Windows + I keys to open the Settings app. Then, head to Accounts > Windows backup.

Step 2: Click on Remember my preferences to expand it. Then, use the checkboxes to enable or disable sync for accessibility, passwords, language preferences, and other Windows settings.

Alternatively, you can use the toggle next to Remember my preferences to enable or disable sync entirely.
Method 2: Turn Sync Settings On or Off With the Registry Editor
The Registry Editor is a useful tool that lets you configure various system settings by modifying a few registry files. However, as registry files contain important settings for Windows and its system apps, it’s important to be cautious while making any changes.
Step 1: Click the search icon on the taskbar and type in registry editor. Select Run as administrator.
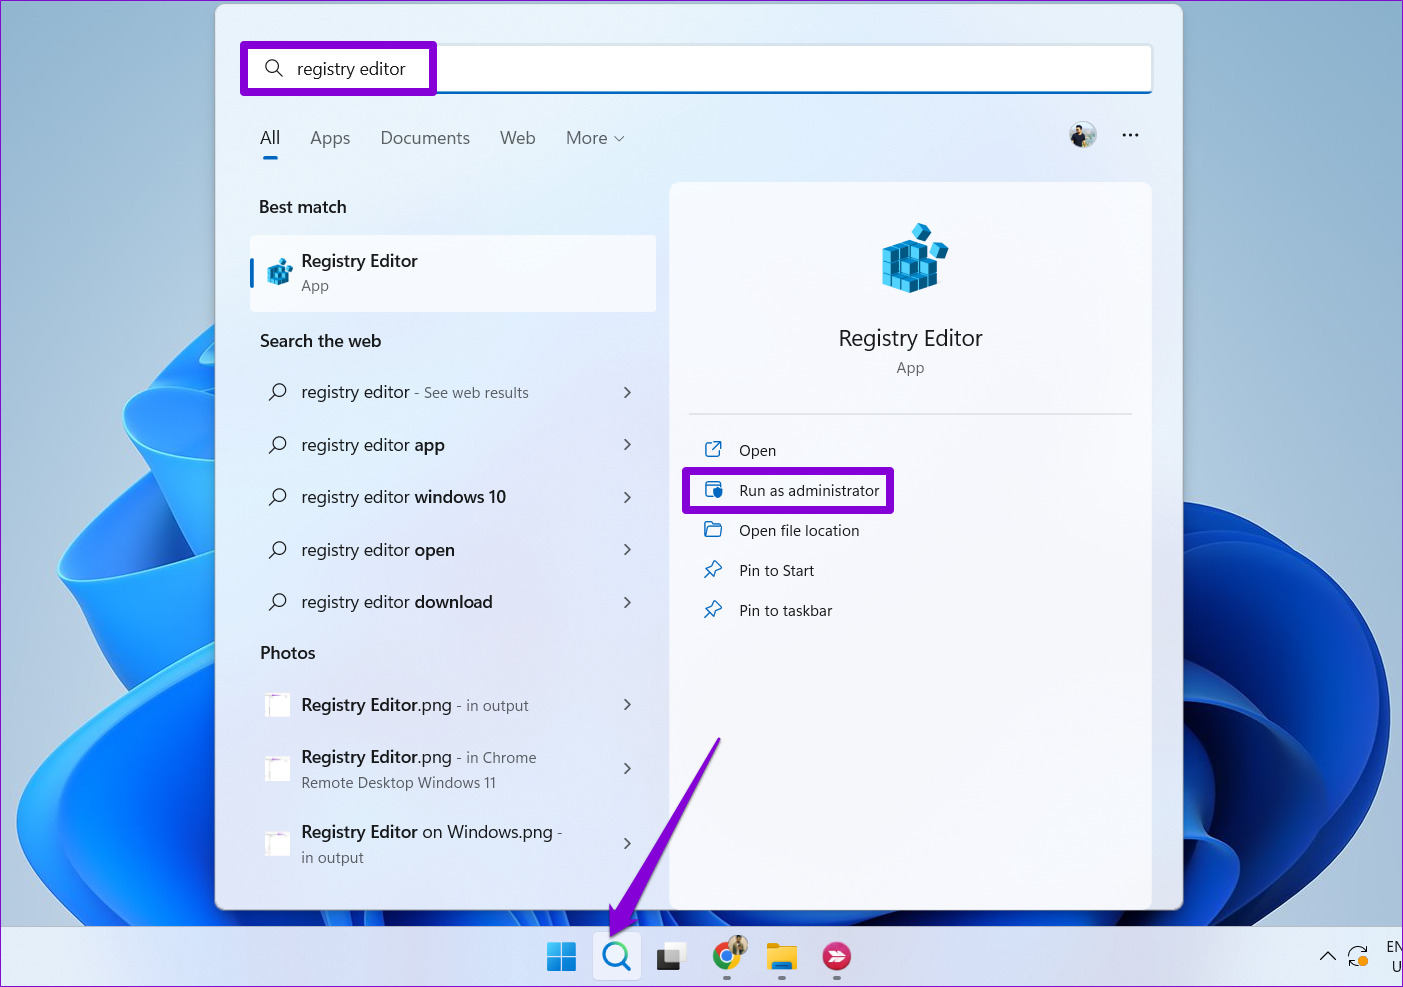
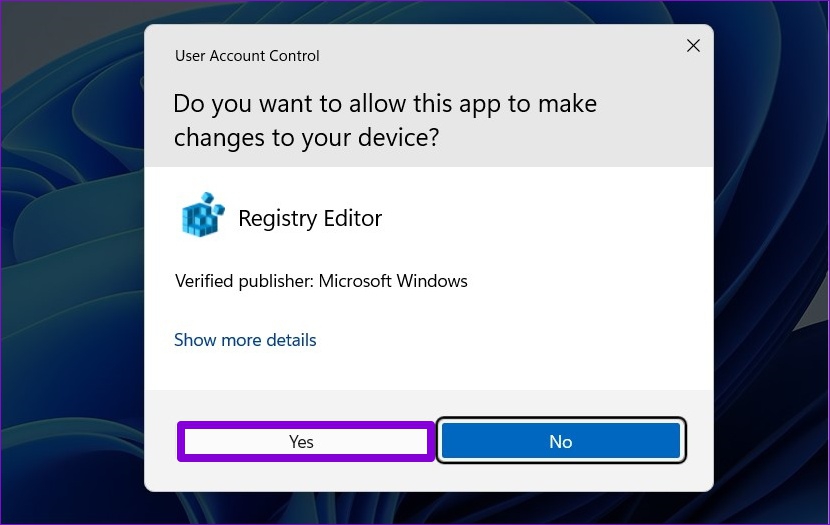
Step 2: Select Yes when the User Account Control (UAC) prompt appears.
Step 3: Paste the following path in the address bar at the top and press Enter to quickly navigate to the SettingSync key.
HKEY_CURRENT_USER\SOFTWARE\Microsoft\Windows\CurrentVersion\SettingSync

Step 4: Right-click on the SettingSync key in the left sidebar and choose New > DWORD (32-bit) Value. Name the new DWORD DisableSettingSync.

Step 5: Right-click on the SettingSync key in the left sidebar and choose New > DWORD (32-bit) Value. Name the new DWORD DisableSettingSyncUserOverride.

Step 6: Double-click the DisableSettingSync DWORD and change its value data to 2 to disable sync settings. Then, click OK.

Step 7: Double-click the DisableSettingSyncUserOverride DWORD and set its value data to 1 to disable sync settings. Then, click OK.

Similarly, if you want to configure Windows to sync settings across your devices, set the value of the DisableSettingSync and DisableSettingSyncUserOverride DWORDs to 0. Then, restart your PC to apply the changes.
Method 3: Turn Sync Settings On or Off Using the Group Policy Editor
The Group Policy Editor provides yet another way to configure sync settings on your Windows computer. However, you can only use this method if you’re using Windows 10 or Windows 11 Professional, Education, or Enterprise editions. If you’re using Windows Home Edition, you will have to use the Settings app or the Registry Editor solutions above to enable or disable sync settings.
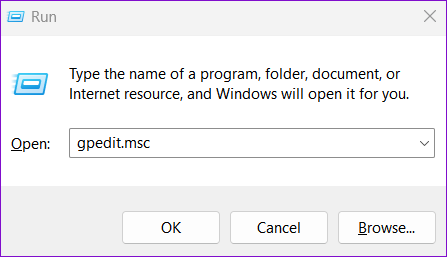
Step 1: Press the Windows + R keys to open the Run dialog box. Type gpedit.msc in the text box and hit OK.
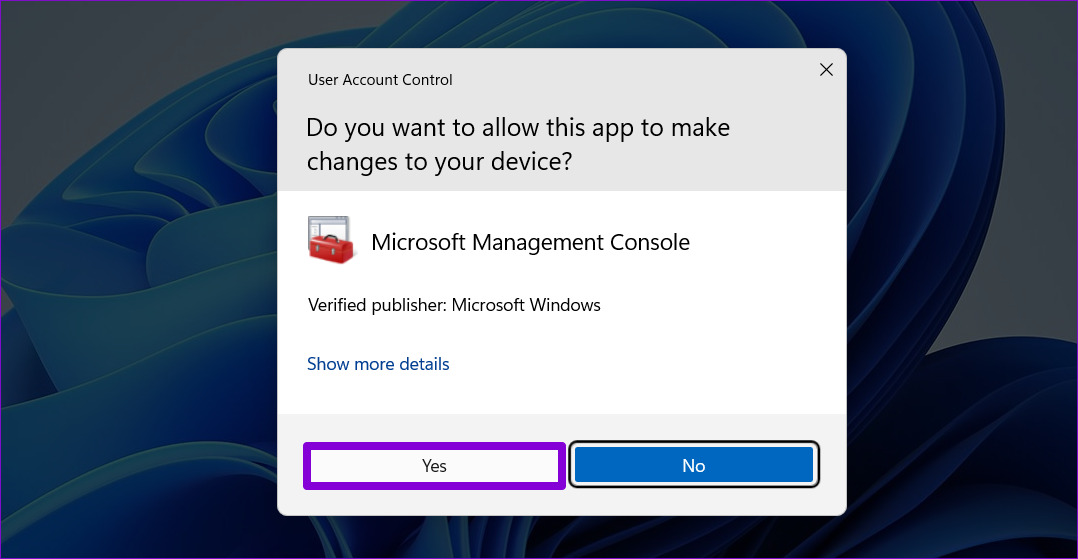
Step 2: When the User Account Control (UAC) prompt appears, select Yes to proceed.
Step 3: Use the left pane to navigate to the following folder:
Computer Configuration\Administrative Templates\Windows Components\Sync your settings
Step 4: Double-click the Do not sync policy from the right pane.

Step 5: Select the Enabled option if you want to stop Windows from syncing settings across devices. If you want to turn on sync settings, select Disabled or Not Configured instead.
Step 6: Click Apply followed by OK.

Was this helpful?
Thanks for your feedback!
The article above may contain affiliate links which help support Guiding Tech. The content remains unbiased and authentic and will never affect our editorial integrity.
Sign in to your How-To Geek account

Quick Links
-
How Do Sync Settings Work?
-
How to Disable Account Sync Settings on a Device
-
How to Remove Sync Settings
Windows 10 lets you synchronize settings on all devices you sign into with your Microsoft Account. Some of these settings include themes, language preferences, and passwords. But what if you don’t want your old settings to transfer over? Here’s how to disable and remove all account Sync settings on Windows 10.
How Do Sync Settings Work?
Sync Settings were first introduced with Windows 8 and are available for any Windows 10 device you sign into with your Microsoft account.
By default, when you enable Sync settings, Windows uploads various system settings and preferences to OneDrive. When you sign in to another device with the same account and on which you’ve also enabled sync settings, those settings all transfer over. It’s really handy if, for example, you like your desktop and laptop to look the same or you want to retain all your settings on a fresh install.
The following is a list of the settings that get synced to your Microsoft account:
- Theme — Desktop background, user tile, taskbar position, etc.
- Passwords — Windows credential manager, including Wi-Fi profiles
- Language Preferences — Spelling dictionary, system language settings
- Ease of Access — Narrator, on-screen keyboard, magnifier
- Other Windows Settings — A full list of Other Windows Settings
How to Disable Account Sync Settings on a Device
Disabling Sync settings in Windows 10 lets you limit what information Microsoft sends to the cloud and stores on their servers. Whether you want to disable a single setting or stop syncing altogether, this is how you can gain control of your settings once and for all.
Note: If you have multiple devices that all use Sync settings with your Microsoft account, you need to follow these steps for each device to disable and remove Sync settings completely.
Open up the Settings app by clicking the Start button and then the Settings cog. You can also press Win+I.
In the Settings window, click the «Accounts» option.
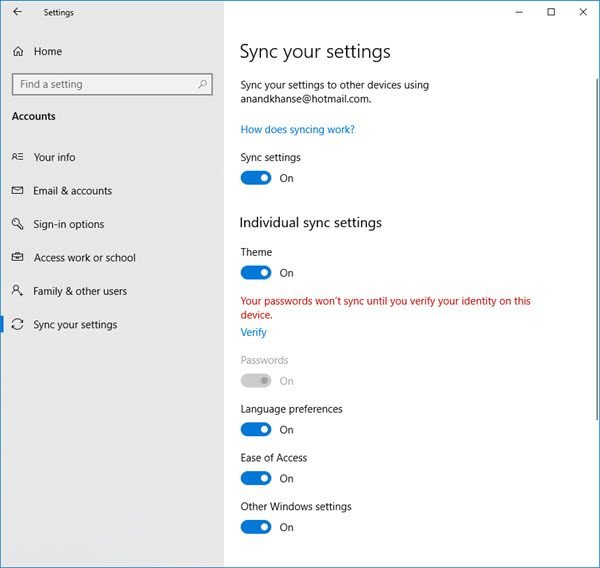
On the left side of the Accounts page, click «Sync Your Settings.»
If you still like the idea of syncing some of your setting across devices but want to limit how much information is stored, try toggling specific options off under the «Individual Sync Settings» heading.
Otherwise, to disable Sync settings altogether, switch the main «Sync Settings» toggle to the «Off» position. This disables all the sub-options completely.
How to Remove Sync Settings
Disabling Sync Settings prevents your device from transferring or receiving any settings to OneDrive. That might be all you want to do. If, for example, you have multiple computers and want most of them to sync, you can disable Sync Settings on the ones you don’t want to be synced up.
On the other hand, if you’ve disabled sync settings on all your devices, you can also remove any stored settings from OneDrive. Maybe you don’t plan on using the feature again at all and just want that information off of OneDrive, or maybe you only want to delete all the settings and then re-enable Sync Settings on your devices to get a fresh start. Either way, here’s how to do it.
Note: To remove all data from your OneDrive account you must first turn off Sync settings on all devices connected to your Microsoft account.
Fire up your browser and go to the Delete your personal settings from the cloud OneDrive page. Scroll to the bottom and click «Remove» to remove the settings stored in the cloud. If you have to sign in, do so using the account from which you want to remove the settings info.
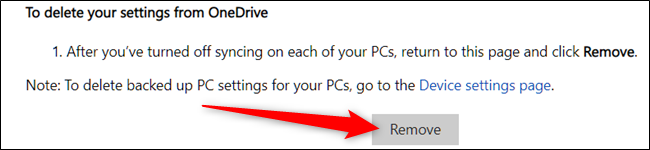
Click «Yes» when asked for confirmation.

Your account settings are now removed from Microsoft’s servers. Any new device you sign in with using your Microsoft account won’t carry over any settings from your old PC. And if you do re-enable Sync Settings on any of your devices, those settings will start getting saved to OneDrive again.
What is Sync Center? How to use Sync Center Windows 10? How to use Sync Center to sync files or folders? This post written by MiniTool shows you the answers. In addition, a Sync Center alternative – MiniTool ShadowMaker will be introduced.
What Is Sync Center?
Nowadays, data security is becoming more and more important, so more and more people choose to back up their files. To back up files, people can choose to create a backup image, save files to another location like an external hard drive, sync files to OneDrive or other locations, etc. To sync files, there is a built-in file sync program provided in Windows 10 and it is Sync Center.
Sync Center is a feature that was introduced in Windows Vista, and it has been supported in all modern versions of Windows. Sync Center is mainly used to copy network files and folders always in sync between the local computer and network servers, and to keep these files offline available on your computer, even when your server is slow, not connected or unavailable
With Sync Center, you are able to access a replica of the network files on your local computer even when the system is not linked to any network. That is to say, you can see all data made offline at anytime. Sync Center also allows you to maintain information accessible when syncing between your system & those files located in your network servers or cloud drives. By default, if the computer is not connected to the network drive, the network folder online is empty.
So, in this article, we will show you how to use Sync Center Windows 10.
How to Use Sync Center Windows 10?
In this part, we will show you how to access and use the Windows 10 Sync Center to manage offline files.
Now, here is the tutorial.
Open Sync Center Windows 10
- Open Control Panel.
- Click Sync Center to continue.
- In the pop-up window, click Manage offline files from the left panel to continue.
- Then click Enable offline files to open Windows 10 Sync Center.
Then it may require you to reboot your computer to take the changes into effect. If not, do it manually.
If you want to sync folders Windows 10 or manage offline files on your local hard drive, the shared folder on a network server is required. So, here is the tutorial on how to create the shared folder on a network server.
Create a Shared Folder
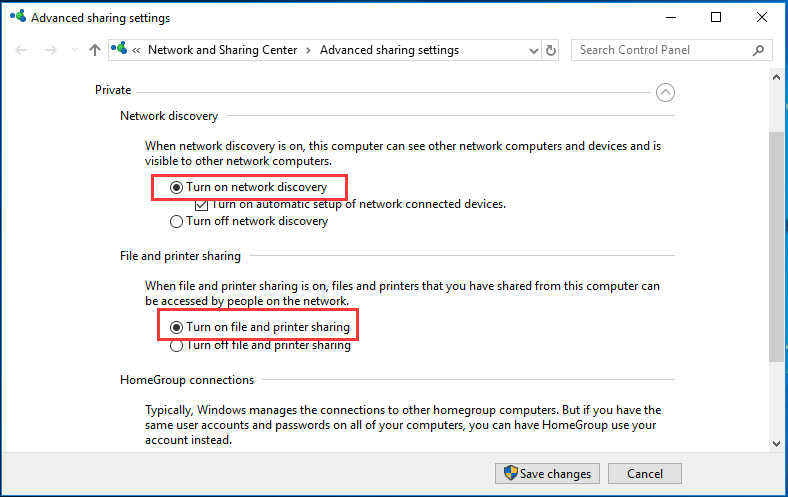
1. Go to Network and Sharing Center and click Sharing Options.
2. Check the three options: Turn on network discovery, Turn on file and printer sharing and Turn off password protected sharing.
3. Then click Save changes to continue.
Once all steps are finished, you can begin to create a shared folder on the network server.
4. Right-click the folder you want to share and choose Properties.
5. Switch to the Sharing tab and choose Share….
6. Add Everyone to share with and give it Read/Write control.
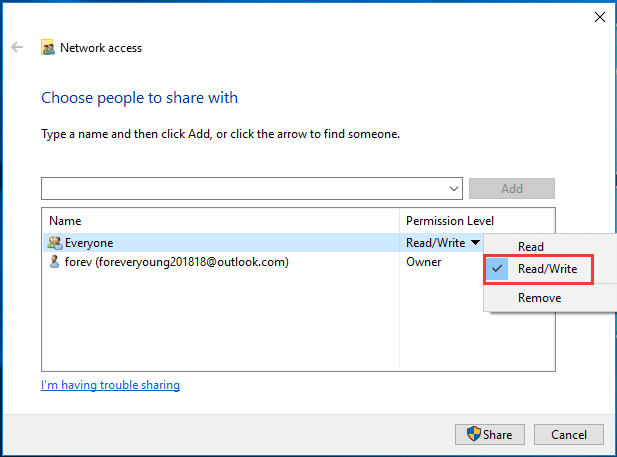
7. Then click the Share button to continue.
8. Then go back to the Sharing tab and choose Advanced Sharing to continue.
9. Next, check the option Share this folder.
10. At last, click Apply and OK to save the changes.
Once all steps are finished, you have created the shared folder on the network server.
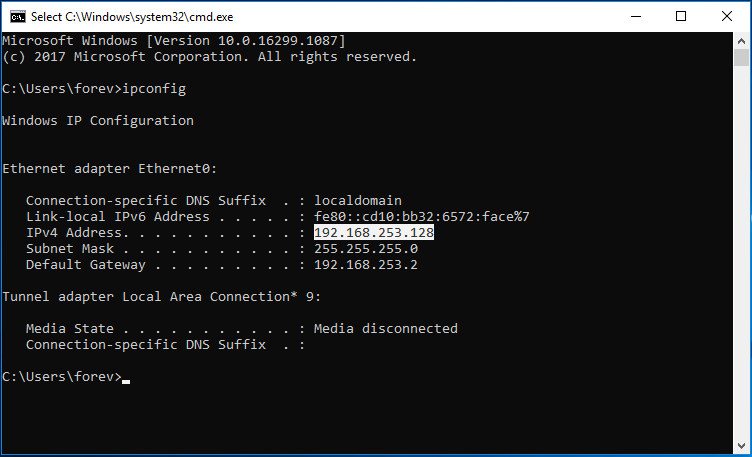
To sync files from the network drive or sync files to it, you also need to know the IP address of the network server.
Get the IP Address of Network Server
Now, we will show you how to get the IP address of the network server.
1. Open Command Prompt.
2. Type ipconfig in the command line window and hit Enter to continue.
3. Next, find your IPv4 address.
Sync the Network Drive to Local Computer
Now, we will show you how to sync the network drive to the local computer so as to manage your offline files.
- Press the Windows key and R key together to open the Run dialog.
- Type \\ plus the IP address of the network server and click OK to continue.
- Then access the shared folder.
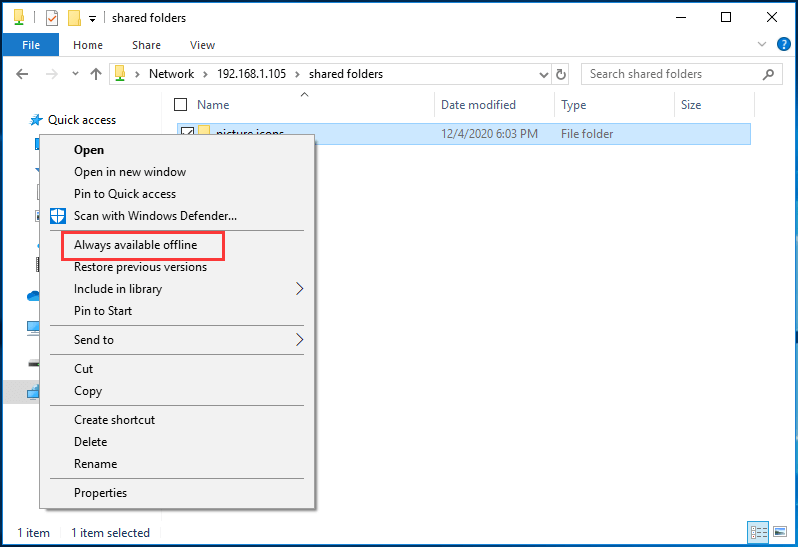
- Select the files or folders you want to access at the local computer, right-click it and choose Always available offline.
- Then wait for the process to be finished.
After that, you can access the files or folders on your local computer even though the network server is not connected. If you change either the source file or the synced files, both will keep the pace and display the same. After making it offline, you can edit it on your computer and then the source file will be synced.
How to Configure Files in Windows 10 Sync Center?
In this part, we will show you how to configure files in Windows 10 Sync Center.
How to Sync Schedule for Offline Files
In order to sync your files automatically, you can set scheduled sync for offline files.
Now, here is the tutorial.
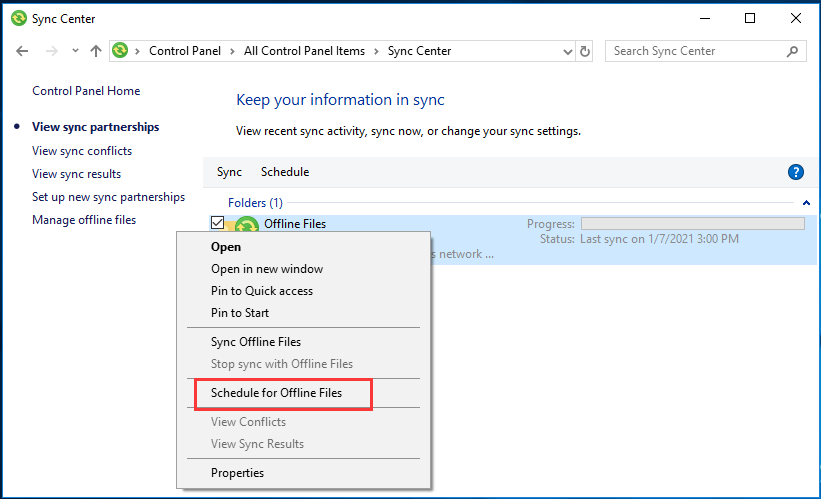
1. Open Sync Center.
2. Right-click the offline task and choose Schedule for Offline Files.
3. Next, choose which items you want to sync on this schedule and click Next.
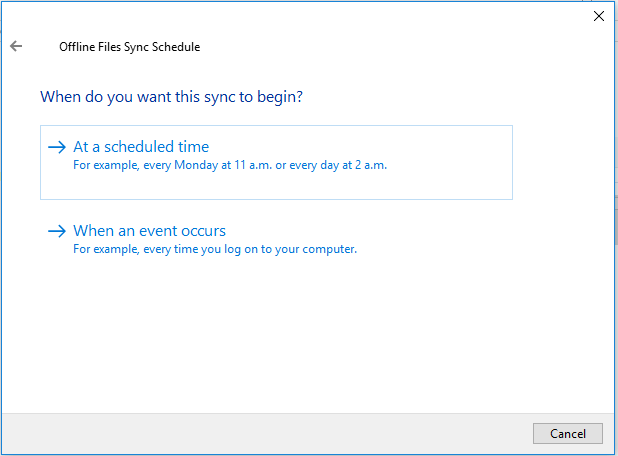
4. Decide when you want this sync task to begin. You can choose At a scheduled time or When an event occurs. Here, we choose a scheduled time.
5. Then set the time and click Next.
6. Name the scheduled sync and click Save changes to continue.
After all steps are finished, you have set the scheduled sync and it will begin to sync your files regularly as long as you do not remove it.
Change Windows Offline Files Disk Usage
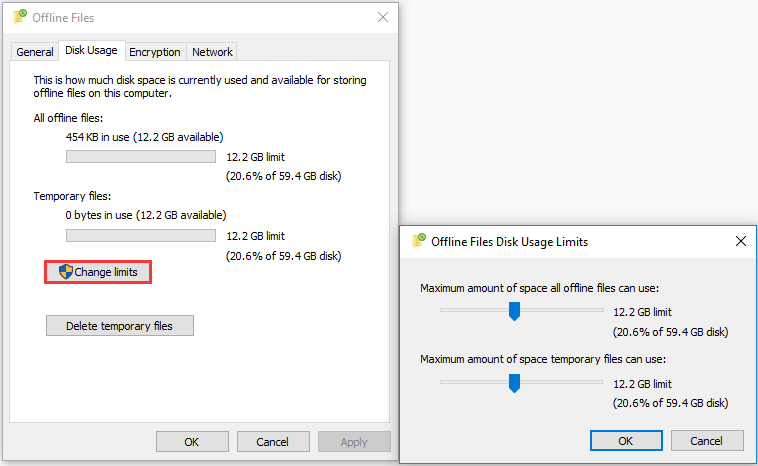
The Disk Usage will show you the available disk space on your system as well as the disk space used for keeping the offline files. You can also modify it.
Now, here is the tutorial.
- Open Sync Center.
- Click Manage offline files on the left pane.
- In the pop-up window, switch to the Disk Usage tab.
- You can see the available storage space on your system, the used space for the offline files, and the disk space for the temporary files.
- You can also click Change limits to change it.
Encrypt Offline Files
In Windows 10 Sync Center, you can also encrypt it.
Now, here is the tutorial.
- Open Sync Center.
- Click Manage offline files.
- Go to the Encryption tab.
- Click the Encrypt button to continue.
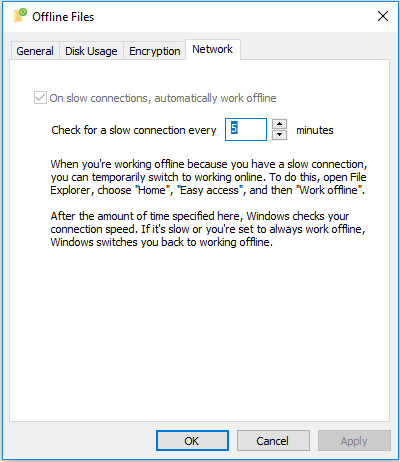
Configure Windows Offline Files Network Settings
You can set your preferred time to check for slow connectivity and once a slow connection occurs. Windows will start working offline automatically.
How to Disable Sync Center?
If you do not want to use Sync Center, you can choose to disable it. To do that, you can choose to end the mobysync.exe in the Task Manager. After that, it will be disabled.
To disable it, you can also choose to do that in Sync Center itself. Open Sync Center, click Manage offline files and click Disable offline links. After that, the Sync Center will be disabled.
The above content is all about the Sync Center and shows how to use Sync Center to sync files from the network server to the local hard drive and manage the offline files. However, if you want to sync files to the network drive, how can you do it?
In the following part, we will show you the Sync Center alternative – MiniTool ShadowMaker. It enables you to sync files from a local computer to the external hard drive, internal hard drive or network drive. So, keep on your reading to find more detailed information.
What is Sync Center? How to enable Sync Center? How to disable Sync Center? After reading this post, I knew all the answers. Click to Tweet
How to Sync Files to Network Drive?
MiniTool ShadowMaker is a piece of professional Windows 10 backup software and it is designed to back up the files, folders, disks, partitions and the operating system. It also comes with the Sync feature, ensuring the files are in two or more locations and kept in pace.
Now, we will show you how to use the Sync feature to sync files.
1. Download MiniTool ShadowMaker from the following button, install it and launch it.
MiniTool ShadowMaker TrialClick to Download100%Clean & Safe
2. Click Keep Trial.
3. Then you enter the main interface of MiniTool ShadowMaker, and go to the Sync page.
4. Click the SOURCE module to choose the files or folders you want to sync.
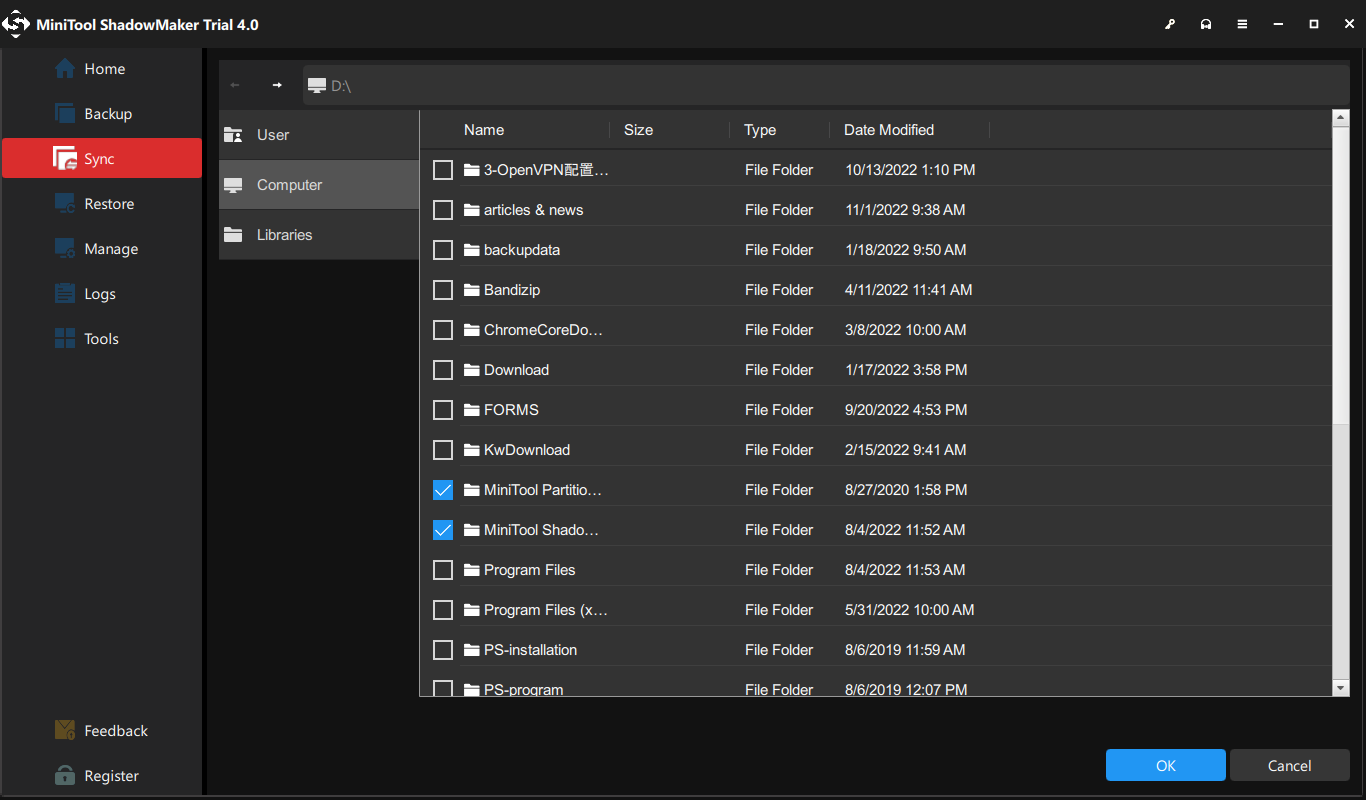
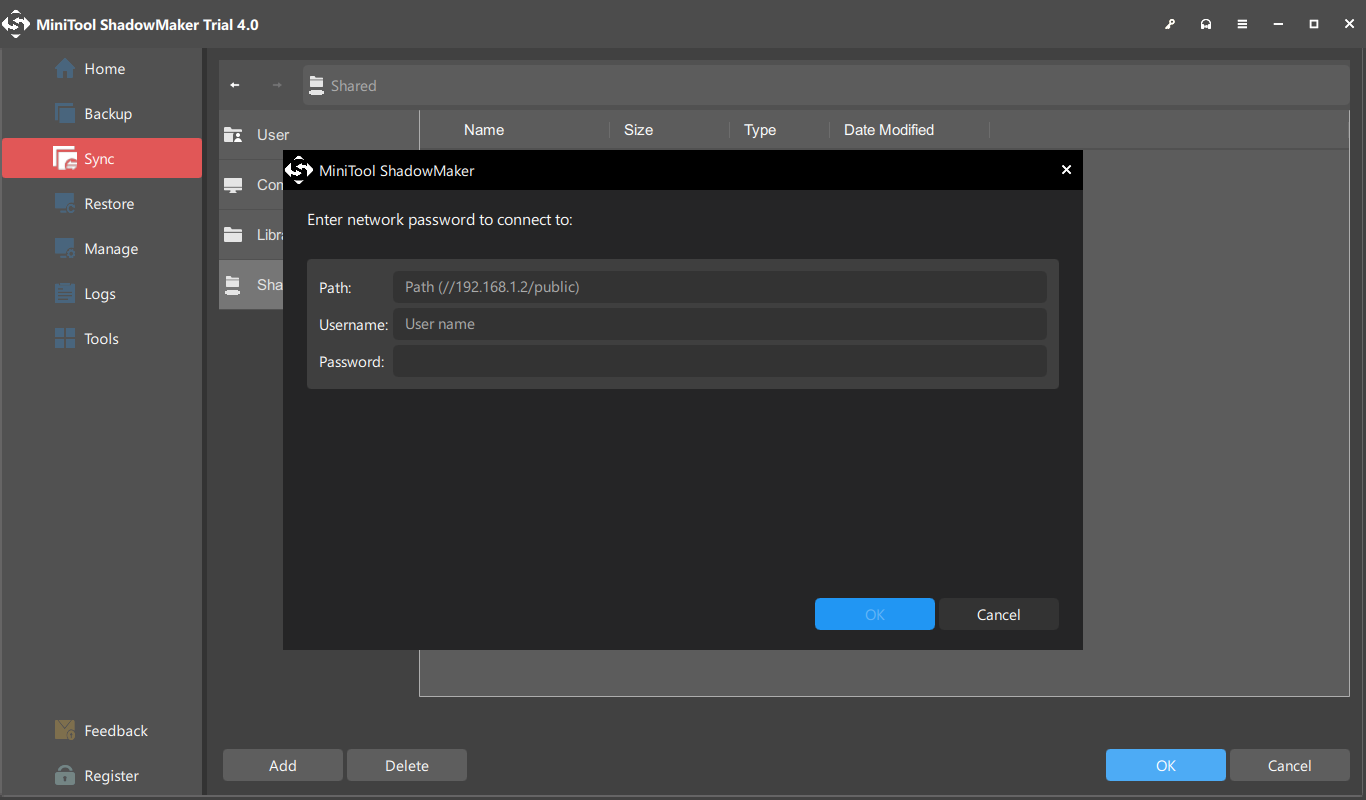
5. Then click the DESTINATION module to choose the target disk. If you want to sync them to the network drive, choose Shared.
6. Then click Add New and input the path, name and password of the internet server.
7. MiniTool ShadowMaker also enables you to set the automatic file. You can go to Options > Schedule Settings to do that.
8. After the sync source and destination are selected, click Sync Now to start syncing files to the network drive.
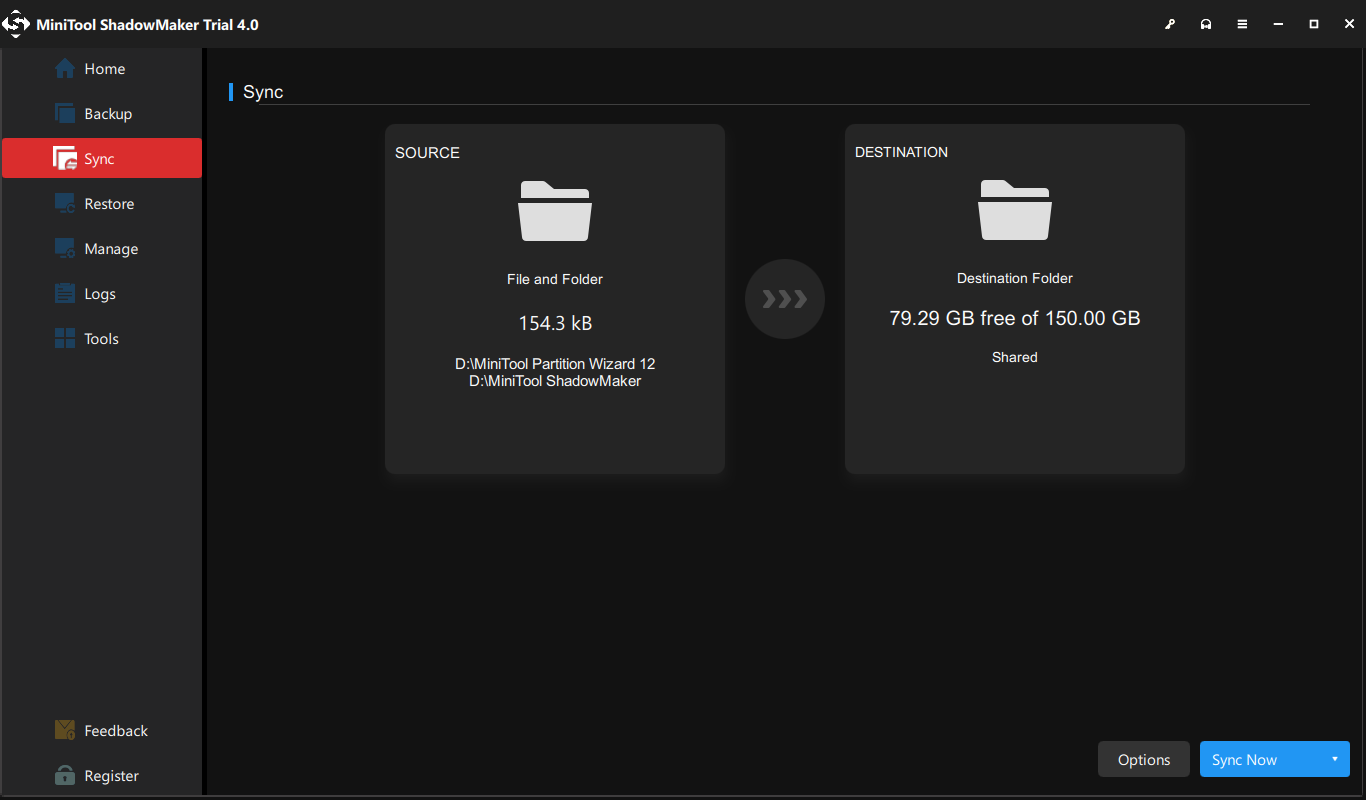
After all steps are finished, you have synced files from the local computer to the network drive. So, if you want to sync files, try MiniTool ShadowMaker.
Apart from the file backup and sync feature, MiniTool ShadowMaker also allows you to perform some recovery solutions. If your computer is crashed, you can restore it to a previous state with the system image created before.
In addition, MiniTool ShadowMaker is also a hard drive clone tool that helps you to clone OS from HDD to SSD without data loss.
Bottom Line
To sum up, this post shows what the Sync Center is and how to enable and disable Sync Center Windows 10. If you have any different ideas for Windows 10 Sync Center, you can share them in the comment zone.
If you have any problem with MiniTool ShadowMaker, please feel free to contact us via the email [email protected] and we will reply to you as soon as possible.
Sync Center FAQ
How Does Sync Center Work?
The Sync Center is a Windows 10 built-in tool that is used to sync files from the network server to the local computer. A prerequisite is that there are files on the network drive. You can manage offline files on your local drive even though the network server is not connected.
How do I turn off Sync Center?
To disable Sync Center, you can open Sync Center, click Manage offline files and choose Disable offline files.
Where is Sync Center?
The Sync Center is a Windows 10 built-in tool and you can open Control Panel to find it. If it is enabled, you can also access it in the system tray. If there is a sync conflict, you will see a yellow triangle with and an exclamation in front of the Sync Center icon.
Download Windows Speedup Tool to fix errors and make PC run faster
As you may already know, we can set up Sync settings using our Microsoft account. However, if you want to turn off sync settings for all users on Windows 11/10, you either have to create a local account or disable syncing from your Microsoft account. But this will turn your Microsoft account into a Local account. Hence, in this post, we will learn how you can disable Sync Settings in Windows for Multiple users using Group Policy Editor.

Enable, Disable Sync Setting in Windows 11/10
To enable or disable Sync Settings in Windows using the Group Policy Editor, you can follow the instructions given below.
Log into Windows as an administrator
Run gpedit.msc and then hit Enter.
This will open up a Local Group Policy Editor.
Navigate to the following location
Computer Configuration/Administrative Templates/Windows Components
In the left pane look for the ‘Sync your settings’ option.
Next, select the option and you will notice a list of group policies in the right pane like (Do not sync passwords, Do not sync App settings’, Do not Sync browser Settings, etc).
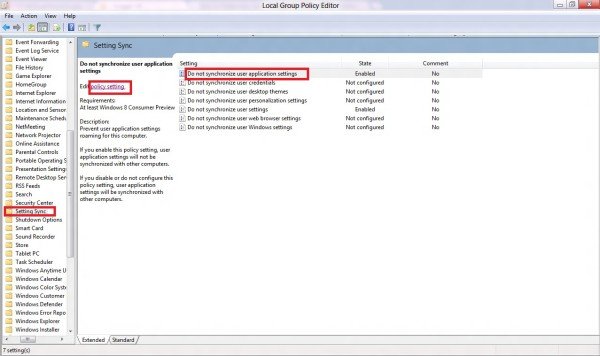
Adjacent to these options you will find the ‘Edit policy setting’ option.
Double-click on the option to open its settings panel.
A new window will show up on your computer screen, from where you will be able to change the policy setting.
Under it, you will find 3 options: Not Configured, Enabled, and Disabled. Choose ‘Enabled’ from the list and click on ‘OK’. If you would like to know the effect of each option, select the individual option and read its description in the ‘Help’ section.
Likewise, change the policy settings of other items, belonging to the ‘Sync your settings’ group.
After you have disabled all the sync-related policy settings, other PC users will be unable to change the sync settings from the PC Settings window.
To enable it back, you have to choose the Not Configured option.
Hope you found the post useful!
How do I turn off sync settings?
If you don’t want to sync your settings in Windows 11, you can go to Settings > Accounts > Windows backup, and then disable the Remember my preferences toggle. In case, you just want Windows not to sync a few of the Settings, click on the arrow next to Remember my preferences and untick those. However, if you wish to disable Sync settings for all multiple users, check out the steps mentioned earlier.
Read: How to Stop, Resume or Pause OneDrive Syncing in Windows 11/10
How do I stop Windows from syncing across devices?
You can disable the Remember my preferences option to stop Windows from syncing across devices. For that, go to Settings > Accounts > Windows backup. To stop Windows devices from syncing for all the users, you need to use Group Policy Editor, we have mentioned the steps to do the same earlier.
Also Read: Stop Cloud Backup in Windows 11.
Anand Khanse is the Admin of TheWindowsClub.com, a 10-year Microsoft MVP (2006-16) & a Windows Insider MVP (2016-2022). Please read the entire post & the comments first, create a System Restore Point before making any changes to your system & be careful about any 3rd-party offers while installing freeware.