
Для работы проектов iXBT.com нужны файлы cookie и сервисы аналитики.
Продолжая посещать сайты проектов вы соглашаетесь с нашей
Политикой в отношении файлов cookie
Стараниями корпорации Microsoft современные версии Windows давно превратились из удобных операционных систем для общения человека с компьютером в навязчивый сервис с сотнями ненужных фоновых процессов, следящих за действиями пользователя и изрядно нагружающих компьютер. В этой небольшой инструкции вы узнаете, как, используя всего одну программу, отключить телеметрию в Windows 10/11 и существенно повысить производительность своего ПК.

В стремлении угодить широкому кругу пользователей корпорация Microsoft год за годом превращала изначально спартанскую ОС в швейцарских нож, где на каждую задачу должно быть готовое решение. Например, даже если у вас нет принтера, служба, отвечающая за его работу, постоянно висит в фоне, что хоть и немного, но нагружает ПК. И так с десятками служб/процессов, которые не всем пользователям Windows необходимы.
Чтобы отключить лишние процессы и убрать телеметрию из Windows 10/11, программистами были придуманы сотни способов, но наиболее проверенный — это использовать небольшую бесплатную утилиту под названием O&O ShutUp10++.
1. Скачиваем программу с официального веб-сайта.
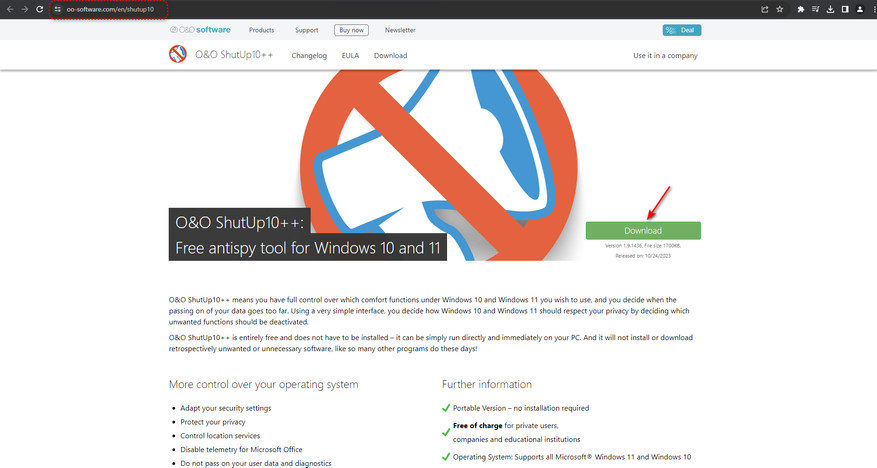
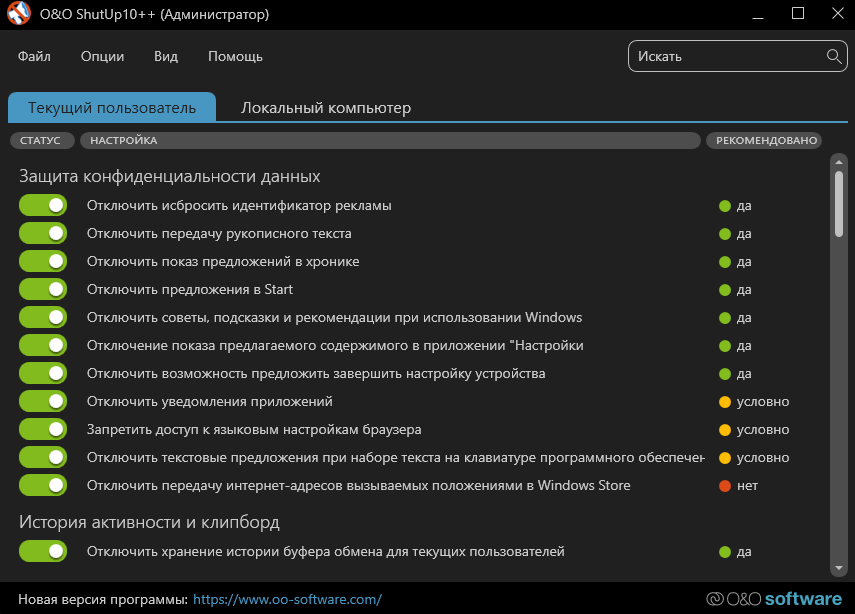
2. Запускаем от имени администратора файл OOSU10.exe. Если всё прошло успешно, то перед вашим взором появится окно программы.
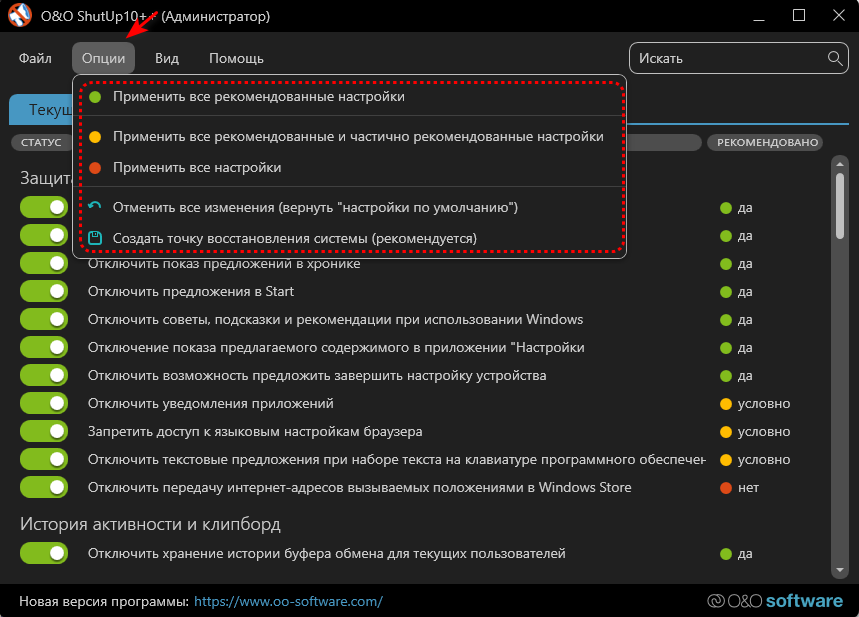
3. Переходим в раздел «Опции» и применяем желаемый профиль. Советую ограничиться настройками «Применить все рекомендованные настройки» если вам по каким-то причинам нужен Microsoft Store. Также вы можете, используя удобный интерфейс ПО, в ручную отключить только ненужные вам службы/процессы. Однако будьте осторожны, потому как бездумное отключение всего и вся может существенно повлиять на работу операционной системы. Обязательно создайте точку восстановления, если не уверены в своих действиях!
4. Закрываем программу, перезагружаем ПК и наслаждаемся более быстрой и плавной работой Windows!
Дабы не прослыть голословным, проведём небольшое тестирование на примере Windows 10 Pro x64 22H2 (19045.4046) с применением различных профилей программы O&O ShutUp10++.
Результат потрясает!
Несмотря на многократный запуск и холостой простой в 5 минут для каждого теста, по умолчанию Windows 10 потребляла внушительные 3.9 Гб оперативной памяти и существенно нагружала процессор фоновой активностью 124 процессов. Применение же рекомендованных настроек программы O&O ShutUp10++ позволило значительно снизить потребляемый объём RAM до 1.8 Гб и разгрузить CPU. Два оставшихся профиля также возымели эффект и позволили ещё более сократить потребление до уровня в 1.6 Гб и 1.4 Гб, а также 107 и 95 фоновых процессов соответственно. Базовый функционал и сервисы Windows не пострадали!
Я бы солгал, сказав, что был потрясён итогом полученных результатов. Тем не менее факт остаётся фактом: более 30% всей фоновой активности Windows 10/11 состоит из телеметрии и ненужных среднестатистическому пользователю ПК процессов. Возможно, что успех Steam Deck и популяризация Linux заставит корпорацию Microsoft пересмотреть свою стратегию. А пока имеем то, что имеем. Уважайте свободу, используйте только проверенное ПО и ни в коем случае не позволяйте компаниям диктовать вам свои условия. С вами был Павел. Ещё увидимся!
Сейчас на главной
Новости
Публикации

В эпоху, когда человечество только осваивало космические просторы, Франция сделала неожиданный выбор, отправив в полет не собаку или обезьяну, а кошку по имени Фелисетт. В октябре 1963 года она…

Нержавеющая
сталь — материал, который ассоциируется
с прочностью, долговечностью и
устойчивостью к коррозии. На первый
взгляд, кажется, что это идеальный выбор
для производства…

Зевота — явление, знакомое каждому. Мы зеваем не только от усталости или скуки, но и когда видим, как зевает другой человек. Почему так происходит? Заразна ли зевота? Чтобы…

Представьте себе бескрайний, почти невообразимо огромный океан. Только вместо воды он наполнен разреженным газом, пылью и заряженными частицами. Этот океан — межзвездная среда,…

Представьте себе место, где чистота возведена в абсолют. Место, где каждая пылинка на счету, а воздух фильтруется с такой тщательностью, что обычный городской смог показался бы густым туманом….

Лет восемь тому назад моим основным смартфоном был «ультрабюджетник» Xiaomi Redmi 5A. Несмотря на простецкую внешность и скромные характеристики, он хорошо справлялся с ролью «рабочей лошадки»…
Data privacy has been an important topic of conversation in recent years, and users have been demanding stricter data privacy laws from tech companies such as Meta, Google, and even Microsoft. While many legal gray areas still exist that tech companies utilize to safeguard themselves from scrutiny, you must safeguard yourself by configuring privacy protection settings.
There are several ways to disable tracking or telemetry features in Windows 11; read on as we help you take control of your Windows 11 activity data.
How Does Windows 11 Track Your Data?
Windows 11, much like its predecessor Windows 10, continuously collects a significant amount of user data. While some of this happens in the background, most data collection is based on your user activity. Microsoft claims to collect user data to better understand how their customers use their products and improve the overall user experience.
Some methods Microsoft uses to collect data from an average Windows 11 user are location services, cookies, diagnostic feedback, and browser activity in Microsoft Edge. Any third-party apps installed on your Windows 11 PC may also collect your activity and location data.
Should You Be Worried About Your Data Privacy on Windows 11?
As a Windows 11 user, you should be aware of apps that collect your data and understand what your preset Windows 11 activity tracking preferences mean. Microsoft tracks its users to improve the experience of their users, but more importantly, to make advertisements more relevant and personalized.
Your activity data directly contributes to how relevant the advertisements you receive are. To a certain extent, this means that Windows 11 keeps track of the websites you visit, how you interact with ads, your current location, etc.
If you, like most people, are concerned about your data privacy and do not want Microsoft taking advantage of your user activity, you should consider turning off tracking features on Windows 11. Even if you cannot completely disable the tracking features, you should opt out of voluntary data collection preferences.
How to Disable Advertising Data Tracking on Windows 11
If you’re concerned about your data or activity patterns being used by third parties for advertisement, you should consider turning off the relevant settings. To turn off advertising data tracking on Windows 11:
-
Open the Start menu and launch the Settings app.

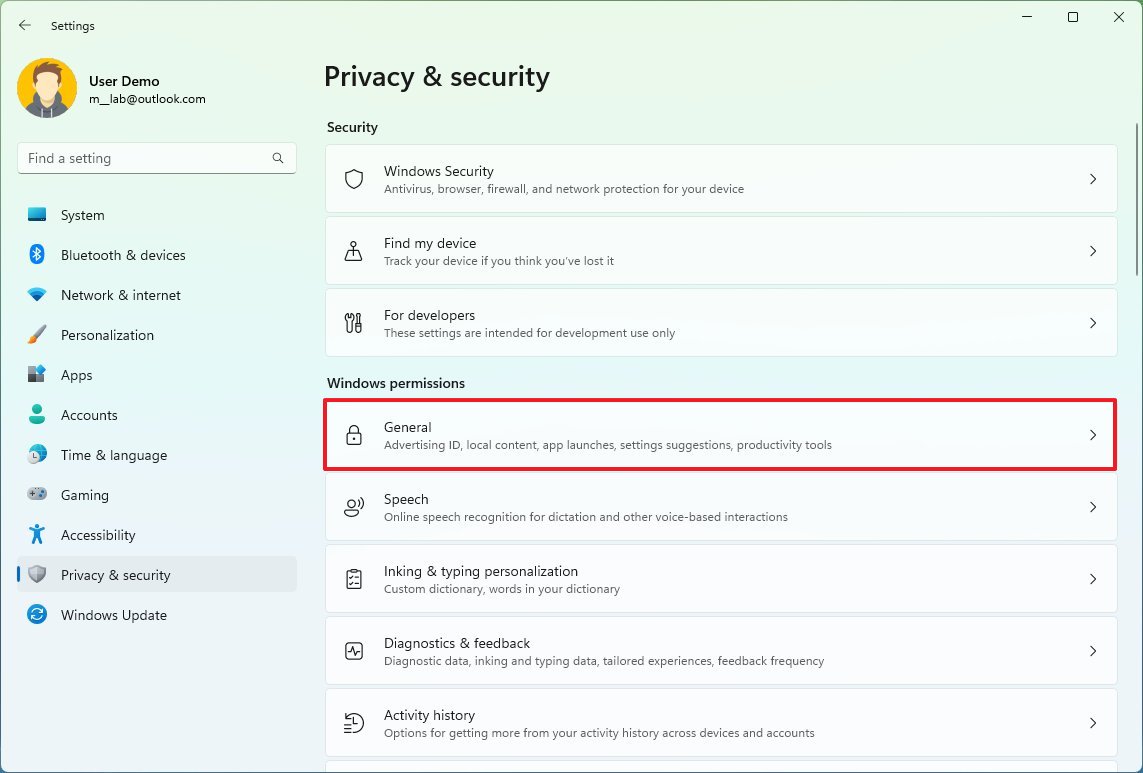
- From the side pane, select Privacy & security, and then under Windows permissions, select the General tab.
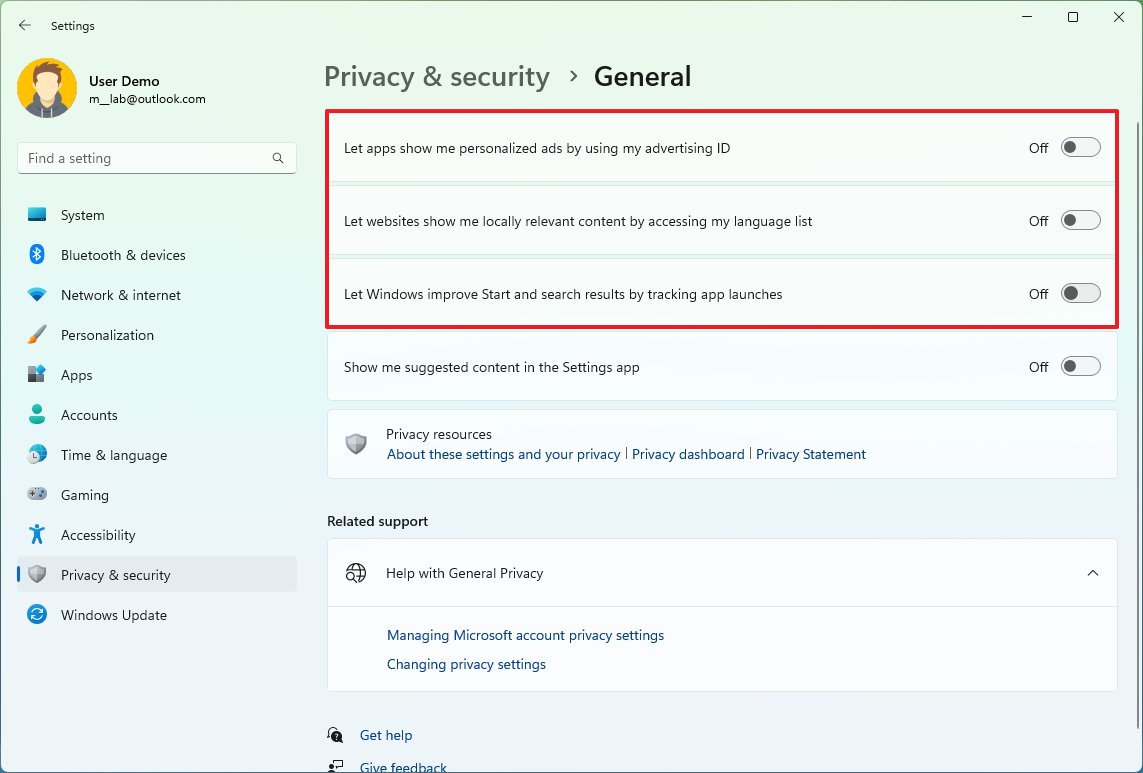
- Turn off all of the general preferences by using the toggle option.
Once you complete the above steps, you will successfully opt out of personalized ads on Windows 11.
How to Disable Activity Tracking on Windows 11
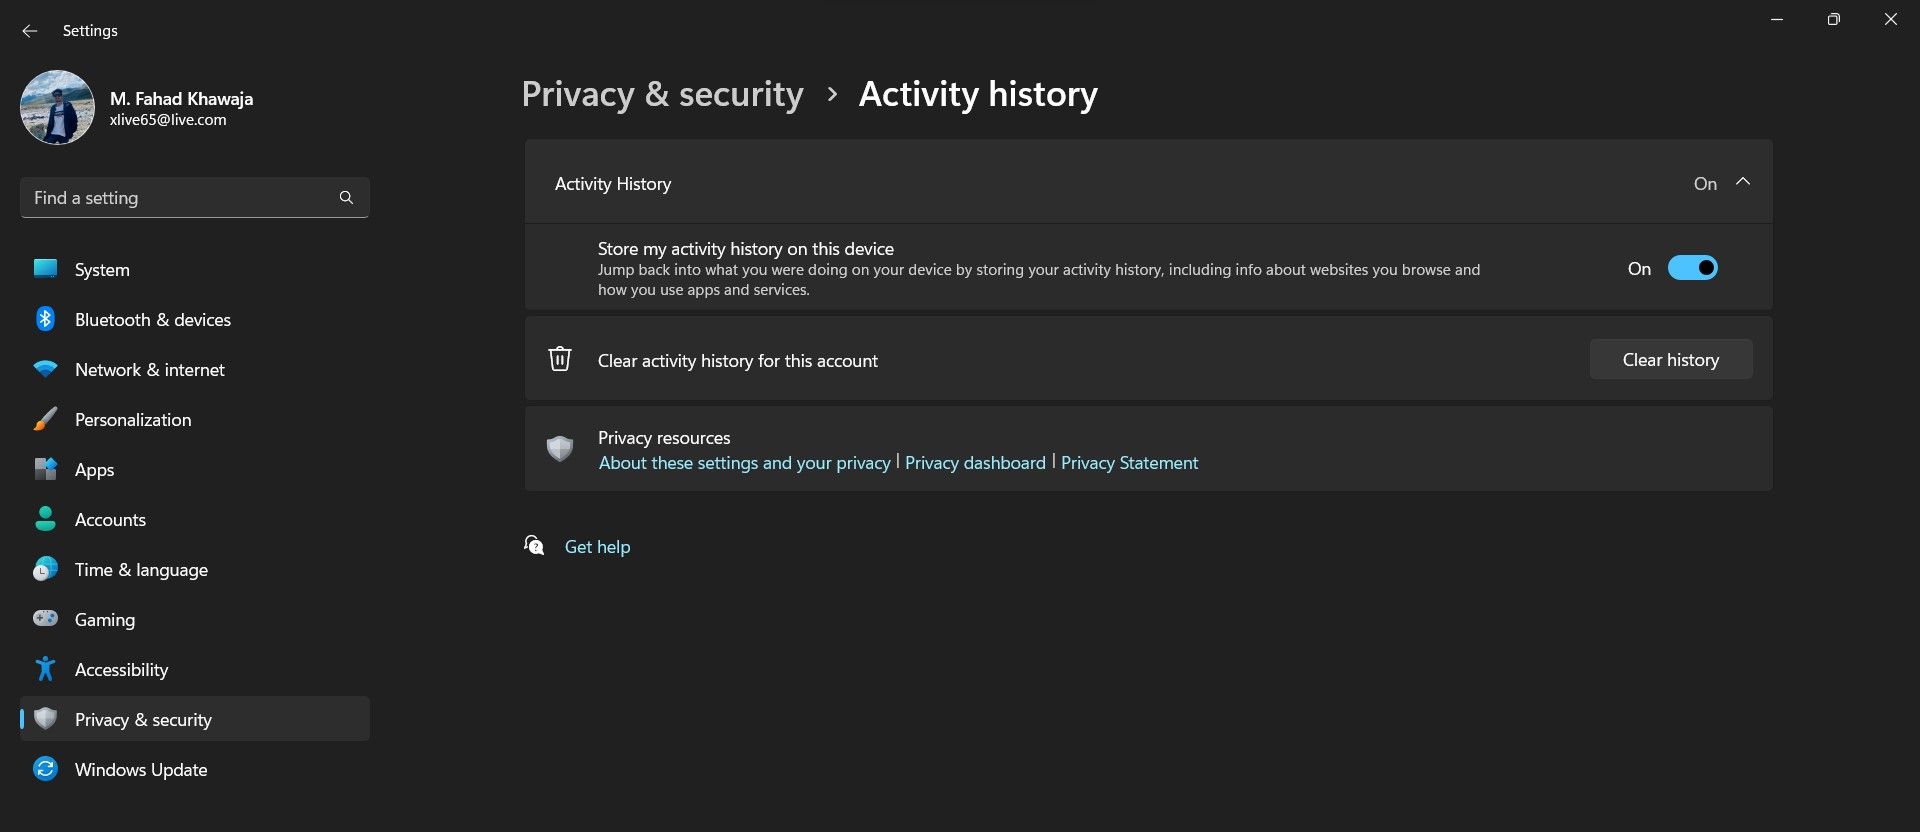
Activity history is a shady Windows 11 feature that has plenty of privacy concerns. According to Microsoft, the feature allows users to keep track of how they use their Windows 11 devices. This includes recording what apps, services, websites, and files users have used or accessed recently. If your PC is signed in with a Microsoft account, your data is sent to Microsoft; otherwise, your activity history is only stored locally on your device.
Your activity history is used to personalize your Windows experience and provide relevant suggestions. The Windows 11 Timeline and Microsoft Edge utilize your activity history.
To disable Activity history tracking on Windows 11:
- Launch the Settings app via the Start menu.
- Navigate to Settings > Privacy & security.
-
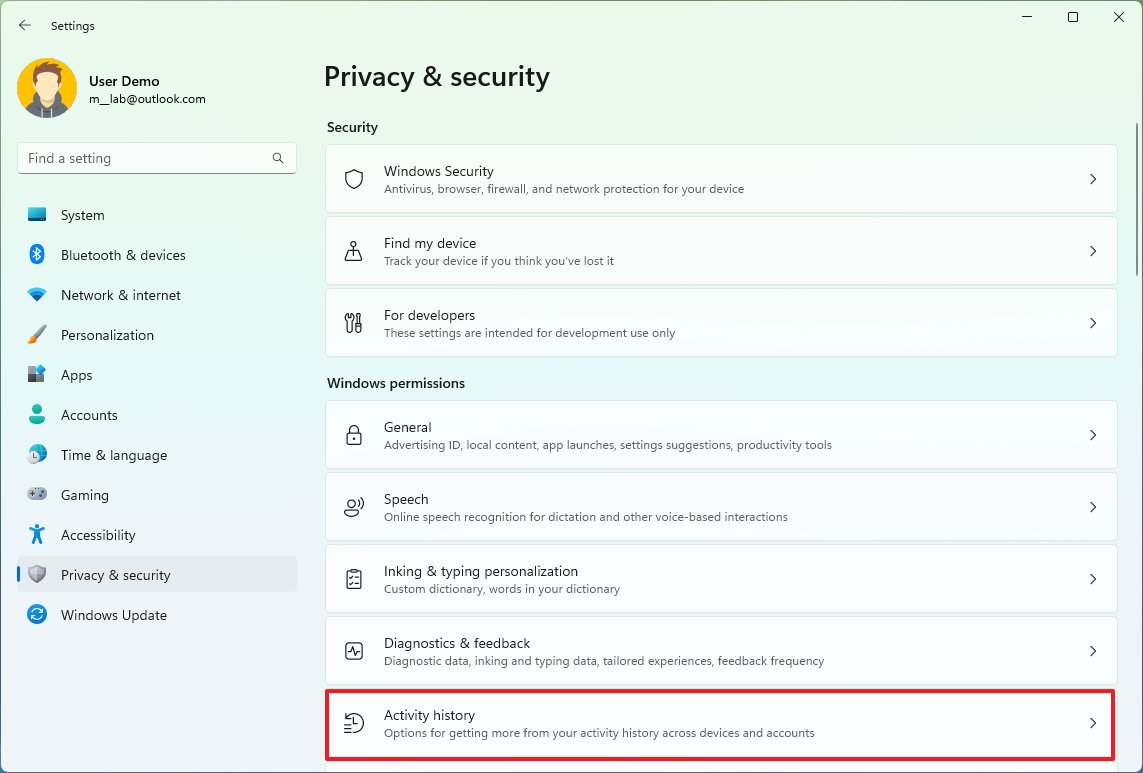
Under Windows permissions, select Activity history.

- Click the Activity history tab and disable the Store my activity history on this device option.
- We also recommend choosing the Clear activity history for this account option.
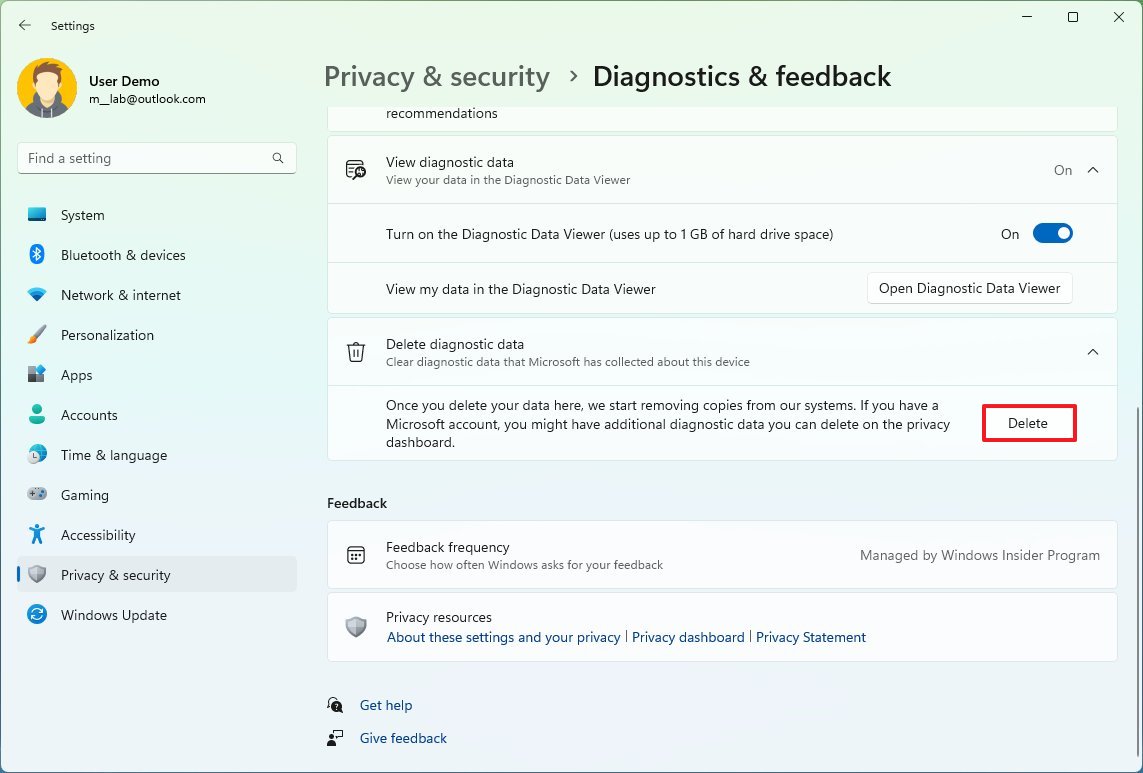
- Similarly, navigate to Settings > Privacy & security > Diagnostics & feedback.
- Disable the Tailored experiences option to stop Microsoft from using your diagnostic data for ads, personalized tips, and recommendations.
- You can also delete existing diagnostic data via the Delete diagnostic data option.
How to Stop Microsoft Edge Data Collection on Windows 11
Microsoft Edge is one of the best browsers around, and it takes your privacy very seriously. There are several different privacy-related options that you can tweak to your liking and level of comfort.
To disable tracking within Microsoft Edge:
- Launch Microsoft Edge via the Taskbar or the Start menu.
-
Click on the 3-dots menu icon in the far right and select Settings from the dropdown menu.

- Select Privacy, search and services from the side menu.
- Enable Tracking prevention, and choose the tracking level you want to allow during your browsing sessions.
If you’re still unsatisfied and want to take privacy protection to another level, you should check out our dedicated Microsoft Edge privacy guide.
How to Delete Activity Tracking Data from Microsoft Account
Even if you disable and delete Activity history from your Windows 11 device, there might still be data that you need to data off your Microsoft cloud account.
Here’s what you need to do to clear activity tracking data from your linked Microsoft account:
-
Login to your Microsoft account and complete any two-factor authentication required by the site.

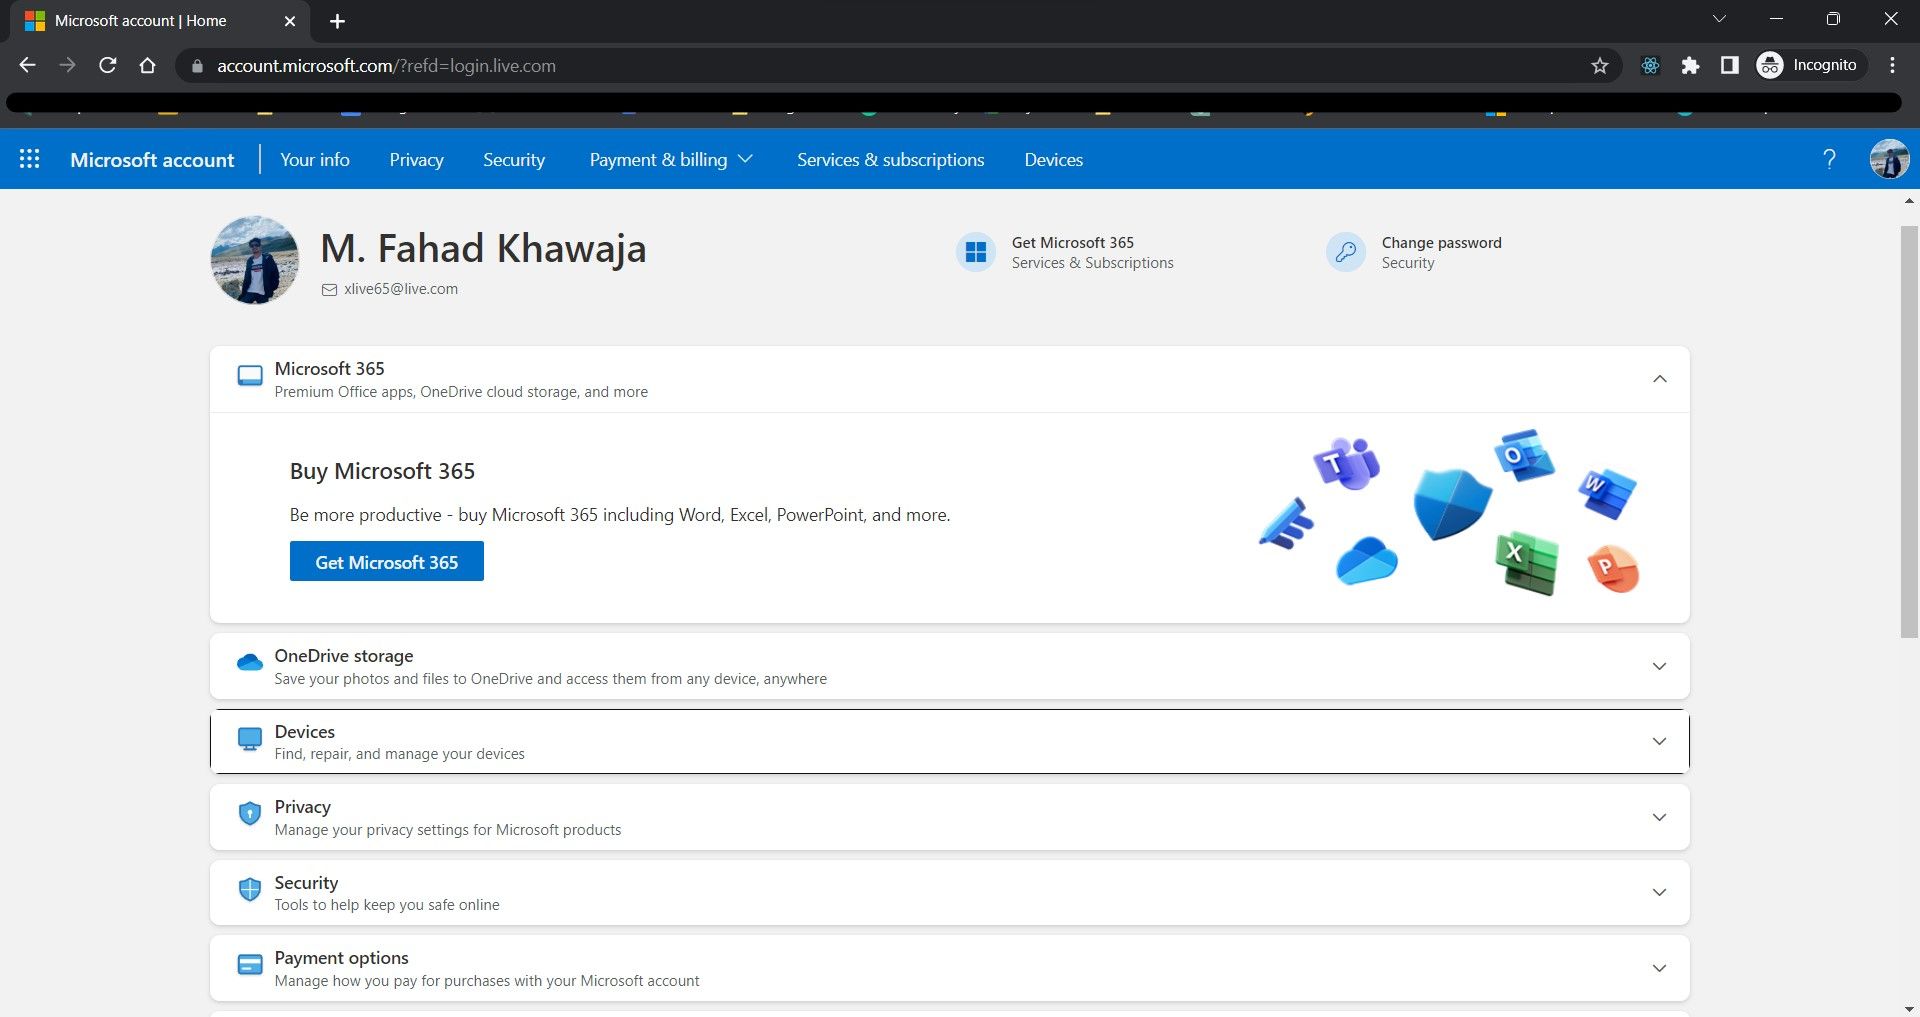
- From your dashboard, select Privacy and then Privacy dashboard.
-
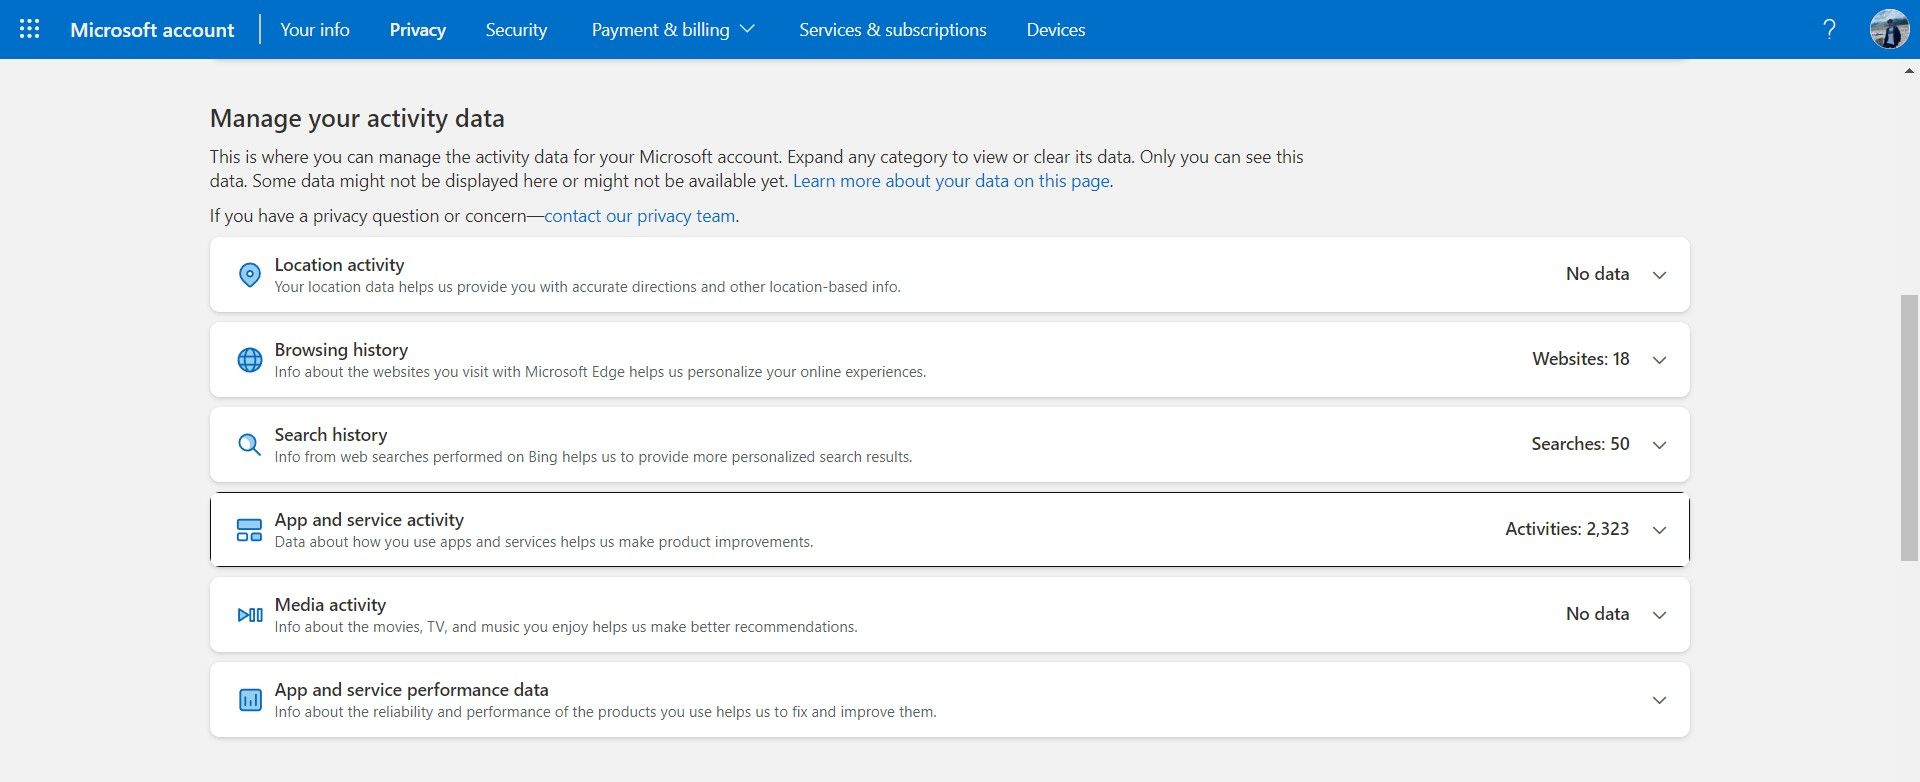
Under the Manage your activity data, you should see several groups such as Location activity, Browsing history, Search history, App and service activity.

-
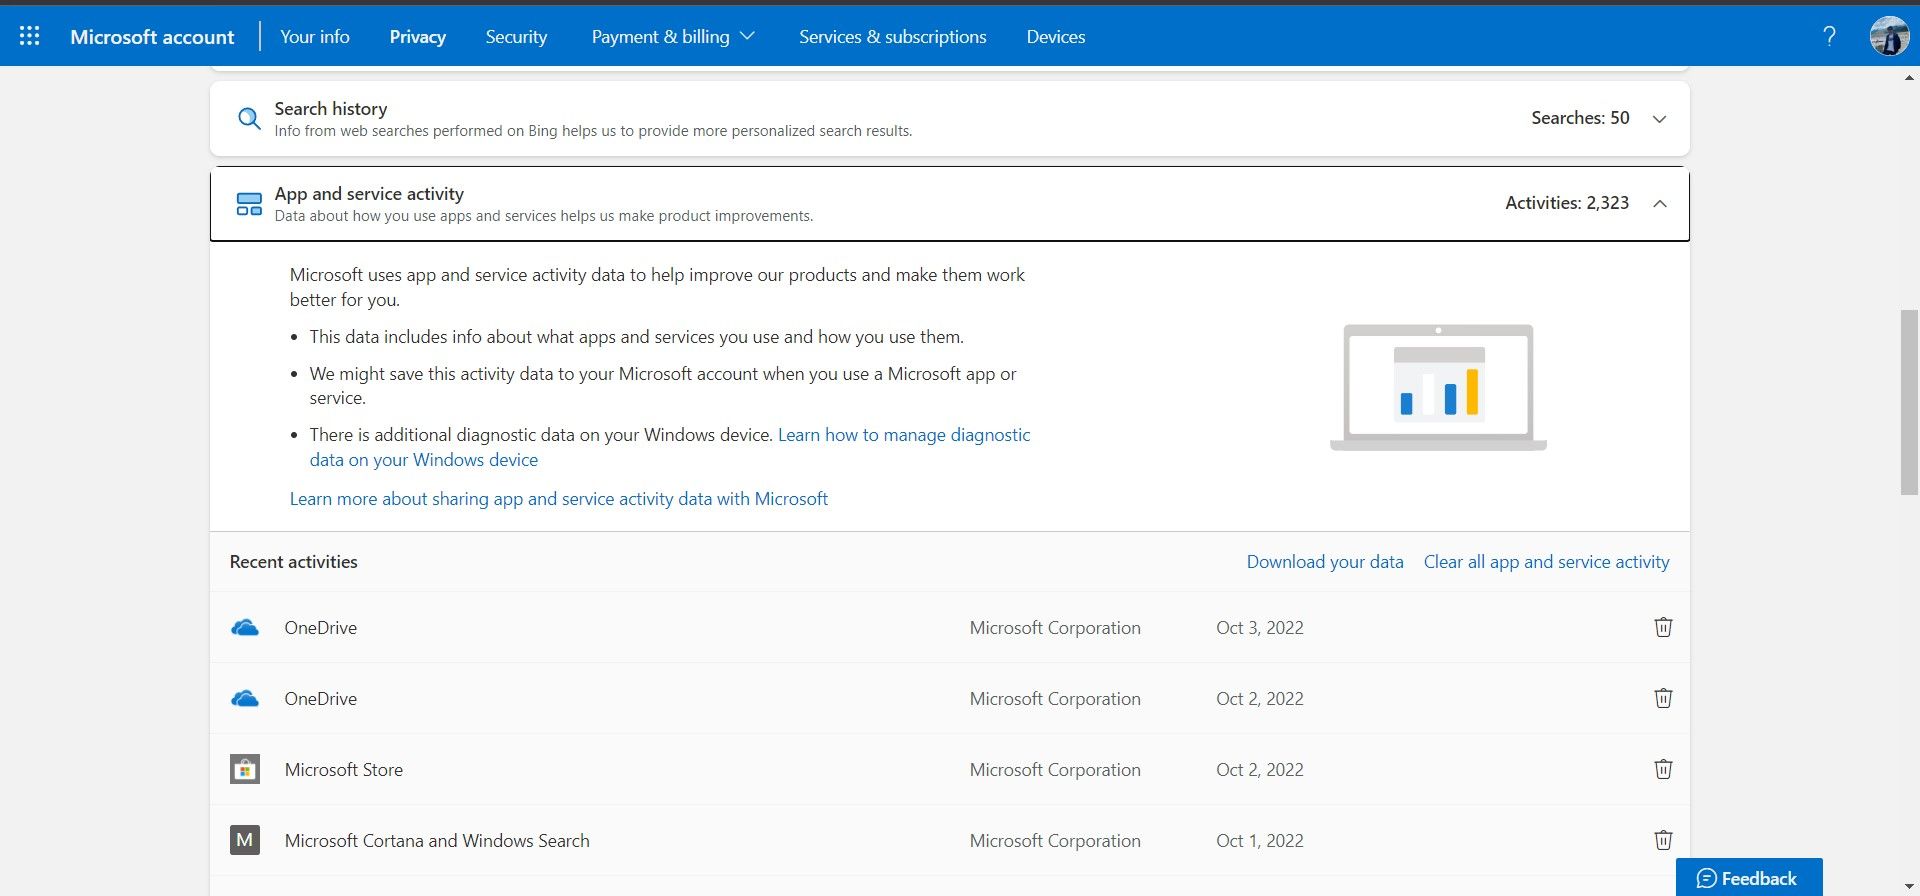
One by one, select each tab and click Clear all.

- For example, to clear the 2,323 instances of app and service-related activity stored by the above Microsoft account, we’ll select the App and service activity tab and then select Clear all app and service activity.
- In the popup window, select Clear, and choose how frequently you want Microsoft to clear the selected data automatically.
- You can also choose to Download your data to have a closer look at the extent of the data that Microsoft has collected.
Controlling Your Location Tracking on Windows 11
Many apps utilize location services, and while some may use them out of necessity (in the case of map services), others might exploit the location permission for advertisement purposes. It’s crucial you make sure your location data is not being misused by any app on your Windows 11 device.
Data privacy has become a huge concern over the past few years. Apps, software, phones, computers, and other smart devices constantly have access to your private information that can be used by companies or even third parties for their benefit. If you have a Windows PC, then you should know that even Microsoft collects your data through a telemetry system. If you are not comfortable with this, you can disable the telemetry on Windows 11 and ensure that the company no longer keeps a log of your data.
Disable Telemetry on Windows 11
There are different ways to disable the telemetry, and I will walk you through the most straightforward methods.
Limit Microsoft Logs
Limiting what Microsoft has access to is the best way to handle data privacy if you are using the Home editions. Microsoft doesn’t allow Home edition users to disable the telemetry altogether, so limiting access is best to protect your privacy. To limit access, follow the steps below:
Step-1: Open the settings app using the shortcut keys Win + I.
Step-2: Click on Privacy & Security from the left pane.

Step-3: Scroll down and click on Diagnostics & feedback under Windows permissions.

Step-4: Turn the toggle switch Off next to Send optional diagnostic data.

Turning the toggle switch Off will ensure that Microsoft can only collect data about hardware, system settings, and processes. If the switch is turned On, the company will be able to get further data about the apps you use, the websites you visit, etc.
Disable Telemetry on Windows 11 Using Services
- Open the Run box using shortcut keys Win + R.
- Type services.msc and press Enter.

- Locate Connected User Experiences and Telemetry and double-click on this option. (You can locate the option quickly as everything is listed in alphabetic order).

- Ensure that you are in the General tab and select Disabled from the Startup type drop-down menu.
- Select OK and close the window.
- Now look for Device Management Wireless Application Protocol (WAP) Push Message Routing Service and double-click on it.

- Select Disabled from the Startup type drop-down menu in the General tab and press OK.
- Restart your PC.


Disable Telemetry on Windows 11 Command Prompt
Step-1: Click on the search icon and type cmd. Select Run as administrator.

Step-2: You will be asked, do you wish to allow this app to make changes to your devices? Select Yes.
Step-3: Type the following command and press Enter:
sc config DiagTrack start= disabled
Step-4: After that type, the following command and press Enter:
sc config dmwappushservice start= disabled
Step-5: Restart your PC.
Task Scheduler
- Click on the search icon and type Task scheduler. Select Open.

- Click on the arrow next to Task Scheduler Library in the left pane.

- Click on the arrow next to Microsoft.

- Click on the arrow next to Windows.
- Click on the Customer Experience Improvement Program.

- Right-click on Consolidator in the right pane and select Disable.
- Right-click on UsbCeip and select Disable.
- Restart your system.


I hope this helps and if you have any more questions, let us know in the comments below.
(Image credit: Future)
On Windows 11, you can minimize the information that Microsoft, advertisers, and other services track about you and your computer, and in this guide, you will learn how.
It has always been known that Microsoft collects various types of data about your computer and your activities to improve the experience. However, the company seems to be growing the amount of data collection on each new operating system version, and this continues to be a concern for many people.
Case and point, a recent video published in «The PC Security Channel» on YouTube compares the privacy of Windows 11 to the one of Windows XP, and the result shows that the latest version of the operating system appears to be collecting (or at least sending) many folds more of data than the two-decade-old version.
If you are concerned about your privacy, Windows 11 provides settings to disable many of the tracking features to minimize the amount of data the company collects. In addition, the operating system even includes a tool to review some of the data sent to the company.
In this how-to guide, I’ll walk you through the steps to understand the diagnostic data that Microsoft collects from your computer and the instructions to disable many of the tracking features available on Windows 11.
How to review tracking data on Windows 11
Although you can’t view every piece of information that Microsoft and other services track about you and your computer, it’s possible to review the diagnostic data that the company uses to improve the experience on Windows 11.
Install diagnostic data viewer
All the latest news, reviews, and guides for Windows and Xbox diehards.
To install the «Diagnostic Data Viewer» on Windows 11, use these steps:
- Open Settings.
- Click on Privacy & security.
- Click the Diagnostic & feedback page from the right side.
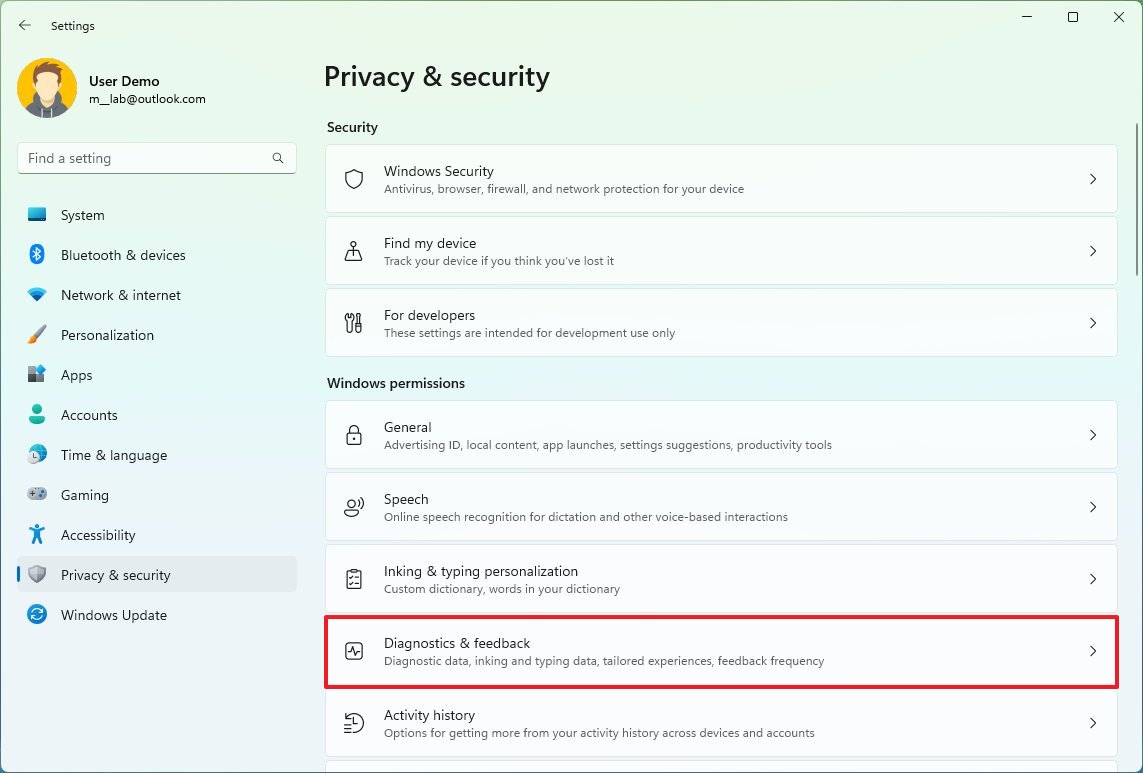
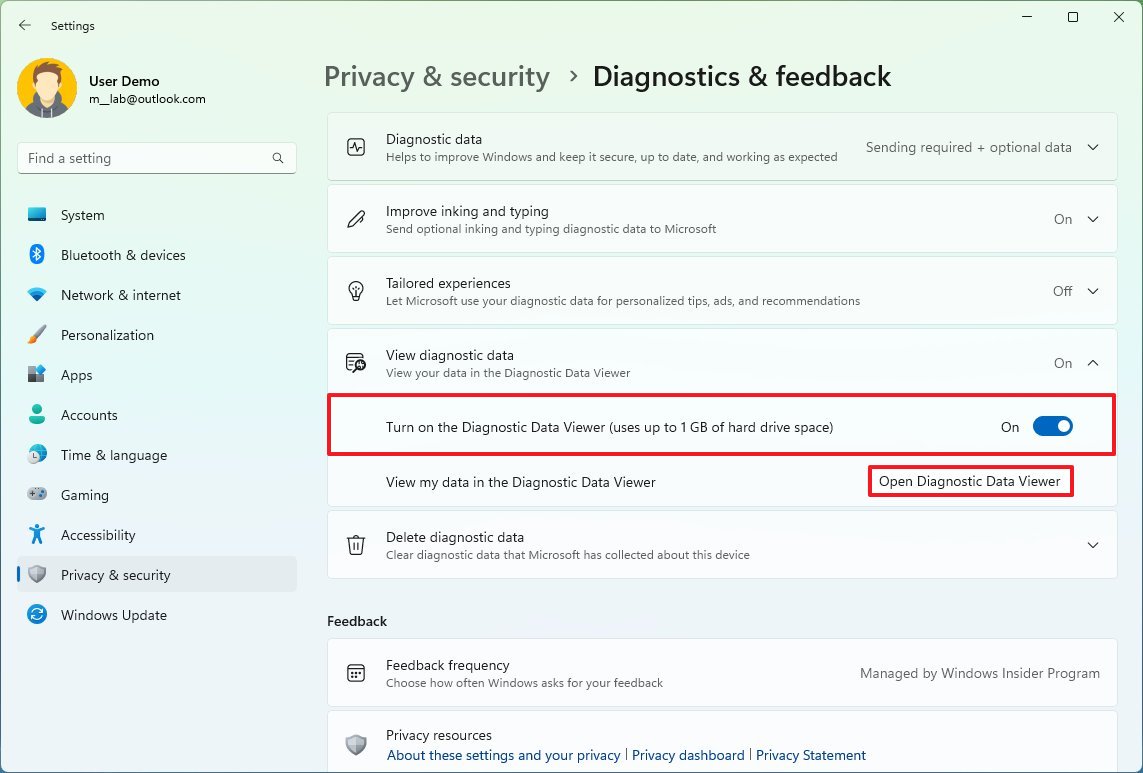
- Click the «View diagnostic data» setting and turn on the toggle switch.
- Click the «Open Diagnostic Data Viewer» button.
- Click the Install (or Get) button from the Microsoft Store.
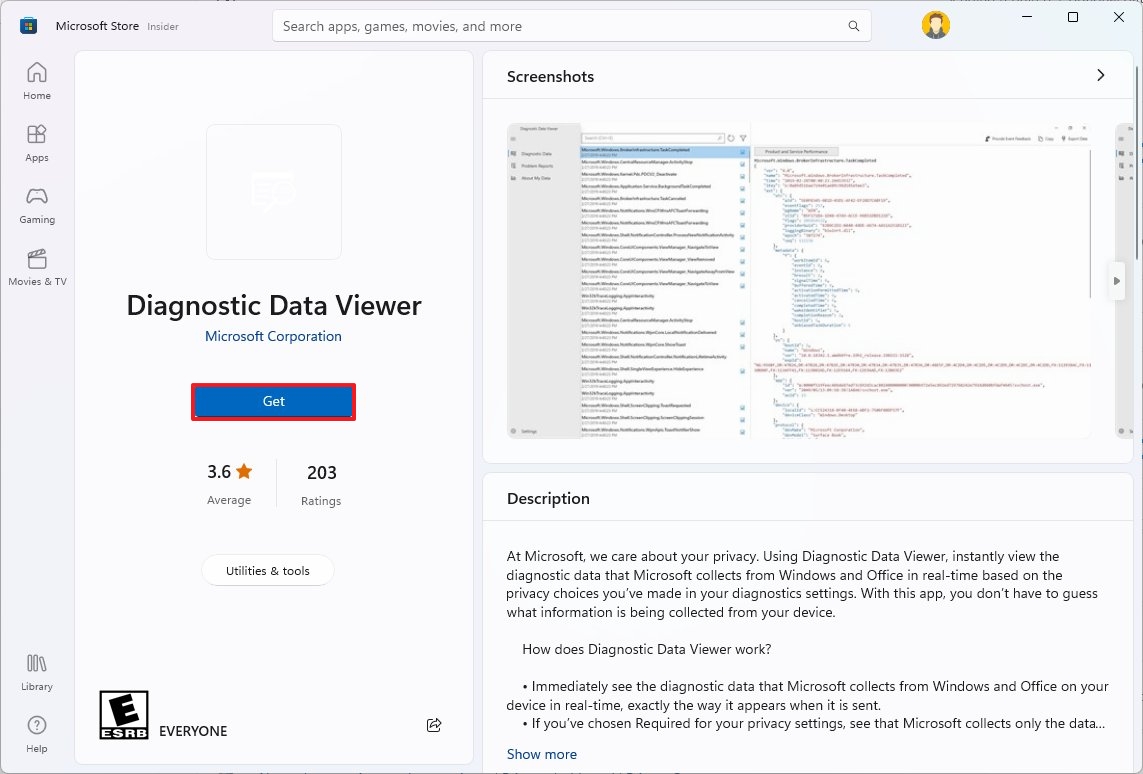
Once you complete the steps, you can proceed to open the app and review the data that Microsoft collects from you and your computer.
Review diagnostic data
To review the diagnostic data, use these steps:
- Open Settings.
- Click on Privacy & security.
- Click the Diagnostic & feedback page from the right side.
- Click the «View diagnostic data» setting and turn on the toggle switch.
- Click the «Open Diagnostic Data Viewer» button.
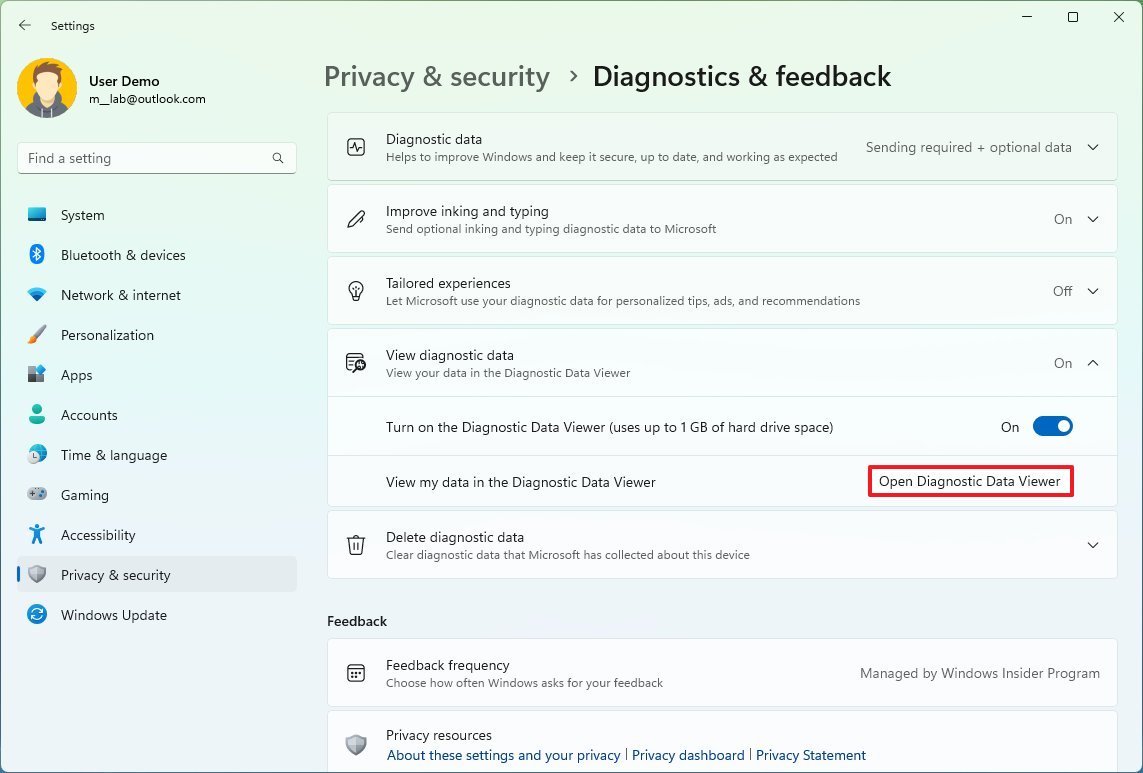
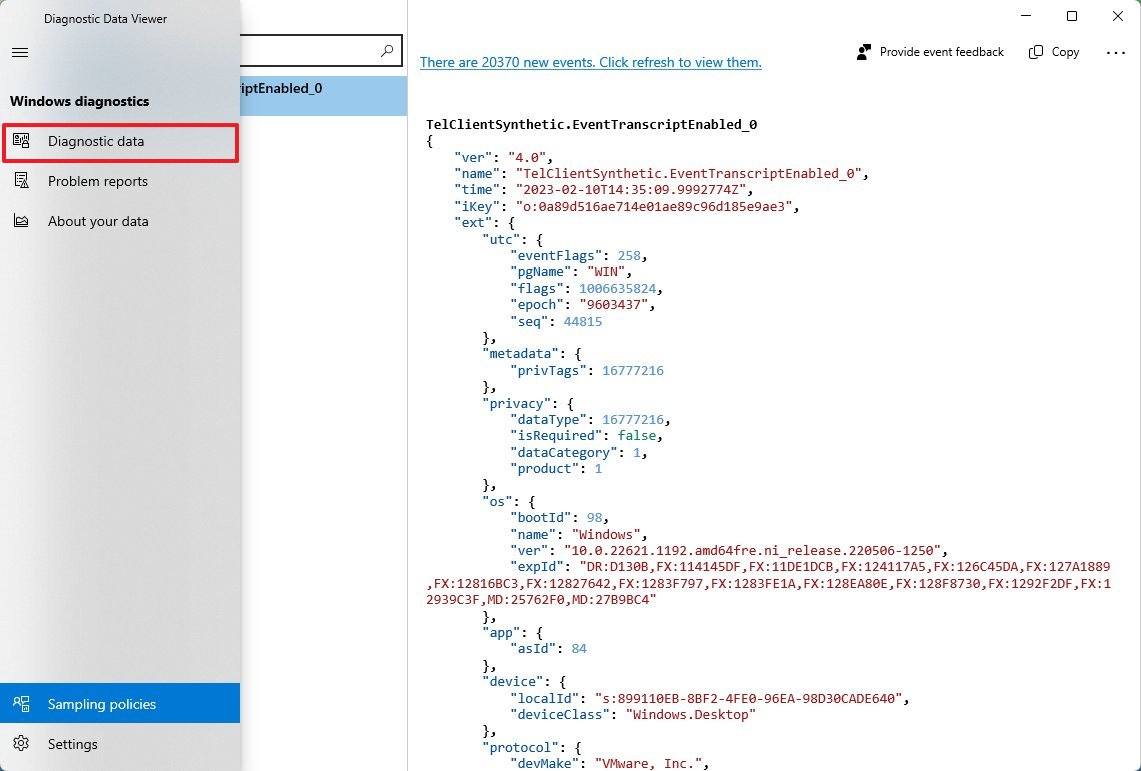
- Click on Diagnostic data to review the data that Microsoft has been collecting.
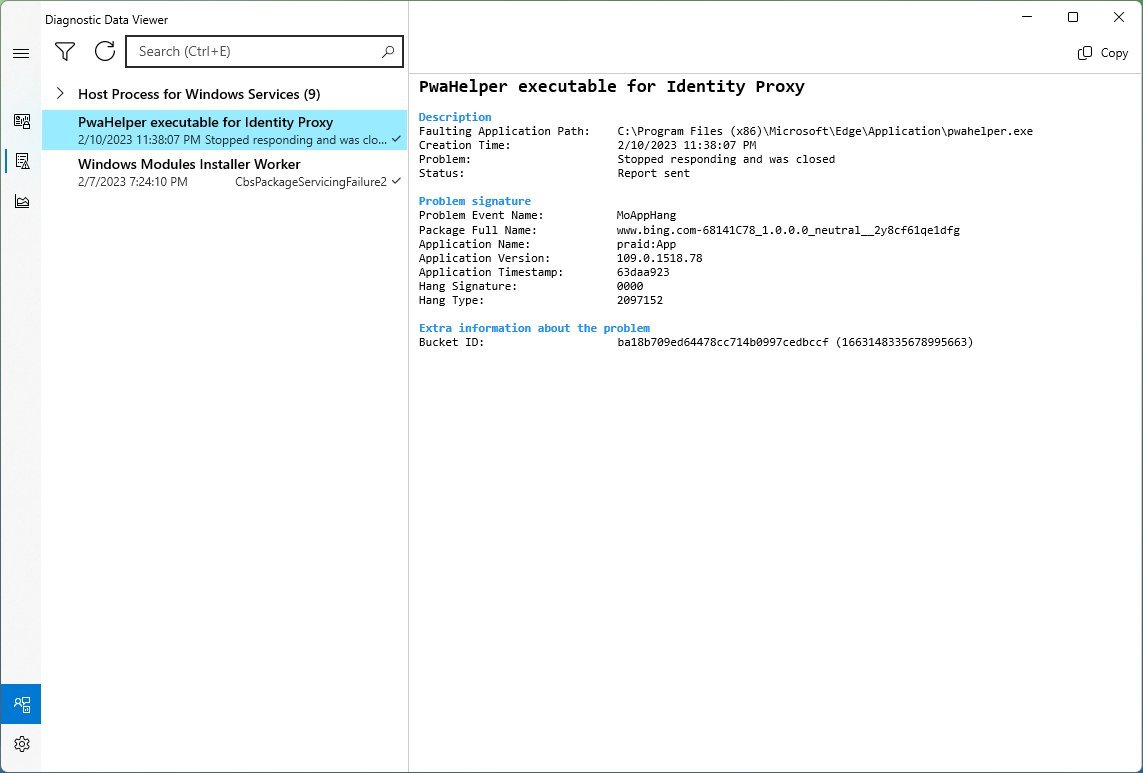
- Click on Problem reports to check the system issues that were reported to Microsoft.
- Click on About your data to see an overview of data captured on your computer.
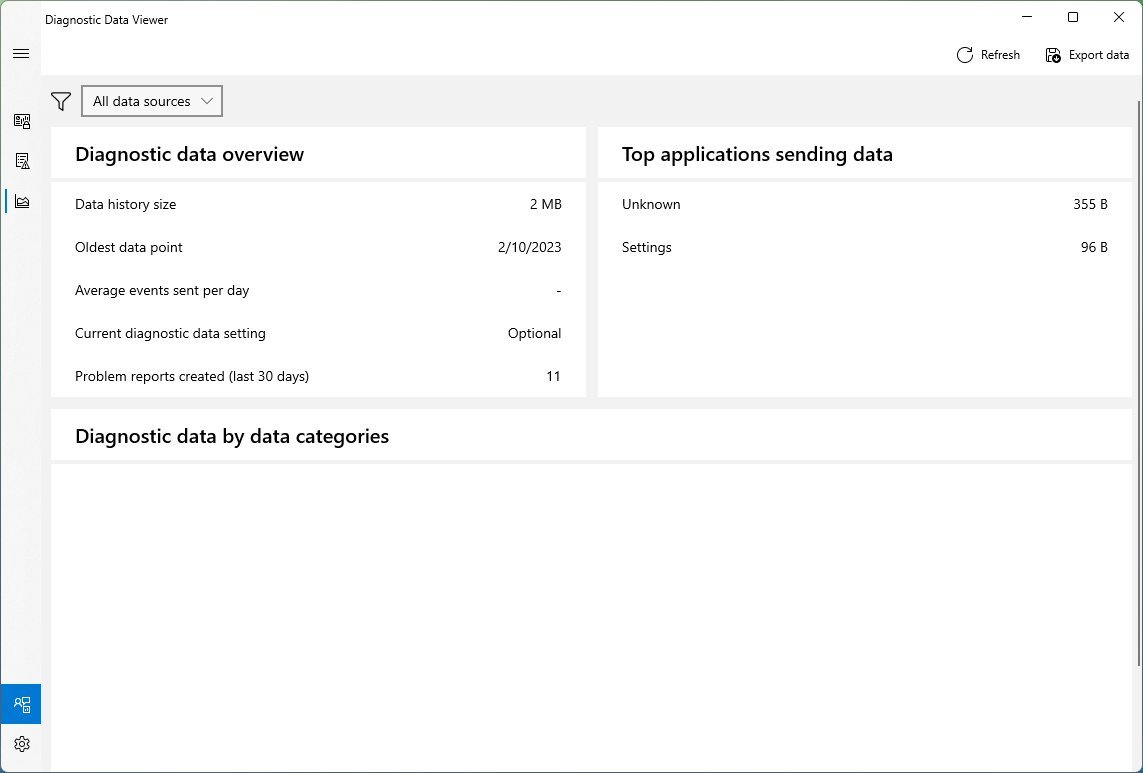
After you complete the steps, you will have a basic understanding of the information sent to the software giant, which can include computer configuration, hardware details, peripherals, performance data, installed apps, visited websites, speech, location, and more.
How to disable tracking on Windows 11
Windows 11 includes different features to track information about you and your device, and even though you can disable most of these features, some information may still be sent to the cloud.
Disable diagnostic data collection
To disable diagnostic data collection on Windows 11, use these steps:
- Open Settings.
- Click on Privacy & security.
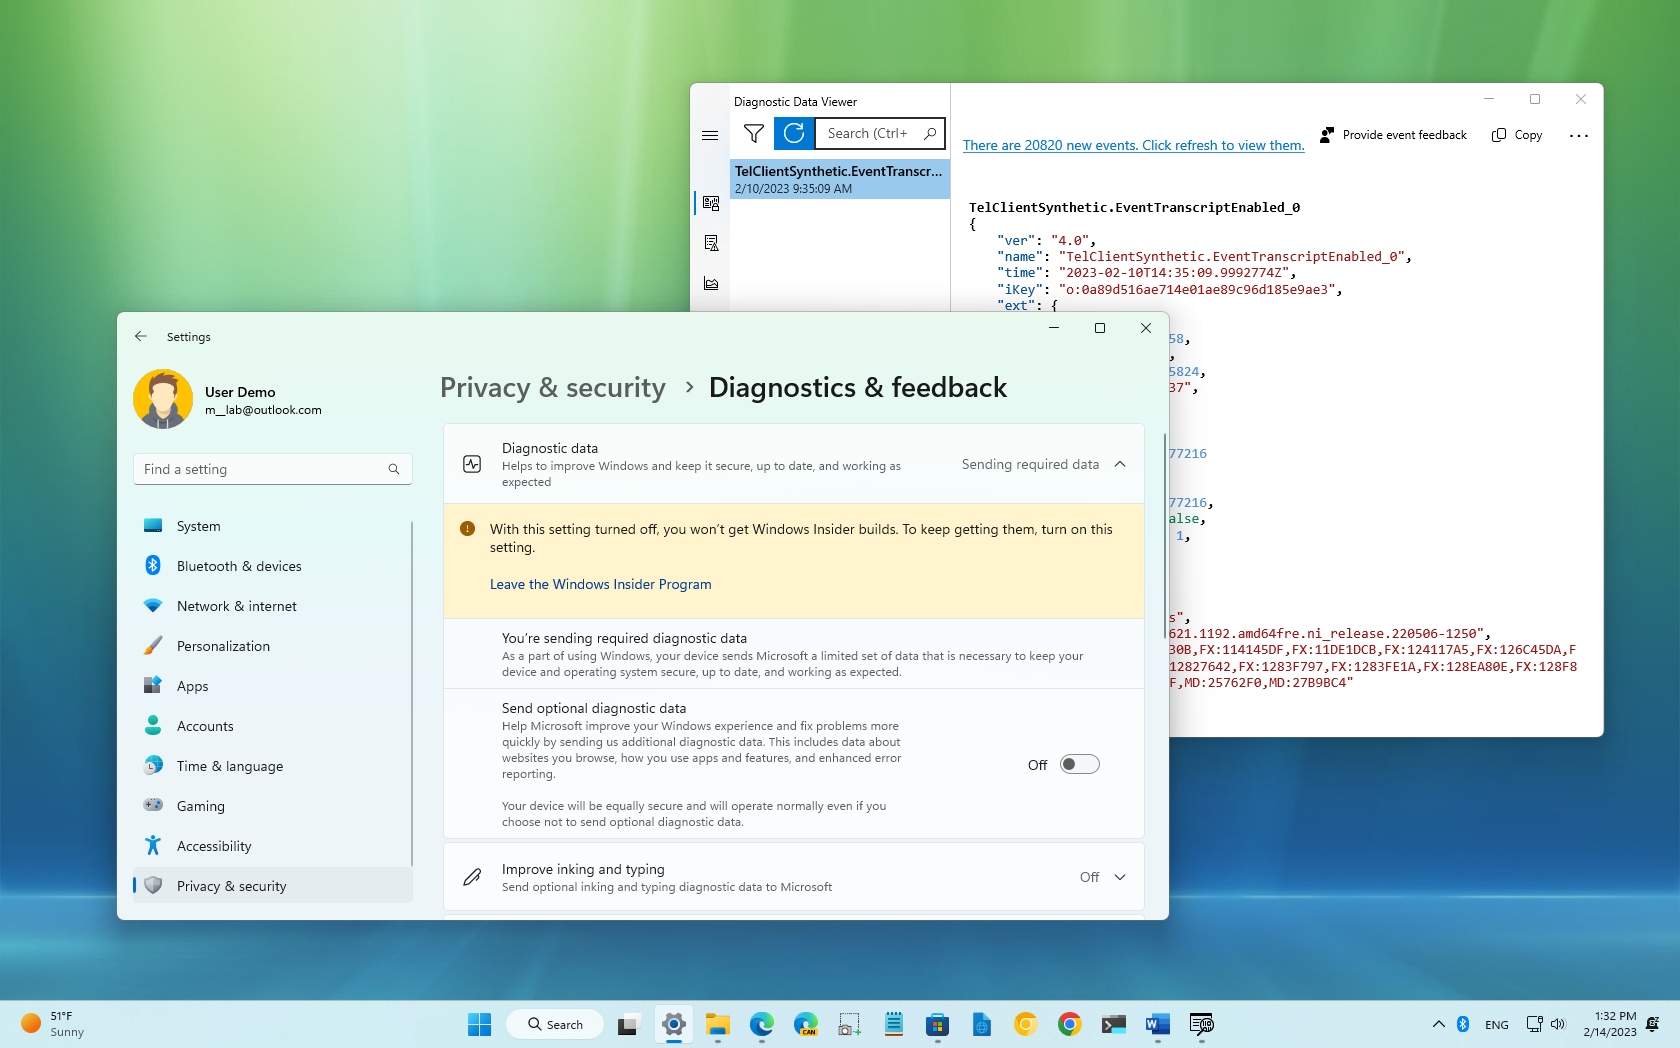
- Click the Diagnostic & feedback page from the right side.
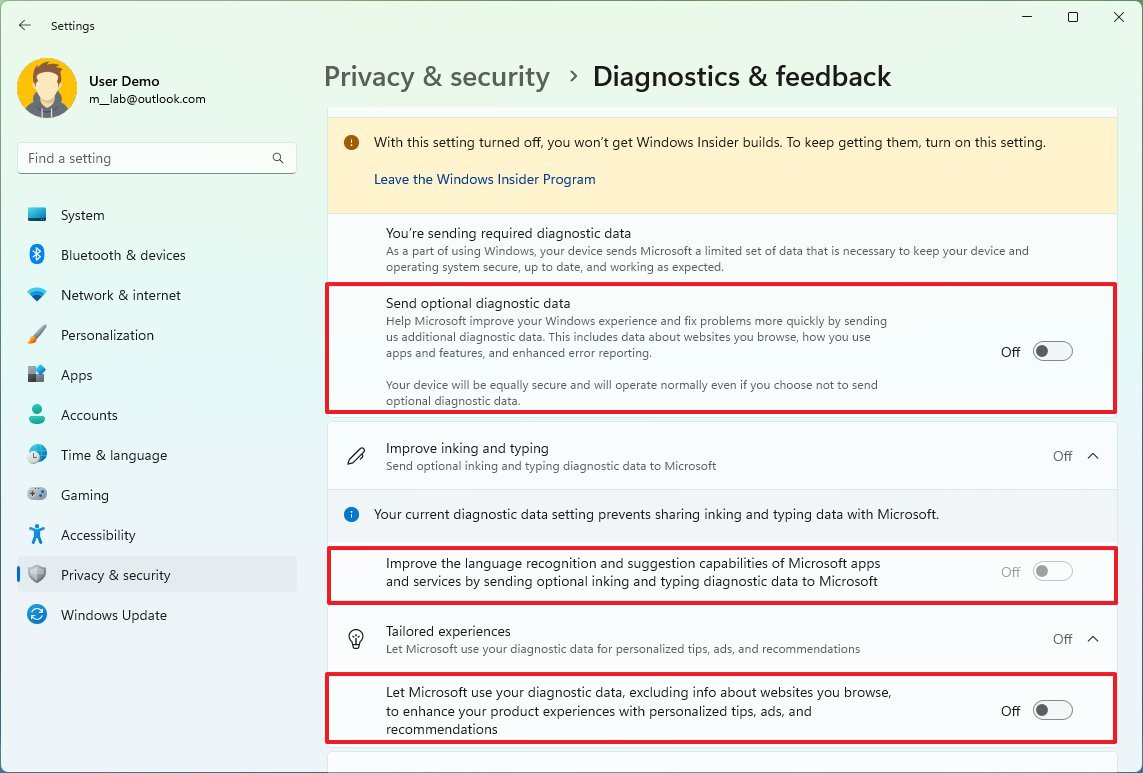
- Under the «Diagnostic data» section, turn off the «Send optional diagnostic data» toggle switch.
- Click the «Improve inking and typing» setting and turn off the toggle switch (if applicable).
- Click the «Tailored experiences» setting to turn off the toggle switch.
- Click the «Delete diagnostic data» setting and click the Delete button to remove the collected diagnostic data from the computer.
Once you complete the steps, the system will continue sending diagnostic data to the software giant. However, the company won’t collect some data, such as browsing history, app and feature usage, and enhanced error reporting.
Disable advertising tracking
To disable advertising tracking on Windows 11, use these steps:
- Open Settings.
- Click on Privacy & security.
- Click the General page from the right side.
- Turn off the «Let apps show me personalized ads by using my advertising ID» toggle switch.
- Turn off the «Let websites show me locally relevant content by accessing my language list» toggle switch.
- Turn off the «Let Windows improve Start and search results by tracking apps launches» toggle switch.
- (Optional) Turn off the «Show me suggested content in the Settings app» toggle switch.
After you complete the steps, you may continue to see advertisements on Windows 11, but they won’t be based on your behavior.
Disable Windows 11 activity tracking
To disable activity tracking on your computer, use these steps:
- Open Settings.
- Click on Privacy & security.
- Click the Activity history page from the right side.
- Clear the «Store my activity history on this device» toggle switch.
- Click the Clear button for the «Clear activity history» setting.
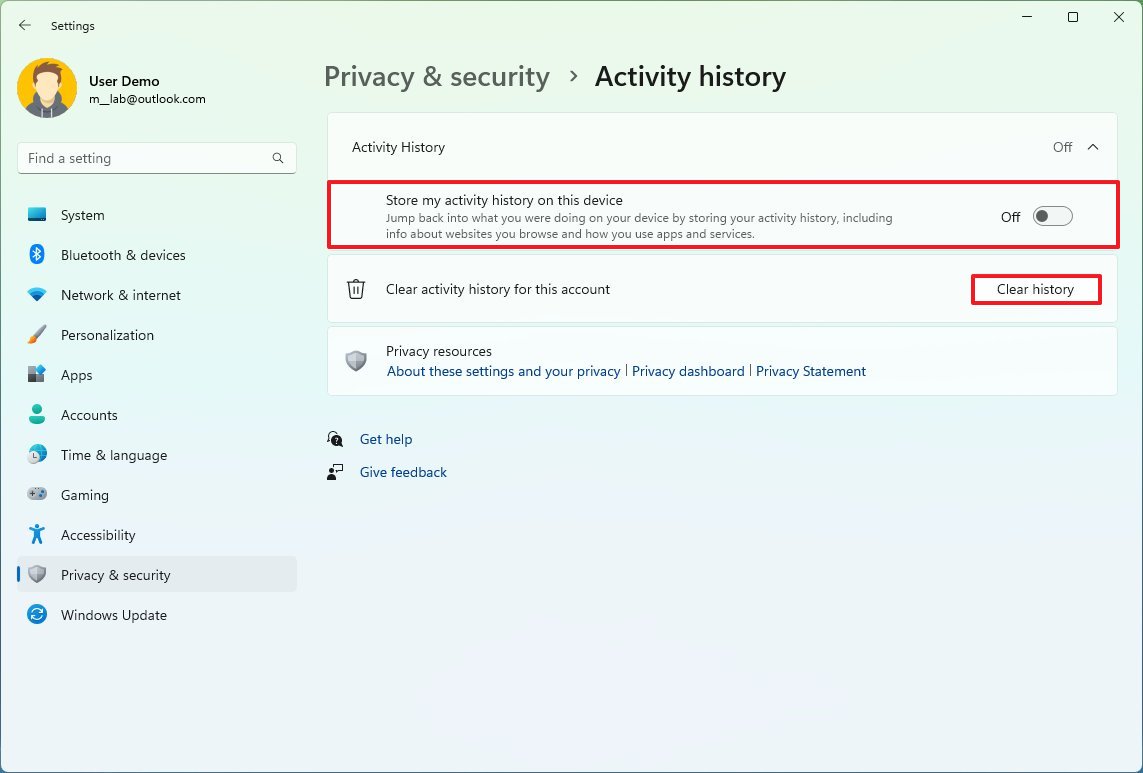
Once you complete the steps, the system will no longer collect information about the websites you browse and the apps and services you use to suggest the content and apps you can pick up where you left off across devices when using the same Microsoft account.
Disable Find my device feature
To prevent Microsoft from tracking your computer location turn off Find my device with these steps:
- Open Settings.
- Click on Privacy & security.
- Click the Find my device page on the right side.
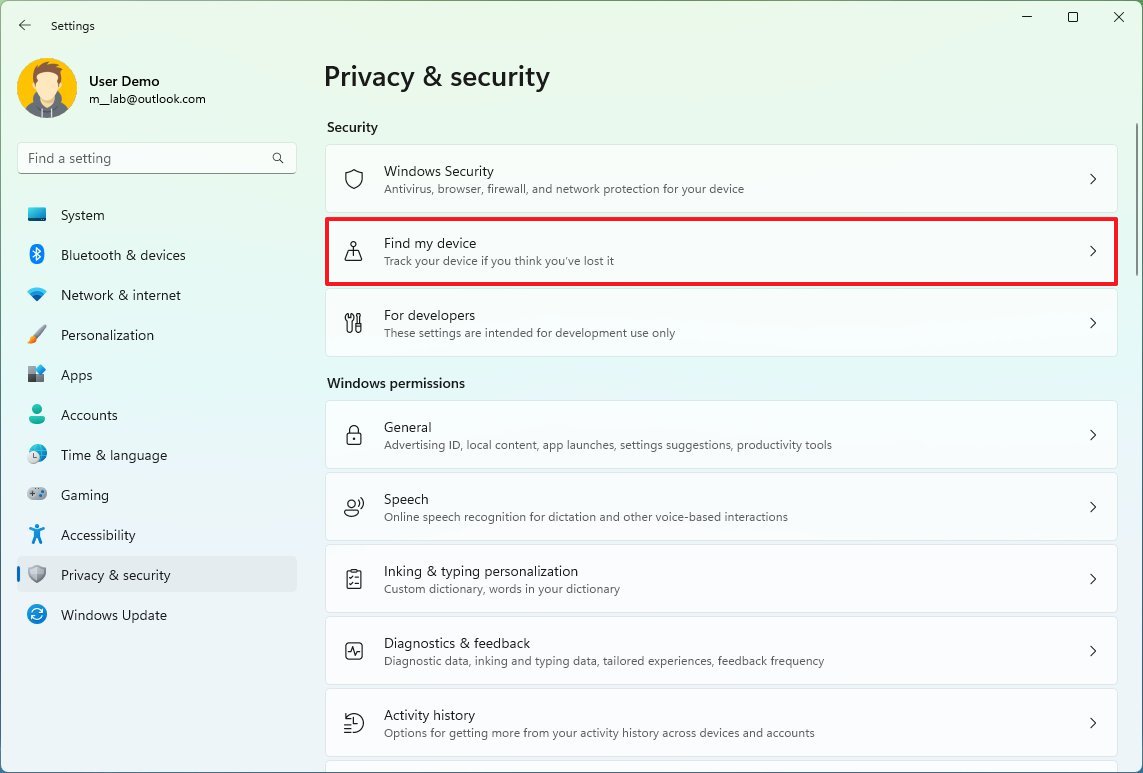
- Turn off the «Find my device» toggle switch.
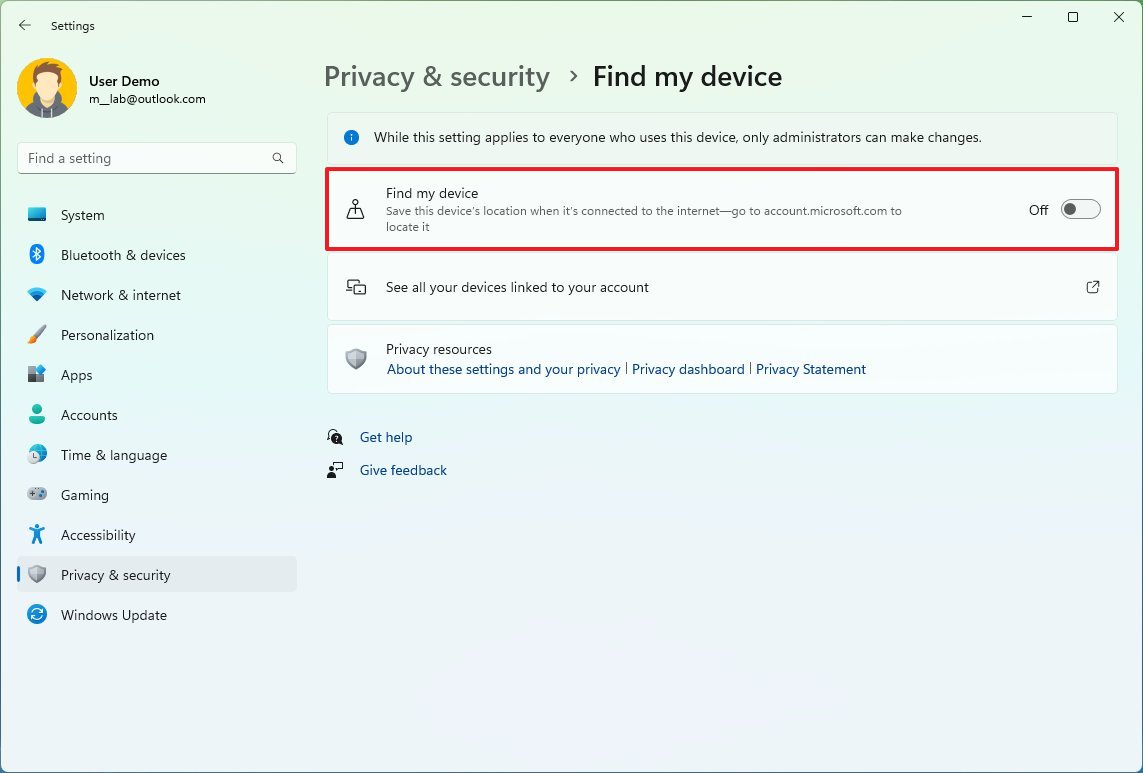
After you complete the steps, the computer will no longer upload location data to your online account. However, you will also no longer be able to use the feature to find your laptop if it turns out missing or stolen.
Clear Microsoft account activity tracking
To delete the tracking information from your Microsoft account, use these steps:
- Open Settings.
- Click on Accounts.
- Click the Your info page on the right side.
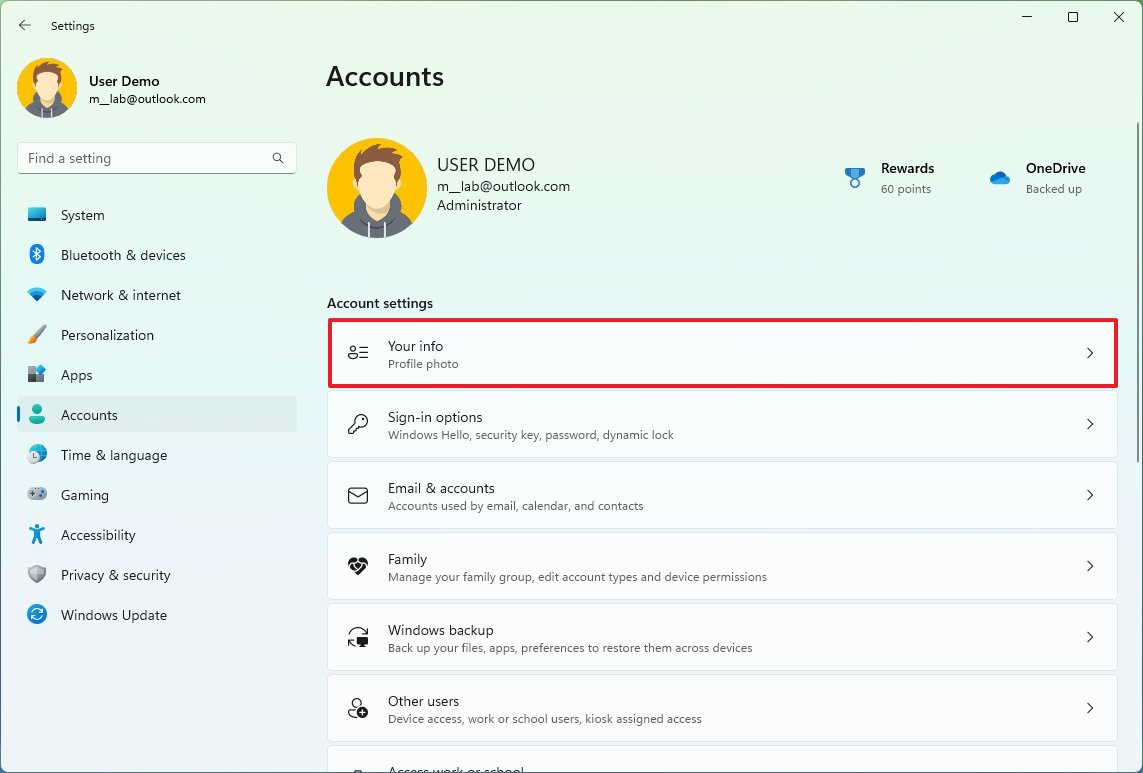
- Under the «Related settings» section, click the Accounts option.
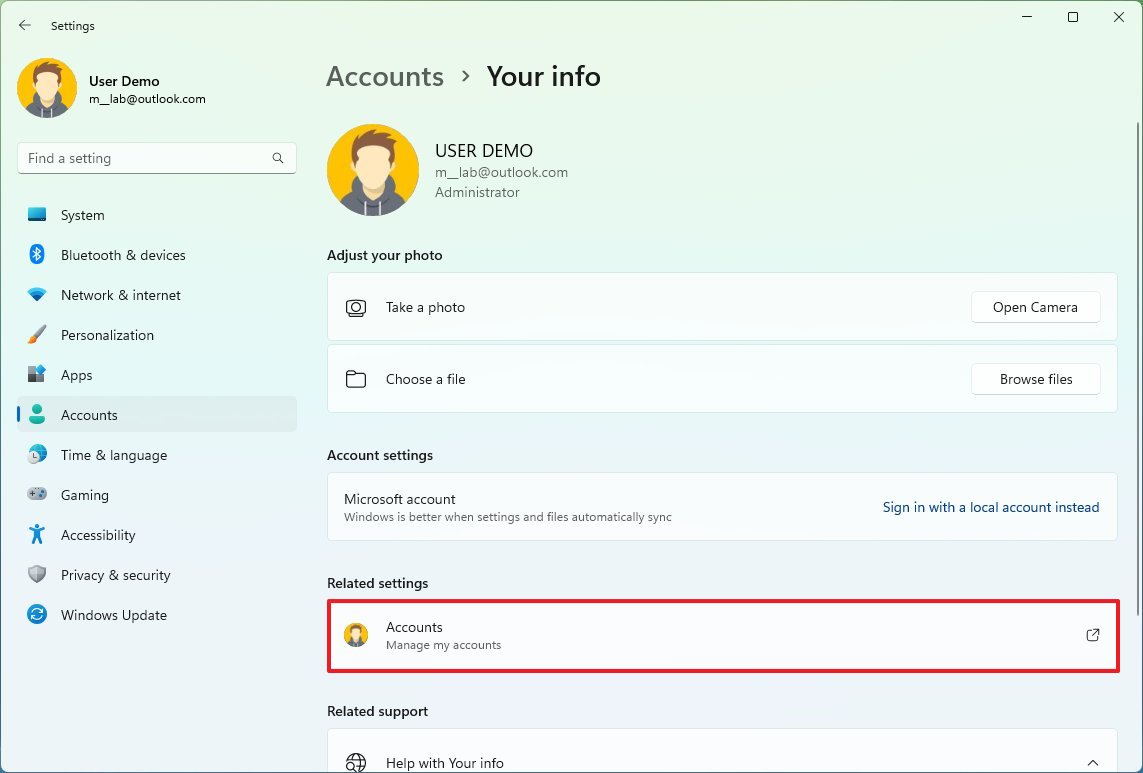
- Sign in with your Microsoft account (as needed).
- Click the Privacy tab.
- Under the «Manage your activity data» section, click the «Location activity» setting and clear the data.
- Click the «Browsing history» setting and clear the data.
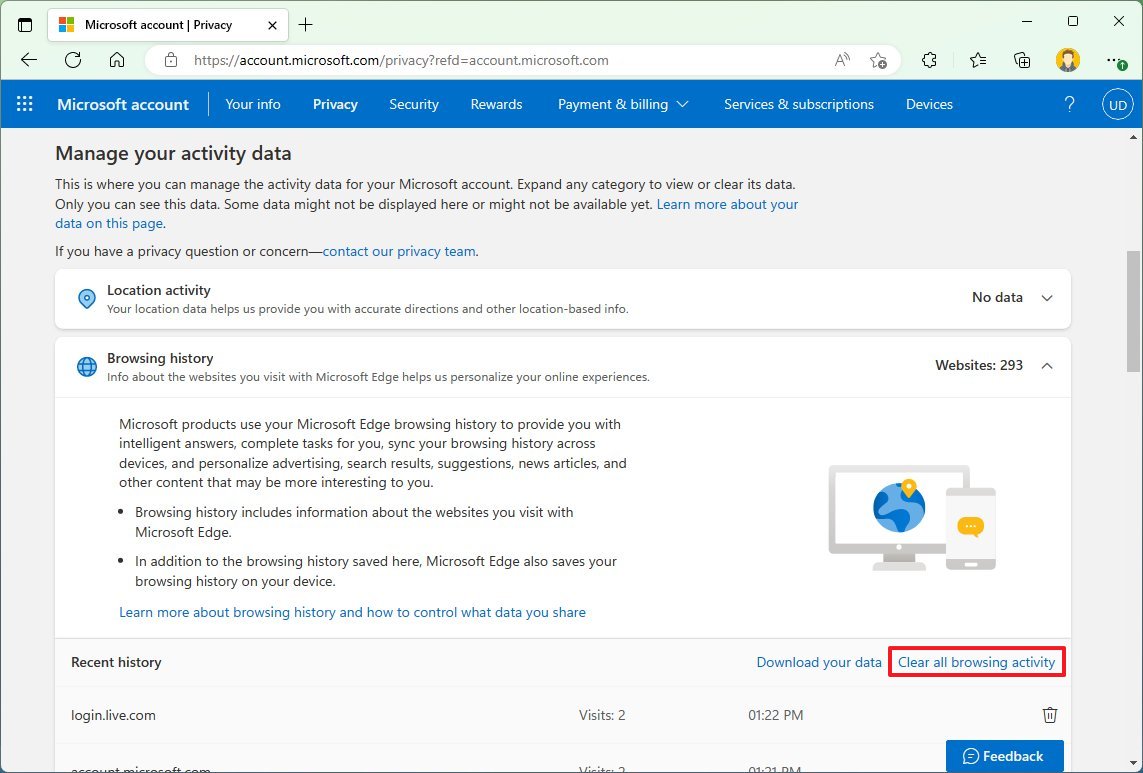
- Click the «Search history» setting and clear the data.
- Click the «App and service activity» setting and clear the data.
- Click the «Media activity» setting and clear the data.
- Click the «App and services performance data» setting and clear the data.
Once you complete the steps, the information stored in your online account will be deleted.
Disable Microsoft Edge data collection
To disable data collection on Microsoft Edge, use these steps:
- Open Microsoft Edge.
- Click the main menu (three-dotted) button and select the Settings option.
- Click on Privacy, search and services.
- Under the «Tracking prevention» section, turn on the Tracking prevention feature and select the best option. For example, «Balanced.»
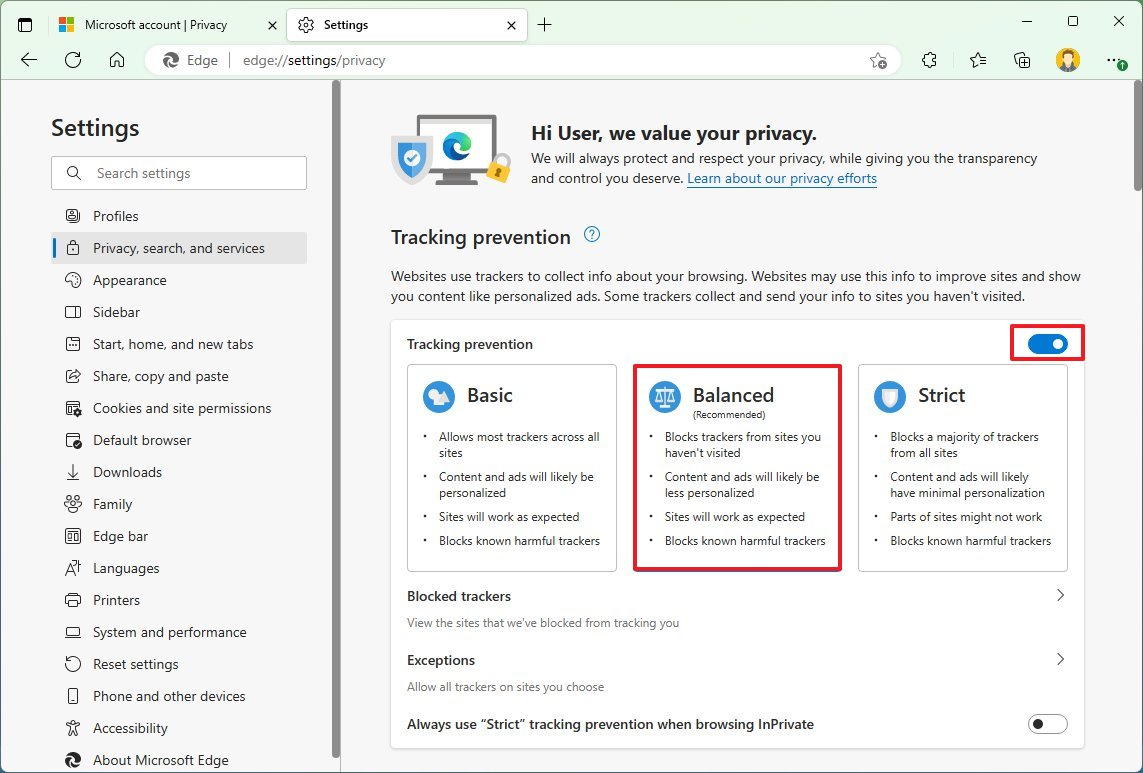
After completing the steps, the browser will block trackers from websites you didn’t visit before, and ads won’t be significantly personalized.
The «Balanced» option is usually the best option, but you can choose the «Strict» option. The only caveat is that the last option may sometimes break the web experience.
It’s worth noting that the video claims that the computer is using a fresh installation but not the original image of Windows 11. Instead, the device seems to be using the manufacturer’s default image, which is known to include far more bloatware than the original image (such as third-party antivirus and other trial software), which could be the reason for many of the network calls to different services.
I have installed WireShark on one of my machines, and even though I’ve seen the operating system making many online calls, I didn’t see much of the information detailed in the video.
You also have to consider that Windows 11 is a cloud-connected system, meaning that it relies on online services to run as expected. For example, the Start menu needs to know your activities to show recommendations. Windows Search requires a connection to Microsoft services to show web search results and other content. The Widgets feature connects to the MSN network to render your personalized feed and weather information. And Windows Update needs an internet connection to download and install updates (to name a few).
More resources
For more helpful articles, coverage, and answers to common questions about Windows 10 and Windows 11, visit the following resources:
- Windows 11 on Windows Central — All you need to know
- Windows 10 on Windows Central — All you need to know

Cutting-edge operating system
A refreshed design in Windows 11 enables you to do what you want effortlessly and safely, with biometric logins for encrypted authentication and advanced antivirus defenses.
Mauro Huculak has been a Windows How-To Expert contributor for WindowsCentral.com for nearly a decade and has over 15 years of experience writing comprehensive guides. He also has an IT background and has achieved different professional certifications from Microsoft, Cisco, VMware, and CompTIA. He has been recognized as a Microsoft MVP for many years.
Время на прочтение2 мин
Количество просмотров9.3K
Утилита защиты от отслеживания DoNotSpy11 получила обновление 1.2.0.0, позволяющее отключать различные функции в Microsoft Windows 11 и браузере Edge, включая Copilot. Обновление также полностью поддерживает Windows 11 версии 23H2.
DoNotSpy11 — это сторонняя утилита для защиты от отслеживания, предназначенная для поддержки конфиденциальности пользователей Windows 10 и Windows 11. Утилита может отключать большинство трекеров телеметрии Microsoft, встроенных в Windows 10/11, а также трекеры в различных приложениях Microsoft, включая Edge и Office.
Список новых функций для версии 1.2.0.0 довольно обширен, самыми примечательными стали возможность отключения ИИ-помощника Microsoft Copilot, а также поисковых предложений и синхронизации данных в Edge.
Часть новых функций, вошедших в версию 1.2.0.0:
-
отключение ИИ-функции составления писем Edge Compose;
-
отключение предложений в поиске;
-
отключение предложения похожих страниц;
-
отключение фактов, советов, галочек и прочего на экране блокировки;
-
отключение синхронизации данных в Edge;
-
отключение доступа к содержимому страницы в Edge;
-
отключение прогнозирования текста в Edge;
-
отключение автоисправления и выделения слов с ошибками;
-
отключение Copilot;
-
отключение фильтра SmartScreen для URL-адресов.
Конфиденциальность пользователей в Windows вызывает споры из-за большого количества данных, которые Microsoft собирает в своих ОС. Отслеживание стало ещё тщательнее с появлением ИИ-помощников, таких как Cortana, работа которой уже завершилась, и Copilot, а также персонализированной рекламы, присутствующей в Windows 10 и 11.
Технически Microsoft позволяет отключить большинство функций, работа которых предполагает сбор данных, однако это не гарантирует прекращения отслеживания. Предполагается, что утилиты вроде DoNotSpy11 дают пользователям больше информации о том, какие фоновые приложения отслеживают их информацию, и больше возможностей для управления сбором данных. На сегодня инструмент насчитывает 1,8 млн скачиваний.
1 ноября Microsoft объявила, что обновление Windows 11 23H2 уже доступно. Оно включает новые ИИ-функции, такие как Copilot и Cocreator в Paint, современный Проводник и многое другое. Функции этого обновления Windows ранее поэтапно распространялись для пользователей Windows 11 Moment 4, а теперь доступны для всех.
Windows 11 версии 23H2 поставляется в виде «пакета активации», включающего функции, уже присутствующие в операционной системе, но ещё не работающие. Оно получит два года активной поддержки с ежемесячными обновлениями и исправлениями.