
Kiosk mode on Windows is implemented to attain a highly secure, purpose-built device for focused working.
There are multiple ways to configure Windows 10 kiosk mode, and each method has its own features and support, so users can choose the method based on their specific business needs. Similarly, the exit strategies for each method are different.
Let’s discuss how to exit kiosk mode Windows 10 to run a restriction-free device with access to all device features.
- 1 :Sign out of assigned access
- Method 1. Shortcut Key
- Method 2. Task Manager
- Method 3. Command Prompt
- Method 4. Sign out from «Settings»
- Method 5. Turn off assigned access via Group Policy
- Method 6. PowerShell
- 2 :Remove Windows Kiosk Provisioning Package
- 3 :Exit Kiosk Mode in MDM(Mobile Device Management)
1 Sign out of assigned access
Note : Assigned access is a widely used method to ensure restricted and focused device usage by blocking access to the start menu and other device features. It works on Windows 10 Pro, Enterprise, and Education.
Users need to exit assigned access to access all the device functions freely, and there are multiple ways to exit assigned access:
Method 1. Shortcut Key
Press Ctrl+ Alt+ Delete keys collectively. Sign out of your current account and log in with another account. It lets you exit the assigned access mode from the device.


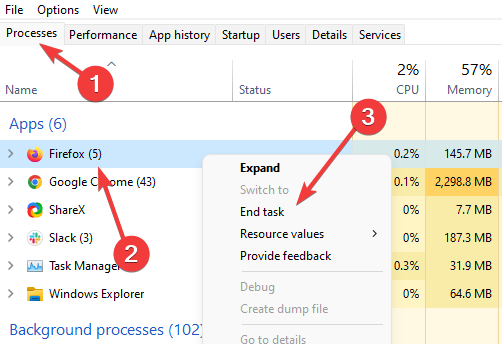
Method 2. Task Manager
Use the shortcut key Ctrl + Shift + Esc to open the task manager. Once it is opened, choose the kiosk app from the list of opened tabs and applications. After selecting it, click the ‘End Task’ button, and the kiosk mode will exit as the app closes.

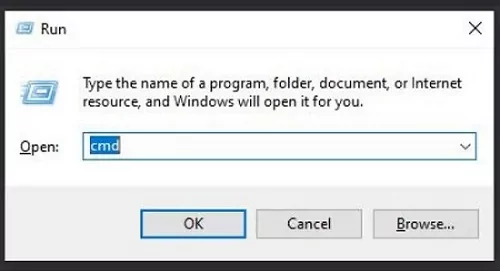
Method 3. Command Prompt
- Step 1. Open the Command Prompt by typing cmd in the Run program
- Step 2. Type shutdown/r, and it will initiate the device restart process. You can also type shutdown/l to log off. It will exit the specific account that was logged in.
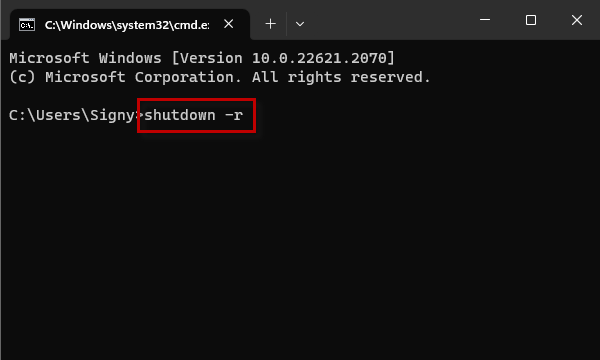
Note : In both cases, assigned access will exit, and you can sign in with another account to enjoy normal device usage without the kiosk mode or assigned access.
Method 4. Sign out from «Settings»
Follow these steps to learn how to exit kiosk mode in Windows 10 which set up with assigned access from Settings:
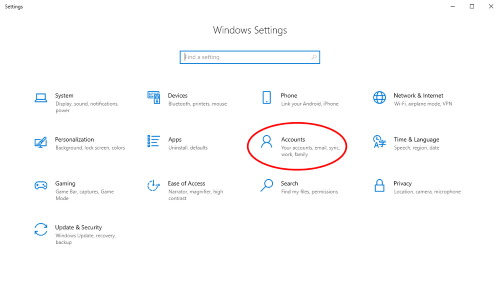
- Step 1. Press the shortcut key Windows key + I to open the Settings app on your Windows PC.

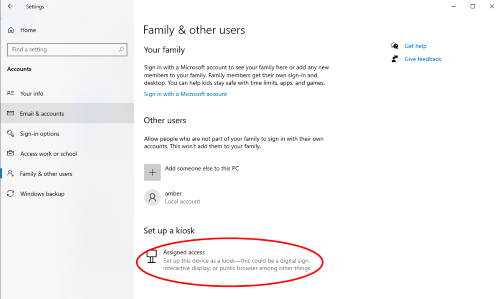
- Step 2. Select the ‘Accounts’ tab and click ‘Family and other people.’ Select the ‘Set up assigned access’ below the ‘Other people’ tab.
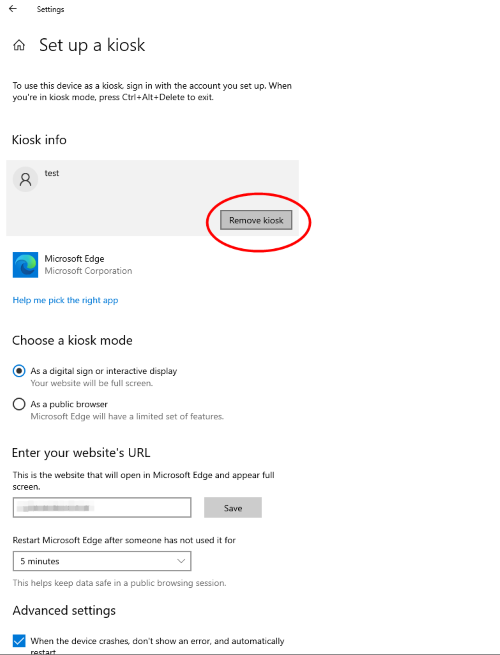
- Step 3. Select the current kiosk account and choose ‘Remove Kiosk.’ It will take the device from assigned access and run as a standard account.
Method 5. Turn off Assigned Access via Group Policy
- Step 1. Open the run program from the Windows menu or press the Windows + R keys.
- Step 2. Type ‘gpedit.msc’ and press the enter key. It will take you to the group policy editor.
- Step 3. Move to the assigned access policy > navigate to the Computer Configurations tab > Select Administrative Templates > System > Assigned Access.
- Step 4. Now restrict assigned access by double-clicking the ‘turn off Assigned Access'(or a similarly named setting) option.
- Step 6. After disabling it, click the ‘Apply’ button and then ‘OK’ to save changes. Restart the computer, and it will turn on automatically in normal mode.
Method 6. PowerShell
To disable the Windows 10 kiosk mode that was set up using PowerShell, you will use the Clear-AssignedAccess command in the PowerShell, and it will remove all the configured settings associated with assigned access and restore the device to its default settings.
Open PowerShell as an Administratoron your Windows 10. Use ‘Get-AssignedAccess’ to check if any account is configured with Assigned Access.

If an account is configured with assigned access, you can clear it by using this command:Clear-AssignedAccess
2 Remove Windows Kiosk Provisioning Package
A provisioning package contains specific configuration settings that are enforced on devices where it is enabled. IT administrators use it to configure employee devices without physically touching them. It provides a streamlined process for managing device settings when enrolled in the business network.
Follow the below guidelines to remove the kiosk mode by disabling the provisioning package from Windows 10:
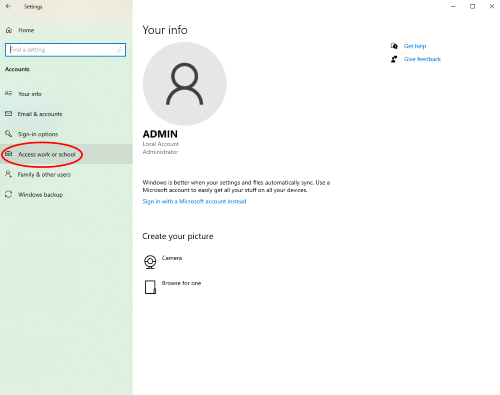
- Step 1. Open device settings and select the ‘Access work or School’ tab. It is on the left-side menu.
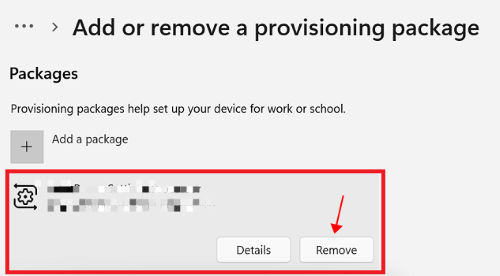
- Step 2. Now observe the right-side menu and select the ‘Add or remove provisioning package’ option.
- Step 3. A list of provisioning packages will appear. Choose the one with set kiosk mode and press the ‘Remove’ button. The installed provisioning package will be removed from the device, and kiosk mode will ultimately exit.
3 Exit Kiosk Mode in MDM(Mobile Device Management)
The scenario for exiting kiosk mode through MDM solutions is different. MDM is the safest and most effective way to implement kiosk mode because end-users cannot exit it without admin permission.
Different MDM solutions have different steps to exit kiosk mode, but the basic principle is almost the same: They require admin permission to enter the MDM dashboard and exit it.
Demo — How to Exit Windows 10 Kiosk Mode of AirDroid Business
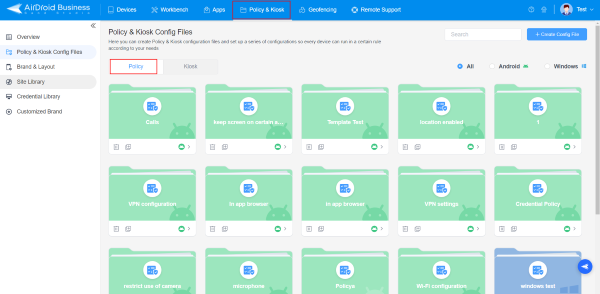
- Step 1: Sign in to the AirDroid Business admin console.
- Step 2: After successful login, navigate to the ‘Policy & Kiosk’ tab and click on it to open the menu. Find the ‘Policy’ option.
- Step 3: Find and choose the profile that has set your Windows device into kiosk mode. Edit or delete the profile to exit kiosk mode.
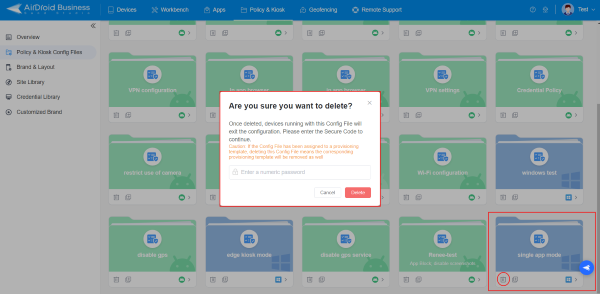
- Step 4: It is important to sync your Windows device into AirDroid Business so the current changes are applied to it. Usually, the devices are automatically synced, but if not, you need to do it to apply changes manually. Restart the device to exit it from kiosk mode and run as a standard Windows device.
Assigned Access (or kiosk mode) on Windows 10 is a feature that enables administrators to restrict the usage of a specific machine to only a select few purposes by converting it into a kiosk device. Typically, you’ll see such as the kiosks at the airports or PCs that are used to display digital signage.
Windows 10 isn’t the first Microsoft OS that has the kiosk mode. However, Microsoft redesigned the feature in 2018 to make configuring it a lot more user-friendly. Here’s how to use it.
Lay the Groundwork for Kiosk Mode
Once you’ve configured kiosk mode on your Windows 10 PC, it will always sign in automatically into a user account with restricted access and run only one app at a time. Nobody that has access to the device will be able to view the desktop, multitask, or modify anything on it. You’ll be able to restrict a guest user’s access to one or more Universal Windows Provisioning (UWP) apps and gate their access to anything else on the machine.
Before you begin to set up kiosk mode on your PC, you should see if your PC meets the pre-requisites for setting up kiosk mode. If it does, make sure you’ve got the required settings in order so you don’t run into a problem while you configure kiosk mode on Windows 10.
1. Find Out Which Version of Windows You Have
Windows kiosk mode isn’t available on Windows 10 Home edition. To set up kiosk mode, your computer must be running Windows 10 Pro (v1709 or later), Enterprise, or Education, so check which version of Windows 10 you’re running beforehand.
2. Creating a User Account for Kiosk Mode
You can’t set up kiosk mode on an administrator account. If you don’t have one already, you’ll need to create a new standard user account so you can configure kiosk mode for that account. Make sure you’re able to create a standard user account before you start configuring kiosk mode.
3. Checking If Your Chosen Apps Can Run in Kiosk Mode
You’ll need to determine the app(s) that you want to provision under the kiosk mode. You can only allow UWP apps (aka metro-style apps).
How to Enable and Configure Kiosk Mode
The process to configure kiosk mode isn’t complex. All you need to do is set up a standard user account, choose the app(s), and add relevant settings for them.
1. Create a User Account
Start by pressing Ctrl + I to launch the Settings app and go to Accounts > Family & other users. From the right pane, click on Add someone else to this PC.

When you’re asked for an email or phone of the person so they can sign in, just click on I don’t have this person’s sign-in information and click Next. You’ll now need to create a local user account for your PC. Just give it a name and a password (or leave the password blank if you want them to sign in automatically).
2. Set up Kiosk Mode
Once you’ve created the account, go back to Settings > Accounts > Family & other users. Now, click on Assigned access to configure kiosk mode on your PC. You’ll now need to select a user account (select the one you just created).
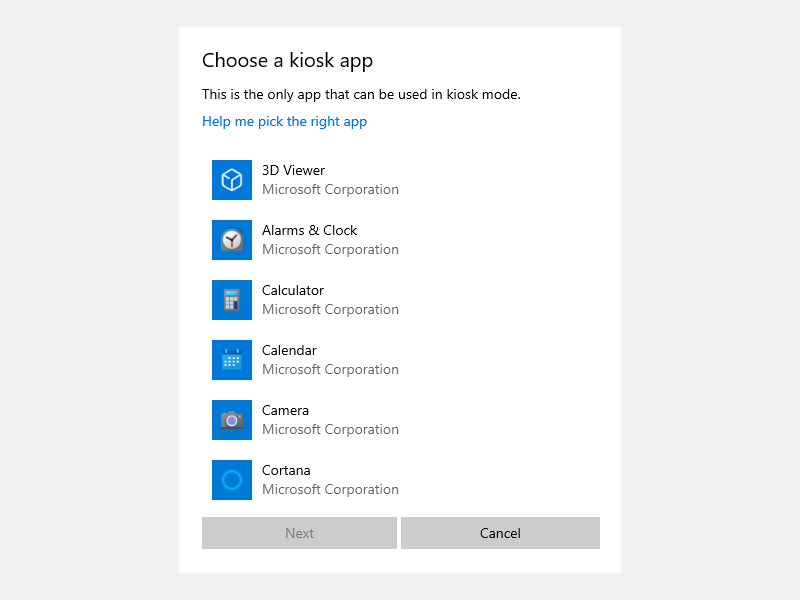
You’ll see a list of apps from which you can choose your kiosk app. Just select the app you want and click Next.
Depending on the app you choose, you may need to enter a few more details. Just fill in the details that you see along the way. Once you’re done, restart the PC and select the guest user account you created earlier to log in.
How to Disable Kiosk Mode in Windows 10
To disable kiosk mode, go back to the Settings app and navigate to Accounts > Family & other users. Click on Assigned access. On the next screen, select the kiosk you set up under the Kiosk info section and click on the Remove kiosk button.
Alternatively, you could just delete the user account for which you enabled the kiosk mode. To delete that account, you’ll need to use two commands.
Press Win + R, type cmd, and press Ctrl + Shift + Enter to launch an elevated Command Prompt. First, run the following command:
net user
This will give you a list of all the user accounts on your system. Identify the one you created for enabling kiosk mode. Next, run the following command:
net user "username" /delete
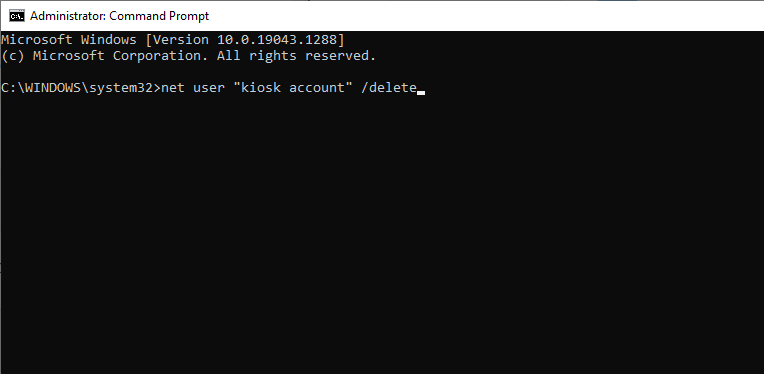
Of course, replace the word username with the actual user account name. This command will delete the user from your system.
Potential Problems With Kiosk Mode
While Kiosk Mode is a handy way to set up a one-app machine for public use, it can sometimes encounter problems.
1. Freezing
You’re still using a PC with Windows 10 that’s prone to the occasional freezing. When you’re in the kiosk mode and your screen freezes, just press Ctrl + Alt + Del and log out of the standard user account. Log back in and see if it fixes the issue. If not, restart your PC.
2. Unauthorized Actions
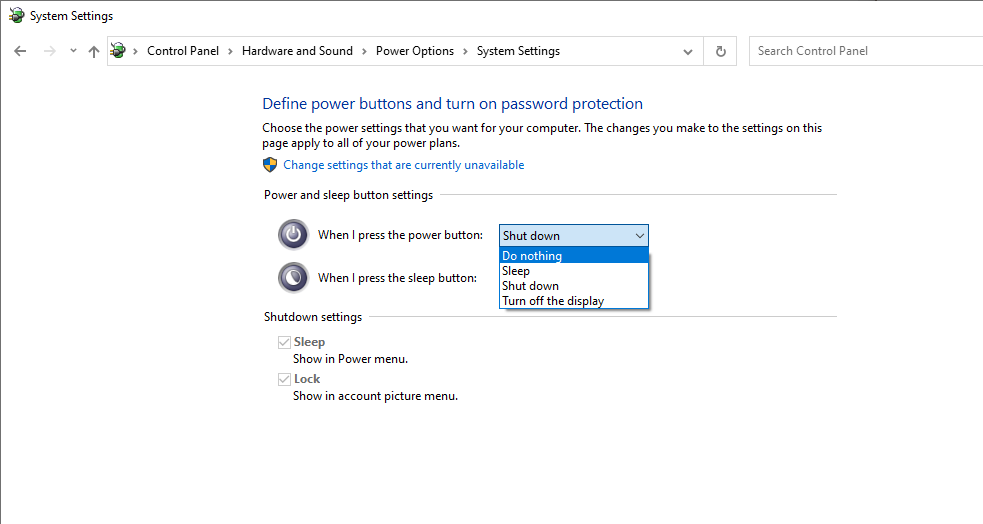
If your kiosk is in a public place, someone could just shut the PC down unless you stand guard for the full duration that the kiosk remains on. However, you could get around this issue by tweaking your power settings.
Go to Control Panel and navigate to Hardware and Sound > Power Options. Click on the Choose what the power buttons do option from the left pane and select Do nothing for the When I press the power button option.
3. Kiosk User Account Not Visible
If you don’t see your kiosk user account in the Settings app from where you created it, don’t be alarmed. It’s usually still there even if it’s not visible. You can, of course, verify its existence using the Command Prompt. Just use the net user command to get a list of the user accounts on the PC and you should find the standard user account you created for the kiosk mode in the list.
Enjoy Singularity on Your PC
Kiosk mode is a great way to turn an old laptop into a jukebox or something of more value for others without allowing them access to your personal files. However, if you’re trying to just restrict access for other users rather than limiting them to one or a couple of apps, there’s a better way to go about it.
If you’re stuck in Kiosk mode on Windows 10 and need to get out, don’t worry. In just a few steps, you can exit this mode and regain full access to your desktop. We’ll walk you through the process, so by the time you finish reading this guide, you’ll know exactly how to exit Kiosk Mode.
In this section, we’ll guide you through the essential steps to exit Kiosk Mode. We’ll explain each step clearly so you can follow along and resolve the issue easily.
Step 1: Press Ctrl + Alt + Delete
Press Ctrl + Alt + Delete on your keyboard simultaneously.
When you press Ctrl + Alt + Delete, you’ll bring up the security options screen. This is a fundamental way to access different functions when you’re in a restricted mode, like Kiosk Mode.
Step 2: Select Task Manager
From the security options screen, click on Task Manager.
Task Manager allows you to see all running applications and processes. By accessing Task Manager, you can end the Kiosk application that is currently running.
Step 3: End the Kiosk Application
In Task Manager, find the application that is running in Kiosk Mode, right-click on it, and select End Task.
Ending the task will stop the Kiosk application, effectively taking you out of Kiosk Mode and returning you to the regular desktop environment.
Step 4: Access Settings
Once back on the desktop, click the Start button and go to Settings > Accounts > Family & other users.
By accessing the Settings menu, you can make changes to user accounts and manage Kiosk Mode settings.
Step 5: Remove Assigned Access
Under the ‘Set up a kiosk’ section, click on the name of the kiosk and select Remove kiosk.
Removing the assigned access completely disables Kiosk Mode, ensuring it won’t automatically start the next time you log in.
After completing these steps, your computer will exit Kiosk Mode, and you’ll have full access to all the regular features of Windows 10.
Tips for Exiting Kiosk Mode in Windows 10
- Make sure you have administrative privileges. You need these permissions to access Task Manager and the Settings menu.
- If you are unable to access Task Manager, restarting your computer might help. Sometimes a fresh start can resolve unexpected glitches.
- Make a note of any changes you make. In case you need to re-enable Kiosk Mode later, having notes will make the process easier.
- Regularly update your Windows system. Keeping your system up to date may help you avoid issues with modes like Kiosk.
- Consider using a different user account. If Kiosk Mode is set up on one account, switching to another user might bypass it.
Frequently Asked Questions
What is Kiosk Mode?
Kiosk Mode is a feature in Windows 10 that allows a device to run a single app in full-screen mode. It’s commonly used in public areas like museums or information kiosks.
Can I exit Kiosk Mode without administrative privileges?
No, you generally need administrative privileges to exit Kiosk Mode because you need access to Task Manager and Settings.
What if I can’t access Task Manager?
If you can’t access Task Manager, try restarting your computer. If the issue persists, you may need to use a different method, such as accessing Safe Mode.
How do I re-enable Kiosk Mode?
To re-enable Kiosk Mode, go to Settings > Accounts > Family & other users > Set up a kiosk and follow the prompts to assign access again.
Is there a shortcut to disable Kiosk Mode quickly?
Unfortunately, there isn’t a universal shortcut to disable Kiosk Mode. You’ll need to follow the steps outlined above to disable it properly.
Summary
- Press Ctrl + Alt + Delete – Bring up the security options screen.
- Select Task Manager – Access running applications.
- End the Kiosk Application – Stop the Kiosk app.
- Access Settings – Navigate to the user accounts.
- Remove Assigned Access – Disable Kiosk Mode setup.
Conclusion
Exiting Kiosk Mode in Windows 10 doesn’t have to be a head-scratcher. By following these straightforward steps, you can quickly regain full control of your desktop. Just remember, pressing Ctrl + Alt + Delete is your first step to freedom. From there, Task Manager and the Settings menu will be your best friends. If you encounter issues, a simple restart or ensuring you have the right permissions can often solve the problem.
If you’re frequently toggling between Kiosk and regular modes, it might be helpful to jot down these steps or bookmark this guide for future reference. For more detailed instructions, Microsoft’s official support page is always a good place to check.
Feel like a Windows 10 pro now? Great! Dive into the settings, make the changes you need, and say goodbye to any frustrations with Kiosk Mode. Happy computing!
Matt Jacobs has been working as an IT consultant for small businesses since receiving his Master’s degree in 2003. While he still does some consulting work, his primary focus now is on creating technology support content for SupportYourTech.com.
His work can be found on many websites and focuses on topics such as Microsoft Office, Apple devices, Android devices, Photoshop, and more.
How to Activate and Deactivate Kiosk Mode in Windows 10 and 11
Kiosk Mode is a feature in Windows 10 and Windows 11 designed to lock down a computer, allowing users to access only a specific app or application suite. This feature is particularly useful in public spaces, such as libraries or stores, where the computer is intended for a singular purpose without enabling full access to the operating system. Configuring Kiosk Mode can enhance security and user experience by minimizing the risk of unauthorized access and reducing potential distractions from multiple applications.
In this article, we’ll explore how to activate and deactivate Kiosk Mode in both Windows 10 and Windows 11, including detailed step-by-step instructions, the necessary prerequisites, and helpful tips for optimal usage.
Understanding Kiosk Mode
Kiosk Mode acts as a lockdown feature that restricts a user to using specific applications. When a device is in Kiosk Mode, users will not have the ability to access the desktop, system settings, or any other applications that are not explicitly permitted. This makes it an excellent choice for organizations that want to control the user experience, limit functions, and secure sensitive information.
Prerequisites for Kiosk Mode
Before you can set up Kiosk Mode on Windows 10 or Windows 11, there are some key requirements to be aware of:
-
Windows Version: Kiosk Mode is available on Windows 10 Pro, Enterprise, and Education versions, as well as Windows 11 Pro and Enterprise.
-
User Account: To configure Kiosk Mode, you need to create a dedicated user account that will be limited to the kiosk application(s).
-
Administrative Privileges: You must have administrator access on the device to set up Kiosk Mode.
-
Internet Connection (Optional): Depending on the application you are using in Kiosk Mode, you may need an internet connection.
Activating Kiosk Mode in Windows 10
Step 1: Set Up a Kiosk User Account
- Open Settings: Press
Windows + Ito open the Settings app. - Accounts: Click on the “Accounts” option in the Settings menu.
- Family & other users: In the left pane, select “Family & other users”.
- Add someone else to this PC: Click on the “Add someone else to this PC” button.
- Create a New Account: Choose the option “I don’t have this person’s sign-in information.” Follow the prompts to create a new account, selecting the “User” type without administrative access.
- Complete the Account Setup: Fill in the required information to finalize creating the account.
Step 2: Configure Kiosk Mode
- Go Back to Accounts: Again, navigate to “Settings” > “Accounts”.
- Access Kiosk Settings: Look for an option labeled “Access work or school” or “Set up a kiosk”. Click the “Assigned access” link.
- Choose a Kiosk User: In this section, select the account you just created.
- Choose an App: You will be prompted to select the application that will run in Kiosk Mode. If you want a single app, choose “Select an app” and pick from the list, or use a Microsoft Store app.
- Finalize Setup: Follow any remaining prompts to finalize the Kiosk Mode setup.
Activating Kiosk Mode in Windows 11
The steps for activating Kiosk Mode in Windows 11 are similar but may have slight differences in navigation.
Step 1: Set Up a Kiosk User Account
- Open Settings: Right-click on the Start button and select “Settings”.
- Accounts: Click “Accounts” from the side menu.
- Family & other users: In the Account settings, select “Family & other users”.
- Add Account: Click the “Add account” button under “Other users”.
- Create Account: Choose “I don’t have this person’s sign-in information” and follow the prompts to create a local account.
- Complete Setup: Follow the on-screen instructions to finalize the new user creation.
Step 2: Configure Kiosk Mode
- Access Kiosk Settings: Navigate back to “Settings” > “Accounts”.
- Kiosk Setup: Locate “Family & other users” or “Assigned access”, then click the “Set up a kiosk” option.
- Select a Kiosk User: Choose the account created for Kiosk Mode.
- Choose an App: Select which app needs to run in Kiosk Mode.
- Complete Setup: Follow through the instructions to finalize the application selection and settings.
Understanding Kiosk User Experience
Once Kiosk Mode is activated, the user experience will significantly differ from a standard Windows interface. Here’s what users can expect:
-
Restricted Access: Users will only have access to the designated app. Other functionalities, such as accessing the settings or the desktop, will be disabled.
-
Automatic Sign-In: The OS will automatically log in to the Kiosk user account when the device is turned on, ensuring a seamless experience for users.
-
Exit Kiosk Mode: Users will not have the ability to exit the Kiosk Mode independently, which adds an extra layer of security for public devices.
Deactivating Kiosk Mode in Windows 10
When you need to deactivate Kiosk Mode, perhaps for maintenance, updating, or changing settings, follow this process:
- Access Settings: Press
Windows + Ito open the Settings app. - Navigate to Accounts: Click on “Accounts” in the Settings menu.
- Assigned Access: Find the “Family & other users” or “Assigned access” section.
- Remove Kiosk Setup: Locate the Kiosk user account, and you’ll see an option to remove the assigned access. Click “Remove” and confirm your choice.
- Complete Removal: Once removed, the Kiosk mode is deactivated, and the account will revert to a standard user profile.
Deactivating Kiosk Mode in Windows 11
For Windows 11, the steps to deactivate Kiosk Mode are quite similar:
- Open Settings: Right-click the Start button and select “Settings”.
- Accounts: Click on “Accounts” from the sidebar.
- Family & Other Users: Navigate to this section.
- Remove Kiosk Mode: Locate the Kiosk user account, and find the option to “remove” Kiosk assigned access. Click to confirm.
- Finish Process: The Kiosk Mode will now be deactivated.
Additional Tips for Using Kiosk Mode
To optimize the use of Kiosk Mode, consider implementing these additional tips:
-
Regular Maintenance: It is important to regularly check and maintain the application(s) being used in Kiosk Mode to ensure they are up-to-date and functioning correctly.
-
Use Updates Wisely: If the Center for Disease Control and Prevention (CDC) is linked to the kiosk, consider scheduling updates during off-peak hours to avoid user disruption.
-
Testing Before Deployment: Always test Kiosk Mode in a controlled environment before deploying it in a public or business scenario to address any potential issues promptly.
-
User Feedback: Monitor user feedback to refine application functionalities and usability to enhance the overall user experience.
-
Security Measures: Use other security settings, such as Windows Defender and firewall configurations, to further secure the Kiosk environment.
Conclusion
Kiosk Mode in both Windows 10 and Windows 11 provides a valuable tool for organizations and public spaces by offering a streamlined user experience while enhancing security protocols. By following the steps outlined in this article, you can quickly set up Kiosk Mode for specialized applications, ensuring that users can efficiently interact with the tools necessary for their tasks without distractions or unauthorized accesses to the system.
Understanding how to activate and deactivate Kiosk Mode not only empowers users to manage their devices effectively, but it also contributes to a safer, more focused environment conducive to productivity and convenience. Whether you’re deploying a public information kiosk or securing a specialized workstation, Kiosk Mode offers a straightforward and powerful solution.
Get your customers straight to the point!
PC Guide is reader-supported. When you buy through links on our site, we may earn an affiliate commission. Read More
Table of Contents
- How to turn on Kiosk Mode in Windows 10
- How to set up Multi App Kiosks in Windows 10
- How to turn on Kiosk Mode in Windows 11
- How to turn off Kiosk Mode in Windows
Kiosk Mode in Windows 10 and 11 differ very slightly, in that Windows 11 allows you to only run a single app in Kiosk mode, while Windows 10 still retains the multi-app functionality. This is probably something that’ll see a return in the future, but for now, if you need customers or users to use a couple of apps, you might want to consider not upgrading.
If you’ve already upgraded the PC in question, there’s still time to roll it back if you’ve not had Windows 11 for more than 10 days. However, we still have a guide for you for both less than or more than 10 days.
How to turn on Kiosk Mode in Windows 10
Go to settings, you can do this by either going to Start and pressing the gear in the corner of the Start Bar or searching for it. Inside, you want to head to Accounts and Family & other users. Here, you’ll be setting up a kiosk by pressing Assigned access and hit Get Started.
Windows separates out the Kiosk account from your regular user, just in the event that a customer does manage to get around the intended use, protecting your data from being accessed. Create an account and go through their various setup instructions.
Once you’ve set it up, you’ll be able to choose what application you want to have accessed by users, and Windows will launch the program in Kiosk mode, which should be a full-screen variation. There are dedicated programs to use while using the mode as well, for various prices.
How to set up Multi App Kiosks in Windows 10
As Windows 10 is currently the only one that allows for multi-app kiosks, you’ll want to ensure the PC is updated to at least version 1803. If you run Windows Update (search for it via the Start Bar) and download the latest one it suggests, you’ll be right on point at 212H.
It’s a little more complex than turning it on and will require you to install a text editor like Notepad++ or Atom, which are a little more capable than Notepad or Word. Microsoft’s documentation takes you through the various steps for this and I highly recommend you read that over anything, but there is an included video. You’ll be creating an XML file that will lay out your kiosk and more.
How to turn on Kiosk Mode in Windows 11
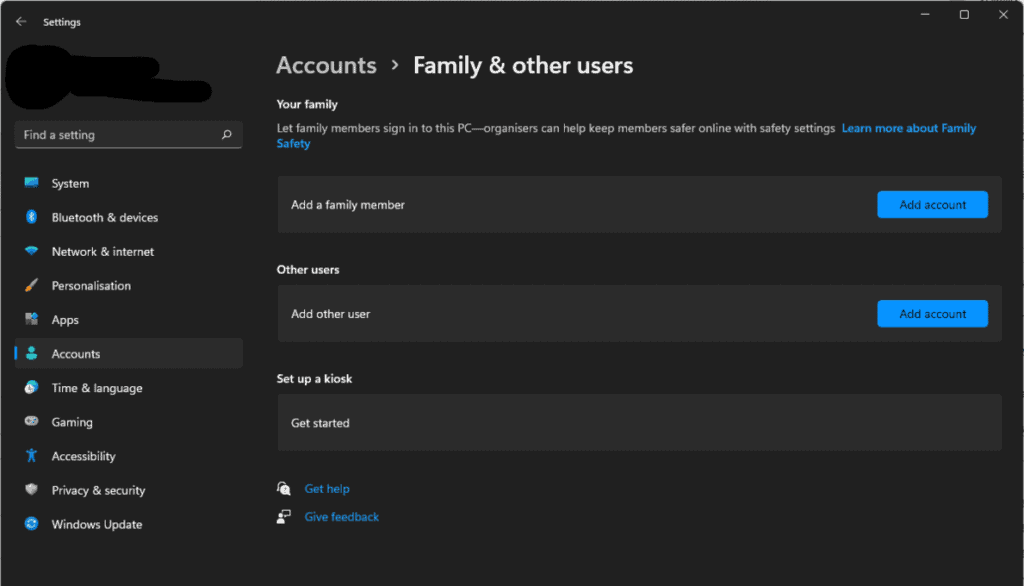
If you’re on Windows 11, it’s pretty much the same routine, go to settings and head to accounts and then Family & other users. While our screenshot shows that we can’t do it, that’s because it’s an office PC, you should find that it’ll have the Get Started button ready to go.
Windows will ask you to make a new account for the kiosk, then choose your app and you should be good to go!
How to turn off Kiosk Mode in Windows
To turn off Kiosk Mode, you will want to hit CTRL+ALT+DEL to exit it and then go back into settings, Accounts, and then Family & other users. You go back to your Set up a Kiosk menu item and press “Assigned Access”, then Kiosk Info, and then Remove Kiosk.