
Протокол TCP/IP версии 6 (IPv6) включен по умолчанию в актуальных версиях Windows, при этом редко используется и, в некоторых случаях, может приводить к проблемам с подключением к Интернету или ресурсам в локальной сети. Иногда отключение протокола позволяет решить такого рода проблемы.
В этой инструкции подробно о способах отключить IPv6 в Windows 11, Windows 10 и предыдущих версиях системы: с помощью настроек сетевых соединений, в редакторе реестра или командной строке и PowerShell.
Отключение IPv6 в свойствах сетевого подключения
Стандартный способ, одинаково работающий в Windows 11, 10, 8.1 и 7 — использование свойств сетевого подключения.
Шаги для отключения протокола IPv6 в свойствах подключения будут следующими:
- Нажмите клавиши Win+R на клавиатуре, а в Windows 11 или 10 можно нажать правой кнопкой мыши по кнопке «Пуск» и выбрать пункт «Выполнить». Введите команду ncpa.cpl и нажмите Enter.

- Нажмите правой кнопкой мыши по подключению, для которого нужно отключить IPv6 — вашему Интернет-соединению или подключению по локальной сети, выберите пункт «Свойства».

- Снимите отметку с компонента «IP версии 6 (TCP/IPv6)» и нажмите кнопку «Ок».


Готово, протокол IPv6 для выбранного подключения больше не задействован. При необходимости повторите действие для других подключений.
Командная строка
Вы можете полностью отключить IPv6 на компьютере для всех подключений с помощью команды командной строки. По сути, всё что она делает — это вносит соответствующие изменения в параметры протокола в реестре Windows:
- Запустите командную строку от имени администратора (как это сделать).
- Введите команду
reg add "HKLM\SYSTEM\CurrentControlSet\Services\Tcpip6\Parameters" /v DisabledComponents /t REG_DWORD /d 255 /f
- Перезагрузите компьютер.
Если в дальнейшем вам потребуется откатить эти изменения, используйте команду
reg delete "HKLM\SYSTEM\CurrentControlSet\Services\Tcpip6\Parameters" /v DisabledComponents /f
Ещё один вариант полного отключения IPv6 в командной строке — набор следующих команд:
netsh interface teredo set state disabled
netsh interface ipv6 6to4 set state state=disabled undoonstop=disabled
netsh interface ipv6 isatap set state state=disabled
Отключение IPv6 в Windows PowerShell (Терминале Windows)
Ещё одна возможность — использование Windows PowerShell и имеющиеся команды для настройки сетевых адаптеров:
- Запустите PowerShell от имени администратора или Терминал Windows от имени администратора. В Windows 11 и Windows 10 это проще всего сделать с помощью контекстного меню кнопки «Пуск».
- Введите команду
Get-NetAdapterBinding -ComponentID ms_tcpip6
и нажмите В результате вы увидите список имен (в столбце Name) подключений с включенным IPv6.

- Для отключения IPv6 для выбранного подключения, используйте следующую команду, изменив имя на нужное
Disable-NetAdapterBinding -Name "ИМЯ" -ComponentID ms_tcpip6

- Чтобы отключить IPv6 для всех подключений, вместо имени используйте символ «*» (звёздочка).


После выполнения указанных команд IPv6 будет отключен.
Параметры TCP/IPv6 в реестре
Первый способ с командной строкой вносил изменения в реестр для отключения IPv6, сделать это можно и вручную с помощью редактора реестра:
- Нажмите клавиши Win+R на клавиатуре, введите regedit и нажмите Enter — это откроет редактор реестра.
- Перейдите к разделу
HKEY_LOCAL_MACHINE\SYSTEM\CurrentControlSet\Services\Tcpip6\Parameters
- Нажмите правой кнопкой мыши в правой панели редактора реестра и создайте новый параметр DWORD (32-бит, даже для 64-бит Windows) и задайте имя DisabledComponents для него.
- Дважды нажмите по параметру и задайте значение — 255 в десятичной системе счисления или FF в шестнадцатеричной.

- Подтвердите изменения, закройте редактор реестра и перезагрузите компьютер — IPv6 будет отключен для всех соединений.

Упомянутый параметр DisabledComponents может иметь другие значения:
- Десятичное 32, шестнадцатеричное 20 — предпочитать IPv4 вместо IPv6
- Десятичное 16, шестнадцатеричное 10 — отключить IPv6 для всех нетуннельных интерфейсов
- Десятичное 1, шестнадцатеричное 1 — отключить IPv6 для всех туннельных интерфейсов
- Десятичное 17, шестнадцатеричное 11 — отключить IPv6 на всех интерфейсах, кроме петлевых
Дополнительная информация по настройке IPv6 для системных администраторов доступна на официальном сайте Майкрософт.
7766
В этой статье я покажу несколько простых способов, которые помогут вам отключить протокол IPv6 для беспроводного (Wi-Fi) или проводного (Ethernet) подключения в Windows 11 и Windows 10.
Несмотря на то, что протокол IPv6 существует уже достаточно долго, поддерживается многими интернет-провайдерами и роутерами, и имеет ряд преимуществ (лучшая безопасность, эффективность, контроль), многие по прежнему используют IPv4. А так как в Windows протокол IPv6 всегда включен по умолчанию, иногда возникает необходимость отключить его. В основном это одна из рекомендаций при решении каких-то проблем с подключением к интернету. Многих, например, пугает статус IPv6 без доступа к сети в свойствах подключения.
Отключение IPv6 через Сетевые подключения
Этот способ универсальный, подойдет как для Windows 11, так и для Windows 10. Все шаги будут одинаковые.
- Нажмите на клавиатуре сочетание клавиш Win+R. Откроется окно «Выполнить». Введите в нем команду ncpa.cpl (можете скопировать ее и вставить) и нажмите Ok.
- Откроется окно «Сетевые подключения». Нажмите правой кнопкой мыши на тот адаптер, для которого вы хотите отключить IPv6 и выберите Свойства. Ethernet – это проводное подключение (сетевая карта), а Беспроводная сеть – это Wi-Fi.

- В новом окне нужно убрать галочку возле пункта IP версии 6 (TCP/IPv6).
Нажмите на кнопку Ok.


Все готово, протокол IPv6 отключен для данного сетевого адаптера. Чтобы включить его обратно, просто установите галочку возле соответствующего пункта и нажмите Ok.
Через командную строку
- Запустите командную строку от имени администратора. Это можно сделать через поиск.

- В командной строке по очереди выполните эти команды:
netsh interface teredo set state disabled
netsh interface ipv6 6to4 set state state=disabled undoonstop=disabled
netsh interface ipv6 isatap set state state=disabled
Скопируйте команду, вставьте ее в командную строку и нажмите Enter.

- Перезагрузите компьютер.


Как отключить протокол IPv6 в терминале Windows 11, 10?
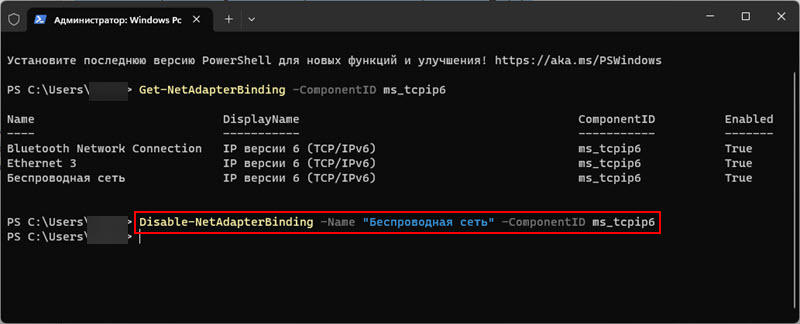
- Чтобы открыть Windows PowerShell можно нажать правой кнопкой мыши на меню Пуск и выбрать Терминал (Администратор).
- Выполните команду:
Get-NetAdapterBinding -ComponentID ms_tcpip6
Появится список подключений, для которых включен протокол IPv6. Нам понадобится имя (Name) сетевого адаптера.

- Дальше для отключения IPv6 мы будем использовать эту команду:
Disable-NetAdapterBinding -Name «NAME» -ComponentID ms_tcpip6
В этой команде вместо «NAME» нужно указать имя подключения (из списка, полученного выше), для которого вы хотите отключить протокол IPv6. Я, например, выполнил отключение для «Беспроводная сеть».

Чтобы выполнить отключение протокола для всех соединений, вместо имени введите «*».
- Для проверки вы может снова выполнить команду
Get-NetAdapterBinding -ComponentID ms_tcpip6
Если IPv6 отключился, то напротив данного подключения в последнем столбце Enabled будет написано False.


Изменение настоек IPv6 в редакторе реестра
Редактор реестра в Windows так же можно использовать для отключения сетевого протокола IPv6.
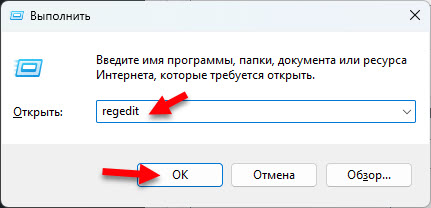
- Для запуска редактора реестра я рекомендую использовать окно Выполнить (открыть можно сочетанием клавиш Win+R) и команду regedit.
- Перейдите в эту ветку реестра: HKEY_Local_Machine\SYSTEM\CurrentControlSet\services\TCPIP6\Parameters
- Нужно создать новый параметр. Нажмите правой кнопкой на пустую область и выберите Создать – Параметр DWORD (32-разрядное). Задайте ему имя DisabledComponents.

- Откройте свойства этого параметра (двойной клик) и установите значение FF. Или 255 выбрав систему исчисления «Десятичная». Нажмите Ok.

Это способ отключает IPv6 для всех подключений.
- Перезагрузите компьютер.


На этом все. Надеюсь, моя инструкция вам пригодилась.
If you need to disable IPv6 on your Windows 11 system, it’s pretty straightforward. By following a few simple steps, you can easily turn off IPv6 and only use IPv4 for your network connections. Here’s how to do it:
Disabling IPv6 on your Windows 11 machine involves a few key steps. We’ll take you through the process, step-by-step, so you can follow along and get the job done without a hitch.
Step 1: Open the Control Panel
First things first, you need to access the Control Panel.
You can do this by hitting the Start button and typing “Control Panel” into the search bar. Once it pops up, click on it to open.
Step 2: Go to Network and Sharing Center
Once you’re in the Control Panel, look for the “Network and Sharing Center” option.
This is where you’ll find all the settings related to your network connections. Click on it to proceed.
Step 3: Change Adapter Settings
Next, you need to go to the “Change adapter settings” option.
This link is usually on the left-hand side. Clicking on it will show you all your network connections.
Step 4: Access Network Properties
Now, find the network connection you’re currently using.
Right-click on it and select “Properties” from the dropdown menu. This will bring up a new window with various settings.
Step 5: Uncheck Internet Protocol Version 6 (TCP/IPv6)
In the properties window, look for “Internet Protocol Version 6 (TCP/IPv6)”.
Simply uncheck the box next to it. This action will disable IPv6 for your selected network connection.
Step 6: Apply Changes and Restart
After unchecking the IPv6 option, click “OK” to save the changes.
You may need to restart your computer for the changes to take effect fully. Once restarted, your computer will rely solely on IPv4.
So, after you’ve completed these steps, your Windows 11 machine will no longer use IPv6, and you’ll be running on IPv4 instead. This can help solve certain network issues or compatibility problems you might have been experiencing.
Tips for Disabling IPv6 on Windows 11
- Backup First: Always back up your network settings before making changes.
- Check Compatibility: Make sure your network devices support IPv4.
- Test Connection: After disabling IPv6, test your network connections to ensure everything works smoothly.
- Update Drivers: Ensure all your network drivers are up-to-date to avoid any issues.
- Consult Your ISP: Sometimes, your Internet Service Provider may have specific requirements about using IPv6.
Frequently Asked Questions
Why should I disable IPv6?
Disabling IPv6 can solve network issues and improve compatibility with older systems and software.
Will disabling IPv6 affect my internet speed?
Typically, it won’t affect your internet speed. However, always test your connection to be sure.
Can I re-enable IPv6 later?
Absolutely! Just follow the same steps and recheck the IPv6 box.
Is it safe to disable IPv6?
Yes, it’s generally safe. However, be aware that some modern applications might require IPv6.
Do I need admin privileges to disable IPv6?
Yes, you’ll need to have administrative rights to make these changes.
Summary
- Open the Control Panel.
- Go to Network and Sharing Center.
- Change adapter settings.
- Access network properties.
- Uncheck Internet Protocol Version 6 (TCP/IPv6).
- Apply changes and restart.
Conclusion
Disabling IPv6 on Windows 11 can be a helpful solution to various network issues. It’s a simple process that can make a big difference in your internet connectivity and overall system performance. We’ve walked you through each step, and even provided some handy tips to ensure you have a smooth experience.
Remember, you can always re-enable IPv6 if you need to down the road. If you’re having persistent network problems, disabling IPv6 is a good troubleshooting step. As always, make sure to back up your settings and check with your ISP for any specific requirements they might have.
For further reading, you might want to explore more on how IPv4 and IPv6 work differently, and why some networks prefer one over the other. Good luck, and happy networking!
Matthew Burleigh has been writing tech tutorials since 2008. His writing has appeared on dozens of different websites and been read over 50 million times.
After receiving his Bachelor’s and Master’s degrees in Computer Science he spent several years working in IT management for small businesses. However, he now works full time writing content online and creating websites.
His main writing topics include iPhones, Microsoft Office, Google Apps, Android, and Photoshop, but he has also written about many other tech topics as well.
Read his full bio here.
(Image credit: Future)
On Windows 11, by default, the system uses the Internet Protocol version 6 (TCP/IPv6) and IPv4 protocols in a dual-stack configuration. Although IPv4 is still the primary protocol in local networks, using both versions is a good idea since more and more modern applications depend on the protocol.
However, if IPv6 is causing problems in a specific scenario or you determine there’s no need for the networking feature in your network, Windows 11 provides various ways to disable it. For example, disabling IPv6 has been known to fix issues with PC Game Pass games not syncing or installing correctly, in some situations. Microsoft offers a variety of ways to turn off Internet Protocol version 6 through the Settings app, Command Prompt, and PowerShell.
This how-to guide will teach you the steps to disable the IPv6 networking feature on Windows 11.
How to disable IPv6 from Settings on Windows 11
To disable the IPv6 protocol on Windows 11, use these steps:
- Open Settings.
- Click on Network & internet.
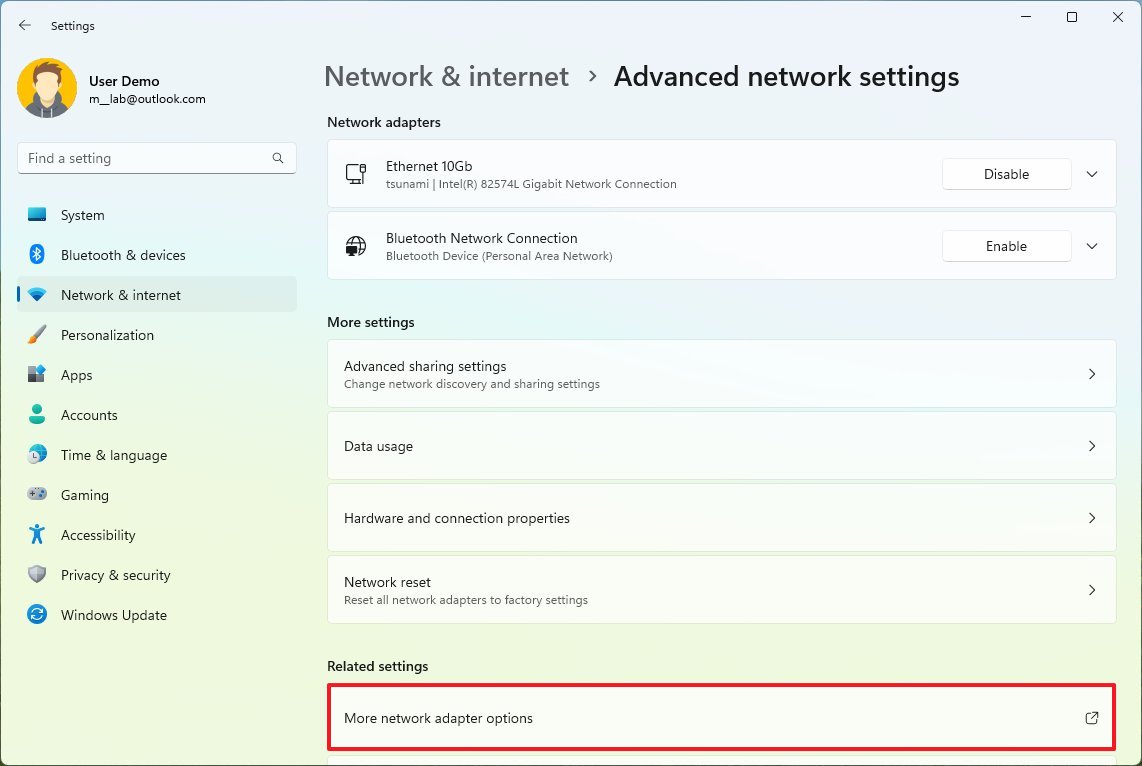
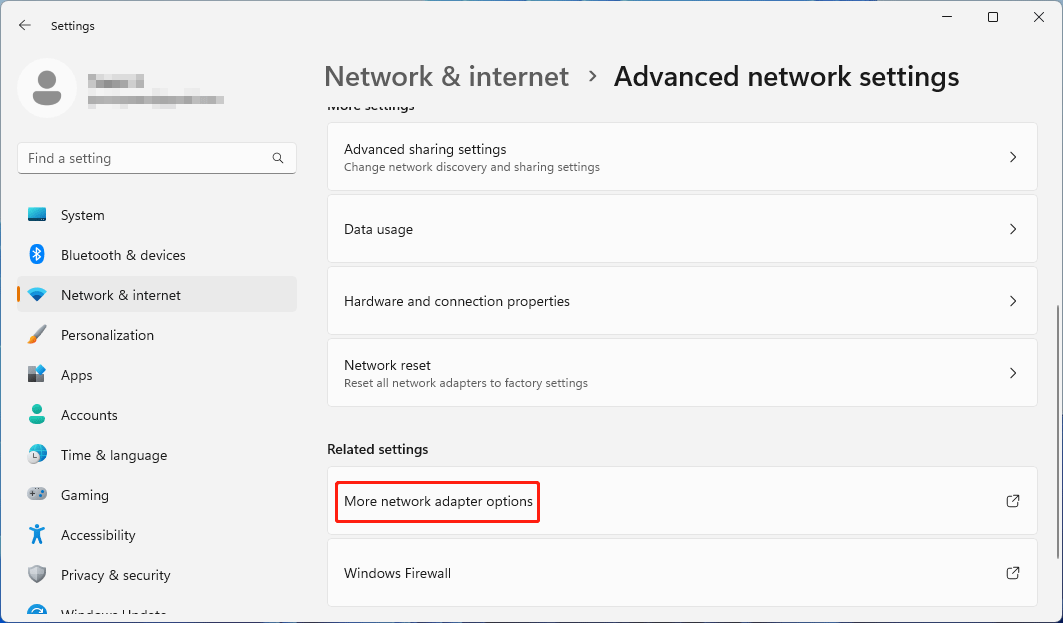
- Click the «Advanced network settings» option.
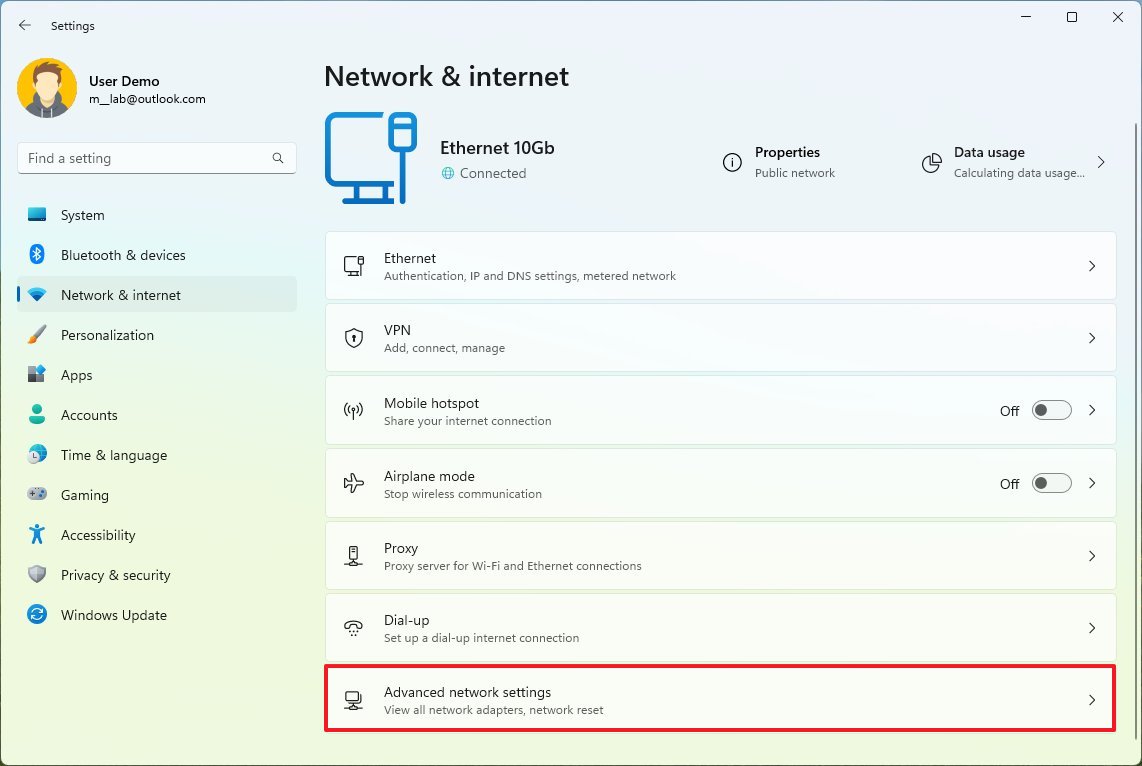
- Under the «Related settings» section, click the «More network adapter options» setting.
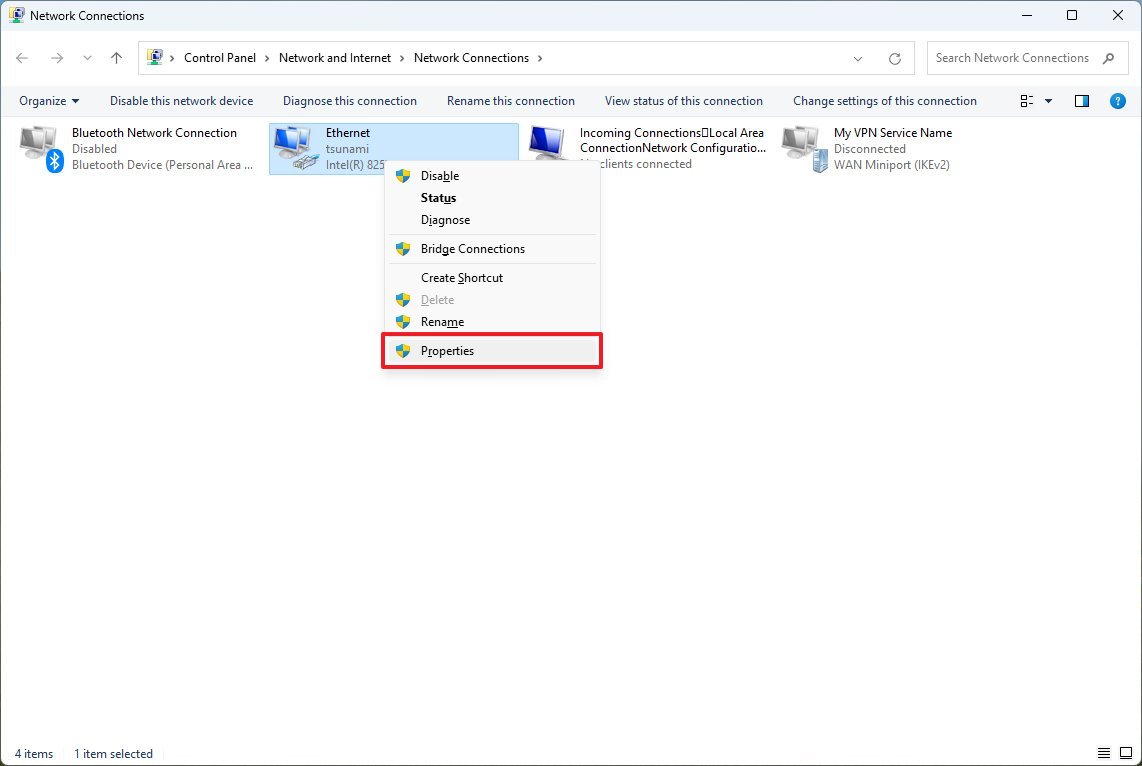
- Right-click the network adapter and choose the Properties option.
- Clear the «Internet Protocol Version 6 (TCP/IPv6)» option.
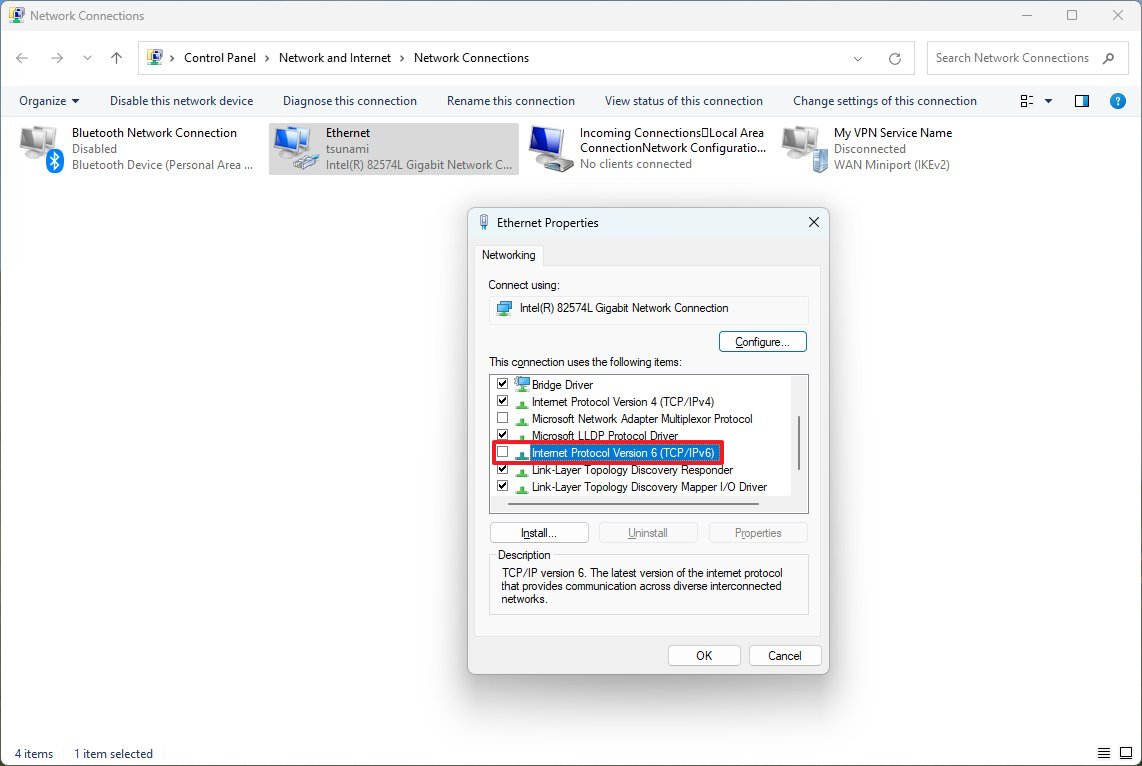
- Click the OK button.
Once you complete the steps, the IPv6 protocol will no longer be available on the system. Although it’s not a requirement, restarting the computer to ensure the changes apply correctly is a good idea.
How to disable IPv6 from Command Prompt on Windows 11
Warning: This is a friendly reminder that editing the Registry is risky and can cause irreversible damage to your installation if you do not complete the task correctly. It is a good idea to create a backup of the device before proceeding.
To turn off IPv6 using commands, use these steps:
All the latest news, reviews, and guides for Windows and Xbox diehards.
- Open Start.
- Search for Command Prompt, right-click the top result, and select the Run as administrator option.
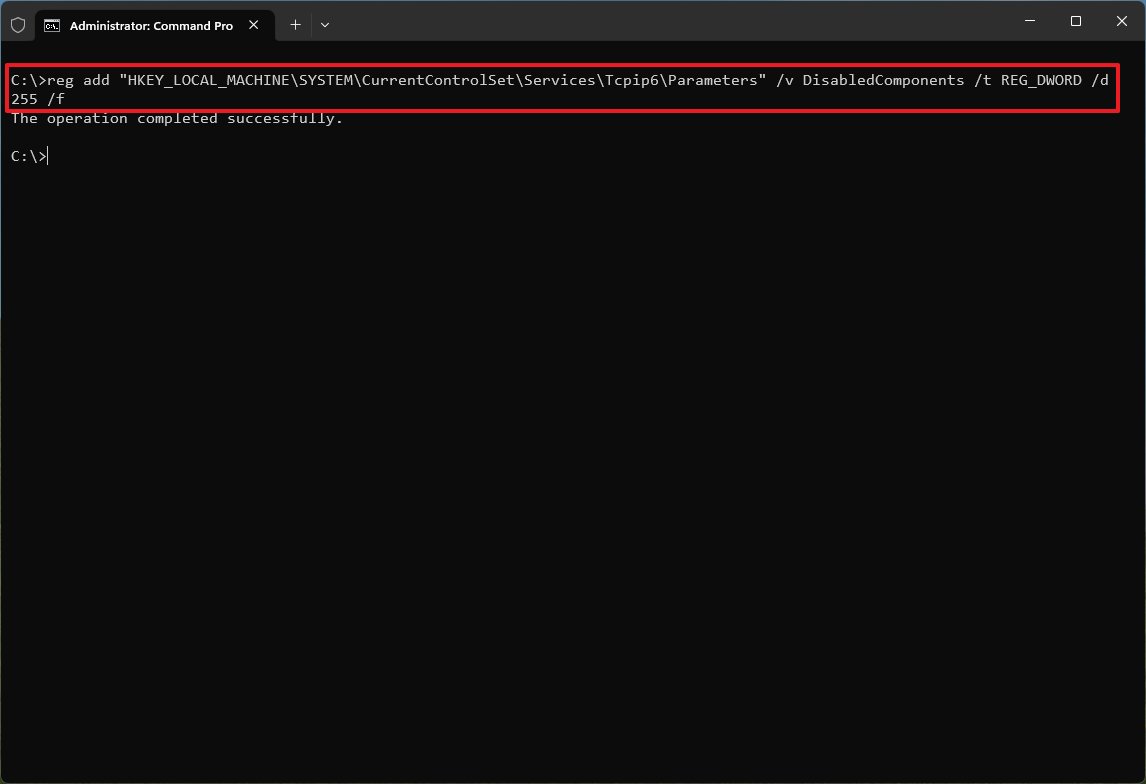
- Type the following command to disable IPv6 on Windows 11 and press Enter: reg add «HKEY_LOCAL_MACHINE\SYSTEM\CurrentControlSet\Services\Tcpip6\Parameters» /v DisabledComponents /t REG_DWORD /d 255 /f
- (Optional) Type the following command to re-enable IPv6 on the computer and press Enter: reg delete «HKEY_LOCAL_MACHINE\SYSTEM\CurrentControlSet\Services\Tcpip6\Parameters» /v DisabledComponents /f
- Restart the computer.
After you complete the steps, the device will only use the IPv4 protocol on Windows 11.
How to disable IPv6 from PowerShell on Windows 11
To disable the TCP/IPv6 protocol with PowerShell commands, use these steps:
- Open Start.
- Search for PowerShell, right-click the top result, and select the Run as administrator option.
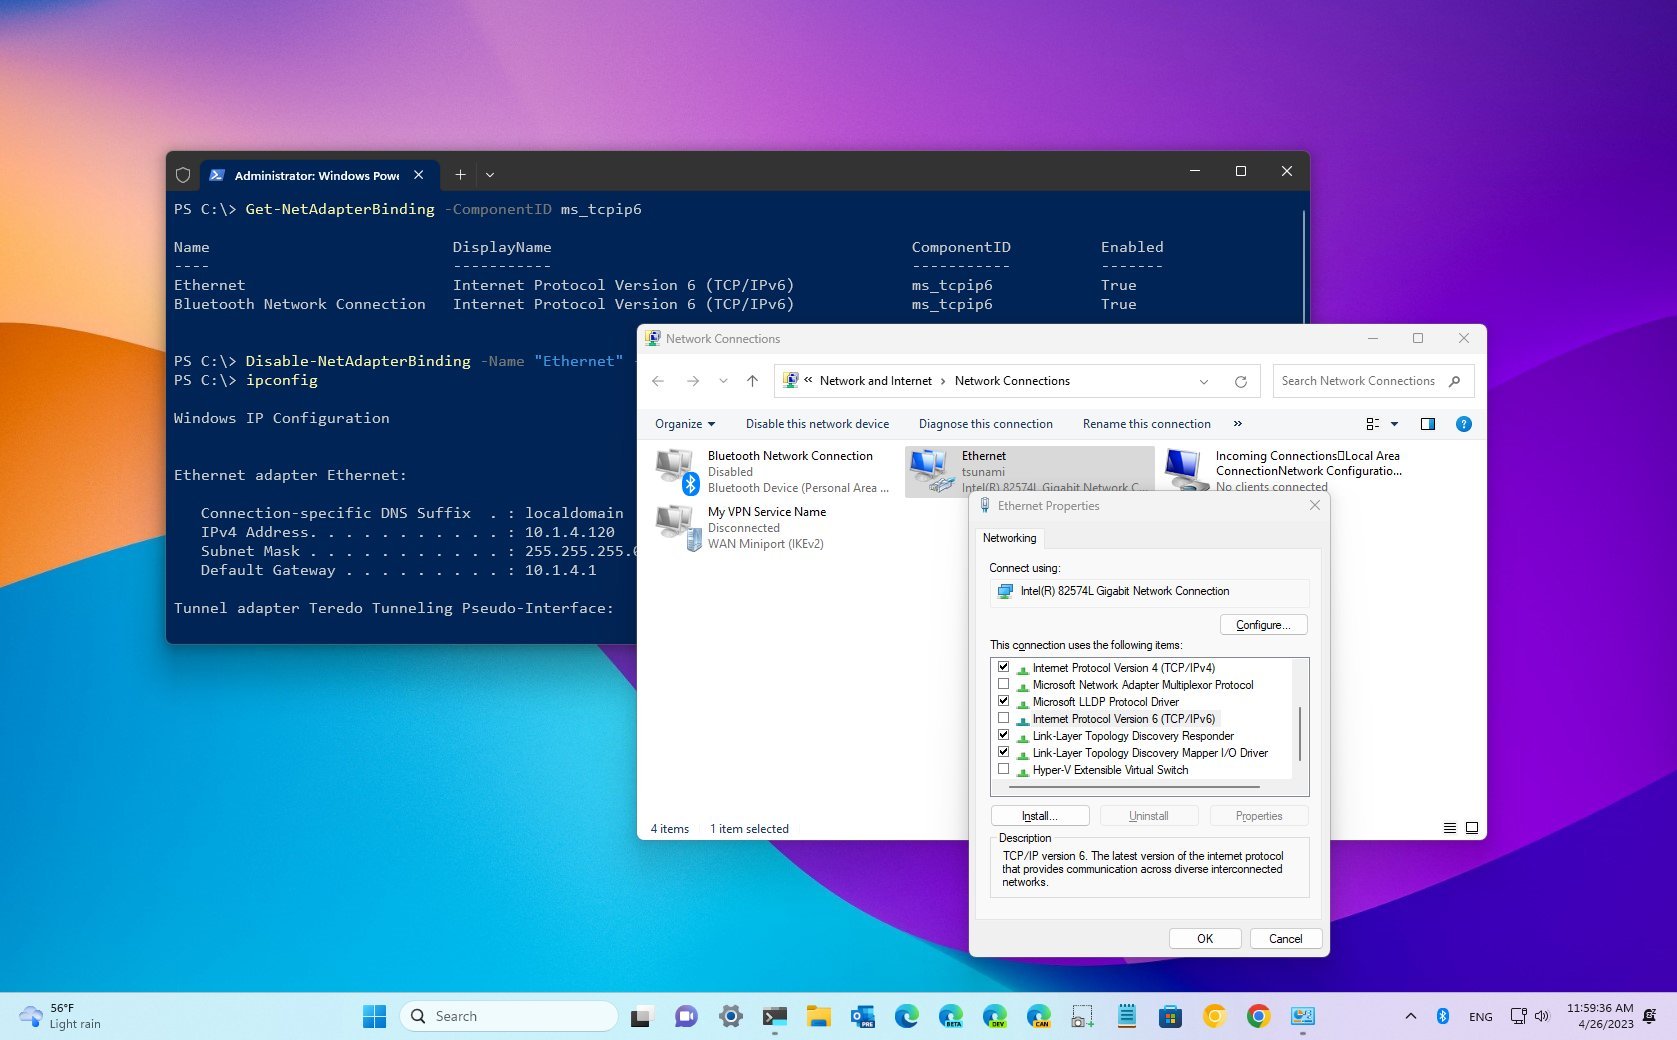
- Type the following command to determine the state of IPv6 and the network adapter name and press Enter: Get-NetAdapterBinding -ComponentID ms_tcpip6
- Type the following command to disable IPv6 on the adapter and press Enter: Disable-NetAdapterBinding -Name «Ethernet» -ComponentID ms_tcpip6
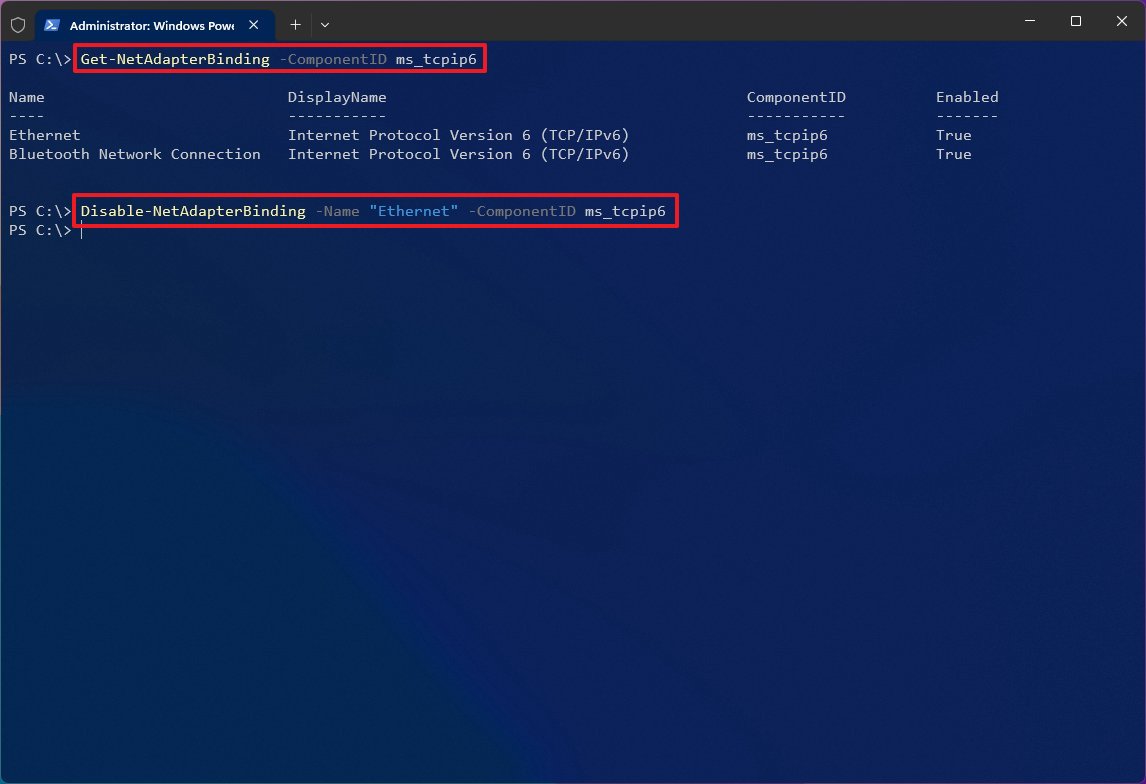
In the command, replace «Ethernet» with the name of your network adapter.
- Type the following command to re-enable IPv6 on the adapter and press Enter: Enable-NetAdapterBinding -Name «Ethernet» -ComponentID ms_tcpip6
Once you complete the steps, the Internet Protocol version 6 networking feature will be disabled on Windows 11. However, the computer can still access the local network and the internet through the IPv4 protocol.
IPv6 is the next version of the networking protocol to overcome the limitations of IPv4. Primarily, the new version of the protocol deals with the shortage of IP addresses, as IPv4 uses a 32-bit address scheme that offers close to 4.3 billion, and IPv6 uses a 128-bit address scheme that provides trillions of addresses. However, since the transition has been slower than expected, operating systems like Windows run both network stacks simultaneously.
Typically, you should keep the IPv6 protocol enabled, but you may find times when to disable it. However, if you are experiencing networking issues, it’s probably because the protocol has been disabled, in which case, turning it on again may resolve the issue.
More resources
For more helpful articles, coverage, and answers to common questions about Windows 10 and Windows 11, visit the following resources:
- Windows 11 on Windows Central — All you need to know
- Windows 10 on Windows Central — All you need to know
Mauro Huculak has been a Windows How-To Expert contributor for WindowsCentral.com for nearly a decade and has over 15 years of experience writing comprehensive guides. He also has an IT background and has achieved different professional certifications from Microsoft, Cisco, VMware, and CompTIA. He has been recognized as a Microsoft MVP for many years.
If you need to disable IPv6 on Windows 11 or Windows 10 to fix the issue you are facing, you can find a guide to do this from this MiniTool post. In addition, if you want to recover deleted files on Windows 11/10, you can try MiniTool Power Data Recovery.
By default, Windows 10 and Windows 11 use the Internet Protocol Version 6 (TCP/IPv6) and Internet Protocol Version 4 (TCP/IPv4) protocols in a dual-stack configuration. It is good to use two protocols in local networks.
However, some users report that IPv6 is causing issues in some situations. For instance, PC Game Pass games not syncing or installing could be caused by IPv6. You can directly disable IPv6 on Windows 11 or Windows 10 to solve the problem.
This post will introduce some ways to turn off IPv6 on Windows 11 or Windows 10.
Download MiniTool Power Data Recovery Free Edition for data recovery.
MiniTool Power Data Recovery FreeClick to Download100%Clean & Safe
How to Disable IPv6 on Windows 11?
Way 1: In the Network and Internet Settings
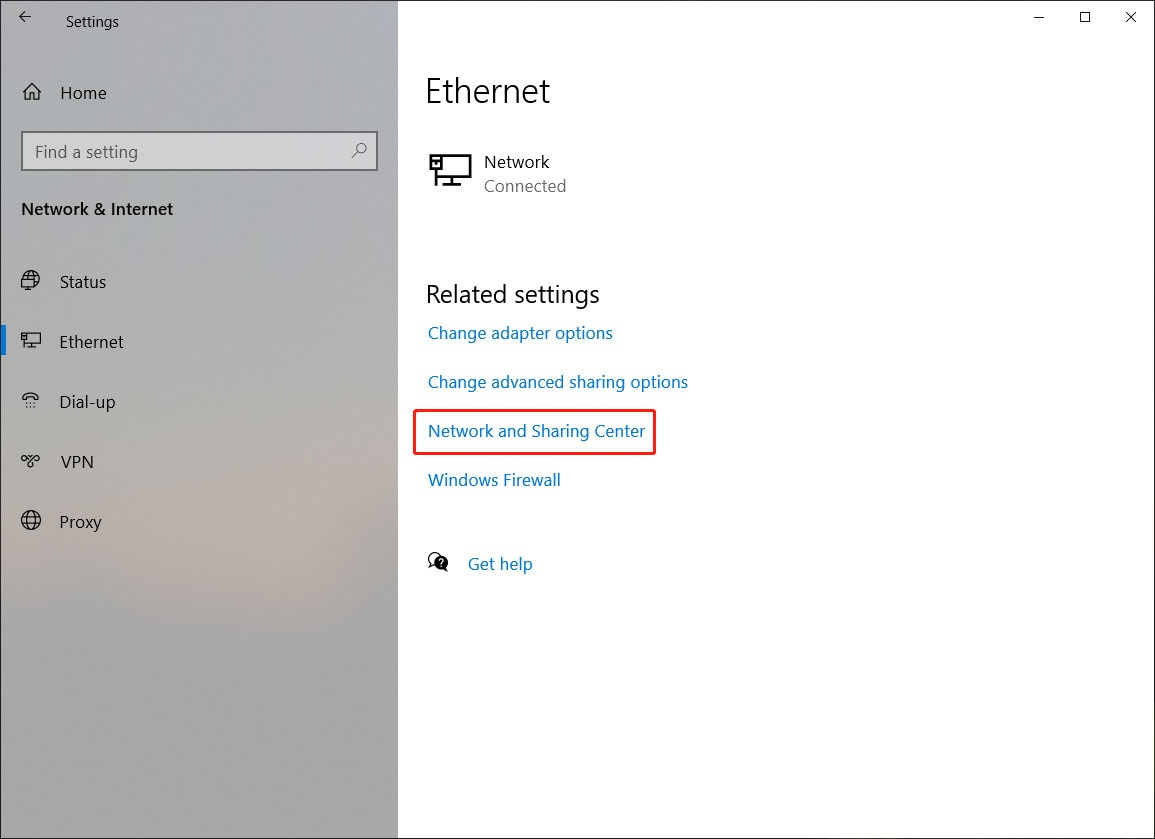
Step 1: Right-click the network icon from the taskbar and select Network and Internet settings.
Step 2: In the Settings app, click Advanced network settings, then select More network adapter options to continue.
Step 3: Right-click Ethernet and select Properties.
Step 4: On the pop-up interface, clear the checkbox next to Internet Protocol Version 6(TCP/IPv6).
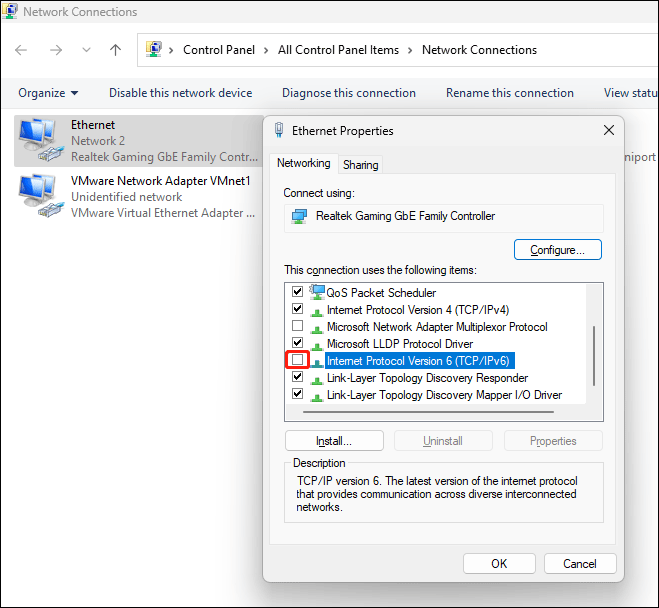
Step 5: Click OK to save the change.
Step 6: Restart your computer.
If you want to re-enable Internet Protocol Version 6(TCP/IPv6), you can select the checkbox in step 4.
Way 2: Use Command Prompt
Step 1: Click the search icon from the taskbar and search for cmd.
Step 2: Right-click Command Prompt and select Run as administrator. This will run Command Prompt as administrator.
Step 3: Enter the following command and press Enter:
reg add “HKEY_LOCAL_MACHINE\SYSTEM\CurrentControlSet\Services\Tcpip6\Parameters” /v DisabledComponents /t REG_DWORD /d 255 /f

If you want to re-enable IPv6, you can run this command:
reg delete “HKEY_LOCAL_MACHINE\SYSTEM\CurrentControlSet\Services\Tcpip6\Parameters” /v DisabledComponents /f
Step 4: Close Command Prompt.
Step 5: Restart your computer.
Way 3: Use Windows PowerShell
You can also run special commands in Windows PowerShell to make Windows 11 disable IPv6.
Here is the guide on how to turn off IPv6 on Windows 11 using Windows PowerShell:
Step 1: Search for PowerShell using Windows Search and select Run as administrator.
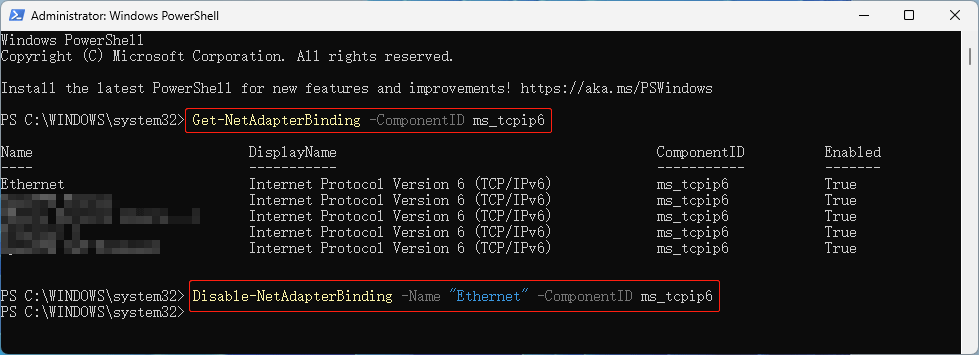
Step 2: Run the following command, which can determine the state of IPv6 and the network adapter name.
Get-NetAdapterBinding -ComponentID ms_tcpip6
Step 3: Run the following command to disable IPv6 on Windows 11:
Disable-NetAdapterBinding -Name “Ethernet” -ComponentID ms_tcpip6
If you want to re-enable IPv6 using this method, you should run this command:
Enable-NetAdapterBinding -Name “Ethernet” -ComponentID ms_tcpip6
Step 5: Close Windows PowerShell.
Step 6: Restart your computer.
How to Disable IPv6 on Windows 10?
You can also make Windows 10 disable IPv6 in the Network & Internet settings. Here is how to turn off IPv6 on Windows 10 using this way:
Step 1: Right-click the network icon from the taskbar and select Open Network & Internet settings.
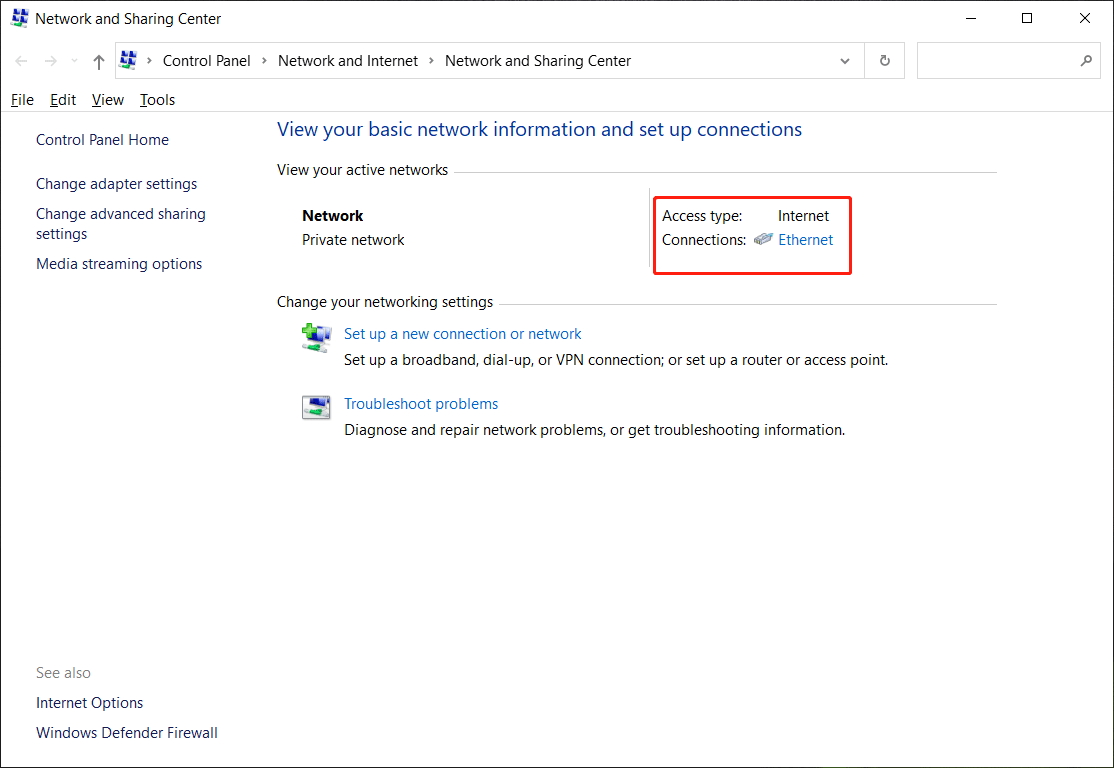
Step 2: On the next page, scroll down to click Network and Sharing Center to continue.
Step 3: Click your network adapter under View your active adapters to continue.
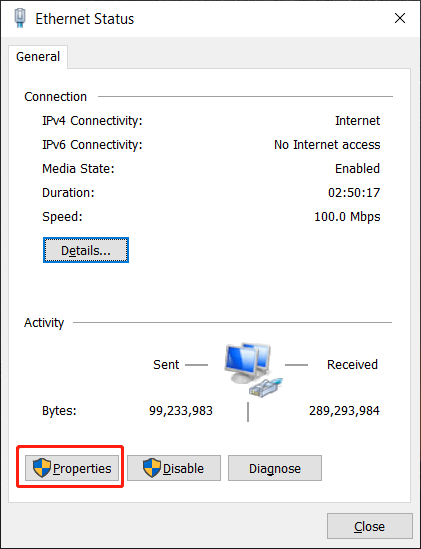
Step 4: Click the Properties button to continue.
Step 5: Clear the checkbox next to Internet Protocol Version 6(TCP/IPv6).
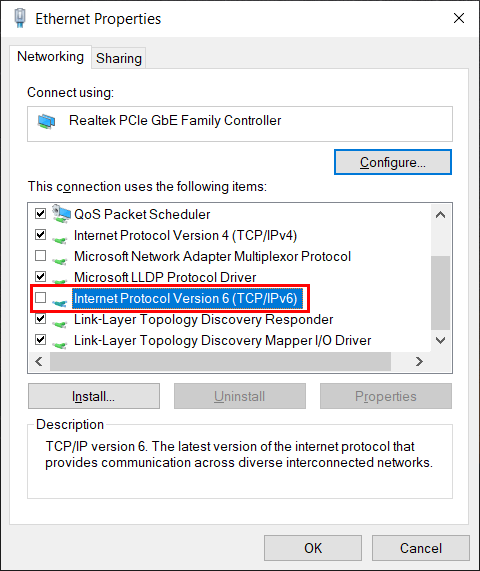
Step 6: Click OK to save the change.
You’d better restart your computer after these steps.
Recover Lost and Deleted Files on Windows 11/10
You might delete some important files while using a Windows computer and you want to get them back. In a situation like this, you can use MiniTool Power Data Recovery to perform data recovery.
This is a special data recovery software that can work on all Windows versions. You can use it to recover lost and deleted files from computer’s internal hard drives, external hard drives, SSDs, SD cards, memory cards, USB flash drives, and other types of storage devices.
You can first try the free edition of this software and see if this tool can find the files you want to recover. You can also recover 1 GB of files with this freeware.
MiniTool Power Data Recovery FreeClick to Download100%Clean & Safe
Bottom Line
Want to disable IPv6 on Windows 11 or Windows 10? You can find out how to do this in this post. You also get a professional data restore tool to help you recover files from different drives. We hope this post is the one you want to see.