
Проводник файлов может отображать миниатюры изображений и значки файлов и папок в Windows 10. В этом учебнике мы покажем, как включить или отключить предварительный просмотр миниатюр в Проводнике для всех или конкретной учетной записи пользователя в Windows 10.
СОДЕРЖАНИЕ:
- Способ 1. Включение и отключение миниатюр в параметрах проводника
- Способ 2. Включение и отключение просмотра миниатюр в настройках визуальных эффектов
- Способ 3. Включение и выключение просмотра миниатюр с использованием BAT-файла
- Способ 4. Включение или отключение миниатюр в групповой политике
- Способ 5. Включить или отключить предварительный просмотр миниатюр с использованием файла REG
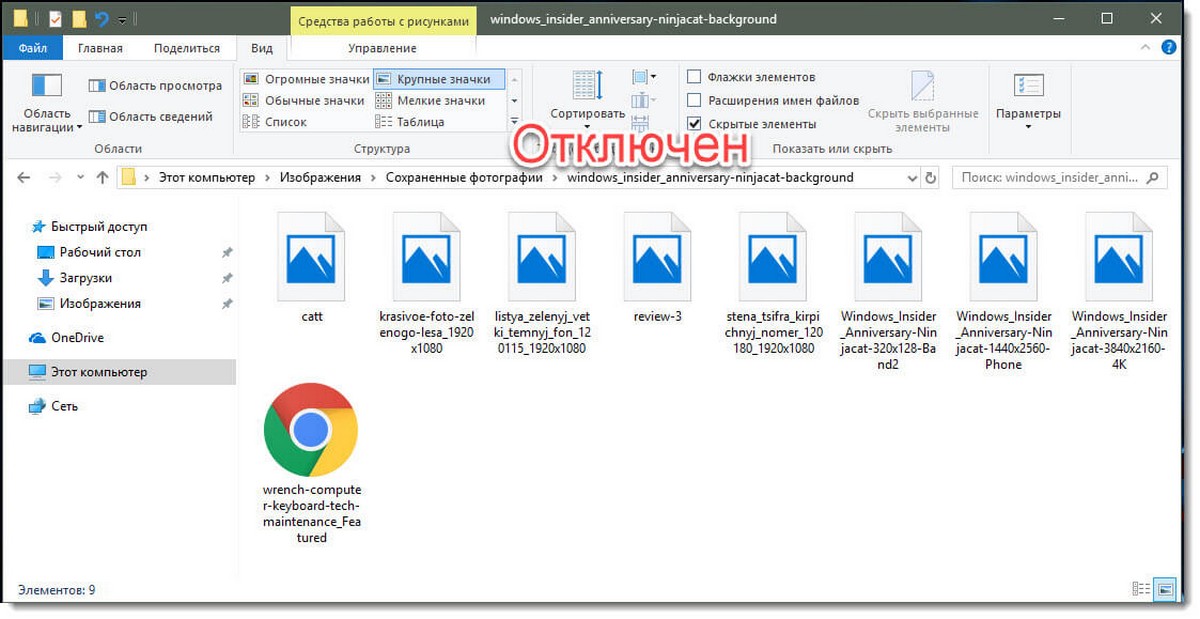
ПРИМЕР: Предварительный просмотр миниатюр включен и отключен в проводнике файлов
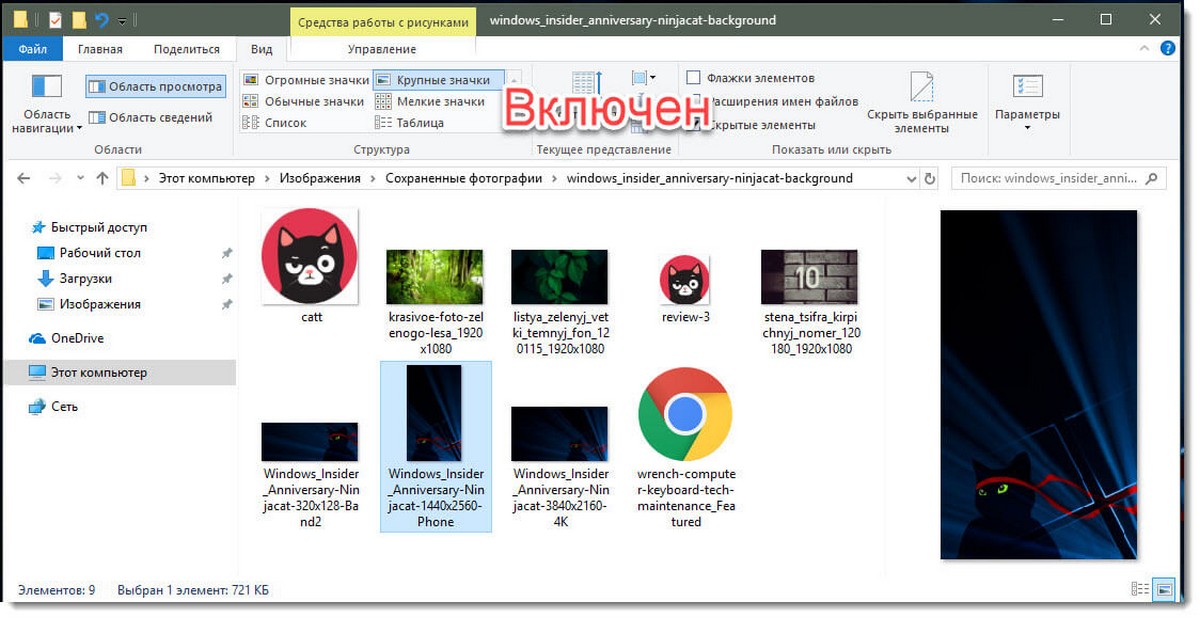
Включить или отключить предварительный просмотр миниатюр в проводнике файлов Windows 10.
Способ 1. Включение и выключение миниатюр в параметрах проводника.
Примечание: Эта настройка влияет только на вашу учетную запись пользователя, также как второй и третий способ.
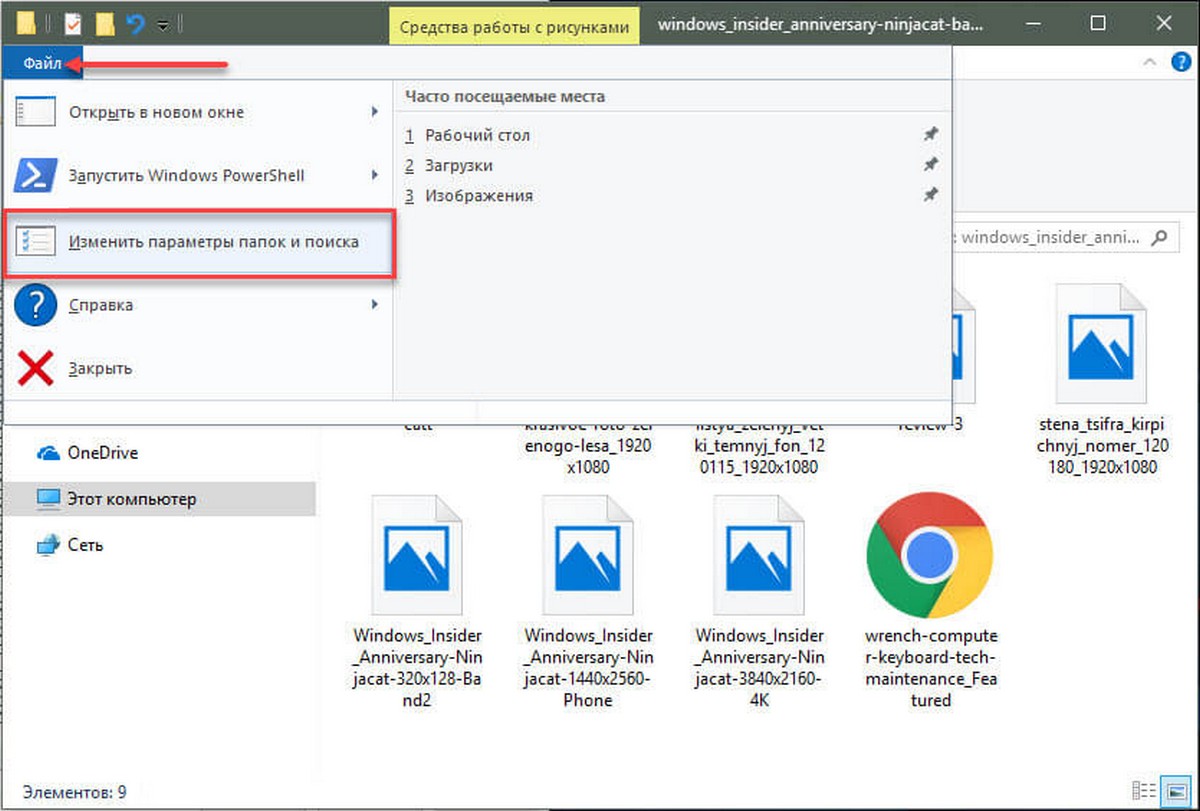
1. Откройте «Параметры проводника». Кликните мышкой меню «Файл» и выберите «Изменить Параметры папок и поиска».
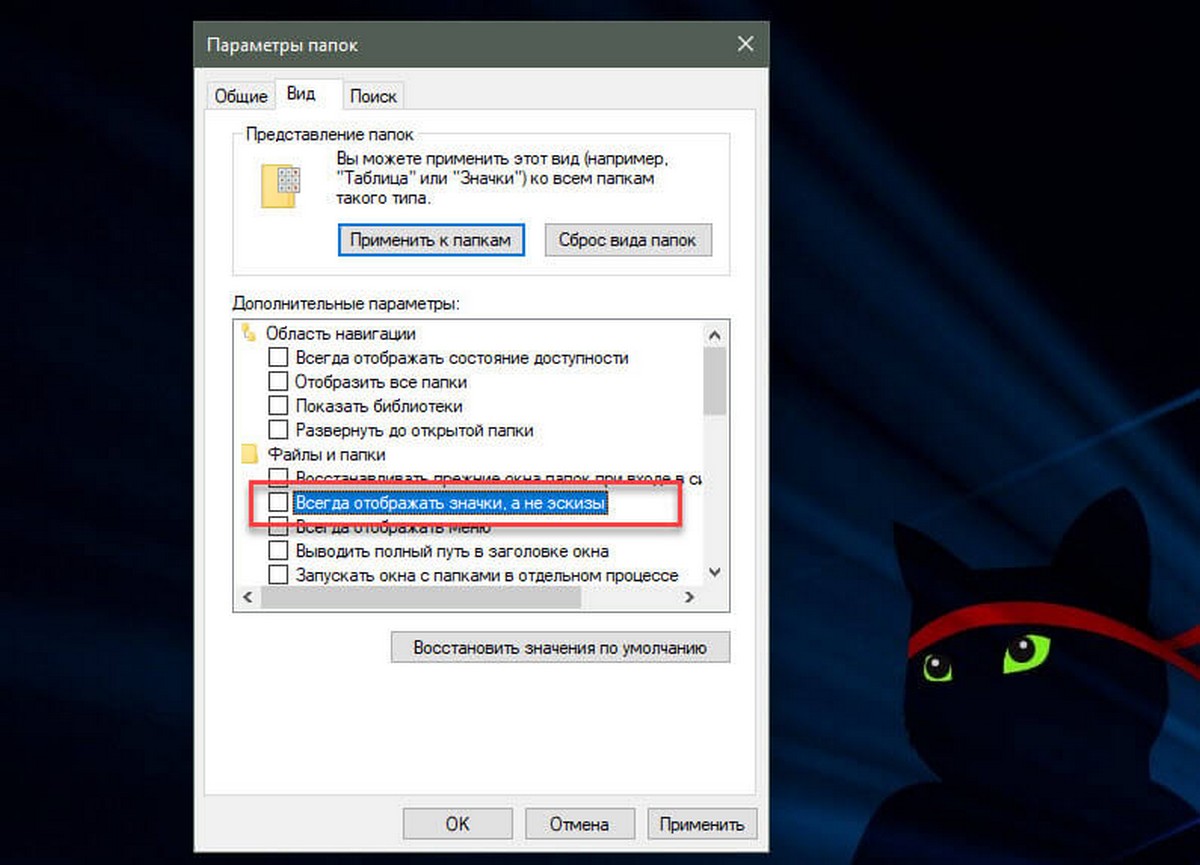
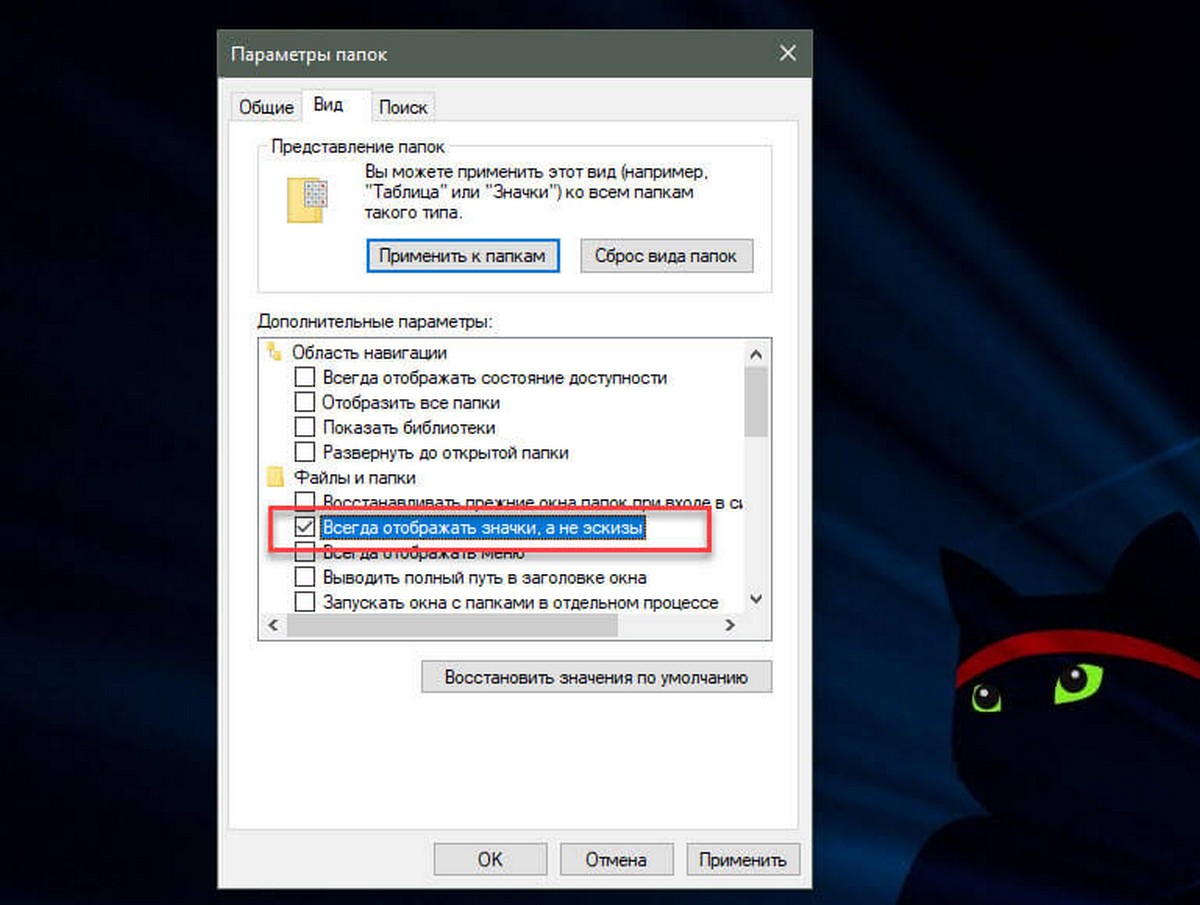
2. В открывшимся окне «Параметры папок» перейдите на вкладку «Вид».
Примечание: значение по умолчанию.
3. Включить предварительный просмотр миниатюр в проводнике файлов
3.1 На вкладке «Вид» найдите параметр «Всегда отображать значки а не эскизы» и снимите флажок и нажмите на кнопку «OK».
4. Отключить предварительный просмотр миниатюр в проводнике файлов
4.1 Перейдите на вкладку «Вид», установите флажок «Всегда отображать значки а не эскизы» и нажмите «ОК».
Способ 2. Включить или отключить предварительный просмотр миниатюр в проводнике файлов Windows 10 с помощью настройки «Визуальные эффекты».
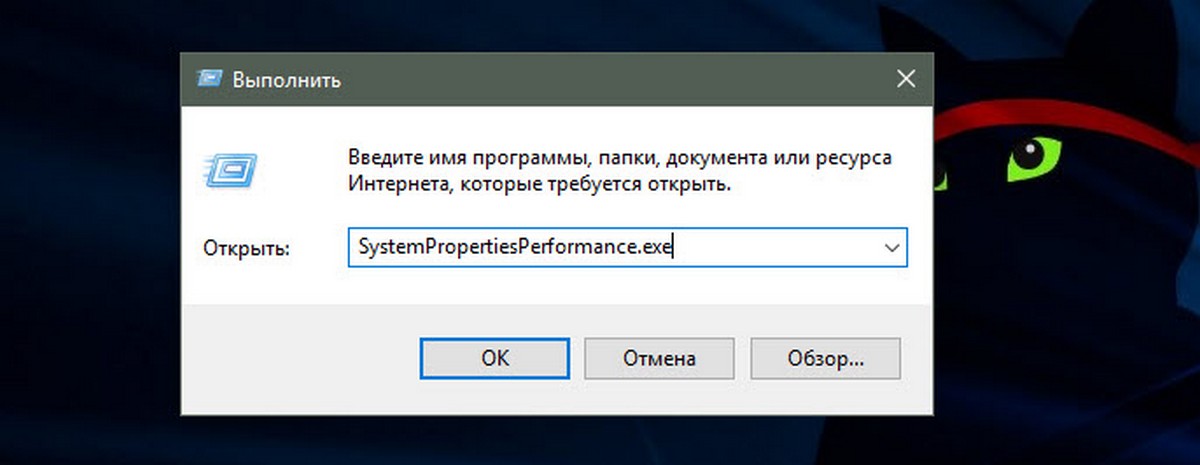
1. Откройте настройки «Визуальные эффекты». Нажмите сочетание клавиш Win + R , введите или скопируйте и вставьте в диалоговое окно «Выполнить»: SystemPropertiesPerformance.exe и нажмите клавишу Enter.
3. Включить предварительный просмотр миниатюр в проводнике файлов
Примечание: значение по умолчанию.
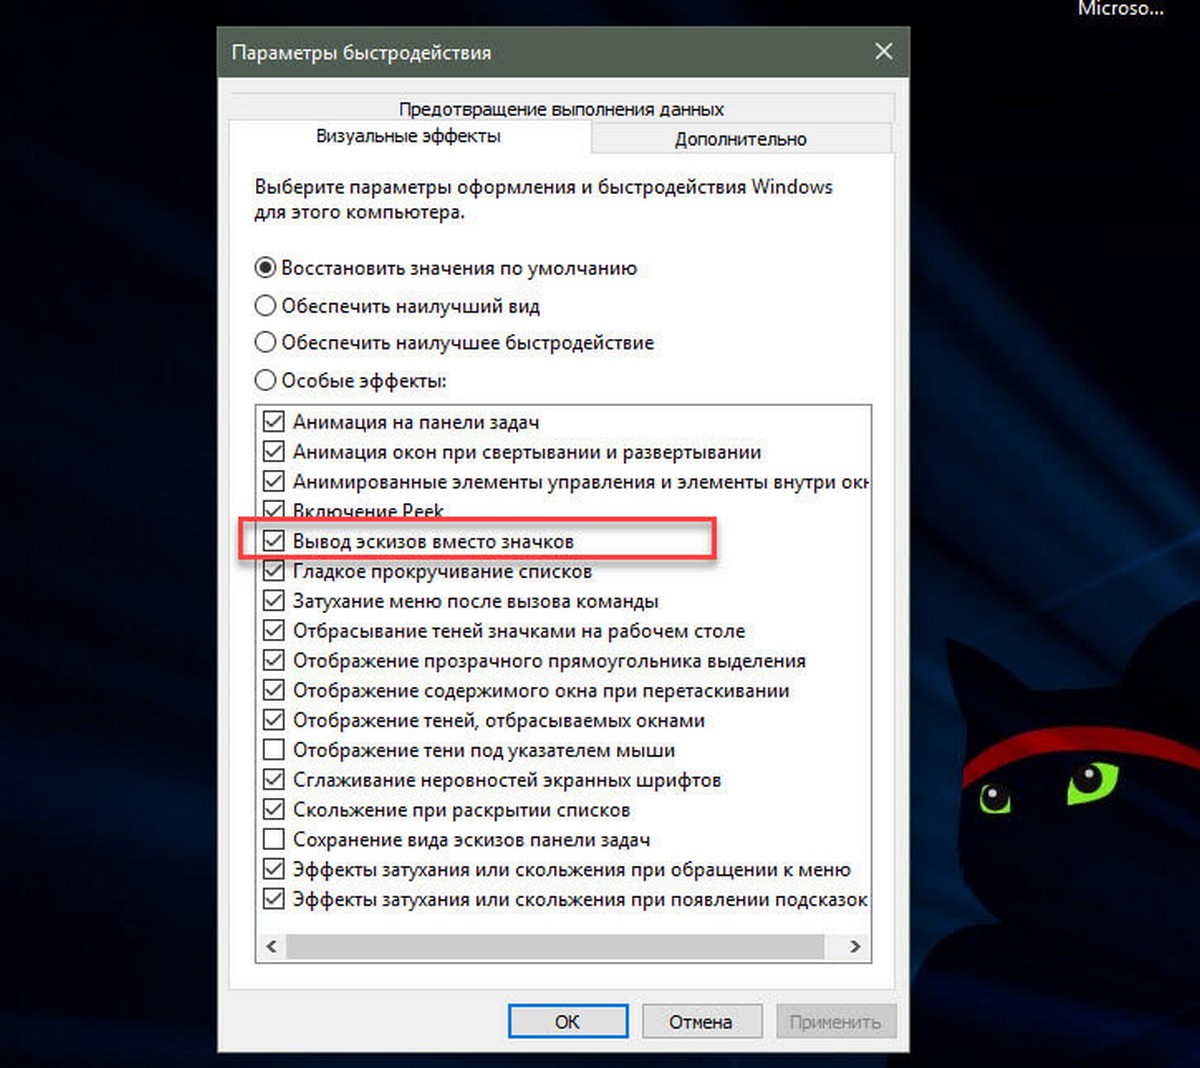
3.1 Установите флажок напротив пункта «Вывод эскизов вместо значков» и нажмите кнопку «OK».
4. Отключить предварительный просмотр миниатюр в проводнике файлов
4.1 Снимите флажок «Вывод эскизов вместо значков» нажмите «OK».
Способ 3. Включение и выключение просмотра миниатюр с использованием BAT-файла.
Файлы .bat ниже изменят параметр DWORD в разделе реестра:
HKEY_CURRENT_USER\SOFTWARE\Microsoft\Windows\CurrentVersion\Explorer\Advanced
IconsOnly DWORD
- 0 = Выкл. — показать значки
- 1 = Вкл — показать эскизы
2. Включить предварительный просмотр миниатюр в проводнике файлов
Примечание: значение по умолчанию.
2.1 Нажмите ссылку Turn_on_thumbnail_previews_in_explorer.zip, чтобы загрузить файл BAT, и перейдите к пункту 4 ниже.
3. Отключение предварительного просмотра миниатюр в проводнике файлов
3.1 Нажмите ссылку Turn_off_thumbnail_previews_in_explorer.zip, чтобы загрузить файл BAT, и перейдите к пункту 4 ниже.
4. Сохраните и разархивируйте файл .bat.
5. Запустите файл .bat.
6. Вы заметите мерцание экрана, быстро откроется окно командной строки и закроется после перезапуска проводника, чтобы применить изменения реестра.
7. По завершении вы можете удалить загруженный .bat-файл, если хотите.
Способ 4. Включить или отключить предварительный просмотр миниатюр в проводнике файлов в Windows 10 с помощью в групповой политики.
Примечание: вы должны иметь права администратора.
Этот параметр влияет на всех пользователей и переопределит предыдущие установки в способах 1, 2, 3.
Настройка недоступна в редакторе Windows 10 Home, так как редактор локальной групповой политики доступен только в версиях Windows 10 Pro, Enterprise и Education.
1. Откройте редактор групповой политики.
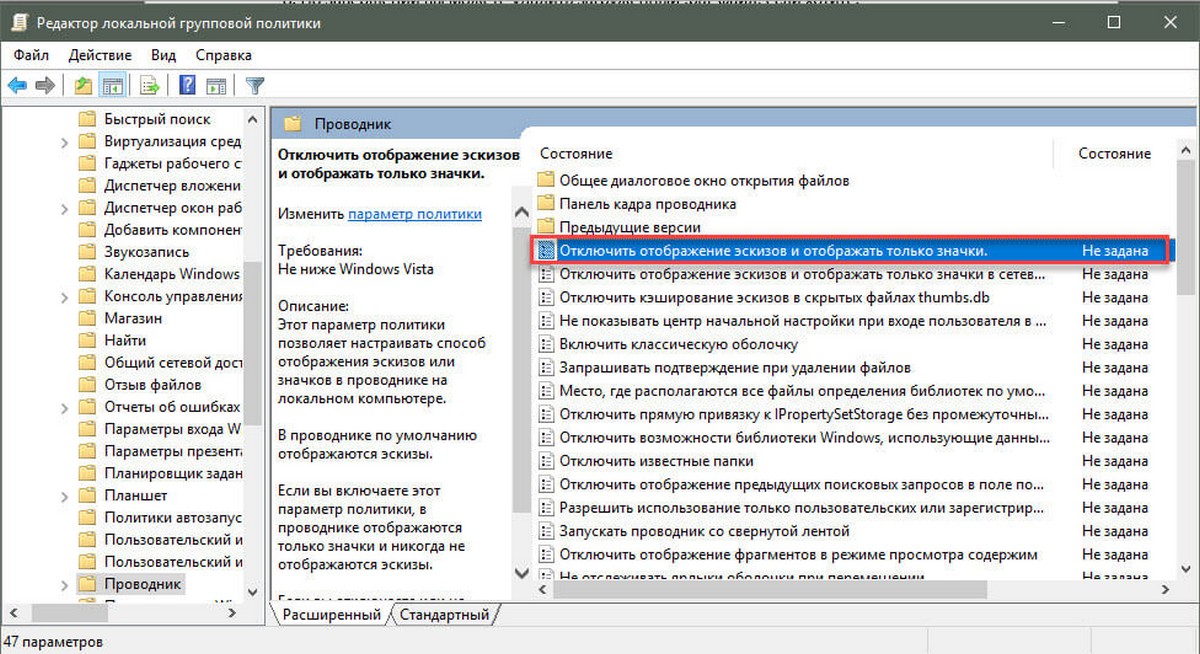
2. На левой панели редактора локальной групповой политики перейдите- «Конфигурация пользователя» , «Административные шаблоны» , «Компоненты Windows» , «Проводник». (см. снимок экрана ниже)
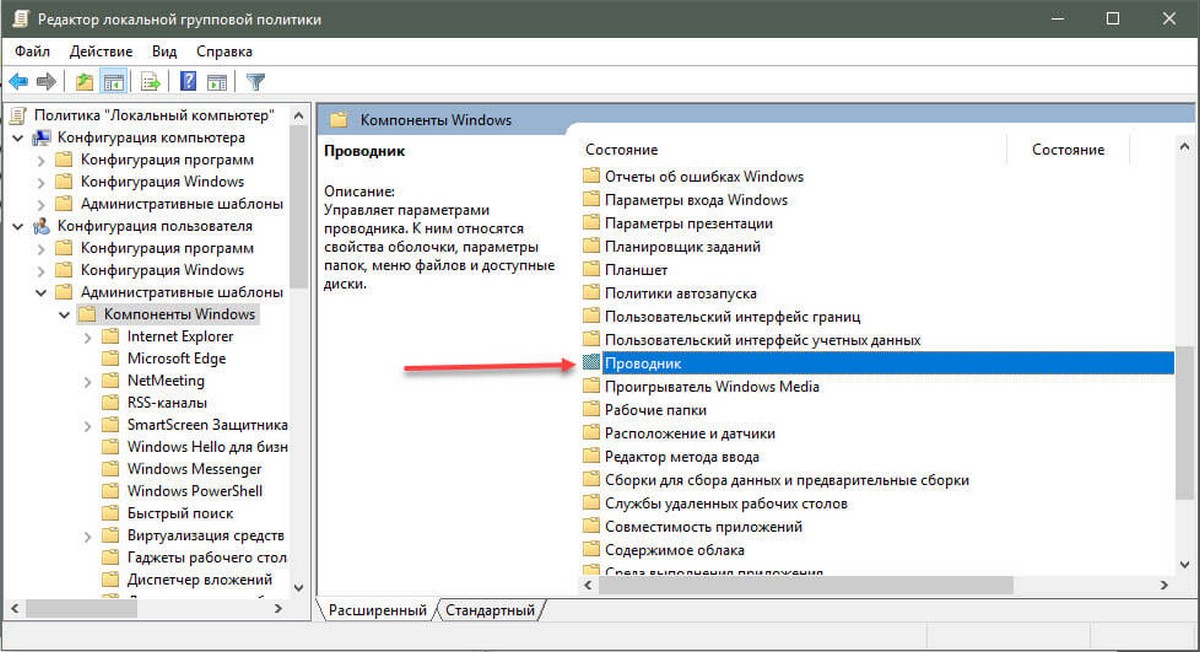
3. В правой панели политики откройте раздел «Проводник» и измените параметр политики «Отключить отображение эскизов и отображать только значки».
5. Чтобы включить предварительный просмотр миниатюр в проводнике файлов
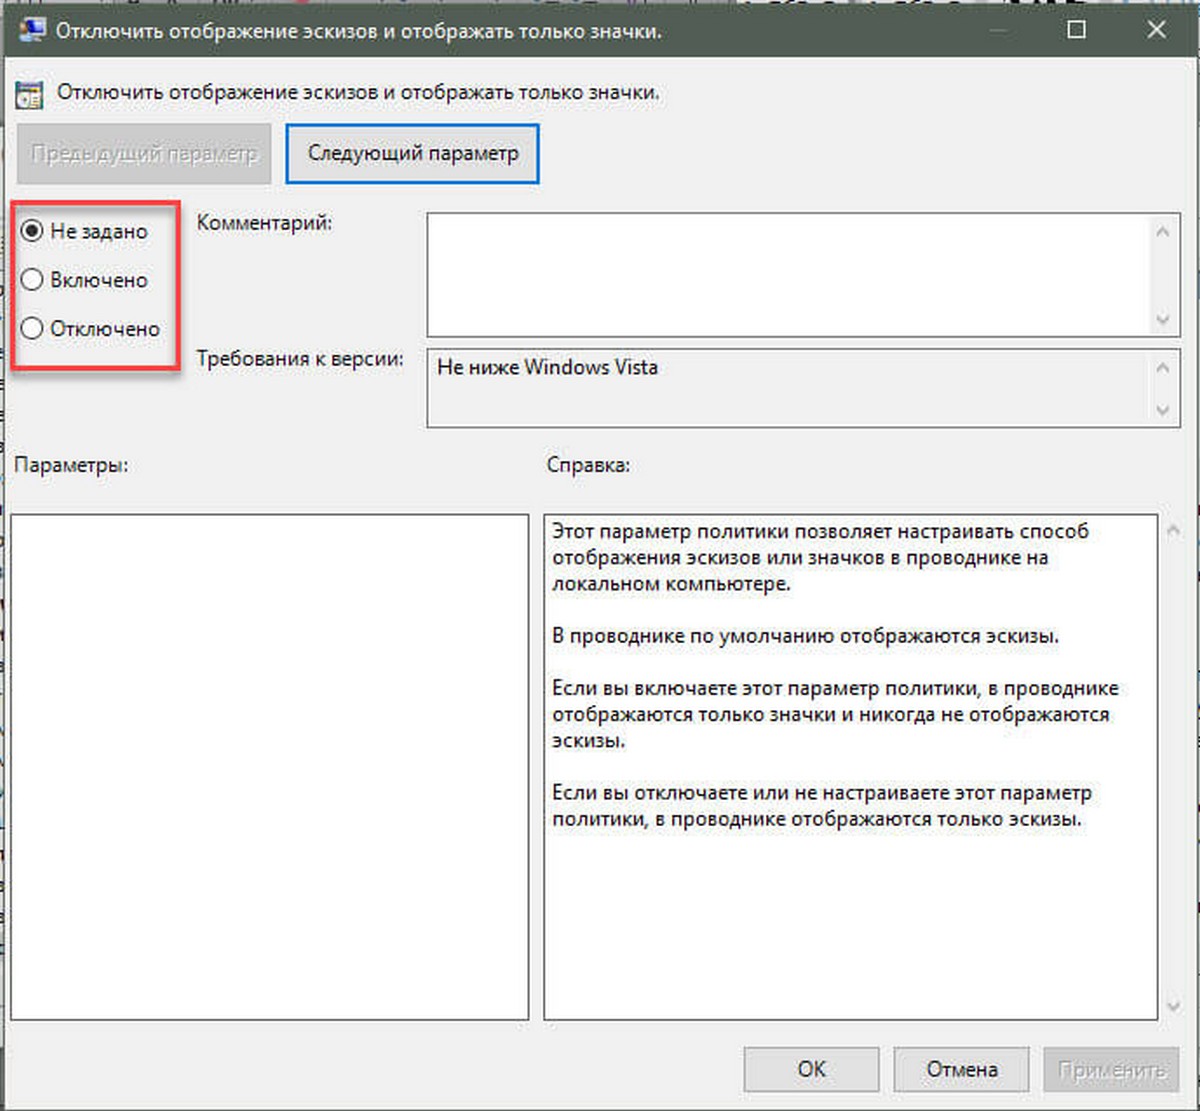
5.1 Выберите «Не задано» или «Отключено» и кнопку «OK».
5.2 Теперь пользователи смогут включать / выключать предварительный просмотр миниатюр, используя Способы 1, 2, 3.
6. Отключить предварительные просмотр миниатюр в проводнике файлов.
6.1 Выберите «Включено» и нажмите «OK».
Способ 5. Включить или отключить предварительный просмотр миниатюр в проводнике файлов в Windows 10 с использованием файла REG
Примечание: Вы должны обладать правами Администратора.
Эта опция делает то же самое, что и Способ 4, но применяется только к текущему пользователю.
Этот Способ переопределит предыдущие установки в способах 1, 2, 3.
Используя reg файл ниже, добавляются и изменяются значения DWORD в разделах реестра:
HKEY_CURRENT_USER\SOFTWARE\Microsoft\Windows\CurrentVersion\Policies\Explorer
HKEY_LOCAL_MACHINE\SOFTWARE\Microsoft\Windows\CurrentVersion\Policies\Explorer
DisableThumbnails DWORD
- 0 или delete = Включено
- 1 = Отключено
2. Включить предварительный просмотр миниатюр в проводнике файлов для всех пользователей.
Примечание: Это значение по умолчанию.
2.1 Нажмите ссылку Enable_Thumbnails_for_All_Users.zip, чтобы загрузить reg файл, и перейдите к шагу 4 ниже.
3. Отключить предварительный просмотр миниатюр в проводнике файлов для всех пользователей.
3.1 Нажмите ссылку Disable_Thumbnails_for_All_Users.zip, чтобы загрузить reg файл, и перейдите к шагу 4 ниже.
4. Сохраните файл .reg на рабочем столе и разархивируйте файл.
5. Дважды кликните/ коснитесь загруженный файл .reg.
6. При появлении запроса нажмите подтвердите слияние.
7. Выйдите и войдите в систему или перезагрузите компьютер.
8. Теперь вы можете удалить загруженный .reg-файл, если хотите.
9. Если включено, пользователи теперь смогут включать / выключать предварительный просмотр миниатюр, используя способы 1, 2, 3.
Вот и все!
Рекомендуем: Как изменить изображение папки в Windows 10
Если в проводнике Windows у вас отображается область предварительного просмотра в папке, которая вам мешает, то отключить её можно следующим образом:
1) В меню, отображаемом наверху, выбрать пункт «Вид».

2) Теперь на панели, которая находится под этим меню, нажмите на кнопку «Область просмотра».

Всё готово!
Есть альтернативный вариант — использовать комбинацию клавиш Alt + P (нужно переключиться на латинскую раскладку).
Отмечу, что опция отображения панели предварительного просмотра включается/отключает
Если же вы убрали предварительный просмотр, а при следующем открытии папки он у вас появился снова, то скорее всего у вашей учётной записи не хватает прав — попробуйте войти из-под «учётки» с правами администратора.
Thumbnail preview is an important feature of Windows 10 which let you have a preview of the app’s window on your taskbar when you hover over it. Basically, you get a peek of the tasks, and the hover time is predefined, which is set to half a second. So when you hover over the taskbar’s tasks, a thumbnail preview pop up window will show you what is running on the current application. Also, if you have multiple windows or tabs of that app, for example, Microsoft Edge, you will be shown the preview of each one.

Sometimes, this feature is more of a problem because the thumbnail previews window comes in your way whenever you try to work with multiple windows or apps. In this case, it will be best to disable the Thumbnail Previews in Windows 10 to work smoothly. Sometimes, it can be disabled by default so some users might want to enable thumbnail previews, so this guide will show you How to Enable or Disable Thumbnail Previews in Windows 10.
Table of Contents
Make sure to create a restore point just in case something goes wrong.
Method 1: Enable or Disable Thumbnail Previews using System Performance Settings
1. Right-click on This PC or My Computer and select Properties.
2. From the left-hand menu, click on Advanced system settings.

3. Make sure the Advanced tab is selected and then click Settings under Performance.

4. Uncheck Enable Peek to Disable Thumbnail Previews.

5. If you want to Enable Thumbnail Previews, then check Enable Peek.
5. Click Apply, followed by OK.
6. Reboot your PC to save changes.
Method 2: Enable or Disable Thumbnail Previews using Registry Editor
1. Press Windows Key + R then type regedit and hit Enter to open Registry Editor.
2. Navigate to the following Registry key:
HKEY_CURRENT_USER\Software\Microsoft\Windows\CurrentVersion\Explorer\Advanced
3. Now select Advanced registry key then right-click and select New > DWORD (32-bit) value.

4. Name this new DWORD as ExtendedUIHoverTime and press Enter.
5. Double click on ExtendedUIHoverTime and change its value to 30000.
Note: 30000 is the time delay (in milliseconds) showing the Thumbnail Preview when you hover over the tasks or apps on the Taskbar. In short, it will disable thumbnails to appear on hover for 30 seconds, which is more than enough to disable this feature.
6. If you want to enable thumbnail preview set its value to 0.
7. Click OK and close the Registry Editor.
8. Reboot your PC to save changes.
Method 3: Disable Thumbnails Previews only for multiple instances of the app window
1. Press Windows Key + R then type regedit and hit Enter.
2. Navigate to the following registry key:
HKEY_CURRENT_USER\SOFTWARE\Microsoft\Windows\CurrentVersion\Explorer\Taskband
3. Right-click on Taskband and then select New > DWORD (32-bit) value.

4. Name this key as NumThumbnails and double click on it to change its value.
5. Set its value to 0 and click OK.
6. Reboot your PC to save changes.
Recommended:
- Fix DPC_WATCHDOG_VIOLATION Error 0x00000133
- Fix Windows could not automatically detect this network’s proxy settings
- Resolve Windows 10 Freezes Randomly Issue
- Change Lock Screen Timeout Setting in Windows 10
That’s it you have successfully learned How to Enable or Disable Thumbnail Previews in Windows 10 but if you still have any questions regarding this post then feel free to ask them in the comment’s section.
How do I enable or disable thumbnail previews in file explorer Windows 10? Why are my thumbnails not showing up on Windows 10? With the default configuration of Windows 10/8/7, it shows thumbnail previews of images and videos. In many cases, thumbnail previews are useful since they let you preview Windows files without opening them. However, it might slow down the folder navigation process.
Windows machines maintain a cache database with thumbnail images for every folder, document, video, and picture on your computer. When you open File Explorer or Windows Explorer, this database is used to display a preview of a file quickly or give you a look at the content of a folder or file before you open it.
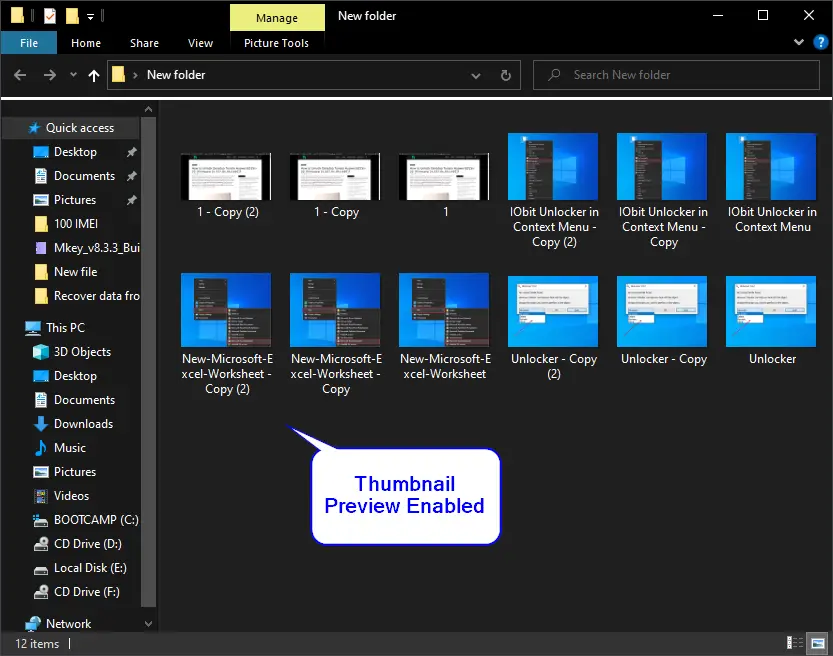
Have a look when Thumbnail Preview is enabled:
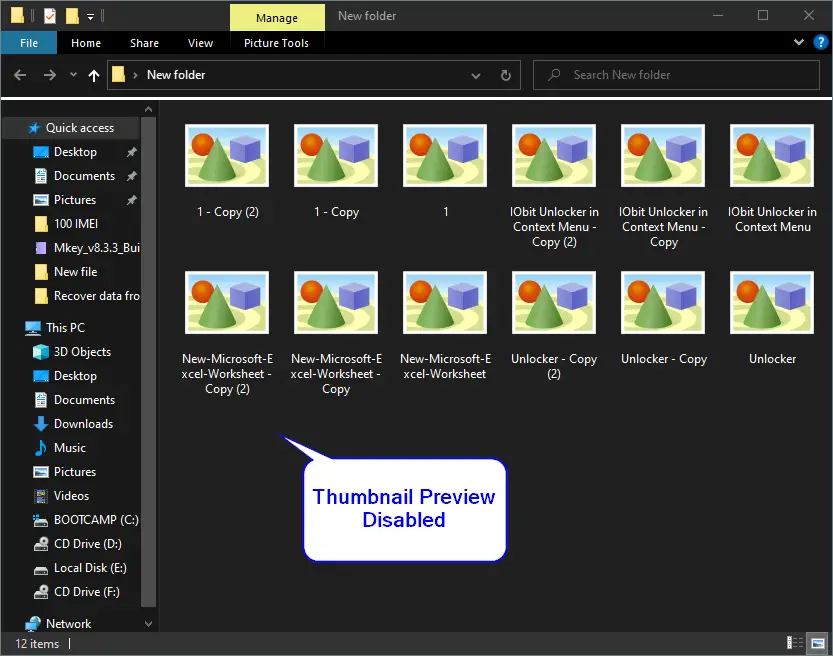
Have a look when Thumbnail Preview is disabled:
The problem with the “thumbnail cache” is that; it keeps growing over time as you create new folders and files, and sometimes the database becomes corrupted. Because of this, you may notice that File Explorer displays thumbnails incorrectly. Some files may not show a thumbnail preview, or sometimes thumbnails may not be available at all.
This gearupwindows article will guide you on enabling or disabling thumbnail previews in File Explorer on Windows 10 / 8 / 7. There are at least four ways through which you can turn on or turn off thumbnail previews in File Explorer or Windows Explorer. These are the following:-
- Using Folder Options
- Via Performance Options
- Through Registry Editor
- From Local Group Policy Editor
How to Enable or Disable Thumbnail Previews Using Folder Options?
Follow these steps to turn on or off Thumbnail Previews using Folder Options:-
Step 1. Simultaneously press the Windows logo + E keys to access Windows Explorer or File Explorer dialog box.
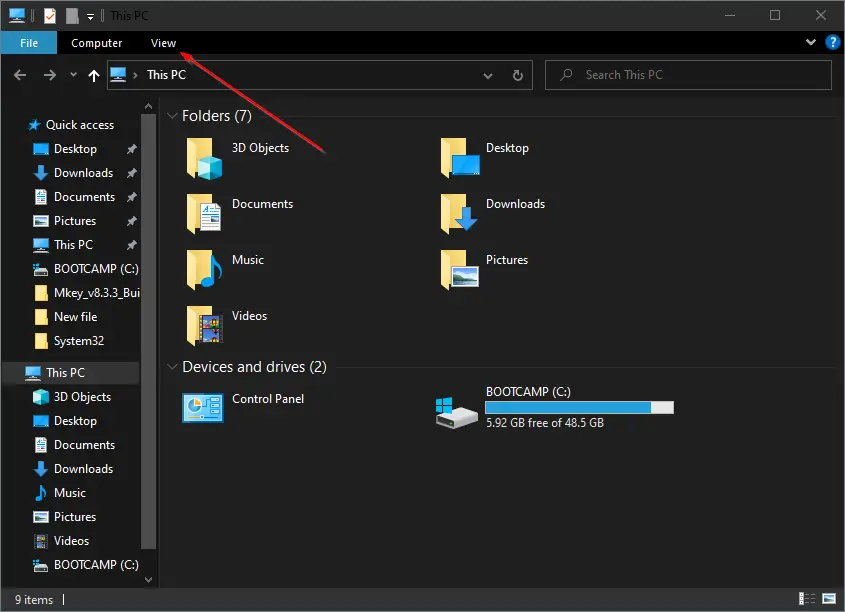
Step 2. Click on the View in the menu and then Options in the ribbon to open the Folder Options dialog.
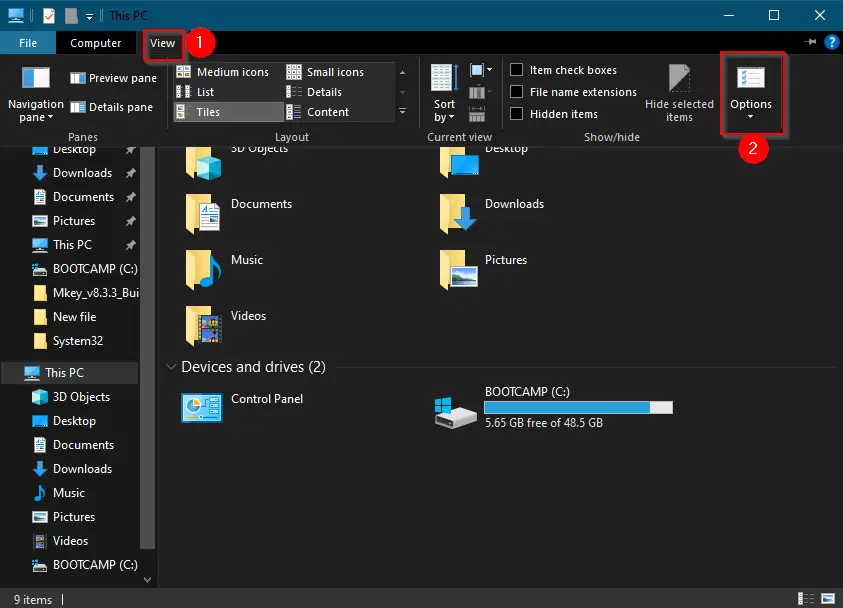
Step 3. In the Folder Options dialog, click the View tab.
Step 4. Check or uncheck the option “Always show icons, never thumbnails” to enable or disable the Thumbnail Previews in File Explorer or Windows Explorer, according to your needs.
Step 5. Click Apply.
Step 6. Click OK.
How to Enable or Disable Thumbnail Previews using Performance Options?
Follow these steps to turn on or off Thumbnail Previews using Performance Options:-
Step 1. Open the Run dialog box by pressing the Windows logo + R keys simultaneously.
Step 2. In the Run box, type SystemPropertiesPerformance and press Enter from the keyboard to open Performance Options.
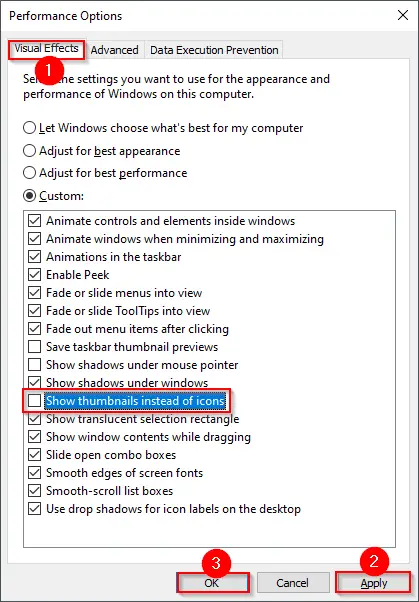
Step 3. Navigate to the Visual Effects tab and check or uncheck the option “Show thumbnails instead of icons” to turn on or turn off thumbnails preview.
Step 4. Click Apply.
Step 5. Click OK.
How to Enable or Disable Thumbnail Previews from Registry Editor?
Follow these steps to enable or disable Thumbnail Previews from Registry Editor:-
Step 1. Open the Registry Editor.

Step 2. Navigate to the following key from the left side in the Registry Editor window:-
HKEY_CURRENT_USER\SOFTWARE\Microsoft\Windows\CurrentVersion\Explorer\Advanced
Step 3. On the right side pane, double-click on IconsOnly to change the Value data.
Step 4. Set the following value:-
- 0 – Show Thumbnails Preview
- 1 – Hide Thumbnails Preview
Step 5. Click OK.
How to Enable or Disable Thumbnail Previews with Local Group Policy Editor?
Follow these steps to enable or disable Thumbnail Previews with Local Group Policy Editor:-
Step 1. Launch Local Group Policy Editor.
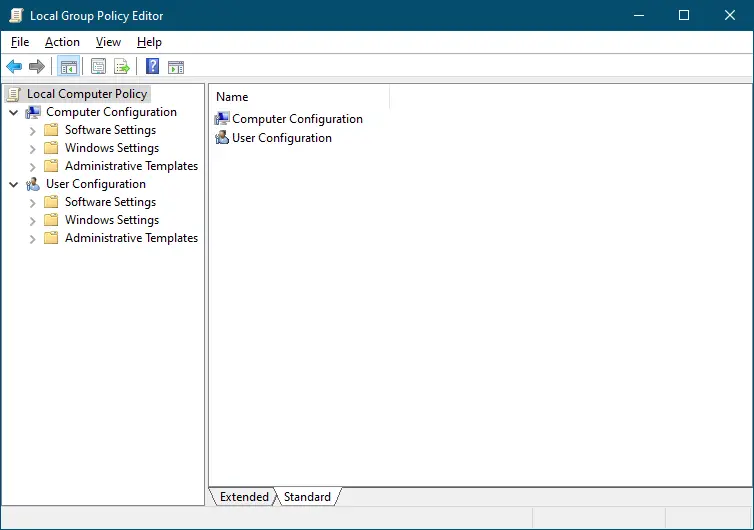
Step 2. Navigate to the following path from the left side pane:-
User Configuration > Administrative Templates > Windows Components > File Explorer
or,
User Configuration > Administrative Templates > Windows Components > Windows Explorer
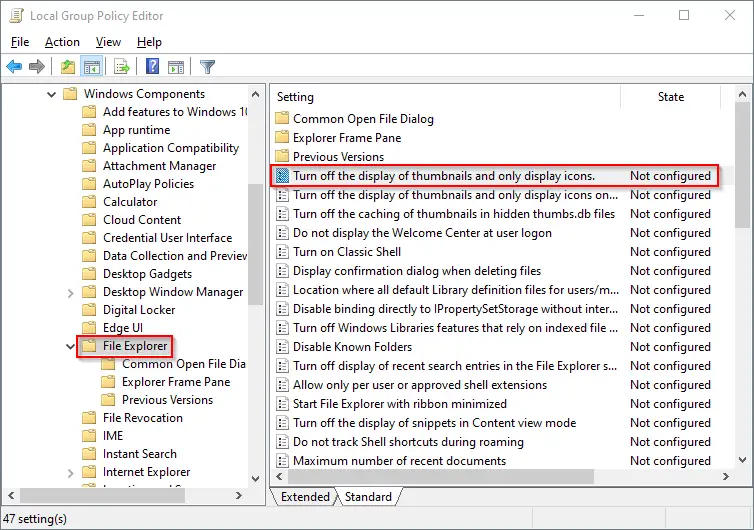
Step 3. On the right side pane, look for the policy name “Turn off the display of thumbnails and only display icons” and double-click on it to open its settings.
Step 4. Select the Enabled option to enable thumbnail previews, or select Not Configured to disable thumbnail previews.
Step 5. Click Apply.
Step 6. Click OK.
Conclusion
In conclusion, thumbnail previews can be helpful in quickly previewing files without having to open them, but they can also slow down the folder navigation process. Windows maintains a cache database with thumbnail images for every file and folder on your computer, but it can become corrupted over time, causing File Explorer to display thumbnails incorrectly. In this gearupwindows article, we discussed four different ways to enable or disable thumbnail previews in File Explorer or Windows Explorer on Windows 10/8/7: using Folder Options, Performance Options, Registry Editor, and Local Group Policy Editor. By following the steps mentioned in the article, you can turn on or off thumbnail previews according to your needs.
You are here: Home / Windows / How To Disable Preview Pane In Windows 10? – Ultimate Guide
Recently, if you open Windows File Explorer and select any of your files, you will see a small preview thumbnail of the file on the right pane of your screen. This is the Preview Pane feature that was recently updated in the Windows Explorer.
Because of this new feature, you can see a small preview of your files as a thumbnail on the right pane of Windows Explorer. This feature is very useful in identifying your files faster, however, it has also been the central cause for many Windows File Explorer related issues.
In this article, we have discussed how to disable Preview Pane in Windows 10 for those users that are affected by the errors caused by it.
We have shown a VIDEO walk through at the end of the post for easy solution.
Why Remove Preview Pane In Windows 10?
The Windows 10 Preview Pane feature shows thumbnails of your locally stored files by using cache files stored in the installation directory. When a new file opens, a cache folder for the same file gets created, which is then used by Windows File Explorer to preview its contents as a thumbnail.
This feature sounds very useful, but it has been repeatedly reported to cause errors while opening files. This error is more common for Word and Excel files. Although, the Preview Pane feature is nice, its not worth to hamper your work for it. Also, removing Preview Pane makes the Windows File Explorer work faster.
Disable Preview Pane In Windows 10 With Some Simple Methods
If you have also decided that the Windows File Explorer Preview Pane feature is not worth the trouble it causes, then the next thing you should do is disable it. Below we have mentioned a few different methods you can use to remove Preview Pane in Windows 10.
Method 1: Hide Preview Pane Using A Shortcut
The easiest way to hide Preview Pane is by using the Alt + P shortcut. To use this shortcut first, open the Windows File Explorer by pressing the Windows + E keys. Next, press the Alt + P keys to hide the Preview Pane. Using this shortcut again will enable the Preview Pane feature.
Method 2: Hide Preview Pane From The View Tab
You can also enable or disable Preview Pane from the View tab in the ribbon menu. To do it, follow the steps given below:
- Open the Windows File Explorer again.
- Click on the View tab on the ribbon menu.
- There you will find the Preview Pane option.
- You can toggle it on or off by clicking on it.
Method 3: Disable Thumbnails From The Preview Pane
You can change the settings of Windows File Explorer to hide the thumbnails in the Preview Pane. To do it, follow the steps given below:
- Open Windows File Explorer again.
- Select the View tab from the ribbon menu.
- Next, click on the Options button and select the Change folders and search options button. This will open the Folder Options on your screen.
- Select the View tab and in the Advanced settings section, check the Always show icons, never thumbnails box. Also, uncheck the Display file icon on thumbnails option.
- Finally, click on Apply and OK to save the changes.
Wrapping Up
So, there you have it. Now you know how to disable Preview Pane in Windows 10. Follow the above steps carefully and you shouldn’t face any issues while removing the Preview Pane feature from File Explorer. Also, if you have any questions related to this article, then ask them in the comment section below.