
Quick Links
-
What Is Secure Boot Anyway?
-
How to Disable Secure Boot in Windows 10 and Windows 11
-
How to Check If Secure Boot Is Enabled
-
Should You Disable Secure Boot?
Summary
To disable Secure Boot on your PC:
1. Restart your PC while holding Shift, or access the «Advanced Startup» menu by typing «Advanced Startup» in Windows Search and then restart your PC from there.
2. Locate the Secure Boot option in your BIOS/UEFI setup menu and disable it. You might have to tweak some other settings in BIOS/UEFI to be able to toggle the Secure Boot option.
3. Save your changes and restart your PC.
Secure Boot is a security feature supported on Windows and some Linux distros. Below you can learn how to disable Secure Boot from the UEFI setup menu, how to locate the Secure Boot toggle, and what Secure Boot is and why it’s important.
What Is Secure Boot Anyway?
Secure Boot is a security feature available on most modern computers –and on most modern motherboards, in the case of desktop PCs– that prevents malware and other malicious software from tampering with the operating system installed on the said computer by executing itself during the boot procedure, before the OS loads. If all’s right and the boot procedure goes as planned, UEFI gives control to the OS after the system boots.
In a nutshell, Secure Boot is a verification mechanism that scans any piece of code that tries to run itself on your PC during the early stages of the boot process for digital signatures confirming the software in question is legit and secure. If a piece of code doesn’t include specific digital signatures, Secure Boot prevents it from executing and potentially tampering with your system.
How to Disable Secure Boot in Windows 10 and Windows 11
The process of disabling Secure Boot is simply to enter your BIOS/UEFI menu, finding the Secure Boot toggle, then saving your settings. Note that the BIOS/UEFI menu can look and be organized very differently depending on your computer. If you have trouble following with your device, check out our hints at the end of the instructions.
Step 1: Enter BIOS/UEFI Setup
To disable Secure Boot, you need to access your PC’s UEFI/BIOS setup menu. The most straightforward way to do that is to restart your PC and then hit the appropriate key during the boot sequence. For example, the BIOS setup key is Del on MSI motherboards (the motherboard brand found in my PC).
However, other motherboard and laptop manufacturers have different BIOS setup keys. Depending on the manufacturer, they’re usually set to F1, F2, F9, F10, F12, or Del. Some manufacturers use unique keys or key combinations; on Microsoft Surface laptops you have to hold the volume up button, and on Lenovo ThinkPad devices you need to first press Enter and then hit the F1 key.
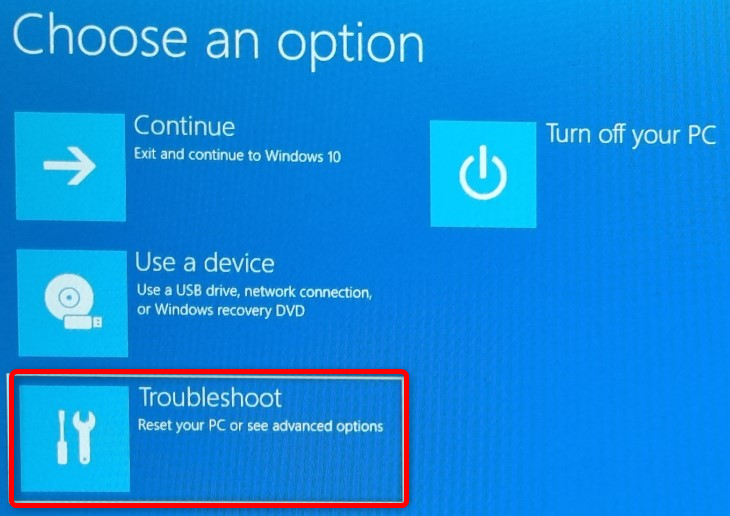
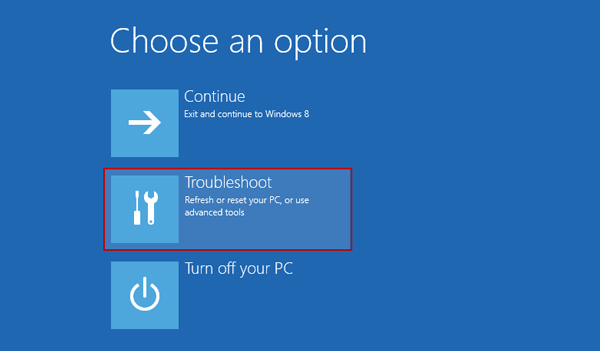
If you don’t want to experiment and restart your PC multiple times before discovering the BIOS/UEFI setup key, simply hold Shift and restart your PC —Start Menu > Power button > Restart. Hold Shift until you’re presented with the “Advanced Startup” menu, like in the screenshot below. Once there, click the “Troubleshoot” button.
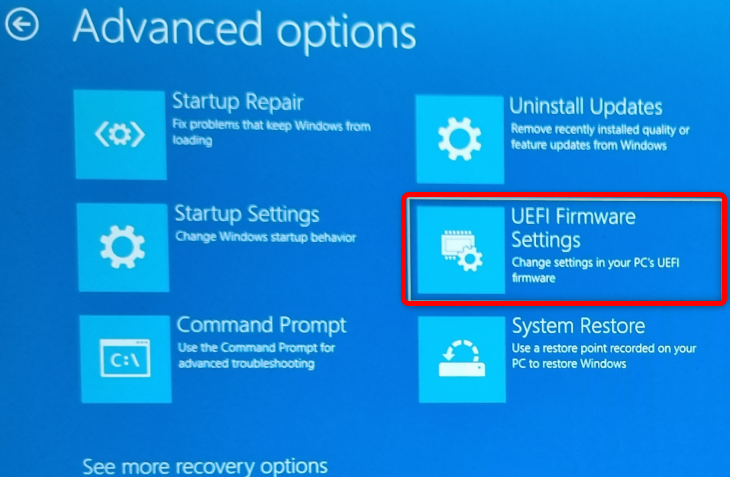
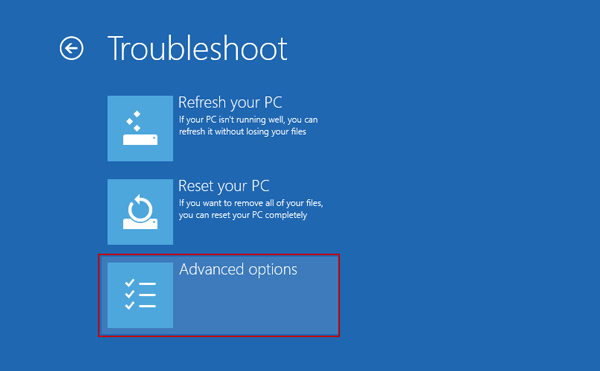
Next, click the “Advanced Options” button.

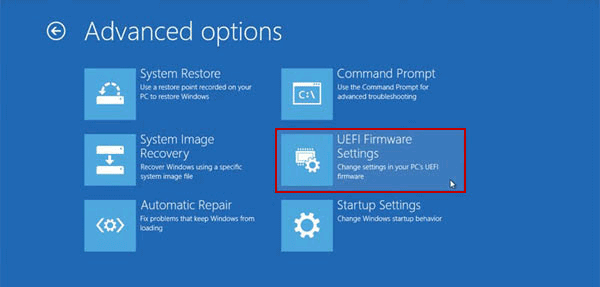
Then click the “UEFI Firmware Settings” button.
Finally, hit the “Restart” button, and you’ll be greeted with the BIOS setup menu once your PC restarts.

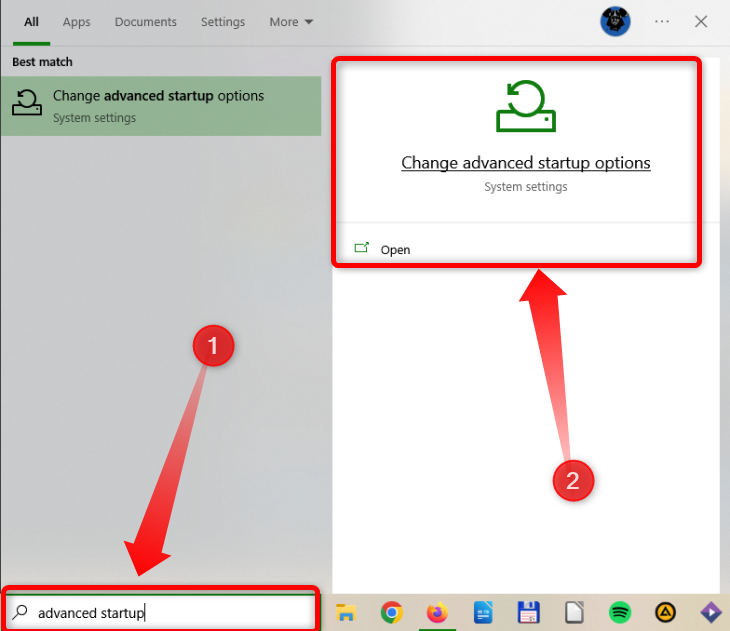
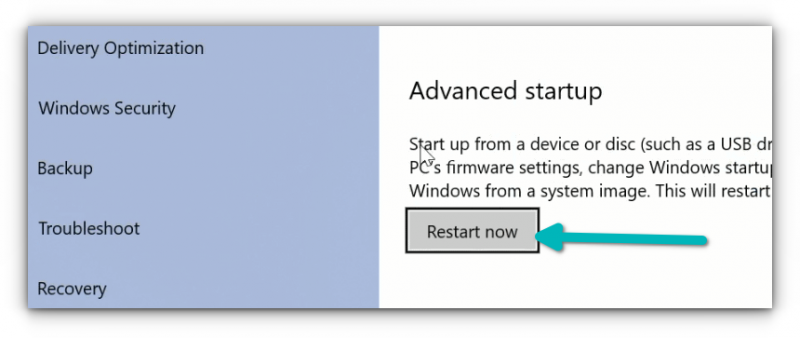
Another way to access the BIOS setup is to open Windows search, type “Advanced Startup,” and then open the “Advanced Startup” menu.
Once there, click the “Restart Now” button. After your PC restarts, you’ll be greeted with the same options as when you restart your PC while holding the Shift button, so follow the steps we listed above.

Note that you can also access the BIOS/UEFI setup on most PCs by holding the F2 key and pressing the power button while the device is powered off. Just keep holding the F2 key after your device turns on until you enter the BIOS setup.
Step 2: Disable Secure Boot in BIOS/UEFI
Once you enter the BIOS/UEFI setup menu, you need to find the Secure Boot option. On MSI motherboards and laptops, click the “Settings” button and then click the “Advanced” tab.

Once there, click the “Windows OS Configuration” tab.

Next, click the “Secure Boot” tab.
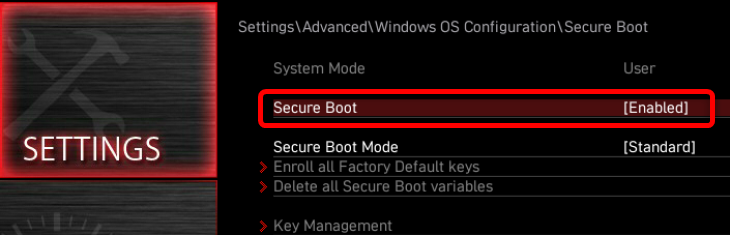
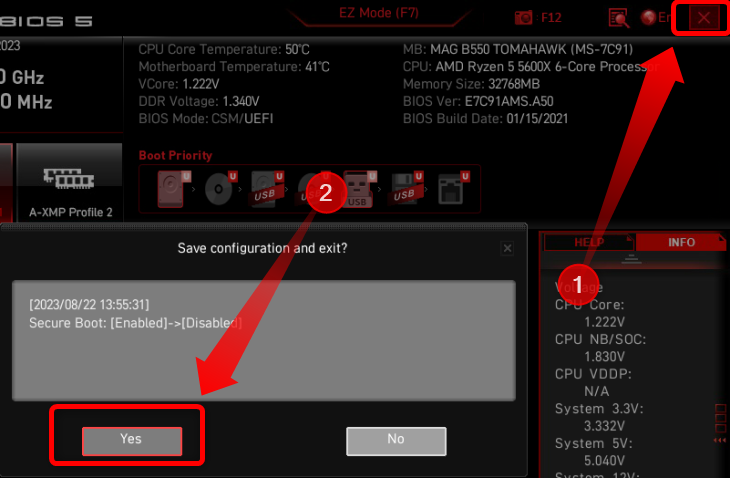
Once you’re inside the “Secure Boot” option menu, you’ll see whether Secure Boot is enabled or disabled on your machine. If it’s enabled, and you want to disable it, click the button and select the “Disable” option.
Once you’re done, exit the BIOS setup and make sure to save the changes you’ve made —in the case of MSI motherboards and laptops, just hit the “X” button in the upper right corner and save the changes when prompted.
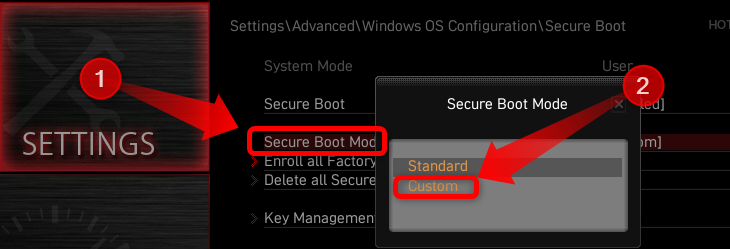
If you cannot enable Secure Boot on an MSI motherboard, you’ll most likely be greeted with the following notification when trying to change the setting: “System in Setup Mode! Secure Boot can be enabled when System in User Mode. Repeat operation after enrolling Platform Key(PK).”
If that happens, change the Secure Boot mode option from “Standard” to “Custom.”
Then, switch back to “Standard,” and click “Yes” when prompted to “Install Factory Defaults.”
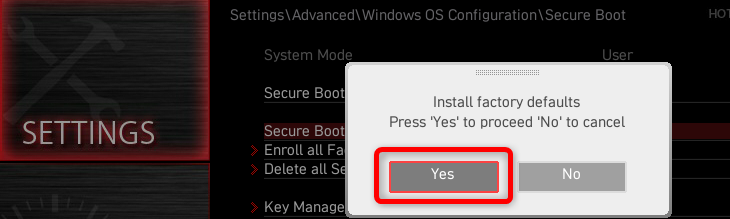
Next, select “No” when asked whether to exit without saving.

Now you should be able to enable or disable Secure Boot without issues.
What to Do if You Can’t Find Secure Boot
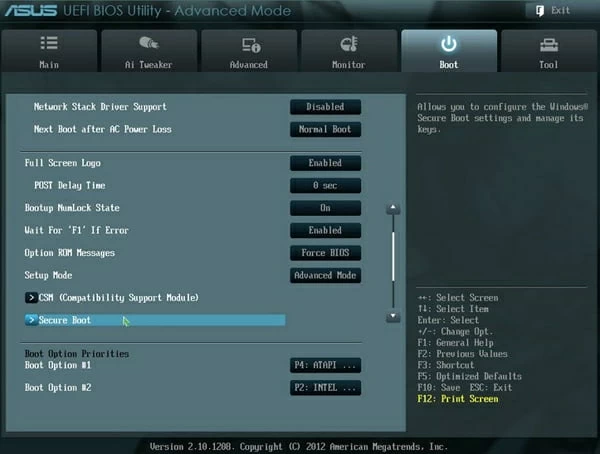
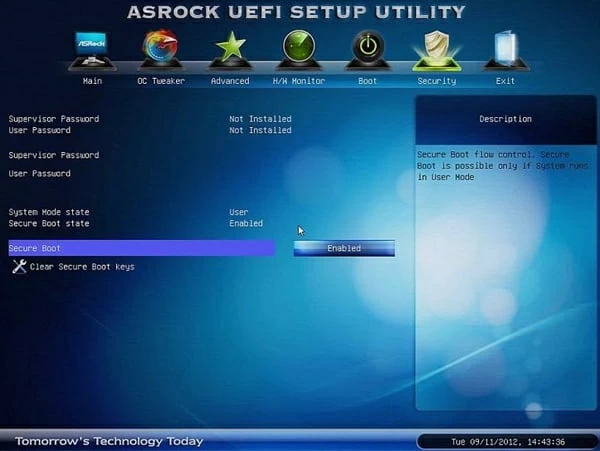
Remember that these settings differ on different laptops and motherboards. For example, on ASUS and Gigabyte motherboards and laptops, Lenovo PCs, and most other motherboards and laptops, you can locate the Secure Boot toggle in the “Security” tab of the BIOS setup menu.
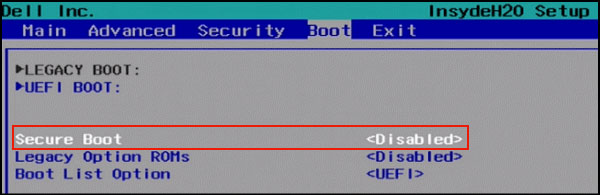
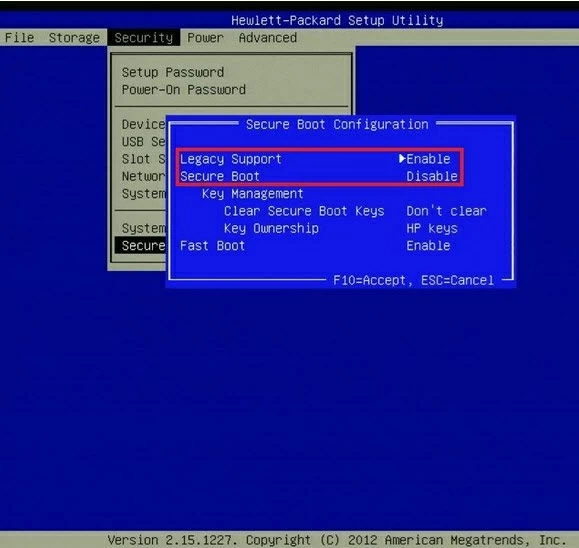
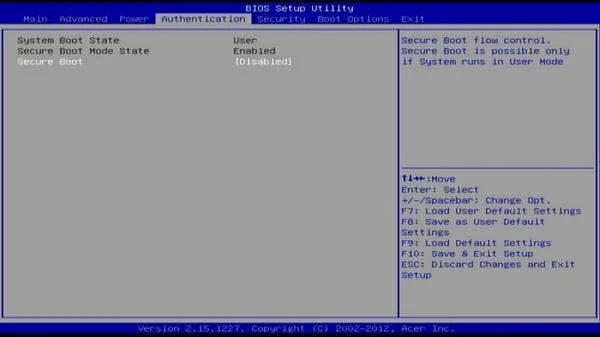
On Acer laptops, the toggle is either located in the “Security” or “Boot” menus. On most Dell devices, the option is found in the “Boot” or “Boot Sequence” tabs. On HP devices, you can find the Secure Boot toggle in the “Boot Options” menu in the “System Configuration” tab or the “Boot Options” tab.
Note that, as is the case with MSI motherboards and laptops, there’s a chance you’ll have to tweak some other settings in order to be able to toggle Secure Boot or make the option appear in the first place. On some systems, you need to enable the BIOS advanced mode by pressing the F7 key; on others, you’re required to create a BIOS administrator password, restore default BIOS settings, load default platform keys, etc. If you encounter issues, just Google “how to enable/disable Secure Boot” on your motherboard, PC, or laptop brand. For example, if you own a Razer laptop, Google “How to disable Secure Boot on Razer laptops.”
How to Check If Secure Boot Is Enabled
On Windows 10 and 11, open Windows Search, type “System Information,” open the System Information app, and look for a row titled “Secure Boot State.” If it’s on, you have Secure Boot enabled; if the “Secure Boot State” reads off, you have it disabled. For a more in-depth guide as well as other ways to check if Secure Boot is enabled on your PC, read our guide on how to check if Secure Boot is enabled on your PC.
Should You Disable Secure Boot?
If you’re a regular user, disabling Secure Boot doesn’t offer much of a benefit. The feature doesn’t affect your PC’s performance, but it does increase overall security and prevents malware from messing up your system. In other words, there’s no harm in keeping Secure Boot enabled in most cases.
If you plan on dual booting a modern Windows OS —think Windows 10 or Windows 11-– along with either some Linux distro or an older Windows OS, you might have to disable Secure Boot since Secure Boot can block the second OS from booting. Some older pieces of hardware also don’t work well with Secure Boot, so if you encounter any issues, you might have to disable Secure Boot.
Note that you can install Windows 11 only on machines with support for Secure Boot. This means that you don’t have to have Secure Boot enabled to install and run Windows 11, but your system has to support the option.
It’s also worth noting that some multiplayer games that come with kernel-level anti-cheat software, such as Valorant, won’t run unless you’ve Secure Boot enabled. So if you want to play those games, you have to enable Secure Boot.

These days, if you buy a computer pre-installed with Windows, it comes with UEFI boot system. UEFI is not something that Microsoft invented, instead it is a protocol existing even before Windows 8. Some Mac devices have been using UEFI for a longer time.
With UEFI comes the feature of “secure boot” which boots only those bootloaders that are signed in to UEFI firmware. This security feature prevents rootkit malware and provides an additional layer of security.
The downside of secure boot is that if you want to boot from a Linux USB or if you want to use a bootable Windows USB, it won’t allow that. Sometimes, it may also create problems in dual booting with Linux.
The good thing is that you can easily disable the secure boot. All you have to do is to access the UEFI firmware settings, go to the Boot option and disbale it.
Don’t worry. I won’t leave you hanging like that. Let me show the steps in detail.
Disabling UEFI secure boot in Windows 10
Some systems don’t let you change the secure boot option without setting an admin password. I’ll discuss the issue in later steps.
Step 1: Access the UEFI settings
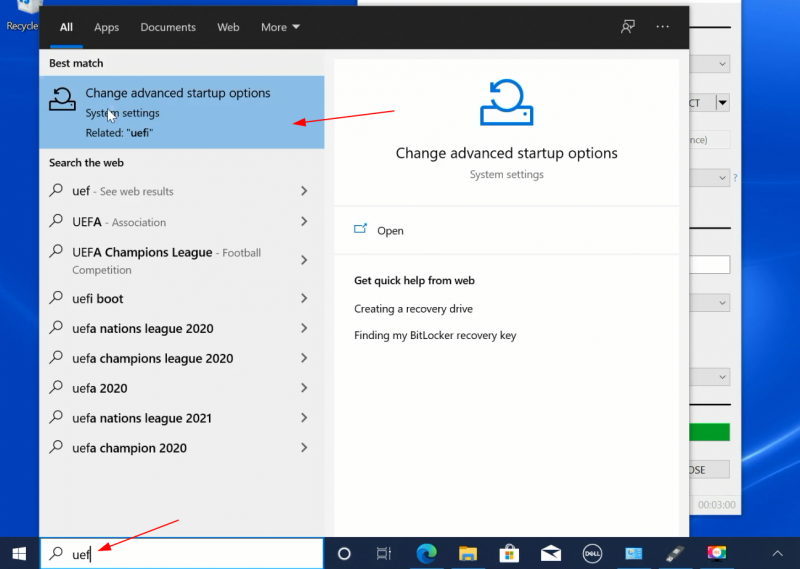
You may access the UEFI settings by powering on your system and using the F2/F10 or F12 keys at the boot time. If that doesn’t work, don’t worry. You can go to the firmware settings from within Windows as well. Here’s how.
Search for UEFI and go to Change advanced startup options in Windows menu.
Now, click on the Restart now button under Advanced startup option.
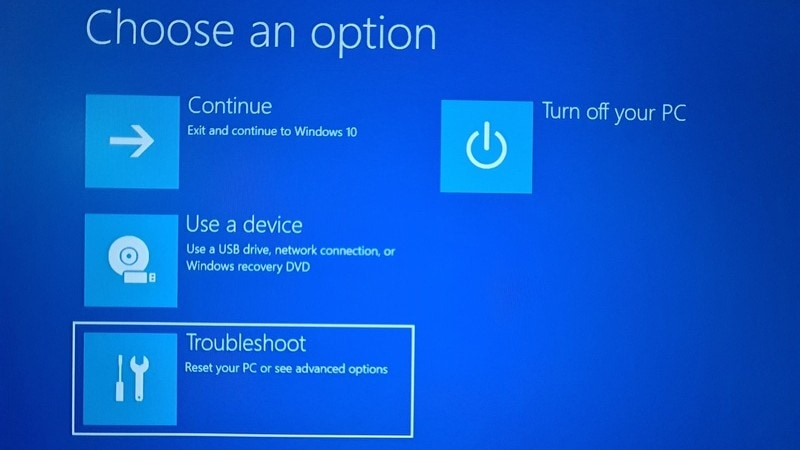
After a few seconds, you should see a blue screen with a few options to choose from. You have to click on Troubleshoot option.
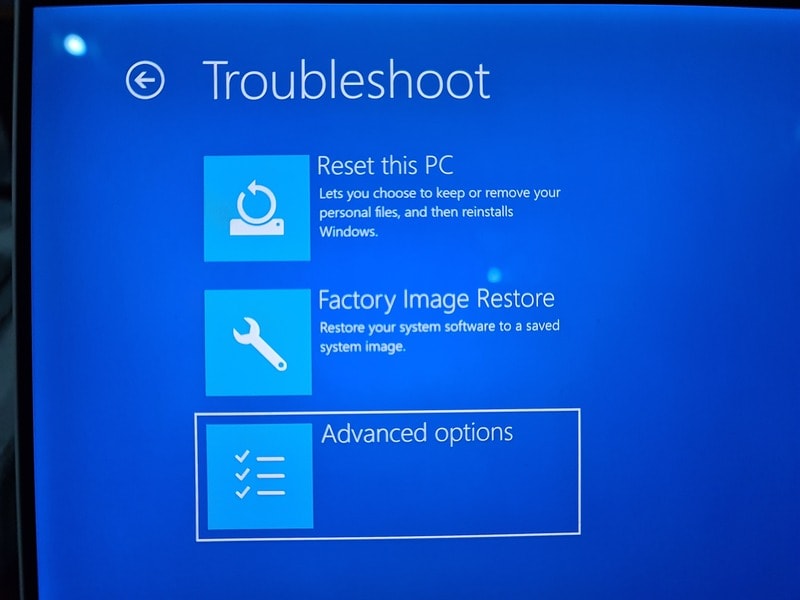
Now, some systems will give you the UEFI Firmware Settings on this screen. Some system may require you to choose an Advanced options.
If you see the UEFI Firmware Settings option, well, click on it. Otherwise, click the Advanced options.
When you see the UEFI Firmware Settings, click on it.

It will notify that you’ll have to restart in order to change any UEFI firmware settings (or UEFI settings in short). Click on the Restart button.

Your system will restart now and when it boots again, you’ll find yourself in the BIOS/UEFI settings interface.

Step 2: Disable secure boot in UEFI
By this time you must have been booted in to UEFI utility. You can change various settings here but all we want to do right now is to disable secure boot option here.
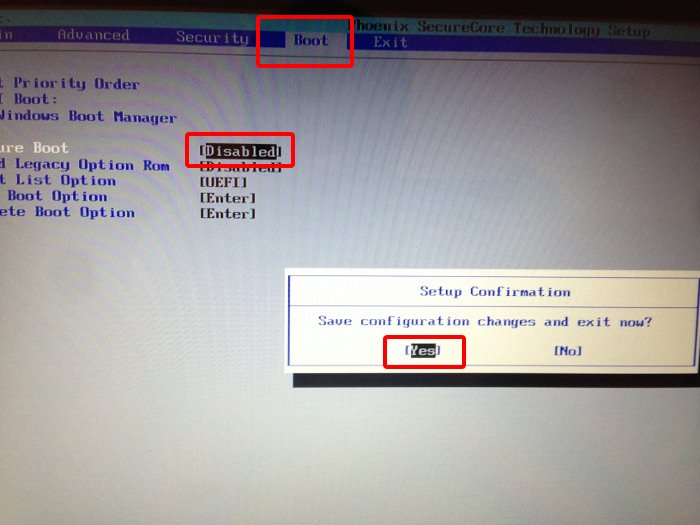
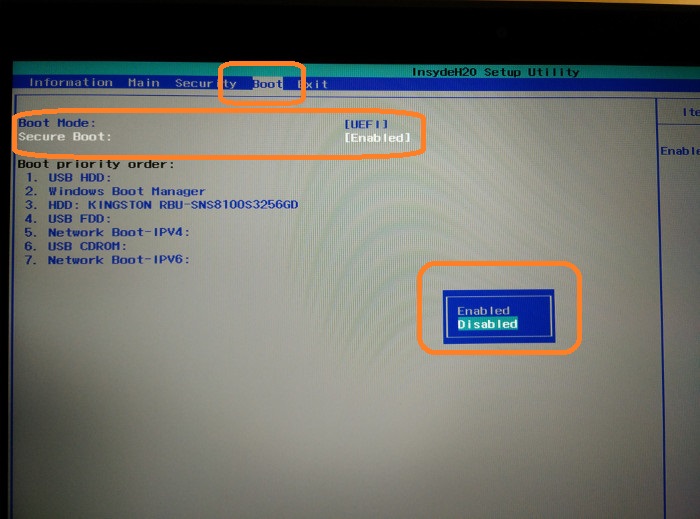
Move to Boot tab. Here, you’ll find Secure Boot option which is set to enabled.
Use the arrow key to go to Secure Boot option and then press enter to select it. Use + or – to change its value. Confirm it when prompted.
Press F10 to save the changes and exit the UEFI settings.
Troubleshooting tip: Disable secure boot option disabled?
As mentioned by some readers in the comments, if you are using an Acer laptop, you might see that option to disable secure boot has been greyed out. If that is the case, no need to panic just yet. There is a way around it.
Using arrow keys, move to Security tab. Look for Set Supervisor Password here.
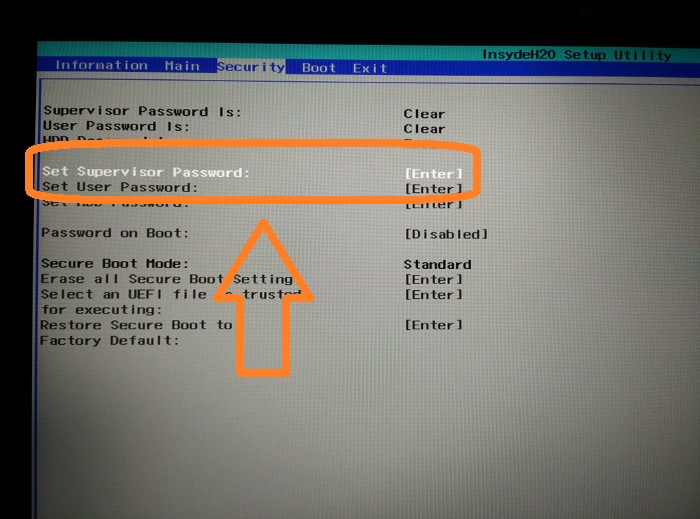
Set a Supervisor password by double-clicking on it.
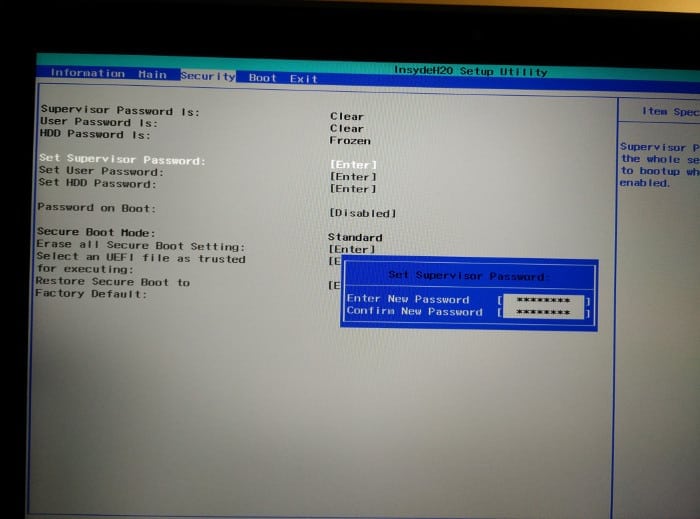
🚧
Either save this password somewhere safe where you can access it years later as well. Use a password manager or a cloud service or a draft in your email. Basically, you should not lose this password. You may also clear the supervisor password after disabling the secure boot.
Once you have set the supervisor password, move to Boot tab now. This time you’ll see that you can actually access the Secure Boot option and change its value. Press the Enter key and change its value to Disabled.
Press F10 to save and exit the UEFI settings.

Next you’ll be booted into Windows normally. That’s it. You can use similar steps to re-enable secure boot later as well.
I hope you find this tutorial helpful. Do let me know if you have confusion and I’ll try to help you out.
About the author
Abhishek Prakash
Created It’s FOSS 11 years ago to share my Linux adventures. Have a Master’s degree in Engineering and years of IT industry experience. Huge fan of Agatha Christie detective mysteries 🕵️♂️
Most modern PCs have a feature called Secure Boot. The purpose of this feature is to prevent your computer from booting with unsigned firmware like drivers and even operating systems. This feature protects your computer from getting malware and other such threats.
However, there are times when you may wish to disable Secure Boot. It’s easy to do on most computers.

What Exactly Is Secure Boot on Windows 10?
Secure Boot is a feature on your Windows 10 PC that prevents your computer from booting with non-trusted devices. These devices are the ones that Microsoft hasn’t yet approved and digitally signed.
For example, if you create a bootable Linux drive, that drive isn’t signed by Microsoft. Secure Boot will prevent your computer from booting that drive, hence keeping your PC safe and secure.
You would need to disable Secure Boot if you want to boot your computer from non-trusted devices. For example, if you wish to install Linux on your PC, and you need to boot from a bootable Linux drive, you’ll need to disable Secure Boot first.

Other reasons for disabling Secure Boot include the need to install certain graphics cards or other hardware devices.
How to Disable Secure Boot on Windows 10
On Windows 10, you can disable Secure Boot from the UEFI firmware settings menu (BIOS).
Before you turn this feature off, know that re-activating it might require you to reset your PC.
With that said, let’s start the Secure Boot disable process:
- Open the Start menu on your Windows 10 PC.
- At the lower-left corner of the Start menu, select the power icon.
- Press and hold down the Shift key on your keyboard and select Restart in the power icon menu.

- Wait for a menu to appear on your screen. When it does, select Troubleshoot from it.

- On the following screen, select Advanced options.

- From the Advanced options screen, select the UEFI Firmware Settings option.

- Confirm your action by selecting Restart on the following screen.

- Your PC should boot into BIOS.
- On the BIOS screen, select the Security tab at the top. This tab might have a different name depending on your PC’s manufacturer. It might say Boot, Authentication, or something similar, but you get the idea.

- Under the Security (or a similar) tab, select the Secure Boot option.

- On the Secure Boot screen, the Secure Boot status should say Active. This means the option is currently enabled on your PC.

- To disable Secure Boot, select the Secure Boot Control option and then choose Disabled from the menu.

- You now need to save your settings and exit BIOS. To do this, find the F10 key next to Save and Exit on the right pane. Press this key to save your changes and exit BIOS.

- A Save & Exit Setup prompt appears. Select Yes in this prompt to continue.

- Your PC should reboot.
And that’s all there is to it. Secure Boot should now be disabled, and you can proceed to boot your PC from various bootable drives.
How to Enable Secure Boot on Windows 10
If you’ve finished your tasks and you want to re-enable Secure Boot, visit the same BIOS screen to turn the feature off.
A few things to know before you attempt to re-enable Secure Boot:
- If you have installed any graphics cards, hardware devices, or operating systems that are incompatible with Secure Boot, remove them before disabling Secure Boot.
- If Secure boot doesn’t reactivate for some reason, follow the troubleshooting procedure below.
To re-enable Secure Boot:
- Open the Start menu and select the power icon.
- Hold down the Shift key and select Restart from the power icon menu.
- On the screens that follow, navigate to Troubleshoot > Advanced options > UEFI Firmware Settings > Restart.
- Your PC should be in BIOS mode.
- In BIOS, select the Security tab at the top.
- Select Secure Boot and then choose Secure Boot Control.
- Choose Enabled from the prompt.

- Press the F10 or any other key (shown on the right pane) to save your BIOS settings.
- Your PC should reboot.
Secure Boot should now be enabled.
What to Do When Secure Boot Won’t Turn On?
If Secure Boot refuses to turn back on despite removing the incompatible items from your PC, you might need to reset your PC.
Resetting your PC will remove all your files as well as any custom settings. If you wish to keep certain files, back them up to an external drive or cloud.
Then, follow these steps to reset your PC:
- Open the Settings app by pressing Windows + I keys at the same time.
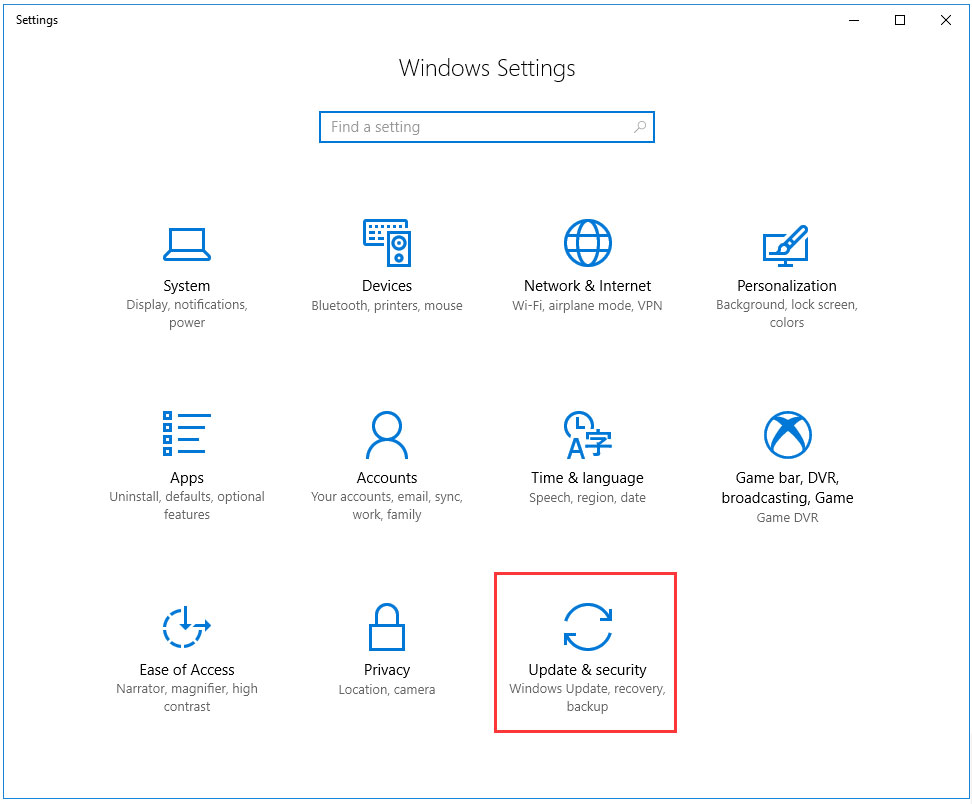
- In Settings, select Update & Security at the bottom.

- From the sidebar on the left, select Recovery.
- On the right pane, under the Reset this PC section, select the Get started button.

- In the window that opens, choose Remove everything.

- Your PC should begin to reset.
Once your PC is reset, follow the procedure above to reactivate Secure Boot on your PC.
We hope this guide helped you disable Secure Boot on your Windows 10 PC. Let us know what made you turn this feature off in the comments below.
Related Posts
- How to Fix a “This file does not have an app associated with it” Error on Windows
- How to Fix an Update Error 0x800705b4 on Windows
- How to Resolve “A JavaScript error occured in the main process” Error on Windows
- How to Fix the Network Discovery Is Turned Off Error on Windows
- How to Change Folder Icons in Windows
-
Home
-
Knowledge Base
- What Is Secure Boot? How to Enable and Disable It in Windows?
By Vicky |
Last Updated
This article introduces what secure boot is and how it works for your Windows operating system. And it also shows how to enable and disable Secure Boot in Windows.
What Is Secure Boot?
Nowadays, the modern computers come in a feature named Secure Boot. Do you have any idea about it? Secure Boot is a part of Microsoft’s Windows 8 and the above versions of Microsoft Windows operating system.
As we know, a traditional BIOS will boot form anywhere, while Secure Boot which is working on the top of UEFI is used to make sure that Windows operating system remains safe from Malware. To put it more clearly, Secure Boot ensures that a device boots using only the software that is trusted by the Original Equipment Manufacturer.
How Does Secure Boot Work?
Once you power on a PC, it starts the process of executing code that configures the processor, memory, and hardware peripherals to make a preparation for the operating system to boot.
During the preparation, Secure Boot checks the signature of firmware code that exists on hardware peripherals like storage deices.
During the boot process, secure Boot will check for an embedded signature inside of the fireware module. If the signature match against a database of signature in Secure Boot, the nodule is allowed to execute.
It can be said that Secure Boot works like a security gate. Code with valid credentials can get through the security gate and execute. Surely, code with bad credentials or no credential will be refused.
Enable Secure Boot
Seeing the function of Secure Boot, you may want to enable it. In order to use it, your PC must meet the following requirements.
- Secure Boot must be enabled after an operating system has been installed.
- Secure Boot requires a recent version of UEFI. Update the firmware with Device Manager if you are in doubt.
- Secure Boot requires Windows 8 or higher versions like Windows 10.
- A system password on some devices should be set to turn on the necessary system firmware options.
Now, lets see how to enable Secure Boot. Please following the steps below.
Step 1: Boot into the system settings by powering on the system and using the manufacture’s method to access the system settings.
Step 2: Look through the menu and select UEFI as the boot mode.
Note: Many menus show UEFI and Legacy as the choices, while others may display UEFI and BIOS (click here to learn about their differences).
Step 3: Navigate to the Secure Boot option and turn it on.
Note: On some devices, you should first boot once after enabling UEFI and go back to the settings menu to enable Secure Boot.
Step 4: Save the changes and exit the menu. You can now boot to media that supports Secure Boot and install an operating system. Please pay attention that Windows will partition storage with GPT partitions instead of MBR (click here to learn about how to convert MBR to GPT).
Step 5: After the operating system is installed, you can verify that Secure Boot is enabled by opening msinfo32.exe (type the command in the open box) and checking that the value for Secure Boot State is “on”.
Disable Secure Boot in Windows 10
Let’s see how to disable Secure Boot in Windows 10.
Note: Before disabling Secure Boot, you should make sure that your PC has Secure Boot and it has been turned on.
Step 1: Please click the following terms in order: Settings, Update & security, Recovery, Restart now, Troubleshoot, Advanced options, UEFI Firmware Settings, and Restart.
Step 2: When you access the UEFI utility screen, please move to the Boot tab on the top menu. According to the information on the screen, use the arrow key to go to the Secure Boot option. (The Secure Boot option can be found on the Boot, Security, or Authentication tab.)
Step 3: Use + or –to change its value to Disable.
Warning:
After disabling Secure Boot and installing other software and hardware, it may be difficult to re-active Secure Boot unless you restore your PC to the factory state. Please be careful when you make some changes on your BIOS settings, and be sure to follow the manufacturer’s instructions exactly.
About The Author
Position: Columnist
Vicky is a website editor who has been writing tech articles since she was graduated from university. Most of her articles talk about Windows PC and hard disk issues. Some of her articles also touch on YouTube usage and issues.
During her spare time, she likes to spend time reading, watching videos, and sitting on her Yoga mat to relax.
Rob Parsons Updated on Apr 15, 2022 4:59 PM
UEFI (Unified Extensible Firmware Interface) is a standard firmware interface for new PCs pre-installed with Windows 8/10, which is designed to replace BIOS (basic input/output system).
Basic steps: Access UEFI BIOS settings and disable «Secure Boot» option, then change «Boot List option» as «Legacy», and enable «Load Legacy Option Rom», then follow a traditional method to boot computer from USB device or CD-ROM.
- How to boot from a USB drive in Windows
- How to boot from CD/DVD-ROM in Windows
Part 1: Access «UEFI BIOS» by PC Settings
Navigate to Settings. You can get there by clicking the gear icon on the Start menu.
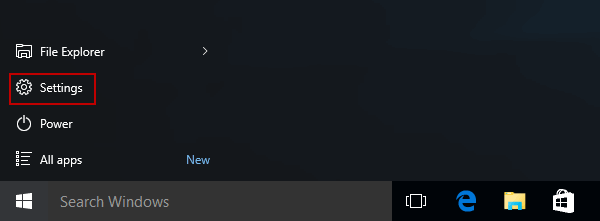
Then in Settings window, choose Update & security.
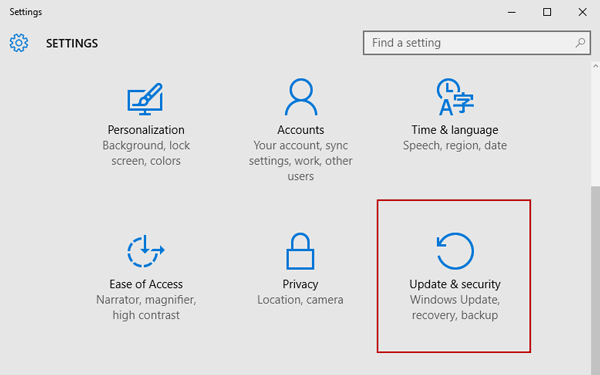
Nest, select Recovery from the left menu and you can see Advanced startup at the right side.
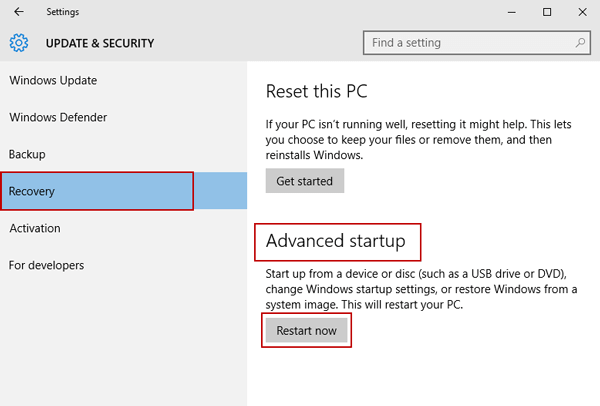
Click Restart Now under Advanced startup option. The comptuer will reboot to a special menu.
Now you will be presented with the Choose an option screen, simply select Troubleshoot.
Next select Advanced options.
Next you select UEFI Firmware Settings.
Click the Restart button. Your system will restart and take you to the UEFI BIOS.
Part 2: Disable «Secure Boot»
Once you’re on the UEFI utility screen, move to Boot tab on the top menu. Use the arrow key to go to Secure Boot option and then Use + or – to change its value to Disable.
Note: Depending on the motherboard’s BIOS/ UEFI firmware, the Secure Boot option will be found on the «Boot», «Security», or «Authentication» tab.
HP Secure Boot
ASUS Secure Boot
Acer Secure Boot
ASRock Secure Boot
Next, press F10 to save the changes and exit the UEFI settings.
That’s for how to disable secure boot in Windows 10. Note that if you’re on an Arm-based Windows RT PC, you can’t disable secure boot because these devices have a locked boot loader.