
Вы тут: Главная → Windows → Как грамотно настроить язык ввода на экране входа в Windows
Сегодня я расскажу, как работает язык ввода до входа в систему и после него, а также разберу настройку в специфических случаях с помощью групповой политики. Эта запись продолжает серию статей о тонкостях языковых настроек.
[+] Сегодня в программе
Как настроить язык ввода по умолчанию после входа в систему
Вы вошли в систему, открыли меню Пуск и начали печатать. Какой язык вы видите в поле ввода, тот и задан по умолчанию. Из коробки он соответствует верхнему предпочитаемому языку, но вы можете переопределить его в дополнительных параметрах клавиатуры. Смотрите также Как грамотно настроить язык интерфейса Windows, магазинных приложений и ввода по умолчанию.
Как работает язык ввода по умолчанию на экране входа в систему
Исторически предпочтения языка ввода на экране приветствия задаются для всех пользователей в разделе HKEY_USERS (освежить память на предмет HKU vs HKCU вам поможет мой разбор 2009 года).
[HKEY_USERS\.DEFAULT\Keyboard Layout\Preload]
"1"="00000409";EN
"2"="00000419";RU
Однако начиная с Windows 8 поведение изменилось и теперь учитывает языковые предпочтения каждого пользователя, нежели форсирует один язык для всех сразу.
Язык ввода по умолчанию, заданный в своей учетной записи, одновременно определяет ее настройки до и после входа в систему.
Когда вы явно указываете язык в дополнительных параметрах клавиатуры, изменение ожидаемо записывается в параметр InputMethodOverride раздела HKCU\Control Panel\International\User Profile. Однако система также меняет значения параметров в разделе реестра HKCU\Keyboard Layout\Preload.
Изменения в разделе HKCU означают, что конфигурация одной учетной записи не влияет на другие. Например, в системе две учетные записи – у первой язык ввода по умолчанию английский, а у второй — русский. Если на экране входа вы выберете первую, у нее будет английский язык, а если вторую – русский.
При этом настройки HKCU преобладают над HKU!
Поэтому только административным копированием (control intl.cpl,,1) или внесением изменений в раздел реестра HKU (что одно и то же) у вас не получится задать единый язык на экране входа для всех пользователей.
То же самое верно и для попыток настроить разные языки для одного пользователя.
Как настроить разные языки ввода на экране входа в систему и после входа
Из описания выше вытекает нестыковка в одном сценарии. Если у человека пароль учетной записи задан на английском языке, а в системе он хочет иметь русский язык ввода по умолчанию, то не вполне очевидно, как добиться желаемого результата.
Так ли это необходимо
Мне понятен сценарий, но желание странное, на мой взгляд. Есть пара способов обойтись без удовлетворения специальных потребностей.
- Можно использовать цифровой ПИН-код, что вполне приемлемо в домашних условиях. Я понимаю, что любителей сложных паролей это не устроит, но в то же время с трудом представляю, почему у таких опытных пользователей язык ввода в ОС русский

- Можно менять не язык ввода на экране входа, а язык пароля, т.е. установить пароль пользователя на предпочитаемом языке! В самом деле, если вы настроили русский язык ввода после входа в систему, то зачем вам пароль на английском?

Если желание задать разные языки непреодолимо или в организации требуется установить всем на экране входа английский язык, читайте дальше!
Решение: групповая политика
Несколько читателей сообщили, что описанное далее решение работает нестабильно или совсем не работает в Windows 10 20H2. Я не смог воспроизвести проблему у себя на 20H2 и 21H1. Если у вас не работает групповая политика, мне нечем помочь. Заносите баг в центр отзывов и/или пишите в техподдержку Microsoft.
Задача решается с помощью групповой политики Disallow copying of user input methods to the system account for sign in, которая появилась в Windows 8 наряду с новым поведением. Из официального описания:
Этот параметр политики предотвращает автоматическое копирование пользовательских методов ввода в системную учетную запись для использования на экране входа.
Формулировка не совсем точная, потому что копирование выполняется не только в системные аккаунты (что не существенно), но и на экран входа пользователя. Кстати, политика сломалась в версии Windows 10 1709, но ее починили в 1809.
Включить политику можно в gpedit.msc или в реестре, например, из командной строки от имени администратора:
reg add "HKLM\Software\Policies\Microsoft\Control Panel\International" /v BlockUserInputMethodsForSignIn /t REG_DWORD /d 1 /f
При этом вам надо учитывать, что политика фиксирует язык, настроенный для экрана входа в систему, т.е. в HKU. Администратор, конечно, может поменять его в любой момент. Но если в системе есть пользователи с паролями на разных языках, кому-то из них придется переключать раскладку каждый раз.
Настройка
Вы можете просто импортировать приведенный ниже REG-файл и сразу же перезагрузить ОС.
Windows Registry Editor Version 5.00

[HKEY_USERS\.DEFAULT\Keyboard Layout\Preload]
"1"="00000409";EN
"2"="00000419";RU

;Disallow copying of user input methods to the system account for sign in
[HKEY_LOCAL_MACHINE\SOFTWARE\Policies\Microsoft\Control Panel\International]
"BlockUserInputMethodsForSignIn"=dword:00000001
Вручную действуйте так:
- Включите политику «Запретить копирование пользовательских методов ввода в системную учетную запись для входа» и перезагрузитесь.
- В Параметрах выберите язык ввода, который вы хотите задать на экране входа для всех пользователей и скопируйте настройки текущего пользователя с помощью административных языковых параметров (
control intl.cpl,,1)
или
Задайте желаемые параметры вHKEY_USERS\.DEFAULT\Keyboard Layout\Preload. - В параметрах задайте язык ввода, который вы хотите иметь после входа в систему в своей учетной записи.
Теперь язык ввода на экране приветствия не будет меняться у пользователей в зависимости от языка ввода, который они задали в Параметрах.
Замечание о языке ввода на экране блокировки
Рассматриваемые выше параметры реестра и политика распространяются на экран входа, но не на экран блокировки.
Когда пользователь блокирует учетную запись, язык ввода по умолчанию на экране блокировки будет тем, который был на момент блокировки.
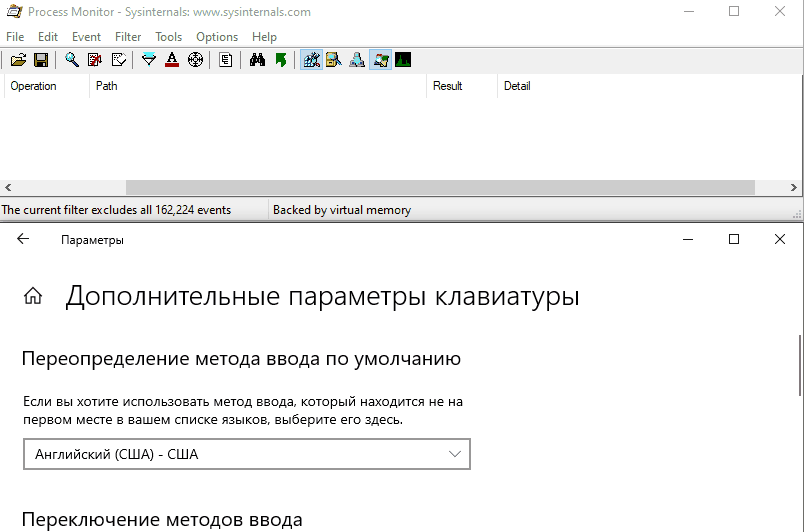
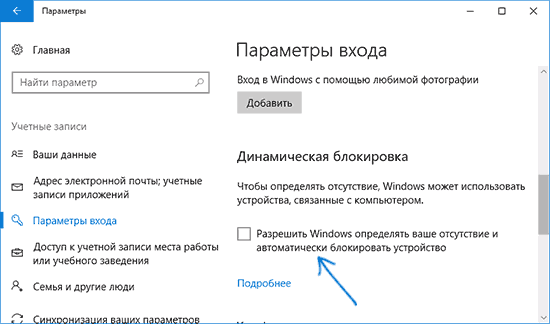
Поведение зависит от того, включена ли у пользователя настройка Позволить выбирать метод ввода для каждого окна приложения (первая картинка в статье), которая выключена по умолчанию.
- Если настройка выключена, на экран блокировки проецируется язык ввода последнего активного приложения. Допустим, у пользователя русский язык ввода по умолчанию. Он печатал в Word на английском языке, а потом заблокировал аккаунт (или сработала политика блокировки). В этом случае на экране блокировки будет английский язык, а не русский.
- Если настройка включена, экран блокировки принимает язык оболочки — панели задачи и меню Пуск. Поэтому на этом экране язык всегда будет тот, что задан у пользователя в качестве языка ввода по умолчанию.
Мне неизвестен способ форсирования конкретного языка на экране блокировки. Если знаете, сообщите, и я добавлю его в статью. В качестве обходного пути следует включить настройку и устанавливать пароль на предпочитаемом языке ввода.
Заключение
Решение написать в блог я принял после очередного вопроса, как это нередко бывает. Поведение далеко не новое, но любопытное, согласитесь. И оно заслуженно пополнило большую коллекцию нестыковок в блоге.
Если честно, я сам узнал об изменении, только когда в форуме люди сообщили о неработающей политике. У меня всегда задан английский язык ввода, а ставить какой-то другой язык на экран входа даже мысли не возникало. Поэтому сам я наступить на грабли не мог. Но да, меня бомбит, когда сажусь за чужой ПК с русским языком ввода по умолчанию  А вас?
Какой у вас язык ввода по умолчанию после входа в систему?
- Английский в локализованной ОС (65%, голосов: 213)
- Английский в английской ОС (19%, голосов: 62)
- Не английский в локализованной ОС (14%, голосов: 45)
- Не английский в английской ОС (1%, голосов: 3)
- Другое / Моего варианта тут нет (1%, голосов: 3)
Проголосовало: 326 [архив опросов]
Загрузка …
В инструкции описано несколько способов убрать пароль при входе в Windows 10 при включении компьютера, а также отдельно при выходе из режима сна. Сделать это можно не только с помощью настроек учетных записей в панели управления, но и используя редактор реестра, настройки электропитания (для того, чтобы отключить запрос пароля при выходе из сна), или бесплатные программы для включения автоматического входа, а можно и просто удалить пароль пользователя — все эти варианты подробно изложены ниже.
Для того, чтобы выполнить описанные ниже действия и включить автоматических вход в Windows 10, ваша учетная запись должна иметь права администратора (обычно, это так и есть по умолчанию на домашних компьютерах). В конце статьи имеется также видео инструкция, в которой наглядно показан первый из описанных способов. По более новой версии системы материал доступен здесь: Как убрать пароль при входе в Windows 11. См. также: Как поставить пароль на Windows 10, Как сбросить пароль Windows 10 (если вы его забыли).
- Как убрать пароль при входе (отключить запрос пароля) в настройках учетных записей
- Автоматический ввод пароля Windows 10 с помощью редактора реестра
- Отключение пароля при выходе из режима сна Windows 10
- Вход в Windows 10 без пароля с помощью программы Autologon от Microsoft Sysinternals
- Как удалить пароль пользователя Windows 10 полностью
- Видео инструкция
- Дополнительная информация
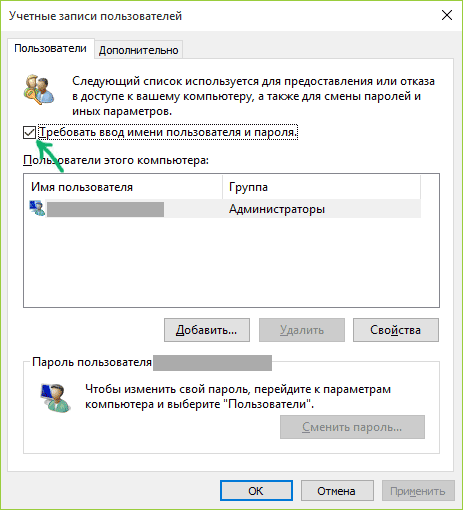
Отключение запроса пароля при входе в настройках учетных записей пользователей
Первый способ убрать запрос пароля при входе в систему Windows 10 очень простой и не отличается от того, как это делалось в предыдущей версии ОС. Потребуется выполнить несколько простых шагов.
- В случае, если в вашей системе вход выполняется не по паролю, а по ПИН-коду, сначала отключите их используя обе части этой инструкции: Как отключить запрос на создание ПИН-кода и удалить ПИН-код в Windows 10.
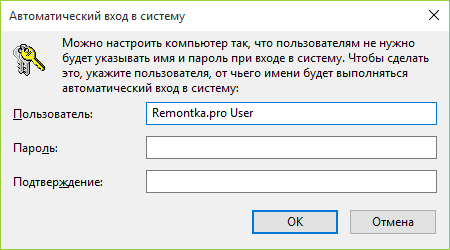
- Нажмите клавиши Windows + R (где Windows — клавиша с эмблемой ОС) и введите netplwiz или control userpasswords2 затем нажмите Ок. Обе команды вызовут появление одного и того же окна настройки учетных записей.
- Чтобы включить автоматический вход в Windows 10 без ввода пароля, выберите пользователя, для которого нужно убрать запрос пароля и снимите отметку с «Требовать ввод имени пользователя и пароля». Если такой отметки нет, решение описано здесь: Что делать если нет пункта Требовать ввод имени пользователя и пароля в Windows 10.

- Нажмите «Ок» или «Применить», после чего потребуется ввести текущий пароль и его подтверждение для выбранного пользователя (которого можно и поменять, просто введя другой логин). Внимание: если у вас используется учетная запись Майкрософт и метод не сработает, попробуйте снова, но в верхнем поле вместо имени пользователя укажите привязанный адрес электронной почты (E-mail).

Также, по некоторым отзывам, если отключение пароля на срабатывает сразу — попробуйте выполнить его дважды: отключили запрос, применили, включили, применили, снова отключили.
В случае, если отметки «Требовать ввод имени пользователя и пароля» в окне нет, зайдите в Параметры – Учетные записи – Варианты входа и проверьте, есть ли там пункт «Требовать выполнение входа с Windows Hello для учетной записи Майкрософт». Если есть — отключите и снова зайдите в настройки автоматического входа в систему. Если нет, запустите командную строку от имени администратора (как это сделать) и введите команду (нажав Enter после неё):
reg add "HKLM\SOFTWARE\Microsoft\Windows NT\CurrentVersion\PasswordLess\Device" /v DevicePasswordLessBuildVersion /t REG_DWORD /d 0
После выполнения команды закройте командную строку и перезагрузите компьютер. Затем повторите шаги, описанные выше — пункт для отключения запроса пароля должен появиться. Также опция «Требовать ввод имени пользователя и пароля» будет недоступна если ваш компьютер в настоящее время подключен к домену. Однако, есть возможность отключить запрос пароля с помощью редактора реестра, хотя этот способ и менее безопасный, чем только что описанный.
Как убрать пароль при входе с помощью редактора реестра Windows 10
Есть еще один способ проделать вышеописанное — использовать для этого редактор реестра, однако при этом следует учитывать, что в данном случае ваш пароль будет храниться в открытом виде в качестве одного из значений реестра Windows, соответственно любой может его просмотреть. Примечание: далее будет также рассмотрен аналогичный способ, но с шифрованием пароля (с помощью Sysinternals Autologon).
Для начала, запустите редактор реестра Windows 10, для этого нажмите клавиши Windows + R, введите regedit и нажмите Enter.
Перейдите к разделу реестра
HKEY_LOCAL_MACHINE\Software\Microsoft\Windows NT\CurrentVersion\Winlogon
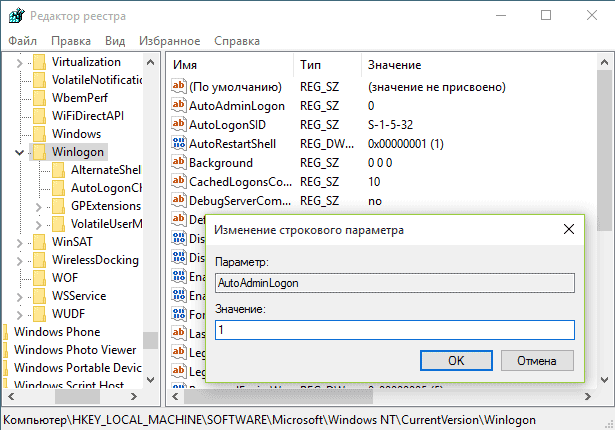
Для включения автоматического входа в систему для домена, учетной записи Microsoft или локальной учетной записи Windows 10, выполните следующие шаги:
- Измените значение AutoAdminLogon (дважды кликните по этому значению справа) на 1.
- Измените значение DefaultDomainName на имя домена или имя локального компьютера (можно посмотреть в свойствах «Этот компьютер»). Если этого значения нет, его можно создать (Правая кнопка мыши — Создать — Строковый параметр).
- При необходимости, измените DefaultUserName на другой логин, либо оставьте текущего пользователя.
- Создайте строковый параметр DefaultPassword и в качестве значения укажите пароль учетной записи.
После этого можно закрыть редактор реестра и перезагрузить компьютер — вход в систему под выбранным пользователем должен произойти без запроса логина и пароля.
Как отключить пароль при выходе из режима сна
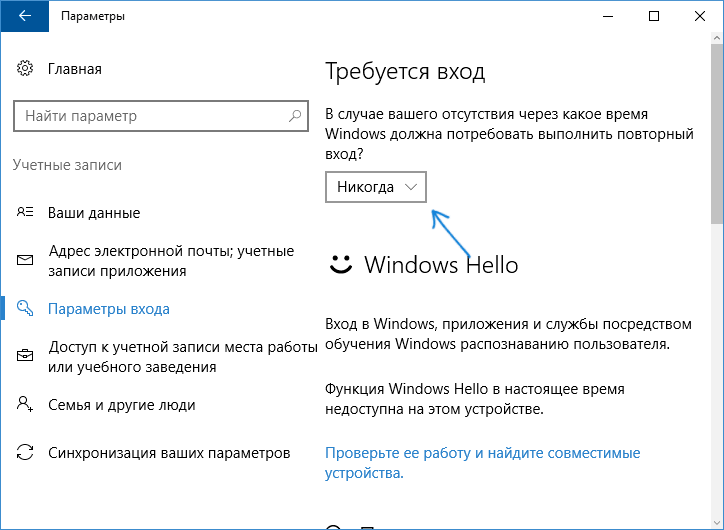
Также может потребоваться убрать запрос пароля Windows 10 при выходе компьютера или ноутбука из сна. Для этого в системе предусмотрена отдельная настройка, которая находится в (клик по значку уведомлений) Все параметры — Учетные записи — Параметры входа. Эту же опцию можно изменить с помощью редактора реестра или редактора локальной групповой политики, что будет показано далее.
В разделе «Требуется вход» (на некоторых компьютерах или ноутбуках такой раздел может отсутствовать) установите «Никогда» и после этого, выйдя из сна компьютер не будет снова запрашивать ваш пароль.
Есть и еще один способ отключить запрос пароля при данном сценарии — использовать пункт «Электропитание» в Панели управления. Для этого, напротив используемой в настоящий момент схемы, нажмите «Настройка схемы электропитания», а в следующем окне — «Изменить дополнительные параметры питания».
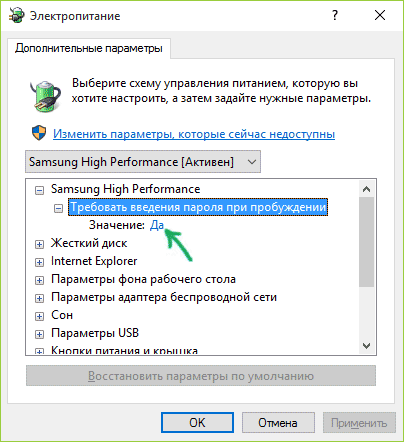
В окне дополнительных параметров кликните по «Изменить параметры, которые сейчас недоступны», после чего измените значение «Требовать введение пароля при пробуждении» на «Нет». Примените сделанные настройки. Не на всех системах в параметрах электропитания вы найдете такой пункт, если он отсутствует — пропускаем этот шаг.
Как отключить запрос пароля при выходе из сна в редакторе реестра или редакторе локальной групповой политики
Помимо параметров Windows 10, отключить запрос пароля при выходе системы из режима сна или гибернации можно, изменив соответствующие системные параметры в реестре. Сделать это можно двумя способами.
Для Windows 10 Pro и Enterprise самым простым способом будет использование редактора локальной групповой политики:
- Нажмите клавиши Win+R и в введите gpedit.msc
- Перейдите к разделу Конфигурация компьютера — Административные шаблоны — Система — Управление электропитанием — Параметры спящего режима.
- Найдите два параметра «Требовать пароль при выходе из спящего режима» (один из них для питания от батареи, другой — от сети).

- Дважды кликните по каждому из этих параметров и установите «Отключено».

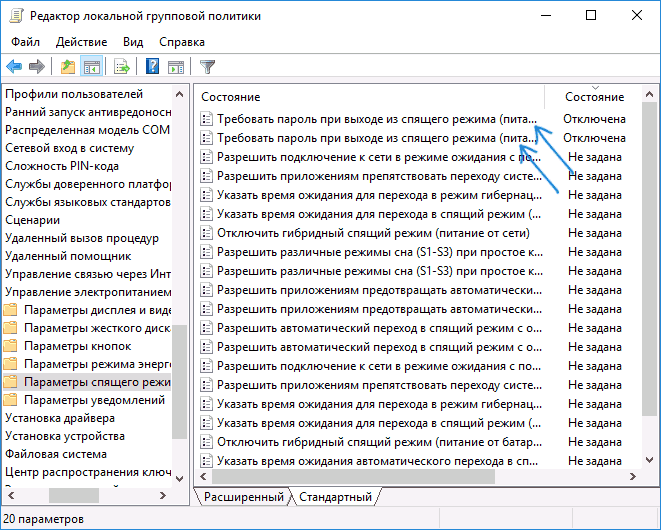
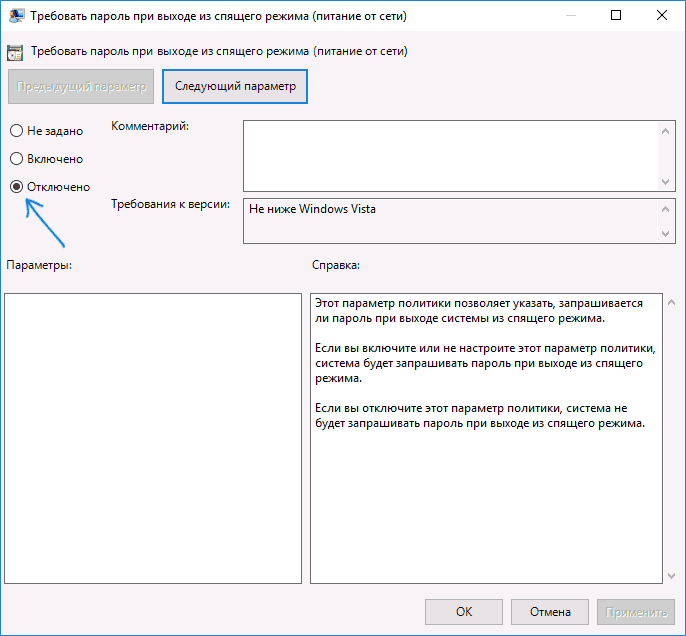
После применения настроек пароль при выходе из спящего режима больше запрашиваться не будет.
В Windows 10 Домашняя редактор локальной групповой политики отсутствует, но сделать то же самое можно с помощью редактора реестра:
- Зайдите в редактор реестра и перейдите к разделу
HKEY_LOCAL_MACHINE\SOFTWARE\Policies\Microsoft\Power\PowerSettings\0e796bdb-100d-47d6-a2d5-f7d2daa51f51
(при отсутствии указанных подразделов создайте их с помощью пункта «Создать» — «Раздел» контекстного меню при правом нажатии по имеющемуся разделу).
- Создайте два значения DWORD (в правой части редактора реестра) с именами ACSettingIndex и DCSettingIndex, значение каждого из них — 0 (оно такое сразу после создания).

- Закройте редактор реестра и перезагрузите компьютер.
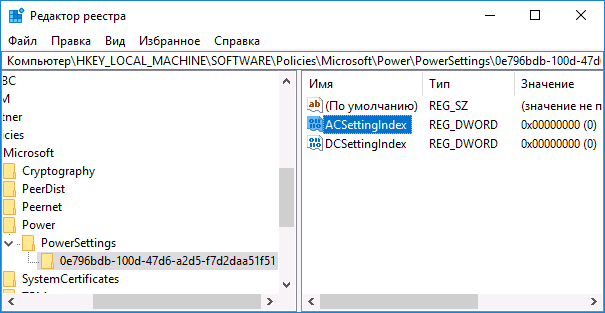
Готово, пароль после выхода Windows 10 из сна спрашиваться не будет.
Как включить автоматический вход в Windows 10 с помощью Autologon for Windows
Еще один простой способ отключить ввод пароля при входе в Windows 10, а осуществлять его автоматически — бесплатная программа Autologon for Windows, которая доступна на официальной странице https://docs.microsoft.com/ru-ru/sysinternals/downloads/autologon.
Если по какой-то причине способы отключить пароль при входе, описанные выше, вам не подошли, можете смело попробовать этот вариант, во всяком случае чего-то вредоносного в нём точно не окажется и вероятнее всего он сработает. Всё что потребуется после запуска программы — согласиться с условиями использования, а затем ввести текущий логин и пароль (и домен, если вы работаете в домене, для домашнего пользователя обычно не нужно, программа может автоматически подставить имя компьютера) и нажать кнопку Enable.
Вы увидите информацию о том, что автоматический вход в систему включен, а также сообщение, что данные для входа зашифрованы в реестре (т.е. по сути это второй способ данного руководства, но более безопасный). Готово — при следующей перезагрузке или включении компьютера или ноутбука вводить пароль не понадобится.
В дальнейшем, если будет нужно снова включить запрос пароля Windows 10 — снова запустите Autologon и нажмите кнопку «Disable» для отключения автоматического входа.
Как полностью убрать пароль пользователя Windows 10 (удалить пароль)
Если вы используете локальную учетную запись на компьютере (см. Как удалить учетную запись Майкрософт Windows 10 и использовать локальную учетную запись), то вы можете полностью убрать (удалить) пароль для вашего пользователя, тогда его не придется вводить, даже если вы заблокируете компьютер клавишами Win+L. Чтобы сделать это, выполните следующие шаги.
Есть несколько способов сделать это, один из них и, вероятно, самый простой — с помощью командной строки:
- Запустите командную строку от имени администратора (для этого вы можете начать набирать «Командная строка» в поиске на панели задач, а когда найдется нужный элемент — кликнуть по нему правой кнопкой мыши и выбрать пункт меню «Запустить от имени администратора».
- В командной строке по порядку использовать следующие команды, нажимая Enter после каждой из них.
- net user (в результате выполнения этой команды вы увидите список пользователей, в том числе скрытых системных, под теми именами, под которыми они значатся в системе. Запомните написание имени вашего пользователя).
-
net user имя_пользователя ""
(при этом если имя пользователя состоит из более одного слова, также возьмите его в кавычки).

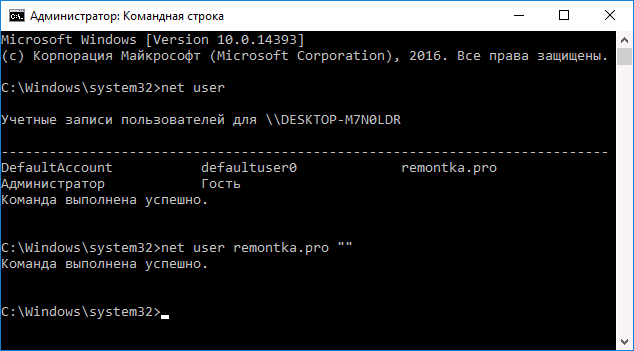
После выполнения последней команды, у пользователя будет удален пароль, и вводить его для входа в Windows 10 не будет необходимости.
Видео инструкция
Дополнительная информация
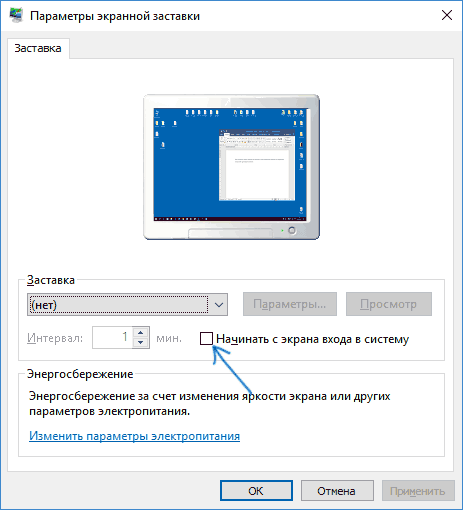
Судя по комментариям, многие пользователи Windows 10 сталкиваются с тем, что даже после отключения запроса пароля всеми способами, он иногда запрашивается после того, как компьютер или ноутбук не используется некоторое время. И чаще всего причиной этого оказывалась включенная заставка с параметром «Начинать с экрана входа в систему».
Чтобы отключить этот пункт, нажмите клавиши Win+R и введите (скопируйте) следующее в окно «Выполнить»:
control desk.cpl,,@screensaver
Нажмите Enter. В открывшемся окне параметров заставки снимите отметку «Начинать с экрана входа в систему» или вовсе отключите заставку (если активная заставка — «Пустой экран», то это тоже включенная заставка, пункт для отключения выглядит как «Нет»).
И еще один момент: в Windows 10 последних верий появилась функция «Динамическая блокировка», настройки которой находятся в Параметры — Учетные записи — Параметры входа.
Если функция включена, то Windows 10 может блокироваться паролем, когда вы, к примеру, отходите от компьютера с сопряженным с ним смартфоном (или отключаете Bluetooth на нем).
И последний нюанс: у некоторых пользователей после использования первого метода отключения пароля для входа в систему, на экране входа в систему появляется два одинаковых пользователя и требуется пароль. Обычно такое происходит при использовании учетной записи Майкрософт, возможное решение описано в инструкции Два одинаковых пользователя Windows 10 при входе.
Applies ToWindows 11 Windows 10
Various language and keyboard/input layout settings in Windows can be managed in the Settings app including:
-
Installing and removing languages.
-
Changing the Windows display language.
-
Changing the language used by Microsoft Store apps and websites.
-
Adding speech features to a language.
-
Adding and removing keyboard/input layouts.
-
Changing keyboard/input layouts.
This article covers these tasks.
Note: For the sake of simplicity, the rest of this article refers to keyboard/input layout as just keyboard layout.
Select the desired task from the following list:
To check what languages are currently installed in Windows:
-
In the Time & language > Language & region window, the currently installed languages are displayed in the Language section.
The first step in setting language settings in Windows is making sure that the desired language is installed. To install a language in Windows:
-
Since language packs are downloaded via the Internet, make sure that the Windows device is connected to the Internet.
-
Save all work and close out of any open apps.
-
In the Time & language > Language & region window, under the Language section, select the Add a language button next to Preferred languages.
-
In the Choose a language to install window, enter in the name of the desired language in the Type a language name… text box or scroll through the list of available languages. Once the desired language is displayed, select it and then select the Next button.
-
In the Install language features window:
-
Under Optional language features, make sure Language pack is selected.
-
Under Optional language features, select any additional desired features, such as speech recognition.
-
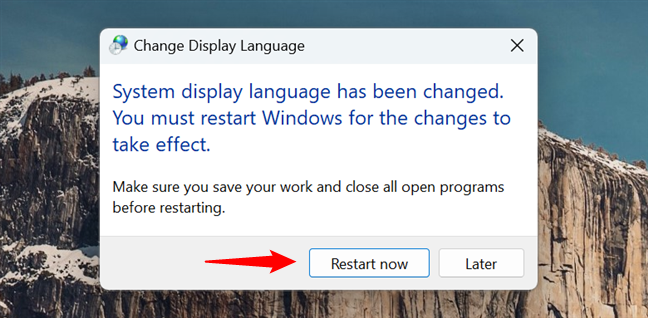
Under Language preferences, if the language being installed should be set as the Windows display language, select Set as my Windows display language. For more information, see the Change the Windows display language section in this article.
-
-
Once all the options are selected as desired in the Install language features window, select the Install button.
-
In the Time & language > Language & region window, the following message is displayed under the Language section:
Please wait while the language finishes installing. This could take a few minutes.
In the list of languages, the download and install progress of the selected language is also displayed.
-
Once the selected language is finished installing, the language is added as a language under the Language section in the Time & language > Language & region window.
-
If the option Set as my Windows display language was selected:
-
The following message is displayed under the Language section in the Time & language > Language & region window prompting to sign out of Windows:
Windows needs to sign you out in order to apply your new display language.
To sign out of Windows, select the Sign out button next to the message.
Note: If there’s no Sign out button next to the message, then manually sign out by right-clicking on the Start menu and then selecting Shutdown or sign out > Sign out.
-
At the Windows sign-on screen, sign back into Windows. The Windows display language is applied and changes the selected display language.
Warning: When the Windows display language is changed, it might also change the keyboard layout to match the language. The input language icon at the sign-on screen shows the currently selected keyboard layout. Be aware of the possible different keyboard layout when entering the username and password at the Windows sign-on screen.
If necessary, use the password reveal icon in the password box to verify that the password is being entered correctly with the current keyboard layout. The keyboard layout can be changed from the sign-on screen using the input language icon.
Changing the keyboard layout only changes the layout and doesn’t change the Windows display language.
-
Note: A single language edition of Windows might be installed if one of the following messages is displayed when trying to add a language pack:
Only one language pack allowed.
Your Windows license supports only one display language.
For more information, see Check whether a version of Windows supports multiple languages.
The Windows display language determines the language used by the Windows user interface. It also determines the language used by Windows features such as the Settings app and File Explorer.
Changing the Windows display language also causes the selected language to move to the top of Preferred languages list. The first supported language in the Preferred languages list determines the language used by Microsoft Store apps and websites.
Important: Some languages aren’t fully localized. For languages that aren’t fully localized, some elements in Windows might still appear in the first language that is fully localized in the Preferred languages list.
To change the Windows display language:
-
Ensure that Windows already has the desired language installed before switching to it. To check what languages are currently installed in Windows, follow the section Check what languages are installed in Windows in this article. If the desired language isn’t currently installed, follow the section Install a language pack in this article.
-
Save all work and close out of any open apps.
-
In the Time & language > Language & region window, under the Language section, select the desired Windows display language in the drop-down menu next to Windows display language.
Tip: If the desired display language isn’t displayed in the Windows display language drop-down menu, see the section Install a language pack in this article to install the language.
-
The following message is displayed under Windows display language:
Windows needs to sign you out in order to apply your new display language.
To sign out of Windows, select the Sign out button.
Note: If there’s no Sign out button next to the message, then manually sign out by right-clicking on the Start menu and then selecting Shutdown or sign out > Sign out.
-
At the Windows sign-on screen, sign back into Windows. The Windows display language is applied and changes to the selected display language.
Warning: When the Windows display language is changed, it might also change the keyboard layout to match the language. The input language icon at the sign-on screen shows the currently selected keyboard layout. Be aware of the possible different keyboard layout when entering the username and password at the Windows sign-on screen.
If necessary, use the password reveal icon in the password box to verify that the password is being entered correctly with the current keyboard layout. The keyboard layout can be changed from the sign-on screen using the input language icon.
Changing the keyboard layout only changes the layout and doesn’t change the Windows display language.
Changing the Windows display language changes the language used by the Windows user interface and Windows features such as the Settings app and File Explorer. By default, it also changes the language used by Microsoft Store apps and websites by moving the selected Windows display language to the top of the Preferred languages list. For more information, see the section Change the Windows display language in this article.
However, the language used by Microsoft Store apps or websites can be controlled independently of the Windows display language. For example, the Windows display language can be in one language, while the language used by Microsoft Store apps or websites can be in another. The first supported language in the Preferred languages list determines the language used by Microsoft Store apps and websites.
To change the language used by Microsoft Store apps and websites:
-
In the Time & language > Language & region window, the current preferred order of the installed languages is shown under Preferred languages in the Language section.
-
To move the desired language for Microsoft Store apps and websites to the top of the Preferred languages list, select the language and then drag it to the top of the list. Observe how moving the language to the top of the Preferred languages list doesn’t affect the language selected as the Windows display language.
-
If desired, reorder the preference of other installed languages by selecting the language and then dragging it to the desired location in the Preferred languages list.
To install speech features for a language:
-
Since speech features are downloaded via the Internet, make sure that the Windows device is connected to the Internet.
-
Make sure that the language where speech is going to be used is set as the display language.
-
In the Time & language > Language & region window, under the Language section, select the ellipses next to the current Windows display language and then select Language options.
-
In the Time & language > Language & region > Options window, under the Language Features section, select the Download button next to each desired speech features that should be installed. For example:
-
Text-to-speech.
-
Basic Speech recognition.
-
Enhanced speech recognition.
Note: Not all languages have speech features. If some or all of the above features aren’t available as an option, that language doesn’t have those speech features.
-
Adding a keyboard layout allows selection of an alternate keyboard layout for the current Windows display language. Alternate keyboard layouts allow directly entering of characters using the keyboard or input device that aren’t available in the current Windows display language’s keyboard layout. For example, characters only found in other languages.
Note: A full language pack that matches the language of the desired keyboard layout doesn’t always need to be installed to gain access to that keyboard layout. All languages, including the current Windows display language, have keyboard layouts in various different languages. The current Windows display language might have the keyboard layout of the desired keyboard layout in a different language.
To add a keyboard layout:
-
In the Time & language > Language & region window, under the Language section, select the ellipses next to the current Windows display language and then select Language options.
-
In the Time & language > Language & region > Options window, under the Keyboards section, verify that the desired keyboard layout isn’t already installed. If it’s not, then select the Add a keyboard button next to Installed keyboards.
-
In the pop-up menu that appears, scroll through the list of keyboard layouts and then select the desired keyboard layout. The list is sorted first with the keyboard layouts from the selected language, and then alphabetically.
Important: If the desired keyboard layout isn’t listed, start this section over, but instead of the current Windows display language, select the language that matches the desired keyboard layout.
If the language that matches the desired keyboard layout isn’t installed, then follow the section Install a language pack in this article to install the language of the desired keyboard layout.
-
Once the desired keyboard layout is selected, it should display in the Time & language > Language & region > Options window under the Keyboards section. To switch to the keyboard layout that was installed, see Change the keyboard layout section in this article.
A keyboard layout can be selected from the input language icon in the system tray area of the taskbar. The input language icon displays the currently selected keyboard layout. To select a different keyboard layout:
-
In the system tray area of the taskbar, select the input language icon.
-
A pop-up menu is displayed with the available keyboard layouts. Select the desired keyboard layout.
-
The input language icon changes to the selected keyboard layout.
Tips: A keyboard layout can also be selected by holding down the Windows logo key on the keyboard and then selecting the Spacebar. Each selection of the Spacebar while holding down the Windows logo key cycles through the installed keyboard layouts. If selecting the Spacebar doesn’t do anything, only one keyboard layout is installed. To see what languages and keyboard layouts are currently installed in Windows, see the following sections in this article:
-
Check what languages are installed in Windows.
-
Add a keyboard layout.
If the desired keyboard layout isn’t available, follow the section Add a keyboard layout in this article.
To remove a currently installed language pack:
-
In the Time & language > Language & region window, under the Language section, select the ellipses next to the language that needs to be removed and then select Remove.
Note: If the Remove button is greyed out, the selected language to be removed is the current Windows display language. Switch to another Windows display language before attempting to remove the language. For more information, see Change the Windows display language section in this article.
-
In the dialog box that appears, confirm removing the language by selecting the Yes button.
To remove a currently installed keyboard layout:
-
In the Time & language > Language & region window, under the Language section, select the ellipses next to the language that contains the keyboard that needs to be removed and then select Language options.
Note: Installed keyboard layouts aren’t always part of a matching language. The keyboard layout might be installed as part of the current Windows display language. Languages can contain keyboard layouts that aren’t the same language as the language pack.
For this reason, the keyboard layout can be located either under the current Windows display language or the language that matches the keyboard layout. If the keyboard layout to be removed isn’t under the current Windows display language, then check the language that matches the keyboard layout.
-
In the Time & language > Language & region > Options window, under the Keyboards section, select the ellipses next to the keyboard that needs to be removed and then select Remove.
Note: If the Remove button is greyed out, the selected keyboard layout is the only installed keyboard layout for the current Windows display language. Add another keyboard layout before attempting to remove the keyboard layout. For more information, see Add a keyboard layout section in this article.
The input language icon in the system tray area of the taskbar allows selection of keyboard layouts. By default, the input language icon is enabled and displays in the taskbar. For more information, see the Change the keyboard layout section of this article.
An alternative to the input language icon is the legacy language bar found in previous versions of Windows. If the legacy language bar is enabled, then the input language icon in the taskbar is disabled and no longer displays. To reenable the input language icon and display it in the taskbar, follow these steps:
-
Select Start and then select Settings > Time & language > Typing .
Or
Select the following Time & language > Typing shortcut:
Open Time & language > Typing
-
In the Time & language > Typing window, select Advanced keyboard settings.
-
In the Time & language > Typing > Advanced keyboard settings window, under Switching input methods, uncheck the option Use the desktop language bar when it’s available.
Warning: Unchecking the option Use the desktop language bar when it’s available causes the input language icon to display again in the taskbar. However, it causes the legacy language bar to no longer display. If the legacy language bar is preferred over the input language icon, then leave the option Use the desktop language bar when it’s available enabled.
Additional options for the legacy language bar can be found under the Language bar options link in the Time & language > Typing > Advanced keyboard settings window.
Need more help?
Want more options?
Explore subscription benefits, browse training courses, learn how to secure your device, and more.
Did you install an English version of Windows on your computer, only to change the default display language to another language afterward? Like maybe Spanish, French, German, or any other language you prefer using? If you did that, you probably found out the hard way that although the display language is the one you want, the language your computer uses on the sign-in/lock screen is still the one that your Windows version uses by default. Read this tutorial if you want to find out how to make Windows 11 and Windows 10 use the same display language everywhere, both on the desktop and on the lock screen or the sign-in screen:
What happens when you change the language for the lock screen in Windows
If you want to enhance your experience with your Windows 11 or Windows 10 computer, you might want to change the language for the Lock Screen. The sign-in or lock screen is the first thing you see when you turn on your PC, and it usually displays a picture with the date and time, but it can also show some notifications like the weather or the number of emails you’ve got in your inbox. However, if you’ve changed the display language of your Windows computer, the lock screen might still be displayed in the original language you had.
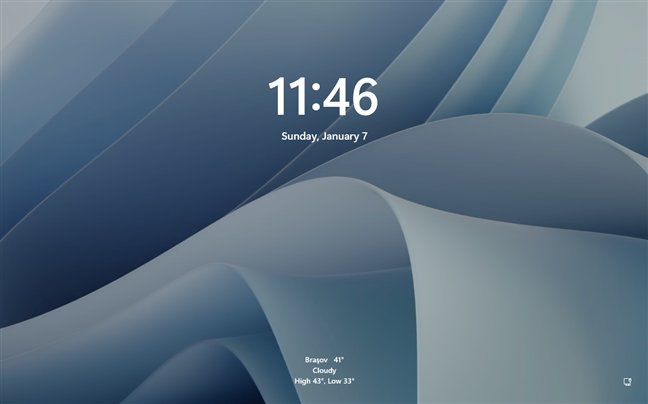
The lock screen in Windows 11 using the default language
For instance, you may have Spanish set as your Windows 11 or Windows 10 display language, but your lock screen might still be showing information in English. And in that case, you’ll probably want to change the language for the lock screen, too, so that you’ll have a more unified experience across the whole operating system on your PC.
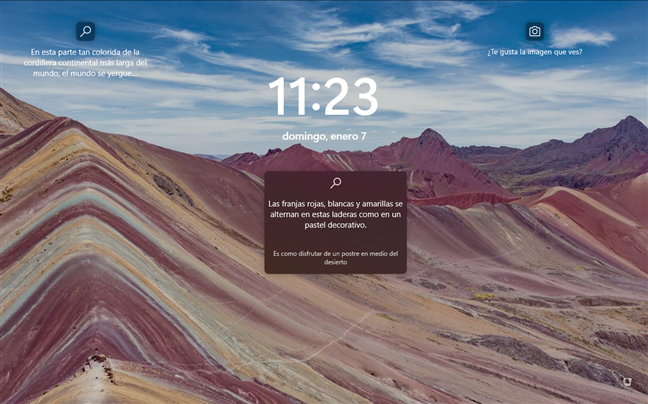
The lock screen in Windows 11 using a different language
If this is something you’d like, follow the next steps to make your sign-in/lock screen use any language you want:
Step 1. Open the Region Administrative settings in Windows
In order to change the language used by your Windows computer on the sign-in/lock screen, you’ll have to open a panel called Region. Here’s how to do that in both Windows 11 and Windows 10:
1.1. How to open Windows 11’s Region Administrative settings
The fastest way to access the Region settings panel in Windows 11 is to use the search box from the taskbar. Enter the word region in it and then click or tap on the Region (Control panel) search result.

Open Region in Windows 11 using search
If you prefer, there are other ways to get to the Region panel. For example, you can open the Settings app, select Time & language in the left sidebar, access Language & region on the right panel, and click or tap the Administrative language settings in the Related settings section at the bottom of the right area of the window.
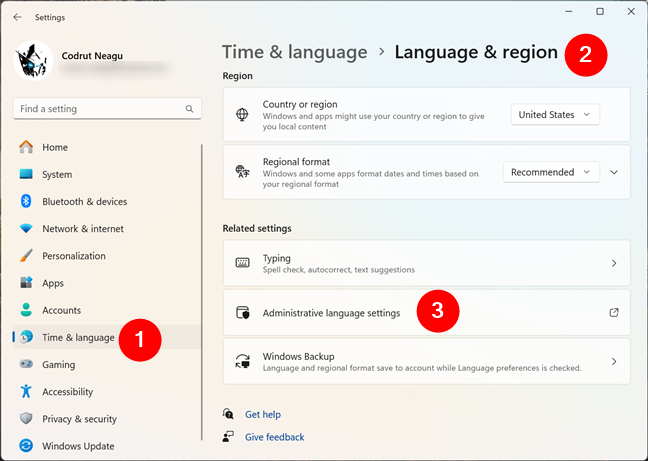
Open Administrative language settings in Windows 11
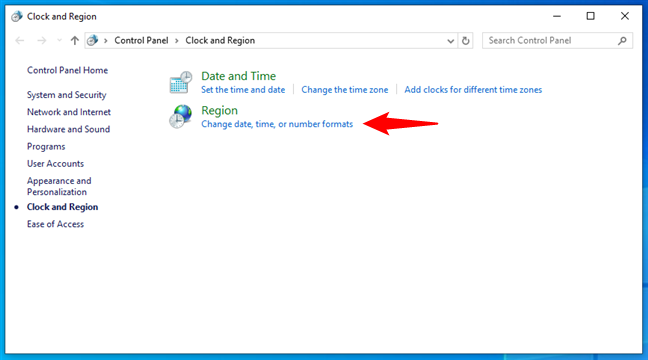
Moreover, you can also open the Region settings by accessing the Control Panel and clicking or tapping the Change date, time, or number formats link under Clock and Region.
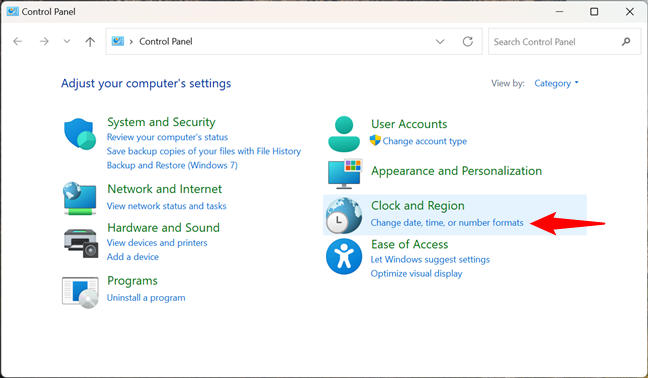
Change date, time, or number formats
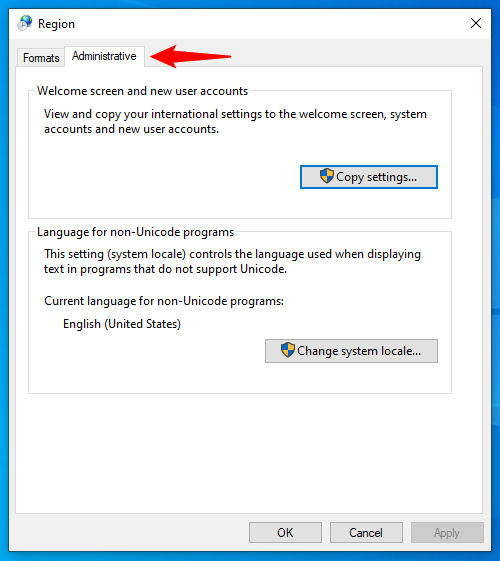
Either way, this opens the panel called Region. In it, select the Administrative tab, like in the screenshot below.
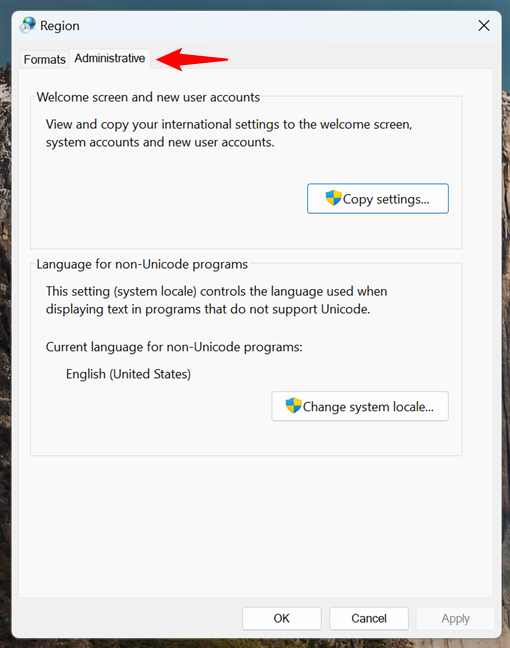
The Administrative Region settings in Windows 11
Now that you’ve found the Region Administrative settings, move on to the second step in this guide.
TIP: You might also be interested in learning how to change the Windows 11 Lock Screen wallpapers.
1.2. How to open Windows 10’s Region Administrative settings
To open the Region settings panel in Windows 10, you can use the taskbar search box. Type region in the search field and click or tap the Region settings result.
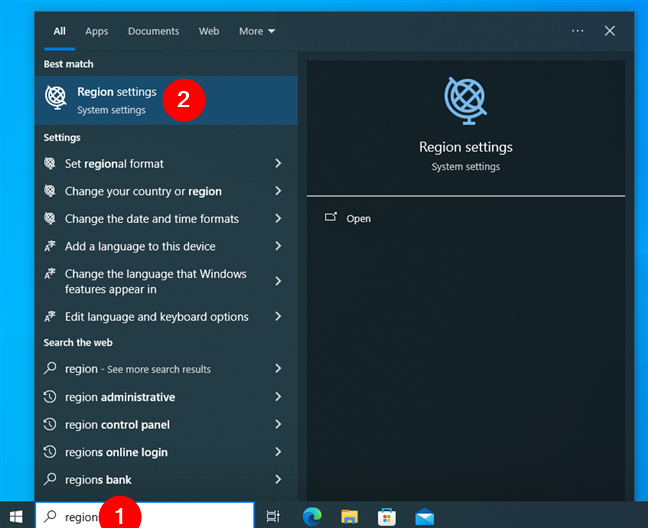
Open Region settings in Windows 10 using search
This launches the Settings app and takes you to the Region page in the Time & Language category. Here, click or tap the Additional date, time & regional settings link in the Related settings section on the right-hand panel.
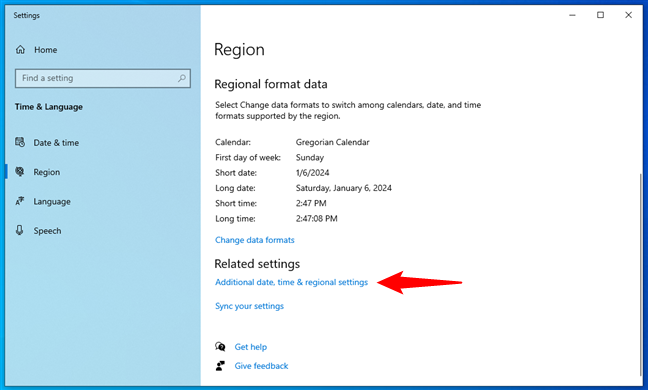
Additional date, time & regional settings
The link opens the Control Panel and automatically takes you to its Clock and Region section. Here, click or tap Change date, time, or number formats under Region.
Change date, time, or number formats in Windows 10
Finally, the Region panel opens: in it, select the Administrative tab at the top.
Administrative Region settings in Windows 10
Note that you can also follow the previous steps manually without using the search in Windows 10. For example, you can choose to go straight to the Control Panel, access Clock and Region, and click or tap the Change date, time, or number formats link.
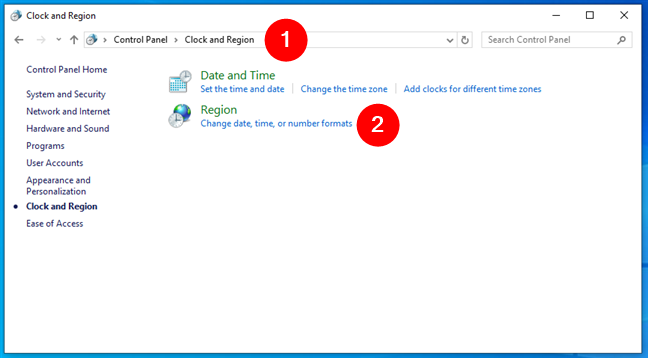
Open Change date, time, or number formats from Windows 10’s Control Panel
Or, you could open Settings, navigate to Time & Language > Region, click or tap the Additional date, time & regional settings, and then take the last steps in the Control Panel.
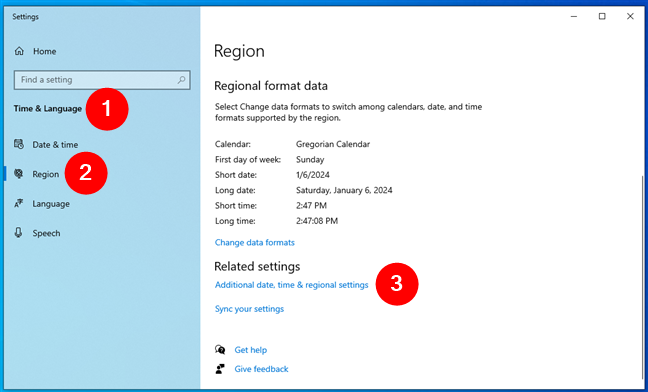
Open Additional date, time & regional settings in Windows 10
Either way, once you have the Administrative tab selected in the Region panel, do the next steps to translate the Windows sign-in/lock screen into your local language:
Step 2. Change the default language used on the Windows sign-in/lock screen
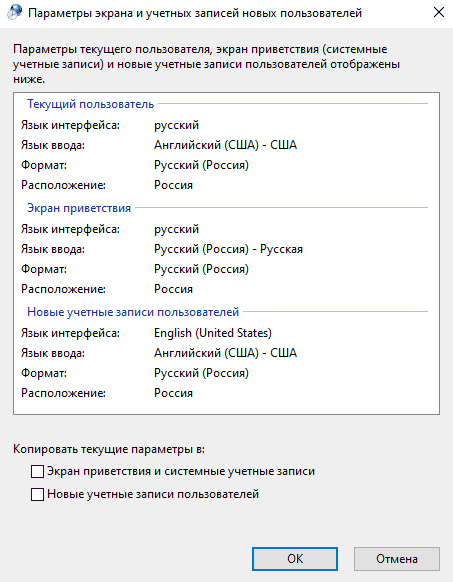
In the Administrative tab of the Region window, the first section of settings is called Welcome screen and new user accounts. It briefly explains that you can use it to “View and copy your international settings to the welcome screen, system account and new user accounts.” Although it’s not exactly precise, the “welcome screen” is just another name for the sign-in screen or the lock screen, which is what you’re looking for.
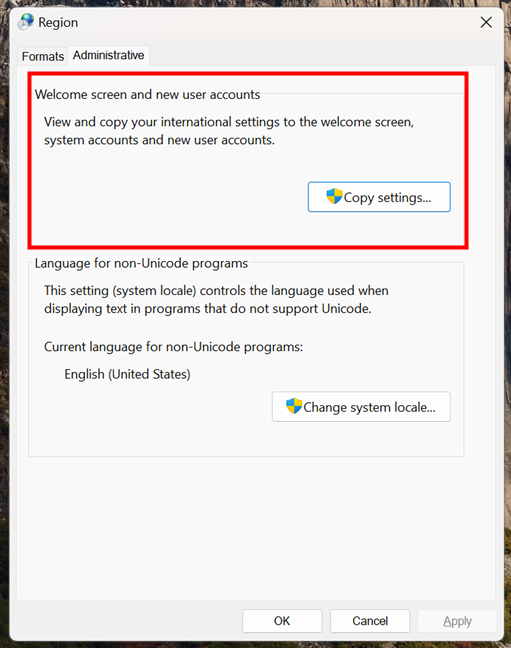
Welcome screen and new user accounts
This section includes a single button named Copy settings. Click or tap on it.
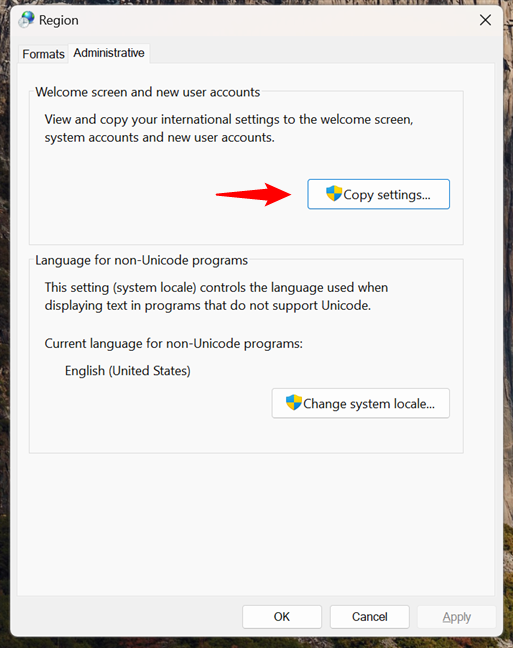
Click Copy settings
A dialog box called “Welcome screen and new user accounts settings” opens. In it, you can see the display language used by your user account, as well as the display language your Windows PC uses for the “Welcome screen”.
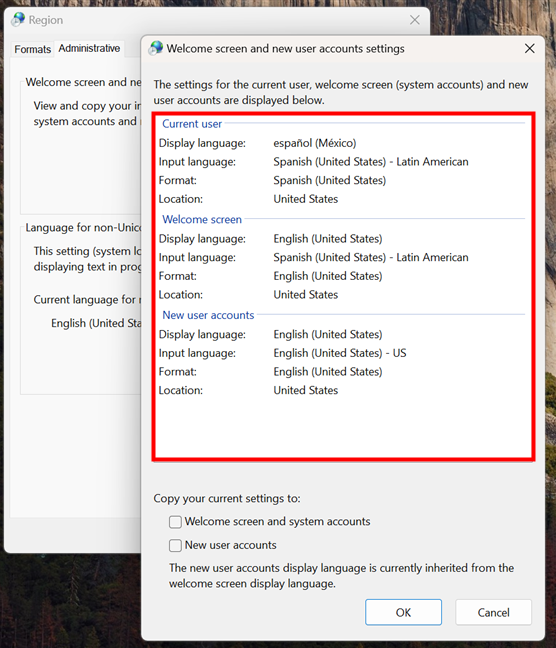
The settings for the current user, welcome screen, and new user accounts
To match the sign-in/lock screen language with that used for your user account, check the “Copy your current settings to: Welcome screen and system accounts” option. You will find it at the bottom of the window.
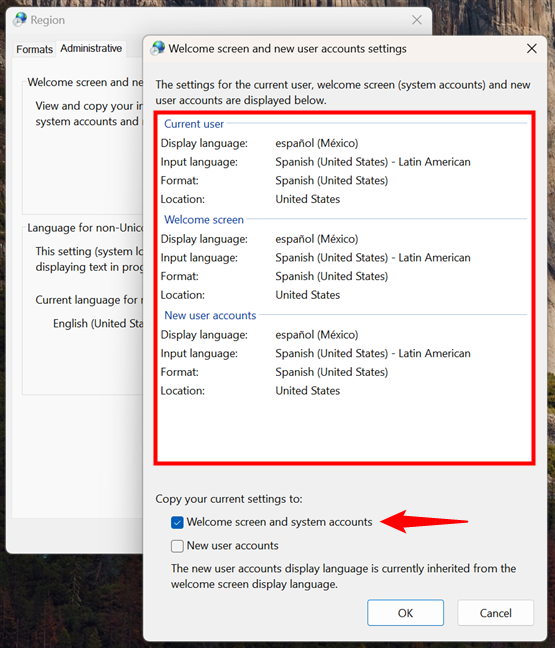
Check the Welcome screen and system accounts option
After you click or tap on the OK button, Windows asks you to reboot your computer or device, so that it can save your new preferences.
Restart your Windows computer to change the lock screen language
Do that, and when you get to the sign-in screen, you’ll see that it now uses the same language as the one used by Windows on your desktop.
TIP: Do you like the wallpapers shown on your Lock Screen? Here’s how to find the location of Windows 10 wallpapers for the Desktop & Lock Screen.
Did you change your lock screen language?
Matching the display language you use on your desktop to the one shown by Windows on the sign-in/lock screen might not seem like much, but it’s something that helps you customize your PC to use the same display language everywhere. And, at least for some of us, it’s pretty important to see our mother tongue being used everywhere on our Windows computers. I hope that you found this guide useful. If you have any questions or issues, ask using the comments form below.
Задача простая: установить английский язык на экране ввода логина/пароля вариантом по-умолчанию.
Про ветку реестра HKU\.DEFAULT\Keyboard Layout\Preload я знаю, параметры ставил таким образом:
1 = «00000409»
2 = «00000419»
Перезагружаем машину, и видим, что ничего не изменилось — как был РУС по-умолчанию, так и остался.
UPD:
Заметил интересную вещь: после установки вышеописанных значений и повторном входе пользователя, значения меняются местами. Интересно, с чего бы это?
-
Вопрос задан
-
32012 просмотров
Ответ найден.
Оказывается, есть недокументированная особенность Windows 8/8.1/10 — копирование пользовательских методов ввода в системную учётную запись для входа. Настраивается через локальную или групповую политику здесь:
Конфигурация компьютера \ Политики \ Административные шаблоны \ Система \ Службы языковых стандартов
Запретить копирование пользовательских методов ввода в системную учётную запись для входа — Включена
Пригласить эксперта
Для будущих поколений, а то сейчас сам мучался.
В новых версиях все изменилось
Решение:
Параметры -> Время и язык -> Язык -> Выберите метод ввода, который всегда используется по умолчанию -> Английский
Оратор выше только половину рецепта дал. Вот тут полное и правильное решение vynesimozg.com/izmenit-yazyk-po-umolchaniyu-na-ekr…
А групповые политики не стоит трогать из за таких пустяков, а то потом можете поиметь проблем там где не ждали и будете гадать в чем причина.
В новых версиях все изменилось:
«Дополнительные параметры клавиатуры», выбираем английским первым (вместо использовать список языков «рекомендуется»)
«Параметры» → Время и язык → Язык → Сопутствующие параметры → Административные языковые параметры, появится окно «Регион», «Дополнительно», кнопка — «Копировать параметры»
И указать «Экран приветствия» и «Новые пользователи»
-
Показать ещё
Загружается…