
Permanently Disable Microsoft Defender in Windows 11: 5 Methods
Published
5 min read
5 Ways to Permanently Disable Microsoft Defender in Windows 11
Introduction
Microsoft Defender, previously known as Windows Defender, serves as the built-in antivirus and anti-malware solution for Windows operating systems, including Windows 11. While it provides essential protection against various forms of malware, certain users may find the need to disable it permanently. Reasons for this could range from using a third-party antivirus solution, improving system performance, or addressing compatibility issues with specific software. This article presents five reliable methods for permanently disabling Microsoft Defender in Windows 11.
Understanding Microsoft Defender
Before diving into the methods of disabling Microsoft Defender, it is crucial to understand its role and functionality. As a crucial component of Windows security, Microsoft Defender offers:
- Real-time Protection: Scans files and processes in real time to detect and mitigate potential threats.
- Cloud Protection: Uses Microsoft’s cloud intelligence to identify threats more effectively.
- Controlled Folder Access: Protects sensitive data from unauthorized access by malicious applications.
- Offline Scanning: Allows users to scan their devices for malware when offline.
While Microsoft Defender is generally reliable, some users may prefer to opt for alternative security solutions or may experience conflicts with their existing software.
Method 1: Using Windows Security Settings
The most straightforward way to disable Microsoft Defender is through the Windows Security settings. This method is recommended for users who wish to turn off Defender without delving into advanced configurations.
Steps:
-
Open Windows Security:
- Click on the Start menu.
- Type «Windows Security» in the search bar and select the application from the results.
-
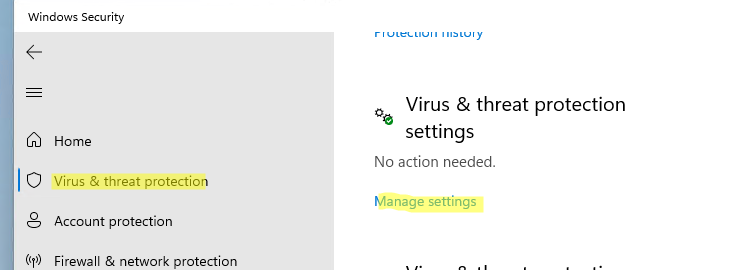
Navigate to Virus & Threat Protection:
- In the Windows Security window, click on Virus & threat protection.
-
Manage Settings:
- Under the “Virus & threat protection settings,” click on Manage settings.
-
Turn Off Real-time Protection:
- Toggle the switch off next to Real-time protection.
-
Confirm Your Selection:
- A warning may appear, informing you that Microsoft Defender will regain control if it detects other security software has been uninstalled. Click “Yes” to confirm.
Important Note:
Disabling real-time protection will not disable Microsoft Defender entirely. You will need to utilize additional methods to ensure it does not re-enable automatically.
Method 2: Group Policy Editor
For Windows 11 Pro and Enterprise users, the Group Policy Editor is an effective tool to disable Microsoft Defender permanently. This method provides a centralized way to manage system settings, making it ideal for more advanced users and system administrators.
Steps:
-
Open Group Policy Editor:
- Press
Windows + Rto open the Run dialog. - Type
gpedit.mscand hit Enter.
- Press
-
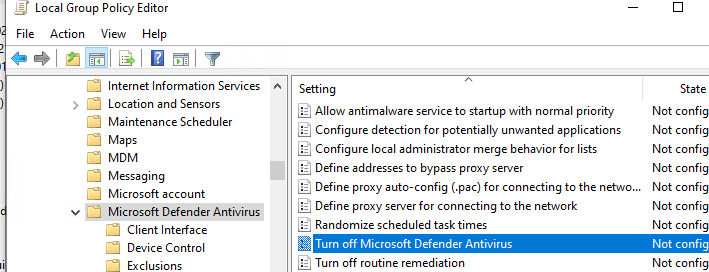
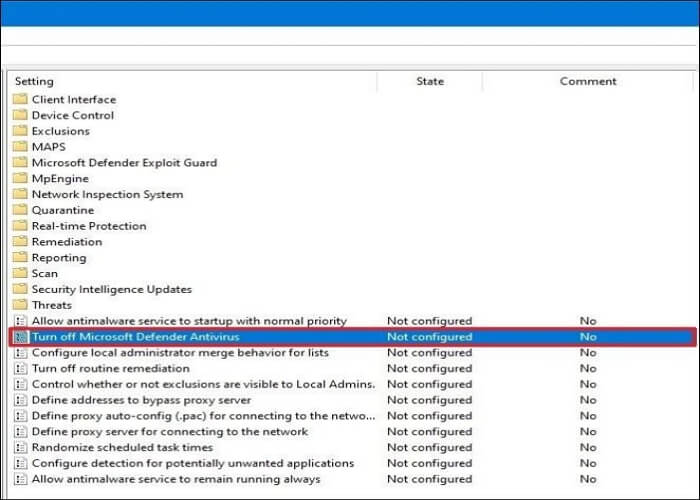
Navigate to Windows Defender Antivirus:
- In the Group Policy Editor window, navigate to:
Computer Configuration -> Administrative Templates -> Windows Components -> Microsoft Defender Antivirus
- In the Group Policy Editor window, navigate to:
-
Disable Microsoft Defender:
- In the right pane, find the setting labeled Turn off Microsoft Defender Antivirus.
- Double-click on it and select Enabled. This action will disable Microsoft Defender.
-
Apply Changes:
- Click Apply and OK to save changes.
-
Reboot the Computer:
- Restart your computer for the changes to take effect.
Important Note:
If you later decide to re-enable Microsoft Defender, follow the same steps and select Not Configured for the Group Policy setting.
Method 3: Registry Editor
Another method for disabling Microsoft Defender permanently involves using the Registry Editor. This approach is suitable for users familiar with Windows registry settings. Caution is advised, as incorrect modifications can affect system stability.
Steps:
-
Open Registry Editor:
- Press
Windows + Rto open the Run dialog. - Type
regeditand hit Enter.
- Press
-
Backup the Registry:
- It is recommended to back up your registry before making any changes. Click on File > Export, choose a location, and save the backup.
-
Navigate to the Defender Key:
- Go to the following path in the Registry Editor:
HKEY_LOCAL_MACHINESOFTWAREPoliciesMicrosoftWindows Defender
- Go to the following path in the Registry Editor:
-
Create a New DWORD Value:
- Right-click in the right pane and select New > DWORD (32-bit) Value.
- Name the new value DisableAntiSpyware.
-
Set the Value to 1:
- Double-click on DisableAntiSpyware and set its value to 1. This action will disable Microsoft Defender.
-
Restart Your Computer:
- Close the Registry Editor and reboot your system for the changes to apply.
Important Note:
To re-enable Microsoft Defender, repeat the steps and delete the DisableAntiSpyware value, or set it to 0.
Method 4: Using PowerShell
PowerShell offers a powerful command-line interface for managing various system settings, including disabling Microsoft Defender. This method is suitable for advanced users who prefer a scripting approach.
Steps:
-
Open PowerShell as Administrator:
- Right-click on the Start button and select Windows Terminal (Admin) or Windows PowerShell (Admin).
-
Execute the Command:
- In the PowerShell window, type the following command and press Enter:
Set-MpPreference -DisableRealtimeMonitoring $true
- In the PowerShell window, type the following command and press Enter:
-
Verify the Status:
- To confirm that the real-time monitoring is disabled, you can run:
Get-MpPreference | Select-Object -Property DisableRealtimeMonitoring
- To confirm that the real-time monitoring is disabled, you can run:
-
Reboot Your Computer:
- While this command disables real-time monitoring, ensure you reboot your system for complete deactivation.
Important Note:
Similar to the previous methods, executing the above command will not fully disengage all components of Microsoft Defender. You may wish to employ another strategy for comprehensive disabling.
Method 5: Installing an Alternative Antivirus Program
Installing a third-party antivirus program is one of the most effective ways to disable Microsoft Defender permanently. Windows 11 detects the installation of a new antivirus solution and automatically disables Microsoft Defender’s real-time protection.
Steps:
-
Choose a Reliable Antivirus Software:
- Research and select a credible third-party antivirus solution. Make sure it aligns with your security needs.
-
Uninstall Existing Antivirus (if applicable):
- If you already have another antivirus installed, uninstall it through Settings > Apps > Apps & features.
-
Download and Install the New Software:
- Download the installer for your chosen antivirus software and run the installation process by following the prompts.
-
Complete the Installation:
- After installation, follow the initial setup prompts. The new antivirus should automatically disable Microsoft Defender.
-
Confirm Status:
- Open Windows Security settings to ensure that Microsoft Defender has been disabled.
Important Note:
Utilizing a third-party antivirus program not only disables Microsoft Defender but often offers more comprehensive security features catering to various needs.
Conclusion
Disabling Microsoft Defender in Windows 11 can be accomplished through several methods, each catering to different user preferences and expertise levels. Whether you choose to manipulate security settings directly, navigate the Group Policy Editor or Registry Editor, leverage PowerShell commands, or install an alternative antivirus solution, ensuring that you have sufficient protection is paramount.
Before making any changes, always ensure that you assess your system’s security needs and consider the implications of disabling built-in protection. Regular updates and safe browsing practices should remain a part of your routine to ensure a secure computing environment.
Даже полезные программы иногда мешают работе. Например, встроенный в операционную систему защитник периодически блокирует установку стороннего софта или замедляет устройство. В этот момент приходится выяснять, как отключить антивирус Windows. Убрать его возможно как на время, так и насовсем.
Зачем отключать
В Windows 10 и 11
В Windows 7
После отключения
Чек-лист
Зачем отключать
В Windows 10 и 11
В Windows 7
После отключения
Чек-лист

Разберемся, как отключить антивирус в разных версиях Windows. Выясним, зачем иногда требуется временная деактивация встроенной защиты, какие при этом возникают риски, и что обязательно нужно сделать после отключения.
Стоит ли отключать Windows Defender и когда это может понадобиться
Windows Defender запускается в фоновом режиме и, подобно другим антивирусам, защищает компьютер от вредоносных программ. Отключая защиту, вы оставляете компьютер уязвимым, однако иногда приходится пойти на риск.
Отключение может понадобиться в нескольких случаях.
-
При установке определенных программ или игр, которые ошибочно распознаются как угрозы.
-
Для тестирования программного обеспечения или системных настроек.
-
При переходе на сторонний антивирус — например, Kaspersky, Avast и другие.
-
Когда Defender потребляет слишком много ресурсов и тормозит работу операционной системы.
Помните: не стоит надолго оставлять компьютер совсем без защиты. Если выключили «Защитника Windows», будьте особенно осторожны при загрузке файлов и серфинге в интернете, чтобы не заразить систему вредоносным ПО.
Как отключить защиту Windows 10 и 11
Современные версии операционной системы позволяют временно деактивировать защитник. Также существуют методы его полного отключения. Пошагово разберем все варианты.
Через «Параметры»
1. Откройте «Параметры» с помощью сочетания клавиш Win + I, выберите «Конфиденциальность и защита», далее «Безопасность Windows».

2. Откройте раздел «Защита от вирусов и угроз», после чего переходите в настройки.


3. Перетащите ползунок защиты в режиме реального времени в положение «Выключено».

Алгоритм временно отключает защиту. Она включится автоматически после перезагрузки. Можно сразу активировать Defender. Для этого достаточно вернуть ползунок в положение «Включено».
Учтите, что уже запланированную проверку антивирус выполнит, но новые файлы не тронет до следующей диагностики.
Через реестр
Деактивировать программу насовсем получится через реестр. Схема тоже несложная.
1. Чтобы попасть в реестр, нажмите Win + R, введите команду regedit, затем задайте путь или пройдите его вручную: HKEY_LOCAL_MACHINE\SOFTWARE\Policies\Microsoft\Windows Defender.

2. Щелкните мышкой справа, чтобы создать параметр DWORD.

3. Дайте ему имя DisableAntiSpyware.
4. В графе «Значение» поставьте единицу. Отправьте компьютер на перезагрузку.

5. Чтобы вновь активировать защиту, поставьте нулевое значение или лишите параметр имени.
Важно. Этот способ работает только в старых версиях платформы безопасности, выпущенных до августа 2021 года.
Если у вас установлена платформа антивируса версии 4.18.2108.4 или новее (а это практически все системы на Windows 10 версии 1903+ и Windows 11), то параметр DisableAntiSpyware больше не действует. Его просто игнорирует система.
Это связано с тем, что Microsoft включила функцию Tamper Protection (защита от несанкционированных изменений). Она блокирует любые попытки отключить встроенную защиту через реестр или сторонние программы, чтобы злоумышленники не могли сделать это без ведома пользователя.
Чтобы проверить свою версию платформы безопасности, откройте «Центр безопасности Windows» → «Параметры» → «О программе». Найдите строку «Платформа антивируса».
Если версия 4.18.2108.4 и выше — способ с реестром работать не будет. Отключить Defender можно в настройках, как мы описывали выше, или при установке другого антивируса. Чтобы избежать конфликта ПО, встроенный защитник Windows отключится автоматически.

Через редактор групповой политики
Профессиональные и корпоративные версии Windows 10 и 11 оснащены редактором групповой политики. Он тоже позволяет избавиться от срабатывания защиты навсегда.
1. Зажмите Win + R, используйте команду gpedit.msc.
2. По папкам проделайте такой путь: «Конфигурация компьютера» → «Административные шаблоны» → «Компоненты Windows» → «Антивирусная программа».

3. Откройте параметр «Выключить антивирусную программу» и выберите опцию «Отключено».

4. В папке «Антивирусная программа» также есть раздел «Защита в режиме реального времени». Деактивируйте все элементы.
5. Антивирус отключится после перезагрузки. Включить его получится, если возвратить параметры в прежнее положение.
Как отключить защиту Windows 7
В «семерке» процесс немного другой, но выключить встроенный антивирус тоже несложно.
1. Откройте «Панель управления» и перейдите в блок «Защитник Windows».
2. Нажмите «Программы» → «Параметры» → «Администратор».
3. Снимите галочку с опции «Использовать эту программу» и сохраните изменения.
Что делать после отключения встроенного антивируса «Защитник Windows»
После выполнения задач, которым мешал Defender, не забывайте включать его снова. В процессе работы с отключенным защитником придерживайтесь мер безопасности.
-
Установите альтернативный антивирус или хотя бы блокировщик рекламы, если у вас его еще нет.
-
Ограничьте время работы без защиты — оставлять так ПК насовсем не стоит.
-
Не посещайте сомнительные сайты, не загружайте и не открывайте подозрительные файлы.
-
Пользуйтесь только проверенными сетями Wi-Fi.
-
Проведите полное сканирование системы, когда закончите и включите встроенный антивирус снова.
Если антивирус каждый раз ложно блокирует определенные программы или файлы, а отключать его не хочется, некоторые папки можно внести в исключения Defender. Но не злоупотребляйте этой функцией, добавляйте только проверенные объекты.
Чек-лист: как отключить антивирус Windows Defender
Выключать антивирус не рекомендуется, но если защита блокирует программы или затрудняет работу, это допустимо.
-
Снимите защиту в реальном времени. Вам нужны параметры «Безопасность Windows» → «Защита от вирусов» → «Управление настройками».
-
Для Windows 7 — снимите галочку «Использовать эту программу» в параметрах защитника.
-
Соблюдайте осторожность и не блокируйте антивирус надолго.
-
Установите альтернативную антивирусную программу.
-
После повторной активации защиты просканируйте систему на вирусы.
Уровень сложностиСредний
Время на прочтение4 мин
Количество просмотров79K
За последний месяц я описал два интересных издания Windows 11 – Enterprise G в статье Windows 11 Enterprise G – Что за издание для правительства Китая и зачем оно вам? / Хабр (habr.com), и IoT Enterprise LTSC в статье Windows 11 24H2 IoT Enterprise LTSC – что за зверь, и чем он хорош? / Хабр (habr.com). В комментариях и сообщениях в личку все чаще слышу, что хорош EnterpriseG своей легкостью, в первую очередь выпиленным Защитником и телеметрией, но увы, не имеет локализации. А IoT LTSC тоже хорош и переведен, и быть ему тем на что можно наконец переходить тем, кто еще живет на Windows 7, если бы не Defender.
Способов удалять телеметрию есть много, я обычно просто штатно отключаю при установке то, что дают выключить и не парюсь; в сети есть проекты, вычищающие глубокие хвосты.
С Защитником тоже опробовано много способов борьбы. Защитник с каждой версией становится все более устойчивым к попыткам себя отключить. На старых процессорах Intel (там где программным образом Microsoft пробует устранить уязвимости Intel Spectre и Meltdown) производительность процессора в Windows 11 падает до 30%! Как это безобразие отключить? Никакие методы с сайта Microsoft этого не позволят добиться.
В комментариях тут на Хабре мне писали варианты скриптов, которые у кого-то срабатывают. Но проверив на свежих виртуалках массу решений, большинство из скриптов блокируются Защитником сразу после сохранения файла, остальные не выполняют своей задачи.
По итогам тестирования мной также признаны неработоспособными способы отключения Защитника через ProductPolicy и редактирование MUM файла, описывающего компоненты входящие в издание ОС, так как так или иначе, при перезагрузке или обновлении Защитник возвращается в строй. Встроенные групповые политики (и локальные политики через gpedit.msc) позволяли его отключить в Windows 10, но в Windows 11 встроено значительно больше функций защиты, их нужно отключать более грубо вручную.
Итогом после мозгового штурма на форумах MyDigitalLife я для себя посчитал приемлемым открытое решение ionuttbara/windows-defender-remover (github.com).

Оно есть в исходном коде, если вы желаете посмотреть содержимое, или вы можете загрузить скрипт при помощи Git:
git clone https://github.com/ionuttbara/windows-defender-remover.git
cd windows-defender-remover
Script_Run.bat
Ну а тем, кто далек от разработки предлагается подписанный исполняемый модуль. Встроенный в браузер Edge функционал Defender в зависимости от настроек ОС может предупредить о том, что скачиваемый файл небезопасен:

Но вы все равно сможете его сохранить.

Для небольшого процента систем, где администраторы заранее настроили жесткие политики Windows Defender Application Control вы можете получать сообщение о том, что сохраненное приложение при запуске заблокировано в Device Guard или Application Control. Это можно решить, удалив один и тот же файл в четырех местах (из под администратора в PowerShell:
Remove-Item -LiteralPath "$((Get-Partition | ? IsSystem).AccessPaths[0])Microsoft\Boot\WiSiPolicy.p7b"
Remove-Item -LiteralPath "$env:windir\System32\CodeIntegrity\WiSiPolicy.p7b"
Remove-Item -LiteralPath "$env:windir\Boot\EFI\wisipolicy.p7b"
Remove-Item -Path "$env:windir\WinSxS" -Include *winsipolicy.p7b* -Recurse
В самых редких случаях, когда удаление блокируется Virtualization Based Security (VBS) политиками, придется для начала их отключить командой
bcdedit /set hypervisorlaunchtype off
Когда вы успешно запустите DefenderRemover, вам будет задан вопрос — удалить Защитник со всеми компонентами безопасности (Y), удалить только защитник (A) или только убрать предупреждения (S):

При выборе (А) или (Y) будут отключены и удалены следующие компоненты антивируса:
-
список определений (это отключит получение обновлений с Windows Update)
-
Телеметрию Windows Defender SpyNet
-
Службу антивируса
-
Фильтр антивируса и сканер руткит драйверов
-
запланированные задания антивируса
-
ассоциации меню
-
спрячет секцию антивирусной защиты из Центра Безопасности
При выборе (S) или (Y) будут отключены следующие компоненты безопасности:
-
Поддержка Центр Безопасности (Windows Security Center) (службы wscsvc, SgrmBroker, драйверы Sgrm)
-
Поддержка безопасности виртуализации (VBS, LUA, Exploit Guard, Windows Smart Control, Tamper Protection)
-
SecHealthUI (UWP приложение)
-
SmartScreen
-
Поддержка Pluton и его служб
-
Дополнительные настройки безопасности (важно на старых процессорах Intel, дает +30% производительности, так как по умолчанию были отключены уязвимости процессора Spectre и Meltdown)
Никаких другие компоненты ОС не трогаются. В том числе Windows Firewall, он же брандмауэр Защитника Windows остается в системе, — его как и раньше можно просто выключить в консоли, если не требуется.
Предусмотрена возможность интегрировать удаление Защитника в процесс установки ОС. Подробнее в первоисточнике.
Там же есть пример PowerShell кода, удаляющего Центр Безопасности из панели Настроек:

Если до удаления оно выглядит в Настройках так:

То после выполнения скрипта остается лишь:

Система стала ощутимо шустрее. Установка обновлений ОС не приводит к возврату Защитника:

Имею самую последнюю версию в итоге:

Специально для примера выбирал Windows 11 SE (она же CloudEdition), как наиболее тесно интегрированную с Защитником. Если вы хотите о нем забыть, — дело пары минут. Это не означает, что вам не нужен антивирус. Установите его после самостоятельно на свой вкус и настройте, в зависимости от профиля работы на ПК.
Как мне сообщают в комментариях, если у вас включен Контроль Учетных Записей (User Account Control), то при выполнении программы будут сложности под неадминистративным пользователем — не будет запроса о повышении привилегий, и запуска чего-либо под администратором. Исправляется легко, — зайдите под Администратором, отключите контроль учетных записей, перезагрузитесь. Если он нужен, после перезагрузки верните его назад. Сам функционал не удаляется, в Windows 10 сбрасываются флаги вызова повышения привилегий.
Я на этом завершаю, всем удачи, ставьте лайк, задавайте вопросы, отвечу.
Microsoft Defender Antivirus (Защитник) — это встроенный антивирус в Windows 10/11 и Windows Server, который включен и настроен по умолчанию. В этой статье мы рассмотрим, как полностью отключить Защитник в Windows 11 или временно (приостановить).
В Windows 11 и 10 при установке стороннего антивируса, встроенный стандартный Защитника Microsoft должен отключаться. В некоторых случаях это не происходит автоматически и вам может потребоваться ручное отключение Microsoft Defender.
Содержание:
- Временная приостановка защиты Microsoft Defender в Windows 11 и 10
- Как полностью отключить Защитник Defender в Windows 11 и 10?
Временная приостановка защиты Microsoft Defender в Windows 11 и 10
В некоторых случаях вам может понадобится временно отключить защиту Microsoft Defender, не затрагивая важные системные службы. Например, запуск или установка какой-то системной программы или утилиты блокируется Microsoft Defender. Чтобы запустить такое приложение, нужно остановить защиту Windows Defender в реальном времени.
- Перейдите в следующий раздел настроек Windows 11: Settings -> Privacy and Security -> Windows Security -> Open Windows Security (или выполните команду быстрого доступа к настройкам
ms-settings:windowsdefender
);Если приложение службы безопасности Microsoft Defender не запускается, его можно восстановить (под капотом находится UWP приложение
Microsoft.SecHealthUI
). - Откройте раздел Virus and threat protection, и нажмите на кнопку Manage Settings в разделе Virus and Threat protection settings;

- Переведите переключатель Real-time protection в положение Off;
- Подтвердите приостановку антивирусной защиты в окно с подтверждением повышения привилегий UAC.
Чтобы восстановить защиту компьютера Windows Defender, нужно включить переключатель. Также защита в реальном времени Microsoft Defender будет включена автоматически после перезагрузки компьютера.
Ранее мы рассматривали, как управлять настройками антивируса Windows Defender с помощью PowerShell. В статье была рассмотрена PowerShell команда для отключения защиты в реальном времени:
Set-MpPreference -DisableRealtimeMonitoring $true
Однако это команда не отрабатывает, как вы ожидаете в Windows 11 и последних билдах Windows 10. Дело в том, что в Windows 10, начиная с билда 1903, по умолчанию включена новая фича Defender, которая называется Microsoft Defender Tamper Protection (Защита от подделок).
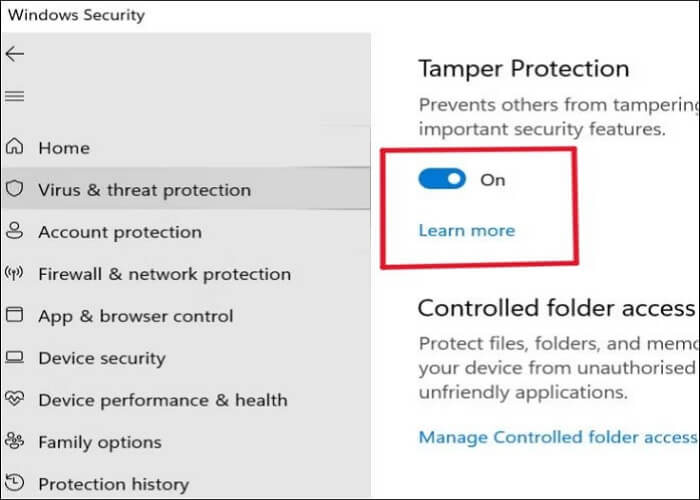
Tamper protection обеспечивает дополнительную защиту основных элементов безопасности Microsoft Defender. В частности, она блокирует несанкционированное изменение настроек антивируса, приостановку защиты в реальном времени, отключение облачной защиты. Это означает, что при включенной Защите от подделок вы не сможете отключить Real Time Protection в Microsoft Defender с помощью PowerShell.
Отключить Tamper Protection можно только вручную из графической панели управления Windows Security.
Перейдите в раздел настроек Virus and threat protection settings, промотайте список компонентов и измените переключатель параметра Tamper Protection на Off.

После отключение Tamper Protection вы сможете отключить защиту в реальном времени указанной выше командой PowerShell.
Как полностью отключить Защитник Defender в Windows 11 и 10?
В ранних билдах Windows 10 и в Windows Server 2016 можно было полностью отключить Windows Defender через параметр групповой политики Turn off Windows Defender Antivirus в разделе Computer Configurations -> Administrative Template -> Windows Component -> Windows Defender Antivirus редактора локальных групповых политик gpedit.msc. Или ключом реестра DisableAntiSpyware в HKEY_LOCAL_MACHINE\SOFTWARE\Policies\Microsoft\Windows Defender, соответствующий этому параметру GPO:
New-ItemProperty -Path “HKLM:\SOFTWARE\Policies\Microsoft\Windows Defender” -Name DisableAntiSpyware -Value 1 -PropertyType DWORD -Force
Для отключение защиты в реальном времени использовалась политика Turn on behavior monitoring или параметр реестра DisableBehaviorMonitoring =1 в указанной выше ветке реестра.
Во всех билдах, начиная с Windows 10 1903, и в Windows 11 эти параметры GPO и ключи реестра нельзя использоваться для отключения Microsoft Defender, так как его настройки защищены новой опцией Tamper Protections (рассмотрена выше). Методы, используемые ранее для отключения Microsoft Defender Antivirus, не работают в Windows 11.
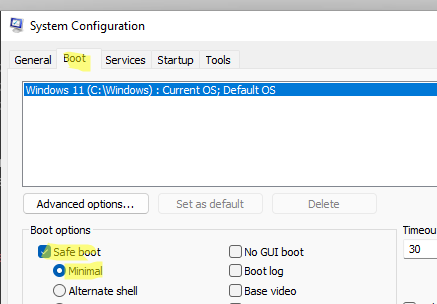
Для полного отключения компонентов Windows Defender нужно загрузить ваш компьютер в безопасном режиме. Для этого:
- Запустите утилиту
msconfig
; - Перейдите на вкладку Boot;
- Выберите опцию Safe boot -> Minimal в разделе настройки параметров загрузки;
- Нажмите OK и перезагрузите компьютер;
- Ваш компьютер загрузится в безопасном режиме;
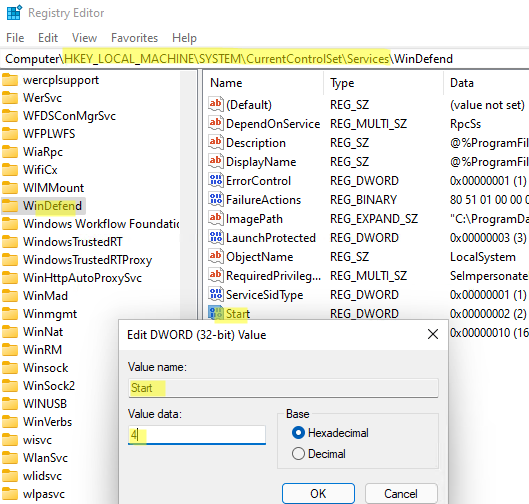
- Теперь нужно открыть редактор реестра (
regedit.exe
), перейдти в ветку HKEY_LOCAL_MACHINE\SYSTEM\CurrentControlSet\Services и отключить запуск следующих служб:- Sense
- WdBoot
- WdFilter
- WdNisDrv
- WdNisSvc
- WinDefend
Для этого нужно изменить значение параметра Start на 4;
Измените параметр Start для всех указанных служб вручную или воспользуйтесь скриптом PowerShell:
$regpath='HKLM:\SYSTEM\CurrentControlSet\Services'
Set-ItemProperty -Path ($regpath+"\WinDefend") -Name Start -Value 4
Set-ItemProperty -Path ($regpath+"\Sense") -Name Start -Value 4
Set-ItemProperty -Path ($regpath+"\WdFilter") -Name Start -Value 4
Set-ItemProperty -Path ($regpath+"\WdNisDrv") -Name Start -Value 4
Set-ItemProperty -Path ($regpath+"\WdNisSvc”) -Name Start -Value 4
Чтобы включить Microsoft Defender в Windows, нужно установить следующие дефолтные значение параметра Start в ветке каждой службы:
- Sense — 3
- WdBoot — 0
- WdFilter — 0
- WdNisDrv — 3
- WdNisSvc — 3
- WinDefend — 2
- Запустите msconfig и отключите безопасный режим, перезагрузите компьютер в обычном режиме;
- Отключите все четыре задания в разделе Microsoft –> Windows –> Windows Defender Task Scheduler (
taskschd.msc
);
Get-ScheduledTask “Windows Defender Cache Maintenance” | Disable-ScheduledTask
Get-ScheduledTask “Windows Defender Cleanup” | Disable-ScheduledTask
Get-ScheduledTask “Windows Defender Scheduled Scan” | Disable-ScheduledTask
Get-ScheduledTask “Windows Defender Verification” | Disable-ScheduledTask
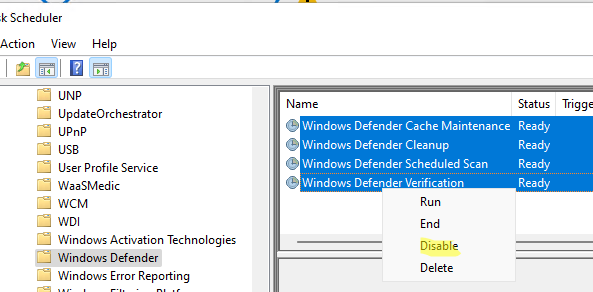
Можно отключить задания планировщика с помощью PowerShell:
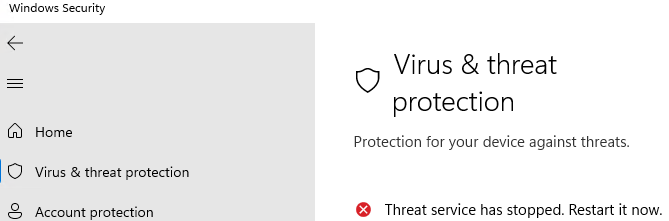
Запустите приложение Windows Security и убедитесь, что антивирус Microsoft Defender теперь отключен. Здесь должна появиться надпись Threat service has stopped. Restart it now (Служба работы с угрозами остановлена).
Итак, мы рассмотрели, как отключить защиту Microsoft Defender в Windows 10 и 11.
Highlights
- Windows has an inbuilt antivirus called Windows Defender to protect your computer from external threats.
- Is Windows Defender any good? Is it enough to protect your data on your computer? In fact, many Windows users want to know how to permanently disable Windows Defender.
- Windows Defender is by no means your sole solution to protect your data. You’d better add a layer of protection to your computer via free backup software like EaseUS Todo Backup.
Microsoft does not provide an option to delete or uninstall the Defender. If you disable it normally, the system turns it back on as a fail-safe method. Anyhow, you must do more now to disable the Microsoft Defender. Let us see how to do it in 3 ways.
- Way 1. Using Group Policy Editor
- Way 2. Using Registry Editor
- Way 3. Using CMD
Before making any changes to the Windows Defender or its files, we must disable Tamper Protection first. Tamper Protection is a Windows setting to restrict other apps from making any changes to Microsoft Defender.
Navigate to Settings > Windows Security > Virus and Threat Protection > Virus and threat protection settings > Manage settings > Disable Tamper Protection.
Way 1. Using Group Policy Editor
Group Policy Editor is a tool to change and customize Windows OS settings. As we cannot uninstall Windows Defender, we can tweak some changes in Group Policy Editor to disable it. See the instructions below:
Step 1. Press Windows + R to open the Run dialog box. Type gpedit.msc and click Enter.
Step 2. Open the Local Group Policy Editor and click on the Computer Configuration option on the landing page.
Step 3. Navigate to the following path: Computer Configuration > Administrative Templates > Windows Components > Microsoft Defender Antivirus.
Step 4. Double-click on Turn off Microsoft Defender Antivirus to open it.
Step 5. Select the Enabled option from the options to disable Microsoft Defender permanently.
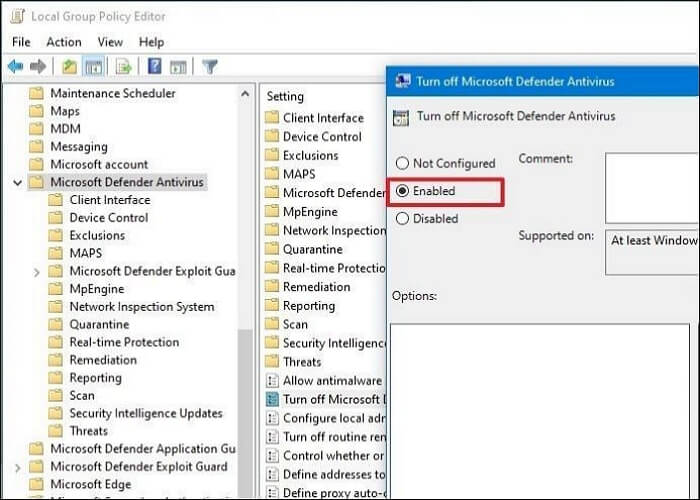
Step 6. Click Apply, and OK. Restart the computer to see the changes.
You can share this article on your social platforms.
Way 2. Using Registry Editor
If you have Windows 11 Home, you may be unable to access Group Policy Editor. But you can tweak some changes in the Registry to disable Microsoft Defender on Windows.
Note: Registry Editor contains important files to run your Windows OS and its functions smoothly. So, make a backup on Registry and create a system restore point in case of any emergencies.
Follow these steps to disable Microsoft Defender:
Step 1. Press Windows + S, and type Regedit. You will see the Registry Editor app and click on Run as administrator.
Step 2. In the Regedit window, paste the below path in the address bar:
Computer\HKEY_LOCAL_MACHINE\SOFTWARE\Policies\Microsoft\Microsoft Defender
Step 3. Right-click on empty space and select New > DWORD (32-bit) Value.
Step 4. Click on the new DWORD (32-bit) Value and name it as DisableAntivirus.
Step 5. Double-click on DisableAntivirus value, change the Value data to 1 and select the Base as Hexadecimal.

Step 6. Click OK, and close the Registry Editor. Restart the PC to apply changes.
After restarting, open the Windows Security and navigate to Virus and Threat Protection settings. You will see a «No active antivirus provider. Your device is vulnerable». Confirm the action.
Way 3. Using CMD
The Command Prompt can also be handy to disable the Defender Antivirus. You have to paste a registry modification command, and it will remove the antivirus from your device. Here are the steps:
Step 1. Search for Command Prompt and open it as an Administrator.
Step 2. Enter the command below and press Enter to execute it:
reg add «HKEY_LOCAL_MACHINE\SOFTWARE\Policies\Microsoft\Microsoft Defender» /v DisableAntiSpyware /t REG_DWORD /d 1 /f
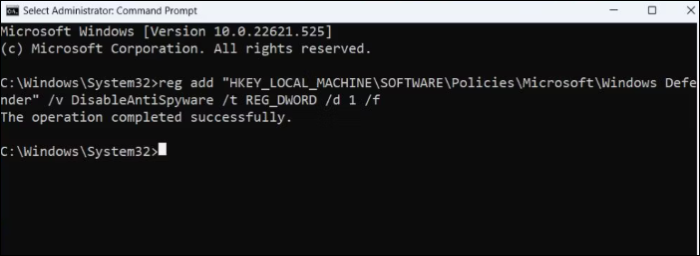
Step 3. If the operation is successful, you will see a «The operation completed successfully.» message.
Step 4. Close the CMD and restart your system.
Pro Tip: Always Backup Your PC for Data Security
Even with the advanced antivirus programs, your device is still vulnerable to external threats. And one should always keep a backup of your data in case of emergencies. Be it a security threat, a failing device or hard drive, or physical damage, there is always a risk of losing data. So, reliable backup software — EaseUS Todo Backup — ensures your data is safe and secure against all the odds.
EaseUS Todo Backup is the best backup tool to make a copy of your entire system against all emergencies. It can help you back up your files, disks, and computer apps and create a system image on a USB. With advanced backup, cloning, and restoration options, this software is a complete backup and restoration solution for personal and business use.
Other Features of EaseUS Todo Backup:
- Install Windows on a new PC without an operating system
- Create full, incremental, differential, scheduled, and auto backups
- Create a sector-by-sector backup and compress backups
- Offer 250G free Cloud and a Security Zone to keep data safe
- Image a hard drive and create an image of an SD card
To add an extra layer of protection, you can safeguard data in the security zone. Download the tool now, and make a backup of your computer.
Step 1. Launch EaseUS Todo Backup on your computer, and click Create Backup on the home screen and then hit the big question mark to select backup contents.

Step 2. To back up your Windows operating system, click «OS» to begin the backup task.

Step 3. Your Windows operating system information and all system related files and partitions will be automatically selected so you don’t need to do any manual selection at this step. Next, you’ll need to choose a location to save the system image backup by clicking the illustrated area.

Step 4. The backup location can be another local drive on your computer, an external hard drive, network, cloud or NAS. Generally, we recommend you use an external physical drive or cloud to preserve the system backup files.

Step 5. Customiztion settings like enabling an automatic backup schedule in daily, weekly, monthly, or upon an event, and making a differential and incremental backup are available in the Options button if you’re interested. Click «Backup Now«, and the Windows system backup process will begin. The completed backup task will display on the left side in a card style.

Why Do You Turn Off Windows Defender on Windows 10/11
The Defender is an excellent antivirus in the Windows ecosystem to tackle malware, viruses, and external threats while using your system online or offline. You can keep your system safe without spending a dime on other third-party apps. But why do you turn off/disable Windows Defender on Windows?
Here are some of the reasons why one wants to disable Windows Defender on Windows:
- When you want to install a third-party antivirus app, like TotalAV, it may be hard to coexist with the Defender.
- If the Defender blocks or flags a legitimate website or app as a threat.
- Windows Defender may conflict with some important system settings as it may be considered a threat.
- Finally, If you do not like Windows antivirus.
To Wrap Things Up
While Microsoft Defender is built into Windows and tough to disable, we can still find ways. Learn how to permanently disable Windows Defender using the 3 methods in this article. Along with antivirus, the best way to protect your data from various external emergencies is to create a backup with a reliable backup tool, like EaseUS Todo Backup. Download EaseUS Todo Backup and quickly make a backup of your system.
How to Permanently Disable Windows Defender FAQs
Here are some of the most frequent FAQs asked about how to permanently disable Windows Defender. I hope you find these queries helpful.
1. Why can’t I turn off Windows Defender?
Microsoft believes that the system can be exposed to threats if you turn off Windows Defender. So, it makes the Defender turn on after some time as a fail-safe method.
2. How can I disable Windows Defender Antivirus temporarily?
- Open Settings and go to Windows Security.
- Navigate to Virus & Threat Protection > Virus & threat protection settings > Manage Settings.
- Turn off Real-Time protection.
3. Is it OK if I turn off Windows Defender?
Yes, only if you have any other antivirus program installed on your device. If you disable Windows Defender without any antivirus programs, your device will be vulnerable to viruses, ransomware, and malware.
4. How do I turn my Windows Defender back on?
Open Settings and navigate to Windows Security > Virus & Threat Protection > Virus & Threat Protection Settings> Manage Settings. Turn on the Real Time protection toggle.