
Приложения Office 365, входящие также в состав пакетов Office 2019 и Office 2016, созданы таким образом, чтобы у пользователя всегда была актуальная версия, а поток новых функций и возможностей не иссякал каждый месяц. Чтобы реализовать этот подход, разработчики сделали систему обновлений Office автоматической и практически бесшовной. В отличие от Windows 10, приложения Office обновляются очень тихо и никогда не надоедают пользователю просьбами перезагрузить компьютер или приложения для установки новой версии. Из-за того, что система обновлений Office сделана крайне хорошо, пользователи редко задаются вопросом отключения обновлений Office. Все же иногда случается так, что пользователю не нравятся какие-то изменения в дизайне, функциях или принципах работы приложений или же в релиз уходит глючный апдейт. В таком случае отключение обновлений Office выглядит вполне разумным и даже правильным.
Опять же, в отличие от Windows 10, где обновления фактически являются принудительными, пользователи Office могут свободно отключить обновления всего в несколько кликов и на неопределенный период. Microsoft никак не ограничивает свою аудиторию в этом вопросе, что несомненно хорошо. Справедливости ради стоит отметить, что за годы использования Office 365 у нас никогда не возникала необходимость отключить обновления Office. Но ради общего развития и на всякий случай стоит изучить этот вопрос.
Итак, если вы хотите отключить обновления Office, вам надо сделать следующее:
- Запустите любое приложение. Word, PowerPoint, Excel, Outlook, Access или любое другое. Настройки у Office глобальные, поэтому не имеет значения приложение, из которого вы будете отключать обновления. И да, не имеет значения, какая у вас версия. Этим способом вы можете отключить обновления Office 2016, Office 2019, Office 365 Индивидуальная, Office 365 Домашняя и так далее. Если у вас версии Office старше 2016, интерфейсы могут немного отличаться, но принцип в общем остается одниковым.
- Создайте новый документ, а затем нажмите Файл.

- Внизу меню Office нажмите на кнопку Учетная запись.
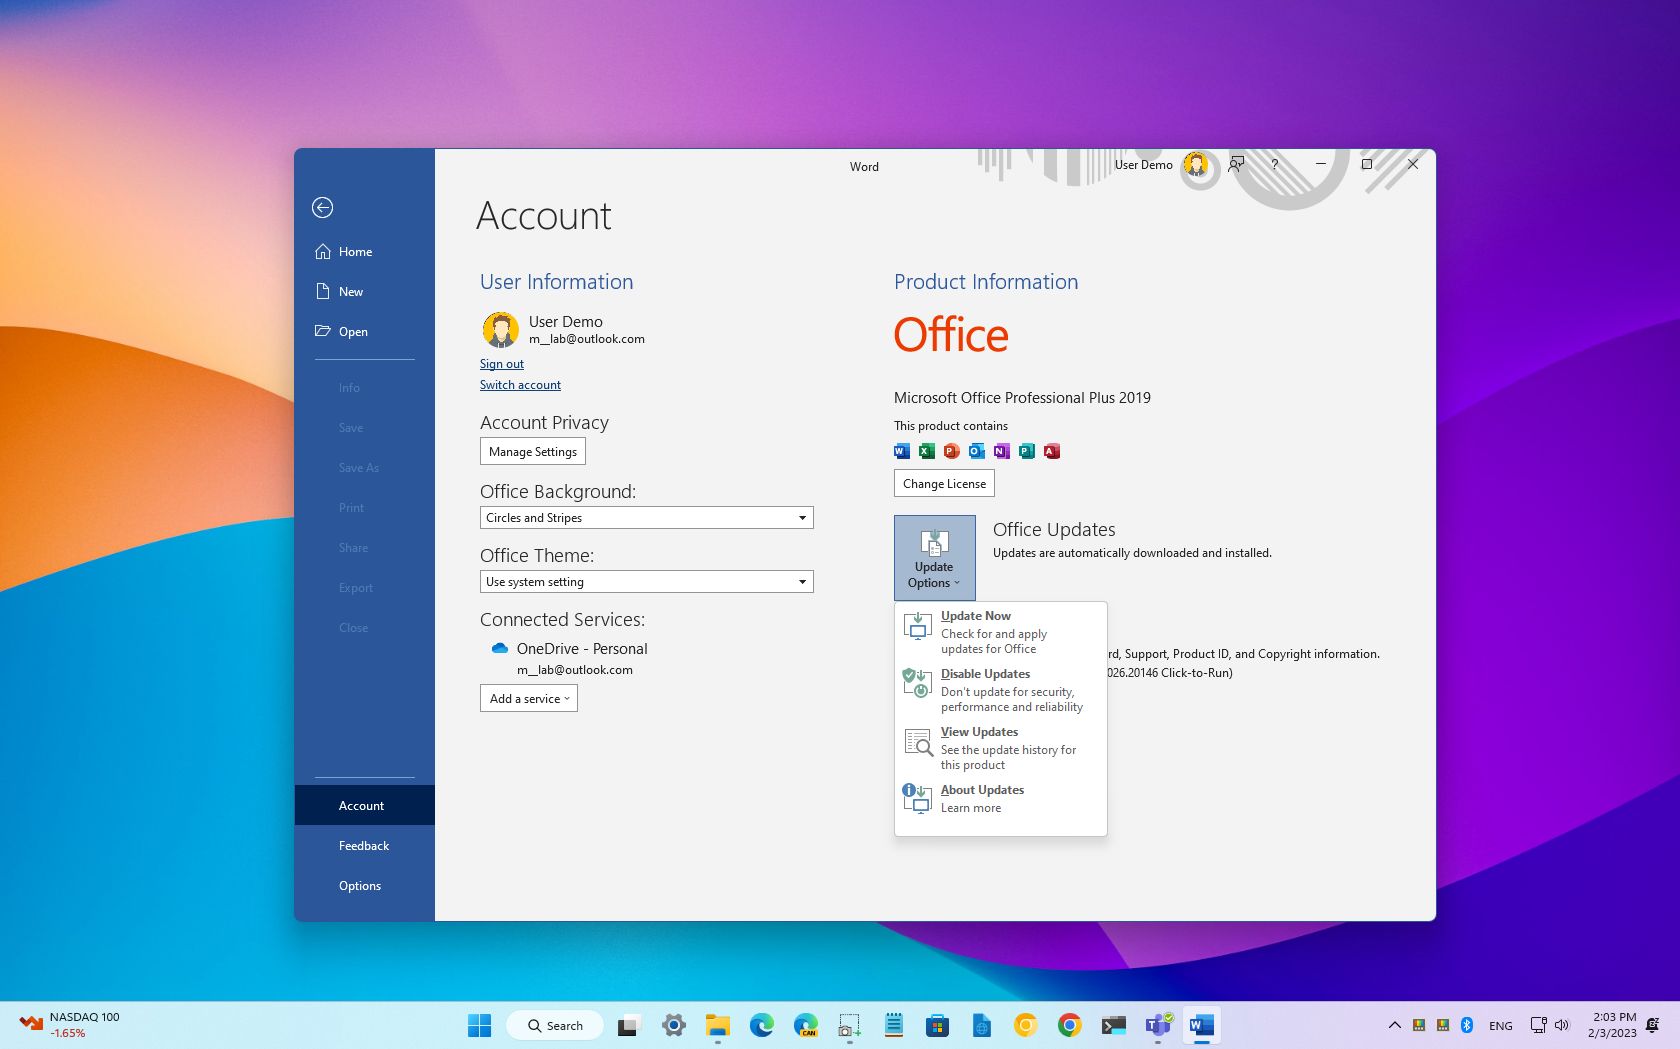
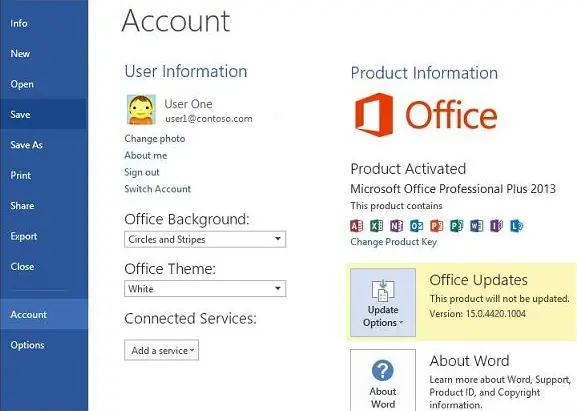
- В появившемся окне в разделе Сведения о продукте найдите пункт Обновления Office и нажмите на кнопку Параметры обновления.
- На экране появится меню, в котором вам доступно несколько действий. Кнопка Обновить отвечает за принудительную проверку и установку обновлений. Кнопка Просмотреть обновления откроет журнал обновлений и даст вам возможность просмотреть список уже установленных обновлений. Кнопка Об обновлениях откроет детальные сведения о доступных обновлениях. Нас же сейчас интересует отключение обновлений, поэтому нажите Отключить обновления.
- Обратите внимание, что отключить обновления Office можно только от имени Администратора, поэтому на экране может появиться окно контроля учетных записей с запросом подтверждения действия или ввода пароля Администратора.
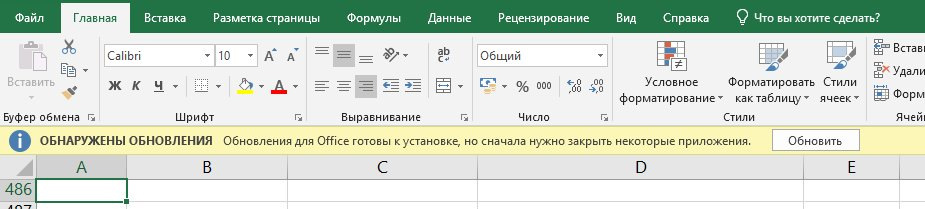
- Все, теперь обновления отключены, о чем свидетельствует большая желтая плашка в меню сведений о продукте. Имейте в виду, что отключение обновлений препятствует не только функциональным обновлениям, но и обновлениям безопасности и улучшениям производительности. Это может повлечь за собой некие риски, которые вам следует учесть. К примеру, обновления чинят уязвимости, которыми могут воспользоваться злоумышленники.


Повторно включить обновления Office можно точно так же, как и отключали. Для этого нажмите Файл – Учетная запись, а затем щелкните большую желтую кнопку Параметры обновления в разделе Сведения о продукте и Включить обновления.
На этом все.
(Image credit: Future)
If you have a Microsoft 365 subscription to access Word, Excel, Outlook, and PowerPoint, you’ve probably noticed new features and changes showing up quite frequently. This is because Office uses automatic updates to ensure that apps are always up to date with the latest security patches, improvements, and features.
However, if updates are causing problems on Windows 11 (or 10), or a new release became available with visual changes and features you don’t need, it’s possible to disable automatic updates completely in the Office version from Microsoft 365 and in the standalone version.
This how-to guide will walk you through the easy steps to completely disable updates for the suite of apps, whether you have a Microsoft 365 subscription or the standalone version, including Office 2021, 2019, 2016, or an older version.
How to disable automatic updates for Microsoft Office
To stop getting updates and features for Office on Windows 11 (or on Windows 10), use these steps:
- Open an Office app. For example, Word.
- Create a new blank document.
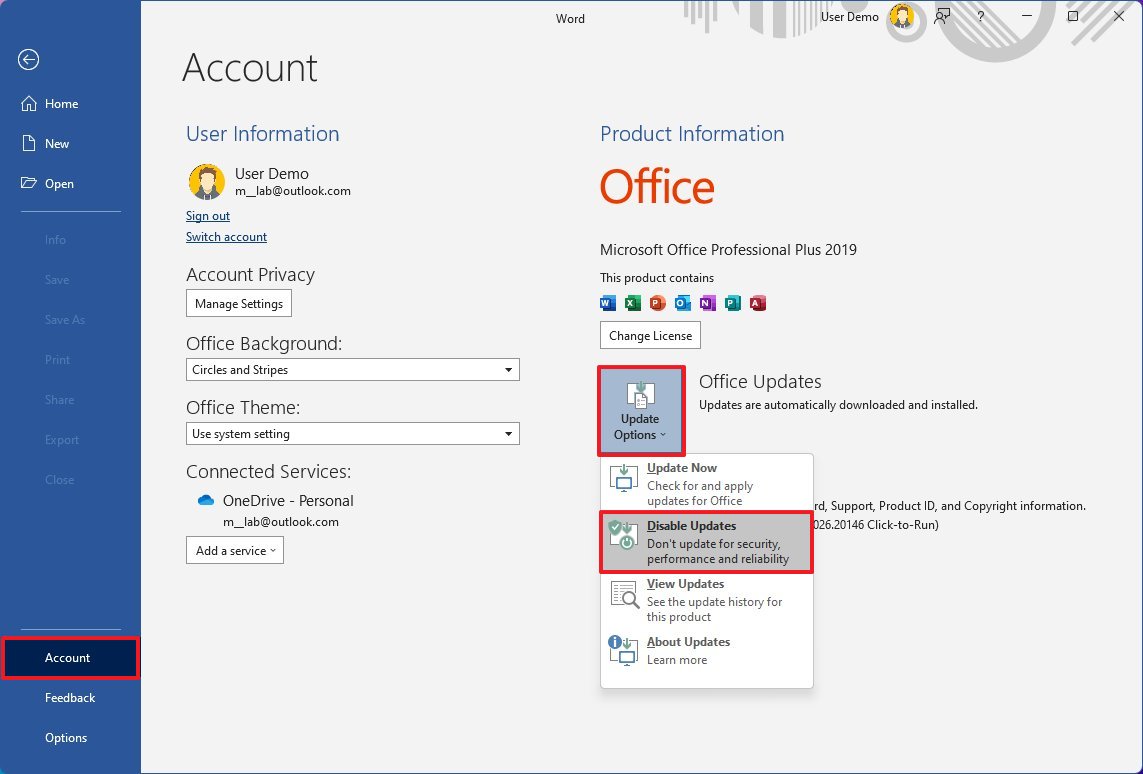
- Click on File.
- Click on Account.
- On the right side, click the Update options menu.
- Select the Disable Updates option.
- Click the Yes button to confirm.
Once you complete the steps, your Office apps will no longer download and install updates automatically.
If you want to enable updates again, you can use the same instructions outlined above, but on step 6, select the «Enable updates» option. You can also use this guide to learn all the steps to enable and install updates, and to check the version of Office that you’re running.
More resources
For more helpful articles, coverage, and answers to common questions about Windows 10 and Windows 11, visit the following resources:
All the latest news, reviews, and guides for Windows and Xbox diehards.
- Windows 11 on Windows Central — All you need to know
- Windows 10 on Windows Central — All you need to know

Cutting-edge operating system
A refreshed design in Windows 11 enables you to do what you want effortlessly and safely, with biometric logins for encrypted authentication and advanced antivirus defenses.
Mauro Huculak has been a Windows How-To Expert contributor for WindowsCentral.com for nearly a decade and has over 15 years of experience writing comprehensive guides. He also has an IT background and has achieved different professional certifications from Microsoft, Cisco, VMware, and CompTIA. He has been recognized as a Microsoft MVP for many years.
Generally, MS Office will be automatically updated in Windows 10. If you do not want to update Office, you can stop Office updates. In this post on MiniTool, we are going to show you how to turn off Office updates Windows 10.
Although Office updates introduce new features and eliminate known bugs and issues, many users may choose to disable Office updates for a variety of reasons. If you are one of them, you can try the methods below to turn off Office updates Windows 10.
How to Disable MS Office Updates in Windows 10
Way 1. Turn off Office Updates Windows 10 via Windows Settings
With Windows Settings, you can configure your display settings, network, apps, and more. Here you can follow the steps below to complete the necessary actions to disable Office updates.
Step 1. Right-click the Start button to choose Settings, or you can press Windows + I key combinations.
Step 2. Click Update & Security > Windows Update. Then click Advanced options.
Step 3. Uncheck the checkbox next to Give me updates for other Microsoft products when I update Windows.

Step 4. Restart your computer, and Office should not be updated automatically.
Way 2. Turn off Office Updates Windows 10 via Office Apps
Alternatively, you can use an Office app like Microsoft Word to stop Office updates. Here are the major steps.
Step 1. Open a Word document. Then click File > Account.
Step 2. Click Update Options and then choose Disable Updates from the option list.
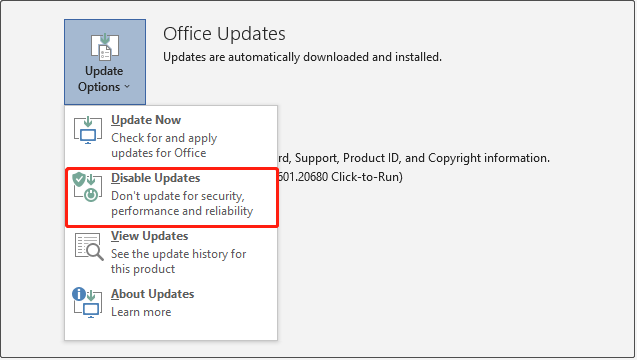
Step 3. In the new Microsoft Office Click-to-Run Client window, select the Yes button to apply this change.
Way 3. Turn off Office Updates Windows 10 via Registry Editor
Windows registry is a database that stores numerous configuration settings. You can make changes to the registry by using Windows Registry Editor. How to disable Office updates using the registry? Follow the steps below.
Note:
Note: Editing registries is dangerous. Any wrong operations to the registry could damage your computer, therefore, you are strongly suggested to back up the registry or create a system restore point.
Step 1. Press Windows + R key combinations and input regedit in the new window. After that, click the OK button or press Enter.
Step 2. In the UAC window, select Yes.
Step 3. In the top address bar, navigate to the following location path:
Computer\HKEY_LOCAL_MACHINE\SOFTWARE\Policies\Microsoft
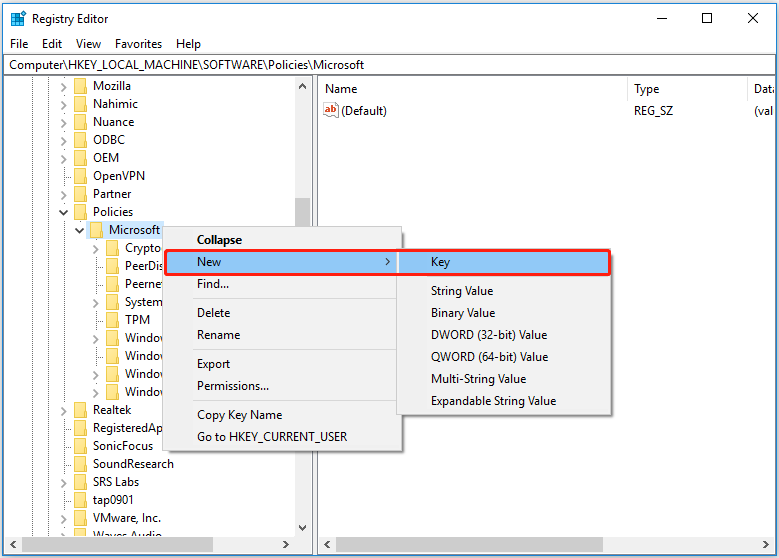
Step 4. Right-click Microsoft to select New > Key. Rename the new key to Office.
Step 5. Right-click Office and repeat the steps above to create a key named 16.0.
Step 6. Right-click 16.0 to create a Common key.
Step 7. Right-click Common to create an OfficeUpdate key.
Step 8. Right-click OfficeUpdate and select New > DWORD (32-bit) Value. Then rename this new DWORD value to EnableAutomaticUpdates.
Step 9. In the right panel, double-click EnableAutomaticUpdates. In the pop-up window, set up the value data to 0 and click OK.
After completing the steps above, now restart your computer, and then the Office products will not be updated automatically.
Click to Tweet
Top Recommendation
As mentioned earlier, incorrect manipulation of the Windows registry can cause computer failure. Apart from this reason, your computer can malfunction due to many other issues. For example, you may encounter the error message saying “disk boot failure – insert system disk and press Enter” when you start the PC.
In such a situation, rescuing data is the most significant thing you should do. MiniTool Power Data Recovery, the best free data recovery software, is recommended to you.
It can help to recover files in lots of data loss situations, such as the Windows Pictures folder being missing, data loss after an MBR to GPT conversion, and so on.
Download it and give it a try.
MiniTool Power Data Recovery FreeClick to Download100%Clean & Safe
Bottom Line
In a word, this article explains how to disable MS Office updates in Windows 10, including using Windows Settings, Microsoft Office apps, and Windows Registry Editor.
If you have come across any other effective ways to turn off Office updates Windows 10, welcome to share them with us by leaving them in the comment zone below.
If you need more help with MiniTool Power Data Recovery, please feel free to contact us via [email protected].
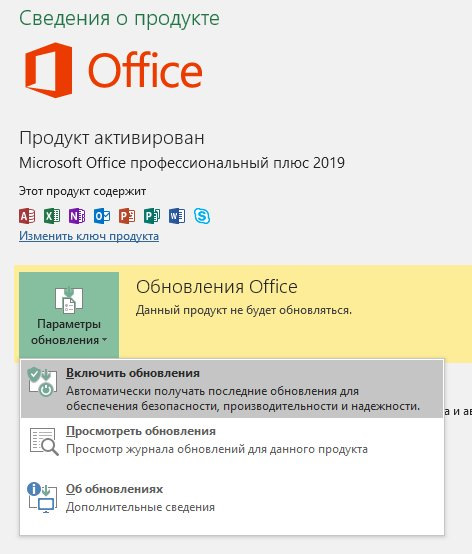
Have you installed Microsoft 365 Apps for enterprise, Office LTSC 2021, Office 2019, Office 2016, or Office 2013 on your Windows PC? By default, these are configured to update automatically when new updates are available from Microsoft. However, if you find that in backstage, updates are disabled, or the command to manage updates is disabled or hidden. For example, the following image indicates that updates are disabled in backstage.
If you wish, you can hide the option to enable or disable Office Updates with the help of the Registry Editor or Local Group Policy Editor on Windows 11 or 10 machines.
How to Hide Enable or Disable Office Automatic Updates using Local Group Policy Editor?
To hide, enable or disable Office Automatic Updates using Local Group Policy Editor, you need to install the Office’s Group Policy template first. For that, navigate the Microsoft website and download the latest admin templates. MS Office 2013 Group Policy template, you can download from here.
Once you have downloaded the Office’s Group Policy template, double-click on the setup files to extract its contents, and select a blank folder on your computer when prompted for the path. Now open the folder and copy all contents of the sub-folder admx into the C:/Windows/PolicyDefinitions/ folder. Then, copy the admin folder contents to the language-locale subfolder (for instance, “en-US”) into the respective language-locale folder under C:/Windows/PolicyDefinitions/.
When done, you can proceed with the following steps to hide, enable or disable Office Automatic Updates:-
Step 1. Open Local Group Policy Editor.
Step 2. Then, navigate to the following path in the left sidebar of Local Group Policy Editor:-
Computer Configuration > Administrative Templates > Microsoft Office 2016 (Machine) > Updates
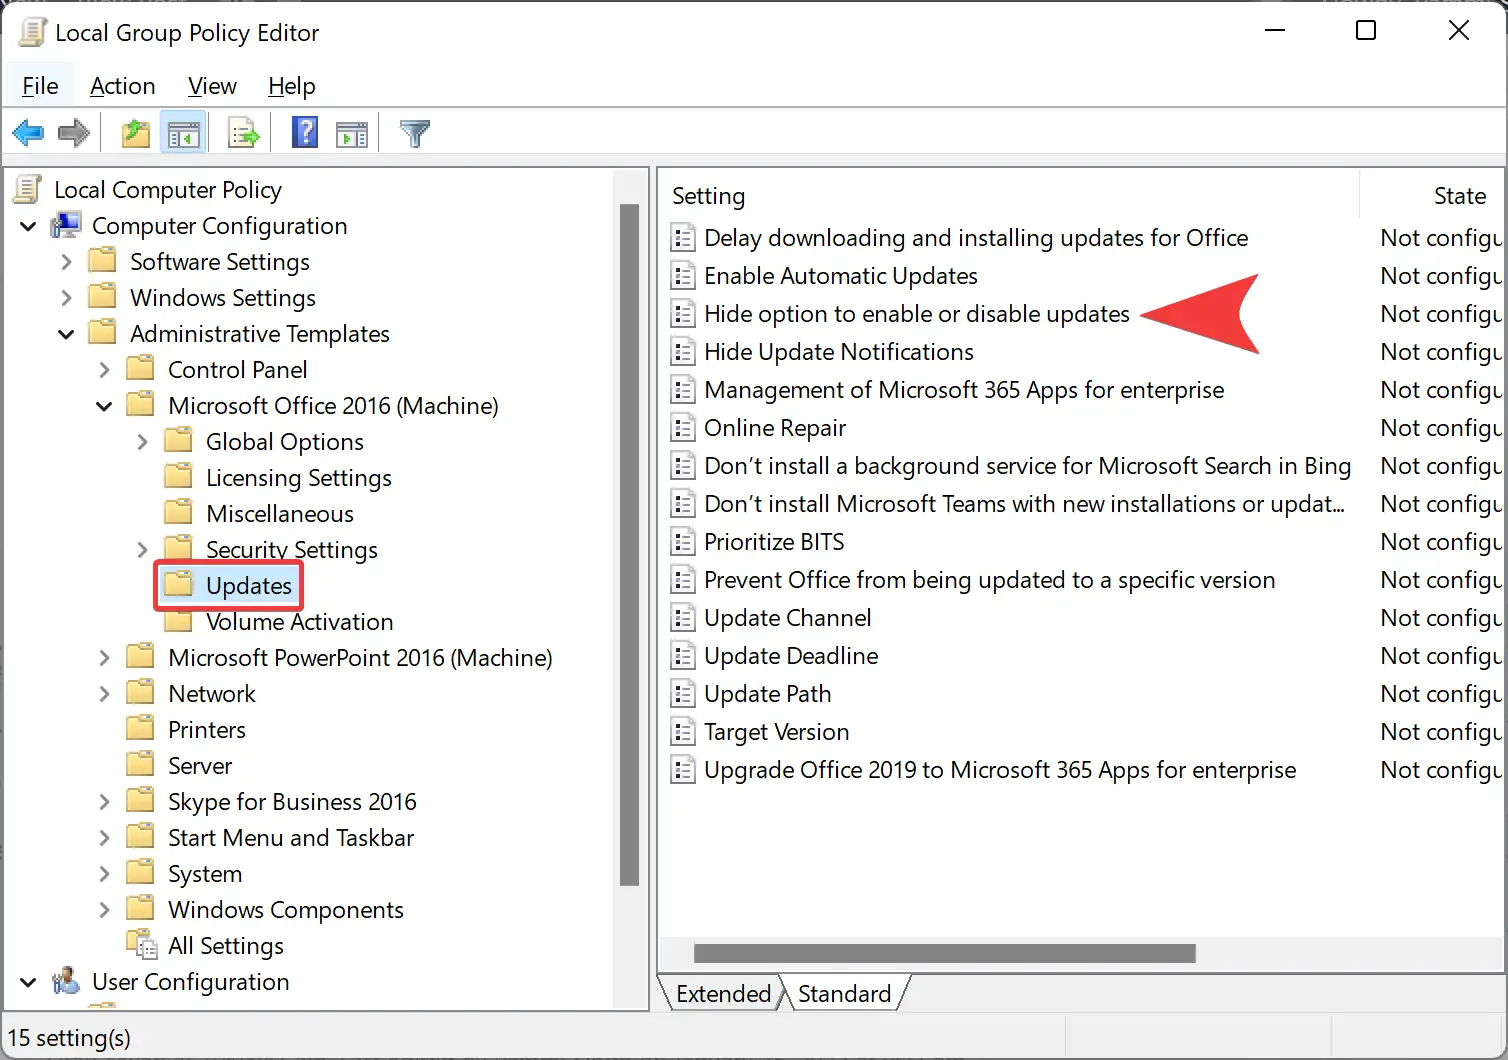
Step 3. On the right side, double-click the policy “Hide option to enable or disable updates.”
Step 4. Select the Enabled option to hide option to enable or disable updates. Select the Not Configured option to unhide enable or disable updates.
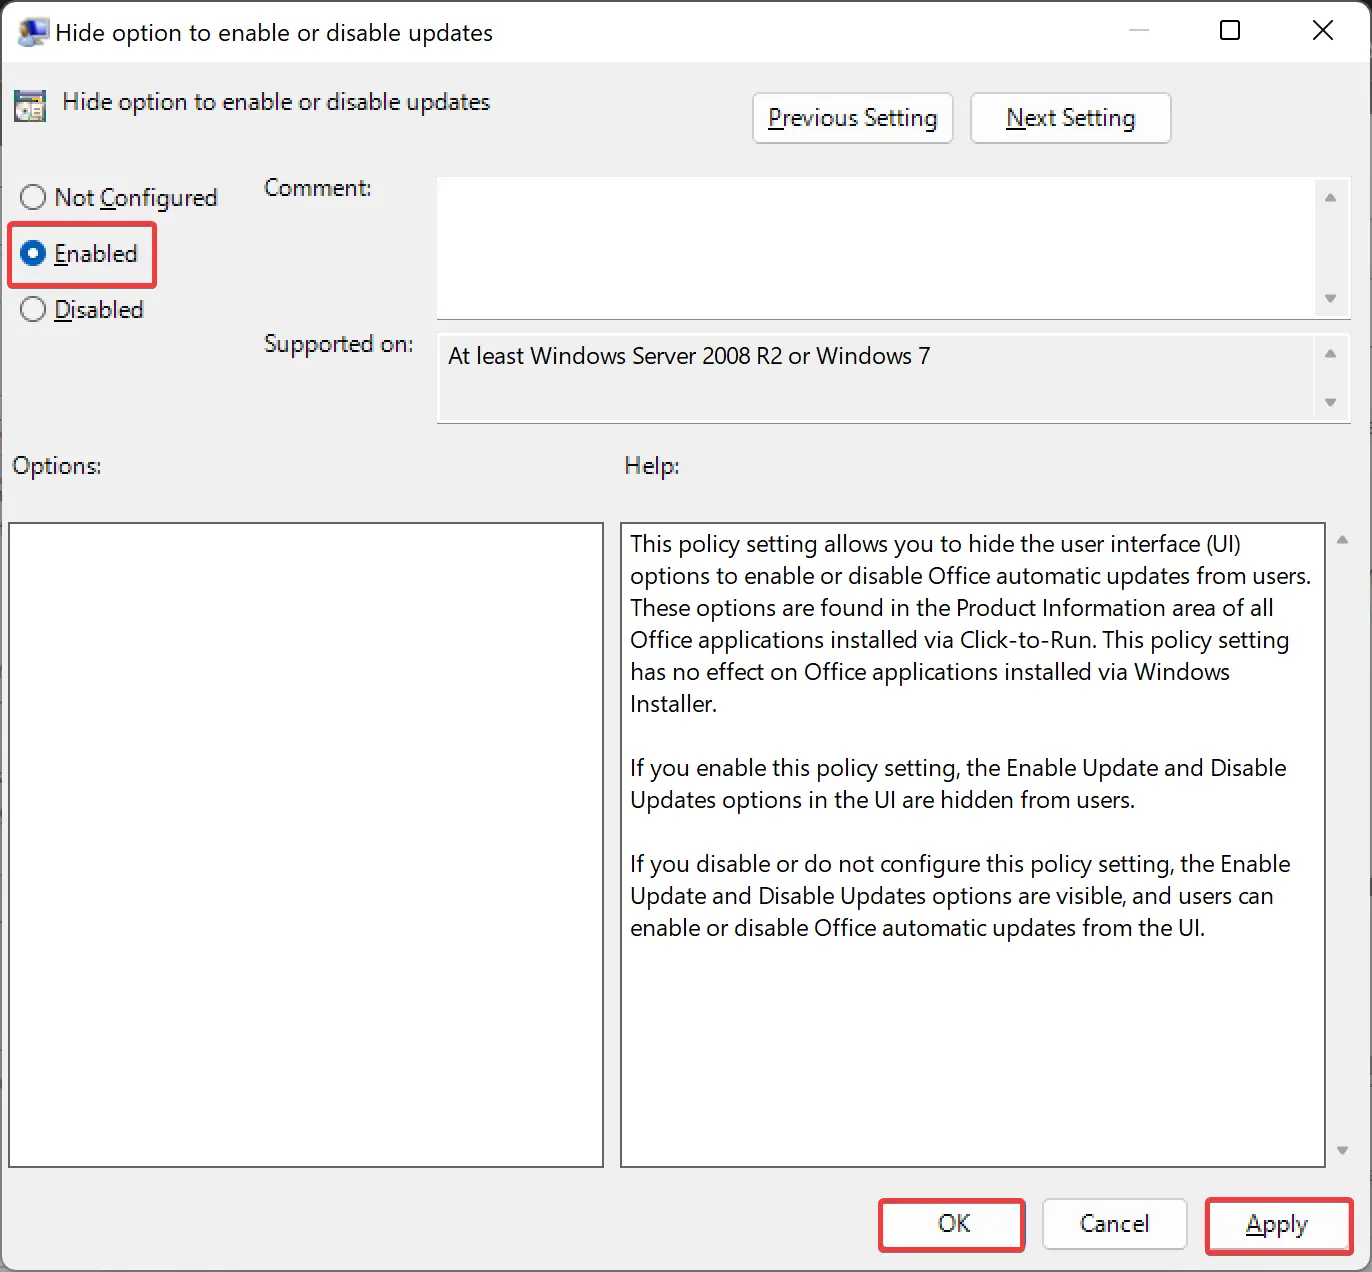
Step 5. Click Apply.
Step 6. Click OK.
How to Hide Option to Enable or Disable Updates for Office apps using Registry Editor?
To hide options to enable or disable updates for Office apps through Windows 11 or 10 Registry Editor, use these steps:-
Step 1. Open Registry Editor.

Step 2. Then, navigate to the following path in the Registry Editor:-
HKEY_LOCAL_MACHINE\software\policies\microsoft\
Note: For Office 2013, you’ll need to navigate to the following path accordingly; if you don’t find then create:-
HKEY_LOCAL_MACHINE\software\Wow6432Node\microsoft\office\15.0\common\OfficeUpdate
Step 3. Right-click on the Microsoft folder and select the New > Key option.
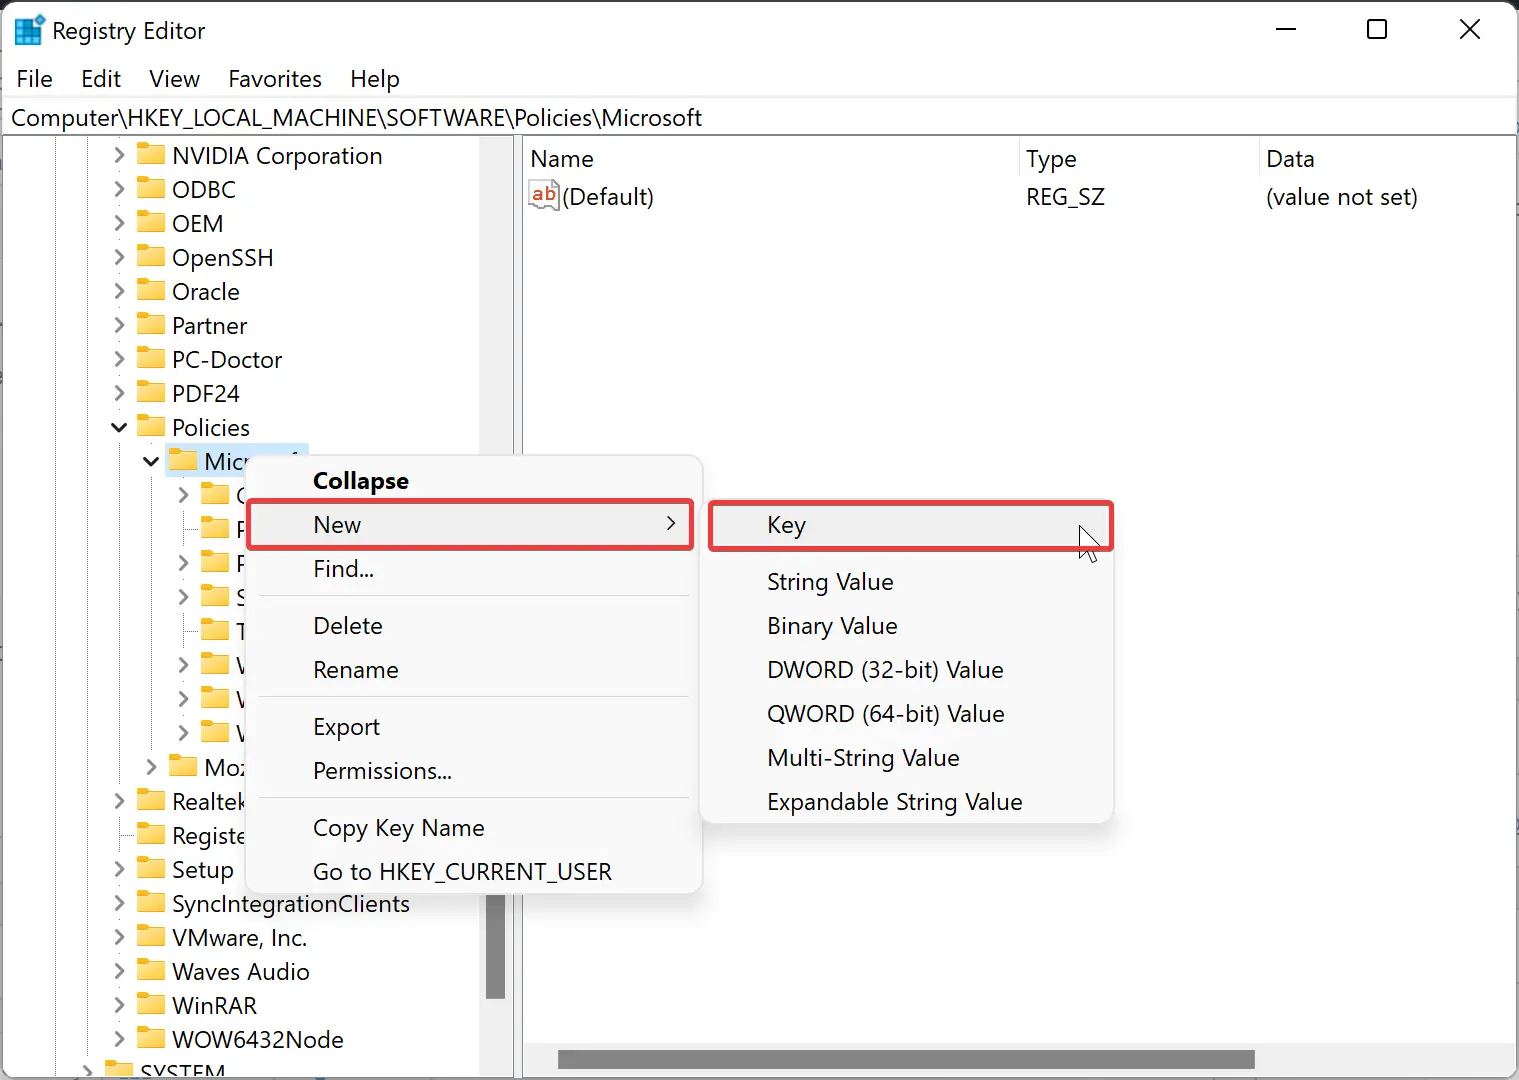
Step 4. Name the newly created key office. Then, right-click on office and select New > Key. Name it 16.0.
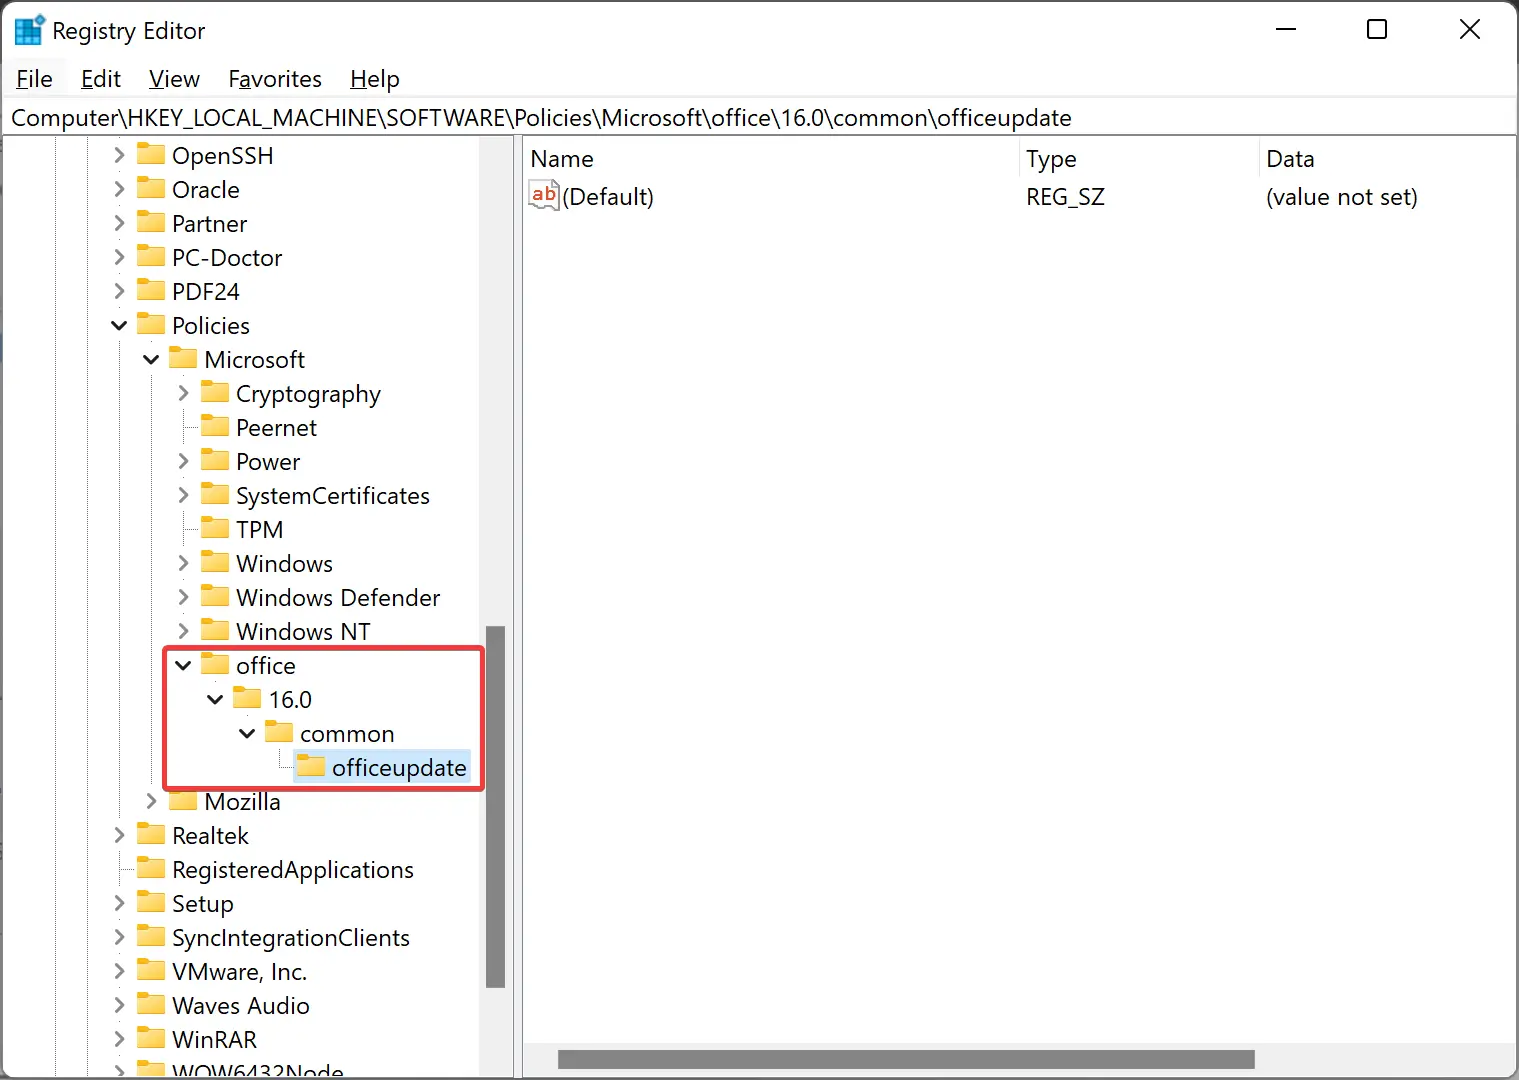
Step 5. After that, right-click on the 16.0 folder. Select the New > Key option and set the name as common.
Step 6. Now, please right-click on the common key and select New > Key. Name it officeupdate.
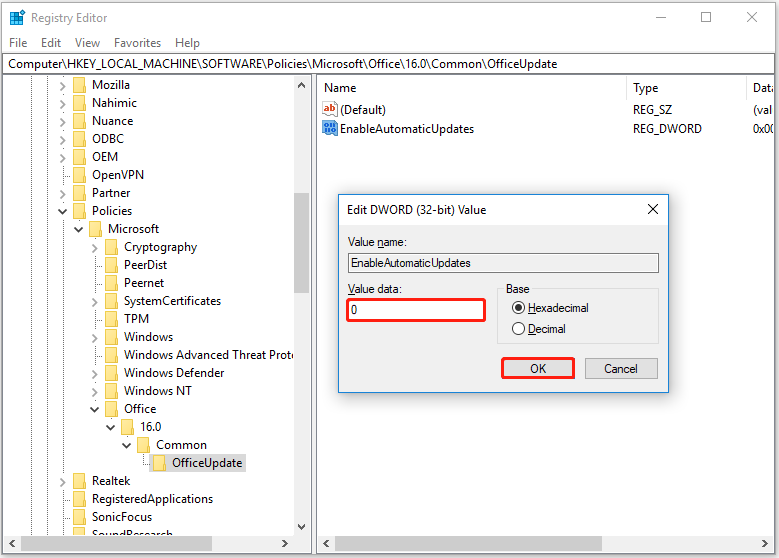
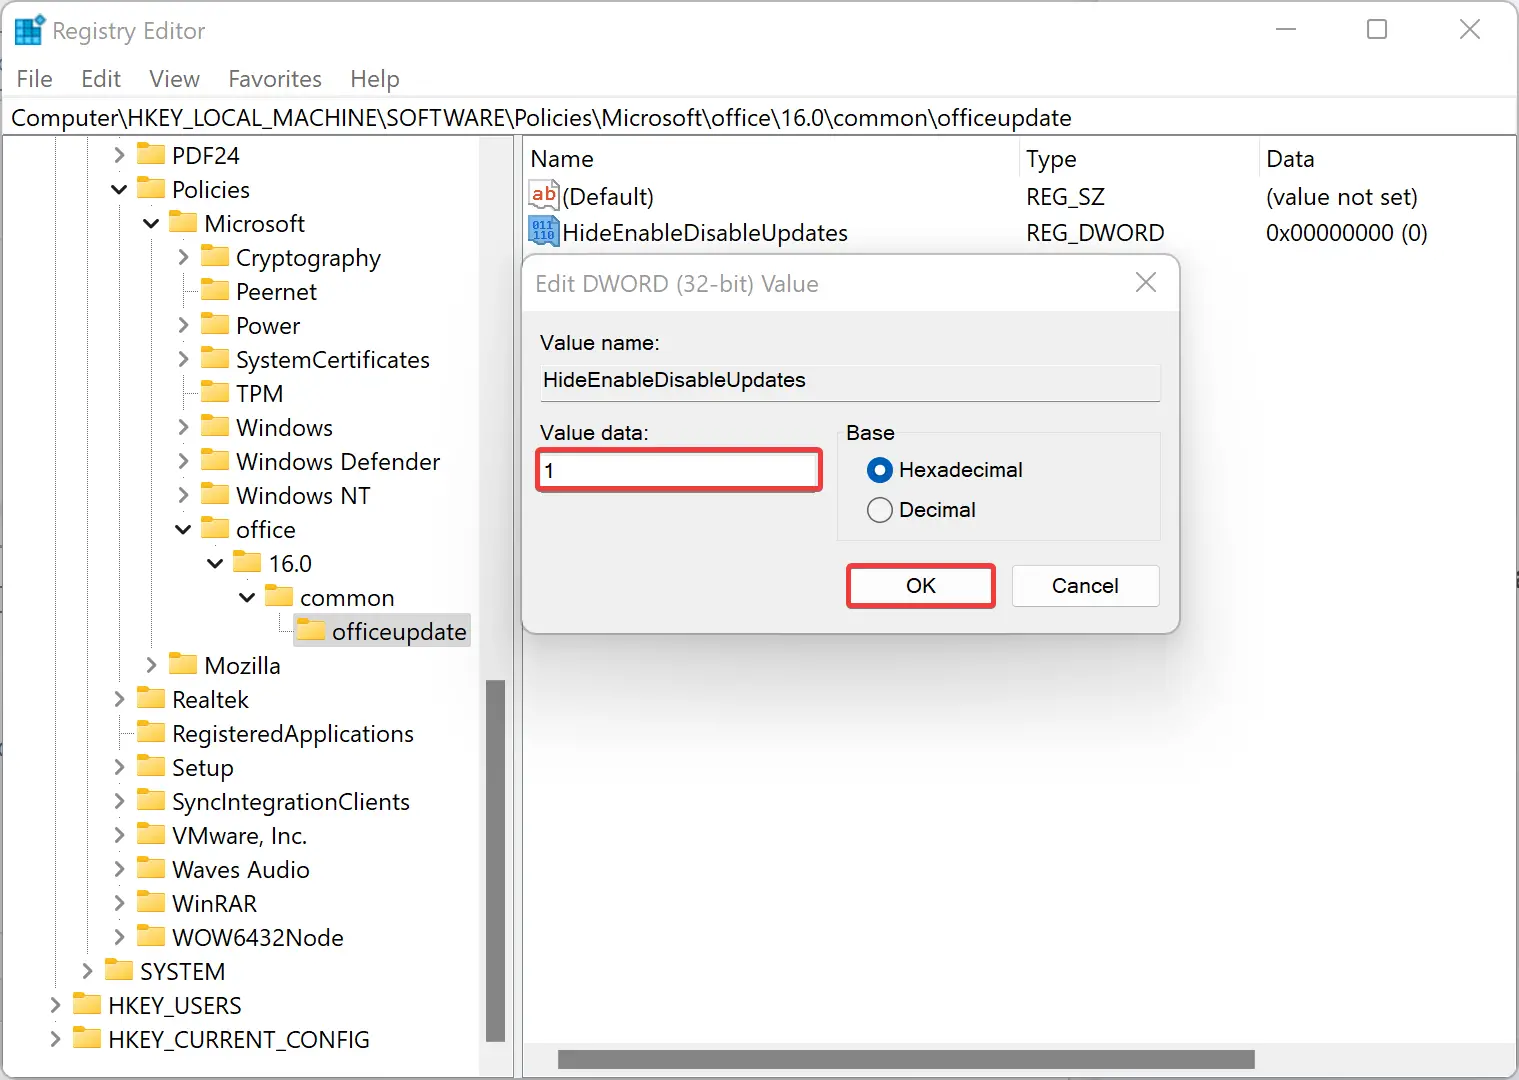
Step 7. Then, right-click on the officeupdate key and select New > DWORD (32-bit) Value. Set the name as HideEnableDisableUpdates.
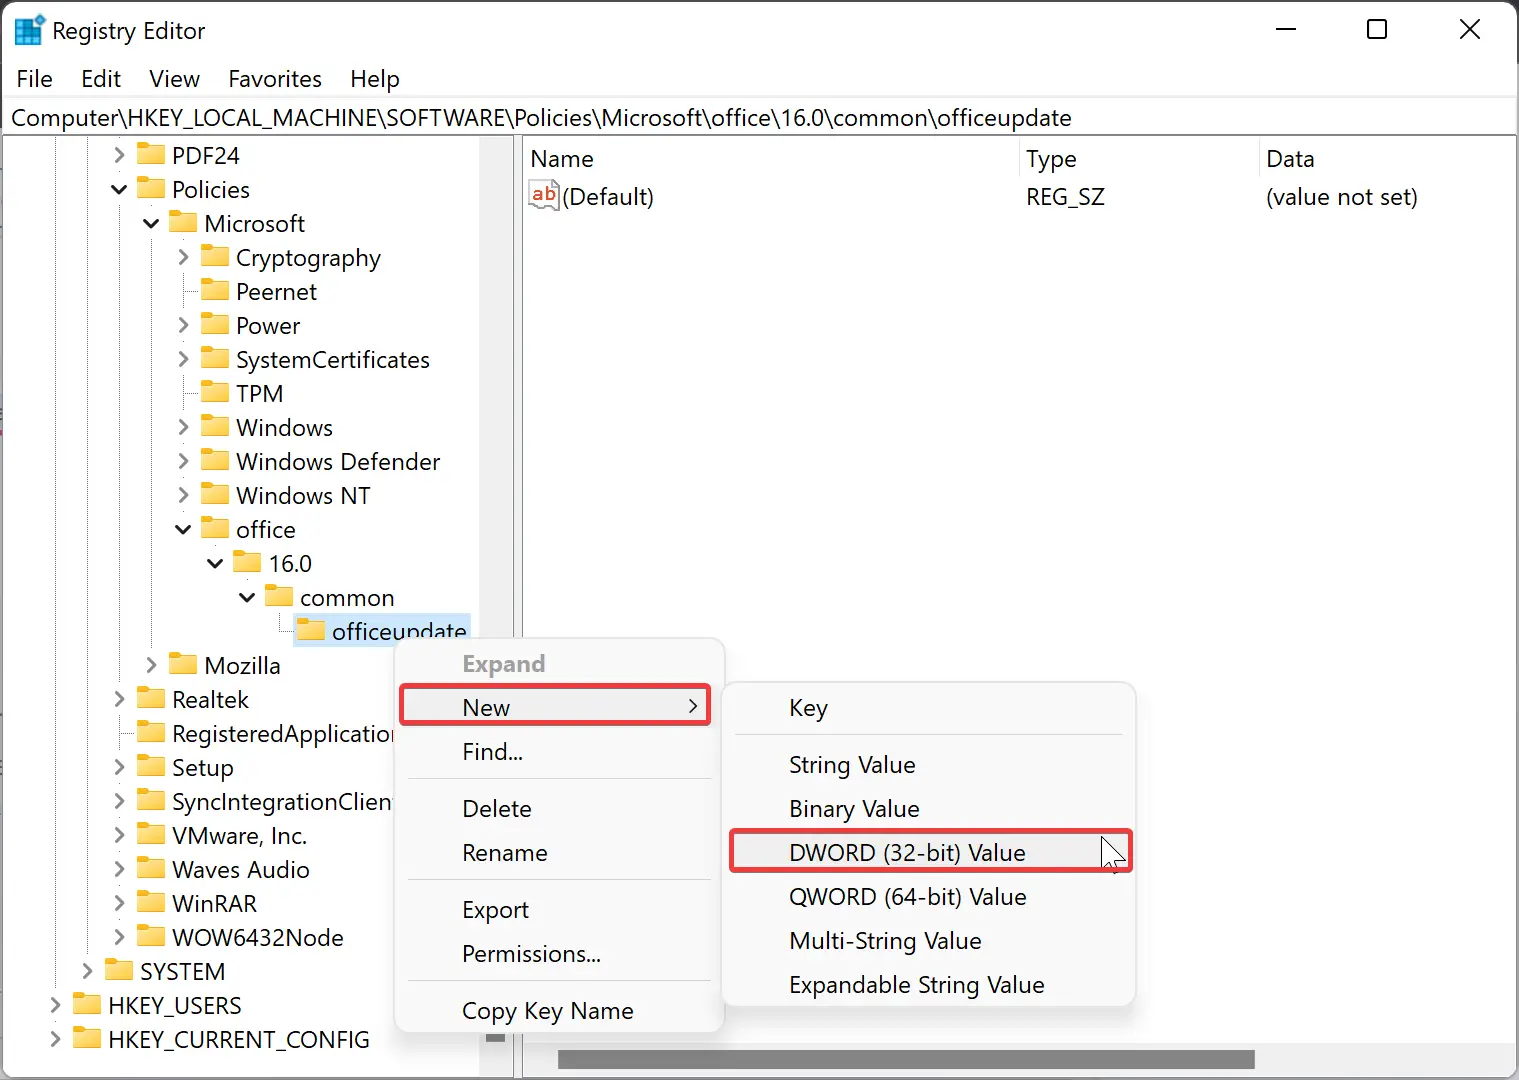
Step 8. Double-click on the HideEnableDisableUpdates REG_DWORD value and set the Value data as:-
- 1 = To hide the menu option to enable or disable automatic updates.
- 0 = To show the menu option to enable or disable automatic updates.
Step 9. Click OK.
Step 10. To enable or disable Office automatic update, right-click on the officeupdate key and select New > DWORD (32-bit) Value. Set the name as EnableAutomaticUpdates.
Step 11. Double-click on the EnableAutomaticUpdates REG_DWORD value and set the “Value data” as:-
- 0 = Automatic updates are disabled
- 1 = Automatic updates are enabled
Step 12. Click OK.
Good luck.
Conclusion
In conclusion, if you have installed Microsoft 365 Apps for enterprise, Office LTSC 2021, Office 2019, Office 2016, or Office 2013 on your Windows PC and you find that updates are disabled in backstage or the command to manage updates is disabled or hidden, you can hide the option to enable or disable Office Updates. This can be done using either the Local Group Policy Editor or the Registry Editor on Windows 11 or 10 machines. The process involves installing the Office’s Group Policy template, navigating to the relevant path, and selecting the appropriate options to hide, enable or disable Office Automatic Updates. These steps are detailed in the article and should enable you to manage Office updates efficiently if followed correctly.
- Сообщества
- Компьютерная Помощь
10 декабря 2021
Автор удалён.
Приветствую. Подскажите как отключить предупреждение о наличии обновлений? Гугл гласит, что нужно отключить обновления в настройках учетной записи. Отключил, через неделю опять началось. Выскакивает при каждом новом открытии программы. Причем, обновления не устанавливаются — скачиваются и все пропадает и ничего не происходит. А при новом открытии программы после «обновления» снова просит обновиться.
Комментарии 10
Войдите или зарегистрируйтесь, чтобы писать комментарии, задавать вопросы и участвовать в обсуждении.
somebody
Автор
Несуществующий пользователь
Без машины
Ну так обнови через вин апдейт
somebody
Автор
Несуществующий пользователь
Без машины
дополнительный параметры. Включить обновление для других продуктов.
в кмс вроде птичка была — разрешить обновления.
somebody
Автор
Несуществующий пользователь
Без машины
Это не кандидат в мастера спорта это — KMSoffline_x64.exe 😁
Тоже 19 и тоже через неделю говорит мне что я вор! 😪
И так каждую неделю. 😭
использовал kmsauto, не было проблемм. с рутракера.