
Are you tired of constantly being interrupted by Microsoft Office 2016 updates in Windows 10? Well, you’re not alone. Many professionals find these updates to be disruptive and time-consuming. But did you know that there’s a simple way to disable these updates and regain control of your workflow? By following a few easy steps, you can put an end to those pesky Office 2016 updates and focus on your work without unnecessary interruptions.
If you’re wondering how to disable Microsoft Office 2016 updates in Windows 10, look no further. Here’s what you need to know. Microsoft Office 2016 updates are designed to provide users with new features, bug fixes, and security patches. However, for some professionals, these updates can be more of a hindrance than a help. They often disrupt work, require system restarts, and can even cause compatibility issues with other software. To disable these updates, you can navigate to the Office Update section in your Windows settings and turn off automatic updates. By doing so, you’ll have more control over when and how updates are installed, allowing you to focus on your tasks without unnecessary interruptions. So, why let Office updates dictate your workflow when you can easily disable them and regain control?
To disable Microsoft Office 2016 updates in Windows 10, follow these steps:
- Open any Office application, such as Word or Excel.
- Click on the «File» tab.
- Select «Account» from the left-hand menu.
- Click on the «Update Options» button.
- Choose «Disable Updates» to prevent Office 2016 from automatically updating.
By following these steps, you can easily disable Microsoft Office 2016 updates on Windows 10.

Why Disable Microsoft Office 2016 Updates in Windows 10?
Microsoft Office 2016 is a popular suite of productivity applications used by millions of individuals and businesses worldwide. While updates for Office applications are generally beneficial, some users may prefer to disable automatic updates. There could be several reasons for this choice:
- Compatibility concerns: Sometimes, new updates may introduce compatibility issues with certain hardware or software configurations. By disabling updates, users can maintain a stable working environment without risking any conflicts.
- Bandwidth management: Automatic updates consume network bandwidth, which can be problematic for those with limited internet connections or data caps. Disabling updates allows users to allocate network resources efficiently.
- Customization control: Some users prefer to tailor their Office applications to their specific needs and preferences. Disabling updates ensures that the software remains unchanged, allowing users to maintain their personalized settings.
- Security concerns: Though updates often include security patches, some users may have stringent security measures in place and prefer to manage updates manually.
How to Disable Microsoft Office 2016 Updates through the Office Application
Microsoft Office 2016 provides built-in options to disable automatic updates. Here’s how you can do it:
Step 1: Open any Office application, such as Word or Excel.
Step 2: Click on the «File» tab in the top left corner of the application window.
Step 3: Select «Options» from the dropdown menu.
Step 4: In the Options window, navigate to the «Update Options» section.
Step 5: Click on the «Disable updates» option.
Step 6: Click «OK» to save the changes.
Following these steps will disable automatic updates for all the Office applications installed on your Windows 10 system.
How to Disable Microsoft Office 2016 Updates through the Windows Update Settings
If you prefer to manage updates from the Windows Update settings, you can do so by following these steps:
Step 1: Open the «Settings» app on your Windows 10 system.
Step 2: Click on «Update & Security» from the available options.
Step 3: In the left-hand sidebar, select «Windows Update.»
Step 4: Click on «Advanced options.»
Step 5: Under the «Choose how updates are installed» section, select «Notify to schedule restart.»
Step 6: Close the Settings app.
Disabling automatic updates through the Windows Update settings will prevent Microsoft Office 2016 updates from being installed automatically.
How to Enable Microsoft Office 2016 Updates
If you decide to enable automatic updates for Microsoft Office 2016 in the future, follow these steps:
Step 1: Open any Office application, such as Word or Excel.
Step 2: Click on the «File» tab in the top left corner of the application window.
Step 3: Select «Options» from the dropdown menu.
Step 4: In the Options window, navigate to the «Update Options» section.
Step 5: Click on the «Enable updates» option.
Step 6: Click «OK» to save the changes.
These steps will enable automatic updates for Microsoft Office 2016 on your Windows 10 system.
Managing Office Updates with Group Policy
For enterprise users or IT professionals managing multiple systems, Group Policy can be a powerful tool to control Office updates. Here’s how to manage Office updates using Group Policy:
Step 1: Open the Group Policy Editor by pressing Windows Key + R, then typing «gpedit.msc» (without quotes) and pressing Enter.
Step 2: In the Group Policy Editor, navigate to «Computer Configuration» → «Administrative Templates» → «Microsoft Office 2016» → «Updates.»
Step 3: Double-click on the «Enable Automatic Updates» policy.
Step 4: Select the «Enabled» option.
Step 5: Choose the desired update option, such as «Download updates but let me decide when to install them» or «Never check for updates.»
Step 6: Click «Apply» and then «OK» to save the changes.
With Group Policy, you can centrally manage Office updates across multiple computers and networks, ensuring consistency and control.
Preventing Microsoft Office 2016 Updates in Windows 10
Windows 10 offers various options to disable Microsoft Office 2016 updates, providing users with flexibility and control over their software management. Whether through the Office application, Windows Update settings, or Group Policy, users can choose the method that best suits their needs. By disabling automatic updates, users can mitigate compatibility issues, manage bandwidth usage, maintain customization control, or address specific security concerns. However, it’s essential to periodically check for manual updates or security patches to ensure the optimal performance and security of Microsoft Office 2016.

Disabling Microsoft Office 2016 Updates in Windows 10
If you want to disable Microsoft Office 2016 updates on your Windows 10 device, there are several methods you can try:
Method 1: Using the Office Application
1. Open any Office application such as Word, Excel, or PowerPoint.
2. Click on «File» in the top-left corner and select «Options».
3. In the left sidebar, click on «Update» and then click on the «Disable Updates» button.
4. Confirm the action by clicking on «Yes».
Method 2: Using the Registry Editor
1. Press the «Windows» key and «R» simultaneously to open the Run dialog box.
2. Type «regedit» and press Enter to open the Registry Editor.
3. Navigate to the following location: HKEY_LOCAL_MACHINE\SOFTWARE\Policies\Microsoft\office\16.0\common\officeupdate
4. Create a new DWORD (32-bit) value with the name «EnableAutomaticUpdates» and set its value to «0».
5. Restart your computer for the changes to take effect.
Method 3: Using Group Policy Editor
1. Press the «Windows» key and type «gpedit.msc» to open the Group Policy Editor.
2. Navigate to «Computer Configuration» > «Administrative Templates» > «Microsoft Office 2016 (Machine)» > «Updates».
3. Double-click on «Disable Automatic Updates» and select «Enabled
Key Takeaways:
- You can disable Microsoft Office 2016 updates in Windows 10.
- Disabling updates may cause security risks, so proceed with caution.
- To disable updates, open Microsoft Word and go to File > Account > Update Options > Disable Updates.
- Keep in mind that disabling updates may prevent you from accessing new features and bug fixes.
- If you change your mind, you can enable updates by following the same steps.
Frequently Asked Questions
Here are some frequently asked questions about disabling Microsoft Office 2016 updates in Windows 10:
1. Can I disable automatic updates for Microsoft Office 2016 in Windows 10?
Yes, you can disable automatic updates for Microsoft Office 2016 in Windows 10. This allows you to control when and how updates are installed on your computer.
To disable automatic updates, you will need to access the settings within Microsoft Office.
2. How do I access the settings to disable updates in Microsoft Office 2016?
To access the settings to disable updates in Microsoft Office 2016, follow these steps:
1. Open any Office application, such as Word or Excel.
2. Click on «File» in the top left corner of the application.
3. Select «Options» from the menu.
4. In the options window, click on «Update» in the left sidebar.
5. Under the «Office Updates» section, click on the dropdown menu next to «Update Options» and select «Disable Updates».
6. Click «OK» to save the changes.
3. Are there any risks to disabling Microsoft Office 2016 updates?
Disabling Microsoft Office 2016 updates may come with some risks. Updates are important for security patches and bug fixes, so by disabling updates, you may leave your computer vulnerable to potential threats.
It is recommended to regularly check for updates manually if you choose to disable automatic updates.
4. How can I manually check for Microsoft Office 2016 updates after disabling automatic updates?
To manually check for Microsoft Office 2016 updates after disabling automatic updates, follow these steps:
1. Open any Office application, such as Word or Excel.
2. Click on «File» in the top left corner of the application.
3. Select «Account» from the menu.
4. Under the «Product Information» section, click on «Update Options».
5. Click on «Update Now» to check for and install any available updates.
5. How can I enable automatic updates for Microsoft Office 2016 if I had previously disabled them?
To enable automatic updates for Microsoft Office 2016 after disabling them, follow these steps:
1. Open any Office application, such as Word or Excel.
2. Click on «File» in the top left corner of the application.
3. Select «Options» from the menu.
4. In the options window, click on «Update» in the left sidebar.
5. Under the «Office Updates» section, click on the dropdown menu next to «Update Options» and select «Enable Updates».
6. Click «OK» to save the changes.
In summary, disabling Microsoft Office 2016 updates in Windows 10 is a straightforward process that can help you take control of your software updates. By following the steps outlined in this article, you can prevent automatic updates from interrupting your work or causing compatibility issues.
Remember that while disabling updates may provide temporary relief, it is essential to keep your Office software up to date to ensure the best performance, security, and access to new features. Be sure to re-enable updates periodically or manually check for updates to stay current with the latest improvements from Microsoft.
Приложения Office 365, входящие также в состав пакетов Office 2019 и Office 2016, созданы таким образом, чтобы у пользователя всегда была актуальная версия, а поток новых функций и возможностей не иссякал каждый месяц. Чтобы реализовать этот подход, разработчики сделали систему обновлений Office автоматической и практически бесшовной. В отличие от Windows 10, приложения Office обновляются очень тихо и никогда не надоедают пользователю просьбами перезагрузить компьютер или приложения для установки новой версии. Из-за того, что система обновлений Office сделана крайне хорошо, пользователи редко задаются вопросом отключения обновлений Office. Все же иногда случается так, что пользователю не нравятся какие-то изменения в дизайне, функциях или принципах работы приложений или же в релиз уходит глючный апдейт. В таком случае отключение обновлений Office выглядит вполне разумным и даже правильным.
Опять же, в отличие от Windows 10, где обновления фактически являются принудительными, пользователи Office могут свободно отключить обновления всего в несколько кликов и на неопределенный период. Microsoft никак не ограничивает свою аудиторию в этом вопросе, что несомненно хорошо. Справедливости ради стоит отметить, что за годы использования Office 365 у нас никогда не возникала необходимость отключить обновления Office. Но ради общего развития и на всякий случай стоит изучить этот вопрос.
Итак, если вы хотите отключить обновления Office, вам надо сделать следующее:
- Запустите любое приложение. Word, PowerPoint, Excel, Outlook, Access или любое другое. Настройки у Office глобальные, поэтому не имеет значения приложение, из которого вы будете отключать обновления. И да, не имеет значения, какая у вас версия. Этим способом вы можете отключить обновления Office 2016, Office 2019, Office 365 Индивидуальная, Office 365 Домашняя и так далее. Если у вас версии Office старше 2016, интерфейсы могут немного отличаться, но принцип в общем остается одниковым.
- Создайте новый документ, а затем нажмите Файл.

- Внизу меню Office нажмите на кнопку Учетная запись.
- В появившемся окне в разделе Сведения о продукте найдите пункт Обновления Office и нажмите на кнопку Параметры обновления.
- На экране появится меню, в котором вам доступно несколько действий. Кнопка Обновить отвечает за принудительную проверку и установку обновлений. Кнопка Просмотреть обновления откроет журнал обновлений и даст вам возможность просмотреть список уже установленных обновлений. Кнопка Об обновлениях откроет детальные сведения о доступных обновлениях. Нас же сейчас интересует отключение обновлений, поэтому нажите Отключить обновления.
- Обратите внимание, что отключить обновления Office можно только от имени Администратора, поэтому на экране может появиться окно контроля учетных записей с запросом подтверждения действия или ввода пароля Администратора.
- Все, теперь обновления отключены, о чем свидетельствует большая желтая плашка в меню сведений о продукте. Имейте в виду, что отключение обновлений препятствует не только функциональным обновлениям, но и обновлениям безопасности и улучшениям производительности. Это может повлечь за собой некие риски, которые вам следует учесть. К примеру, обновления чинят уязвимости, которыми могут воспользоваться злоумышленники.


Повторно включить обновления Office можно точно так же, как и отключали. Для этого нажмите Файл – Учетная запись, а затем щелкните большую желтую кнопку Параметры обновления в разделе Сведения о продукте и Включить обновления.
На этом все.
Office 2016 is an awesome new edition of Microsoft Office package. Although, Office 2013 and Office 2016 look quite same, but Office 2016 products have more options to customize it. People, who were looking for options to change the old-fashioned blue title bar, can easily change it using built-in option. Apart from that, you will get more other improvements in Office 2016.
Generally, you should always install all the Windows and Office updates. Whenever, Microsoft finds a bug or they get reported for a bug, they launch an update to fix that. Sometime, Microsoft sends updates to provide tiny improvements or new options. Sometime, it works like a security solution. You should never ignore any Windows or Office update.
But, not all the time, update brings new features. Sometime, it cannot be up to your expectation. Sometime, updates can ruin your experience. If you have previously got such experience and do not want to install any further update of Office 2016, here is a solution. These three methods are working and they will let you block all the new updates within moments.
#1 Using in-built option of Windows
If you are using Windows 10, you can find the solution very easily. Not only Windows 10, but also, this setting is available in previous Windows versions as well. But, the method to find this setting is pretty different. Anyway, if you are using Windows 10, you can follow this method,
Press Win + I and go to UPDATE & SECURITY. Following that, expand the Windows Update section. Here you will get Advanced Options button. Just click on it. Now, just uncheck the option that says “Give me updates for other Microsoft products when I update Windows”.

That’s all! Now, Windows will ignore all the other products including Microsoft Office when it will search for updates.
If you are using Windows 7/8/8.1, you can find the same option using following method. At first, go to Control Panel to open Windows Update settings. Here you will get Change Settings option in your left hand side. On the next screen, you can find an option that says “Give me updates for other Microsoft products when I update Windows”. Just uncheck the checkbox to disable Office updates.
#2 Using DoNotSpy
DoNotSpy is a great software for Windows 10 users. It can disable all the things that Microsoft uses to gather user information through Windows 10. You can do different things including disable location, disable password reveal button, disable automatic Windows updates and more others. Just like them, it can also turn off automatic Office 2016 update. To utilize it further, at first, download the software for Windows 10 and install it. Then, open the DoNotSpy windows and find out the option that says “Disable Windows Update for other Products”.

Just check the option and hit the Apply button. The setting will be changed automatically. No restart is required.
#3 Using built-in option of Office 2016
Office 2016 comes with several new features and improvements. Although, this is not a new feature that blocks Office updates, but still you can make use of this option. Therefore, to use the built-in option of Office 2016, go through the following guide. At first, open any Office product like Word, Excel, Outlook etc. Click on the File button and go to the section called Account. Sometime, it can be placed as Office Account. Both are same but it varies from app to app. Anyway, on this page, you will get an option named Office Updates.
By default, it will be set to Enable Updates. Just click on the Update Options button and select Disable Updates from the drop-down menu.

That’s it. Now, your Office 2016 will not be updated until you manually do it.
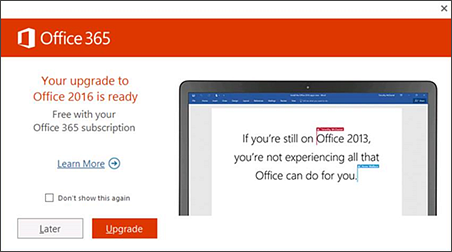
Applies ToOffice 2016 Office 2013
If you’re still using Office 2013 with your Microsoft 365 subscription, you’ll eventually receive notifications to upgrade to Office 2016. If you don’t want to have to dismiss the notification each time you launch an Office 2013 application, follow the steps below to permanently disable this notification.
Run easy fix to disable the «Get the New Office» upgrade prompt
The following steps won’t turn off any notifications that tell you to update Office with the latest security features and product updates. It’s critical you apply those type of updates to Office.
-
Ensure you have the latest Office updates by following the steps in the section, «Get Office 2013 updates» in Install Office updates.
-
Download this easy fix to have it set the registry key for you. Setting this registry key will disable the «Get the New Office» upgrade prompt.
Are you a Microsoft 365 admin?
If you’re a Microsoft 365 for business administrator and want to know how to prevent Microsoft 365 Apps for enterprise 2013 from being automatically updated to Office 2016, see How do I keep on running Microsoft 365 Apps for enterprise 2013?
Need more help?
Want more options?
Explore subscription benefits, browse training courses, learn how to secure your device, and more.
Generally, MS Office will be automatically updated in Windows 10. If you do not want to update Office, you can stop Office updates. In this post on MiniTool, we are going to show you how to turn off Office updates Windows 10.
Although Office updates introduce new features and eliminate known bugs and issues, many users may choose to disable Office updates for a variety of reasons. If you are one of them, you can try the methods below to turn off Office updates Windows 10.
How to Disable MS Office Updates in Windows 10
Way 1. Turn off Office Updates Windows 10 via Windows Settings
With Windows Settings, you can configure your display settings, network, apps, and more. Here you can follow the steps below to complete the necessary actions to disable Office updates.
Step 1. Right-click the Start button to choose Settings, or you can press Windows + I key combinations.
Step 2. Click Update & Security > Windows Update. Then click Advanced options.
Step 3. Uncheck the checkbox next to Give me updates for other Microsoft products when I update Windows.

Step 4. Restart your computer, and Office should not be updated automatically.
Way 2. Turn off Office Updates Windows 10 via Office Apps
Alternatively, you can use an Office app like Microsoft Word to stop Office updates. Here are the major steps.
Step 1. Open a Word document. Then click File > Account.
Step 2. Click Update Options and then choose Disable Updates from the option list.
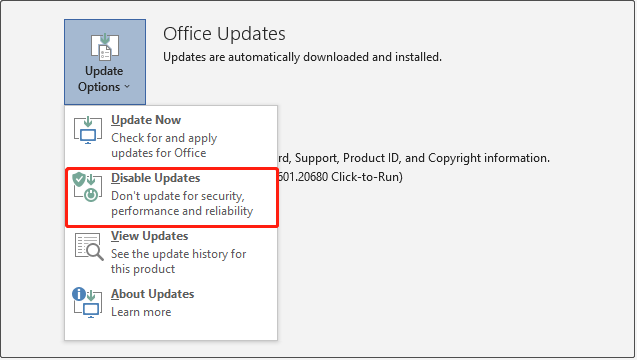
Step 3. In the new Microsoft Office Click-to-Run Client window, select the Yes button to apply this change.
Way 3. Turn off Office Updates Windows 10 via Registry Editor
Windows registry is a database that stores numerous configuration settings. You can make changes to the registry by using Windows Registry Editor. How to disable Office updates using the registry? Follow the steps below.
Note:
Note: Editing registries is dangerous. Any wrong operations to the registry could damage your computer, therefore, you are strongly suggested to back up the registry or create a system restore point.
Step 1. Press Windows + R key combinations and input regedit in the new window. After that, click the OK button or press Enter.
Step 2. In the UAC window, select Yes.
Step 3. In the top address bar, navigate to the following location path:
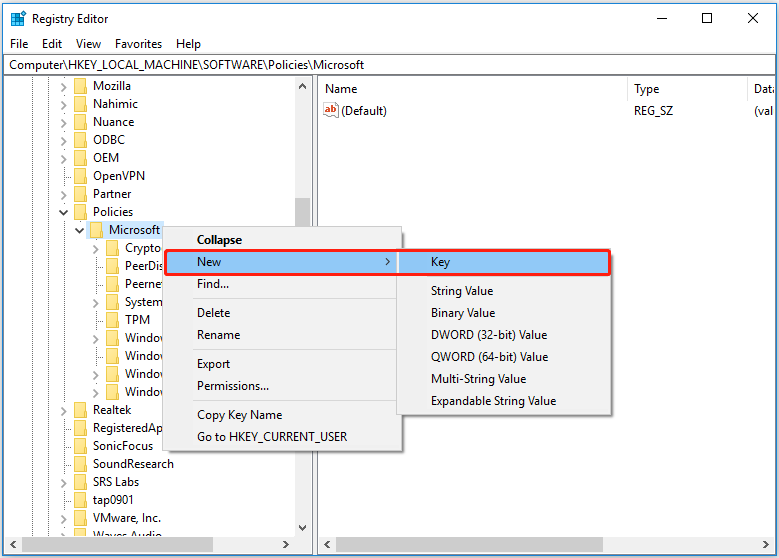
Computer\HKEY_LOCAL_MACHINE\SOFTWARE\Policies\Microsoft
Step 4. Right-click Microsoft to select New > Key. Rename the new key to Office.
Step 5. Right-click Office and repeat the steps above to create a key named 16.0.
Step 6. Right-click 16.0 to create a Common key.
Step 7. Right-click Common to create an OfficeUpdate key.
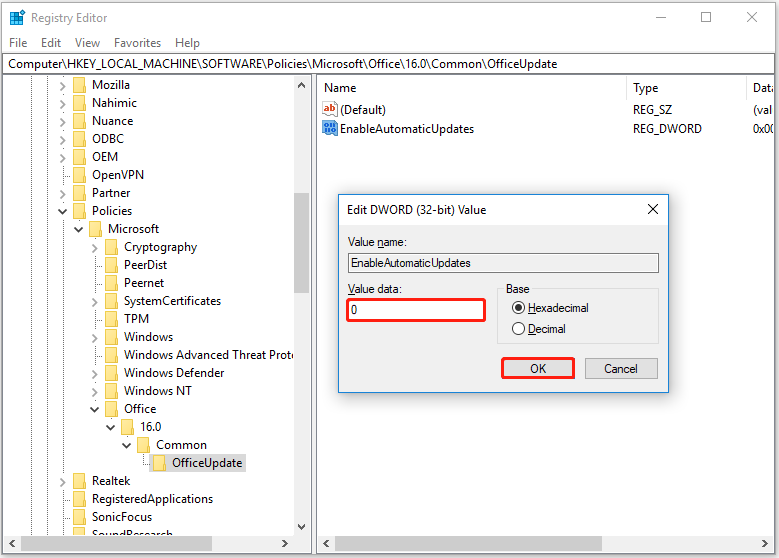
Step 8. Right-click OfficeUpdate and select New > DWORD (32-bit) Value. Then rename this new DWORD value to EnableAutomaticUpdates.
Step 9. In the right panel, double-click EnableAutomaticUpdates. In the pop-up window, set up the value data to 0 and click OK.
After completing the steps above, now restart your computer, and then the Office products will not be updated automatically.
Click to Tweet
Top Recommendation
As mentioned earlier, incorrect manipulation of the Windows registry can cause computer failure. Apart from this reason, your computer can malfunction due to many other issues. For example, you may encounter the error message saying “disk boot failure – insert system disk and press Enter” when you start the PC.
In such a situation, rescuing data is the most significant thing you should do. MiniTool Power Data Recovery, the best free data recovery software, is recommended to you.
It can help to recover files in lots of data loss situations, such as the Windows Pictures folder being missing, data loss after an MBR to GPT conversion, and so on.
Download it and give it a try.
MiniTool Power Data Recovery FreeClick to Download100%Clean & Safe
Bottom Line
In a word, this article explains how to disable MS Office updates in Windows 10, including using Windows Settings, Microsoft Office apps, and Windows Registry Editor.
If you have come across any other effective ways to turn off Office updates Windows 10, welcome to share them with us by leaving them in the comment zone below.
If you need more help with MiniTool Power Data Recovery, please feel free to contact us via [email protected].