
Все способы:
- Способ 1: Утилита Norton Remove and Reinstall
- Способ 2: Штатное средство Windows 11
- Способ 3: Сторонние программы
- Revo Uninstaller
- IObit Uninstaller
- Вопросы и ответы: 0
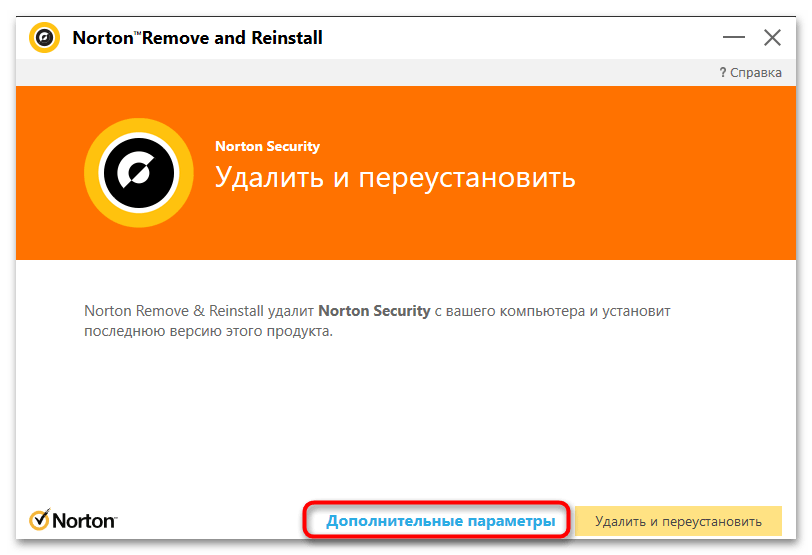
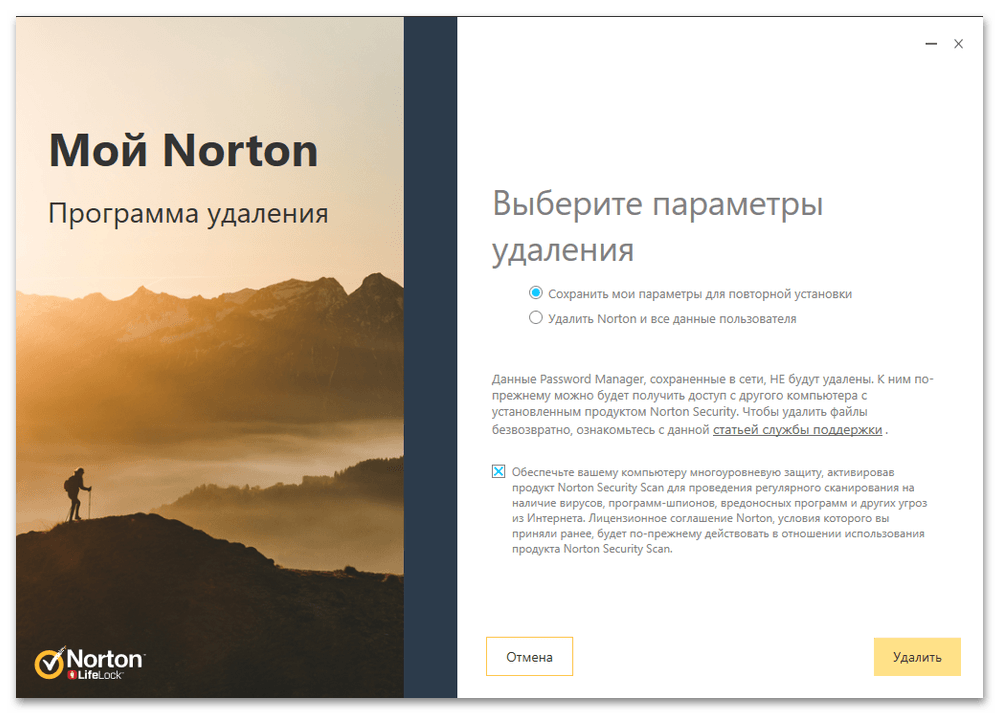
Способ 1: Утилита Norton Remove and Reinstall
Разработчики антивируса Norton Security рекомендуют использовать фирменную утилиту тем пользователям, кто заинтересован в переустановке или полной деинсталляции продуктов со своего компьютера. Утилита поддерживается и в Windows 11, поэтому никаких проблем с ее использованием возникнуть не должно. Достаточно следовать инструкции, чтобы успешно справиться с задачей и быть уверенным в том, что все файлы, связанные с антивирусом, удалены с компьютера.
Скачать Norton Remove and Reinstall
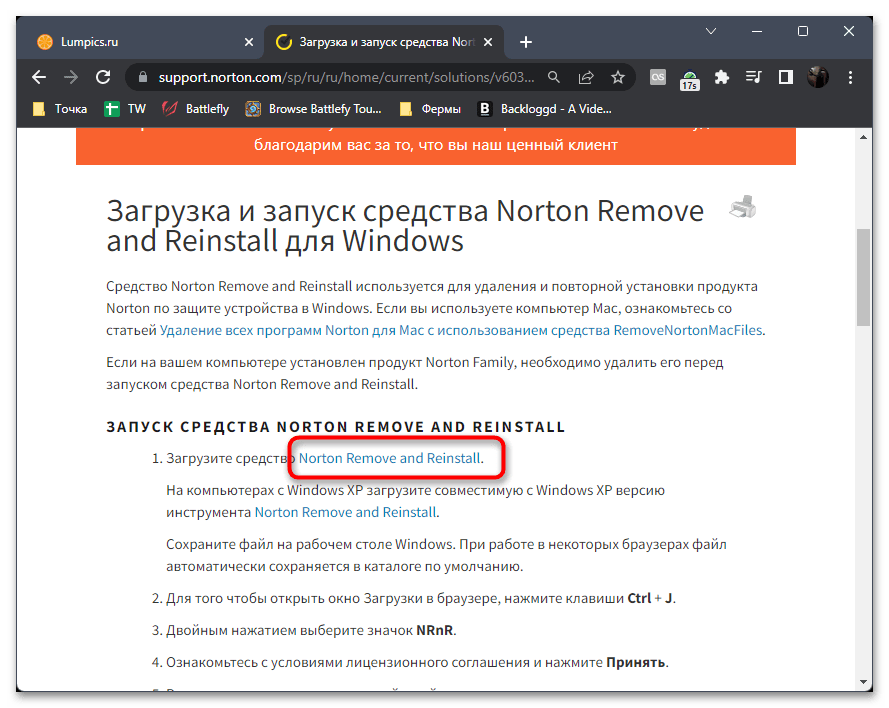
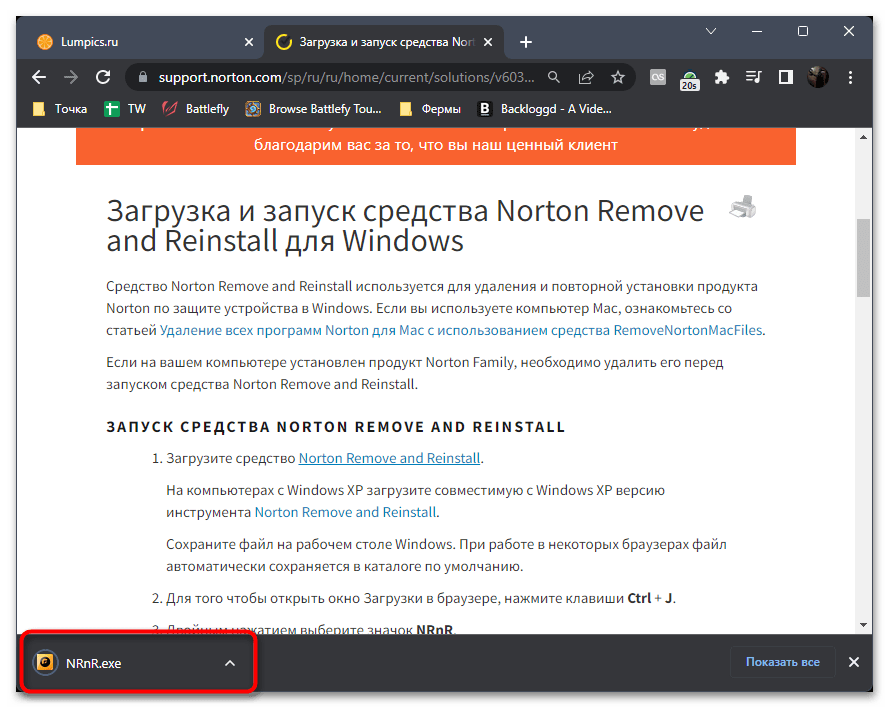
- Для начала откройте статью по ссылке выше и нажмите по синей надписи для скачивания Norton Remove and Reinstall.
- Запустите полученный исполняемый файл.
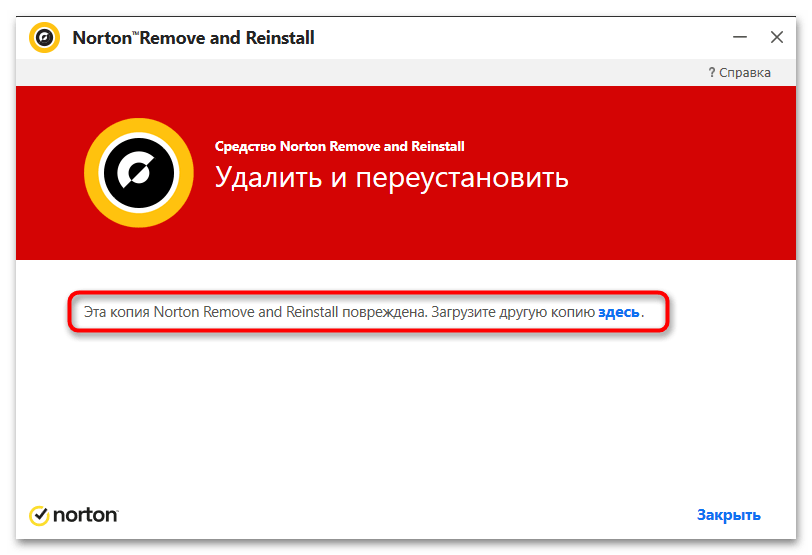
- Если на экране появилась информация о повреждении данной копии или ее старой версии, щелкните по ссылке «Здесь», чтобы скачать свежую версию Norton Remove and Reinstall с официальных библиотек компании.
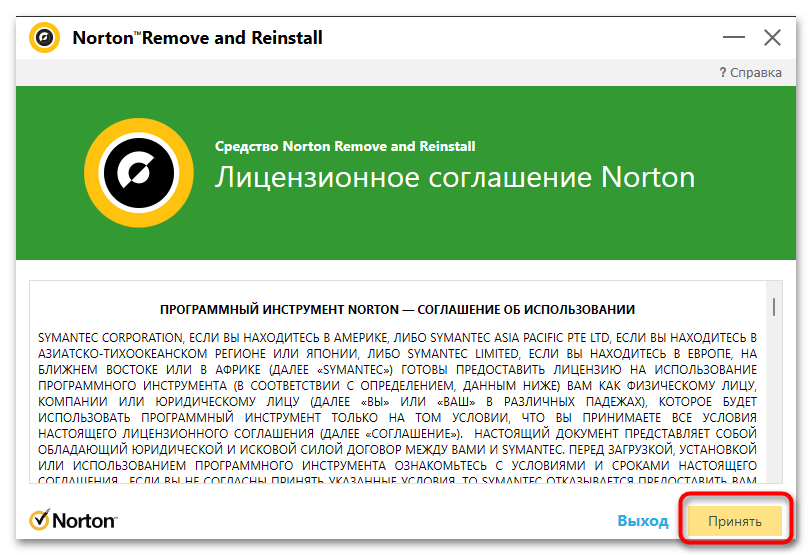
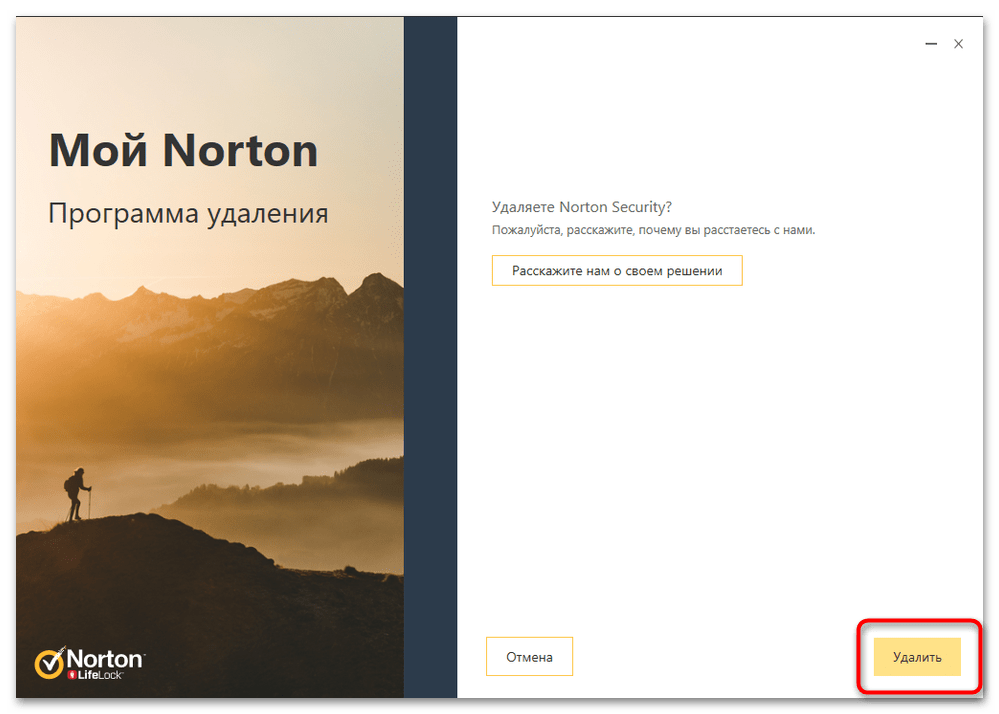
- После запуска нажмите «Принять», чтобы согласиться с лицензионным соглашением и перейти к следующему шагу.
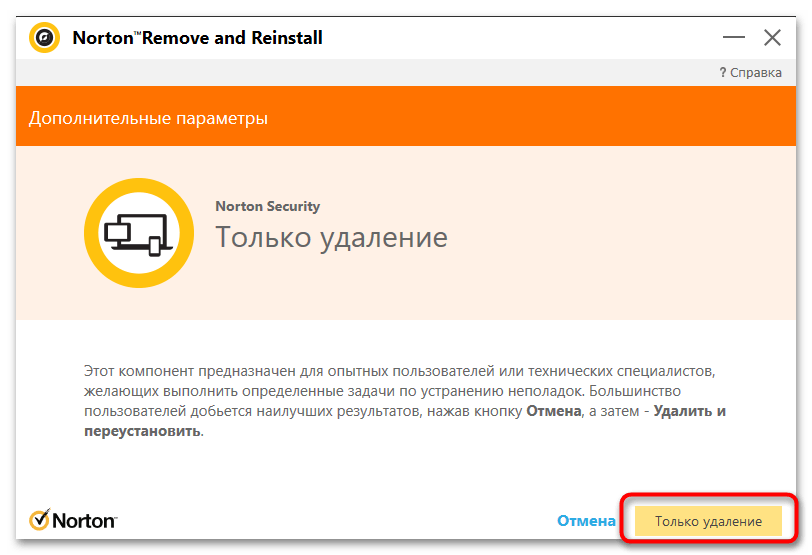
- Если вас интересует исключительно удаление Norton Security, щелкните по «Дополнительные параметры».
- Вы будете перенаправлены в режим «Только удаление», в котором нужно нажать по кнопке с соответствующим названием.
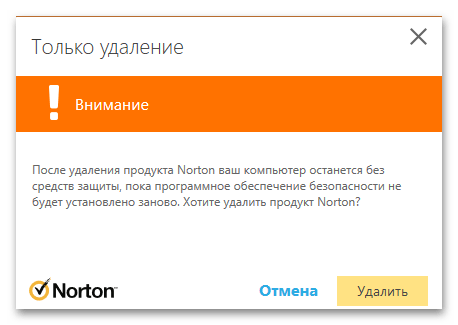
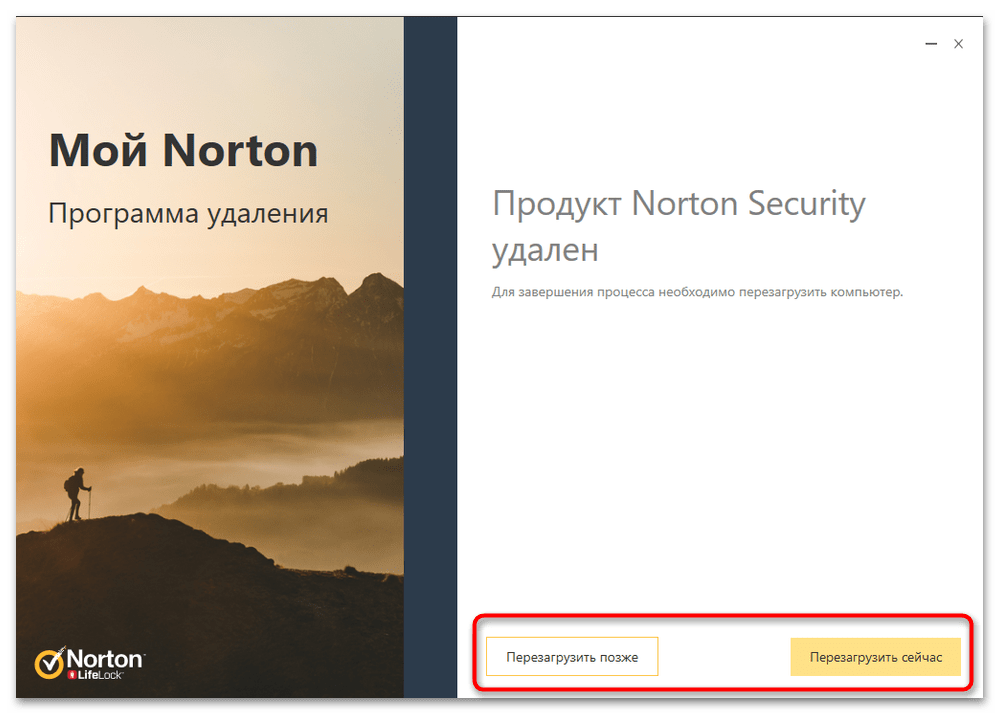
- Следующий этап — подтверждение начала деинсталляции. Прочитайте уведомление от разработчиков и запустите процесс удаления продуктов. Это займет некоторое время, а по завершении понадобится отправить ПК на перезагрузку, после чего вы можете быть уверены в том, что файлов, связанных с антивирусом, на вашем компьютере не осталось.
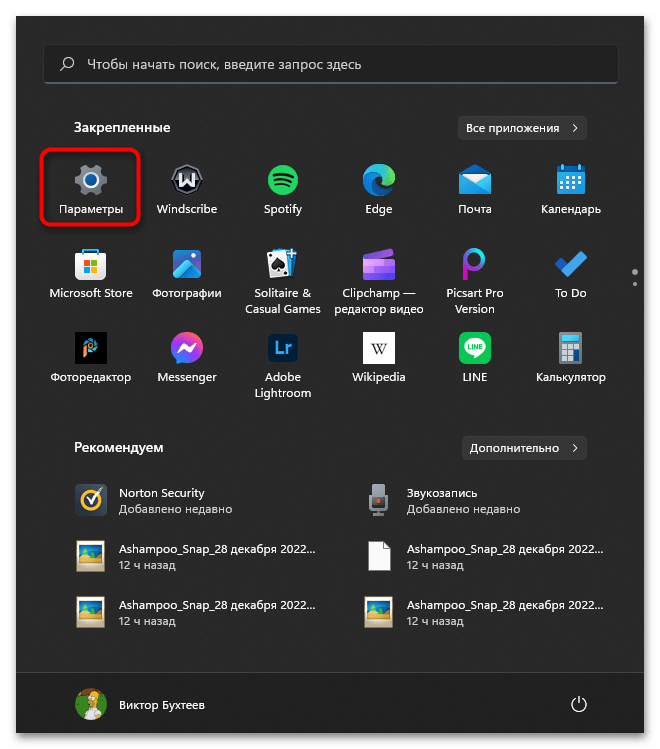
Способ 2: Штатное средство Windows 11
В папке с файлами Norton Security нет исполняемого файла, через который напрямую можно было бы запустить удаление программы. Поэтому придется открывать список приложений через «Параметры» в операционной системе, искать там антивирус и инициировать его удаление.
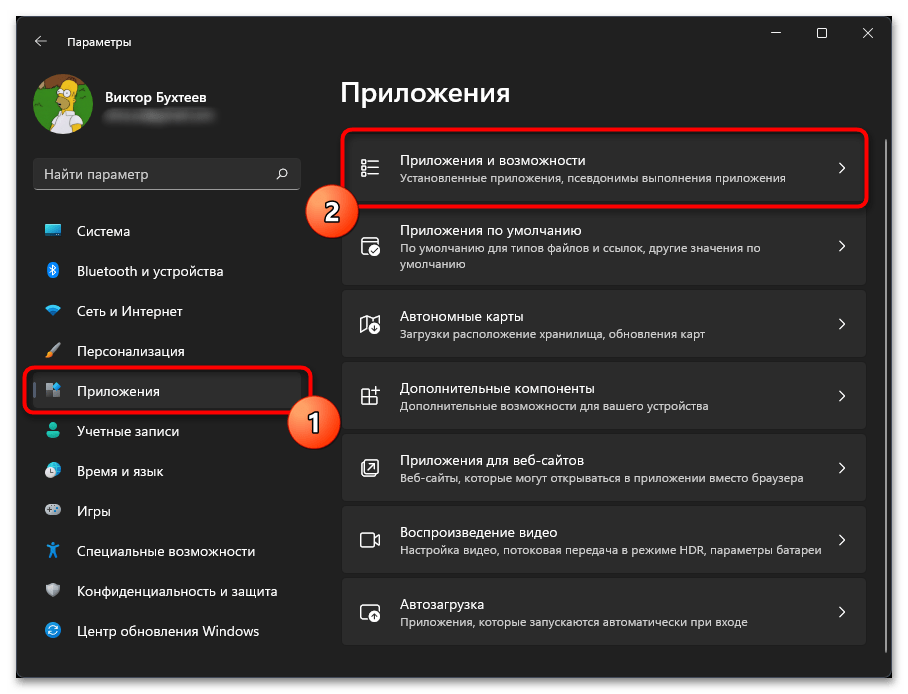
- Откройте меню «Пуск» и перейдите в «Параметры».
- На панели слева выберите раздел «Приложения» и перейдите к категории «Приложения и возможности».
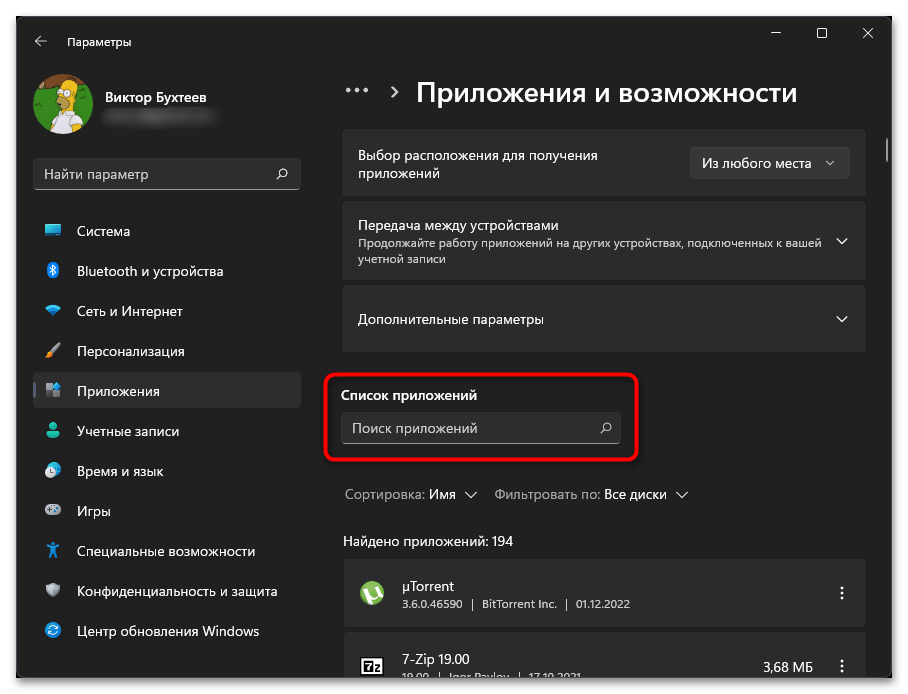
- Можете воспользоваться поиском по списку, чтобы быстрее отыскать требуемое приложение для удаления.
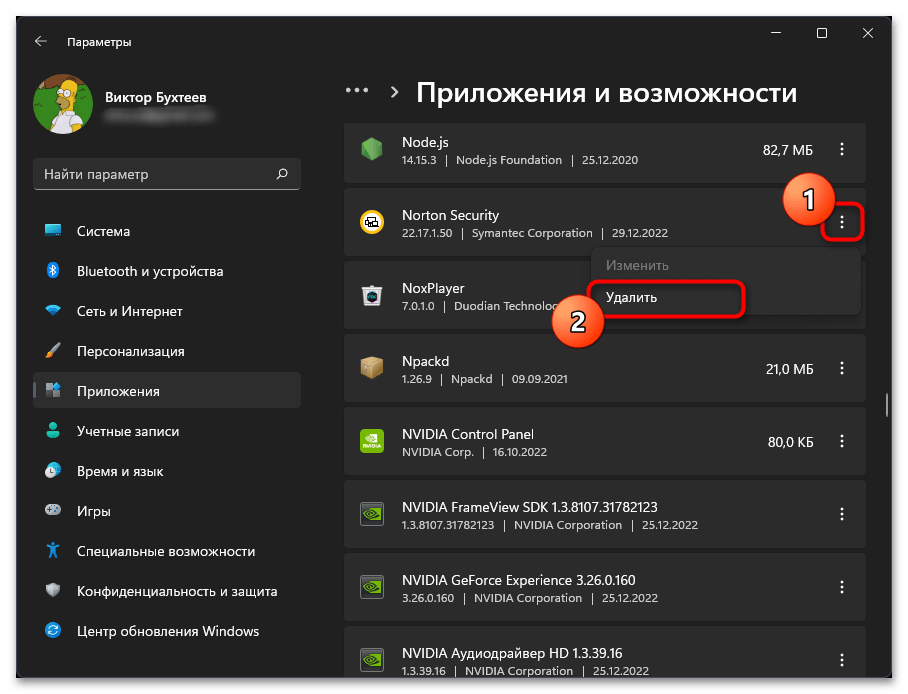
- В строке с названием справа вызовите меню действий, щелкнув по трем точкам, из него выберите пункт «Удалить».
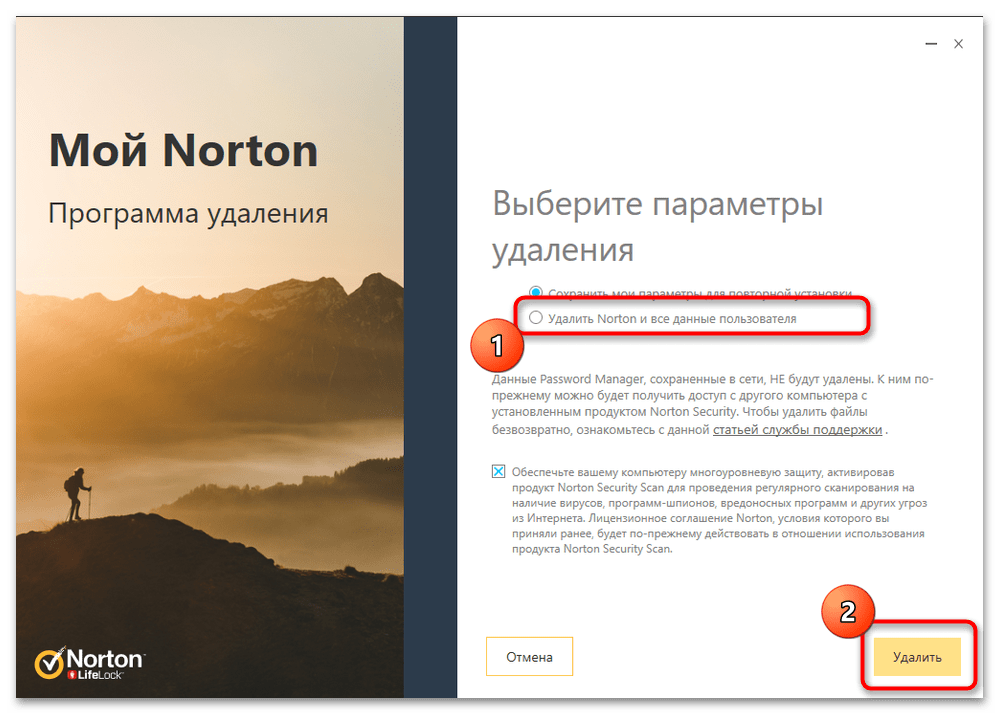
- В деинсталляторе отметьте маркером пункт «Удалить Norton и все данные пользователя», после чего подтвердите удаление.
- Вы можете не отвечать на вопрос о причине удаления продукта, а просто щелкнуть по «Удалить», чтобы запустить данный процесс.
- Ожидайте окончания деинсталляции, что займет несколько минут.
- В итоге появится окно с информацией о требовании перезагрузки ПК, чтобы стереть все файлы, которые в текущем сеансе могут быть заняты другими процессами. Можете отправить Windows на перезапуск прямо сейчас или в любой другой удобный для вас момент.

Способ 3: Сторонние программы
Еще один и последний метод возможного удаления Norton Security подразумевает использование сторонних программ. Такие решения предназначены как для единичной деинсталляции, так и для пакетной. Вместе с этим во многих есть функция автоматической очистки остаточных файлов, что позволит вам окончательно избавиться от следов антивируса на своем компьютере.
Revo Uninstaller
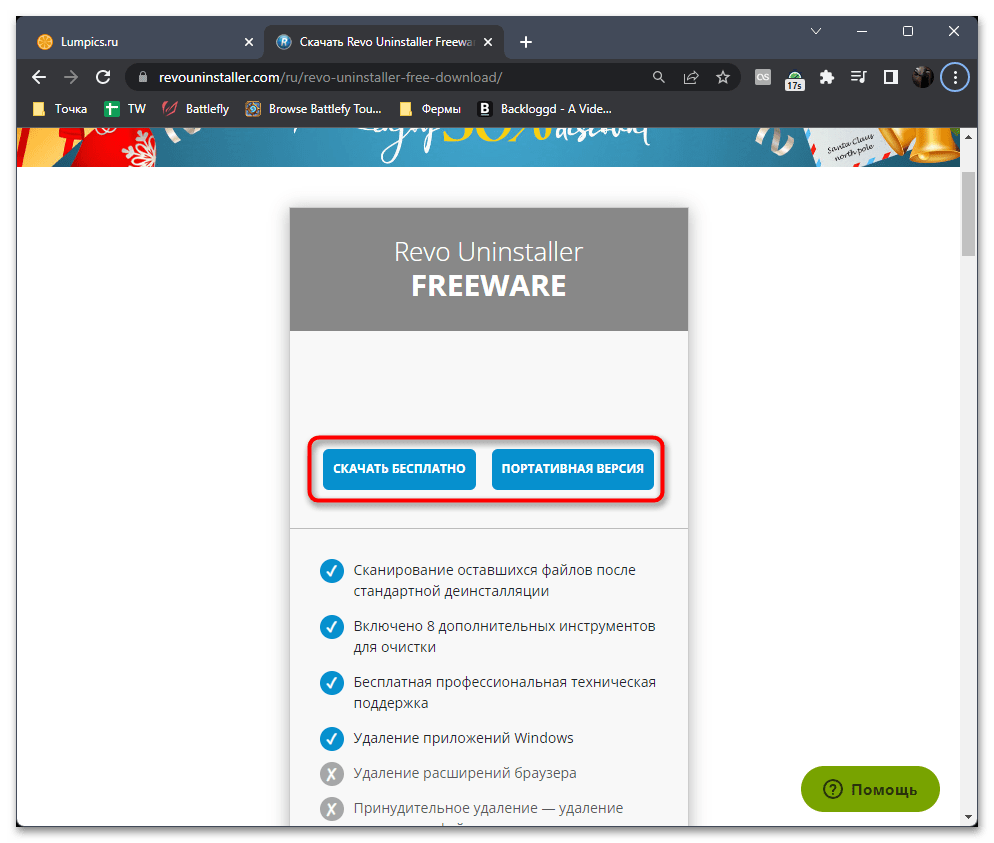
Одним из самых популярных решений для удаления программ можно считать Revo Uninstaller. У софта есть бесплатная версия с доступной портативной сборкой. То есть ее не понадобится устанавливать, можно сразу запустить и выполнить необходимые действия, связанные с деинсталляцией других приложений.
Скачать Revo Uninstaller
- На официальном сайте Revo Uninstaller подберите подходящую для вас версию и ознакомьтесь с преимуществами платных, чтобы решить, стоит ли их использовать.
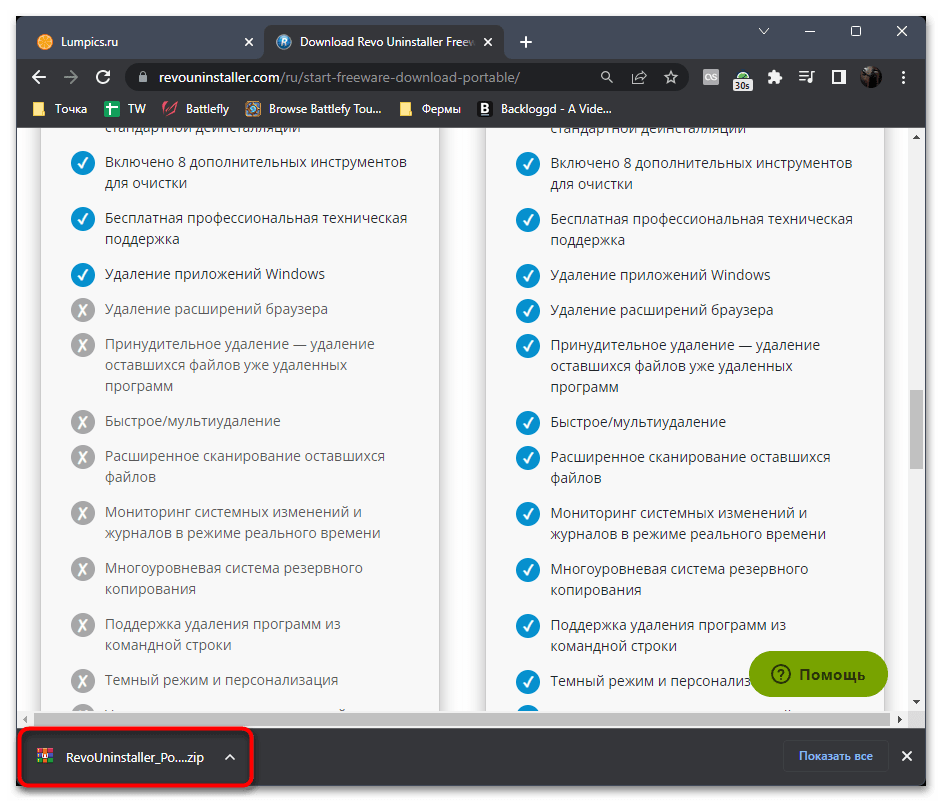
- Если вы остановились на портативной версии, запустите полученный архив после его скачивания.
- Находящиеся в нем файлы можно не распаковывать, а сразу запустить «RevoUPort.exe».
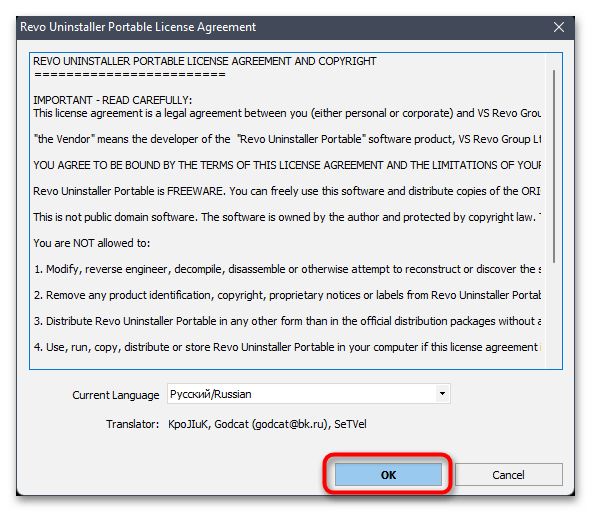
- При первом открытии понадобится подтвердить принятие правил лицензионного соглашения, щелкнув по «ОК».
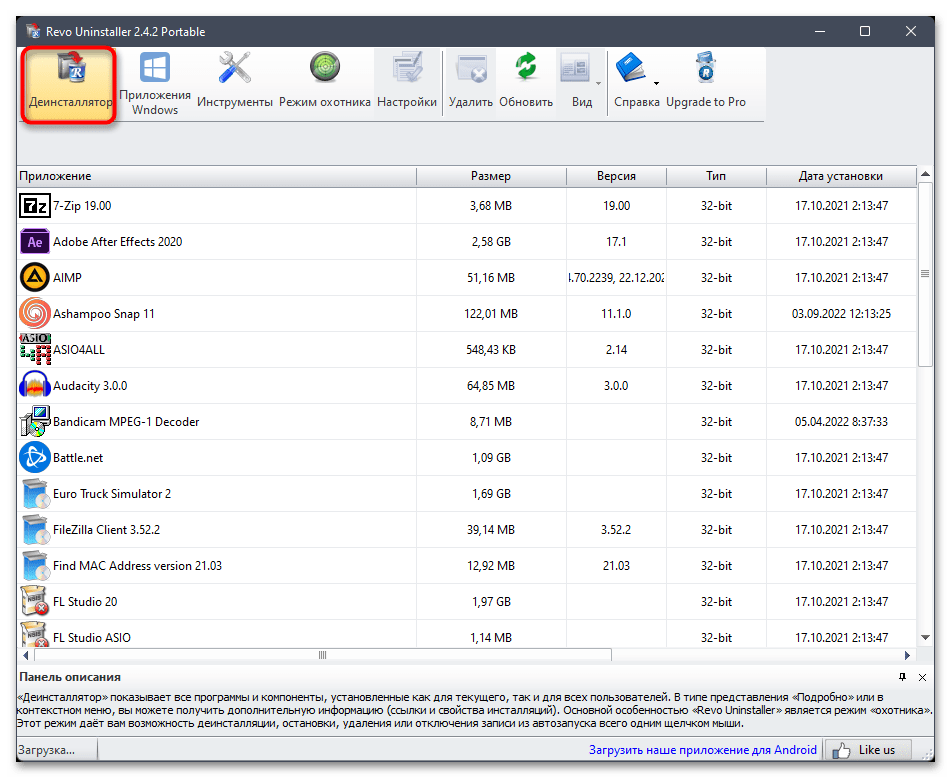
- Дождитесь загрузки всех приложений на вашем компьютере и переведите программу в режим «Деинсталлятор».
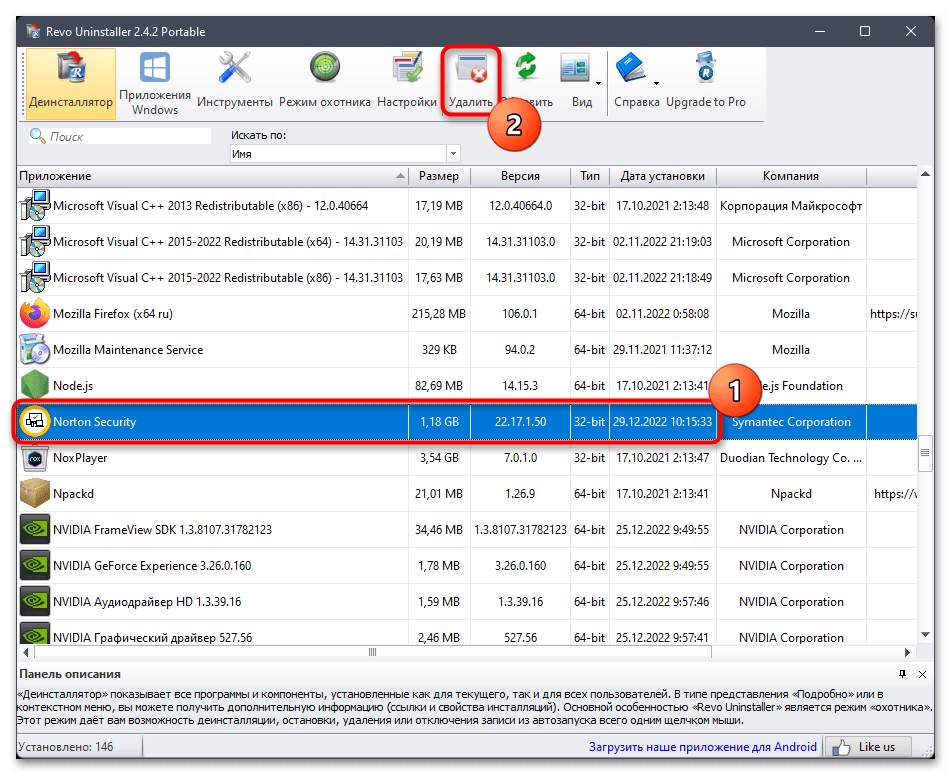
- Левой кнопкой мыши выделите антивирус Norton Security и на верхней панели выберите пункт «Удалить».
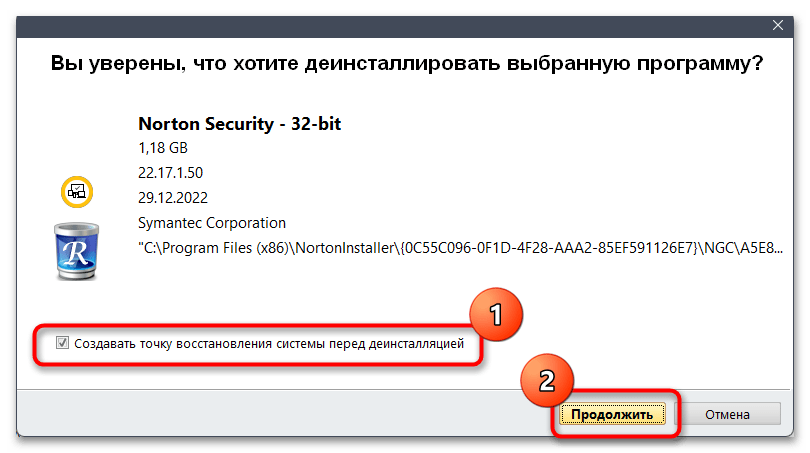
- Можете отменить создание точки восстановления перед удалением или оставить этот параметр, затем нажмите «Продолжить».
- Следуйте инструкциям в фирменном деинсталляторе Norton Security, чтобы завершить процесс и отправить компьютер на перезагрузку.

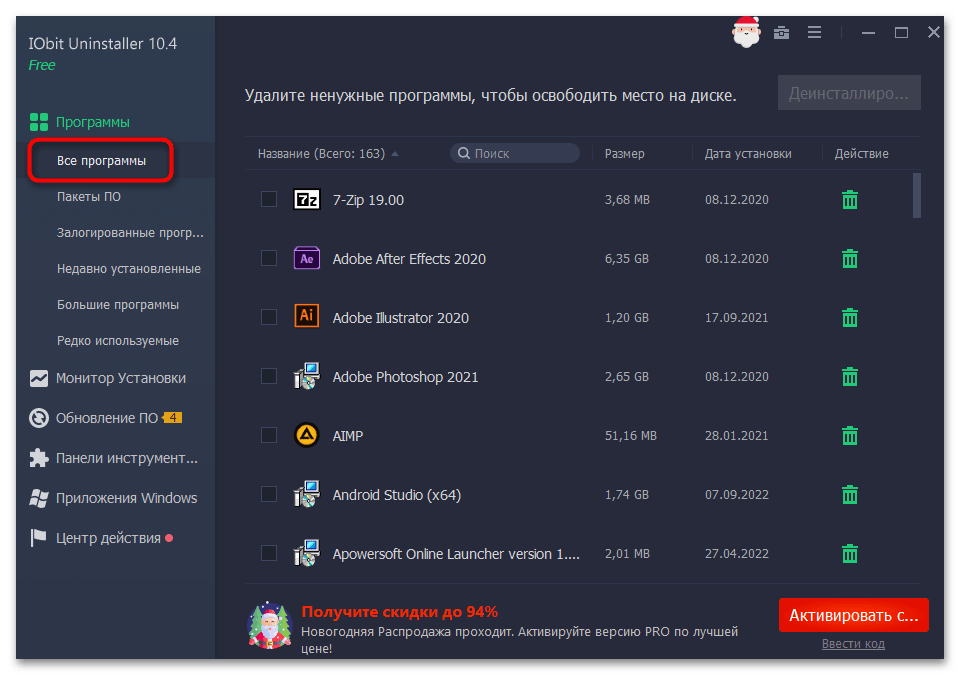
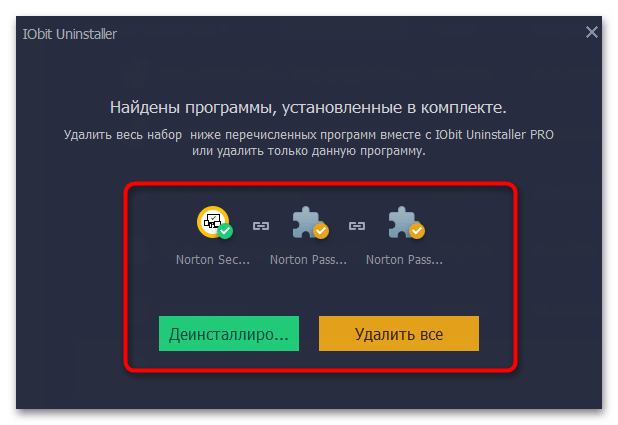
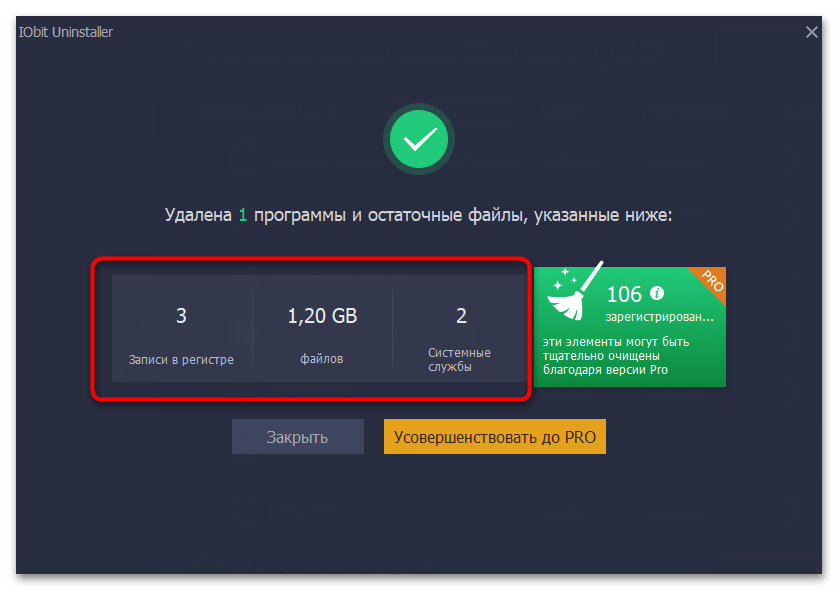
IObit Uninstaller
Рассмотрим еще одну программу под названием IObit Uninstaller, основное предназначение которой тоже заключается в удалении другого софта в Windows. В ней есть дополнительные функции, подразумевающие не только автоматическую очистку остаточных файлов, но и удаление записей из реестра. Мы рекомендуем использовать IObit Uninstaller в тех случаях, когда у вас никак не получается избавиться от следов Norton Security в операционной системе.
Скачать IObit Uninstaller
- После установки и запуска IObit Uninstaller на панели слева выберите раздел «Все программы».
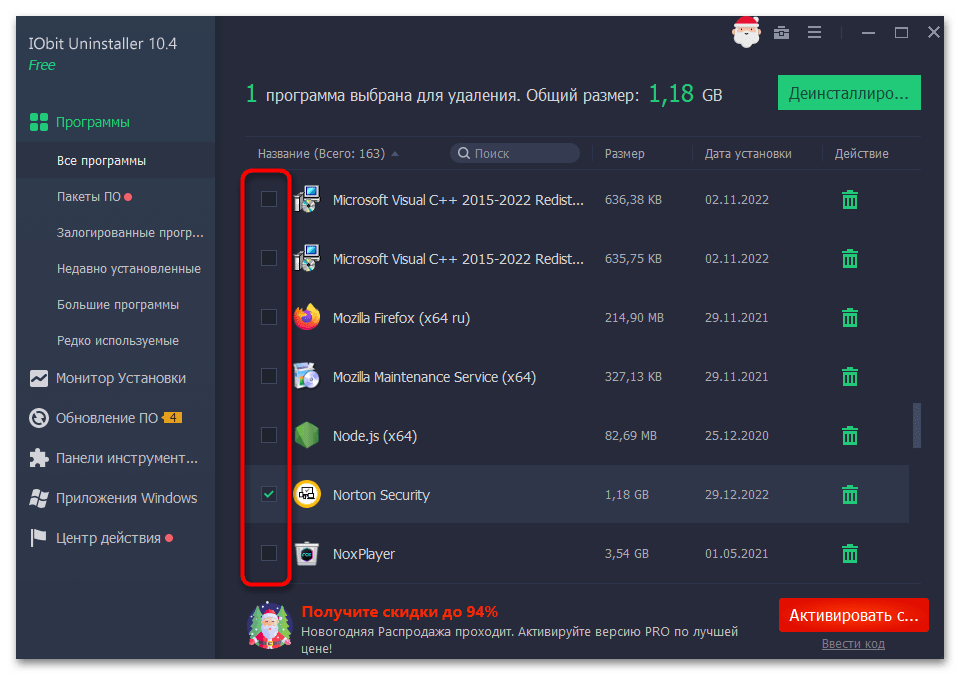
- Вы можете отметить галочками несколько продуктов, чтобы выполнить комплексное удаление.
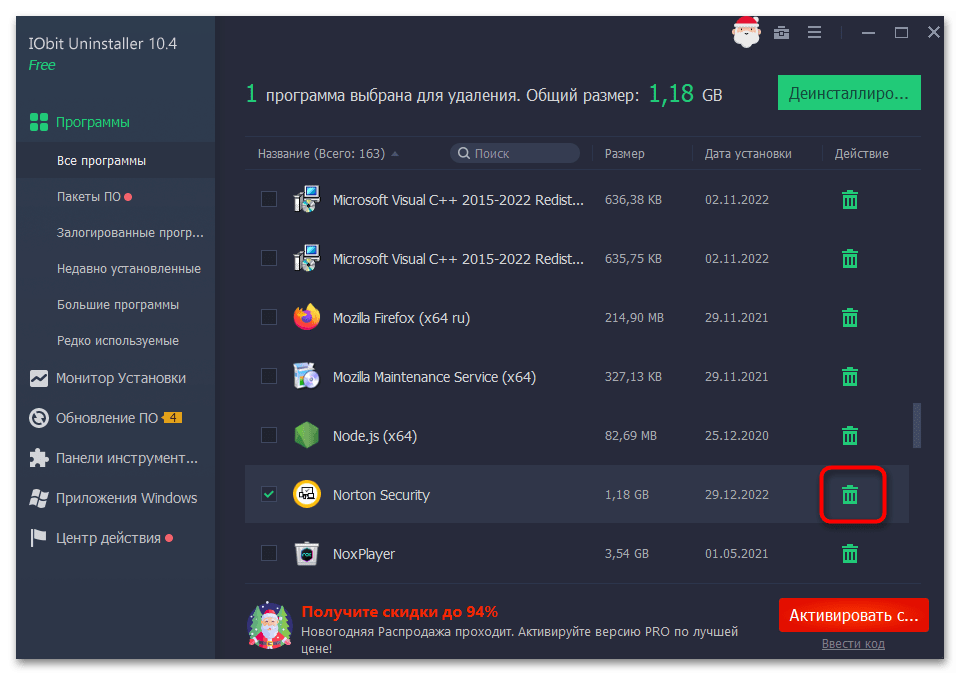
- Если вас интересует только Norton Security, найдите программу в списке и напротив строки щелкните по значку с корзиной.
- IObit Uninstaller отобразит, что, помимо антивируса, были найдены и связанные приложения. Удаление ПО такого рода доступно только в премиум-версии софта, поэтому самостоятельно решайте, стоит ли его приобретать.
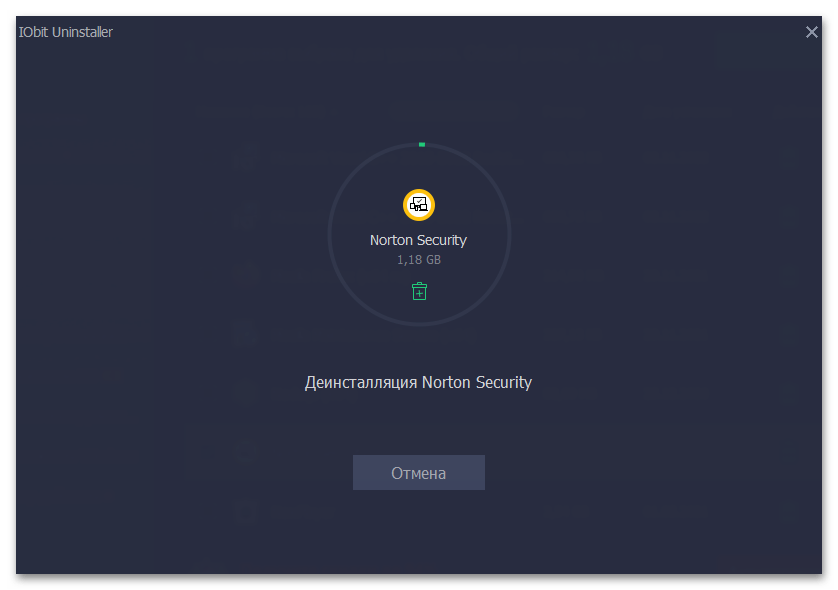
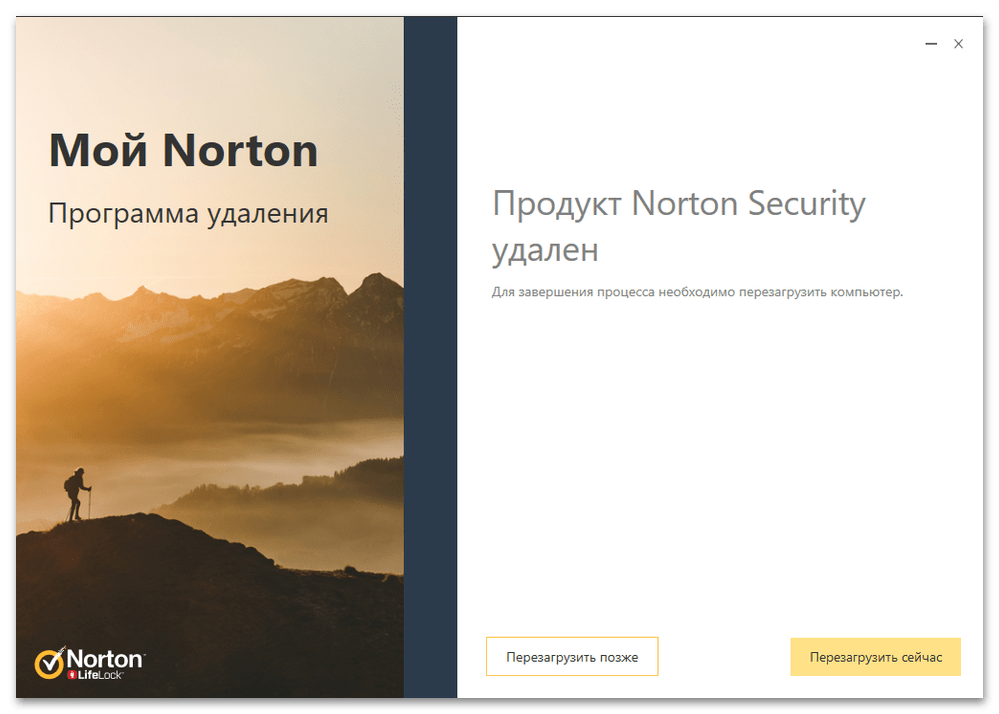
- Начните удаление и ожидайте появления на экране стандартного деинсталлятора Norton.
- В нем следуйте простой инструкции и подтвердите удаление пользовательских файлов.
- По завершении пока отмените перезагрузку ПК, чтобы вернуться к окну IObit Uninstaller.
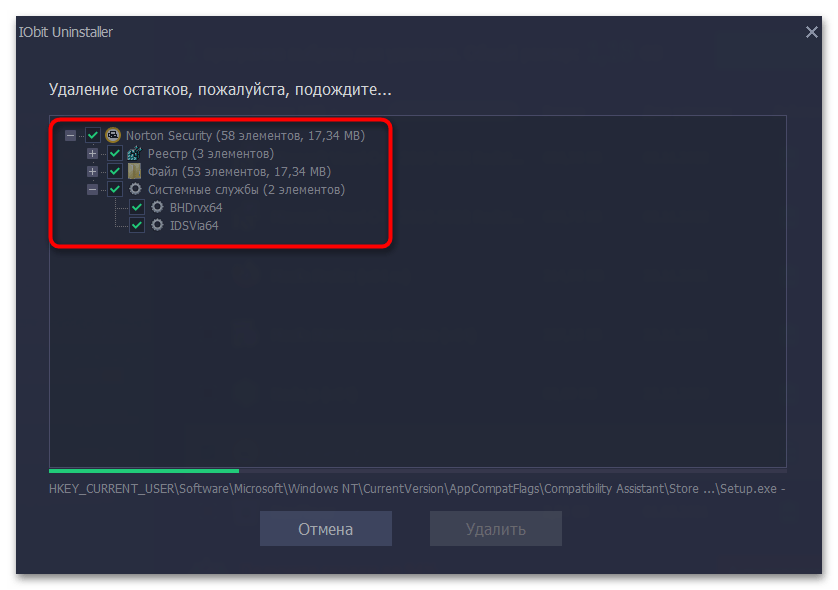
- В нем вы увидите информацию об очистке остатков, куда входят связанные службы и файлы реестра.
- Остается только дождаться информации об успешной очистке и завершить работу с софтом. Перезагрузите компьютер и убедитесь в том, что все следы Norton Security исчезли из вашей операционной системы.

В конце хотелось бы обратить внимание на то, что приведенные выше две программы — далеко не единственные в своем роде. Существуют и другие тематические решения, предоставляющие практически такой же набор функций и позволяющие удалить Norton Security с компьютера. Ознакомиться с ними можно в другой статье на нашем сайте, перейдя по следующей ссылке.
Подробнее: Программы для удаления программ
Наша группа в TelegramПолезные советы и помощь
Norton Security is one of the most widely used antivirus and security software on the market, providing users with protection against a variety of cybersecurity threats. However, there can be several reasons why you might need to uninstall Norton Security from your Windows 11 system. These reasons can range from preferring a different security solution, experiencing performance issues, or simply no longer needing the software. This article will guide you through the process of removing Norton Security from Windows 11 in a comprehensive manner.
Understanding Norton Security
Before diving into the uninstallation process, it’s essential to understand what Norton Security does. Norton Security provides a suite of online security features, such as:
- Real-time protection against viruses, malware, spyware, and other online threats.
- Firewall protection to safeguard your network.
- Identity theft protection features.
- Secure browsing options.
- Backup and recovery solutions.
While these features are beneficial, some users may choose to switch to a different antivirus or may find that Norton interferes with system performance or compatibility with other applications.
Reasons to Remove Norton Security
-
Performance Issues: Some users report that Norton Security can slow down their computers. If your system performance has decreased after installing Norton, it might be worth considering removal.
-
Preference for Another Antivirus: If you have found another antivirus software that suits your needs better, you should uninstall Norton before installing the new application.
-
Expired Subscription: If your Norton subscription has expired and you do not wish to renew, you’ll need to uninstall it.
-
Corrupted Installation: Sometimes the installation itself can become corrupted or fail to update correctly. In such cases, removing and then reinstalling can resolve issues.
-
Simplicity: Some users prefer having a minimalistic approach and may not feel the need for third-party security software if they believe Windows Defender is sufficient.
Regardless of your reasoning, removing Norton Security from your Windows 11 is a straightforward process, and here’s how you can do it.
Uninstalling Norton Security via Settings
Windows 11 has a user-friendly interface that simplifies application management. Here’s how to uninstall Norton Security using the Settings app:
Step 1: Open the Settings App
- Click on the Start Menu (Windows icon) in the taskbar.
- Select the Settings gear icon or type «Settings» in the search bar and press Enter.
Step 2: Go to Apps
- In the Settings window, click on Apps from the sidebar.
- This opens the Apps & Features menu, where you can see a list of all installed applications.
Step 3: Locate Norton Security
- Scroll down the list or use the search bar in the «Apps & features» section to find Norton Security.
- Click on Norton Security to expand the menu.
Step 4: Uninstall Norton
- After clicking on Norton, you will see an Uninstall button. Click on it.
- A confirmation dialog will appear asking if you’re sure that you want to uninstall the application. Click Uninstall again to confirm.
Step 5: Follow the Uninstallation Wizard
- The Norton uninstallation wizard will open. Follow the on-screen instructions to complete the process.
- You may need to restart your computer after the uninstallation is complete to ensure all components are removed.
Uninstalling Norton Security Using Control Panel
For those accustomed to the traditional Windows experience, you can also uninstall Norton from the Control Panel. Although this method is more outdated, it still remains valid. Here’s what to do:
Step 1: Open Control Panel
- Right-click on the Start button and select Run (or press
Windows + R). - Type
controland hit Enter to open the Control Panel.
Step 2: Go to Programs and Features
- In the Control Panel window, click on Programs.
- Then click on Programs and Features.
Step 3: Find Norton Security
- Look through the list of installed programs or type “Norton” in the search box to find Norton Security.
Step 4: Uninstall Norton
- Once you find Norton Security, right-click on it and select Uninstall.
- Confirm the uninstallation by following the prompts in the Norton uninstallation wizard.
Step 5: Restart Your Computer
- You’ll likely need to restart your computer after completing the uninstallation to finalize the process.
Using Norton Removal Tool
If you encounter issues during the standard removal process, or if remnants of Norton Security remain, you may want to use the Norton Removal Tool. This tool is specifically designed to help remove all Norton products from your system thoroughly.
Step 1: Download the Norton Removal Tool
- Go to the official Norton website.
- Search for the «Norton Removal Tool» in their support section.
- Download the tool.
Step 2: Run the Norton Removal Tool
- Locate the downloaded tool (usually in your Downloads folder) and double-click it to run the program.
- If prompted, allow the tool to make changes to your device by clicking Yes.
Step 3: Accept the License Agreement
- Review the license agreement and click Agree to proceed.
Step 4: Remove Norton Products
- The tool will scan your system for any Norton products. Follow the prompts to remove them. It might take a few minutes to complete the process.
Step 5: Restart Your Computer
- Once the removal is complete, restart your computer to ensure all Norton components are removed entirely.
Considering Alternative Antivirus Solutions
After removing Norton Security, it’s wise to consider installing an alternative antivirus solution to fill the security gap. Windows 11 comes with Windows Defender (now called Microsoft Defender Antivirus) pre-installed, which offers excellent protection for most users. However, you can also explore other third-party antivirus solutions such as:
- Bitdefender: Known for its strong malware protection and minimal impact on system performance.
- Kaspersky: Offers robust security features and great detection rates.
- McAfee: Provides a user-friendly experience with decent protection.
- Avast: A free solution with a broad range of security features.
Before switching, always research and read reviews to find the antivirus that best suits your needs.
Conclusion
Uninstalling Norton Security from Windows 11 is a straightforward process, whether you choose to do it through the Settings app, Control Panel, or by using the Norton Removal Tool. As technology and user requirements evolve, so do the reasons for uninstalling security software. Whether due to performance concerns, personal preference, or subscription issues, knowing how to effectively remove unwanted software is an essential skill for all Windows users.
After following the steps outlined in this guide, you can enjoy a clean system free of Norton Security, and consider exploring other antivirus options to maintain your system’s security. Whichever software you choose, ensure that it meets your specific needs for online safety and performance.
Uninstalling Norton on Windows 11 may seem like a daunting task, but fear not, as I’m here to guide you through the process. With its strong reputation for security, Norton has established itself as one of the most widely used antivirus programs. However, there may come a time when you need to remove it from your Windows 11 system. So, let’s dive into the steps that will help you uninstall Norton seamlessly and efficiently.
To uninstall Norton on Windows 11, you need to begin by opening the Control Panel. From there, navigate to the ‘Programs and Features’ section, where you’ll find a list of all the installed applications on your system. Locate Norton in the list and click on it. Next, choose the ‘Uninstall’ option and follow the prompts to complete the uninstallation process. It’s important to note that you may be asked to restart your computer after the uninstallation is complete. By following these simple steps, you’ll be able to remove Norton from your Windows 11 system effectively.
If you’re looking to uninstall Norton on Windows 11, follow these steps:
- Open the Start menu and go to Settings.
- Click on Apps.
- In the Apps & Features section, scroll down and locate Norton.
- Select Norton and click on Uninstall.
- Follow the on-screen prompts to complete the uninstallation process.

Uninstall Norton on Windows 11: A Comprehensive Guide
Uninstalling Norton on Windows 11 can sometimes be a challenging task, especially for users who are not familiar with the process. Norton is a popular antivirus software that provides robust protection against malware and other online threats. However, there may be instances where you need to uninstall it, either due to compatibility issues or the need to switch to a different antivirus solution. In this guide, we will walk you through the step-by-step process of uninstalling Norton on Windows 11, ensuring a smooth transition without leaving any traces of the software behind.
Step 1: Close all Norton-related Processes
Before you begin the uninstallation process, it is crucial to ensure that there are no running Norton processes on your Windows 11 system. Follow these steps to close all Norton-related processes:
1. Right-click on the taskbar and select «Task Manager» from the context menu.
2. In the Task Manager window, navigate to the «Processes» tab.
3. Look for any Norton processes such as «Norton Security,» «Norton Antivirus,» or «Norton Internet Security.»
4. Select each Norton process and click on the «End Task» button to terminate them.
By closing all Norton-related processes, you prevent any conflicts or interruptions during the uninstallation process.
Step 2: Uninstall Norton using the Control Panel
The Control Panel is the primary tool for uninstalling programs on Windows 11. Here’s how you can uninstall Norton using the Control Panel:
1. Press the Windows key and search for «Control Panel.»
2. Open the Control Panel from the search results.
3. In the Control Panel window, click on the «Programs» category.
4. Under the «Programs and Features» section, click on «Uninstall a program.»
5. Locate Norton in the list of installed programs.
6. Right-click on Norton and select «Uninstall» from the context menu.
7. Follow the on-screen prompts to complete the uninstallation process.
Step 3: Remove Norton Extensions from Web Browsers
Norton often installs browser extensions to provide additional security features while browsing the web. Even after uninstalling Norton through the Control Panel, these extensions can remain in your web browser. To remove Norton extensions from your web browsers, follow these steps:
1. Open each web browser individually.
2. Go to the browser’s settings or preferences menu.
3. Look for the extensions or add-ons section.
4. Locate any Norton-related extensions and click on the remove or uninstall button next to them.
5. Confirm the removal when prompted.
By removing the Norton extensions, you ensure a clean uninstallation and prevent any potential conflicts with other antivirus software.
Step 4: Run the Norton Removal Tool
In some cases, the regular uninstallation process may not remove all traces of Norton from your Windows 11 system. Norton provides a dedicated tool called the Norton Removal Tool, which ensures a complete and thorough removal of the software. Here’s how you can use the Norton Removal Tool:
1. Visit the official Norton website and download the Norton Removal Tool.
2. Locate the downloaded file and run it as an administrator.
3. Follow the on-screen instructions to initiate the removal process.
4. Once the tool completes the removal, restart your computer to finalize the uninstallation.
The Norton Removal Tool eliminates any residual files or registry entries associated with Norton, providing a clean slate for installing a different antivirus solution.
Alternate Method: Uninstall Norton using the Norton Remove and Reinstall Tool
If you encounter any issues with the regular uninstallation process or if you want a more automated approach, Norton provides the Remove and Reinstall Tool. This tool is designed to uninstall Norton completely and then reinstall it if desired. Here’s how you can use the Norton Remove and Reinstall Tool:
1. Visit the official Norton website and download the Norton Remove and Reinstall Tool.
2. Run the downloaded file as an administrator.
3. Read and accept the license agreement.
4. Click on the «Remove & Reinstall» button.
5. Follow the on-screen instructions to uninstall Norton.
6. Restart your computer once the uninstallation is complete.
The Norton Remove and Reinstall Tool is especially useful when other uninstallation methods fail or when you plan to reinstall Norton after the uninstallation.
Additional Tips to Ensure a Clean Uninstallation
To ensure a clean uninstallation of Norton on Windows 11, consider the following tips:
1. Disconnect from the internet: Before uninstalling Norton, disconnect your computer from the internet to prevent any interference during the process.
2. Backup important data: Before making any changes to your system, it is always recommended to back up important files and data to prevent any accidental loss.
3. Restart your computer: After completing the uninstallation process, restart your computer to finalize the removal of Norton and clear any remaining temporary files or processes.
By following these additional tips, you can ensure a smooth and thorough uninstallation of Norton from your Windows 11 system.
Conclusion
Uninstalling Norton on Windows 11 may seem like a daunting task, but by following the step-by-step guide outlined above, you can successfully remove Norton from your system. Whether you choose to use the Control Panel, the Norton Removal Tool, or the Remove and Reinstall Tool, you can ensure a clean uninstallation without leaving any traces of Norton behind. Remember to close all Norton processes, remove Norton extensions from web browsers, and consider additional tips to ensure a smooth and thorough uninstallation process. By doing so, you can easily transition to a different antivirus solution or address any compatibility issues on your Windows 11 system.

Uninstalling Norton on Windows 11
If you are looking to uninstall Norton from your Windows 11 machine, follow these steps:
- Start by opening the Start menu and searching for «Control Panel.»
- Click on «Control Panel» to open it.
- In the Control Panel, navigate to «Programs» or «Programs and Features.»
- Here, you will find a list of all installed programs on your computer.
- Look for «Norton» in the list and click on it.
- Click on the «Uninstall» or «Remove» button.
- Follow the on-screen instructions to complete the uninstallation process.
Once the uninstallation is complete, restart your computer to fully remove Norton from Windows 11.
Key Takeaways for «How to Uninstall Norton on Windows 11»
- Uninstalling Norton on Windows 11 can be done through the Windows Settings or Control Panel.
- To uninstall Norton through Windows Settings, open the Settings app, go to Apps, and select Norton from the list of installed apps. Click on Uninstall, and follow the prompts to remove Norton from your computer.
- If you prefer to uninstall Norton through Control Panel, open the Control Panel, go to Programs, and select Norton. Click on Uninstall or Change a Program, and follow the instructions on the screen to remove Norton.
- Once you have uninstalled Norton, it’s recommended to restart your computer to complete the uninstallation process.
- If you encounter any issues during the uninstallation process, you can contact Norton Support for assistance.
Frequently Asked Questions
Below are some common questions about uninstalling Norton on Windows 11:
1. Can I uninstall Norton on Windows 11?
Yes, you can uninstall Norton on Windows 11. Follow the steps below to remove it from your system:
— Open the Start menu and search for «Control Panel».
— Click on «Control Panel» to open it.
— In the Control Panel window, navigate to «Programs» or «Programs and Features» depending on your view settings.
— Find Norton in the list of installed programs and select it.
— Click on the «Uninstall» or «Remove» button.
— Follow the on-screen prompts to complete the uninstallation process.
2. Is it necessary to uninstall Norton on Windows 11?
No, it is not necessary to uninstall Norton on Windows 11 if you are satisfied with its performance and want to continue using it as your antivirus software. However, if you choose to uninstall it, make sure to have an alternative antivirus program installed to ensure the security of your system.
3. What should I do before uninstalling Norton on Windows 11?
Before uninstalling Norton on Windows 11, it is recommended to:
— Disable any active scans or protection features of Norton to prevent any conflicts during the uninstallation process.
— Save any important files or documents that you may have in Norton’s quarantine or backup them to an external storage device.
— Have an alternative antivirus software ready to install after the uninstallation process is complete.
4. Will uninstalling Norton on Windows 11 remove all its components?
Uninstalling Norton on Windows 11 will remove most of its components from your system. However, some residual files or registry entries might remain. To ensure a complete removal, you can use Norton’s official uninstaller tool or a third-party uninstaller software.
5. Can I reinstall Norton after uninstalling it on Windows 11?
Yes, you can reinstall Norton on Windows 11 after uninstalling it. Visit Norton’s website and download the latest version of the software. Follow the installation instructions provided by Norton to install and set up the antivirus program again.
In conclusion, uninstalling Norton on Windows 11 is a straightforward process that can be done in just a few steps. By following the instructions outlined in this article, you can successfully remove Norton from your computer and free up valuable system resources.
Remember to first disable any active Norton protection features and backup any important files or settings. Then, proceed with uninstalling Norton through the Control Panel or using the dedicated Norton removal tool. After the uninstallation is complete, ensure that you restart your computer to fully remove all traces of Norton from your system.
Dave Miller – Tech Enthusiast & Security Expert – August 16th, 2022

How To Stop Norton Pop-Ups on Windows 11 – Get Rid of Them
Norton Pop-Up alerts — How To Stop Norton Pop-Up On Windows 11
Silent Mode
Silent Mode is a feature that comes with Norton. It silences security alerts and momentarily halts background operations. Before beginning any crucial computer work, you can manually turn it on for a predetermined time. From the Administrative Settings window or Quick Controls inside the Settings window, you may enable or disable Silent Mode. Using the Norton product symbol in the notification area, you may also allow or disable Silent Mode.
Note: This approach is speedy, but since it will get automatically removed after a set time, it is not a long-term fix.
Special Offer Notification
Your Norton product will alert you about promotions, discounts, or exclusive offers when it gets turned on. By default, Norton shows special and provides pop-ups of other Norton products. In a sense, they are ads for those products. If you want to, you can also go and turn this off.
Right-click the Norton tray icon, then select Open Norton 360, Settings, Administrative Settings, and Special Offer Notification. Then, select Off and Apply.
Note: Even after turning it off, many customers complain that Norton’s marketing campaign is still active, and you cannot turn it off completely. Users were agitated as a result, as described on official forums.
Monthly Report Card Notification
Every 30 days, a report describing the activities and duties carried out during that period will get sent to you through a feature enabled in Norton. Norton Report Card should get automatically presented. Still, you may turn it off if you’d rather not see it. After starting Norton, select Device Security > Administrative Options to deactivate. You may choose to enable Norton Report Card there. Turn it off to cease receiving reports.
Note: The report card may still be seen manually at your convenience.
Norton Task Notification
Alerts may also appear when your Norton product performs an automated background activity. You may choose to show or conceal them using Norton Task Notification. When this option is enabled, your Norton product displays a notification to let you know about any active background processes. Your Norton product won’t alert you to any background processes if this option is disabled.
Go to Settings > Administrative Setting > Select the switch to Off in the Norton Task Notification row, then click Apply and Close.
Note: This option’s deactivation does not automatically impact how background tasks get carried out.
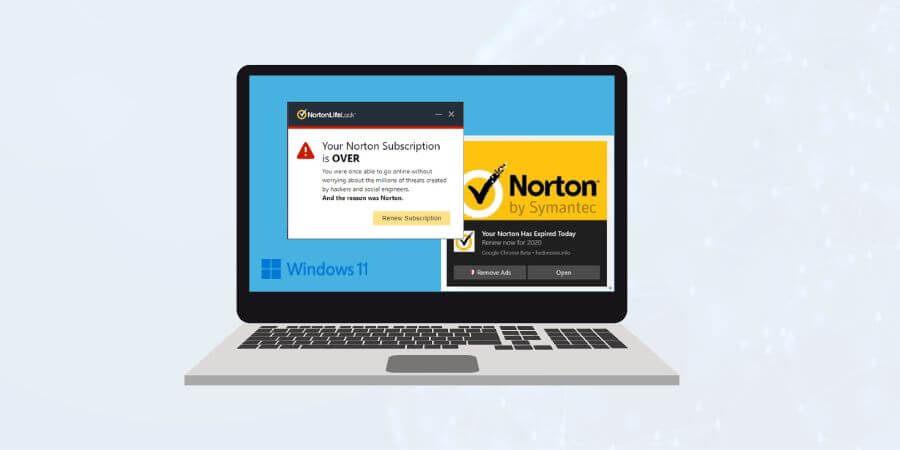
Notification for Norton Subscription Has Expired
The worst part about antivirus software is that it constantly annoys you with notifications and pop-up windows as soon as your membership is ready to expire. Similarly, a Norton pop-up notice notifies you that your membership to the Norton security software has run out, and you must renew it. Again, it may be rather bothersome, and there is no way to turn it off.
If you have a subscription that automatically renews, you don’t need to worry about end dates if you want to keep utilizing your service. However, you may remove the notification by renewing your membership manually. While if no solution works for you, you may delete Norton Antivirus if you’re not comfortable with it.
If you have a subscription that is still current but is still receiving the message, do a subscription status check to synchronize your program with Norton’s database.
Why Do Pop-Ups Occur?
Window 11 Software Pop-Ups
You have upgraded your computer from Windows 10 to Windows 11, and even better, you have bought a brand-new laptop to get the most out of Windows 11. With Windows 11, Microsoft did a terrific job, and there are many new features to appreciate.
However, third parties’ pop-up advertisements and unwanted marketing are now annoying you. Microsoft frequently inserts advertisements inside File Explorer to encourage its OneDrive and Office 365 file sync services. The file explorer itself contained advertisements.
At first, it got believed that Microsoft was testing advertisements in Windows 11’s File Explorer. Usually, it works when Windows assigns you a unique advertising ID to show you more pertinent advertisements. Microsoft has included advertisements inside File Explorer before. While it was officially declared by the that the advertisements got not meant to get tested externally. Even though it’s evident that Microsoft can run them inside Windows 11,
While some of your manufacturer’s advertisements may be advantageous to you, pop-ups are not always necessary. You may change specific settings to disable notifications. If you find these pop-ups annoying and don’t like seeing advertisements follow the steps below to disable them.
- Step 1: To launch the Settings app, press Windows + I. Click System on the left-hand window of the website.
- Step 2: Next, choose Notifications from the right side of the screen.
- Step 3: You’ll find all the apps your manufacturer has listed on your devices. You may now select the app whose alerts you don’t wish to receive and uncheck it.
If you want a simple approach to dealing with malware, spyware, ransomware, and other malicious threats. In that case, I propose you have an antivirus program in addition to blocking pop-up windows in Windows 11.
What if your antivirus started to send you these pop-ups instead of just protecting you?
You can keep your PC safe from malware, viruses, and adware by using this fantastic Windows security program. I’ll talk specifically about Norton today and how to stop Norton pop-up on Windows 11 as it is rather bothersome, and customer complaints are on the rise for these pop-ups
Norton Antivirus – A Clear Choice
Stopping Norton Pop-Ups on Windows 11 — Bottom Line
Norton is a well-known brand in the antivirus industry. It got expertly created to help you keep on top of everything going on with your laptop.
However, there are occasions when you may not require every notification you receive while working on something crucial. Because of this, people frequently complain about excessive Norton pop-up on Windows 11, but thankfully you have various options for fixing it.
Even if you turn off all notifications, there’s still a chance you’ll see some pop-up advertisements. Software companies need to do this to keep their user bases expanding. However, you may easily switch to any other program if unsatisfied and altogether remove Norton from your device.
**Onlinecloudsecurity.com is a participant in the Amazon Services LLC Associates Program, an affiliate advertising program designed to provide a way for websites to earn advertising revenues by advertising and linking to Amazon.com and affiliated sites. As an Amazon Associate we earn affiliate commissions from qualifying purchases.**
Dave Miller
IT Consultant at Online Cloud Security
Dave Miller is an IT Consultant for Online Cloud Security and has over 7 years of experience in the Information Technology space. He also specializes in repairing laptops & computers. In his spare time, he loves to talk about new technologies and hosts monthly IT and Cyber Security meetings in the Houston area.
Popular Reads:
- Is It Safe to Give Bitstamp my SSN?
- Is NordPass Safe to Use? Is it Safe for Storing Passwords?
- TOP 6 Most Secure Laptops in 2022
- Sirin Labs Finney u1 Review – Is it a Good Crypto Phone?
- TOP 5 Most Secure Cryptocurrency Smartphones
- Most SECURE Laptops for Online Banking
- Top 5 Best Laptops for Cyber Security 2021
- How to Protect HP Laptop from Virus
- How to Keep Your Information Secure on a Laptop
Related Articles:
Share This Article with Your Friends!
Click any button down below to share this article on the following channels:
About Online Cloud Security:
Online Cloud Security is here to recommend you the most secure devices, from laptops to smartphones, we only want to provide you with products that we have tested and used ourselves for online security. Every product that we recommend is heavily inspected and tested for security against hackers, viruses, malware, and any other intruders that may want to steal your information.
Recent Posts:
About Online Cloud Security
Online Cloud Security is here to recommend you the most secure devices, from laptops to smartphones, we only want to provide you with products that we have tested and used ourselves for online security. Every product that we recommend is heavily inspected and tested for security against hackers, viruses, malware, and any other intruders that may want to steal your information.
Recent Posts:
Uninstalling Norton on Windows 11 is a straightforward process that involves accessing your system’s settings, locating the Norton application, and removing it. By following a few simple steps, you can completely uninstall Norton and ensure that your computer is free from its components.
In this section, we’ll walk through the necessary steps to uninstall Norton from your Windows 11 device. Following these steps will ensure that Norton is removed cleanly and thoroughly from your system.
Step 1: Open the Settings Menu
The first step is to open the Settings menu on your Windows 11 computer.
To do this, click on the Start button and select the gear icon, or you can press Windows + I on your keyboard. This will open the Settings window where you can access various system settings.
Step 2: Navigate to Apps
Next, you need to navigate to the Apps section within the Settings menu.
In the Settings window, click on ‘Apps’ on the left-hand side. This will take you to a new screen where you can manage all the applications installed on your computer.
Step 3: Locate Norton
Once you are in the Apps section, scroll through the list to find Norton.
Scroll down the list of installed applications until you find Norton. This could be listed as Norton Security, Norton AntiVirus, or a similar name depending on the version you have.
Step 4: Click on Uninstall
After finding Norton, click on it, and then click the Uninstall button.
A prompt will appear asking if you’re sure you want to uninstall Norton. Confirm your choice, and the uninstallation process will begin.
Step 5: Follow the On-Screen Instructions
The final step is to follow any additional on-screen instructions to complete the uninstallation.
Depending on your version of Norton, you might see a few more prompts or options during the uninstallation process. Just follow the instructions, and the software will be removed from your system.
After you complete these steps, Norton will be uninstalled from your Windows 11 computer. You may need to restart your computer to finalize the process, ensuring that all components are fully removed.
Tips for Uninstalling Norton on Windows 11
- Backup Important Data: Before uninstalling any software, make sure to backup your important files to avoid any data loss.
- Use Norton Removal Tool: If the standard uninstallation process doesn’t work, you can use the Norton Removal Tool available on the Norton website.
- Check for Residual Files: Sometimes, uninstallation leaves behind residual files. Use a cleanup tool or manually check for leftover files in Program Files.
- Disable Norton Features: Temporarily disable Norton features before uninstalling to avoid conflicts during the process.
- Reinstall if Needed: If you encounter issues, you can always reinstall Norton and try the uninstall process again.
Frequently Asked Questions
How long does it take to uninstall Norton?
The uninstallation process usually takes a few minutes, but it can vary depending on your system’s speed and the Norton version.
Do I need to restart my computer after uninstalling Norton?
Yes, it’s recommended to restart your computer to ensure all Norton components are completely removed.
Can I reinstall Norton after uninstalling it?
Yes, you can reinstall Norton at any time by downloading it from the official Norton website and following the installation instructions.
What if the Uninstall button is grayed out?
If the Uninstall button is grayed out, try restarting your computer and then attempt the uninstallation again. You can also use the Norton Removal Tool.
Will uninstalling Norton affect my computer’s performance?
Uninstalling Norton should not negatively impact your computer’s performance. In fact, it might improve performance if Norton was consuming a lot of system resources.
Summary
- Open the Settings Menu.
- Navigate to Apps.
- Locate Norton.
- Click on Uninstall.
- Follow the on-screen instructions.
Conclusion
Uninstalling Norton on Windows 11 is a task that can be easily managed by following a few simple steps. Once you’ve navigated through the Settings menu to find and remove the application, your system should be free from Norton’s software. Remember to back up any important data before starting the process and consider using the Norton Removal Tool if you encounter any issues.
With Norton out of the way, you might notice an improvement in your system’s performance, especially if Norton was previously using a lot of resources. If you ever need to reinstall Norton, the process is just as straightforward.
For those looking for alternative antivirus solutions, there are many options available that can provide robust protection without impacting system performance. Always ensure you have some form of security software installed to keep your computer safe from threats.
By following this guide, you’ve taken an important step in managing your software and maintaining your computer’s health.
Matt Jacobs has been working as an IT consultant for small businesses since receiving his Master’s degree in 2003. While he still does some consulting work, his primary focus now is on creating technology support content for SupportYourTech.com.
His work can be found on many websites and focuses on topics such as Microsoft Office, Apple devices, Android devices, Photoshop, and more.